CHOWIS dpi viso User manual
For more information visit us at https://www.chowis.com.
USER MANUAL

Device Overview .................................................................
Package Inclusions .............................................................
How to Use ............................................................................
Attaching Device to Phone ......................................
Installing the dpi viso Pico App ...............................
Connecting Device to Phone ..................................
Registering New Customer ......................................
Analyzing Hydration ...................................................
Analyzing Sebum ........................................................
Analyzing Pore, Wrinkle and Impurities ................
Comparing Results ..............................................................
Adding product recommendation images ....................
Results Sharing function ....................................................
Language Settings ...............................................................
Send Images button ............................................................
FAQ ..........................................................................................
Specifications .......................................................................
Contacts .................................................................................
1
1
2
2
3
4
5
6
7
9
11
12
13
13
14
14
16
16
CONTENTS

1. Moisture sensor
2. Magnetic attachment
3. Micro-USB B port
dpi Viso Device (1) Charger Adaptor (1)
Air Blower (1) Cleaning Cloth (1)
5-pin UBS Cable (1)
Magnet (3)
4. Non-removable lens
5. Switch On/O
6. Light Indicator
1
DEVICE OVERVIEW
PACKAGE INCLUSIONS
1
2
3
4
5
6
Sebum (50)
Paper Guideline (1)
2
HOW TO USE
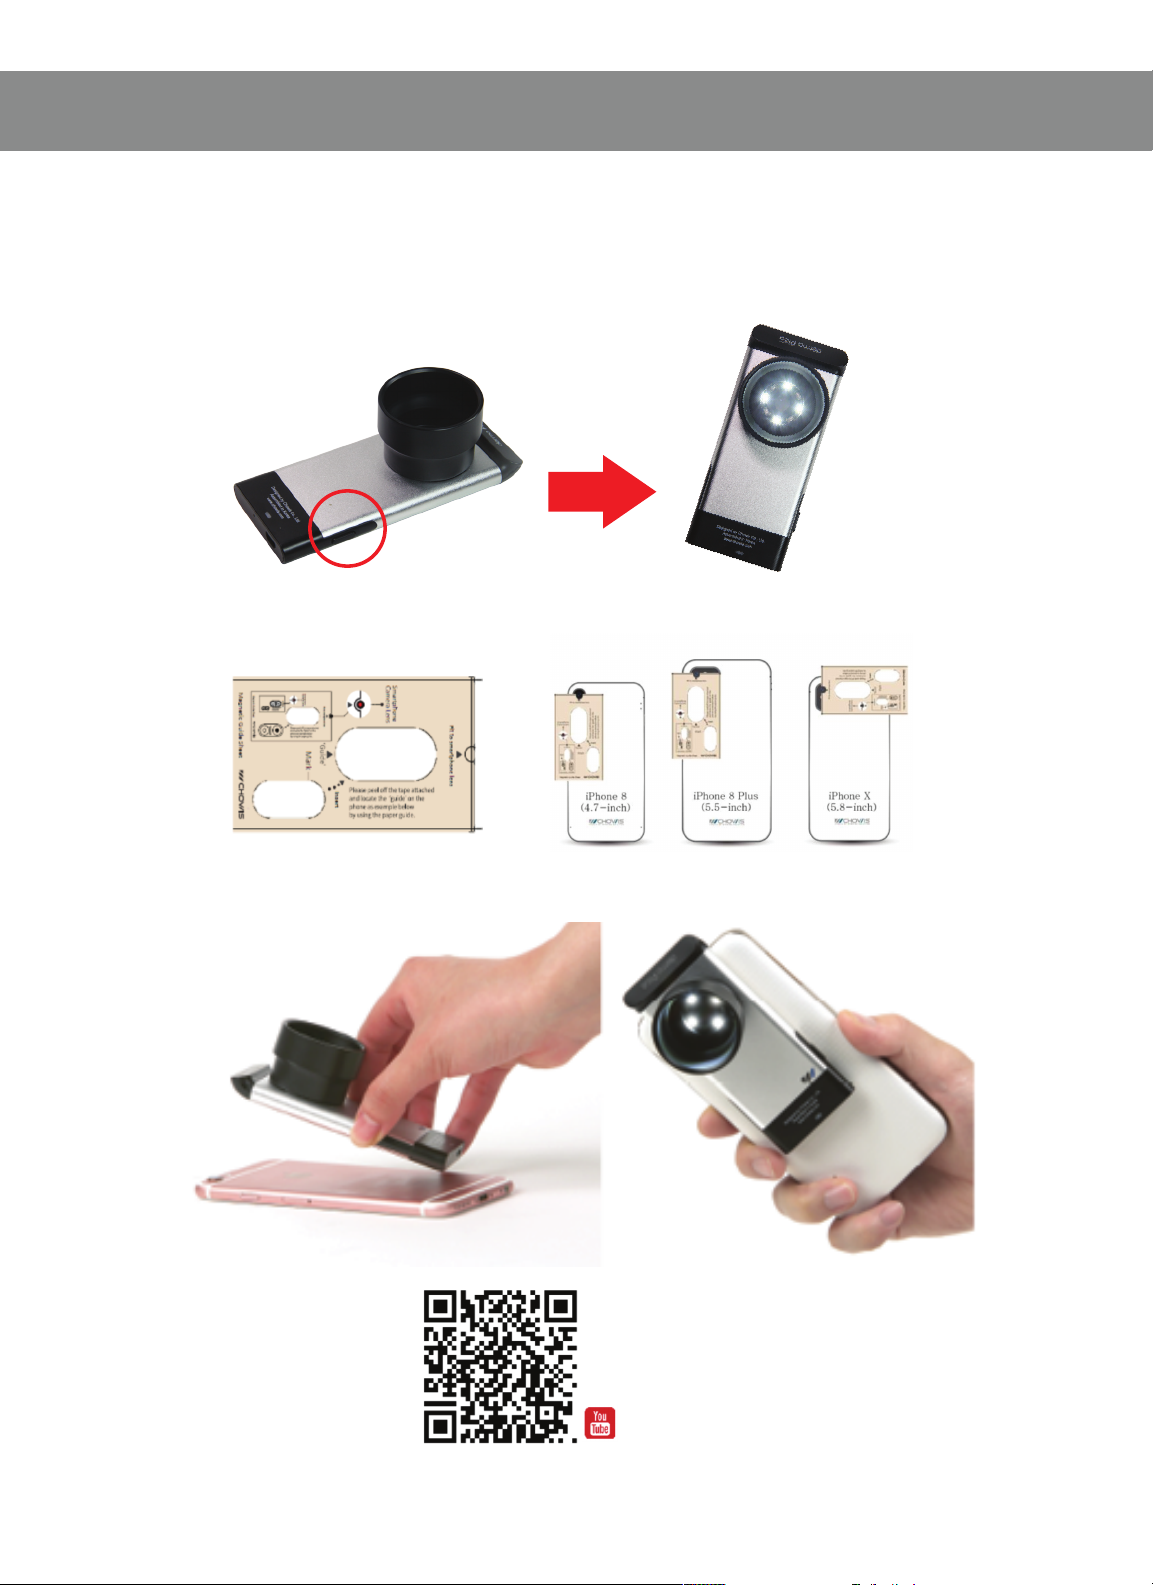
ATTACHING DEVICE TO PHONE
1. Press switch button of the dpiViso device for 3 seconds
until LED light blinks.
2. Put paper guide on your phone and attach magnet.
3. Attach the dpiViso device on magnet.

3
HOW TO USE
INSTALLING THE DPIVISO PICO APP
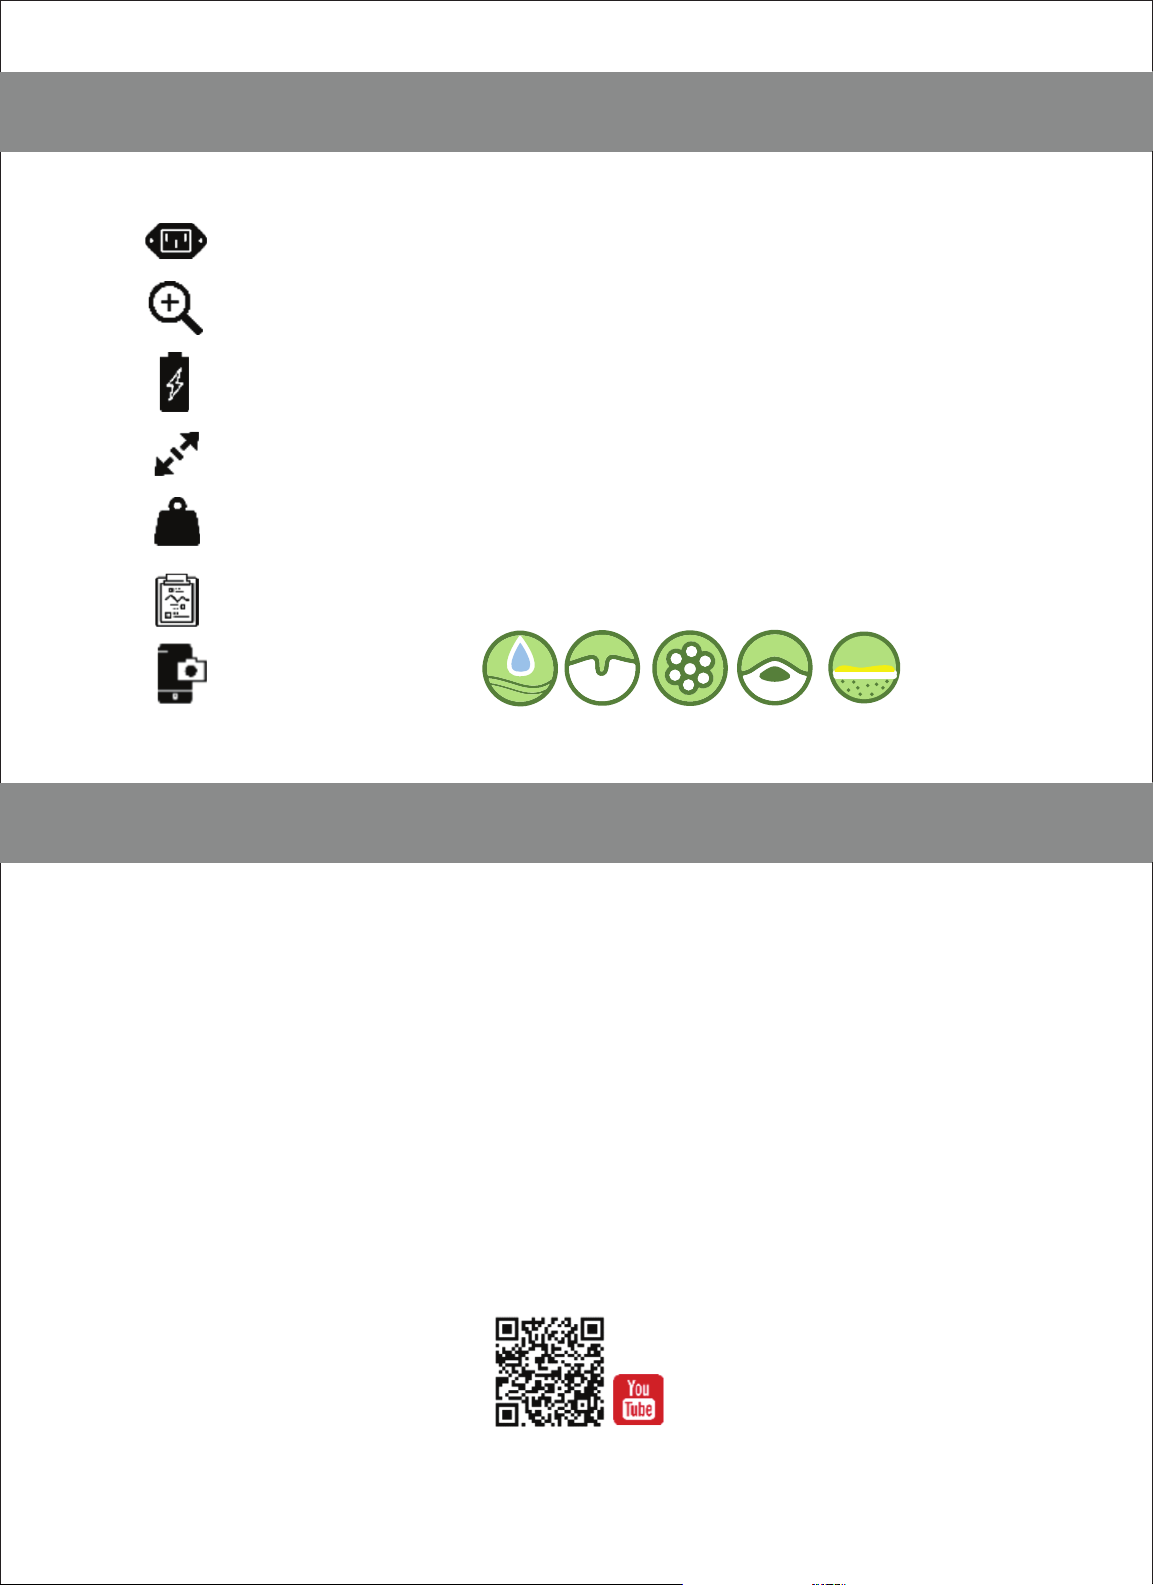
1. Open App Store and type “Chowis.”
or scan QR code:
2. Select dpiViso Pico app and install.
4
HOW TO USE
START
SETTINGS
CUSTOMER
QUICK DIAGNOSIS
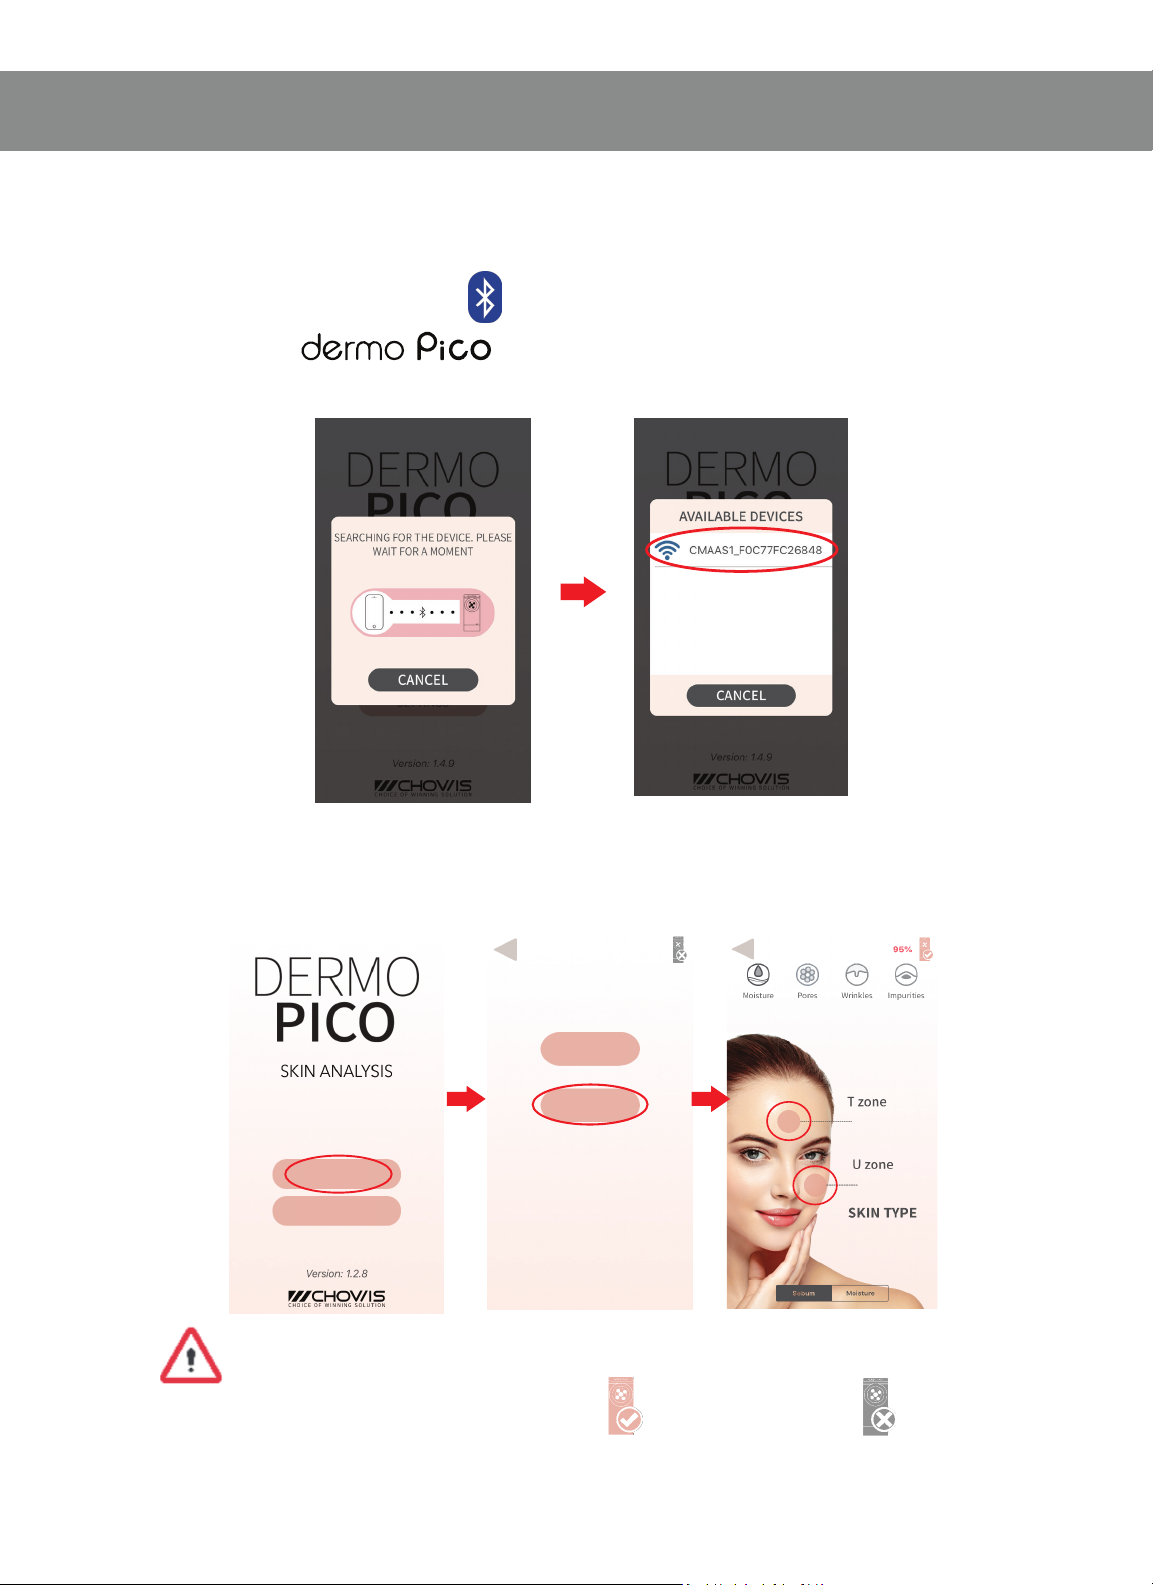
CONNECTING DEVICE TO PHONE
1. Turn on Bluetooth on your phone.
2. Open app.
3. Choose MAC code of device to connect.
4. After connecting device, press start.
5. Select Quick Diagnosis for quick usage.
NOTE: If connection was successful, Bluetooth indicator
will change to pink if not it is grey.
5
HOW TO USE
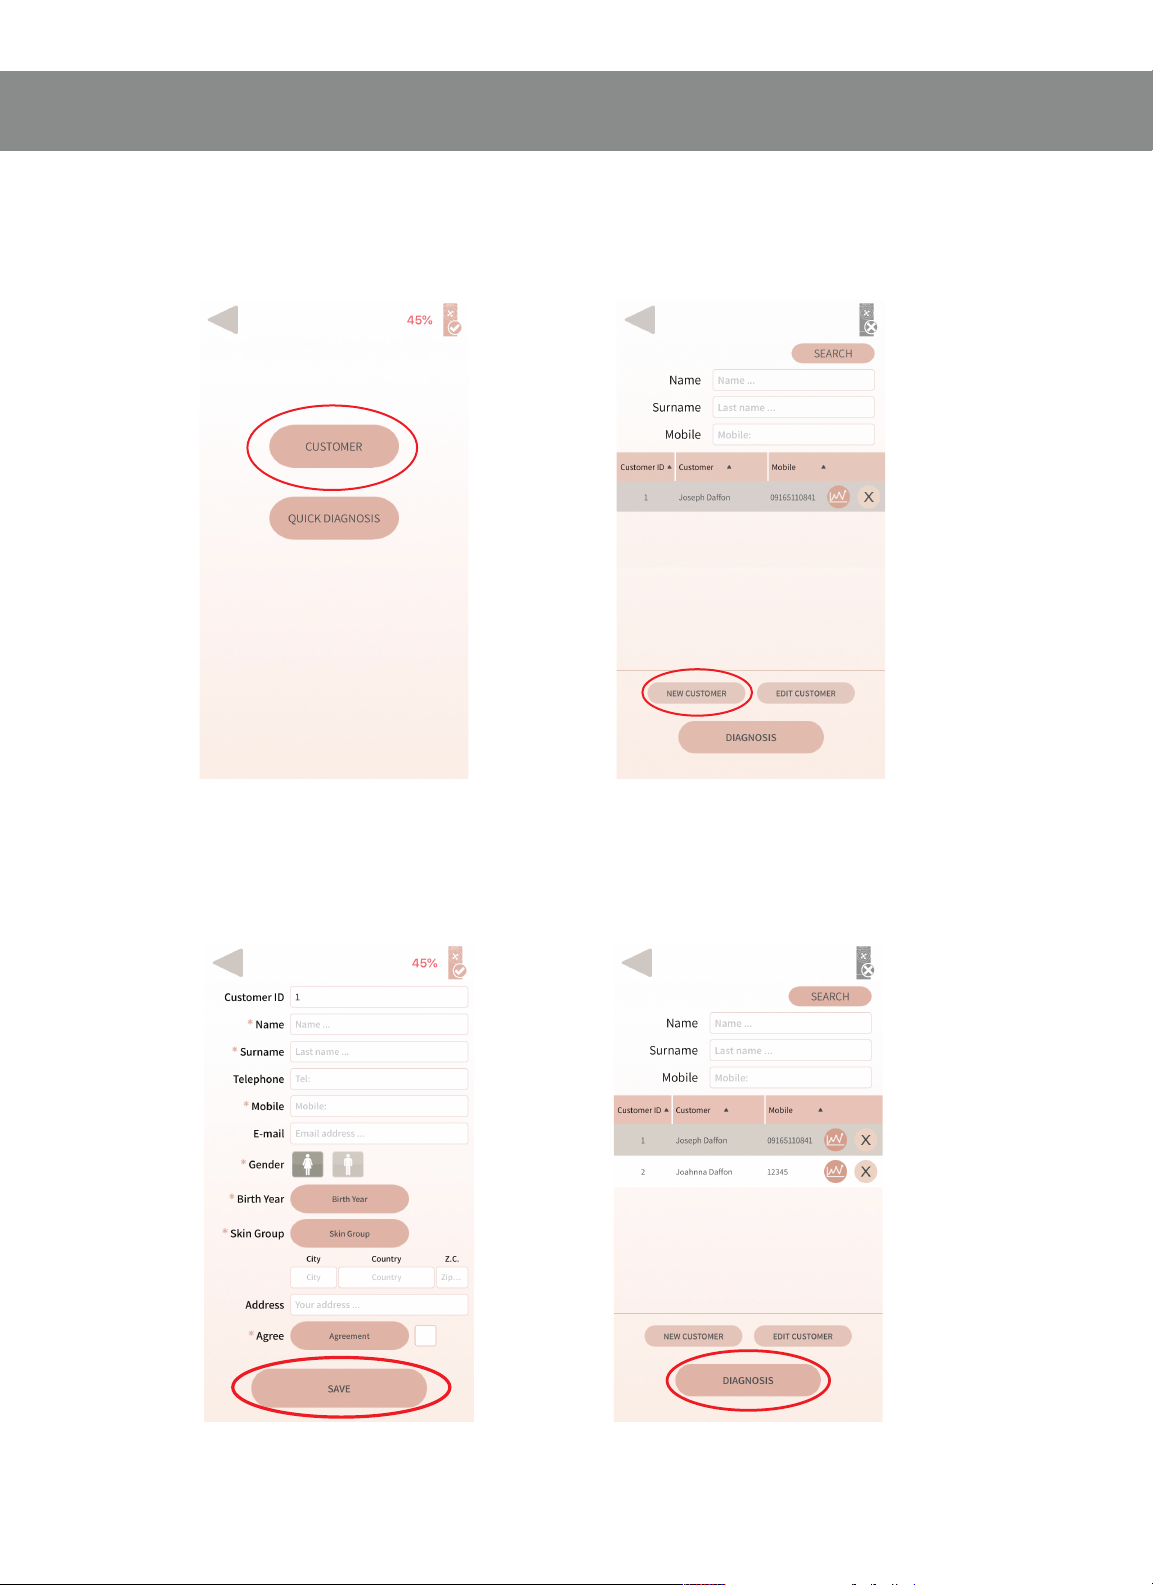
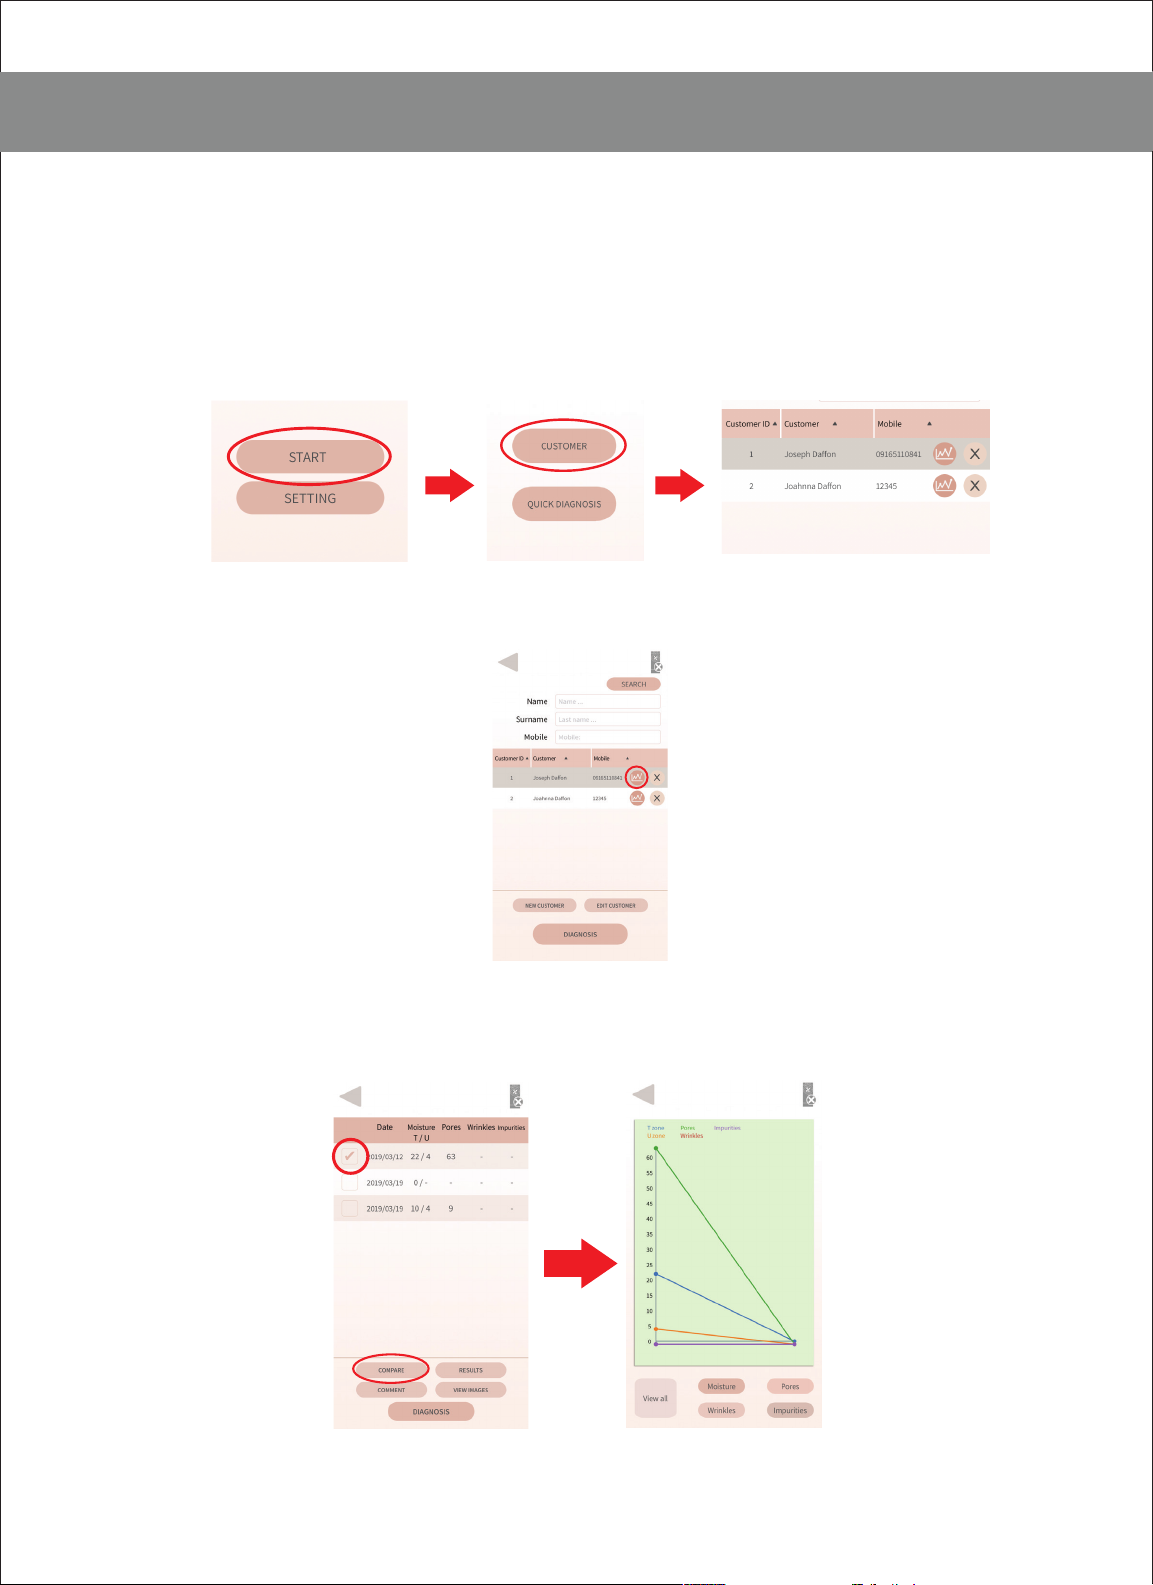
REGISTERING NEW CUSTOMER
1. Select Customer. 2. Select New Customer.
3. Fill up required fields 4. Select registered customer
and press Save. and press Diagnosis.

6
HOW TO USE
ANALYZING HYDRATION
1. Select the hydration icon
2. Place the moisture sensor on your T-zone.
3. Press button of T-zone in the App.
4. Place the moisture sensor on your U-zone.
5. Press button of U-zone in the App.
Device’s Sensor

7
HOW TO USE
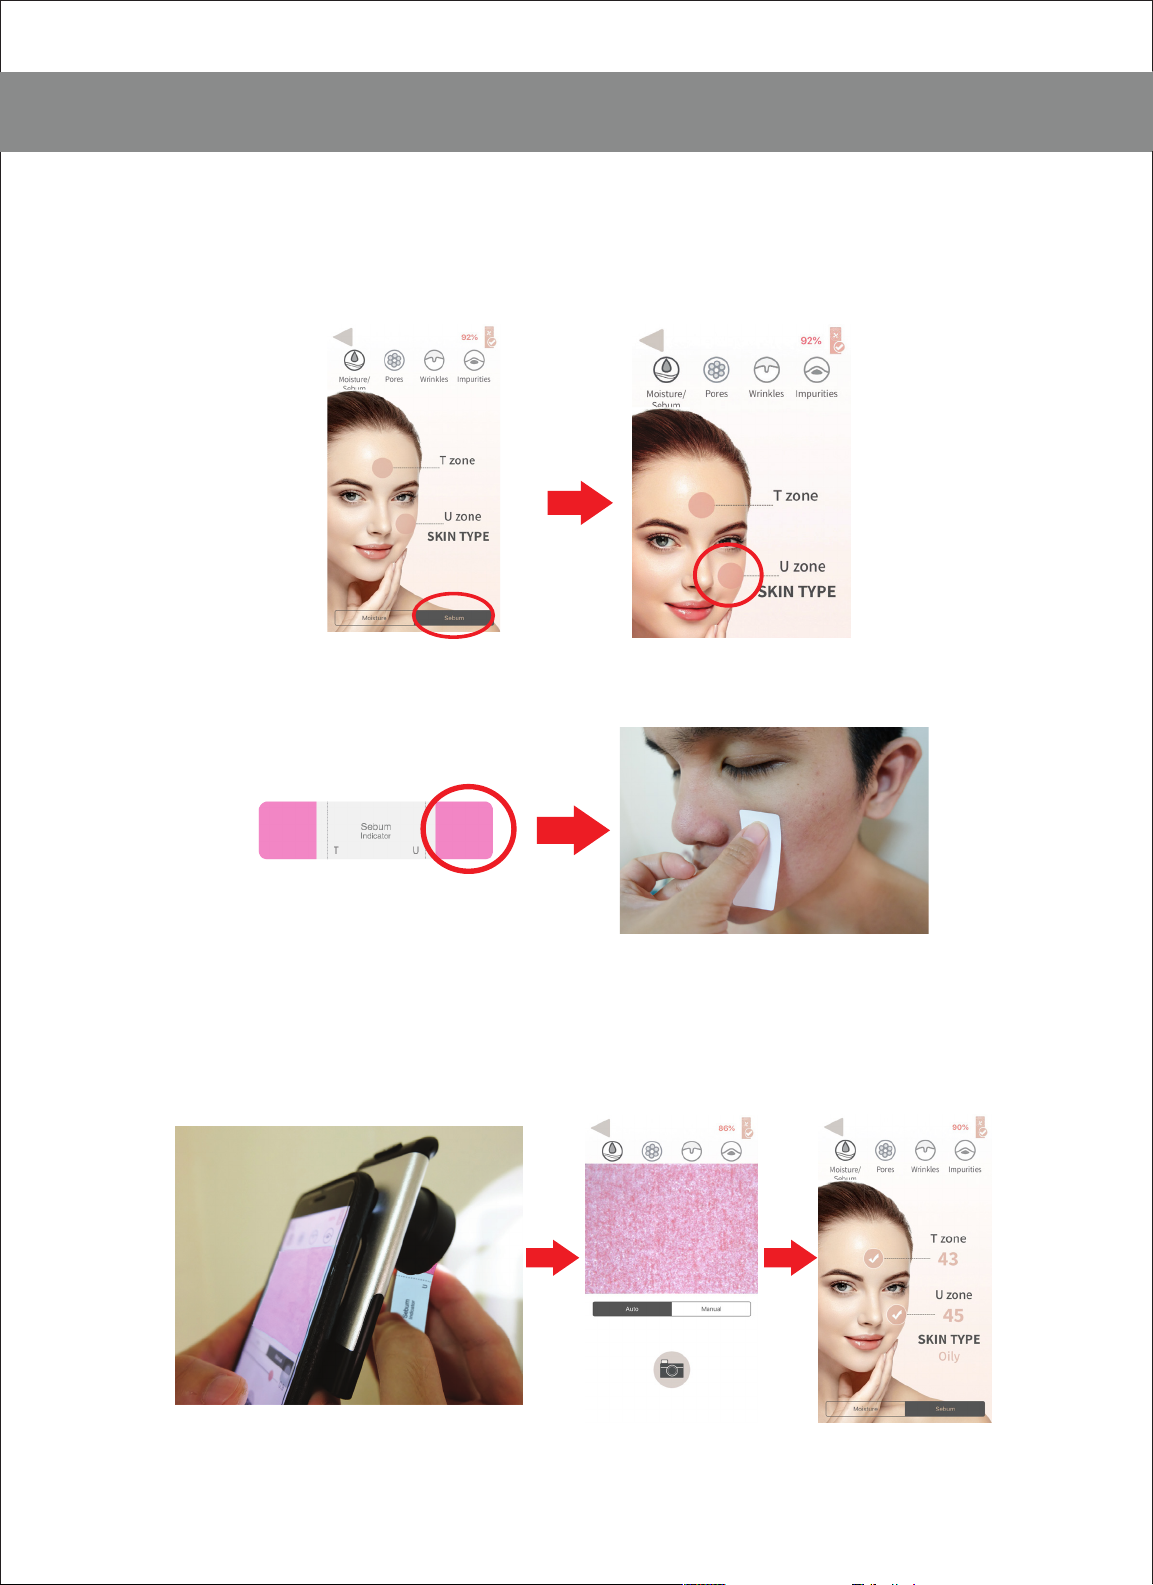
ANALYZING SEBUM
1. Choose Sebum function on the bottom.
2. Select the T-zone icon on the screen
3. Dab one end of the pink Sebum Indicator on the
forehead area for 3 seconds
4. Take an image of the Sebum Indicator making sure to
include all pink areas on the capture.
8
HOW TO USE
ANALYZING SEBUM
6. Select the U-zone icon on the screen.
7. Dab the other end of the pink Sebum Indicator on the
cheek area for 3 seconds
8. Take an image of the Sebum Indicator making sure to
include all pink areas on the capture.
7. Scores will be reflected upon successful capture

9
HOW TO USE
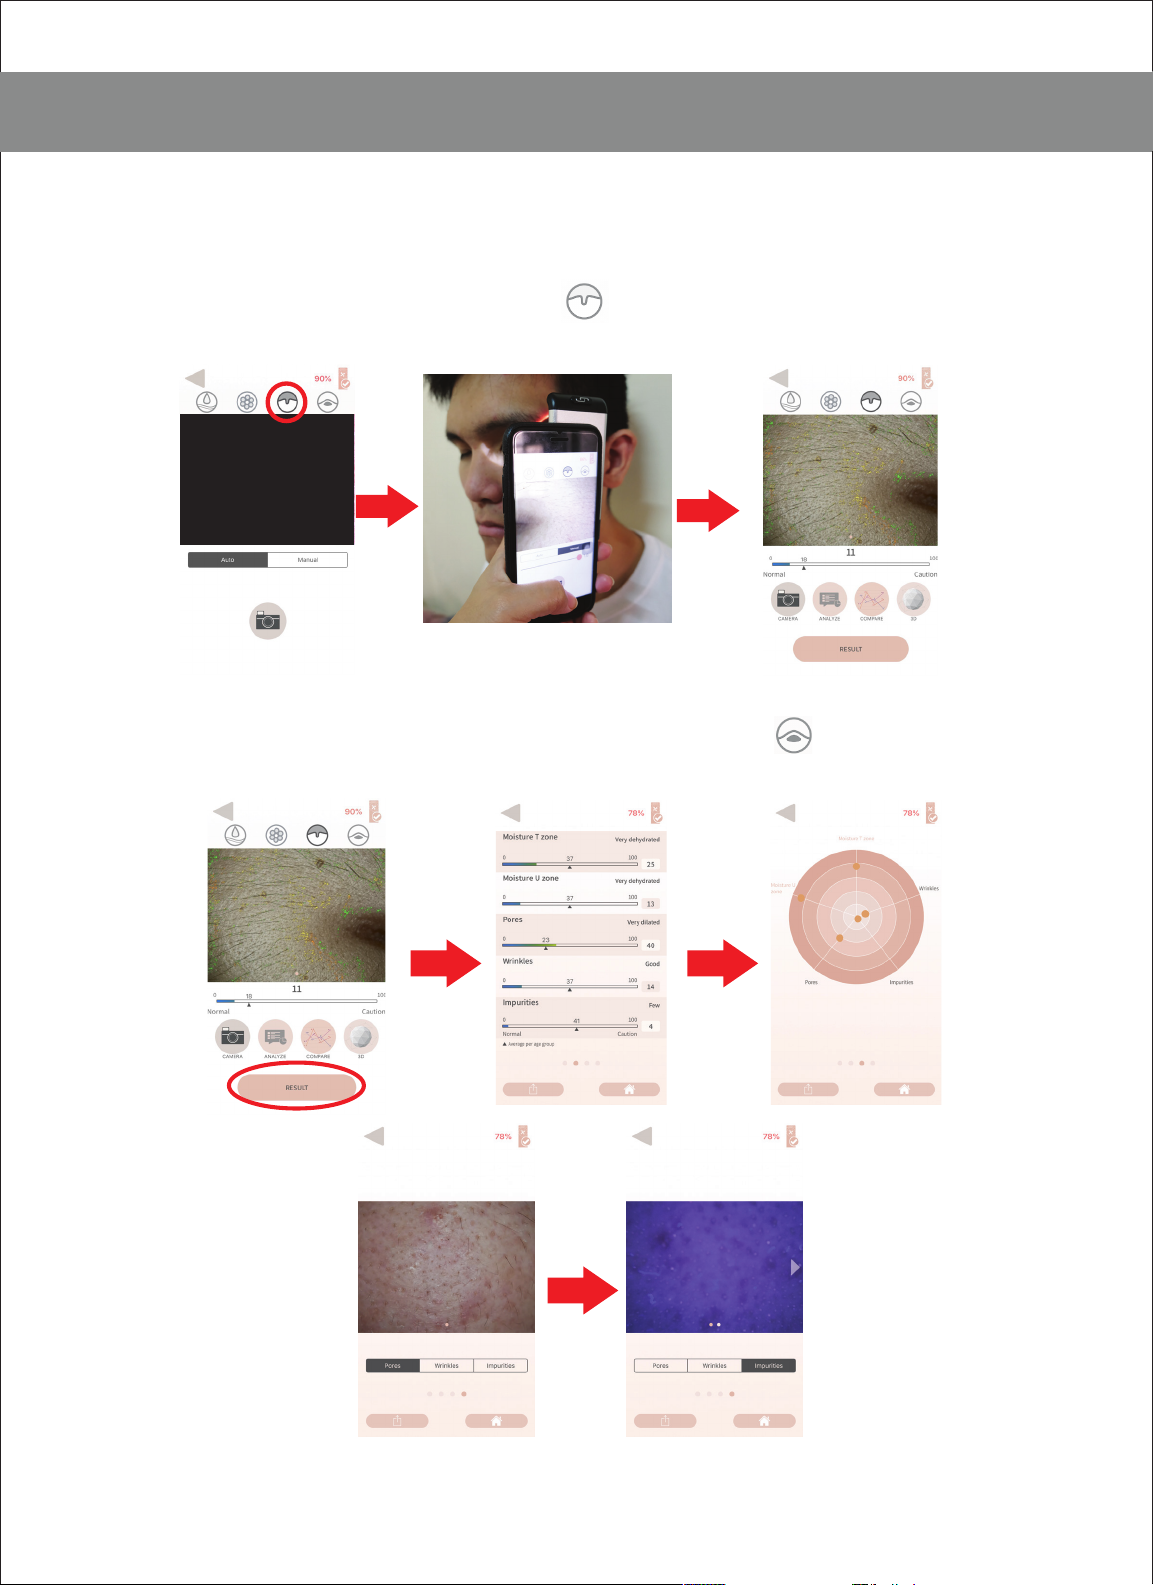
ANALYZING PORE, WRINKLE, AND IMPURITIES
1. Select the pores icon.
2. Press the camera button and take a picture of skin.
3. After taking the image, Press Analyze
Press Compare Press 3D
10
HOW TO USE
ANALYZING PORE, WRINKLE, AND IMPURITIES
4. Select the wrinkles icon.
5. Put camera on the eye wrinkle area and take picture
6. Press Analyze, Compare and 3D, same on Step 3.
7. Do the same steps to analyze Impurities.
8. Press Result to see summary of all results.
11
COMPARING RESULTS
2 OR MORE ANALYSIS RESULTS
1. Open main screen page
2. Press start, customer and choose customer name
from list
3. Click the round pink icon on the right to view analysis
results save
4. Select the dates you want to compare
5. Press compare button and view a linear graph of
comparison

12
ADDING PRODUCT RECOMMENDATION IMAGES
START
SETTINGS
1. Go to the main page and open the settings button.
2. Press products and treatments.
3. Upload product images stored on the phone based on
targeted skin measurements available for analysis.
4. When all fields are done, press Save
product.png
product1.png
product2.png

13
RESULTS SHARING FUNCTION
LANGUAGE SETTINGS
1. On home page, select Settings then Change Language
2. Select the language desired and press Save.
START
SETTINGS
1. After performing analysis, you can send results to your
customer via the share function button (image)

14
SEND IMAGES BUTTON
FAQ
1. On the Settings press Send images button
2. Press Center of the screen to allow users to send images
to the Chowis servers.
How will I know if the device is turned on?
Device is turned on by doing a long press of the power
button. You will notice that lights are well lit and stable. If you
only see blinking lights when you click the power button, it
means it is not yet turned on.
How do I connect the device to the phone?
Yes you can as long as the app is installed. Connectivity is
done thru BLE connection. Simply turn on Bluetooth to pair
the device to the phone. A CMA address will appear upon
opening the Dermopico app, click and connect.
Will I be able to connect to the app without internet?
Yes you may pair the app with the device thru BLE but in
order to send the analysis results , you need to be connected
to the internet.

15
FAQ
Can I connect the device to multiple phones?
Where are the images stored?
You can pair and use the dermopico to one phone at a
time. All images taken by the device are stored on the
phone’s storage system. However, there is an option
provided where images can be sent to Chowis server for
analysis improvement purposes.
Does dermo Pico work on Android and iOS?
Yes, dermopico works with most IOS phones and Android
version is on its final stages of development.
How long can we use the device with a full battery?
How long should we charge it?
Charging time is 2 hours maximum.
Can I take sebum without sebum indicator?
No, you cannot take sebum measurement without using the
sebum indicator .
16
SPECIFICATIONS
CONTACT
Email: [email protected]
Skype ID: Hello Chowis
Chowis Co., Ltd.
Homepage:www.chowis.com
Tel: +82 31 706 7950 / Fax: +82 31 2727950
Address: 114, Sinbong 1-ro, Suji-gu,Yongin-si,
Gyeonggi-do, Republic ofKorea,16814
Power supply Input: 100-240-V / Output: 5V, 2A
Magnification 10×
Battery 250 lithium-ionbattery
Product size 106 mm × 46 mm × 37 mm
Product weight 60 g
Analysis result Index per measurement (0–99)
Measurement
hydration wrinkle pores impurities sebum
Table of contents
Other CHOWIS Diagnostic Equipment manuals


