BikeBoard Snow Series User manual
Bikeboard
/Snow
Bedienungsanleitung vor Gebrauch
sorgfältig durchlesen und aufbewahren.
Lire et regarder soigneusement les instruc-
tions d‘emploi avant l‘utilisation.
Prior to use, carefully read these instruc-
tions and keep them for future reference.
Bedienungsanleitung
Instructions d‘emploi
Instructions for Use
Deutsch
Français
English

Bikeboard/Snow-Manual, DFE-1/2006
Text and pictures Bikeboard AG, www.bikeboard.ch
Layout and Design Gnädinger Marketingwerkstatt, www.marketingwerkstatt.com
Copyright 2006, Bikeboard AG

Inhaltsverzeichnis
1. Einsatzbereich des Bikeboard/Snow ..............4
2. Wichtige Sicherheitshinweise ...........................5
2.1 Grundsätze ...........................................................5
2.2 Sicherheitsleine (Leash) ...........................................6
3. Aufbau und Montage .......................................7
3.1 Lieferumfang FRAME-SET .........................................7
3.2 Lieferumfang SNOW-SET ........................................8
3.3 Zusammenbau .......................................................9
3.4 Schnellspanner mit Sicherungsknopf .......................10
3.5 Die drei unmittelbaren Startvorbereitungen ..............11
4. Wartung ...........................................................12
5. Ausrüstung ......................................................13
6. Fahrtechnik ......................................................14
6.1 Grundsätze .........................................................14
6.2 Kurzschwingen ....................................................14
6.3 Carven ...............................................................15
7. Transport und Liftbenutzung ..........................16
7.1 Sessellift ..............................................................16
7.2 Gondel ...............................................................18
7.3 Skilift ..................................................................18
8. Nach dem Gebrauch .......................................20
9. Entsorgung ......................................................21
10. Transporttasche ...............................................22
3
1. Domaines d‘utilisation du Bikeboard/Snow .. 4
2. Indications de sécurité importants ................. 5
2.1 Principes .............................................................. 5
2.2 Leash ................................................................... 6
3. Construction et assemblage ............................ 7
3.1 Présentation du FRAME-SET .................................... 7
3.2 Présentation du SNOW-SET ................................... 8
3.3 Assemblage ......................................................... 9
3.4 Serrage rapide avec bouton de sécurité ................. 10
3.5 Les trois préparations avant le départ .................... 11
4. Entretien .......................................................... 12
5. Equipement ..................................................... 13
6. Technique ........................................................ 14
6.1 Principes ............................................................ 14
6.2 Virages cours ..................................................... 14
6.3 Carver ............................................................... 15
7. Transport et utilisation des remontées mécaniques .. 16
7.1 Télésièges .......................................................... 16
7.2 Cabine .............................................................. 18
7.3 Arbalètes ........................................................... 18
8. Après l‘utilisation ........................................... 20
9. Rangement ..................................................... 21
10. Sac à dos de transport .................................. 22
1. Applications for the Bikeboard/Snow ........... 4
2. Important Safety Instructions ......................... 5
2.1 Basics .................................................................. 5
2.2 Safety Strap (Leash) ............................................... 6
3. Set-up and Assembly ....................................... 7
3.1 FRAME-SET – scope of delivery ............................... 7
3.2 SNOW-SET – scope of delivery .............................. 8
3.3 Assembly ............................................................. 9
3.4 Quick release with security button ......................... 10
3.5 The three preparations immediately prior to start ..... 11
4. Maintenance ................................................... 12
5. Protective Gear .............................................. 13
6. Riding Technique ............................................ 14
6.1 Basics ................................................................ 14
6.2 Short Turns ......................................................... 14
6.3 Carving ............................................................. 15
7. Transportation and Ski Lift Use .................... 16
7.1 Chair Train ......................................................... 16
7.2 Small Cable Car ................................................. 18
7.3 Ski Lift ................................................................ 18
8. After Use ......................................................... 20
9. Disposal .......................................................... 21
10. Transportation Bag ........................................ 22
Table des matières Table of Contents
Bikeboard/Snow-Manual, DFE-1/2006

1.
Einsatzbereich des
Bikeboard/Snow
Danke, dass Sie sich für das Bikeboard/Snow entschieden haben. Mit
diesem Schneesportgerät erregen Sie auf der Piste garantiert Aufsehen.
Und damit Sie möglichst viel Spass am Bikeboard/Snow haben, bitten wir
Sie, die Bedienungsanleitung aufmerksam zu studieren.
Das Bikeboard/Snow besteht aus einem leichten Aluminium-Rahmen mit
Gabel, einem Faltmechanismus für den höhenverstellbaren Lenker, einer
Standfläche mit Fussschlaufe und einem speziell entwickelten Snowboard
mit Frontboard.
Das Bikeboard/Snow bietet Ihnen vielseitige Einsatzmöglichkeiten:
• Carven mit engsten Radien
• Kurz- und Parallelschwingen
• Beugedrehformen auf Buckelpisten
• Fahren in Boardercross Pipes
• und geniales Powder-Feeling auf Tiefschneehängen
Auch steilste Pisten können Sie kontrolliert befahren. Selbst auf sehr harten
und eisigen Pisten bietet das Bikeboard/Snow Fahrspass pur. Gefahren
wird stehend, in wintertauglichem Schuhwerk mit Profilsohlen – ohne Bin-
dung und drückende Schalenschuhe. Die Beförderungsanlagen (Sessellift,
Gondel, Skilift) können Sie auf die gleiche Art und Weise benützen, wie
als Skifahrer oder Snowboarder. Beachten Sie dazu das Kapitel 7 in
dieser Bedienungsanleitung.
Ob Kinder, Jugendliche oder Erwachsene – alle beherrschen die Technik
rasch. Denn das Fahren mit dem Bikeboard/Snow ist wirklich leicht zu
lernen. Bereits nach kurzer Zeit macht es riesig Spass! Viel Vergnügen.
WebTipp: Beachten Sie bitte auch die Videoclips auf unserer Home-
page www.bikeboard.ch. Die Clips visualisieren Themen wie Fahr-
technik und Transport und Liftbenutzung mit dem Bikeboard/Snow.
Darüber hinaus finden Sie weitere nützliche Tipps und Anregungen
und immer das Neuste rund ums Thema Bikeboard.
www.bikeboard.ch
Nous vous remercions d‘avoir choisi le Bikeboard/Snow. Il vous apportera
une sensation garantie sur les pistes . Et afin que vous ayez un maximum
de plaisir au guidon du Bikeboard/Snow, nous vous demandons d‘étudier
attentivement les instructions d‘utilisation.
Le Bikeboard/Snow se compose d‘un cadre et d‘une fourche en alumini-
um, une potence équipée d‘un mécanisme pliable, d‘un guidon réglable
en hauteur, d‘une plate forme équipée d‘une sangle et de planches de
Snowboards dont une planche avant.
Le Bikeboard/Snow vous offre des applications universelles:
• Carver avec les rayons les plus étroits
• Virages court et parallèles
• Descente sur pistes de bosse
• Descente sur piste de Boardercross et Pipes
• Sensation fantastique sur les pentes de neige poudreuse
De même sur les pistes les plus raides, vous pouvez descendre le cont-
rôlant pleinement. Même sur des pistes très dures et glacées le Bikeboard/
Snow vous apportera du plaisir. On se tient debout et avec des chaussures
convenables pour les conditions hivernales avec semelles profils - sans
chaussures lourdes à coques. Les remontées mécaniques (assiettes, arbalè-
te, télésièges ou cabines) s‘utilisent de la même manière qu‘un skieur. Voir
le chapitre 7 dans ces instructions d‘emploi.
Que ce soit enfants, jeunes ou adultes - tous maîtrisent rapidement la tech-
nique. Car utiliser le Bikeboard/Snow s‘append facilement . On s‘amuse
très rapidement! Beaucoup de plaisir..
Thank you for choosing the Bikeboard/Snow. With this snow sports
equipment, you are sure to cause a stir on the slopes. In order to get the
maximum pleasure out of the Bikeboard/Snow we ask you to carefully
study these instructions for use.
The Bikeboard/Snow consists of a light aluminium frame with a fork, a
folding adjustable handlepost, a standing platform with foot strap and a
specially developed snowboard with front board.
The Bikeboard/Snow offers a variety of applications:
• Carved turns with extremely small radius
• Short turns
• Spins on mogul slopes
• Riding in boardercross pipes
• and terrific powder feeling on deep snow slopes
You will stay in control on the steepest slopes. Even on very hard and icy
slopes, the Bikeboard/Snow will give you pure riding pleasure. You ride it
standing up, in suitable winter shoes with grip soles – without bindings and
uncomfortable hard-shelled boots. You can use the transportation facilities
(chair train, small cable car, ski lift) in the same way as skiers or snowboar-
ders do. Please refer to Chapter 7 of these instructions.
Be it children, young persons or adults – all will quickly master the techni-
que. Riding the Bikeboard/Snow is really easy to learn. It is a lot of fun
after only a short time. Enjoy!
Conseil Internet: Regardez aussi nos vidéo clips sur notre site Internet
www.bikeboard.ch. Les clips présentent des thèmes comme la tech-
nique, le transport et l‘utilisation des remontées mécaniques avec le
Bikeboard/Snow. Vous trouvez en outre toujours de nouvelles re-
marques, conseils et indications utiles autour du thème Bikeboard.
www.bikeboard.ch
Web tip: Check out the video clips on our homepage www.bike-
board.ch. The clips visualize topics like riding technique, and trans-
portation and ski lift use with the Bikeboard/Snow. In addition, you
will find further useful tips and suggestions and always the latest on
everything having to do with Bikeboards.
www.bikeboard.ch
Bikeboard/Snow-Manual, DFE-1/20064
1.
Domaines d‘utilisation du
Bikeboard/Snow
1.
Applications for the
Bikeboard/Snow

Bitte beachten Sie die folgenden Sicherheitshinweise. Die Bikeboard AG
lehnt bei Nichtbefolgung der Sicherheitshinweise Haftungsansprüche ab.
• Nehmen Sie selbständig keine Veränderungen am Gerät vor.
• Prüfen Sie vor der Benutzung alle Befestigungselemente gewissenhaft
auf festen Sitz (Schrauben, Schnellspanner, Faltmechanismus etc.).
• Fahren Sie zum Schutze der anderen Wintersportler nie ohne montier-
te Sicherheitsleine (Leash), die Sie eventuell bereits vom Snowboard
her kennen. Mit der Sicherheitsleine wird das Bikeboard/Snow am
Unterschenkel gesichert. Achten Sie auf die korrekte Befestigung (s.
Kap. 2.2, Abb. 3).
• Benutzen Sie das Gerät nicht, wenn Teile defekt sind.
• Fahren mit dem Bikeboard/Snow kann gefährlich sein.
• Passen Sie die Fahrweise unbedingt Ihrem Können an.
• Fahren Sie mit dem Bikeboard/Snow nur im Vollbesitz Ihrer körperli-
chen und geistigen Kräfte.
• Tragen Sie eine geeignete Schutzausrüstung für Kopf, Gesicht und
Körper.
• Prüfen Sie vor der Benutzung: Ist das Skigebiet für mein Fahrkönnen
geeignet, und ist die Liftbenutzung mit dem Bikeboard/Snow erlaubt?
• Beachten Sie die FIS-Regeln. Nehmen Sie Rücksicht auf andere Skifah-
rer.
• Befolgen Sie die Verhaltensregeln sowohl auf Pisten, als auch im
Gelände ausserhalb gesicherter Pisten (Freeride).
• Beachten Sie die Verhaltensregeln in Notsituationen (Sturz, Lawine,
Ausrüstung, Bruch der Sicherheitsleine).
• Achten Sie stets darauf, dass sich das Bikeboard/Snow nie selbstän-
dig macht und plötzlich ungesichert hangabwärts fährt. Dadurch kön-
nen andere Wintersportler verletzt werden und es kann ein Schaden
am Gerät entstehen. Oder es kann den Verlust des Bikeboard/Snow
bedeuten.
2.1 Grundsätze
2.
Wichtige Sicherheitshinweise
Veuillez considérer les indications de sécurité suivantes. Le Bikeboard AG
rejette des actions en matière de responsabilité lors de la négligence des
indications de sécurité.
• Ne faite aucune modification sur l‘appareil.
• Contrôler consciencieusement l‘ajustement de tous les éléments de
fixation avant l‘utilisation (vis, serrages rapides, mécanisme de la
potence pliable, etc.).
• Afin de protéger les autres personnes sur les pistes, ne descendez
jamais sans avoir préalablement fixé votre Leash de sécurité que vous
connaissez éventuellement déjà du Snowboard. Le Bikeboard/Snow
est relié et fixé à la partie inférieure de la jambe. Tenez compte de la
fixation correcte (voir le chap. 2.2, fig. 3)
• N‘utilisez pas l‘appareil si des pièces sont défectueuses.
• L‘utilisation du Bikeboard/Snow peut être dangereux.
• Adaptez votre vitesse à votre niveau.
• N‘utilisez le Bikeboard/Snow qu‘en pleine possession de vos forces
physiques et mentales.
• Portez un équipement de protection approprié pour la tête, le visage
et le corps.
• Contrôlez avant l‘utilisation : Si le domaine skiable est approprié
à mon niveau et si l‘utilisation des remontées mécaniques avec le
Bikeboard est autorisée.
• Prenez connaissances des règles FIS. Tenez compte des autres prati-
quants.
• Appliquez les règles de bon comportement sur les pistes ainsi qu‘en
hors piste (Freeride).
• Appliquez les règles de bon comportement dans les situations
d‘urgence (chute, avalanche, équipement, cassure du Leash.
• Veillez toujours à ce que le Bikeboard/Snow ne soit libre et que sou-
dainement il dévale les pistes. Ce qui pourrai blesser d‘autre usagés,
endommager l‘appareil ou engendrer la perte du Bikeboard/Snow.
2.1 Principes
2.
Indications de sécurité
importants
Please observe the following safety instructions. In case of non-compliance
with these safety instructions, Bikeboard AG will not accept any liability
claims.
• Don’t make any changes on this piece of equipment on your own.
• Before use, carefully check to make sure that all fasteners (screws,
quick release clamps, folding mechanism etc.) sit tightly.
• For the safety of other skiers on the piste, never ride without attaching
the security strap (leash). You may know the leash from snowboards.
The security strap (leash) secures the Bikeboard/Snow to the lower
leg. Please note the correct attachment (cf. chapter 2.2, fig. 3).
• Don’t use this equipment with defective parts.
• Riding the Bikeboard/Snow may be dangerous.
• It is absolutely essential to adjust your riding style to your ability.
• Use the Bikeboard/Snow only in full possession of your physical and
mental faculties.
• Wear suitable protective gear for head, face and body.
• Prior to use, make sure: is the ski area suitable for my riding ability
and is the use of ski lifts allowed for Bikeboard/Snow?
• Observe Your Responsibility Code. Be considerate of other skiers.
• Observe the rules of conduct both on pistes and on terrain outside of
secured slopes (free-riding).
• Observe the rules of conduct in emergency situations (falls, avalan-
ches, defective gear, breaking of the security strap).
• Always make sure that the Bikeboard/Snow never runs off unsecured
downhill on its own. Other skiers may be injured. And there may be
damage to the equipment or you may lose your Bikeboard/Snow.
2.1 Basics
2.
Important Safety Instructions
5Bikeboard/Snow-Manual, DFE-1/2006

Die Sicherheitsleine (Leash) ist ein wichtiges Sicherheitselement. Sobald Sie
sich mit dem Bikeboard/Snow bewegen, müssen Sie die Sicherheits-
leine mit Ihrem Unterschenkel verbinden. Auch auf dem Skilift oder
auf dem Sessellift. Denn gerade auf dem Sessellift verhindert die
Sicherheitsleine, dass das Bikeboard/Snow unabsichtlich auf die Piste
hinunterfällt und eine Person dabei verletzen kann.
Die Sicherheitsleine reisst bei einer Überbelastung automatisch, um die
Verletzungsgefahr zu reduzieren. Beispielsweise dann, wenn Sie am
Skilift mit dem Bikeboard/Snow stürzen und sich das Gerät unglückli-
cherweise um einen Masten wickelt.
Ist die Sicherheitsleine einmal gerissen, besteht durch eine zweite Befes-
tigungsart die Möglichkeit, dass Sie die Fahrt fortsetzen können (s.
Abb. 4).
Beachten Sie bitte die folgenden Installationshinweise.
3. ...und das Klettband fest um den
Unterschenkel fixiert.
3. ...fixer solidement et l‘attache
velcro autour de la partie inférieure
de la jambe.
3. ...and the Velcro tape is tightly
secured to the lower leg.
4. Bei einem Bruch der Sicherheits-
leine wird diese gemäss Abbildung
neu verschlauft...
4. Lors d‘une coupure du cordon
de sécurité, fixer le cordon selon
l‘illustration...
4. In case the leash breaks, re-loop
it as pictured...
5. ...und die Lasche bis ans Alumi-
niumrohr geführt. Die Sicherheitsvor-
kehrung ist wieder aktiviert.
5. ...et le verrou au tube
d‘aluminium. La mesure de sécurité
est à nouveau activée.
5. and tighten the loop at the
aluminium tube. The safety provision
is now reactivated.
2.2 Sicherheitsleine (Leash)
1. Lieferumfang Sicherheitsleine: Eine Sicherheitsleine mit zwei Karabiner-
haken und einem Klettband. Am einen Karabinerhaken ist das Klettband
befestigt.
1. Présentation du Leash de sécurité : un cordon de sécurité avec deux
mousquetons et une attache avec velcro. L‘attache est attaché au mous-
queton.
1. Scope of delivery for safety strap: a safety strap with two snap hooks
and a Velcro tape. The Velcro tape is fixed to one of the snap hooks.
2. Der andere Karabinerhaken wird
am Bikeboard befestigt...
2. L‘autre mousqueton est fixé au
Bikeboard...
2. The other snap hook is attached
to the Bikeboard...
Le Leash est un élément de sécurité important. Aussitôt que vous vous dé-
placez avec le Bikeboard/Snow, vous devez lier la ligne de sécurité
à la partie inférieur de votre jambe. Celui-ci doit également être fixé
lors de l‘utilisation des remontées mécaniques. Car sur les télésièges
le Leash empêche que le Bikeboard/ Snow ne tombe sur la piste et
ne puisse blesser involontairement quelqu‘un.
Afin de réduire le risque de blessure, le Leash se rompt automatique-
ment lors d‘une surcharge. Par exemple lorsque vous tombez des
remontées mécaniques avec votre Bikeboard/Snow et que le Leash
s‘enroule autour d‘un poteau.
Si la ligne de sécurité a rompu une fois, un deuxième mode de fixation est
possible et vous pouvez alors continuez votre progression (voir fig.
4).
Veuillez considérer les indications d‘installation suivantes.
2.2 Leash
The safety strap (leash) is an important safety feature. You have to tie it to
your lower leg as soon as you move with the Bikeboard/Snow, even
when riding the ski lift or the chair train. Especially on the chair train,
the leash prevents your Bikeboard/Snow from unintentionally falling
down on the piste possibly injuring a person.
In case of capacity overload, the leash will break off automatically in order
to reduce the danger of injury. For example, in case you fall with the
Bikeboard/Snow on the ski lift and the equipment unfortunately gets
wrapped around a pole.
If the leash has broken off, there is an alternative way of securing the Bike-
board/Snow so that you can continue the ride (cf. fig. 4).
Please observe the following installation instructions.
2.2 Safety Strap (Leash)
Bikeboard/Snow-Manual, DFE-1/20066
2. Wichtige Sicherheitshinweise
Indications de sécurité importants
Important Safety Instructions

Bikeboard/Snow-Manual, DFE-1/2006
1 Rahmen mit montierter Gabel und Faltlenker.
Cadres avec fourche et potence pliable monté.
Frame with mounted fork and folding handlepost.
2 Doppelklettverschluss für Faltlenker.
Double fixation velcro pour la potence pliable.
Double Velcro tape for folding handlepost.
3 Toolset.
Outil.
Toolset.
4 Lenker mit Schutzkappe, Vorbau, Griffen und Endkappen.
Guidon avec protection de potence, poignées et embouts de guidon.
Handlebar with protective cap, frontload stem, grips and end plugs.
5 Zwei lange Schnellspanner, vormontiert.
Deux longs serrages rapides pré montés.
Two long quick release clamps, pre-assembled.
6 Ein kurzer Schnellspanner, eventuell ohne Federn oder auf der falschen
Seite montiert (s. Kap. 3.3, Abb. 1).
Un serrage rapide plus court éventuellement sans ressorts ou montés du faux
côté (voir le chap. 3.3, fig. 1).
One short quick release clamp, possibly without springs or mounted on the
wrong side (cf. chapter 3.3, fig. 1).
7 Zwei Federn für den kurzen Schnellspanner, wenn nicht vormontiert
(s. Kap. 3.3, Abb.1).
Deux ressorts pour le serrage rapide court, si pas pré monté (voir le chap.
3.3, fig.1).
Two springs for the short quick release clamp, unless pre-assembled (cf. chap-
ter 3.3, fig. 1).
8 Auszugsrohr Faltlenker (ev. bereits in Faltlenker eingeschoben oder am
Lenkervorbau montiert).
Tube de réglage du guidon (év. déjà inséré dans la potence pliable ou sur la
potence).
Telescope tube for folding handlepost (possibly already inserted in folding
handlepost or mounted on the frontload stem).
9 Schnellspanner für Auszugsrohr, bereits montiert
Serrage rapide pour le tube de réglage de la hauteur du guidon, déjà monté.
Quick release clamp for telescope tube, already assembled.
1
2
3
4
56
5
8
9
3.1 Lieferumfang FRAME-SET
Présentation du FRAME-SET
FRAME-SET – scope of delivery
3. Aufbau und Montage
Construction et assemblage
Set-up and Assembly
7
Bikeboard/Snow-Manual, DFE-1/20068
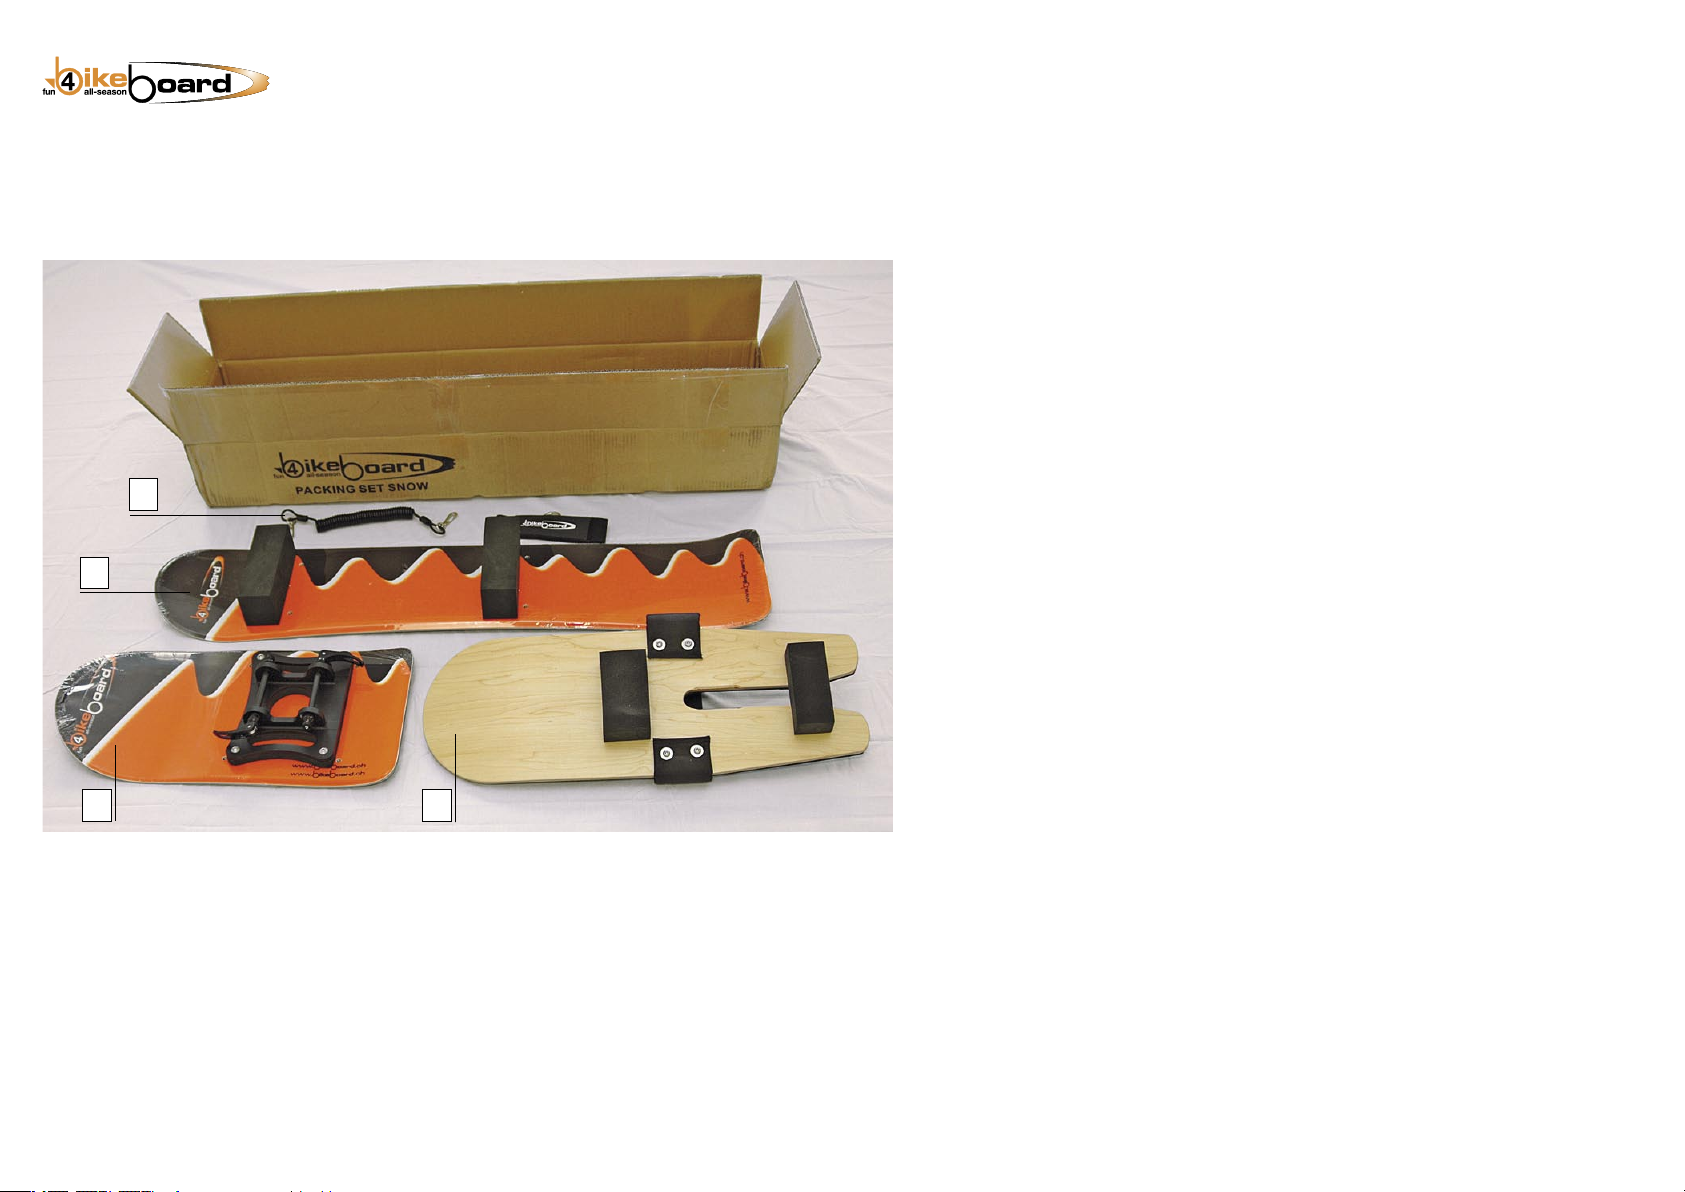
1 Sicherheitsleine (Leash) mit Klettverschluss.
Leash avec attache velcro.
Safety strap (leash) with hook and loop fastener.
2 Rearboard mit Schaumstoffschutz auf den vormontierten Verbindungskrallen
zum Rahmen.
Planche arrière pré montée avec profils de fixation et protections en mousse.
Rear board with plastic foam cover on the pre-assembled connection claws to
the frame.
3 Frontboard mit vormontiertem Verbindungsprofil zur Gabel.
Planche avant pré montée avec profil de fixation pour la fourche.
Front board with pre-assembled connecting section to the frame.
4 Standfläche mit vormontierten Verbindungsprofilen zum Rahmen, mit
Schaumstoffschutz.
Plate forme pré montée avec profils de fixation pour le cadre et protections
en mousse.
Standing platform with pre-assembled connecting sections to the frame, with
plastic foam cover.
1
2
34
3.2 Lieferumfang SNOW-SET
Présentation du SNOW-SET
SNOW-SET – scope of delivery

9
1. Kurzer Schnellspanner mit den
beiden Federn bestücken (liegen se-
parat bei). Griff des Schnellspanners
nach hinten ausrichten – Siche-
rungsknopf lässt sich so bequem
betätigen.
1. Serrage rapide avec les deux
ressort (présentés séparément).
Placer la tête du serrage rapide vers
l‘arrière, le bouton de sécurité se
laisse actionner plus facilement.
1. Mount the two springs (enclosed
separately) on the short quick re-
lease clamp. Point the quick release
handle backward to easily actuate
the safety button.
2. Lenker mit Vorbau in Auszugsrohr
einsetzen und festschrauben. Vorbau
muss ganz nach unten bis zum
Anschlag eingesetzt werden. Lenker
gerade ausrichten, Schrauben fest
anziehen (Bikeboard-Toolset).
2. Placer le guidon et la potence
sur le tube de réglage et serrer les
vis de fixation. La potence doit être
placée en butée de la tête du tube
de réglage. Régler le guidon droit et
serrer les vis (Outil Bikeboard).
2. Insert handlebar with stem into
telescope tube and tighten. Insert the
stem all the way down to the stop.
Align the handlebar, fasten screws
tightly (Bikeboard toolset).
3. Schutzkappe aufsetzen.
3. Placer la protection de potence.
3. Put on protective cap.
4. Kontrollieren Sie die Schrauben
des Faltlenkers. Diese müssen sehr
fest angezogen werden (in der Rei-
henfolge von oben nach unten).
4. Contrôler les vis de la potence
pliable. Celles-ci doivent être serrées
fortement (de haut en bas).
4. Check the screws of the folding
handlepost. They have to be faste-
ned tightly (from top to bottom in
sequence).
5. Zum Öffnen und Schliessen des
Faltlenkers wird der Schnellspanner
aufgeklappt und gerade heraus
gezogen.
5. Pour l‘ouverture de la potence
pliable, ouvrir le levier et le tirer vers
l‘extérieur.
5. To open or close the folding
handlepost, open the quick release
and pull out straight.
6. Doppelklettverschluss am Faltlen-
ker anbringen. Mittels Klettverschluss
fixieren Sie den Faltlenker am
Rahmen.
6. Fixer la double fixation velcro à
la potence pliable. Fixer la potence
pliable au cadre au moyen de la
fixation velcro.
6. Attach double Velcro tape to the
folding handlepost. With the Velcro
tape, you secure the folding handle-
post to the frame.
7. Zur Montage der Standfläche Bikeboard auf den Kopf stellen und Lenker
um 180 Grad drehen, damit Rahmen stabil auf den Lenkergriffen steht.
Standfläche von unten her einführen.
7. Pour fixer la plate forme, mettre le Bikeboard sur le guidon et le tourner
de 180° afin que le cadre soit stable, posé sur les poignées. Glisser la
plate forme depuis le bas.
7. To mount the standing platform, set bikeboard upside down and turn
handlebar 180o, in order for the frame to rest firmly on the handlebar
grips. Insert standing platform from below.
8. Hinteres Snowboard zuerst mit unterer „Kralle“
in Rahmen einführen. Anschliessend Snowboard
nach vorne drücken und obere „Kralle“ in den
Rahmen schieben.
8. Fixer la planche arrière d‘abord avec le profil
de fixation inférieur. Presser la planche vers
l‘avant et fixer le profil supérieur.
8. Introduce rear snowboard into the frame with
lower „claw“ first. Then push the snowboard
forward and slide the upper „claw“ into the frame.
7 7
Pkt. 1 und 2 ev. bereits vormontiert.
Point 1 et 2 év. déjà pré monté.
Items 1 and 2 possibly pre-assembled.
3.3 Zusammenbau
Assemblage
Assembly

Bikeboard/Snow-Manual, DFE-1/200610
9. Achten Sie beim Anziehen der
Schnellspanner darauf, dass die „Kral-
le“ und der Rahmen gut zusammen
gepresst werden. Schnellspanner vorne
nach vorne richten, damit man gut zum
Sicherungsknopf gelangt.
9. Contrôler lors du serrage des serra-
ges rapides à ce que les profils et le
cadre soient bien pressés ensemble.
Placer la tête du serrage rapide avant
vers l‘avant afin que le boutons de
sécurité soit plus accessible.
9. Make sure to press claw and frame
firmly together when tightening the
quick release. Point the front quick
release handle forward for easy access
to the security button.
10. Und den Schnellspanner hinten
nach hinten richten, damit man
ebenfalls gut zum Sicherungsknopf
gelangt.
10. Et diriger le serrage rapide
arrière vers l‘arrière également afin
que le boutons de sécurité soit plus
accessible.
10. Likewise, point the back quick
release handle backward, also for
easy access to the security button.
11. Da der Lenker um 180 Grad gedreht ist, wird das Frontboard nach
hinten eingesetzt. Die Schnellspanner gut anziehen und so ausrichten, dass
man beim Öffnen guten Zugriff zu den Sicherheitsknöpfen hat.
11. Du fait que le guidon est tourné de 180°, la planche avant se monte
vers l‘arrière. Bien serrer les serrages rapides et placer les têtes de façon à
ce que les boutons de sécurités soient bien accessibles.
11. Since the handlebar is turned 180o, insert the front board backwards.
Tighten the quick release clamps firmly and align them for easy access to
the security buttons.
3.3 Zusammenbau (Fortsetzung)
Assemblage (Suite)
Assembly (continued)
1. Die Schnellspanner soweit schliessen, bis der Kopf
einklickt (Schnellspanner im Original schwarz).
1. Fermer les têtes des serrages rapides jusqu‘à enten-
dre le clic (Serrage rapide original en noir).
1. Tighten the quick release until the button clicks in
(Actual colour of quick release is black).
1. Der Knopf ist nun eingeklickt und muss zum Öffnen
wieder gedrückt werden.
1. Der Knopf ist nun eingeklickt und muss zum Öffnen
wieder gedrückt werden.
1. La tête est maintenant sécurisée et pour l‘ouverture,
le bouton de sécurité doit être pressé.
3.4 Schnellspanner mit Sicherungsknopf
Serrage rapide avec bouton de sécurité
Quick release with security button

11Bikeboard/Snow-Manual, DFE-1/2006
1. Sicherheitsleine anbringen.
1. Attacher le Leash.
1. Attach leash.
2. Fussschlaufe korrekt einstellen,
so dass die Fussspitzen noch leicht
hervor schauen.
2. Régler correctement la sangle de
façon à ce que la pointe des souliers
dépasse légèrement.
2. Adjust foot strap correctly so that
the tips of your feet slightly stick out.
3. Lenkerhöhe korrekt einstellen (nur
soweit herausziehen, bis Markie-
rung erscheint).
3. Régler correctement la hauteur du
guidon (au plus jusqu‘aux lignes de
marquage).
3. Adjust correct handlebar height
(only pull out as far as the marking)
Lenkerhöhe korrekt einstellen
Die optimale Lenkerhöhe ist individuell abhängig von Ihrer Körpergrös-
se und Ihrer bevorzugten Körperhaltung während dem Fahren. Geübte
Bikeboard/Snow-Fahrer stellen den Lenker etwas tiefer ein, noch ungeübte
Fahrerinnen und Fahrer etwas höher. Achten Sie stets darauf, dass Sie den
Lenker mit beiden Händen bequem umfassen können. Nehmen Sie wenn
nötig nach ersten Fahrten Korrekturen an der Einstellung vor.
Réglage correcte de la hauteur du guidon
La hauteur optimale du guidon dépend individuellement de votre taille
et de votre position préférée pendant la conduite. Les Bikeboarders/
euses expérimenté(e)s ajutent leur guidon légèrement plus bas et les non
expérimenté(e)s le positionnent plus haut. Veillez toujours à ce que vous
puissiez poser agréablement les deux mains sur le guidon. Vous pourrez
au besoin modifier votre position après les premières descentes.
Adjust correct handlebar height
Optimum handlebar height depends on your height and preferred posture
for riding. Experienced Bikeboard/Snow riders adjust the handlebar a little
lower, less experienced riders a little higher. Always make sure that you
can comfortably hold the handles with both hands. After a few rides, make
corrections if necessary.
3.5 Die drei unmittelbaren Startvorbereitungen
Les trois préparations avant le départ
The three preparations immediately prior to start

Bikeboard/Snow-Manual, DFE-1/200612
Folgendes Werkzeug ist im Lieferumfang inbegriffen
• Ein mehrteiliges Bikeboard-Toolset mit verschiedenen Inbussschlüsseln
und Schraubenziehern. Für die regelmässige Wartung
benötigen Sie die Inbussschlüssel 3, 5 und 6 mm.
Lassen Sie Reparaturen nur von Ihrem Fachhändler durchführen. Oder
nehmen Sie direkt mit der Bikeboard AG Kontakt auf.
Überprüfen Sie vor jeder Fahrt die folgenden Punkte
• Sind alle Schnellspann-Vorrichtungen richtig geschlossen?
• Ist der Rahmen korrekt mit dem Frontboard (3), Rearboard (2) und
Standfläche (4) verbunden (s. Kap. 3.2)?
• Ist die Sicherheitsleine korrekt am Board und am Unterschenkel befes-
tigt (s. Kap. 3.5, Abb. 1)?
• Ist die Fussschlaufe korrekt eingestellt (s. Kap. 3.5, Abb. 2)?
• Ist die Lenkerhöhe korrekt eingestellt (s. Kap. 3.5, Abb. 3)?
Schraubverbindungen regelmässig überprüfen
• Bitte überprüfen Sie die Schraubverbindungen regelmässig. Dazu
benötigen Sie die Inbussschlüssel 3, 5 und 6 mm.
• Wenn Sie eine Schraubverbindung lösen mussten (ist nicht der Nor-
malfall), müssen Sie die Verbindung wieder mit Loctite (für wiederlös-
bare Verbindungen, im Fachhandel erhältlich) sichern.
Beachten Sie bitte folgende Pflegehinweise
• Bikeboard/Snow trocken versorgen, nicht im Transportsack einlagern.
• Nach Saisonschluss Kanten und Fahrflächen leicht einfetten.
Gehen Sie beim Ersatz von Verschleissteilen folgendermassen
vor
Zu ersetzende Teile bei Ihrem Fachhändler oder direkt bei der Bikeboard
AG bestellen:
• Sicherheitsleine (Leash) mit Haken (sofort ersetzen, wenn gerissen)
• Lenker-Schutzkappe
• Sicherheitsschloss Schnellspanner
• Lenkergriff Endkappe
• Fussschlaufe
Nehmen Sie bei Unsicherheiten direkt mit der Bikeboard AG
oder mit Ihrem Fachhändler Kontakt auf.
4.
Wartung
L‘outil suivant est compris dans la livraison
• Un outil Bikeboard comportant plusieurs parties avec différentes
clefs Imbus et tournevis. Pour l‘entretien régulier, vous utilisez les clefs
Imbus 3, 5 et 6 mm.
Ne faites faire les réparations que par votre commerçant spécialisé, ou
prenez contact directement avec Bikeboard AG.
Contrôlez le points suivants avant chaque utilisation
• Tous les serrages rapides sont t‘ils fermés correctement?
• Le cadre est t‘il fixé correctement à la planche avant(3), planche
arrière (2) et à la plate forme (voir le cap. 3.2)?
• Le Leash de sécurité est t‘il attachée correctement au Bikeboard et au
bas de la jambe (voir le cap. 3.5, fig. 1)?
• La sangle est t‘elle ajustée correctement (voir le cap. 3.5, fig. 2)?
• La hauteur du guidon est t‘elle ajustée correctement (voir le cap. 3.5,
fig. 3)?
Contrôler régulièrement le serrage des vis
• Veuillez contrôler régulièrement le serrage des vis. Pour cela, vous
utilisez les clefs Imbus 3, 5 et 6 mm?
• Si vous deviez desserrez une vis (pas un cas normal), vous devez
assurer la vis avec de la Loctite(livrable dans les commerce spécialisé
disponible).
Veuillez considérer les indications d‘entretien suivantes
• Stocker le Bikeboard/Snow au sec et non dans un sac de transport
humide.
• Aiguiser et graisser les carres en fin de saison.
Procéder comme suit concernant le remplacement des pièces
usagées
Commander les pièces chez votre commerçant spécialisé ou directement
chez Bikeboard AG:
• Leash avec des crochets (remplacer immédiatement, si le crochet est
fissuré)
• Protection de la potence
• Sécurité des serrages rapides
• Bouchons de guidon
• Sangle
En cas de doute, prenez directement contact avec Bikeboard
AG ou avec votre commerçant spécialisé.
4.
Entretien
The scope of delivery includes the following tools
• A multi-part Bikeboard toolset with different socket wrenches and
screw drivers. For regular maintenance, you need socket wrenches 3,
5 und 6 mm.
Have repairs done by your specialist dealer or get directly into contact
with Bikeboard AG.
Before every ride, check for the following points
• Are all quick release fasteners properly tightened?
• Are front board (3), rear board (2) and standing platform (4) properly
attached to the frame (cf. chapter 3.2)?
• Is the leash correctly attached to the board and properly tied to your
lower leg (cf. chapter 3.5, fig. 1)?
• Is the foot strap properly adjusted (cf. chapter 3.5, fig. 3)?
• Is the handlebar height properly adjusted (cf. chapter 3.5, fig. 3)?
Check screw connections regularly
• Please check the screw connections regularly. You’ll need the socket
wrenches 3, 5 und 6 mm.
• If you had to loosen a screw connection (not a normal case), you
have to use Loctite (for disconnectable connections, available through
specialist dealers) when securing the connection again.
Please observe the following care instructions
• Store the Bikeboard/Snow in dry condition, don’t store it in the bag.
• Once the season has ended, lightly grease the edges and riding
surfaces.
For replacing wear-and-tear parts, proceed in the following
manner
Order the parts to be replaced from your specialist dealer or directly from
Bikeboard AG:
• Safety strap (leash) with snap hook (immediately replace if broken)
• Protective cap on handlebar
• Quick release with safety lock
• Handlebar end plugs
• Foot strap
Directly contact Bikeboard AG or your specialist dealer if
you’re not sure.
4.
Maintenance
13Bikeboard/Snow-Manual, DFE-1/2006
Damit Sie den Bikeboard/Snow-Fahrspass maximal genies-
sen können, ist das Tragen einer guten Schutzausrüstung
unabdingbar. Bitte beachten Sie die folgenden Hinweise
und Empfehlungen.
Empfohlene Schutzausrüstung
• Helm mit Brille
• Protektoren an Knie, Ellbogen und am Rücken
• Handschuhe, die einen guten Halt am Lenker gewährleisten
• wintertaugliches Schuhwerk mit Profilsohle
Afin que vous puissiez jouir au maximum du Bikeboard/
Snow le port d‘un bon équipement de protections est in-
dispensable. Veuillez considérer les indications et recom-
mandations suivantes.
Équipement de protections recommandé
• Casque avec lunettes
• Protection des genoux, coudes et au dos
• Gants qui garantissent une bonne prise du guidon
• Chaussures convenables pour les conditions hivernales avec la semel-
le profil
For maximum enjoyment, it is indispensable to wear good
protective gear when riding the Bikeboard/Snow. Please
observe the following instructions and recommendations.
Recommended protective gear
• Helmet with goggles
• Protectors on your knees, elbows and on your back
• Gloves providing a good grip on the handlebar
• suitable winter shoes with grip soles
5. Ausrüstung
Equipement
Protective Gear
6. Fahrtechnik
Technique
Riding Technique
• Suchen Sie sich für das Aufstellen und Montieren des Bikeboard/
Snow eine sichere und ebene Fläche aus. Achten Sie auf das korrekte
Befestigen der Sicherheitsleine (Leash). Startvorbereitungen s. Kap.
3.5, Abb. 1-3.
• Achten Sie auf die richtige Fussposition, die korrekte Körperhaltung
und die korrekte Einstellung der Fussschlaufe.
• Üben Sie als Anfänger bei den ersten Fahrversuchen Zurückhaltung.
Machen Sie sich zuerst in sicherem Gelände vertraut mit den grund-
sätzlichen Fahreigenschaften und Manipulationen wie Lenken und
Bremsen.
• Passen Sie Ihre Fahrweise dem Fahrkönnen an.
• Wählen Sie eine Ihrem Fahrkönnen gerechte Piste.
• Kommt es zu einem Sturz, lassen Sie wenn möglich den Lenker nicht
los. Wichtig ist, dass die Sicherheitsleine (Leash) korrekt montiert ist.
6.1 Principes
• Pour la préparation du Bikeboard/ Snow, choisir une surface sûre
et plane. Fixer correctement le Leash. Pour les préparatifs de départ,
voir le chap. 3.5, fig. 1-3.
• Contrôler si la position de la sangle et de vos pieds est correcte.
• En tant que débutants, descendre avec retenue lors des premières ten-
tatives. Familiarisez-vous d‘abord avec le terrain, regardez comment
le Bikeboard/ Snow réagit lors de freinage ou de virage.
• Adaptez votre position à votre façon de descendre.
• Choisissez-vous une piste adaptée à votre niveau.
• Si une chute survient, ne si possible pas lâcher le guidon. vous laissez
si possible le volant pas détaché. Il est important que Leash soit instal-
lé correctement.
6.1 Grundsätze
• Choose a safe and flat surface for set-up and assembly of the Bike-
board/Snow. Make sure to properly tie the leash. (cf. Preparations
for Start chapter 3.5, fig. 1-3)
• Watch out for correct foot position, proper posture and correct adjust-
ment of the foot strap.
• As a beginner, proceed with caution for your first riding attempts.
To start, get familiar with the basic riding characteristics and with
steering and braking on safe terrain.
• Adjust your riding style to your ability.
• Choose a piste correspondent to your riding ability.
• If you fall, don’t let go of the handlebar if possible. It is important that
the safety strap (leash) is properly attached.
6.1 Basics
Web tip www.bikeboard.ch

14
1. Grundstellung: Parallele Fussposi-
tion, Knie geschlossen, Oberkörper
dynamisch tief, Ellbogen leicht
gebeugt.
1. Position de base : Position des
pieds parallèle, genoux serrés et
fléchis, position du corps basse et
les coudes légèrement pliés.
1. Basic stance: feet in parallel
position, knees closed, upper body
dynamically low, elbows slightly
bent.
2. Knie und Hüften kippen auf die
kurveninnere Seite. Leichtes Einlen-
ken und aktives Mitkippen aus der
Lenkerstellung mit den Armen.
2. Les genoux et les hanches
s‘inclinent sur le côté intérieure de la
courbe. Tourner et inclinez le guidon
avec les bras.
2. Knees and hips bend into the cur-
ve. With your arms, slightly turn in
the handlebar and actively support
the bending motion.
3. Mit dem Oberkörper gegenkip-
pen, damit der Schwerpunkt nahe
am Bikeboard bleibt.
3. Contre pencher avec la partie su-
périeure du corps de façon à ce que
le poids reste le plus bas possible.
3. Bend your upper body to the
other side so that your centre of gra-
vity stays close to the bikeboard.
4. Durch das Einlenken auf die
andere Seite entsteht ein deutlicher
Lastwechsel.
4. Par un changement de direction
du guidon apparaît un net change-
ment du poids.
4. Turning in the handlebars causes
a definite shifting of weight.
5. Beide Knie dynamisch auf die
andere Seite kippen und den Ober-
körper aufrichten.
5. Incliner les deux genoux de
l‘autre part et redresser la partie
supérieure du corps.
5. Bend both knees dynamically to
the other side and straighten your
upper body.
6. Durch den dynamischen Last-
wechsel können Sie das perfekte
Gleiten auf der Kante erzeugen.
6. Par ce changement de côté du
poids, vous pouvez alors glisser
parfaitement sur la carre.
6. With the dynamic load change,
you can perfectly glide on the edge.
7. Es entsteht ein optisch schöner
Schwung.
7. Une belle impulsion.
7. This creates visually appealing
turns.
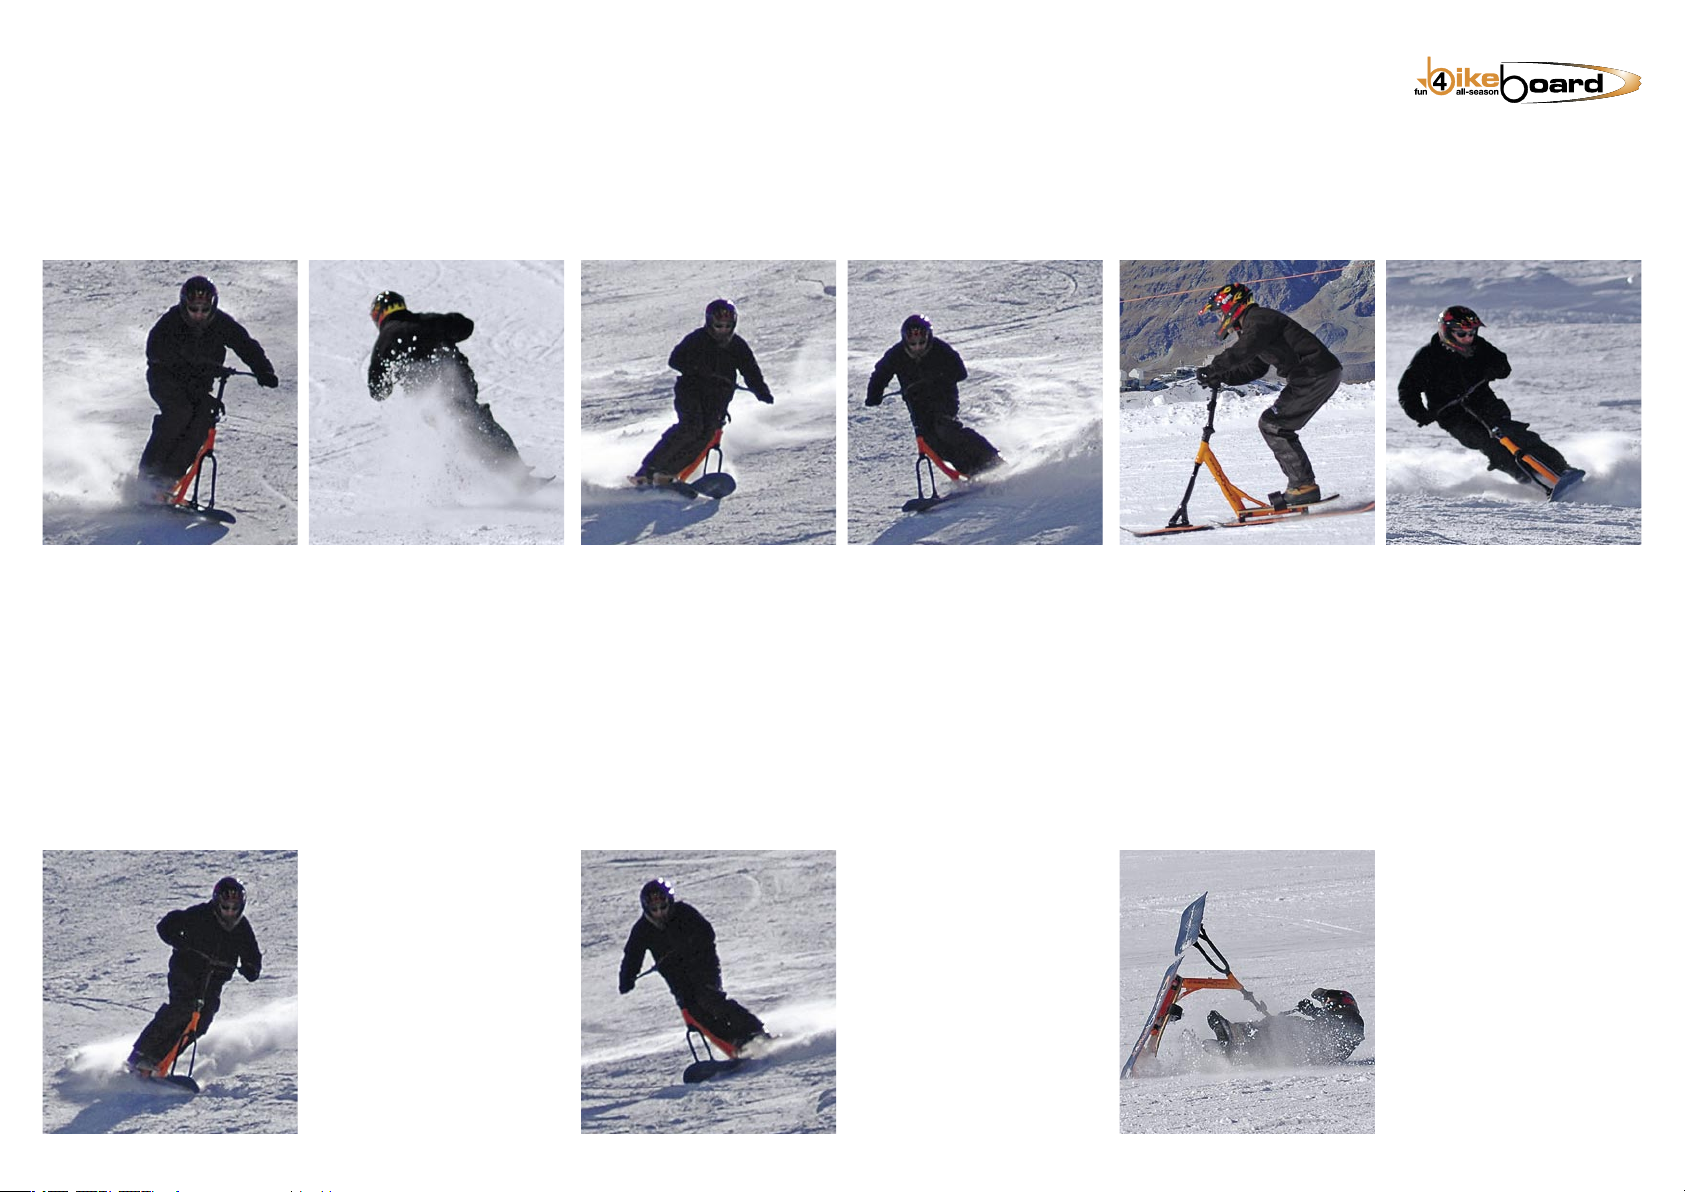
8. Kurzes Schwingen mit dem
Bikeboard.
8. Virages court avec le Bikeboard.
8. Short turns with the Bikeboard.
6.2 Kurzschwingen
Virages cours
Short Turns
15
6.3 Carven
Carver
Carving
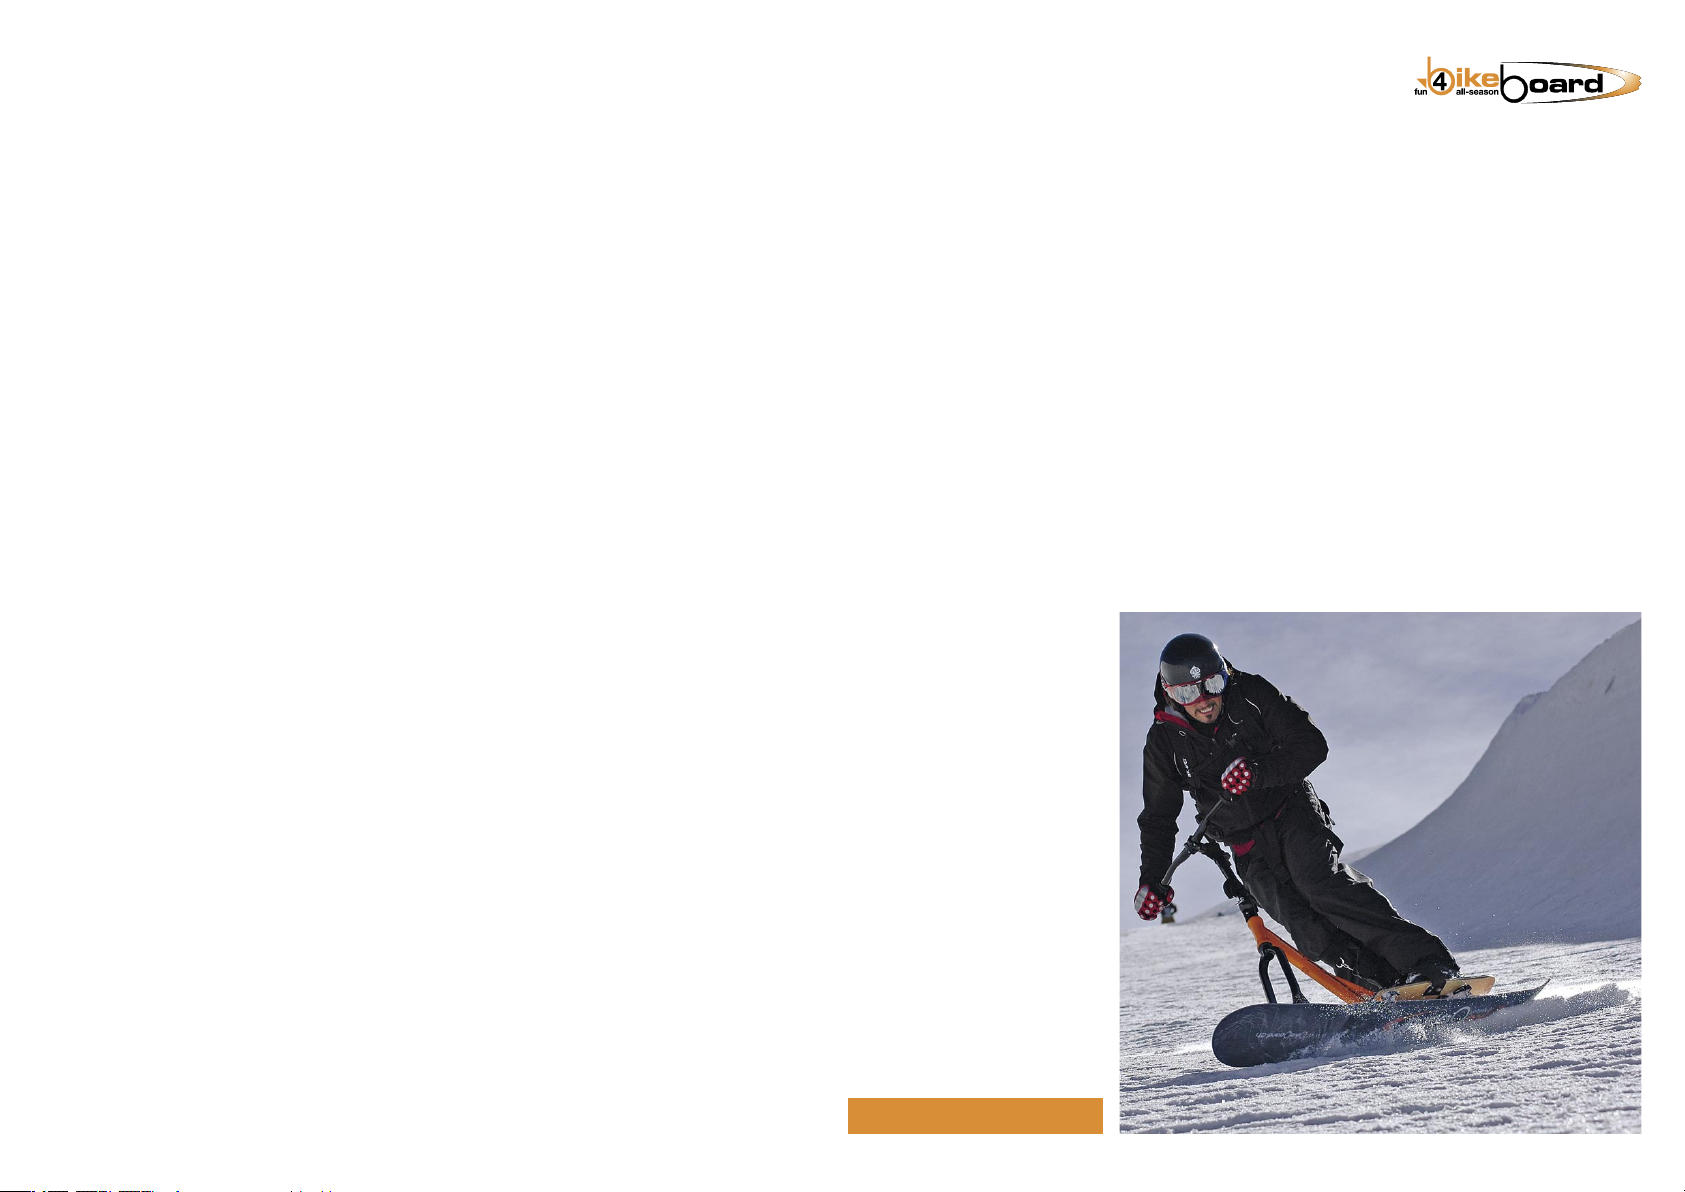
1. Bei guten Schnee- und Pistenver-
hältnissen ist das Carven mit dem
Bikeboard spektakulär.
1. Avec de bonnes conditions de
piste et de neige, Carver avec le
Bikeboard est spectaculaire.
1. With good snow and piste condi-
tions, carving with the Bikeboard is
spectacular.
2. Schon bei mittleren Geschwin-
digkeiten können Sie hervorragend
carven. Jedoch immer zuerst Blick
zurück!
2. Déjà à des vitesses moyennes
vous pouvez remarquablement bien
Carver. Toutefois toujours d‘abord
un coup d‘œil derrière!
2. Even at medium speed, carving
is excellent. But always make sure to
first look back!
3. Kippen Sie den Körper auf die
jeweilige Schwungseite.
3. Pencher le corps sur le côté de
l‘impulsion choisi.
3. Bend your body into the turn.
4. Und mit einem leichten Len-
keinsatz führen Sie den Schwung
präzise auf der Kante.
4. Et avec un léger mouvement du
guidon vous guider précisément
l‘impulsion sur la carre.
4. And by lightly turning in the
handlebar you take the momentum
precisely on the edge.
5. Durch die hohe Standfläche...
5. Du fait de la position haute de la
plate forme...
5. Because of the high standing
platform...
6. ...kann das Bikeboard in extreme
Schräglage gebracht werden...
6. ... le Bikeboard peut être position-
né dans une inclinaison extrême...
6. ...the Bikeboard can be brought
into an extremely inclined position...
7. ...ohne dass Sie mit den Schuhen
oder dem Rahmen...
7. ...sans que les chaussures ou le
cadre...
7. ...without your shoes or the
frame...
8. ...den Boden berühren.
8. ...ne touchent le sol.
8. ...touching the ground.
9. Und passiert trotzdem mal ein
Sturz, sind Sie in keiner Bindung
gefangen. Das Verletzungsrisiko für
Gelenke und Rücken ist sehr gering.
9. Une chute peut malgré tout
survenir mais vous n‘êtes pas dans
une fixation. Le risque de blessure
pour les articulations et le dos est
très faible.
9. And even if you do fall on
occasion, you’re not caught in any
binding. The danger of injury for
joints and back is very low.

Bikeboard/Snow-Manual, DFE-1/200616
1. Bevor Sie in die Spur stehen,
vergewissern Sie sich, dass die
Sicherheitsleine (Leash) korrekt an
Ihrem Bein fixiert ist.
1. Avant d‘être dans la colonne,
s‘assurer que le Leash de sécurité
soit fixé correctement à votre jambe.
1. Before getting on the lift track
make sure that the safety strap
(leash) is properly attached to your
leg.
2. Sie setzen sich hin und lassen
eine Hand am Lenker. Stellen Sie
gleichzeitig einen Fuss in die Fuss-
schlaufe (Abb. linker Fuss). Drehen
Sie den Lenker leicht ab.
2. S‘assoire en tenant le guidon
d‘une main et en ayant un pied
dans la sangle (fig. pied gauche).
Tourner légèrement le guidon.
2. Sit down keeping one hand on
the handle bar. At the same time,
put one foot into the foot strap (fig.
left foot). Turn the handlebar slightly
away.
3. Sobald Sie keinen Kontakt zum
Boden mehr haben, dient Ihnen der
Lenker auf dem Oberschenkel als
Entlastung. Klappen Sie den Schutz-
bügel des Sessels herunter.
3. Aussitôt qu‘il n‘y a plus de con-
tact avec le sol, poser le guidon la
cuisse afin de se soulager. Rabattre
la barrière de sécurité du télésiège.
3. As soon as there is no more con-
tact to the ground, the handlebar on
your thigh will relieve the weight. Put
down the safety bar of the chair.
4. Nach dem Herunterklappen des
Bügels umfassen Sie mit der freien
Hand den Lenkergriff des Bike-
boards über dem Sicherheitsbügel.
Heben Sie nun mit beiden Händen
das Bikeboard auf die Ablage
oder...
4. Après avoir rabattu la barrière
de sécurité, positionner la poignée
du Bikeboard sur celle-ci. Soulever
maintenant le Bikeboard avec les
deux mains et...
4. After putting down the bar, with
your free hand, grab the handlebar
of the bikeboard above the safety
bar. With both hands, now lift the
bikeboard onto the rack or...
5. ...auf das Rohr, welches Ihnen
zur Entlastung der Skis und Snow-
boards dient.
5. ...le positionner sur le tube
destiné à poser les skis ou les
snowboards.
5. ...onto the tube serving as sup-
port for skis or snowboards.
6. Kurz vor der Bergstation bereiten
Sie sich auf das Wegfahren bei der
Endstation vor: Mit beiden Händen
am Lenker und einem Fuss in der
Schlaufe heben Sie mit geringem
Kraftaufwand das Bikeboard aus
dem Rohr.
6. Avant l‘arrivée préparer vous à
quitter le télésiège de la manière
suivante: Avec les deux mains au
guidon et un pied dans la sangle,
vous pouvez soulever le Bikeboard
sans effort du tube de soutient.
6. Shortly before reaching the top
station, prepare for riding off: With
both hands on the handlebar and a
foot in the security strap, lift the Bike-
board off the tube with little effort.
Web tip www.bikeboard.ch
7.1 Sessellift
Télésièges
Chair Train
7. Transport und Liftbenutzung
Transport et utilisation des remontées mécaniques
Transportation and Ski Lift Use

17Bikeboard/Snow-Manual, DFE-1/2006
7. Eine Hand geht nun wieder unter
den Bügel hindurch zum Lenkrohr
des Bikeboards.
7. Une main va maintenant à nou-
veau sous la barrière afin de prend-
re le tube vertical de la potence du
Bikeboard.
7. One hand now moves underne-
ath the bar to reach the handlebar
of the Bikeboard.
8. Öffnen Sie nun den Bügel.
8. Ouverture de la barrière.
8. Now open the bar.
9. Sobald der Bügel offen ist und Ihr Sessel den Ausstiegspunkt erreicht hat,
stehen Sie auf und fahren wie mit einem Kickboard nach vorne weg.
9. Aussitôt que celle-ci a été ouverte et que le siège a atteint le point de
sortie, se lever et avancer comme avec un Kickboard.
9. As soon as the bar is up and your chair has reached the exit point, get up
and ride off forward like on a kickboard.
Viel Spass bei der nächsten Abfahrt!
Beaucoup de plaisir pour la prochaine descente!
Enjoy your next downhill run!
18
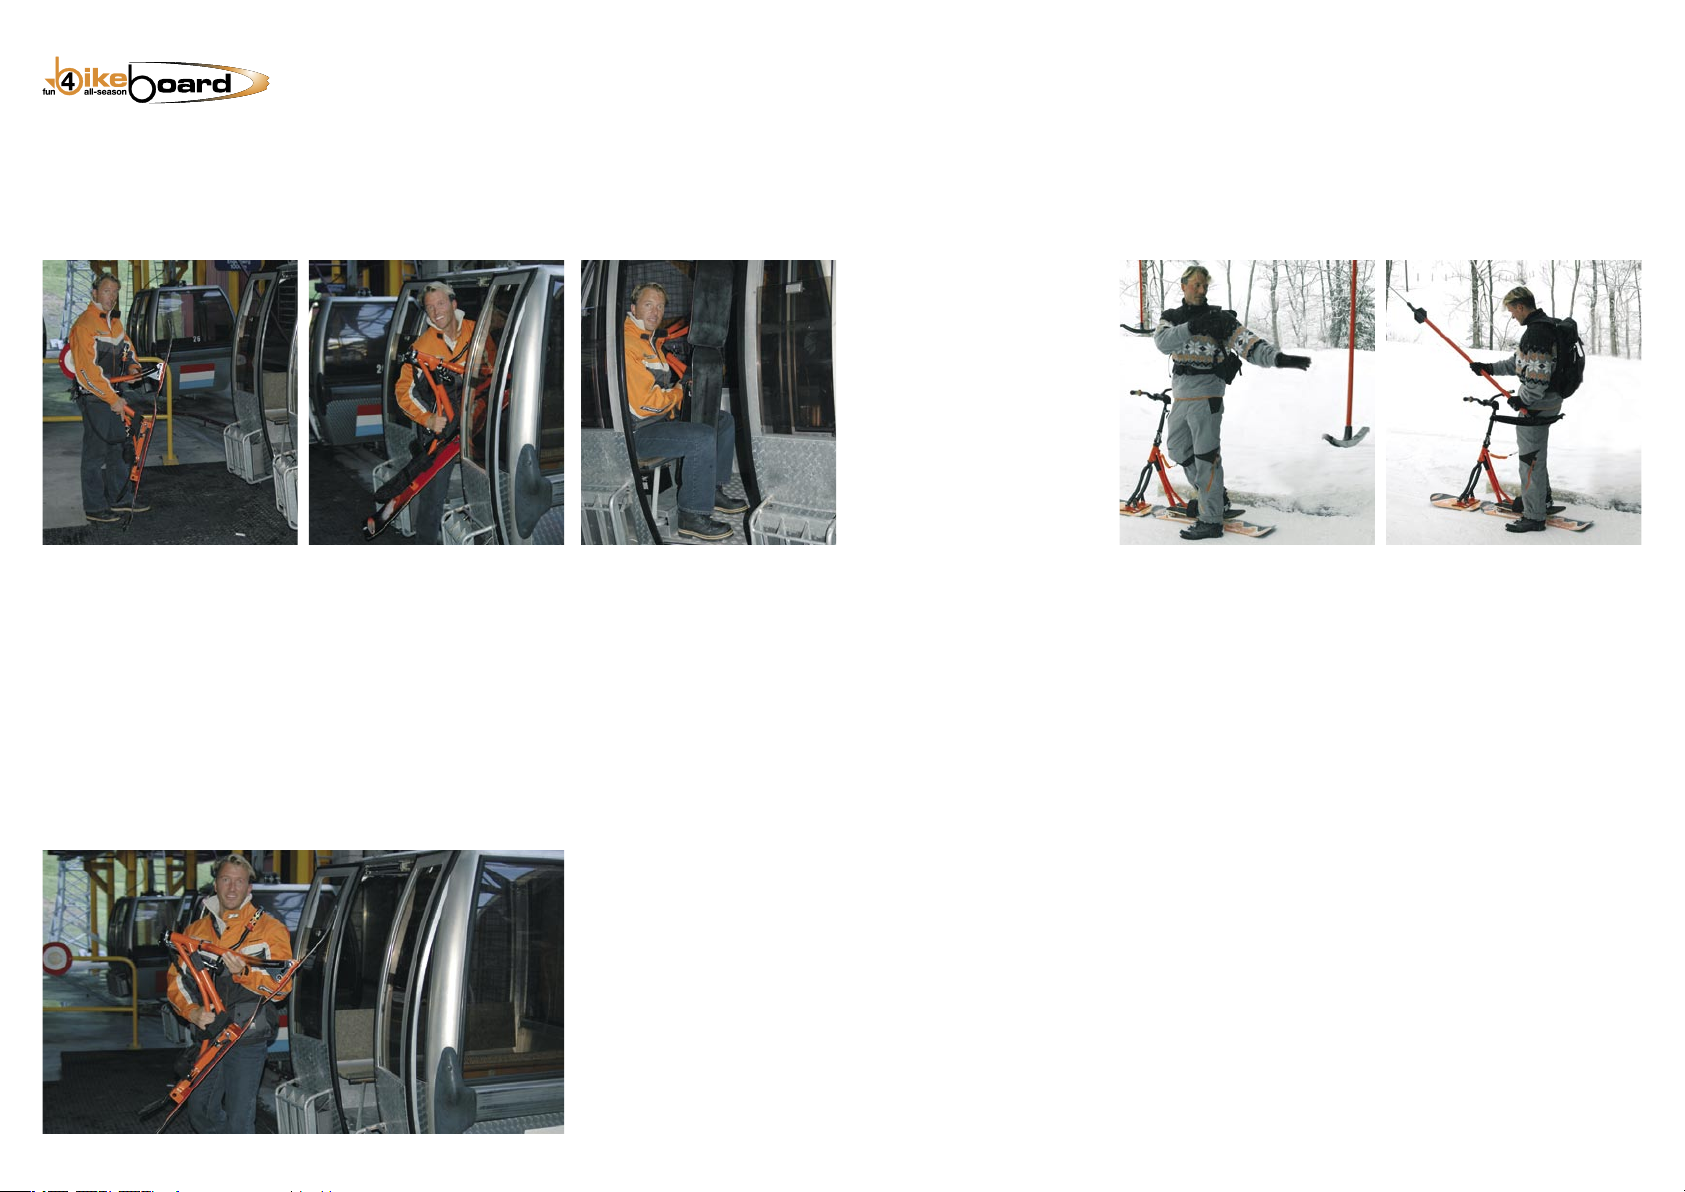
1. Klappen Sie zuerst den Faltlenker
ein und stellen Sie das Bikeboard
auf das hintere Board.
1. Fermer la potence pliable et po-
ser le Bikeboard sur le patin arrière.
1. First, fold up the folding handle-
post and put the Bikeboard on the
rear board.
2. Steigen Sie mit dem Bikeboard
voran in die Gondel ein.
2. Placer le Bikeboard en avant et
rentrer dans la cabine.
2. With the Bikeboard in front of
you, enter the gondola.
3. Setzen Sie sich so hin, dass das
Bikeboard zwischen Ihren Beinen
steht.
3. S‘ asseoir de manière à ce que le
Bikeboard soit entre vos jambes.
3. Sit down with the Bikeboard
between your legs.
4. Verlassen Sie nach dem Erreichen
der Bergstation wiederum die Gon-
del mit dem Bikeboard voran. Nach
dem Aussteigen können Sie den
Lenker wieder hochklappen und das
Gerät zur Abfahrt vorbereiten.
4. A l‘arrivée, sortir de la cabine
avec le Bikeboard en avant. Une
fois sorti relever le guidon et prépa-
rer le Bikeboard pour le départ.
4. After reaching the top station exit
the gondola, again with the Bike-
board in front of you. After leaving
the gondola, you can put up the
handlepost and prepare the gear for
the downhill run.
7.2 Gondel
Cabine
Small Cable Car
1. Stellen Sie das Bikeboard in
die Spur. Der innere Fuss steht am
Boden, der andere Fuss auf der
Standfläche. Ihr Oberkörper ist zum
Bügel ausgedreht. Strecken Sie
beide Arme aus und ergreifen Sie
den Bügel.
1. Placer le Bikeboard en direction
de la montée, le pied arrière au sol
et l‘autre placé sur la plate forme.
Tourner le haut du corps en direction
des Arbalètes et tendres les bras
afin de prendre l‘arbalète.
1. Get the Bikeboard on the lift
track, with the inner foot on the
ground and the other foot on the
standing platform. Turn your upper
body to the t-bar. Stretch out both
arms and grab the t-bar.
2. Führen Sie den Bügel zu Ihrem
Gesäss. Warten Sie einen Augen-
blick, bis Sie den Zug des Bügels
am Gesäss spüren.
2. Amener l‘arbalète son postérieur
et attendre la traction de l‘arbalète.
2. Lead the bar to your bottom. Wait
for a second until you feel the pull of
the t-bar on your bottom.
7.3 Skilift
Arbalètes
Ski Lift
Bikeboard/Snow-Manual, DFE-1/2006

19Bikeboard/Snow-Manual, DFE-1/2006
3. Gehen Sie mit beiden Händen
gleichzeitig zum Lenker. Stellen Sie
den inneren Fuss auf die Standflä-
che. Der Bügel verläuft zwischen
Arm und Oberkörper hindurch.
3. Positionner les deux mains en
même temps sur le guidon et mettre
le pied arrière sur la plate forme.
L‘arbalète se trouve entre les bras et
le haut du corps.
3. Move both hands simultaneously
to the handlebar. Put the inner foot
on the standing platform. The rod
of the t-bar connecting to the cable
runs between your arm and your
hip.
4. Stehen Sie aufrecht...
4. Se tenir droit...
4. Stand upright...
5. Und blicken Sie stets geradeaus.
5. Regarder toujours tout droit.
5. And always look straight ahead.
6. Das Bikeboard kann durch den
Einsatz des Lenkers gut in der Spur
gehalten werden.
6. Le Bikeboard peut être maintenu
dans la trace par simple mouvement
du guidon.
6. Using the handlebar, it is easy to
keep the Bikeboard on the track.
7. Auch steile Skilift-Passagen können Sie mit dem Bikeboard bewältigen.
Wichtig dabei ist, dass Sie den Oberkörper nicht nach vorne neigen.
7. Les passages abruptes sont aussi maîtrisés facilement, l‘important est de
ne pas se pencher vers l‘avant.
7. With the Bikeboard, you can even manage steep inclines. The important
thing is not to bend your upper body forward.
8. Erreichen Sie das Ende des Skillifts, geben Sie den Bügel mit der
inneren Hand seitlich ab. Das sollte eine kurze und rasche Bewegung sein.
Verlassen Sie nach dem Abbügeln zügig das Skiliftgelände, um nachfol-
gende Personen nicht zu behindern.
8. A l‘arrivée du téléski enlever l‘arbalète en la poussant sur le côté. Ce
mouvement doit être court et rapide. Ensuite quitter rapidement l‘aire
d‘arrivée afin de ne pas gêner les autres participants.
8. Having reached the end of the ski lift, with your inner hand, you push
the t-bar off to the side. It should be a short and swift movement. After
letting go of the t-bar, quickly leave the ski lift area in order not to get in
the way of the persons getting off behind you.

20 Bikeboard/Snow-Manual, DFE-1/2006
Nach dem Gebrauch können Sie das Bikeboard/Snow in umgekehrter
Reihenfolge, wie Sie den Zusammenbau ausgeführt haben, für den
Rücktransport vorbereiten. Beachten Sie dabei bitte die folgenden
Punkte:
• Den Lenker müssen Sie nicht mehr komplett demontieren. Öffnen
Sie lediglich den Schnellspanner und ziehen Sie den Lenker gerade
heraus.
• Verstauen Sie die Teile nur in trockenem Zustand in der Transportta-
sche.
• Transportieren Sie das Bikeboard/Snow immer im Auto und nie auf
dem Autodach.
8.
Nach dem Gebrauch
Après l‘utilisation, démonter le Bikeboard dans l‘ordre inverse que celui du
montage. Les points suivants sont à noter:
• Le guidon n‘est plus à démonter complètement. Ouvrir le serrage
rapide de la potence pliable et retirer le guidon.
• Entreposer les pièces dans le sac de transport seulement une fois
sèche.
• Transporter le Bikeboard/ Snow toujours dans la voiture et jamais sur
le toit.
8.
Après l‘utilisation
After use, you can prepare the Bikeboard/Snow for the return transport, in
the inverted order that you assembled it. Please observe the following
points:
• You don’t have to completely disassemble the handlepost. Just open
the quick release and pull out the handlebar straight.
• Store the parts in the bag only in dry condition.
• Always transport the Bikeboard/Snow inside of the car and never on
the roof.
8.
After Use
Table of contents


