BILTON AIR PLUS User manual
101052020. Subject to errors and printing mistakes / Irrtümer und Druckfehler vorbehalten.
Handle
with Care
Instructions BILTON AIR PLUS
Anleitung BILTON AIR PLUS
Instructions BILTON AIR PLUS
Instruzione BILTON AIR PLUS
EN
DE
FR
IT

201052020. Subject to errors and printing mistakes / Irrtümer und Druckfehler vorbehalten.
INSTRUCTION LED MODULES
TOOLS YOU NEED ............................................................................. 3
DO NOT: BILTON AIR PLUS ................................................................ 4
PREPARING BILTON AIR PLUS............................................................. 5
USE CUTTING DEVICE ........................................................................ 6
FASTEN END CAP .............................................................................. 7
FUNCTIONS TEST.............................................................................. 8
MOUNTING BILTON AIR PLUS TOP...................................................... 9
DISTANCE BILTON AIR PLUS CLIPS ..................................................... 10
STRAIGHT MOUNTING....................................................................... 10
MOUNTING POSSIBILITIES.................................................................. 10
EN SAFETY INSTRUCTIONS ............................................................... 12
EN CLEANING INSTRUCTIONS ......................................................... 12
ZU VERWENDENDES WERKZEUG......................................................... 3
DO NOT: BILTON AIR PLUS ................................................................ 4
BILTON AIR PLUS VORBEREITEN ......................................................... 5
SCHNEIDEVORRICHTUNG VERWENDEN............................................... 6
ENDKAPPE BEFESTIGEN ..................................................................... 7
FUNKTIONSTEST............................................................................... 8
MONTAGE BILTON AIR PLUS TOP........................................................ 9
ABSTAND BILTON AIR PLUS CLIPS....................................................... 10
STRAIGHT MOUNTING....................................................................... 10
MONTAGEMÖGLICHKEITEN................................................................ 10
DE SICHERHEITSHINWEISE ................................................................. 13
DE REINIGUNGSHINWEISE ................................................................. 13
FR CONSIGNES DE SÉCURITÉ.............................................................. 14
FR CONSIGNES DE NETTOYAGE ....................................................... 14
IT INDICAZIONI DI SICUREZZA............................................................ 15
IT ISTRUZIONI PER LA PULIZIA ......................................................... 15
INHALT
CONTENTS
INSTRUCTION BILTON AIR
301052020. Subject to errors and printing mistakes / Irrtümer und Druckfehler vorbehalten.
IP67IP67
A
B
C
D
E
F
EN DE FR IT
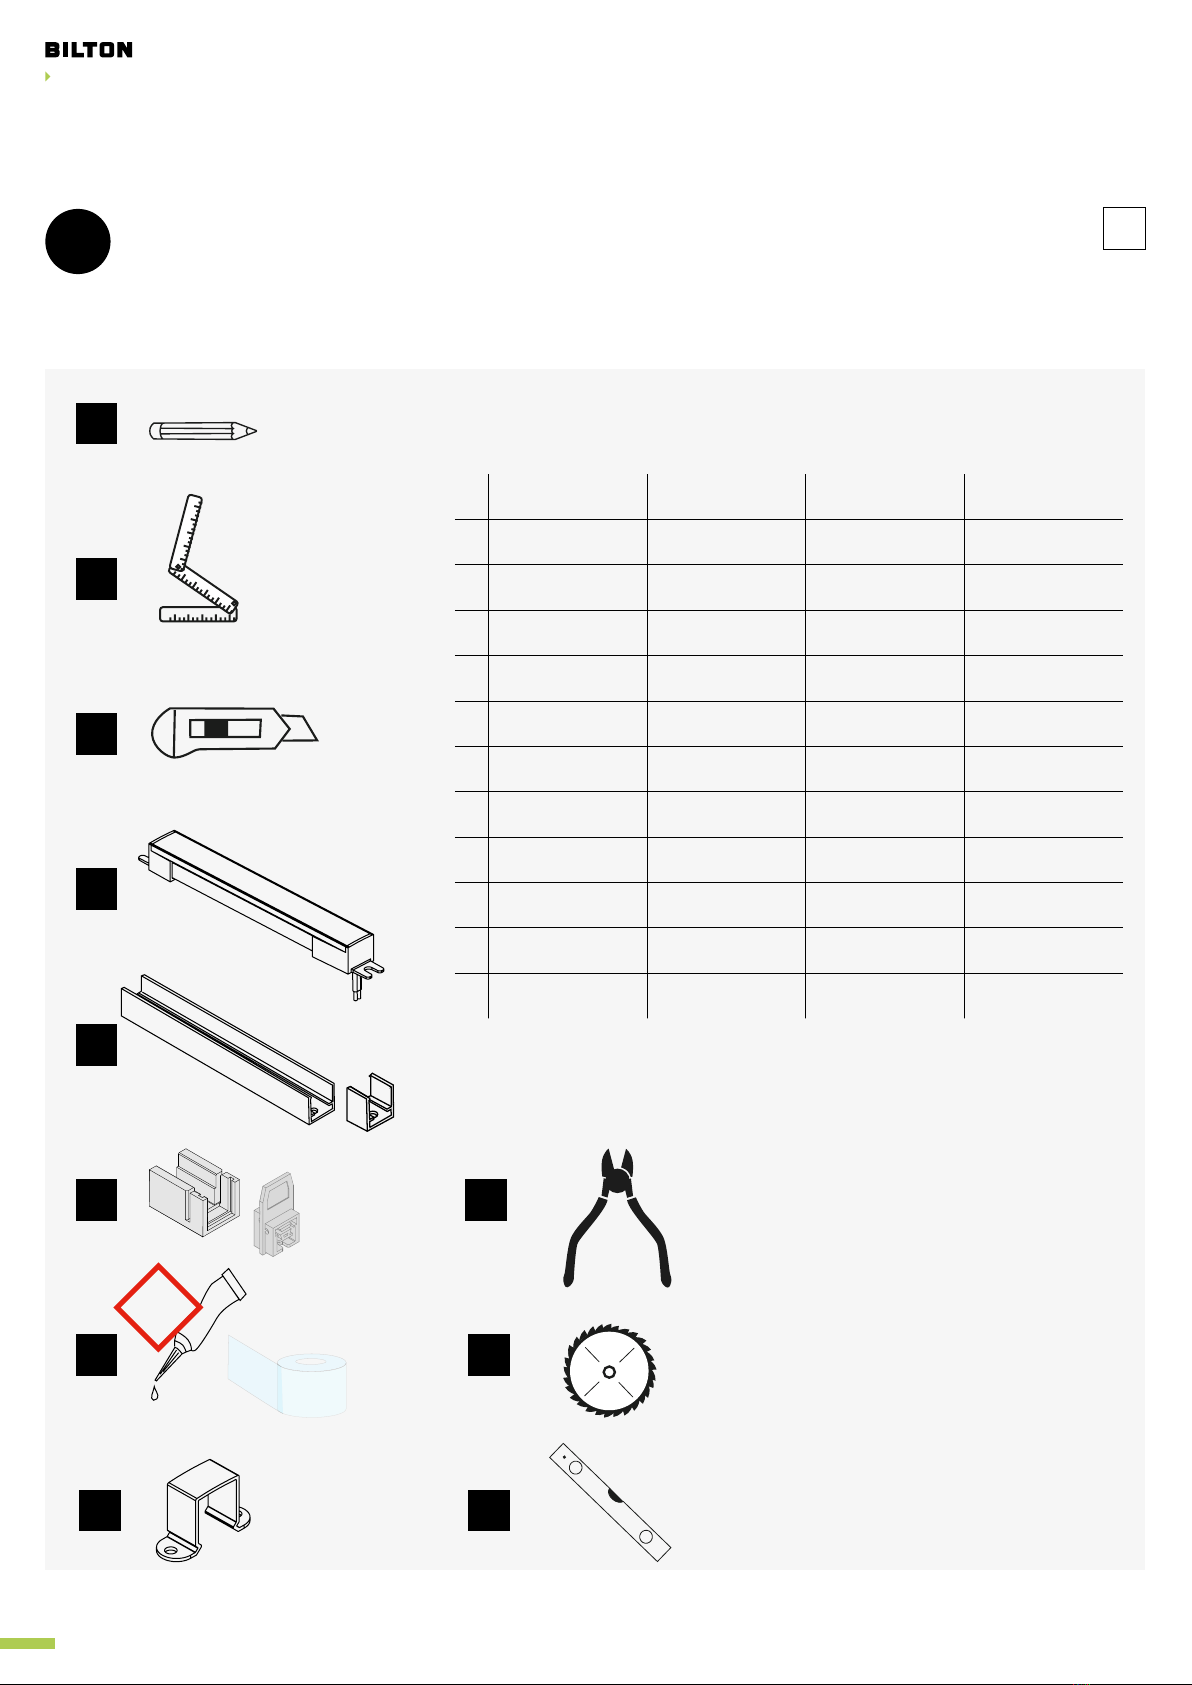
APen Stift Goupille perno
BRuler Lineal Linéaire Righello
CCutter / scissors Cutter Coupeur Fresa
DBILTON AIR PLUS BILTON AIR PLUS BILTON AIR PLUS BILTON AIR PLUS
EMounting material Montagematerial Matériel de mon-
tage
Materiale di mon-
taggio
FCutting device Schneidevorrich-
tung Dispositif de coupe Dispositivo di taglio
GGlue & adhesive
tape Kleber & Tixo Colle et tixo Colla e Tixo
HSafety bracket Sicherheitsbügel Barre de sécurité Barra di sicurezza
IPliers Zange Pinces Tenaglie
JCircular saw Kreissäge scie circulaire Sega circolare
KBubble level Wasserwaage Niveau à bulle Livella a bolla
G
H
I
J
K
!
ZU VERWENDENDES WERKZEUG
TOOLS YOU NEED

INSTRUCTION BILTON AIR
401052020. Subject to errors and printing mistakes / Irrtümer und Druckfehler vorbehalten.
IP67
R<10 cm
IP67
EN Do not twist Bend radius >10 cm Do not subject to mechanical
loads Do not pull
DE Nicht eindrehen Biegeradius >10 cm Nicht mechanisch belasten Nicht ziehen
FR Ne pas visser Raggio di curvatura> 10 cm Ne pas charger mécanique-
ment Ne tire pas
IT Non avvitare Rayon de courbure> 10 cm Non caricare meccanicamente Non tirare
+++
A
+++
+++
A
+++
EN Do not screw into the
silicone
Do not allow to sag LED chip cannot be cut through
DE Silikon nicht anschrauben Nicht durchhängen lassen LED-Chip kann nicht durchgeschnitten werden
FR Ne pas visser de silicone Ne s’affaisse pas La puce LED ne peut pas être coupée
IT Non avvitare il silicone Non cedere Il chip LED non può essere tagliato
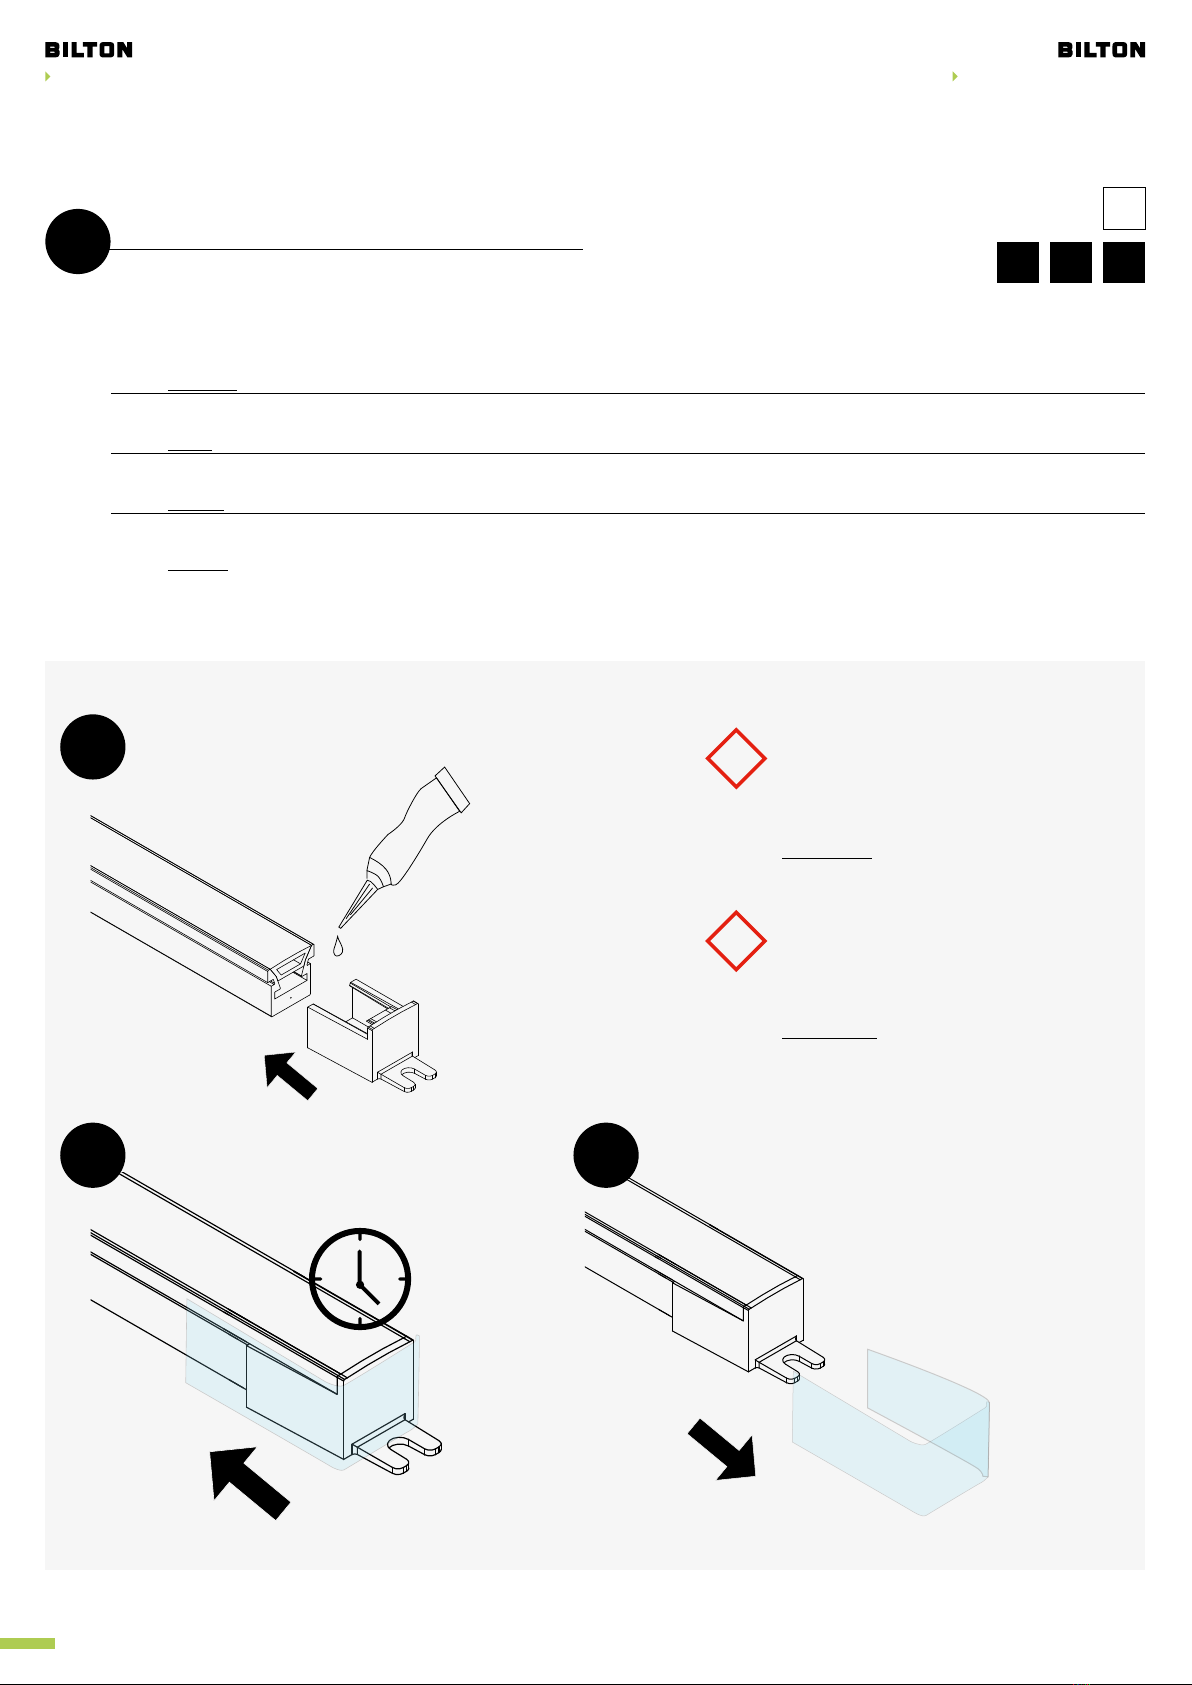
DO NOT: BILTON AIR PLUS
DO NOT: BILTON AIR PLUS

INSTRUCTION BILTON AIR
501052020. Subject to errors and printing mistakes / Irrtümer und Druckfehler vorbehalten.
B C
IP67
EN
1.1 Mark desired length (A) and desired length incl. 10 cm. Cut A + 10 cm with a side cutter.
1.2 Cut the silicone horizontally (about 6 cm) and vertically (up to the LED module) using a cutter.
1.3 LED module now visible.
1.4 Use the LED module template to check the positioning of the LEDs and if necessary add or remove 5 mm. Mark cutting mark.
DE
1.1 Wunschlänge (A) markieren und Wunschlänge inkl. 10 cm markieren. A + 10 cm mittels Seitenschneider durchtrennen.
1.2 Mittels Cutter horizontal (ca 6 cm) und vertikal (bis zum LED-Modul) Silikon durchschneiden.
1.3 LED-Modul freilegen.
1.4 LED-Modul-Schablone verwenden, um die Positionierung der LEDs zu kontrollieren und ggf. 5 mm hinzu- oder wegnehm en.
Schnittmarke markieren.
FR
1.1 Marquez la longueur souhaitée (A) et marquez la longueur souhaitée, y compris 10 cm. Couper A+ 10 cm avec un cutter.
1.2 Coupez le silicone horizontalement (environ 6 cm) et verticalement (jusqu’au module DEL) à l’aide d’un cutter.
1.3 Exposer le module LED.
1.4 Utiliser le modèle de module LED pour vérifier le positionnement des LED et éventuellement ajouter ou supprimer 5 mm. Marque de coupe.
IT
1.1 Contrassegnare la lunghezza desiderata (A) e segnare la lunghezza desiderata, inclusa 10 cm. Tagliare A+ 10 cm con un tag-
lierino laterale.
1.2 Tagliare il silicone orizzontalmente (circa 6 cm) e verticalmente (fino al modulo LED) usando un cutter.
1.3 Esporre il modulo LED.
1.4 Utilizzare il modello di modulo LED per verificare il posizionamento dei LED e, se necessario, aggiungere o rimuovere 5 mm.
Segna il segno di taglio.
A
A + 10 cm
A
A
6 cm
1.
2.
+++
A
+++
- 5 mm
+ 5 mm
1.2 1.3
1.4
+++
A
+++
+++
A
+++
A D
1.1
1BILTON AIR PLUS VORBEREITEN
PREPARING BILTON AIR PLUS

INSTRUCTION BILTON AIR
601052020. Subject to errors and printing mistakes / Irrtümer und Druckfehler vorbehalten.
A
A + 5 mm
A
2
A
2.22.1
2.3
+++
A
+++
EN
2.1. Clamp the silicone band in the cutting device and cut to marked length (incl. 5 mm) with a cutter.
2.2. Position the cut device and BILTON AIR PLUS (select desired side at cutting gauge)
2.3. Cut BILTON AIR PLUS to the desired length
DE
2.1. Silikonband in Schneidevorrichtung einklemmen und bei der Markierung (inkl. 5 mm ) grob mittels Cutter ablängen.
2.2. Schneidelehre und BILTON AIR PLUS positionieren (gewünschte Seite bei Schneidelehre wählen)
2.3. BILTON AIR PLUS auf die gewünschte Länge zuschneiden
FR
2.1. Serrer la bande de silicone dans le dispositif de coupe et la couper grossièrement avec le marquage (y compris 5 mm) à l’aide
d’un cutter.
2.2. Positionnez le gabarit et le BILTON AIR PLUS (sélectionnez la page souhaitée pour le gabarit)
2.3. Couper BILTON AIR PLUS Air à la longueur souhaitée
IT
2.1. Bloccare la fascetta in silicone nel dispositivo di taglio e tagliarla a misura con la marcatura (incl. 5 mm) con una fresa.
2.2. Posizionare la maschera e il BILTON AIR PLUS (selezionare la pagina desiderata per la maschera)
2.3. Tagliare BILTON AIR PLUS alla lunghezza desiderata
C F
IP67
D
BILTON
AIR TOP
!
SCHNEIDEVORRICHTUNG VERWENDEN
USE CUTTING DEVICE
INSTRUCTION BILTON AIR
701052020. Subject to errors and printing mistakes / Irrtümer und Druckfehler vorbehalten.
INSTRUCTION BILTON AIR
3
3.3
3.1
3.2
24 hrs.
E
IP67
EN
3.1. Attach end caps with enough glue // 3.2. Fix the end cap with adhesive tape and allow to dry for 24 hours
3.3. Then remove the adhesive tape again
Adhesive: :Observe instructions for use and personal protective equipment!
DE
3.1. Endkappen mit genug Kleber anbringen // 3.2. Endkappe mittels Klebenband befestigen und 24 Stunden trocknen lassen
3.3. Danach Klebeband wieder entfernen
Kleber: Verarbeitungshinweise sowie persönliche Schutzausrüstung beachten!
FR
3.1. Fixez les embouts avec suffisamment de colle // 3.2. Fixez le capuchon avec du ruban adhésif et laissez sécher pendant 24 heu-
res. // 3.3. Puis retirez à nouveau la bande
Adhésif:Respectez les instructions d‘utilisation et l‘équipement de protection individuelle!
IT
3.1. Fissare i cappucci terminali con una quantità sufficiente di colla // 3.2. Attaccare il cappuccio terminale con del nastro adesivo e
lasciare asciugare per 24 ore // 3.3. Quindi rimuovere nuovamente il nastro
Adesivo: Osservare le istruzioni per l‘uso e l‘equipaggiamento di protezione personale!
D G
H319 Causes serious eye irritation.
H317 May cause an allergic skin reaction.
P280 Wear protective gloves / eye protection.
P302+P352 IF ON SKIN: Wash with plenty of soap and water.
P305+P351+P338 IF IN EYES: Rinse cautiously with water for
several minutes. Remove contact lenses, if present and easy
to do. Continue rinsing.
P501 Dispose of contents/container in accordance with local/
regional/national/international regulations.
Product contains:N-[3-(triethoxysilyl)propyl]ethylenediamine
!
Find more information at the end of the document
H319 Verursacht schwere Augenreizung.
H317 Kann allergische Hautreaktionen verursachen.
P280 Schutzhandschuhe / Augenschutz tragen.
P302+P352 BEI BERÜHRUNG MIT DER HAUT: Mit viel Wasser
und Seife waschen.
P305+P351+P338 BEI KONTAKT MIT DEN AUGEN: Einige
Minuten lang behutsam mit Wasser spülen. Eventuell vor-
handene Kontaktlinsen nach Möglichkeit entfernen. Weiter
spülen.
P501 Entsorgung des Inhalts / des Behälters gemäß den ört-
lichen / regionalen / nationalen/ internationalen Vorschriften.
Produkt enthält: N-(3-(Triethoxysilyl)propyl)ethylendiamin
!
Mehr Informationen finden Sie am Ende des Dokumentes.
ENDKAPPEN BEFESTIGEN
FASTEN END CAP

801052020. Subject to errors and printing mistakes / Irrtümer und Druckfehler vorbehalten.
D
IP67
INSTRUCTION BILTON AIR
4
Lengt > 2 Meter = 2 Menpower
EN The BILTON AIR PLUS should be installed with long cable lengths of at least two people to prevent the product from
being pulled or sagged.
DE Der BILTON AIR PLUS sollte bei langen Leitungslängen von mindestens zwei Personen montiert werden, um ein
Ziehen oder Durchhängen des Produktes zuverhindern.
FR Le BILTON AIR PLUS doit être installé avec des câbles longs d’au moins deux personnes pour éviter que le produit ne
soit tiré ou affaissé.
IT BILTON AIR PLUS deve essere installato con cavi lunghi di almeno due persone per impedire che il prodotto venga
tirato o abbassato.
ESD
FUNKTIONSTEST
FUNCTIONS TEST
4.1 4.2
INSTRUCTION BILTON AIR
901052020. Subject to errors and printing mistakes / Irrtümer und Druckfehler vorbehalten.
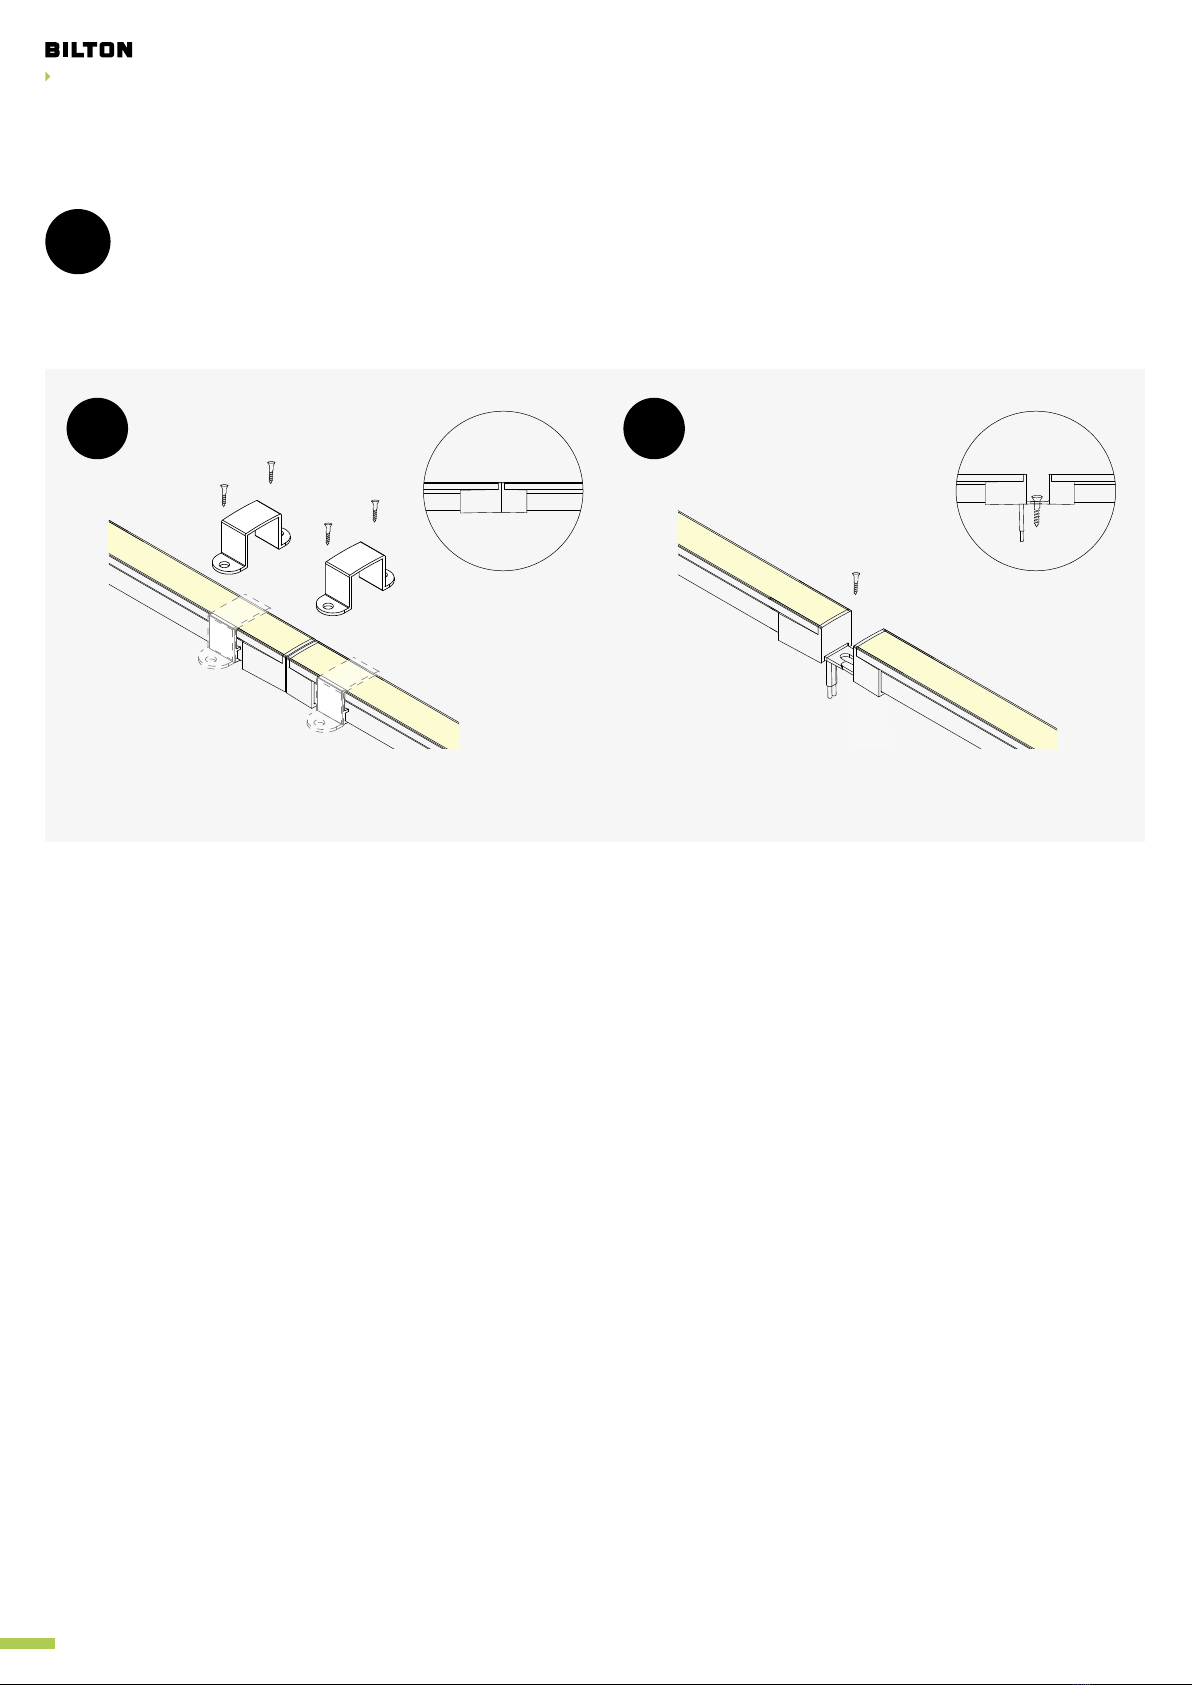
BILTON AIR PLUS TOP
CABLE OUTLET
UNDERNEATH
T.1 T.2
20 cm
J
IP67
E KD H
V1 V2
PROFILE or CLIP SAFETY CLIP MULTI with profile
BILTON AIR PLUS TOP
+ 170885 / 171043 BILTON AIR PLUS TOP
+ 170885 + 170918
V1 V2
TOP MONTAGE BILTON AIR PLUS TOP
MOUNTING BILTON AIR PLUS TOP

INSTRUCTION BILTON AIR
10 01052020. Subject to errors and printing mistakes / Irrtümer und Druckfehler vorbehalten.
TOP E H
IP67
B D
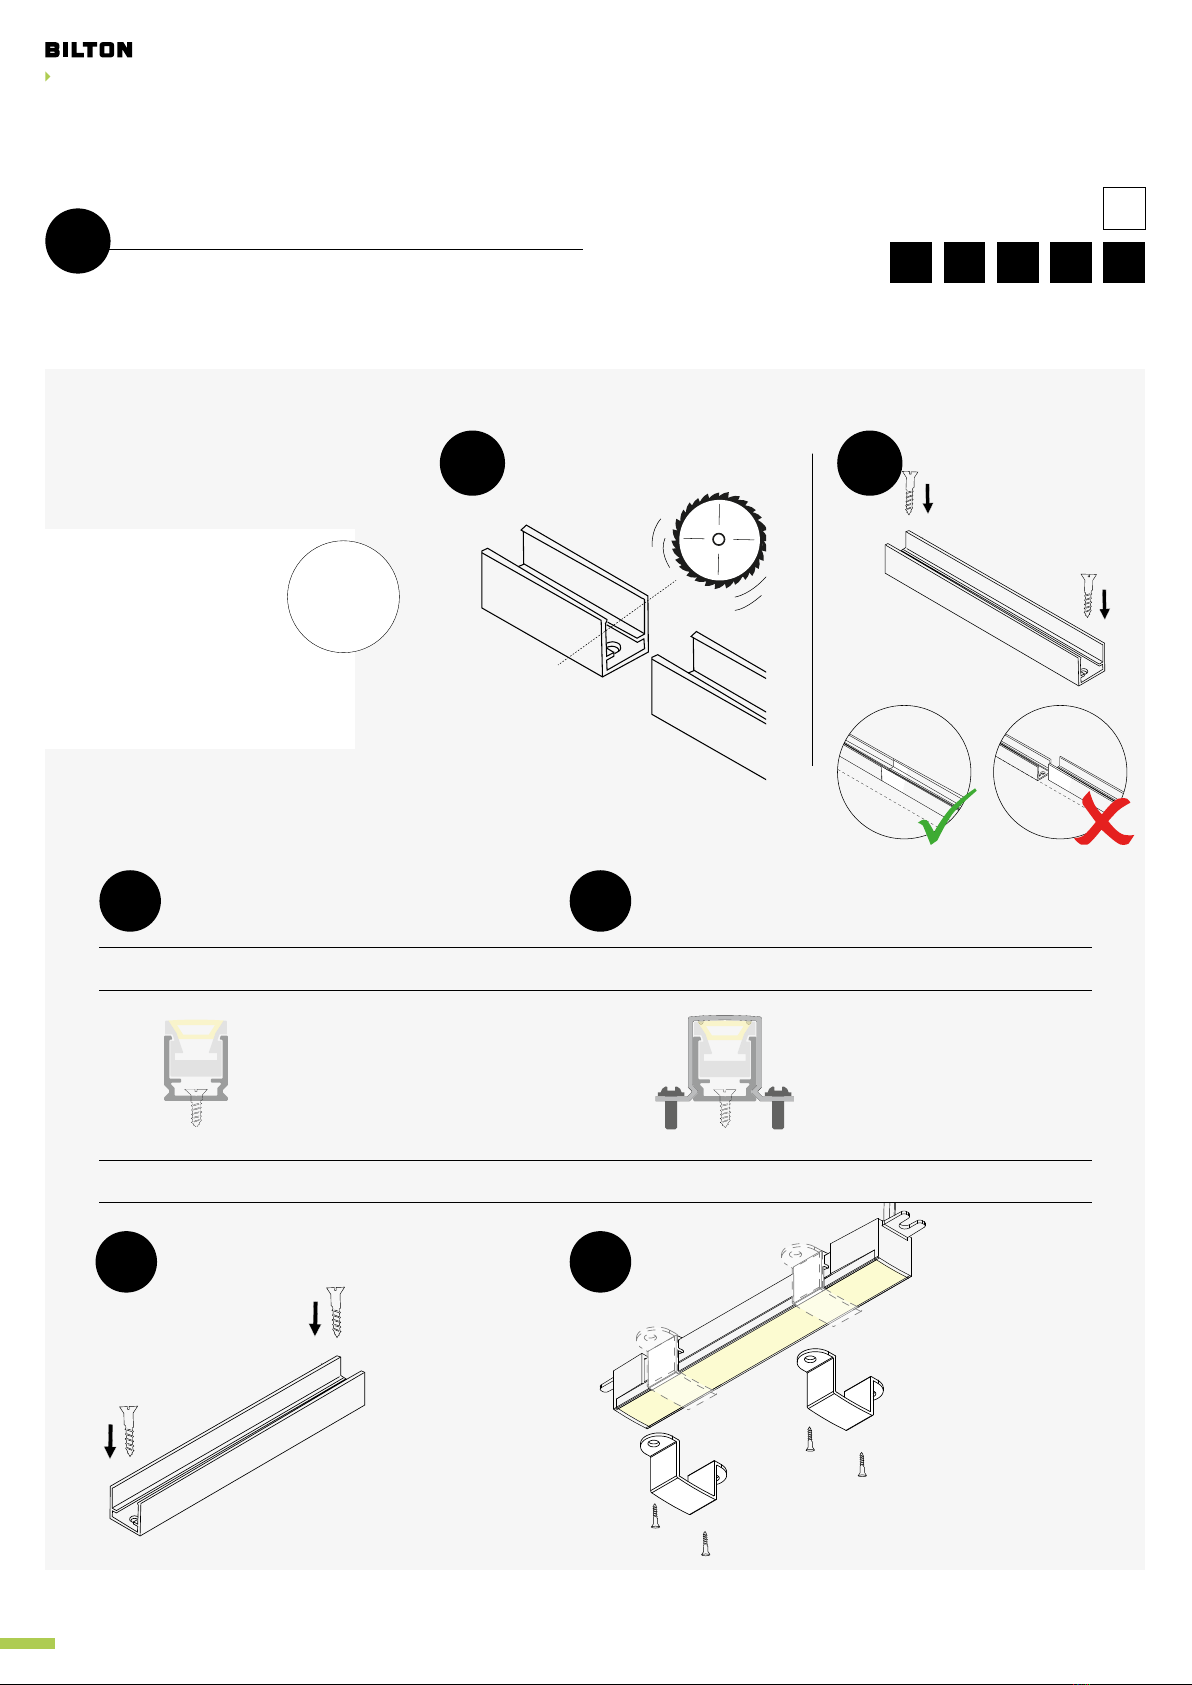
STRAIGHT MOUNTING
R > 10cm
V1
V3
V2
20 cm
20 cm
R<10 cm
20 = Distance clip cm
ABSTAND BILTON AIR PLUS CLIPS
MONTAGEMÖGLICHKEITEN
DISTANCE BILTON AIR PLUS CLIPS
MOUNTING POSSIBILITIES
TOP
20cm
R > 10cm
!
INSTRUCTION BILTON AIR
11 01052020. Subject to errors and printing mistakes / Irrtümer und Druckfehler vorbehalten.
TOP
V4 V5
MONTAGEMÖGLICHKEITEN
MOUNTING POSSIBILITIES
DISCLAIMER
The technical data in these op-
erating instructions are accurate
at the time of printing and have
been compiled to the best of our
knowledge. Nevertheless, the in-
formation is subject to errors and
printing mistakes. The information
serves a more detailed descrip-
tion of the articles, but does not
constitute warranted properties
pursuant to ABGB (Austrian Civil
Code), unless they are expressly
identified as such. Make sure that
you always use the latest version
of the operating instructions. The
latest operating instructions as
well as the system warranty and
the ABGB can be found on the
website: www.biltongroup.com.
INSTRUCTION BILTON AIR
12 01052020. Subject to errors and printing mistakes / Irrtümer und Druckfehler vorbehalten.
DISCLAIMER
The technical data in these op-
erating instructions are accurate
at the time of printing and have
been compiled to the best of our
knowledge. Nevertheless, the in-
formation is subject to errors and
printing mistakes. The information
serves a more detailed descrip-
tion of the articles, but does not
constitute warranted properties
pursuant to ABGB (Austrian Civil
Code), unless they are expressly
identified as such. Make sure that
you always use the latest version
of the operating instructions. The
latest operating instructions as
well as the system warranty and
the ABGB can be found on the
website: www.biltongroup.com.
EN SAFETY INSTRUCTIONS
!LED modules are an electronic product and must thus be handled with care.
GENERAL INFORMATION:
// Read the operating and assembly instructions carefully and completely before commissioning.
// Profiles including modules and power supply units may only be installed by a certified electrician in compliance
with all applicable regulations and standards.
MECHANICAL:
// There must be no mechanical stress on the silicone jacket.
// The LED module must not be operated for more than 5 seconds when rolled up.
// The coefficient of thermal expansion is 100 – 300 x 10^-6 K
// With combinations of profiles & mounting clips, care must be taken that no tensile, shear or compressive
forces occur.
// Carefully press in the profile. The internal LED module must not be subjected to any mechanical load.
// Check end caps for damage before installation.
// The silicone alone must not be mounted on the substrate. The corresponding BILTON mounting material
must be used.
ELECTRICAL:
// The silicone jacket must not be damaged or interrupted during assembly.
// The following protective measures must also be ensured: short-circuit and overload protection, SELV equiv-
alent.
// Pay attention to the correct polarity during commissioning.
// Observe the maximum module lengths.
// Before connecting the LED modules, observe the maximum power of the power supply available to you.
// Avoid electrostatic discharges.
// Not suitable for installation under water.
PHOTOMETRIC:
// Check the function and colour consistency of the goods before installation! Malfunctions and deviations from
the binning must be reported before installation.
EN CLEANING INSTRUCTIONS
Spread water and detergent on a cotton cloth and use to clean the silicone. Silicone is resistant to cleaning agents (based on alkali-
ne solutions) with short-term contact.

INSTRUCTION BILTON AIR
13 01052020. Subject to errors and printing mistakes / Irrtümer und Druckfehler vorbehalten.
DISCLAIMER
The technical data in these op-
erating instructions are accurate
at the time of printing and have
been compiled to the best of our
knowledge. Nevertheless, the in-
formation is subject to errors and
printing mistakes. The information
serves a more detailed descrip-
tion of the articles, but does not
constitute warranted properties
pursuant to ABGB (Austrian Civil
Code), unless they are expressly
identified as such. Make sure that
you always use the latest version
of the operating instructions. The
latest operating instructions as
well as the system warranty and
the ABGB can be found on the
website: www.biltongroup.com.
HAFTUNGSAUSCHLUSS
Die technischen Angaben in dieser
Handhabungsvorschrift entspre-
chen dem Stand bei Drucklegung
und sind nach bestem Wissen
ermittelt worden. Dennoch be-
halten wir uns Irrtümer und Druck-
fehler vor. Die Angaben dienen der
näheren Artikel- beschreibung,
sind jedoch keine zugesicherten Ei-
genschaften nach ABGB, wenn sie
nicht ausdrücklich als solche bez-
eichnet werden. Vergewissern Sie
sich, dass Sie immer den neuesten
Stand der Handhabungsvorschrift
verwenden.
Das Gerät ist wartungsfrei.
Schäden durch Transport etc.
sind unmittelbar dem Hersteller
zu melden. Bei eigenständigen
Re- paraturen oder durch Öffnen
des Gerätes erlischt der Garan-
tieanspruch. Die Garantie gilt
nur bei nachweislich korrekter
Montage. Ein- und Ausbauarbe-
iten sind von der Haftung ausge-
schlossen. Die Gewährleistung
ist im Rahmen der gesetzlichen
Bestimmungen geregelt. Weitere
Informationen erhalten Sie unter
www.biltongroup.com
DE SICHERHEITSHINWEISE
!LED-Module sind ein Elektronikprodukt und müssen daher mit Sorgfalt behandelt werden.
ALLGEMEIN:
/
/ Lesen Sie vor Inbetriebnahme die Betriebs- und Montageanleitung sorgsam und vollständig durch.
// Die Installation von Profilen inkl. Modulen und Netzteilen darf nur unter Beachtung aller gültigen Vorschriften
und Normen durch eine zugelassene Elektrofachkraft erfolgen.
MECHANISCH:
// Es darf keine mechanische Belastung des Silikonmantels erfolgen.
// Das LED-Modul darf max. 5 Sekunden im aufgerollten Zustand betrieben werden.
// Der Wärmeausdehnungskoeffizient beträgt 100 – 300 x 10^-6 K
// Bei Kombinationen von Profilen & Montageclips ist darauf zu achten, dass keine Zug-, Scher- oder Druckkräf-
te auftreten
// Vorsichtig das Profil eindrücken. Das innenliegende LED-Modul darf nicht mechanisch belastet werden.
// Endkappen vor Einbau auf Beschädigung prüfen.
// Das Silikon allein darf nicht auf dem Untergrund montiert werden. Das dazugehörige BILTON Montagemate-
rial muss verwendet werden.
ELEKTRISCH:
// Der Silikonmantel darf durch die Montage nicht beschädigt oder unterbrochen werden.
// Für den Betrieb sind auf das LED-Modul abgestimmte Netzteile zu verwenden, außerdem sind folgende
Schutzmaßnahmen zu gewährleisten: Kurzschluss- und Überlastschutz, SELV equivalent.
// Achten Sie bei der Inbetriebnahme auf die korrekte Polung.
// Beachten Sie die max. Modullängen.
// Beachten Sie vor Anschluss der LED-Module die max. Leistung der Ihnen zur Verfügung stehenden Stromver-
sorgung.
// Vermeiden Sie elektrostatische Entladungen.
// Nicht für den Einbau unter Wasser geeignet.
FOTOMETRISCH:
// Vor Einbau die Ware auf Funktion und Farbkonsistenz prüfen! Fehlfunktionen und Abweichungen vom Bin-
ning sind vor Montage bekannt zu geben.
DE REINIGUNGSHINWEISE
Wasser und Spülmittel auf einem Baumwolllappen verteilen und das Silikon damit reinigen. Gegen Reinigungsmittel (auf Laugen-
basis) mit kurzzeitigem Kontakt ist Silikon beständig.

DISCLAIMER
The technical data in these op-
erating instructions are accurate
at the time of printing and have
been compiled to the best of our
knowledge. Nevertheless, the in-
formation is subject to errors and
printing mistakes. The information
serves a more detailed descrip-
tion of the articles, but does not
constitute warranted properties
pursuant to ABGB (Austrian Civil
Code), unless they are expressly
identified as such. Make sure that
you always use the latest version
of the operating instructions. The
latest operating instructions as
well as the system warranty and
the ABGB can be found on the
website: www.biltongroup.com.
INSTRUCTION BILTON AIR
14 01052020. Subject to errors and printing mistakes / Irrtümer und Druckfehler vorbehalten.
EXCLUSION DE RESPONSABILITÉ
Les informations techniques de
cette directive d‘utilisation sont
conformes à l‘état de l‘impres-
sion et sont transmises en toute
bonne foi. Cependant, nous nous
réservons le droit de faire des er-
reurs, notamment des erreurs
d‘impression. Les informations
servent à décrire en détails les ar-
ticles. Il ne s‘agit cependant pas
de promesses de propriétés se-
lon ABGB lorsqu‘elles ne sont pas
désignées expressément en tant
que telles. Assurez-vous de tou-
jours utiliser l‘état actuel de la di-
rective d‘utilisation .
Cet appareil ne nécessite pas
de maintenance. Les avaries de
transport etc. doivent être im-
médiatement signalées au fab-
ri- cant. En cas de réparations
autonomes ou par l‘ouverture de
l‘ap- pareil, la garantie est déchue.
La garantie est uniquement appli-
cable dans le cadre d‘un montage
correct prouvé. Les travaux de
montage et de démontage sont
exclus de la garantie. La garantie
est réglée dans le cadre des dispo-
sitions légales. Vous trouverez des
informations supplémentaires à
l‘adresse suivante :
www.biltongroup.com
FR CONSIGNES DE SÉCURITÉ
!Les modules LED sont des produits électroniques et doivent donc être manipulés avec précaution.
GÉNÉRAL :
// Lire attentivement et complètement la notice de montage et d‘utilisation avant la mise en service.
// L‘installation des profilés, y compris les modules et les blocs d‘alimentation, ne doit être effectuée que par un
électricien agréé, conformément à toutes les réglementations et normes en vigueur.
MÉCANIQUE :
// Il ne doit y avoir aucune contrainte mécanique sur l‘enveloppe en silicone.
// Le module LED peut être utilisé pendant un maximum de 5 secondes lorsqu‘il est enroulé.
// Le coefficient de dilatation thermique est de 100 – 300 x 10^-6 K
// En cas de combinaison de profilés et de clips de fixation, il faut veiller à ce qu‘aucune force de traction, de
cisaillement ou de compression ne se produise.
// Appuyez avec précaution sur le profilé. Le module LED interne ne doit être soumis à aucune charge méca-
nique.
// Vérifier que les capuchons d‘extrémité ne sont pas endommagés avant l‘installation.
// Le silicone seul ne doit pas être monté sur le support. Le matériel de montage BILTON correspondant doit
être utilisé.
ÉLECTRIQUE :
// L‘enveloppe en silicone ne doit pas être endommagée ou interrompue pendant le montage.
// Les mesures de protection suivantes doivent également être prises : protection contre les courts-circuits et
les surcharges, équivalent SELV.
// Respecter la polarité lors de la mise en service.
// Respecter les longueurs maximales des modules.
// Avant de raccorder les modules LED, respectez la puissance maximale de l‘alimentation électrique à votre
disposition.
// Eviter les décharges électrostatiques.
// Ne convient pas pour une installation sous l‘eau.
PHOTOMÉTRIQUE :
// Avant le montage, vérifier le fonctionnement et la couleur de la marchandise.
FR CONSIGNES DE NETTOYAGE
Étendre l‘eau et le détergent sur un chiffon en coton et utiliser pour nettoyer le silicone. Le silicone résiste aux produits de nettoya-
ge (à base de solutions alcalines) avec contact à court terme.

INSTRUCTION BILTON AIR
15 01052020. Subject to errors and printing mistakes / Irrtümer und Druckfehler vorbehalten.
ESCLUSIONE DI RESPONSABILITÀ
I dati tecnici contenuti nelle pre-
senti istruzioni per l’uso corris-
pon- dono allo stato al momento
della stampa e sono stati rilevati
se- condo scienza e coscienza.
Tuttavia ci riserviamo la possibil-
ità di errori e refusi. Le indicazioni
riportate servono a descrivere l’ar-
ticolo in modo più dettagliato, ma
non rappresentano caratteristiche
ga- rantite come da codice civile
austriaco (ABGB), se non definite
espli- citamente come tali. Accer-
tarsi di utilizzare sempre la ver-
sione più aggiornata delle istruzi-
oni per l’uso.
Il dispositivo non richiede ma-
nutenzione. I danni dovuti al
traspor- to, e simili, devono essere
immediatamente comunicati al
produt- tore. In caso di riparazi-
oni eseguite in autonomia o di
apertura del dispositivo, il dirit-
to alla garanzia decade. La ga-
ranzia vale solo se il montaggio
viene eseguito correttamente e
in modo comprovabile. Si esclude
la responsabilità per le operazio-
ni di montaggio e smontag- gio.
La garanzia è regolata secondo
le disposizioni di legge. Maggiori
informazioni sono disponibili alla
pagina www.biltongroup.com
IT INDICAZIONI DI SICUREZZA
!I moduli LED sono un prodotto elettronico e devono quindi essere maneggiati con cura.
GENERALE:
// Leggere attentamente e completamente le istruzioni per l‘uso e il montaggio prima della messa in funzione.
// L‘installazione dei profili, compresi i moduli e gli alimentatori, può essere eseguita solo da un elettricista cer-
tificato in conformità a tutte le normative e norme vigenti.
MECCANICO:
// Non devono esserci sollecitazioni meccaniche sulla giacca in silicone.
// Il modulo LED può essere azionato per un massimo di 5 secondi quando è arrotolato.
// Il coefficiente di dilatazione termica è di 100 – 300 x 10^-6 K
// In caso di combinazioni di profili e clip di montaggio, occorre fare attenzione a non generare forze di trazione,
di taglio o di compressione.
// Premere con attenzione il profilo. Il modulo LED interno non deve essere sottoposto ad alcun carico mecca-
nico.
// Controllare che i tappi terminali non siano danneggiati prima dell‘installazione.
// Il silicone da solo non deve essere montato sul substrato. Utilizzare il materiale di montaggio BILTON corri-
spondente.
ELETTRICO:
// Il rivestimento in silicone non deve essere danneggiato o interrotto durante il montaggio.
// Devono inoltre essere assicurate le seguenti misure di protezione: protezione da cortocircuito e sovraccari-
co, equivalente SELV.
// Prestare attenzione alla corretta polarità durante la messa in funzione.
// Osservare le lunghezze massime dei moduli.
// Prima di collegare i moduli LED, osservare la potenza massima dell‘alimentatore a vostra disposizione.
// Evitare le scariche elettrostatiche.
// Non adatto per l‘installazione sott‘acqua.
FOTOMETRICA:
// Controllare il funzionamento e la consistenza del colore della merce prima dell‘installazione! Malfunziona-
menti e scostamenti dal binning devono essere segnalati prima dell‘installazione.
IT ISTRUZIONI PER LA PULIZIA
Stendere acqua e detersivo su un panno di cotone e utilizzare per pulire il silicone. Il silicone è resistente ai detergenti (a base di so-
luzioni alcaline) con contatto di breve durata.
This manual suits for next models
14
Table of contents
Popular Light Fixture manuals by other brands


Cooper Lighting
Cooper Lighting ALL-PRO Series specification

Chauvet
Chauvet F-40 user guide

Commercial Electric
Commercial Electric DAWN12-PC-3K-BZ Use and care guide

Cooper Lighting
Cooper Lighting Halo L10230 specification

Quilt Display Products
Quilt Display Products WALL HANGER instructions

Puro
Puro Helo F1 Series user manual