bily BG38 Series User manual

BG38XXXX_IM 3 in 1 Superyard_R1
Please Note: Instructional images may vary
in style from the product you purchased.
English
3 in 1
Superyard
ISSI Inc.
2400A Autoroute Transcanadienne
Pointe-Claire, QC H9R 1B1
1-800-667-4111
T: 514-344-3045
service@issibaby.ca
www.issibaby.ca

(A) Superyard (x1)
(B) Wood screws (x8) (C) Wall mount brackets (x2)
2
Parts List
IMPORTANT!
READ AND FOLLOW THESE INSTRUCTIONS CAREFULLY AND KEEP FOR FUTURE REFERENCE.
Before you begin assembly, please read these instructions. Make sure all pre-assembled
parts are tight. Store this instruction manual in a safe place, for future reference.
If a part is missing or if you have any questions, call us. PLEASE DO NOT return product or
parts to the store where they were purchased before calling us.
Please call us toll free at:
1-800-667-4111
Our service is fast, free and easier than returning the product.
Important: In order to help our customer service representatives better assist you,
we require that you complete the information below before calling:
Model Number:
Date:
Note: The label containing the Model Number and Manufacturer’s Date can be found
under the door.
Important Information:
Ensure the safety barrier is attached to structurally solid surfaces or fixed to the wall
with appropriate wall mounts for drywall, wood, brick etc. If you are unable to secure
to the wall satisfactorily, please consult with a hardware store for adequate fittings or
anchors. Please check the playard on a regular basis to ensure gate and parts are all in
proper working order.
Need assistance? Call our toll-free Consumer Relations help line at
1-800-667-4111 (Monday to Friday 8:30a.m. to 5:00p.m. - Eastern Time) or
for local calls, call (514) 344-3045.
SOME ASSEMBLY REQUIRED
3
WARNINGS
!
• Install according to manufacturer’s instructions.
• Intended for use with children from 6 months through 24 months.
• This product will not necessarily prevent all accidents.
• Never leave child unattended.
• Use only with the locking/latching mechanism securely engaged on side away from
child.
• Never use with a child who is able to open or climb over this gate.
• The safety gate should not be placed at the top of the stairs.
• This safety gate shall not be fitted across window openings and the like.
• Don’t leave anything in the playard which could provide a foothold or create a danger
of suffocation or strangulation.
• All assembly fittings shall always be tightened properly.
• Please be aware of the risk of fire place, keep at least 60 cm (2 ft) from open flame or
heat source.
• Do not use the playard if any part is broken, torn or missing.
• When used as a playard, make sure the product is securely installed to form a
hexagonal playard.
• To clean, wipe surface with a damp cloth or sponge using a mild detergent and warm
water.
• To prevent serious injury or death, securely install gate or enclosure and use according
to manufacturer’s instructions.
• This product requires adult assembly.
KEEP THESE INSTRUCTIONS FOR FUTURE REFERENCE.
4
3
2
1
Hinges must
face inwards
Push and “click” into place
5
Assembly

4
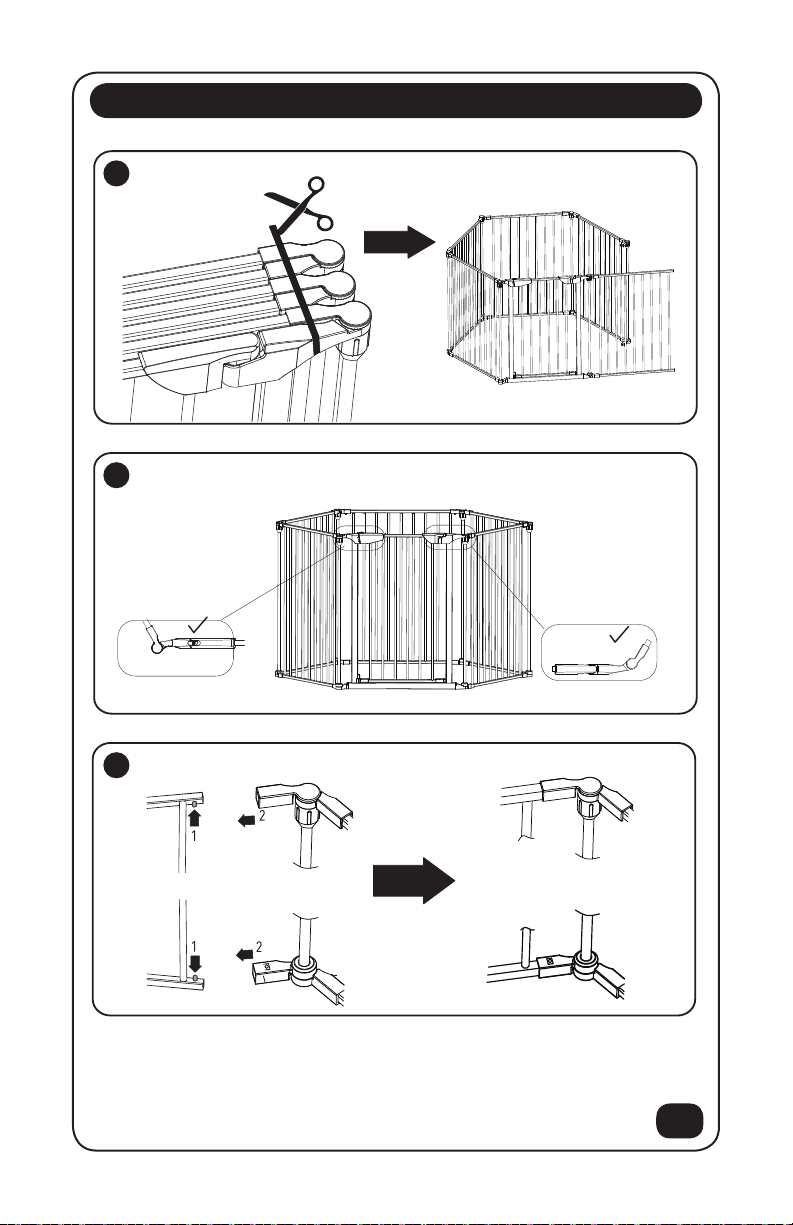
Open
Unpack the folded playard without pressing any buttons Figure 1.
To unlock, please turn knob (Figure 4).
Position and adjust the sections into a hexagon Figure 2.
Note: The playard should be placed on a flat surface. Hinges must face inwards.
Push and “Click” into place. Figure 3.
Tighten each knob so the playard is secured. Check the tension on each knob before each use.
To open, press the release button (1) and lift the gate panel upward (2) and swing gate open.
5
1
2
6
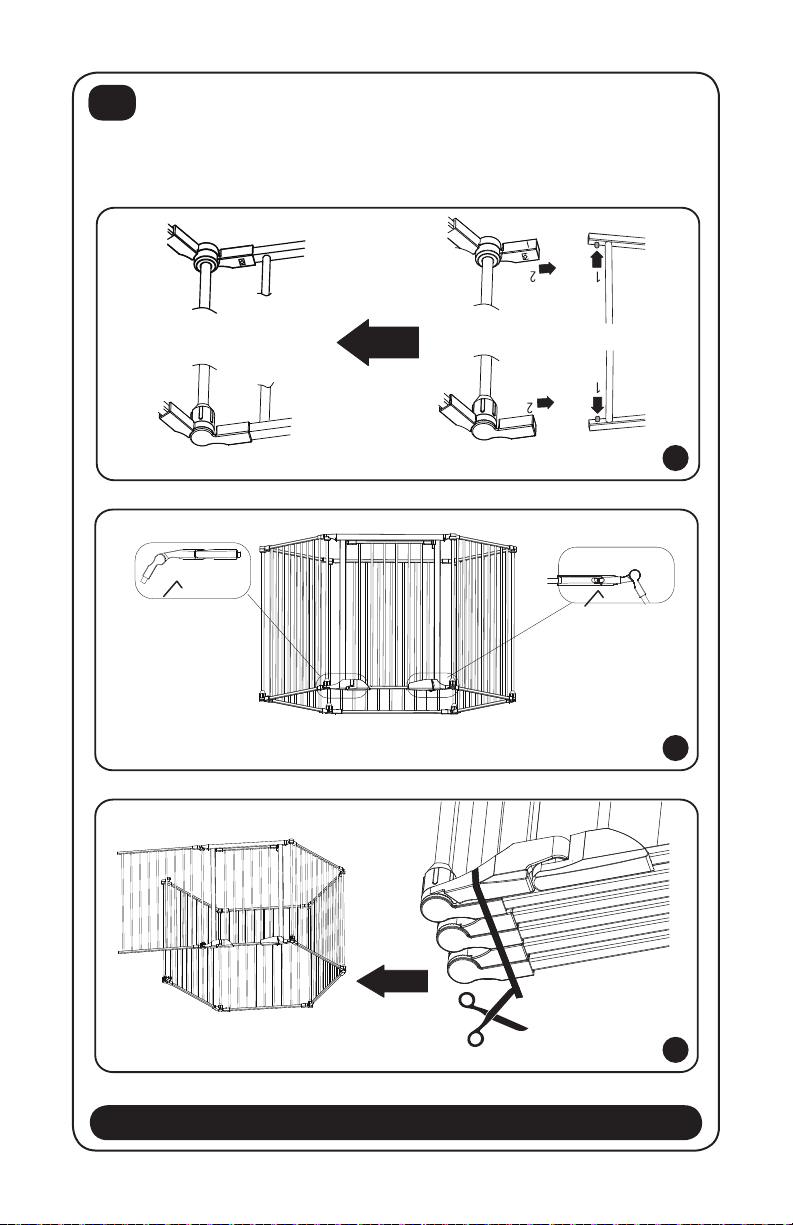
Assembly continued

Wall mounting
To close the gate door, release it and it will close automatically. Try this action several times and
make sure the upper lock rod is completely latched within the lock holder at the upper lock
housing. The lower lock rod of the gate panel fits securely into the lock holder of the gate frame.
Depress clips (1) locates on the underside of the top of the frame and at the bottom of the frame.
Detach frame as shown (2)
Loosen knobs to manipulate the playard to your chosen shape before retightening the knobs.
Remove one panel and attach wall mount brackets to either side.
6
7A
7
Close
Lock

(x8) (x8) (x8)
8
9
7B
Maximum extension of playard: 86 cm (33.75 in)
Maximum extension of safety gate for model BG381120: 312 cm (122.75 in)
Maximum extension of safety gate for model BG380567: 320 cm (126 in)
Mark the screw holes as indicated in picture below (Approximate distance of 650 mm or 26 in.)
8
Wall mounting continued
Wood Concrete Drywall
650mm

9
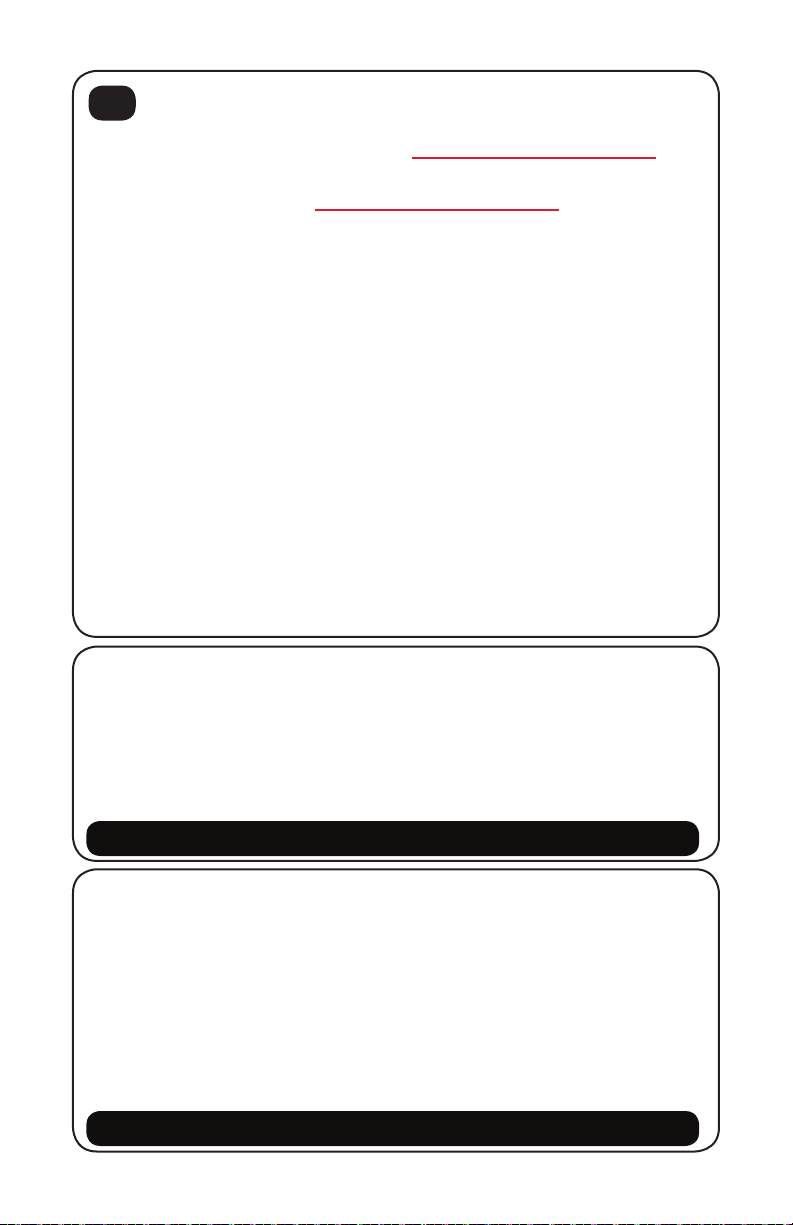
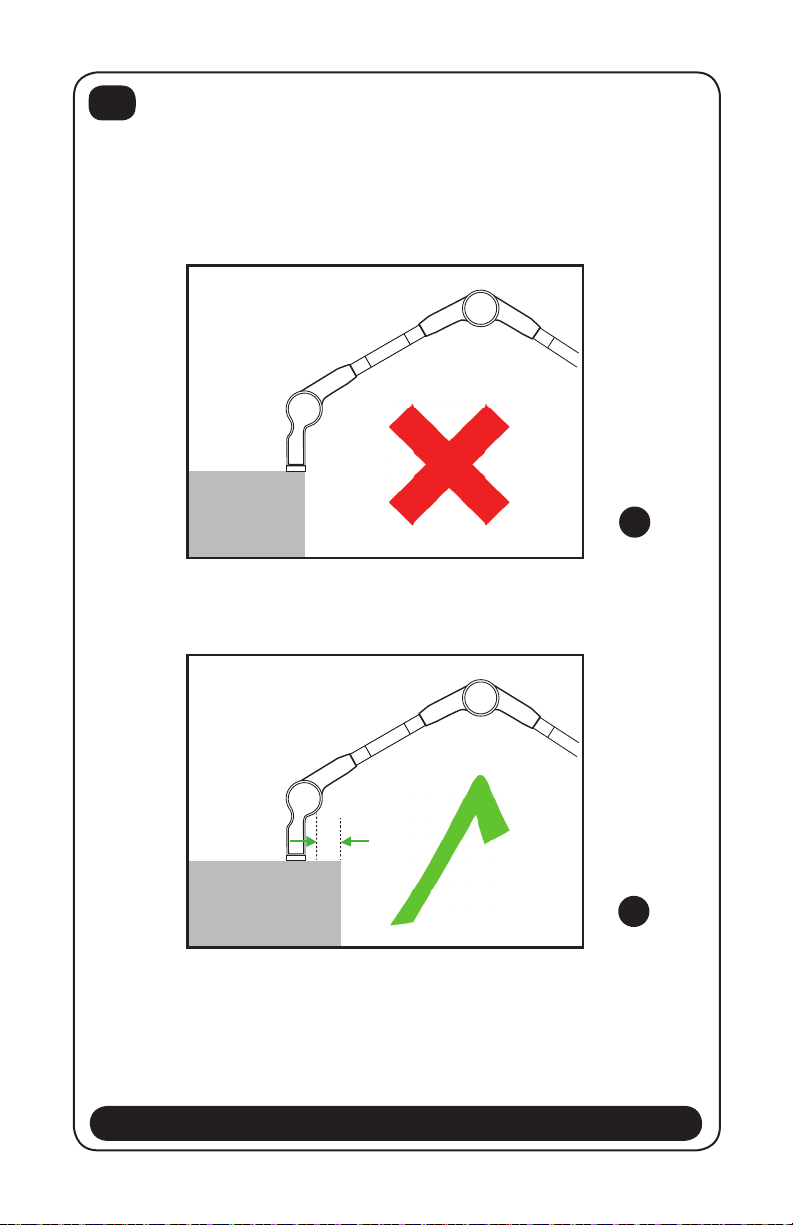
Warning
If you are unable to secure to the wall satisfactorily, please consult with a hardware store for
adequate fittings or anchors.
Please leave at least 0.4” (1 cm) from wall-fittings to the wall. Figure 10.
Do not assemble the wall-fittings as Figure 11.
Wall mounting continued
10
11
at least 0.4”
(1 cm)
WALL
WALL
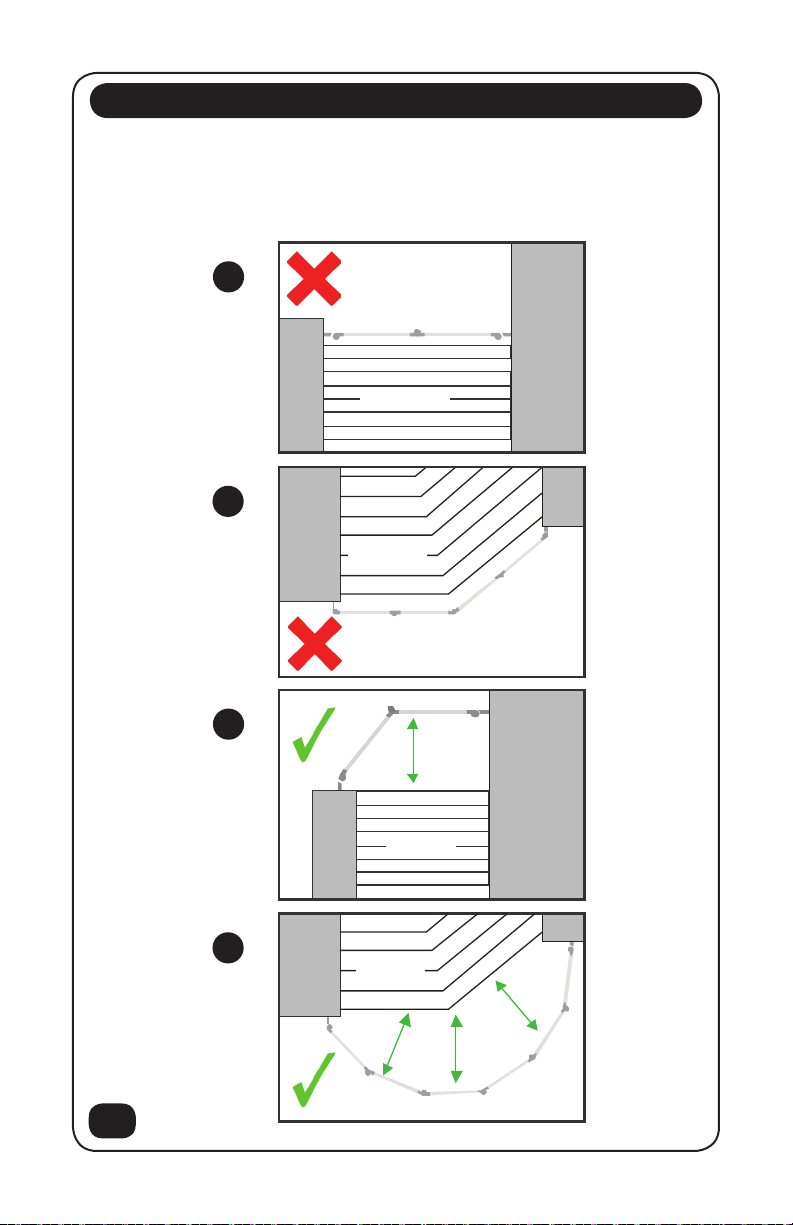
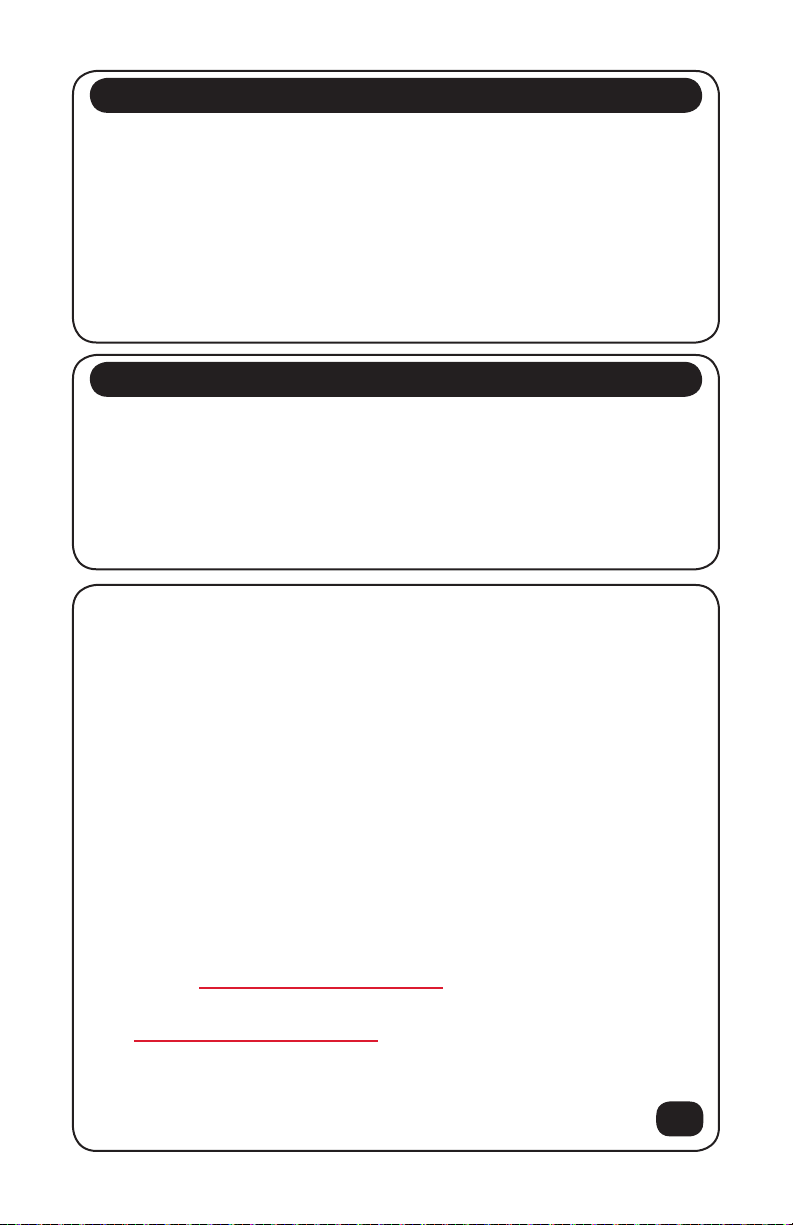
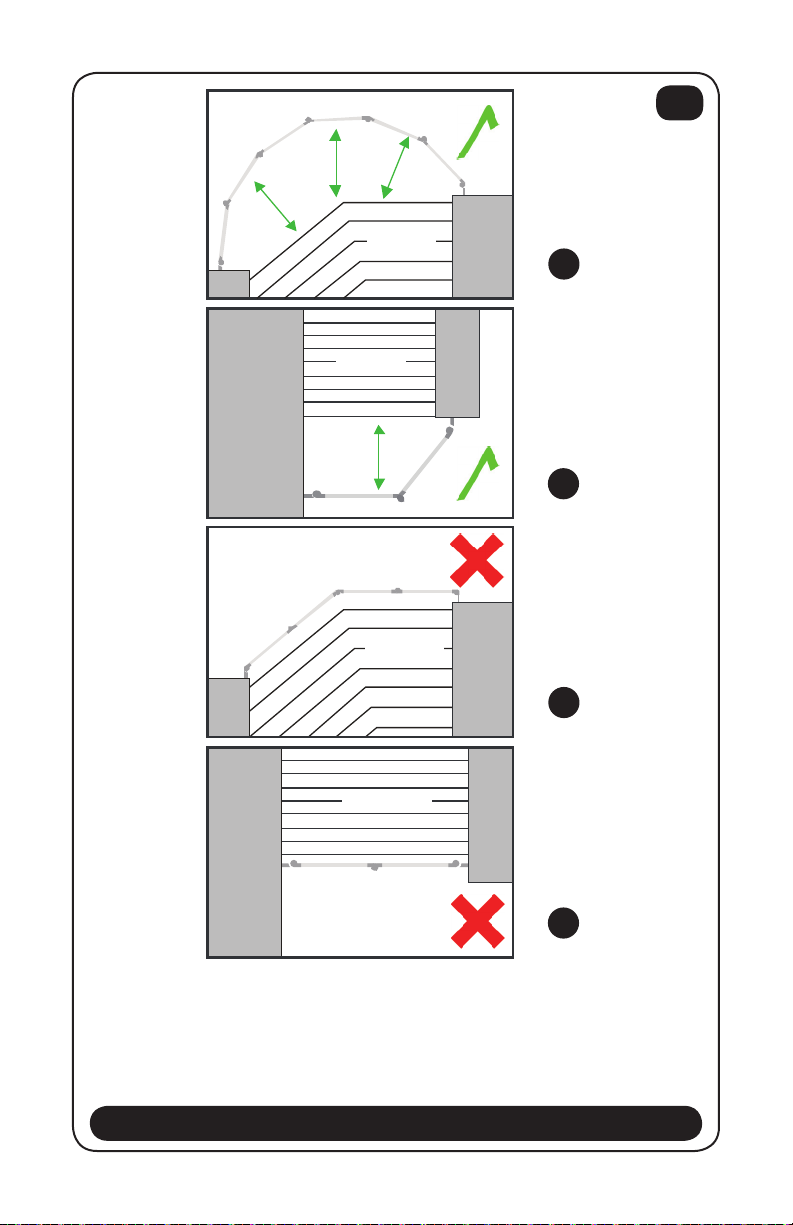
Installation Locations
NOTE: a. The gate must be placed away from the stairs so that a child will not
be able to reach the bottom stair and crawl over the gate. Figure 12 & 13.
b. The gate must be set up in a curve away from the stairs. There must be
a minimum distance of 16” (40 cm) from gate to stairs. Figure 14 & 15.
Wall
Wall
Wall
Wall
Wall
Wall
Stairs
Stairs
Stairs
Wall
Wall
16”
(40 cm)
16”
(40 cm)
16”
(40 cm)
16”
(40 cm)
10
12
14
13
15
Stairs
Important Information:
Before you begin assembly, please read these directions. Make sure all pre-assembled parts
are tight. Store this instruction manual in a safe place, for future reference.
If a part is missing or if you have any questions, call us.
PLEASE DO NOT return product or parts to the store where they were purchased before calling us.
Please call us toll free at:
1-800-667-4111
Our service is fast, free and easier than returning the product.
Important: In order to help our customer service representatives better assist you, we require
that you complete the information below before calling:
Model Number:
Date:
Note: The label containing the Model Number and Manufacturer’s Date can be found
under the door.
Wipe surface with a damp cloth or sponge with mild detergent and warm water.
Never clean with abrasive, ammonia based or spirit type cleaners.
Frame paint may be touched up as needed. Use only nontoxic paints approved for children’s products.
Check all frame fasteners occasionally. Tighten as necessary.
1. Follow the instructions in reverse order.
2. Store the unit in a cool, dry place.
-This 3 in 1 superyard is guaranteed to meet all federal and provincial standards and will provide many
years of service provided you adhere to the guidelines provided for assembly, maintenance and
operation.
-Never aim a vaporizer or humidifier directly at the unit. The water vapor may ruin the finish of the unit.
-For parts or assistance, do not return to retailer where product was purchased. Call or write ISSI Inc.
1 Year Limited Warranty
ISSI Inc. will supply the original owner, without charge, any part discovered to be missing at the time of
purchase or found to be broken or defective during the 1 year warranty period.
The warranty begins on the date of purchase, as established by your purchase receipt. The model number,
date of manufacture, and the part description must be provided. The warranty does not apply to defects
caused by owner damage, product alteration, or unreasonable use. This warranty gives you specific legal
rights that may vary from province to province.
11
Cleaning, Maintenance & Storage
Limited Warranty

ISSI Inc.
2400A Autoroute Transcanadienne
Pointe-Claire (Québec)
H9R 1B1
1-800-667-4111
Tél. : 514-344-3045
service@issibaby.ca
www.issibaby.ca

ISSI Inc.
2400A Autoroute Transcanadienne
Pointe-Claire (Québec)
H9R 1B1
1-800-667-4111
Tél. : 514-344-3045
service@issibaby.ca
www.issibaby.ca
Renseignements importants :
Avant de commencer l’assemblage, lisez le présent livret d’instructions. Assurez-vous que les
pièces déjà assemblées sont solidement fixées. Rangez ce livret en lieu sûr pour vous y référer
au besoin.
Pour toute question ou si une pièce est manquante, communiquez avec nous au numéro
ci-dessous. NE RETOURNEZ PAS le produit ou les pièces au magasin où ils ont été achetés avant
de nous téléphoner.
1-800-667-4111
Notre service est rapide et gratuit, et cette façon de procéder est plus facile que de retourner
le produit au magasin.
Important : Afin d’aider nos préposés à mieux vous répondre, veuillez noter les
renseignements ci-dessous avant de nous téléphoner :
Numéro de modèle :
Date:
Remarque : L’étiquette contenant le numéro de modèle et la date de fabrication
se trouve sous la porte.
Essuyer la surface avec un linge ou une éponge et une solution d’eau tiède et de savon doux. Ne jamais
employer de nettoyants abrasifs, à base d’ammoniac, d’eau de Javel ou d’alcool.
La peinture du châssis peut être retouchée au besoin. Utiliser uniquement des peintures non-toxiques
approuvées pour les objects pour enfants.
Vérifier périodiquement toutes les attaches du châssis. Resserrer toutes les vis et tous les boulons au besoin.
1. Suivez les instructions dans l’ordre inversé,
2. Entreposez votre produit dans un endroit frais et sec.
-Nous garantissons que ce superparc de jeu triple usage satisfait à toutes les normes fédérales et
provinciales et qu’il vous servira pendant de nombreuses années, pourvu que vous respectiez les
instructions d’assemblage, d’entretien et d’utilisation.
-Ne dirigez jamais un vaporisateur ou un humidificateur directement sur le produit. La vapeur d’eau peut
endommager le fini du produit.
-Pour commander des pièces ou obtenir de l’aide, ne retournez pas le produit chez le détaillant où vous
l’avez acheté. Téléphonez ou écrivez plutôt à ISSI Inc.
Garantie limitée d’un an
ISSI Inc. fournira au propriétaire original, sans frais, toute pièce manquante au moment de l’achat ou qui se
brise ou devient défectueuse pendant la période de garantie d’un an.
La garantie entre en vigueur à la date d’achat, telle qu’établie par votre reçu de caisse. Vous devez fournir
le numéro de modèle, la date de fabrication et la description des pièces. La garantie ne s’applique pas aux
défauts résultant de dommages causés par le propriétaire, d’une modification du produit ou d’un usage
abusif. Cette garantie vous confère certains droits en vertu de la loi et ceux-ci peuvent varier selon la province
ou le territoire.
Nettoyage, entretien et rangement
Garantie limitée
11
REMARQUE : a. La barrière doit être installée loin de l’escalier afin qu’un enfant debout sur
la marche du bas ne puisse pas grimper sur la barrière et passer par-dessus.
Figure 12 & 13.
b. La barrière doit être installée de façon à former un arc ou un angle et à
s’éloigner de l’escalier. La distance entre la barrière et l’escalier doit être
d’au moins 40 cm (16 po). Figure 14 & 15.
Lieux d’installation
Mur
Mur
Mur
Mur
Mur
Mur
Mur
Mur
40 cm
(16 po)
40 cm
(16 po)
40 cm
(16 po)
40 cm
(16 po)
10
12
14
13
15
Escalier
Escalier
Escalier
Escalier
9
Mise en garde
Si vous ne pouvez installer cette barrière solidement au mur, veuillez consulter une quincaillerie
pour vous procurez des ancrages appropriés.
Installation au mur suite
10
11
au moins 1 cm
(0,4 po)
Laisser un espace d’au moins 1 cm (0,4 po) entre le bord
du mur et les fixations murales. Figure 10.
Ne pas poser les fixations murales comme l’indique la Figure 11.
MUR
MUR

Ouverture maximale du parc : 86 cm ou 33,75 po.
Ouverture maximale de la barrière de sécurité pour le modèle BG381120 : 312 cm ou 122,75 po.
Ouverture maximale de la barrière de sécurité pour le modèle BG380567 : 320 cm ou 126 po.
Marquer la position des trous, tel qu’illustré ci-haut (distance approximative de 650 mm ou 26 po.)
8
Installation au mur suite
(x8) (x8) (x8)
8
9
7B
Bois Ciment Gypse
650mm

Installation au mur
Le panneau de porte de la barrière de sécurité ou du parc se referme automatiquement
lorsqu’elle est relâchée. Veuillez répéter cette opération plusieurs fois afin de vous assurer que
la porte soit bien fermée et que les loquets de sécurité supérieur et inférieur de la porte soit
bien enclenchés.
Appuyez sur les boutons (1) en utilisant une clé ou un tournevis et détacher tel qu’illustré.
Desserrer les poignées afin de placer le parc à la forme désirée. Resserrer les poignées une fois
terminé afin de solidifier la structure en place.
Retirer un panneau et attacher les fixations murales de chaque côté.
6
7A
7
Fermeture
Loquet

4
Ouverture
Déballer le parc sans appuyer sur les boutons (figure 1).
Pour débloquer, tourner la poignée de verrouillage (figure 4).
Placer le parc et ajuster les panneaux en hexagone (figure 2).
Remarque : Le parc doit être installé sur une surface plane. Les charnières doivent faire face
vers l’intérieur. Pousser et cliquer en place (figure 3).
Serrer chaque poignée de verrouillage de façon à ce que le parc soit en position solide.
Vérifier la tension de chaque poignée de verrouillage avant chaque utilisation.
Appuyez sur le bouton (1) et soulever la panneau de porte vers le haut (2) pour ouvrir la
barrière.
5
1
2
6
Assemblage suite
5
3
2
1
Les charnières doivent
faire face vers l’intérieur.
Pousser et “cliquer” en place
5
Assemblage
This manual suits for next models
1
Table of contents
Other bily Indoor Furnishing manuals

Popular Indoor Furnishing manuals by other brands

Regency
Regency LWMS3015 Assembly instructions

Furniture of America
Furniture of America CM7751C Assembly instructions

Safavieh Furniture
Safavieh Furniture Estella CNS5731 manual

PLACES OF STYLE
PLACES OF STYLE Ovalfuss Assembly instruction

Trasman
Trasman 1138 Bo1 Assembly manual

Costway
Costway JV10856 manual


