BIN WAREHOUSE DFAE2MBFBW0618 User manual

#1
#3
#2
#1
#2
#3
#4
#5 #7
#6
48 x
8 x
8 x
Solutions Murales PROSLAT inc.
225 Industriel blvd
Chateauguay (QC) J6J 4Z2
1 888 691-2944
US Patent No: 6,315,136B1 All rights Reserved
International Patents Pending
8 tote or file box storage system – assembly instructions
TOOLS REQUIRED
1. Powered Screwdriver with #2
Phillips-Head bip
PARTS LIST
1. 8 x Horizontal crossbars
2. 2 x Center verticals
3. 4 x Corner verticals
4. 6 x Vertical top caps
5. 4 x Front and rear grid
connecting tubes
6. 4 x Wall mount brackets
7. 8 x Horizontal slide rails
FASTENER LIST
1. 48 x #06 x ½” fastening screws
2. 08 x #10 x 1-¼” fastening screws
3. 08 x Plastic wall anchors
NOTE
Separate all parts into groups
(as shown) and familiarize. Read
all instructions before beginning
assembly.

TOP
Tilt slide rail forward
Fasten from bottom hole
FRONT GRID ASSEMBLY
Parts needed:
4 of #1 2 of #3
1 of #2
STEP 1
4 Horizontal crossbars (#1) inserted through
1 center vertical (#2) Note: Slide horizontal
crossbar into left side of center vertical
following direction of arrow until alignment dimple
meets center vertical (see enlargement).
STEP 2
Two corner vertical (#3) inserted through
horizontal crossbars
REAR GRID ASSEMBLY
Parts needed:
4 of #1 1 of #2
2 of #3
STEP 1
4 Horizontal Crossbars (#1) inserted through
1 center vertical (#2) Note: Slide horizontal
crossbar into right side of center vertical following
direction of arrow until alignment dimple meets
center vertical.
STEP 2
2 Corner verticals (#3) placed on horizontal
crossbars.
SLIDE RAIL ASSEMBLY
STEP 1
8 Horizontal slide rails (#7) inserted in rear grid.
Tip: If necessary, tap horizontal slide rails to be
sure slide rails are fully inserted.
STEP 2
Fastening horizontal slide rails (#7) in rear grid
using 8 – #06 x ½” fastening screws (#1).
Note: Start at top row and work down.
Use only one fastener – bottom hole only.
All horizontal slide rails fastened to rear grid.
Note: Fastener in bottom hole only
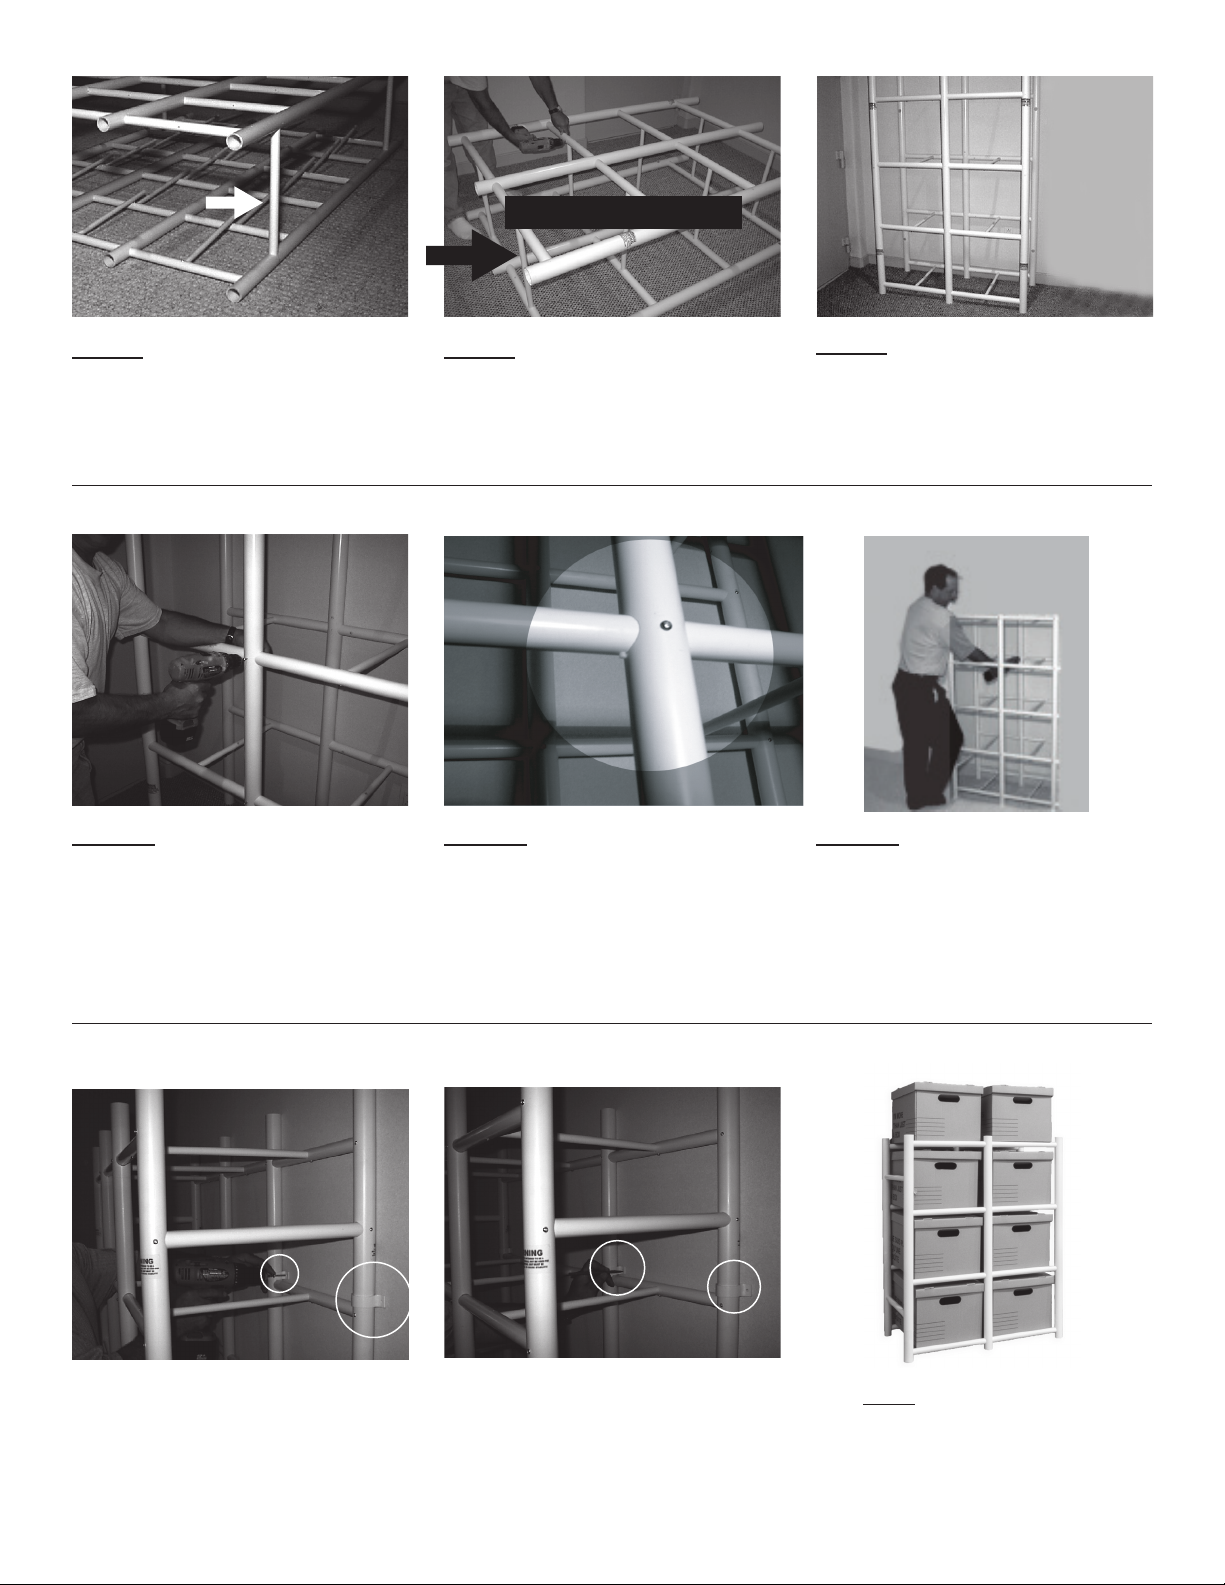
JOINING FRONT TO REAR GRID
STEP 1:
Join front to rear grid by inserting 4 front & rear grid
connecting tubes (#5) into front grid assembly
Note: Do not fasten at this time
STEP 2:
Insert and fasten 8 horizontal slide rails (#7) into
front grid assembly using 8 – #06 x ½’’ fastening
screws (#1) Note: Fasteners in bottom hole
only, work from bottom row to top row
STEP 3:
Turn unit upright and place firmly against wall
where unit is to be mounted.
FASTENING VERTICALS & FRONT & REAR GRID CONNECTING TUBES
FASTENING BIN WAREHOUSE RACK TO WALL
STEP 1:
Fasten 4 front & rear grid connecting tubes
(#5) to front grid assembly using 8– #06 x
½’’ fastening screws (#1).
Place 4 wall mount bracket (#06) over 4 rear
verticals above 2nd horizontal crossbar (#1) and
fasten to wall using 8 – #10 x 1¼ fastening
screws. (#2).
STEP 2:
Make sure unit is straight and square, and
all verticals are pressed firmly together and
against alignment dimples.
Note: If mounting into drywall or masonry,
mark and drill ¼holes and insert plastic
wall anchors – and proceed with step!
– Insert decorative top caps (#4) into all
verticals.
STEP 3:
Fasten all verticals to horizontals making
sure all joints are pressed firmly together and
tight againts alignment dimples using 24 –
#06 x ½’’ fastening screws (#1)
Note: Fasteners in holes facing YOU only.
Unit must be attached to wall
to keep from tipping over.
Congratulations! Enjoy your Bin
Warehouse!
Fasteners in bottom hole only
Other BIN WAREHOUSE Storage manuals


