BIN WAREHOUSE 65004/JAN21 User manual
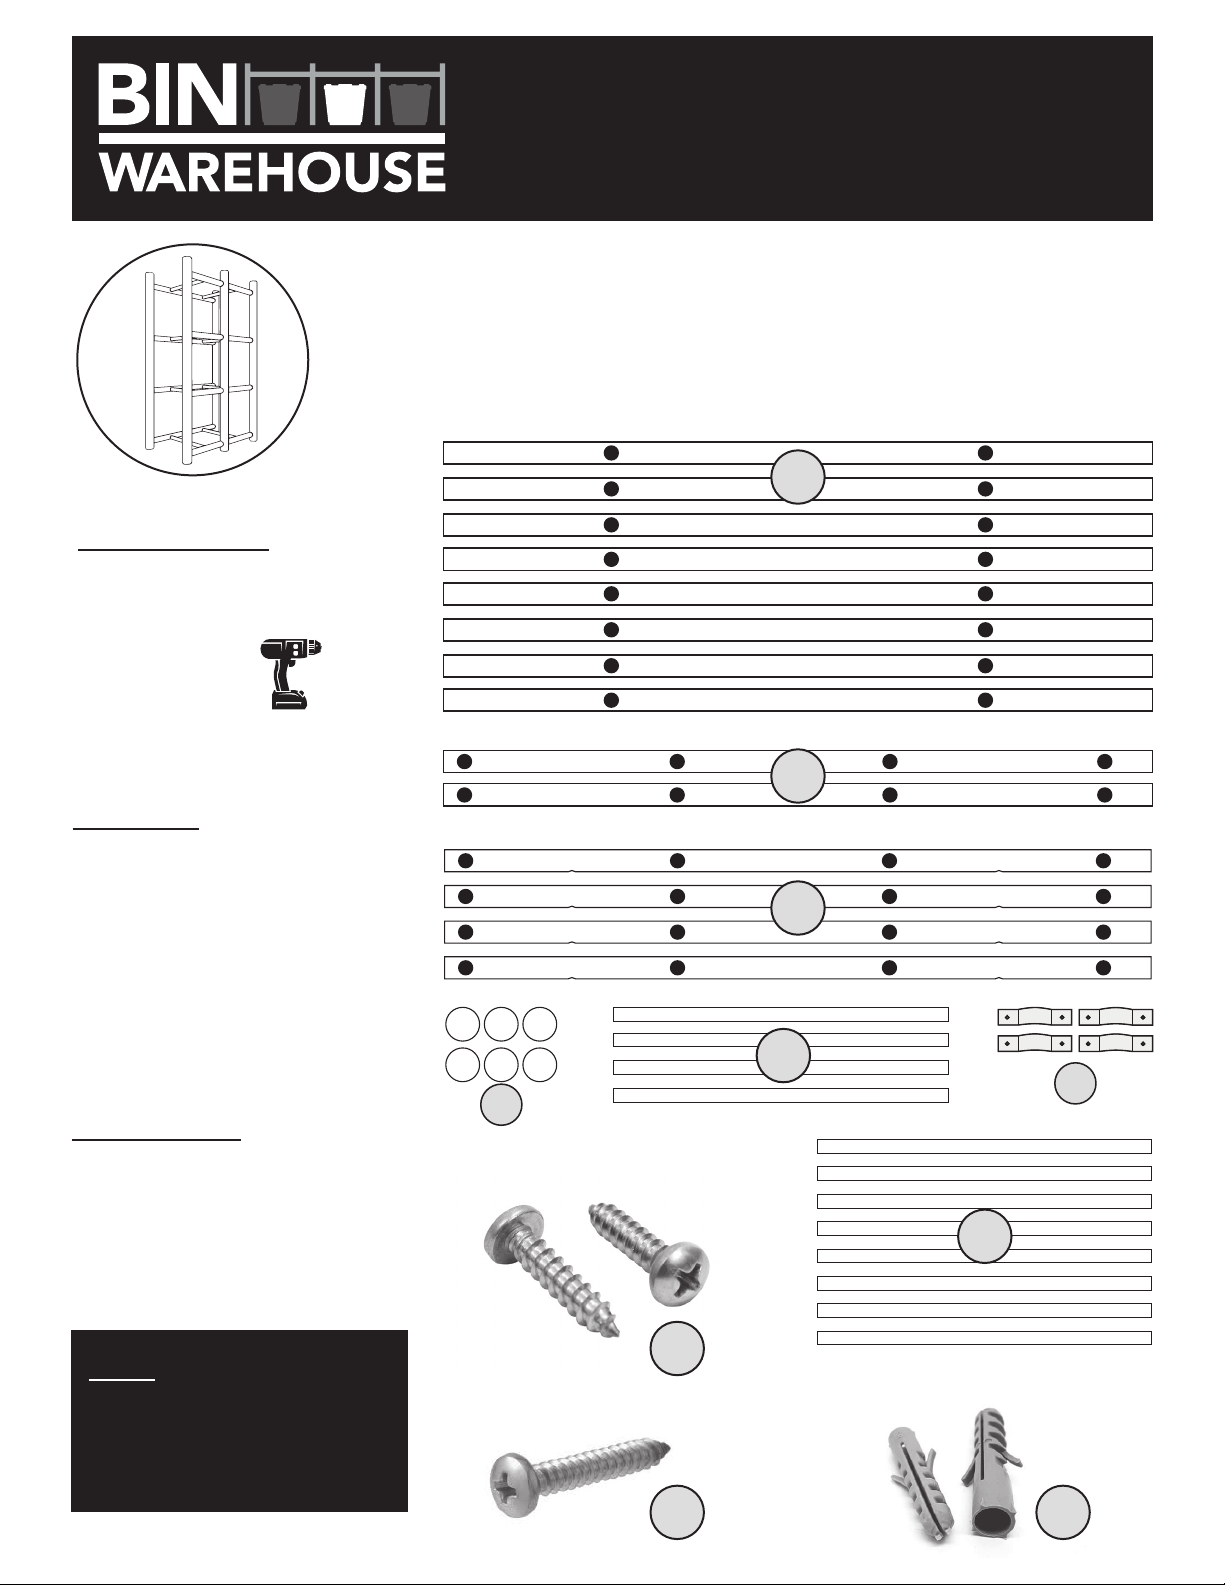
48 x
8 x 8 x
#1
#2
#7
#3
#4
#5
#1
#2 #3
#6
FASTENER LIST
1. 48 x #06 x ½ in. fastening screws
2. 08 x #10 x 1-¼ in. fastening screws
3. 08 x Plastic wall anchors
NOTE
Separate all parts into groups
(as shown) and familiarize. Read
all instructions before beginning
assembly.
PARTS LIST
1. 8 x Horizontal crossbars
2. 2 x Center verticals
3. 4 x Corner verticals
4. 6 x Vertical top caps
5. 4 x Front and rear grid
connecting tubes
6. 4 x Wall mount brackets
7. 8 x Horizontal slide rails
Solutions Murales PROSLAT inc.
225 Industriel blvd, Chateauguay (QC) J6J 4Z2
1 888 691-2944
Model # 65004 / JAN21
TOOLS REQUIRED
1. Drill with #2
Phillips-Head bit
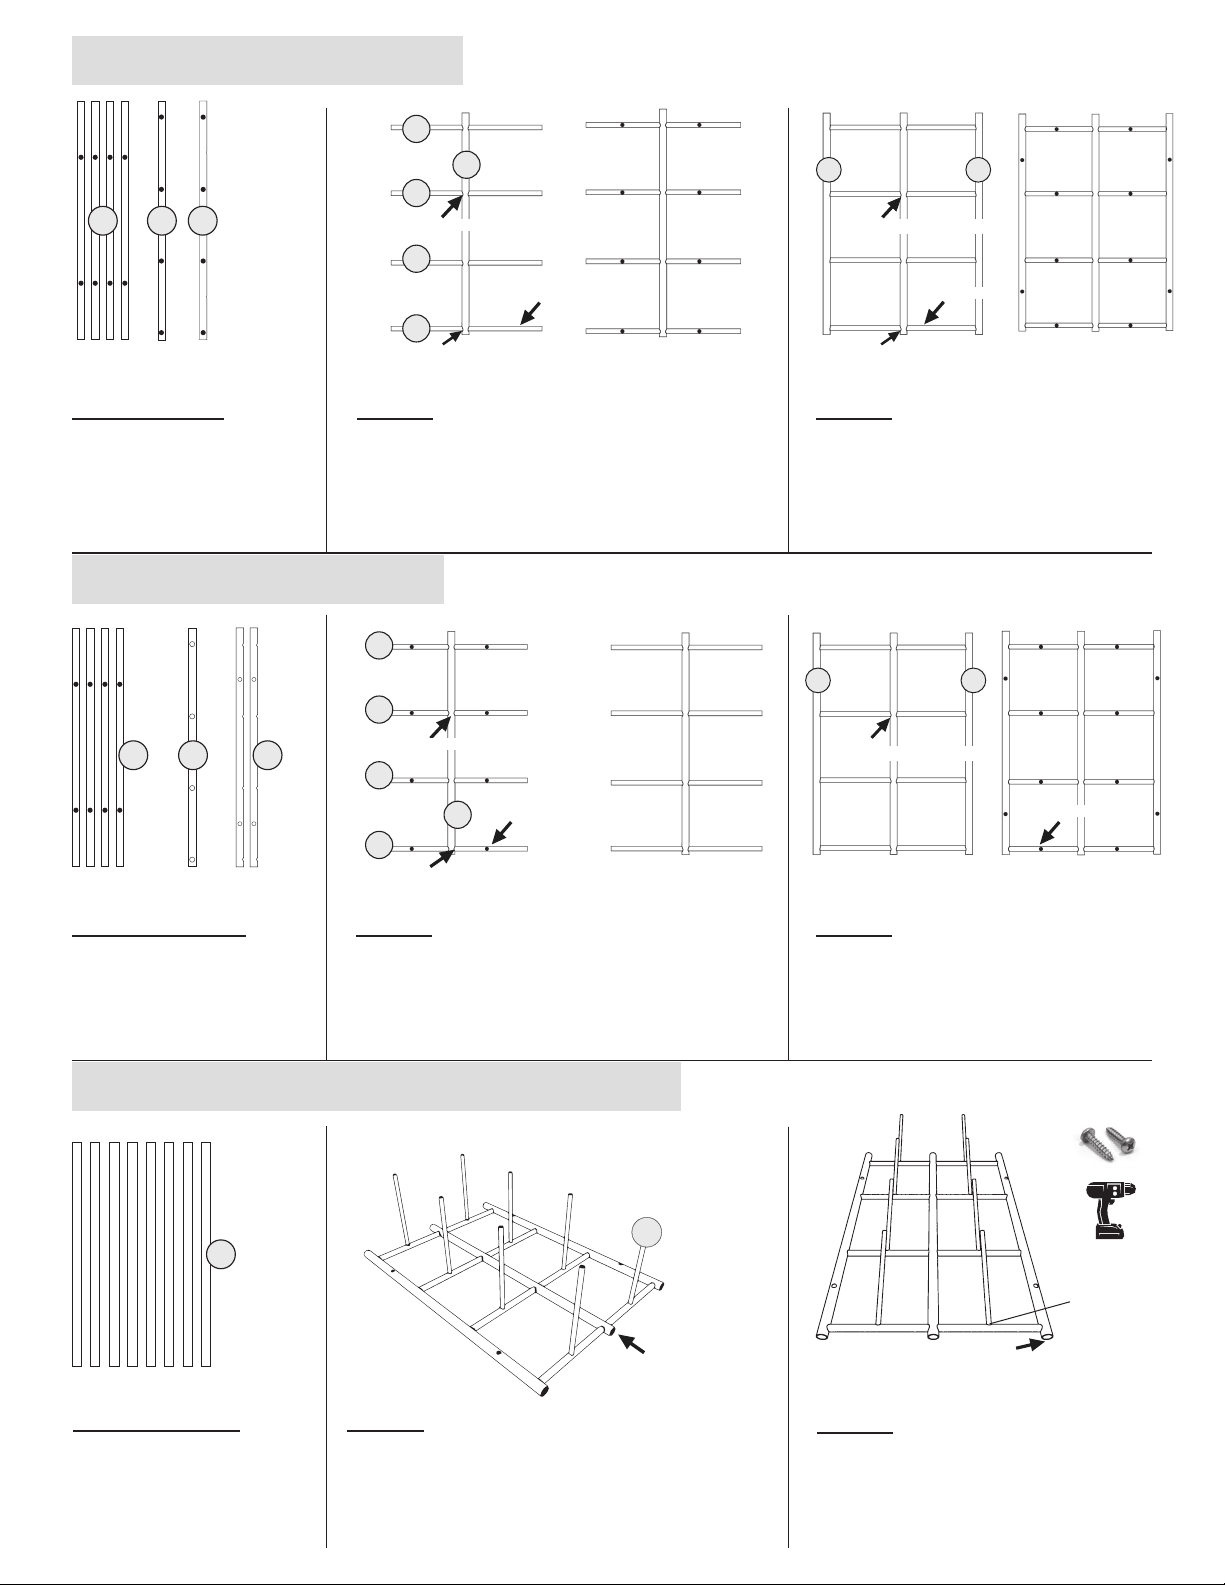
8 FILEBOX STORAGE RACK
Assembly instructions
#1 #2 #3
#2
#1
#1
#1
#1
#3#3
#1 #2 #3
#2
#1
#1
#1
#1
#3 #3
#7
#7
Parts needed:
4 of #1 2 of #3
1 of #2
STEP 2
Two corner vertical (#3) inserted through
horizontal crossbars
FRONT GRID ASSEMBLY
SLIDE RAIL ASSEMBLY TO REAR GRID
Alignment dimples
Holes down
Short side to floor
Top
Other side
STEP 1
4 Horizontal crossbars (#1) inserted through 1 Center Vertical
(#2) Note: Slide horizontal crossbar into left side of center
vertical following direction of arrow until alignment
dimple meets center vertical.
Alignment dimples down
Holes down
Other side
Short side to floor
Top
REAR GRID ASSEMBLY
PARTS NEEDED:
4 of #1 1 of #2
2 of #3
STEP 1
4 Horizontal Crossbars (#1) inserted through one center
vertical (#2) Note: Slide horizontal crossbar into right
side of center vertical following direction of arrow
until alignment dimple meets center vertical.
STEP 2
2 Corner verticals (#3) placed on horizontal
crossbars.
Alignment dimples
Holes up
Short side to floor
Top
Other side
Holes up
Alignment dimples down
Holes down Other side
Top
Short side to floor Short side to floor
Fasten from
bottom hole only
STEP 2
Fastening horizontal slide rails (#7) in rear grid
using 8 – #06 x ½ in. fastening screws (#1).
Note: Start at top row and work down.
Use only one fastener – bottom hole only.
STEP 1
8 Horizontal slide rails (#7) inserted in rear grid.
Tip: If necessary, tap horizontal slide rails to be sure
slide rails are fully inserted.
SLIDE RAIL ASSEMBLY TO REAR GRID
PARTS NEEDED
8 of #7

#5
#6
#4
#5
STEP 2:
Insert and fasten 8 horizontal slide rails (#7)
into front grid assembly using 8 – #06 x ½
in. fastening screws (#1). Note: Fasteners in
bottom hole only, work from bottom row to
top row
Place 4 wall mount bracket (#06) over 4
rear verticals above 2nd horizontal crossbar
(#1) and fasten to wall using 8 – #10 x 1¼
fastening screws. (#2).
STEP 2:
Make sure unit is straight and square, and
all verticals are pressed firmly together and
against alignment dimples.
Note: If mounting into drywall or masonry,
mark and drill ¼ holes and insert plastic
wall anchors – and proceed with step 1
– Insert decorative top caps (#4) into all
verticals.
STEP 1:
Join front to rear grid by inserting 4 front & rear grid
connecting tubes (#5) into front grid assembly
Note: Do not fasten at this time
STEP 3:
Turn unit upright and place firmly against
wall where unit is to be mounted.
STEP 1:
Fasten 4 front & rear grid connecting tubes
(#5) to front grid assembly using
8 – #06 x ½ in. fastening screws (#1).
STEP 3:
Fasten all verticals to horizontals making
sure all joints are pressed firmly together and
tight against alignment dimples using 24 –
#06 x ½in. fastening screws (#1)
Note: Fasteners in holes facing YOU only.
Unit must be attached to wall
to keep from tipping over!
Congratulations! We hope you
enjoy your Bin Warehouse file
box storage rack!
JOINING FRONT TO REAR GRID
Alignment
dimple
FASTENING VERTICALS & FRONT & REAR GRID CONNECTING TUBES
FASTENING TO WALL

Questions, problems, missing parts? Before returning to the store, call
Proslat Customer Service — 8 a.m. – 5 p.m., EST, Monday – Friday
1-888-691-2944
www.proslat.com
Retain this manual for future use.
Warranty – Bin Warehouse PVC Rack
This Lifetime Warranty extends only to the first retail purchaser of Proslat Bin Warehouse product(s)
Lifetime Warranty.
This document details the Solutions Murales PROSLAT inc. Warranty for all new Proslat Bin Warehouse product purchased anywhere in continental USA and Canada.
Solutions Murales PROSLAT inc. (hereafter Proslat) warrants its Bin Warehouse Rack against defects in material or workmanship for a lifetime period. Proslat will replace any defective
Rack as long as it was installed and maintained according to the printed instructions. Any Proslat Bin Warehouse Rack replaced under the terms of the Lifetime Warranty inherits the
remaining warranty period from the original purchase.
Exclusions.
The Proslat Warranty does not cover the following: – Damage that results from improper installation or misuse or abuse; – Damage due to acts of God, fire, or accident; – Damage that
results from loading the rack beyond the stated maximum weight capacity; – The cost of labor or accessory materials; and shipping cost to return defective products.
Limitations of Warranty.
The above Lifetime Warranty is the exclusive warranty for Proslat Bin Warehouse product. Proslat disclaims all other warranties, express or implied, including any implied warranties
or merchantability, fitness for particular purpose or otherwise. If you live in an area where consumer law prohibits this disclaimer, the above Lifetime Warranty will not extend the time
period of any such implied warranty.
Obtaining Lifetime Warranty Service. For warranty service, call 1.888.691.2944. You will need your original proof of purchase and photos to illustrate the claimed defect.
DISCLAIMER OF LIABILITY
Solutions Murales PROSLAT inc. and its successors, distributors and dealers (hereafter SELLER) shall in no way be responsible for the product’s proper use and service. THE BUYER
HEREBY WAIVES ALL LIABILITY CLAIMS. The BUYER acknowledges that he/she is not relying on the SELLER’s skill or judgment to select or furnish goods suitable for any particular
purpose and that there are no liabilities which extend beyond the description on the face hereof and the BUYER hereby waives all remedies or liabilities, expressed or implied, arising
by law or otherwise, (including without any obligations of the SELLER with respect to merchantability and consequential damages) or whether or not occasioned by the SELLER’s
negligence. The SELLER disclaims any warranty and expressly disclaims any liability for personal injury or damages. The BUYER acknowledges and agrees that the disclaimer of any
liability for personal injury is a material term for this agreement and the BUYER agrees to indemnify the SELLER and to hold the SELLER harmless from any claim related to the item of
the equipment purchased. Under no circumstances will the SELLER be liable for any damages or expenses by reason of use or sale of any such equipment. The SELLER assumes no
liability regarding the improper installation or misapplication of its products. It is the installer’s responsibility to check for proper installation and if in doubt, contact the manufacturer.
These assembly guidelines will direct you through the process of assembling a section of Solutions Murales PROSLAT inc. product. Please keep in mind that they may not cover every
assembly or installation scenario you may encounter. Since each installation is unique in its performance requirements, the ultimate installation method used is the sole responsibility
of the installer. Solutions Murales PROSLAT inc. disclaims any liability or responsibility for the improper installation of this product. The purchaser is solely responsible for compliance
with applicable local codes. Solutions Murales PROSLAT inc. recommends that all designs be reviewed by a licensed architect, engineer or local building official before installation.
Other BIN WAREHOUSE Storage manuals


