Bing Innovations DigiVibe User manual
Owner’s Booklet

The DigiVibe device is the latest product innovation from Bing
Innovations, LLC. Specifically designed for blood glucose
monitoring, DigiVibe applies vibrations to your finger to block
pain signals to your brain.
This Owner’s Booklet offers a complete explanation of how to use
your new DigiVibe and testing supplies. It reviews the do’s and
don’ts of using your DigiVibe device while testing your blood.
Please keep your Owner’s Booklet in a safe place; you may want
to refer to it in the future.
We hope DigiVibe products will make it easier and more
comfortable for you to maintain control of your diabetes.
3
TM

Table of contents
DigiVibe Symbols and Icons
Intended Use + Kit Contents
Before You Begin
Setting Up the DigiVibe
Setting Up the Lancing Device
.
Taking a Test with DigiVibe
.
Removing the Used Lancet Device
Care and Maintenance of the Lancing Device
Care and Maintenance of DigiVibe
Troubleshooting & Technical Information
Warranty Information
User Profile
5
6
7
8
10
12
14
15
15
17
18
21
4

DigiVibe Symbols and Icons
Intended Use + Kit Contents
Before You Begin
Setting Up the DigiVibe
Setting Up the Lancing Device
.
Taking a Test with DigiVibe
.
Removing the Used Lancet Device
Care and Maintenance of the Lancing Device
Care and Maintenance of DigiVibe
Troubleshooting & Technical Information
Warranty Information
User Profile
5
6
7
8
10
12
14
15
15
17
18
21
Single use only
Biohazard After Use
Warning
Manufacturer
European Conformity
European Authorized Representative
Single Patient - Multiple Use
BF Symbol
DigiVibe Symbols and Icons
Cautions and Warnings: Refer to all instructions and inserts that
came with your system for safety-related information.
Not Waterproof
5
Consult User Manual

Intended Use
6
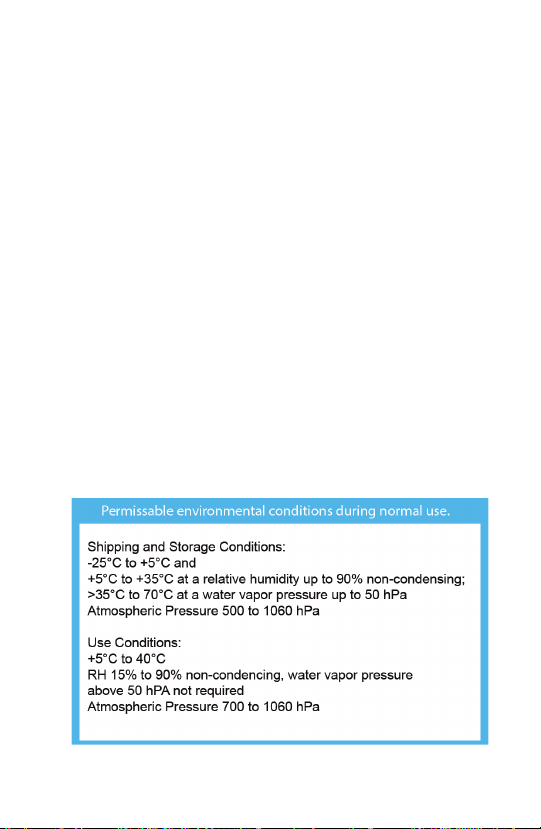
5Test strip storage
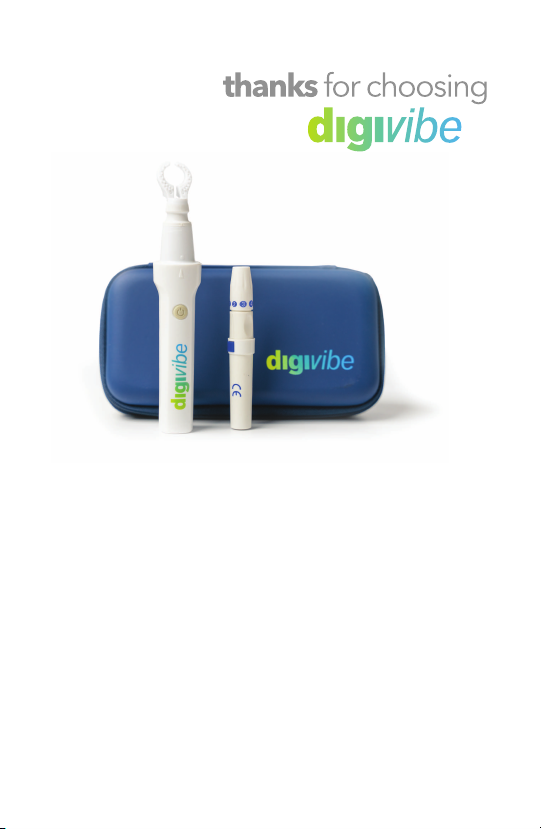
1DigiVibe device and stand
2DigiVibe tip
3Lancing device
4
The DigiVibe is intended to be used during the
quantitative measurement of glucose (sugar) in fresh
capillary whole blood samples drawn from the fingertip.
The system is intended to be used by a
single patient and should not be shared.
Five 30-gauge lancets
6Glucose blood monitor storage
Kit contents

7
Before using this product to help you test your blood
glucose, carefully read this Owner’s Booklet and the
inserts that come with the DigiVibe device.
Lancets are for single use only.
Do not share the DigiVibe unit with anyone else,
including family members!
Do not use on multiple patients!
After use and exposure to blood, all parts of this kit are
considered bio hazardous. A used kit may potentially
transmit infectious diseases even after you have
performed cleaning and disinfection.
Clean and disinfect the DigiVibe before initial use and
once a week with cleaning and disinfecting wipes.
Keep away from young children. Small parts may
present a choking hazard.
Do not use in an oxygen-rich or explosive environment.
Do not expose the unit to high temperatures for an
extended period of time (ex: leaving it in a vehicle
trunk on a hot day or in a sun baked space). This may
reduce the performance and/or cause a failure of the
disposable tip.
WARNING: Battery can explode or leak and cause
burns if installed backwards, dissembled, charged,
or exposed to water, fire or high temperature. No
user serviceable parts inside. Modification or
disassembly not allowed.
Before You Begin
IMPORTANT SAFETY INSTRUCTIONS:
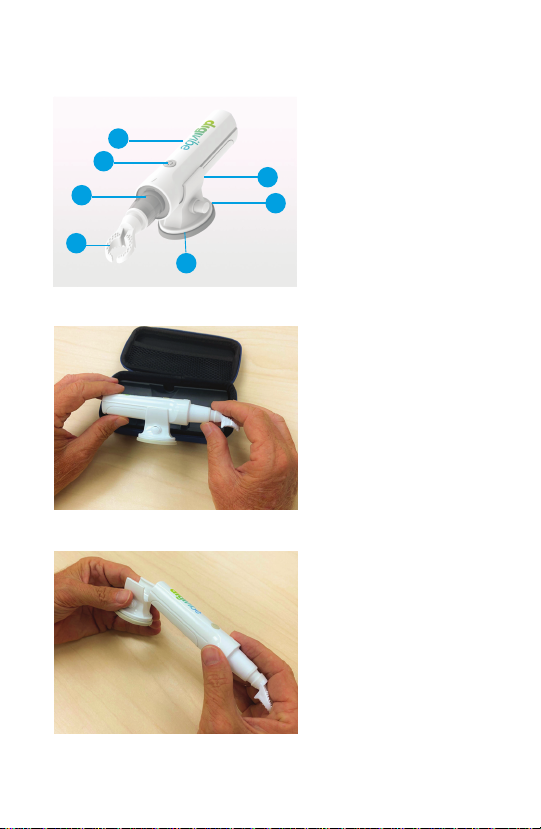
1. Remove the DigiVibe
device and stand from
the travel case.
2. To access the battery
compartment door, slide
the DigiVibe stand off
the device.
Familiarize yourself
with the device.
a.
b.
c.
d.
e.
f.
g.
8
b
a
d
c
g
f
eDigiVibe device
Power button
DigiVibe tip
Tip housing
DigiVibe stand
Suction activation button
Rubber suction base
Setting Up the DigiVibe

a
9
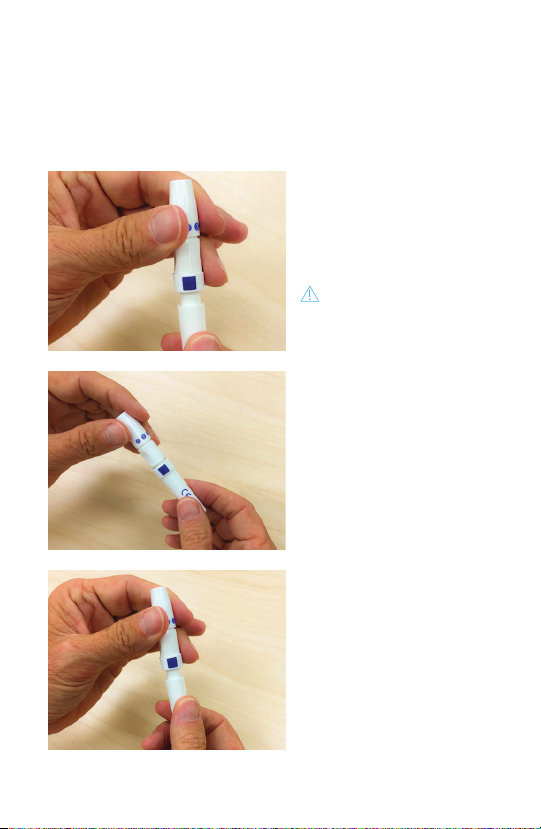
5. Install the DigiVibe tip by
lining up the dot located
on the base of the tip to the
arrow on the device and
pushing the DigiVibe tip
onto the device until you
hear a click.
Remove the DigiVibe tip
by turning it counter-
clockwise (1/4 turn) and
lifting up.
3. Open the battery
compartment by
pressing the latch on
the bottom of the
DigiVibe. Remove the
battery paper tab
protector.
4. Close the battery
compartment and slide
the DigiVibe stand onto
the DigiVibe device by
aligning the stand with
the grooves in the
DigiVibe and sliding
forward.
10
a
b
c
a
d
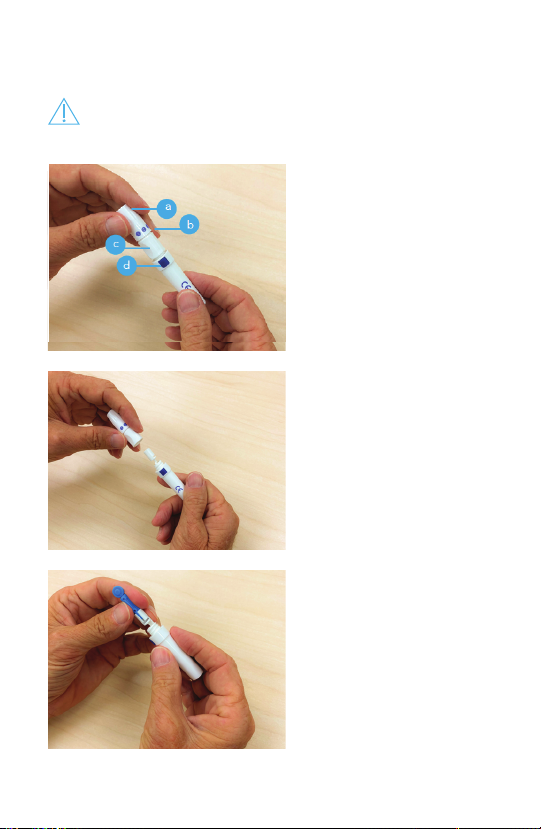
Before handling your lancing device, wash your hands
thoroughly with warm, soapy water. Rinse and dry completely.
Setting Up the Lancing Device
1. Remove the lancing
device
cap by turning it
counterclockwise and then
pulling it straight up from
the device.
2. Insert a sterile lancet into
the grooves of the lancet
holder. Push the lancet into
the device until it is fully
seated in the holder. Twist
the protective cover one
full turn until it separates
from the lancet. Save the
protective cover for lancet
removal and disposal.
Familiarize yourself with
the device.
a. Lancing device cap
b. Depth indicator
c. Cocking control
d. Trigger
11
3. Replace the lancing
device cap back onto
the device; gently turn
clockwise to secure
the cap.
Do not over-tighten.
5. Cock the lancing
device trigger by sliding
the device back until it
clicks. If it does not click,
it may already have been
cocked when you
inserted the lancet. The
lancing device is now
ready to use.
4. Adjust the depth setting
of the lancing device by
turning the wheel to
choose the depth from #1
(minimum depth) to #5
(maximum depth).
Shallower punctures work
for children and most
adults.

12
2. Attach the stand to
the surface by pushing
down with light pressure
against the surface and
pushing the suction
activation button at the
base of the stand until it
slides through to the
other side.
3. Be sure the Rubber
Suction Base and the
surface it is attaching to
are clean.
1. Place the DigiVibe
device with the stand at
the edge of a clean flat
surface with the
DigiVibe tip hanging
over the edge.
Taking a Test with the DigiVibe
Be sure your lancing device
and glucose monitor are ready
for use.

13
4. Press the power
button on the DigiVibe
device to turn it on.
5. Place your finger
against the vibrating
DigiVibe tip. Keep your
fingertip in contact with
the vibrating tip for at
least 12 to 15 seconds
before pricking your
finger and 1 second after.
6. Position the lancet in
the center of the DigiVibe
tip opening so that you
can prick your fingertip.
Do not allow your finger
to lose contact with the
vibrating tip until you
have pricked your
finger.

14
Removing the Used Lancet
1. Remove the lancing device cap
Remove the cap by turning it counterclockwise and then
pulling it straight up from the device.
2. Cover the exposed lancet tip
Before removing the lancet, place the lancet protective
cover on a hard surface then push the lancet tip into the
cupped side of the cover.
3. Remove the lancet
After securing the tip of the lancet with its cover, remove
the lancet by gently pulling away from the lancet device.
4. Replace the lancing device cap
Place the cap back onto the device; turn clockwise to
secure the cap. Do not over-tighten. It is important to use
a new lancet each time you obtain a blood sample. This
will help prevent infections.
5. Discard the used lancet
Discard the used lancet carefully after each use to
avoid unintended lancet stick injuries. Used lancets
and test strips may be considered bio hazardous
waste. Be sure to follow your health
care professional’s recommendations or local
regulations for proper disposal.
Wash hands thoroughly with soap and water after
handling the DigiVibe, test strips, and lancing device
and cap.

15
Cleaning your DigiVibe and DigiVibe tip
1. Clean your DigiVibe device by wiping it with a disinfecting
wipe. DO NOT wet the DigiVibe device.
2. Clean the DigiVibe tip by first removing it from the device and
then cleaning it with liquid detergent and rinsing with water.
DO NOT wet the DigiVibe device.
IMPORTANT: The recommended battery to use with this device is a
1.5v AA lithium battery, which will give the greatest performance and life
of operation before needing to replace the battery. You can also use
other AA batteries; however, the performance and battery life will be
significantly reduced.
Start with the device turned off.
Remove the battery cover by sliding it downward and pressing
the release latch.
Pull up on the battery to lift it out of the compartment.
Remove the old battery.
Insert a new AA lithium battery into the battery compartment. Plus
(+) and minus (–) signs will guide you in placing the battery. The
battery needs to be the Energizer 15VAAL91.
Replacing the battery
Your DigiVibe device uses one 1.5v AA lithium battery. A
lithium battery will operate the DigiVibe device approximately
450 uses, assuming each use requires 15 seconds. If the
DigiVibe does not turn on, check the battery.
Battery
Care and Maintenance of the DigiVibe

16
Cleaning your Lancing Device
The lancing device and cap should be disinfected at least once per
week.
1. First, clean your lancing device and cap prior to disinfecting.
2. Use a new germicidal wipe to rub or swab the outside of
the lancing device until the surface is damp.
3. Wipe dry with a clean, sterile gauze. Wash your hands
thoroughly with soap and water after handling the
DigiVibe and lancing device.
- Do not use alcohol or any other solvent.
- Do not allow liquids, dirt, dust, blood, or control
solution to enter the battery area.
- Do not spray cleaning solution on the DigiVibe and
lancing device.
- Do not immerse the DigiVibe and lancing device in
any liquid, including water.
Care and Maintenance of the
Lancing Device
Replacing the battery (continued)
If the DigiVibe does not power on after you have replaced the
battery, check that the battery is correctly installed. If the
DigiVibe still does not power on, contact Customer Service at
1-844-503-8423.
Disposal of battery
Dispose of battery according to your local environmental
regulations.
17
Troubleshooting
1. DigiVibe stand does not stick to the flat surface.
Detach the stand and wash with mild dish washing
detergent and then dry with a paper towel.
Or, moisten the rubber suction cup prior to placing the stand on
a flat clean surface.
DO NOT WET THE DEVICE.
2. DigiVibe vibration is weak.
Replace the lithium battery if pain reduction effect is not
felt with the new battery. Do not use a rechargeable
battery. We recommend a lithium battery. Alkaline
batteries are not powerful enough to run the device at full
strength.
3. What if my DigiVibe will not turn on?
a. Ensure that the battery is installed correctly.
b. The device is built with a thermostat to ensure it
will not overheat if left on by accident. Should
this occur, wait 5-10 minutes and the device will
reset itself automatically.
4. What if my DigiVibe tip is cracked or damaged?
If your DigiVibe tip is cracked or damaged, contact
Technical Information

18
Bing Innovations, LLC warrants the DigiVibe System to be free
of defects in material and workmanship for a period of one
year from the date of original purchase. If DigiVibe exhibits
such a defect, Bing Innovations, LLC will, at its option, repair or
replace it without cost for parts and labor. The product must
be shipped, prepaid and insured (recommended), to an
authorized Bing Innovations, LLC Service Center. Proof of date
of original purchase is required. The cost to ship the product
to an authorized Service Center is the responsibility of the
consumer. Warranty does not cover finishes or normal wear,
nor does it cover damage resulting from accident, misuse, dirt,
water, tampering, unreasonable use, use of any tip other than
those supplied by Bing Innovations, LLC, service performed or
attempted by unauthorized service agencies, failure to provide
reasonable and necessary maintenance or units that have
been used for commercial purposes. The warranty extends
only to the original purchaser and is not transferable.
ALL IMPLIED WARRANTIES, INCLUDING ANY IMPLIED
WARRANTY OF MERCHANTABILITY OR FITNESS FOR ANY
PARTICULAR PURPOSE, ARE LIMITED IN DURATION TO ONE
YEAR FROM DATE OF ORIGINAL PURCHASE. IN NO EVENT
WILL BING INNOVATIONS, LLC BE RESPONSIBLE FOR
CONSEQUENTIAL DAMAGES RESULTING FROM THE USE OF
THIS PRODUCT. Some states do not allow the exclusion or
limitation of incidental or consequential damages, so the
above limitation may not apply to you. This warranty gives you
specific legal rights, and you may have other legal rights which
vary from state to state.
Limited 1-Year Warranty

19
WARNING: Use of this equipment adjacent to or stacked with other
equipment should be avoided because it could result in improper
WARNING: Use of accessories, transducers andcables other than
could result in increased electromagnetic emissions ordecreased
operation.
WARNING: Portable RF communications equipment (including
peripherals suchas antennacables and external antennas should be
Otherwise degradation ofthe performance of this equipment could
result.
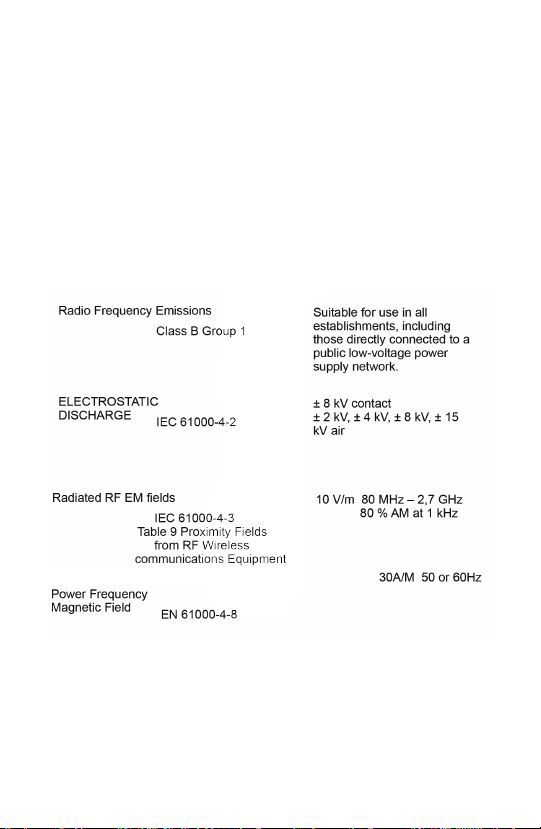
The EMISSIONS characteristics of this equipment make it suitable for
use inindustrial areas and hospitals (CISPR 11 Class A).If it is used in a
required) this equipment might not offer adequate protection to
mitigation measures,suchas relocating or re-orienting the equipment.
In addition to the requirements of 7.9.3 of the general standard, the
technical description shalldescribe precautions to be taken to prevent
adverse events to the PATIENTand OPERATOR due to
ELECTROMAGNETIC DISTURBANCES
a:
The compliances for each EMISSIONS and IMMUNITY standard or test
and IMMUNITY TEST LEVEL.
Warning
20
User profile:
The lancing procedure is typically self-administered, i.e. the patient is
the user and the process is done at-home.
Contra indications:
User does not fit profile.
Device is used off label for other injections.
Device is used for multiple patients.
IP rating. This device has an IP21 rating.
User Profile
Other manuals for DigiVibe
1
Table of contents
Other Bing Innovations Blood Glucose Meter manuals


