Bio-Tek EOS7150-H User manual

HYDROGEN WATER POT
INSTRUCTION MANUAL
EOS7150-H / EOS7150-HG
Thank you for purchasing this Biolux product.
Please read the instructions carefully and follow the safety precautions when using this product. Before
using this product please pay special attention to the “IMPORTANT SAFEGUARDS” (P. 2~4).
This product is intended for household use only.

Table of Contents
Important Safeguards P.02
P.05
P.06
P.07
P.09
P.13
P.13
P.15
P.18
P.19
P.20
P.22
P.22
P.23
P.24
P.26
P.28
Main Features
Specifications
Parts and Handling Instructions
Preparation before Using
How to Use
Hydrogen Water Production
Heating Function
Dispensing Hydrogen Water
How to Dispose Water
How to Connect Cannula (Hydrogen Inhalation)
*EOS7150-HG exclusive
LED Effect
Info / Setting
System Menu & Settings
Cleaning & Maintenance
Q&A on Product Use
Troubleshooting
1
2
3
4
5
6
7
8
9
10
The illustrations used in this Instruction Manual may vary from the actual product that you have purchased.
1
P.21
Gas Delivery (Hydrogen Inhalation)
*EOS7150-HG exclusive
EOS7150-H/HG-EN_V112

IMPORTANT SAFEGUARDS
Basic safety precautions should always be followed when using electrical appliances, including the
following:
1
10. Keep the power cord away from hot surfaces and do not let the cord hang over the edge of tables or counters.
9. Do not use outdoors. Do not place on a unstable surface or near any subjects that can be affected by heat.
8. The use of accessories or attachments not recommended by the appliance manufacturer may result in
electric shock or other injury to persons.
7. Do not use the Power Cord bundled up. Doing so may cause the Power Cord to become excessively hot,
resulting in malfunction.
•Never disassemble, repair, or modify the unit.
•If the power supply cord is damaged, it must be replaced by the manufacturer or its authorized service agent.
6. Do not use or operate the unit with a damaged cord or plug. If the appliance malfunctions or has been
damaged in any manner, unplug the appliance and return it to the nearest authorized service facility for
examination, repair or adjustment.
•When unplugging, pull by the power plug, not the cord.
•Do not touch the hot surfaces, especially the heating surface of the product.
5. Unplug from outlet when not in use and before cleaning. Allow to cool before adding or removing parts, and
before cleaning the appliance.
• Do not allow children or any person unfamiliar with the appliance to use it.
• Do not leave the unit within the reach of infants.
• Special attention must be given to prevent infants from putting the plug into their mouth.
4. Close supervision is recommended when the appliance is used by or near children.
• Do not pour water directly from the tap.
• Do not put the unit in a sink or allow it to get wet.
• Do not turn the unit upside down when the bottom is wet.
3. To safeguard against fire, electric shock and possible injury, keep the power cord, plug and the appliance
away from water or other liquids.
2. Avoid touching hot surfaces and do not block or clog the gas vent opening under any circumstances.
1. Read all instructions thoroughly.
11. Do not place on or near a heated surface such as a gas or electric stove, or in a heated oven.
12. Always use extreme caution when moving an appliance containing hot liquids.
13. Use a single outlet that matches the power rating of the appliance.
14. Do not use the appliance for other than intended or specified purposes.
15. To protect against electrical hazard, unplug the cord before cleaning.
16. Scalding may occur if the lid is removed during heating.
SAVE THIESE INSTRUCTIONS
THIS APPLIANCE IS FOR HOUSEHOLD USE ONLY.
A short power-supply cord has been provided for your safety. To reduce risks from entanglement or
tripping, a longer cord is not recommended.
A.
Extension cords should only be used if care is exercised.B.
If using a extension cord: (1) the marked electrical rating of the extension cord should be at least as high
as the electrical rating of the appliance; (2) if the appliance is of the grounded type, the extension cord
should have a ground-type 3-pronged plug; and (3) the longer cord should not drape over the countertop
or tabletop where it can be pulled on by children or tripped over.
C.
2

Before Use
These WARNINGS and CAUTIONS are intended to protect you and others from personal injury and household
damage. To ensure safe operation, please follow carefully.
WARNINGS
Do not modify the product. Only a repair technician
may disassemble or repair this unit.
•Attempting to do so may cause fire, electric shock or
injury. Make any repair inquires to our Customer
Service.
Do not immerse the product in water or splash it
with water, and do not put it on a wet surface such
as a sink.
•Doing so may cause short circuit or electric shock.
Do not plug or unplug the Power Cord if your hands
are wet.
•Doing so may cause electric shock or injury.
Do not allow children to use the product
unsupervised. Keep it out of the reach of infants.
•Children are at risk of fire, burns, electric shock or
injury.
Do not tilt the product or tip it over.
•Hot water may spill from the Spout or Gas Vent, even if
the Dispense Lock is on.
Insert the Power Plug completely and securely into
the electrical outlet.
•A loosely inserted Power Plug may cause electric
shock, short circuit, smoke or fire.
Do not damage the Power Cord. Do not bend, pull,
twist, fold, or attempt to modify the Power Cord. Do
not place it on or near high temperature surfaces or
appliances, under heavy items or between objects.
•A damaged Power Cord can cause fire or electric
shock..
Do not use the product if the Power Plug or Power
Cord is damaged or if the Power Plug is loosely
inserted into the electrical outlet.
•Doing so may cause electric shock, short circuit or
fire.
Use only an electrical outlet rated at 15 amperes
minimum, and do not plug other device into the
same outlet.
•Plugging other devices into the same outlet may
cause the electrical outlet to overheat, resulting in fire.
If the blades or surface of the Power Plug become
soiled, wipe them clean.
•A dirty Power Plug may cause fire.
Do not use a power supply voltage other than being
specied on the product.
•Use of any other power supply voltage may cause fire
or electric shock.
Stop using immediately if you notice any of the
following symptoms indicating a malfunction or
breakdown.
Do not place ice inside of the product.
•Doing so may cause condensation, resulting in
electric shock or breakdown of the product.
•The Power Plug or Power Cord has become very hot.
•The Power Cord is damaged or the electricity turns on
and off when touched.
•Smoke is arising from the product or there is burning
smell.
•Some part of the product is cracked, loose or
unstable.
•The product heats water continuously and does not
turn to Keep Warm mode.
•The Body is deformed or unusually hot.
This product generates hydrogen gas. While
normal use of this product would not create an
explosion hazard, care must always be taken when
using hydrogen. Failure to operate this product in
accordance with instructions set forth in this manual
may create a hazardous situation.
•Standard precautions for the use of hydrogen should
be taken when using the product.
•Do not use any form of gas storage vessel in
conjunction with the product to store hydrogen. Stored
quantities of hydrogen pose an explosion hazard.
•Do not use any open flame or other ignition source
within 25cm (10 inches) of the Lid or Lid Vent.
If any of the above occurs, unplug the product
immediately and return to the store where you
purchased it for check-ups and/or repairs. Continued
use of the product may cause smoke, fire, electric
shocks or injury.
3

CAUTIONS
This product is not intended for used by persons
(including children) with reduced physical, sensory
or mental capabilities, or lack of experience and
knowledge, unless they have been given supervision
or instruction concerning use of the product by a
person responsible for their safety. Children should
be supervised to ensure that they do not play with
the product.
Allow the product to dry completely when storing
the product in areas where it may freeze for a period
of time.
Do not drag the product over any surface while
attempting to move it.
Avoid using the product near radios, TVs,
computers, etc.
Must keep the product and/or the Lid Vent away from
re or any source of ignition.
Pour only potable drinking water into the product.
The product should be located on a at, level
surface for operation.
If the Power Cord is damaged, it must be replaced by
an appropriate cord or assembly made available by
the manufacturer or its service agent.
This product is shelf life sensitive. Do not store
for more than 6 months prior to installation and
operation.
Do not touch the Lid Vent or bring your hands near
the Gas Vent during heating.
Do not cover or block the Lid and/or Lid Vent with
anything such as a dishcloth.
Do not ll over the maximum Water Level Line.
Do not let the unit fall over. Do not lift, tilt, or shake
the unit or carry it by the lid.
Close the Upper Lid securely.
Do not slam the Upper Lid when closing.
Avoid rough handling, dropping or bumping the
product.
Do not use the product near a heat source or on top
of induction heating cookers.
Do not allow water to come into contact with the
Control Panel.
•Steam may result in scalds if the contained water is
hot.
•If water left inside freezes, it may cause breakdown or
malfunction.
•Doing so may cause damage to surfaces such as
countertops.
•The product may cause interference with certain
electronics.
•Do not use any open flame or other ignition source
within 25cm (10 inches) of the Upper Lid or Lid Vent.
•Poor water quality may have negative effects on your
health and the product. For hard water, please look for
pre-treatment solutions.
•Blockage can cause excessive internal pressure
which may damage the unit and void the warranty.
•Overfilling may cause water to spill out, resulting in
scalds if the contained water is hot.
•Doing so may result in scalds by hot water spilling out
from the Lid or Lid Vent.
•Water may spill out when the product is overturned,
resulting in scalds if the contained water is hot.
•Water may spill out, resulting in scalds if the contained
water is hot.
•Doing so may cause damage or cease operation of
the product.
•Doing so may cause fire, breakdown or damage of the
product.
•Doing so may cause product malfunction.
4

2MAIN FEATURES
The Biolux EOS7150 Series (EOS7150-H & EOS7150-HG) Hydrogen Water Pot has been developed to
produce hydrogen enriched drinking water.
The product produces pure hydrogen (and oxygen as a by-product) by the electrolysis of water using a
Proton Exchange Membrane (PEM) cell. Only pure or deionized water (Reverse Osmosis Water) is the only
liquid that will come into contact with the cell. As this is consumed it must be refilled from time to time as
required.
To ensure the product meets our high expectations with regards to reliability and performance, we have
tested this model extensively at our manufacturing plant to ensure reliability and longevity of the unit.
Other features include:
The of EOS7150-HG model provides a source of high purity hydrogen gas for inhalation.
Safety
Automatic Shut-Off Smart Heating
Intelligence
Keep Concentration
at Peak Levels
Informative User
Interaction
Convenience
1.8L Portable Soothing Lighting Drinking & Inhaling
5

3SPECIFICATIONS
SPECIFICATIONS HYDROGEN WATER POT
Model No EOS7150-H
Hydrogen Enriched Water Hydrogen Enriched Water
Hydrogen Gas
EOS7150-HG
1.8 L
200W
> 99.999%
1.0 - 1.2 ppm*
-550 mv (approx.)*
AC 100 - 120V, 50/60Hz or AC 220 - 240V, 50/60Hz
No change to water pH
50℃ - 65℃ - 80℃ (122℉ - 149℉ - 176℉ )
185 x 290 x 330 (mm)
No by-products (Hypochlorous Acid & Ozone)
*Dissolved concentrations of hydrogen in water and ORP may vary according to water quality and temperature.
3 kg (approx.)
NA > 12 ml/min
Features
Capacity
Voltage
Rated Power
Hydrogen Production Purity
Heating Temperatures
External Dimensions (W x D x H)
Net Weight
Safety Qualications
Hydrogen Water
Hydrogen Gas
6
Concentration
ORP
pH
Delivery Rate
Heating function up to 80℃ (176℉)

4PARTS & HANDLING INSTRUCTIONS
Part Discriptions
Lid Opening Lever
Cannula Connector (Accessory, EOS7150-HG exclusive)Filter Chamber
Upper Lid
7
Lid Vent
• Connect Cannula
Connector here for
inhalation use.
• Do not block this Vent.
• The exhaust contains hydrogen
gas. Do not use an open flame or
other ignition sources within 25cm (10
inches) of the Lid Vent.
This could pose a fire hazard.
• Used for cannula connection to the
Lid Vent in Model EOS7150-HG. For use
instructions, see pg.19.
• Install Filter and pour RO water
for electrolysis in here.
Inner Lid
Inner Lid Gasket
• Provide sealing to maintain pressure for hydrogen dissolution.
• Prevent water leak when tilted.
Front Lid
Lid Latch
Filter Lever
Filter Cartridge
• For care and use
instructions, see pg.24.
Body
Maximum Water Level
Pure Water Chamber
• Collect pure water for
electrolysis in here.
• Vent oxygen here.
Control Panel
Inner Container
• Borosilicate Hard Glass
Water Level Window
Power Cord
• The shape of plug differs
according to region.
Twist Tie
Cleaning Powder
(Accessory)
• Remove the twist tie
holding the Power
Cord before use.
• Citric Acid 40g. For use
instructions, see pg.25.
Heating Surface
LED Light
Hydrogen Output
Spout
• Dispense Hydrogen Water
from here.
• Remove the cap before
use.
Drip Grid
Drip Tray
Drain Tube
• For use instructions, see pg.19.
Filter
(EOS7150-HG exclusive)

A LIGHT TOUCH is all that is required when pressing buttons
8
Control Panel
DISPLAY
• Displays operating information and
explanatory texts.
TEMP SET button
• Start Heating Function
(see pg.15).
• Also used for Temperature Settings
(see pg.16).
START button
• Start Hydrogen Water Production (see pg.15).
• Also used for Resuming Peak Production After
HEATING light
START light
MENU button
• Press to perform Menu Functions
(see pg.22).
DISPENSE button
• Press once to Unlock, then press again
to dispense water (see pg.18).
MENU light
DISPENSE light
EOS7150-H
GAS DELIVERY & MENU button
• Start Hydrogen Gas Timer (see pg.20).
• Also used to perform Menu Functions (see pg.22).
GAS DELIVERY & MENU light
EOS7150-HG
(dual-functions in EOS7150-HG)
In EOS7150-HG
Refilling New Water (see pg.14).

To Detach
How to Detach / Attach the Front Lid
Lift the Front Lid to about a
15-degree angle.
Pull the Front Lid forward to
remove.
To Attach
Push the Front Lid back into
place at the same angle until it
clicks shut.
To Open
How to Open / Close the Upper Lid
Hold the Pot Body down.
Lift up the Upper Lid using
the lever.
To Close
Press lightly on the Upper Lid
until it attaches to the Body with
no gap.
15°
The product needs water to function. Water is filled separately in the Filter Chamber and Inner
Container. The quality of the water used for the product will have an impact on the time between
cleanings and ultimately on the life of the product.
The water added into the Filter Chamber is used exclusively in the electrolysis for hydrogen
production, for which, the higher the water purity, the better the sustainability of the
performance. Although the Filter inside is to provide purification, it is important to use water
with proper purity levels to sustain the performance. Please adhere to the operating guidelines
for the water that is to be added into the Filter Chamber.
• Total Dissolved Solid (TDS) - Less than 40ppm
• Conductivity - Less than 80μs/cm
9
Do not use tap water unless you are sure the quality adheres to the above
requirements. If the product is operated with poor water quality in the Filter and/or
Pure Water Chamber, the warranty will be void.
Reverse Osmosis (RO) /
Pure Water Recommended
5PREPARATION BEFORE USING
Do not use local tap water.
Water to be Added into the Filter Chamber
Local Recommendation
Recommended to use RO water.

Water to be Added into the Inner Container
The water in the Inner Container is for hydrogen enrichment and drinking. The water quality
must meet your local drinking water standards. Poor quality water may have negative effects
on your health and the product.
Local water conditions may require treatment of water to inhibit scale formation,
sediments and to remove chlorine, odor and taste. Please check with your local water
treatment services for recommendations. No Warranty on damage as a result of this
unit requiring cleaning due to hard or poor water quality.
Do not pour anything other than water into the product.
When using mineral or alkaline ionized water or hard water (> 180ppm CaCO3):
When mineral water, alkaline ionized water or hard water is used, after heating, a
floating residue or a milky white substance may form on the surface of the Inner
Container. This is due to the minerals in the water and is harmless to your health.
Frequent cleaning is recommended.
10
To clean the product before using for the rst time, please
refer to “Cleaning and Maintenance” on pg.24.
Filtered and / or Puried Water is
Recommended
Do not use local tap water,
which is unltered.
Standard Preparation Procedures
1
Place the product upright on a at surface
The product should be located on a flat, level surface for operation.

11
Select language
Select your language from the
menu. Once you have selected
your language, the Display
will be displayed the selected
language at every restart.
4
To change the language afterwards, please see pg.23 for further instructions.
Remove the Spout cap and plug the product to a standard AC outlet
The product takes
10 sec to start up.
3
Assemble the Filter Lever onto the Filter Cartridge. Open the Front Lid
and attach the Filter Cartridge at the bottom of the Filter Chamber
2
Initial Use

12
Fill the Filter Chamber with the appropriate quality of water to the MAX
line
5
MAX line
Pour in water with
a pitcher, bottle or
another container.
Approx.
300ml
• Please refer to pg.09 for the operating guideline on adding water to the Filter Chamber.
• Do not pour water directly from tap or place the product on a wet surface such as a sink.
• Do not ll above the MAX line.
• Use RO / Pure water only.
Open the Upper Lid and ll the Inner Container with quality ltered water
to the MAX line
6
MAX line
• Please refer to pg.10 for the operating guideline for the water to be added to the Inner Container.
• Do not pour water directly from a tap or place the product on a wet surface such as a sink.
• Do not ll above the MAX line.
Pour in water with
a pitcher, bottle or
another container.
Max. 1800ml
Standby ready. Ensure Front and Upper Lids are reatached and closed
before using.
7
Upon successful completion of all the
above preparations, the product is
now ready to deliver hydrogen gas and
hydrogen water.
Current water temperature
6HOW TO USE
Time vs. Dissolved Hydrogen & ORP Levels
Current
Temperature
Current Hydrogen
Levels in the water
(simulated values)
The LED turns from GREEN to BLUE
when ready for taking - 1000ppb or above
(recommended levels for taking).
Operation Period 10 Min 15 Min 20 - 30 Min
Dissolved Hydrogen
Levels (ppb) 700~800 900~1000
(above)
1100~1200
(above)
below -400
Green
* Dissolved concentrations of hydrogen in water and ORP may vary according
to water quality and temperature.
* LED Effects can be turned off. For use instructions, see pg.23.
below -450
Blue
below -500ORP Levels
LED Effects
Blue means
Ready
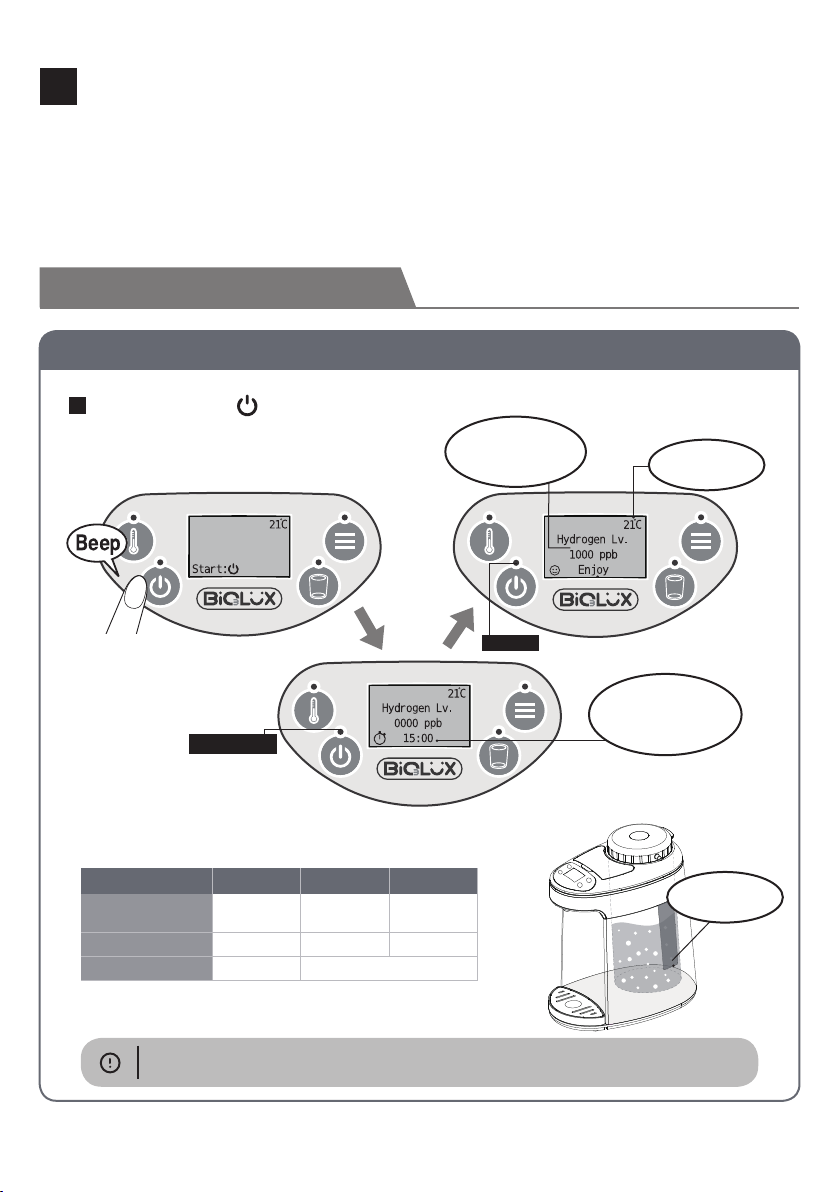
Press once on the button.
13
Produce Hydrogen Water
Hydrogen Water Production ON
During Standby / Heating Function
The first time you use the new product you may notice the smell of plastic. This is normal and will gradually go
away.
Be sure to attach the Filter Cartridge, fill the Filter Chamber and Inner Container with the proper required quality
of water to the MAX line before proceeding to operate.
A bit less bubbling may be seen at initial use of the product. The bubbling will be increased gradually in 4-8
hours while keeping the use.
Observed hydrogen bubbling in the Inner Container.
Having some bubbles of uneven sizes at the starting stage is normal.
Blinks
Steady ON
Remaining time
to recommended
concentrations for taking -
1000ppb or above.

LED remains
BLUE
LED resumes
GREEN
Press once on the button.
14
Anytime during Hydrogen Water
Production after refilling new water
into the Inner Container.
The "Resuming Peak Production" function can become fully automatic while Heating Function is
activated (see further instructions on pg. 17)
Automatically Maintaining Peak Concentration
Resuming Peak Production After Relling New Water
Once the hydrogen water concentration reaches the peak - 1,200ppb, the system will start
the "Automatically Maintaining Peak Concentration" mode to maintain this saturated status
automatically.
Blinks Blinks
Reduced amount and/or having smaller sizes of bubbles during
period of "Automatically Maintaining Peak Concentration" is normal.
The system is programmed to reduce the unnecessary peak
production after 30 minutes from the initial start.
Each time the hydrogen water production function is activated, the
system will provide 3-hour uninterrupted hydrogen production and
concentration maintenance. During this period, if the user does not
perform any operations (including start, restart, and water outlet,
etc.), the hydrogen production will automatically stop after 3 hours.
-If there is any operation during this period, the system will restart
the timer after the operation for a 3-hour period.
Blinks Steady ON

Heating Function
Heating & Maintaining Temperature ON
Press once on the button to unlock.
Either during or not during the operation of hydrogen water production.
Press and hold the button for 3 seconds.
Hydrogen Water Production OFF
During Hydrogen Water Production ON / Automatically Maintaining Peak Concentration
Steady ON Light OFF
* 3 seconds
1
The Heating green light blinks slowly, the
function is unlocked for 3 seconds.
• If the Heating Function is not triggered, the Heating Lock is activated after 3 seconds.
Heating Lock
An automatic safety function to avoid unwanted heating if the button is accidentally
pressed.
*Do not activate the Heating Function when the Inner Container is empty.
Blinks Slowly
15

Heating & Maintaining Temperature ON
Press again on the button to start Heating & Maintaining Temperature based on settings.
During the function unlocked period.
Heating
Maintaining
Temperature
Steady ON
Current / Set
Temperature
2
• To stop Heating at anytime, press the button again.
3-hour Automatic Heating Stop
Activate the Heating Function provides a 3-hour Heating & Maintaining Temperature based on
settings and it will stop automatically.
3 seconds
Blinks Slowly Blinks
16
Changing Temperature Settings
21°C / 50°C
70°F / 122°F
Current Temperature / Set Temperature
Press the button twice to change temperature settings (PS. the rst press is to unlock
the function).
Under Standby or Heating Mode
Press once to unlock Change the temperature settings with a gentle touch
on the button again within 3 sec after unlocking.
In 3 seconds
Every press on can change the heating
settings as shown in the left.
Stop at the desired temperature option to x
the setting and the pot will start to heat.
Blinks Stead ON
21°C / 65°C
70°F / 149°F
21°C / 80°C
70°F / 176°F
• If there is any operation during this period, the system will restart the timer after the operation for a
3-hour period.

Heating & Maintaining Temperature OFF
In the case where the Heating & Maintaining Temperature function is ON during the hydrogen
water production, deactivating the hydrogen water production will also turn off the Heating &
Maintaining Temperature function.
Automatically Resuming Peak Production During Heating
The "Automatically Resuming Peak Production" function is
available while Heating Function is activated.
When refilling new water in the Inner Container and there is a
detection of 3˚C (7˚F) reduction during the Heating Function is
on, the system will reactivate the Resuming Peak Production
automatically. The production time will be rescheduled for a new
15 minutes to re-enrich the hydrogen water concentration to peak.
How to do:
Unplug the pot and wait till the temperature to
cool before re-plug.
Note:
Frequent overheat may cause deformation to the product.
Blinks Steady ON
Automatic Overheat Protection
When system is overheating (water is empty
when heating), a safety protection will be
triggered to suspend all functions until
system cools.
x10s
17

18
• To stop dispensing within 10 seconds, press the button again.
2
Press the button again to dispense water
1
Press the button to unlock
• When the DISPENSE light is off, water cannot be
dispensed.
The DISPENSE green light blinks, the
function is unlocked and water can be
dispensed now.
Activate dispensing with a gentle touch
on the button again within 3 sec after
Unlocking. The “DISPENSE” green light
remains "on" during water dispensing.
3 seconds
Dispensing Hydrogen Water
Blinks
Steady ON
*Right after dispensing, the DISPENSE light turns off and the Dispense Lock is activated.
Automatic Dispense Stop
Press once the button provides a 10-second dispensing and it will stop automatically.
[Approx. 250ml (±10%) ]
• If no water is dispensed, the Dispense Lock is activated after 3 seconds.
*Do not tilt or shake the product after dispensing. Water may drip from the Spout, causing
scalds if the water is hot.
Dispense Lock
An automatic safety function to prevent water from dispensing if the button is accidentally
pressed.

• There could still be a little water
remaining in the Pure Water
Chamber after draining through
the Drain Tube.
• Take precaution to avoid scalds
If water in the Inner Container
is still hot. It is recommended
to dispose water after it cools.
Unplug the Power Cord
2
Detach the Front and
Upper Lid and remove the
Drip Grid and Tray
3
Remove the Drain Tube
Cap and drain all the
electrolysis water out
Pour in water with a
pitcher, bottle or another
container to the MAX line.
Attach your cannula on
the Cannula Connector.
Enjoy hydrogen inhalation!
Insert the Cannula
Connector into the Lid Vent.
4
Hold the product with both
hands and dispose all
remaining water
5
Dispense as much water
out as possible
1
1
How to Dispose Water
19
How to Connect Cannula * EOS7150-HG exclusive
Connect Cannula to Lid Vent
2
3 4
Gasket
This manual suits for next models
1
Table of contents
Other Bio-Tek Water Filtration System manuals


Popular Water Filtration System manuals by other brands


KENT
KENT Prime Mineral RO Instruction handbook

Beko
Beko OWAMAT 10 Instructions for installation and operation

Foxx
Foxx GALAZY 2000 Installation & operation manual

SpectraPure
SpectraPure MarinePRO DI System Installation and operating manual

Spruce
Spruce AIRaider Installation & operating instructions

WilTec
WilTec ECF-15000 instruction manual


