Bionizer BioDoser User manual

TM
INSTRUCTION BOOK
Simple, Fully Programmable Dosing System
Please read before you call us for advice. Version 2.1a, 19-Sep-2019
www.bionizer.com.au www.bionizer.com
BioDoser
C h l o r i n e - F r e e F r e s h w a t e r P o o l s
DOWN UP
AUTO /
OFF
CANCEL
PROGRAM /
SET
C h l o r i n e - F r e e F r e s h w a t e r P o o l s
TM
BioDoser

Page
DRUM WEIGHT HOSE INSTALLATION . . . . . . . . . . . . . . . . . . . . . . . . . . . . . . . . . . . . . . . . . . . . . . . 8
DOSING ON / OFF KEY. . . . . . . . . . . . . . . . . . . . . . . . . . . . . . . . . . . . . . . . . . . . . . . . . . . . . . . . . . . . 9
SET DOSING SCHEDULE . . . . . . . . . . . . . . . . . . . . . . . . . . . . . . . . . . . . . . . . . . . . . . . . . . . . . . . . . . 9
TEE PIECE INSTALLATION . . . . . . . . . . . . . . . . . . . . . . . . . . . . . . . . . . . . . . . . . . . . . . . . . . . . . . . . . 6
TABLE OF CONTENTS
ACID SAFETY . . . . . . . . . . . . . . . . . . . . . . . . . . . . . . . . . . . . . . . . . . . . . . . . . . . . . . . . . . . . . . . . . . . 5
INTRODUCTION . . . . . . . . . . . . . . . . . . . . . . . . . . . . . . . . . . . . . . . . . . . . . . . . . 3
BIODOSER ILLUSTRATION . . . . . . . . . . . . . . . . . . . . . . . . . . . . . . . . . . . . . . . . . 4
BIODOSER INSTALLATION . . . . . . . . . . . . . . . . . . . . . . . . . . . . . . . . . . . . . . . . . 6
CONTROL BOX INSTALLATION . . . . . . . . . . . . . . . . . . . . . . . . . . . . . . . . . . . . . . . . . . . . . . . . . . . . . 7
DOSING PUMP HOSE INSTALLATION . . . . . . . . . . . . . . . . . . . . . . . . . . . . . . . . . . . . . . . . . . . . . . . . 7
TEE PIECE HOSE INSTALLATION . . . . . . . . . . . . . . . . . . . . . . . . . . . . . . . . . . . . . . . . . . . . . . . . . . . . 8
SAFETY INSTRUCTIONS . . . . . . . . . . . . . . . . . . . . . . . . . . . . . . . . . . . . . . . . . . . 5
PROGRAMMING YOUR BIODOSER . . . . . . . . . . . . . . . . . . . . . . . . . . . . . . . . . . 9
SET DOSE SIZE . . . . . . . . . . . . . . . . . . . . . . . . . . . . . . . . . . . . . . . . . . . . . . . . . . . . . . . . . . . . . . . . . . 9
BIONIZER CONTACT INFORMATION . . . . . . . . . . . . . . . . . . . . . . . . . . . . . . . . 12
PUMP SQUEEZE TUBE LUBRICATION AND REPLACEMENT . . . . . . . . . . . . . . . . . . . . . . . . . . . . . . 10
TROUBLESHOOTING . . . . . . . . . . . . . . . . . . . . . . . . . . . . . . . . . . . . . . . . . . . . . 11
MANUAL DOSE . . . . . . . . . . . . . . . . . . . . . . . . . . . . . . . . . . . . . . . . . . . . . . . . . . . . . . . . . . . . . . . . . 9
DOSING PUMP MAINTENANCE . . . . . . . . . . . . . . . . . . . . . . . . . . . . . . . . . . . . 10
CONTENTS
2

INTRODUCTION
IMPORTANT : WHEN DOSING ACID, ALWAYS USE DILUTED ACID.
SEE SAFETY & WARRANTY SECTION.
IF USING THE BIODOSER FOR DOSING LIQUID CHLORINE, AN ANTI-CRYSTALLISING
AGENT IS HIGHLY RECOMMENDED TO PREVENT THE ONE-WAY VALVE FROM
BECOMING BLOCKED. THIS IS AVAILABLE FROM YOUR POOL PROFESSIONAL.
PLEASE TAKE THE TIME TO READ THESE INSTRUCTIONS CAREFULLY AND NOTE HOW
THEY APPLY TO YOUR PARTICULAR POOL AND EQUIPMENT.
! Liquid Pool Blanket.
! Regular addition of premixed Buffer slurry to
maintain Total Alkalinity.
! Any other supplement that can be dispensed in
liquid form, and which is needed on a regular
basis.
The BioDoser can be safely used on all types of pool
finishes, with all types of sanitation systems. Even
those users who have a salt chlorinator system, can
use BioDoser to maintain pH, backup sanitiser or
other supplements.
Welcome to the BioDoser, semi automatic dosing
system. BioDoser can be used to regularly dispense
a preset dose of a liquid pool supplement of your
choice.
! Semi Automatic Acid dosing (for fully automatic
Acid dosing, use the Bionizer pH BOSS).
This not only saves you time, but helps with your
overall pool balance, by maintaining a steady level
of the required supplement, rather than adding a
large quantity every so often.
Some example applications include :
Bionizer is committed to creating a more healthy
environment… the BioDoser has been created in
response to requests for this type of user friendly
system.
! Regular addition of IonLife+.
The BioDoser takes the hassle out of regular
addition of pool supplements, by doing the job for
you. Program how often you want a dose added, for
example once each hour of filtration, once per day,
once per week etc. Then program the quantity to
be added for each dose. It’s as simple as that !
If you use a pool care service you can reduce the
time they visit… they are now almost redundant.
Let them visit once a month and sweep the pool,
check the skimmer and add some supplement to
the container and you do no pool care whatsoever.
! Backup Sanitiser such as liquid chlorine.
Other components to advance ourselves along the
path back to a toxic free world include the original
Bionizer Bio-effective ionic pool and spa purifer, pH
BOSS Automatic pH Controller, and also the Eco-
Oxidizer chemical free pool oxidizer.
Take note of the few “do’s and don’ts” and you will
have a simple and trouble free start up.
This is the Bionizer “Ultimate Solution” to Pool
Care…
3
INTRODUCTION

DOWN UP
AUTO /
OFF
CANCEL
PROGRAM /
SET
C h l o r i n e - F r e e F r e s h w a t e r P o o l s
TM
BioDoser
4BIODOSER ILLUSTRATION
BIODOSER ILLUSTRATION
DISPLAY
DOSING ON / OFF
PROGRAM / SET
STATUS INDICATOR
UP & DOWN SETTING ADJUSTMENT
PERISTALTIC DOSING PUMP
DC POWER SOCKET
AUTO ..............Normal dosing according to program.
OFF..................Unit will not dose any supplement.
Press this button to cancel without saving changes when adjusting
settings in the programming menus.
DELAY .............Delay function : Unit will not dose supplement for
24 hours. For example use this function if some
buffer was added to the pool.
Press to select:
Press to save changes when adjusting settings.
Press to scroll through the four user setting menus.
Add...BioDoser dosing pump is running, adding supplement to the
pool.
Dly ....BioDoser is in Dosing Delay mode for 24 hours.
Off ....BioDoser dosing pump will remain OFF at all times.
Wait..BioDoser start-up delay to ensure pool lines have water flow.
16 x 2 Line alphanumeric LCD with LED backlight.
Press to makes changes to user settings.
Precision, high quality dosing pump. 150mL/min flow rate while
running.
Use only genuine power adaptor or cable supplied by Bionizer to
avoid damage to your BioDoser.
One Way
Valve
Tee Piece and one way valve
Tee Piece

5
SAFETY INSTRUCTIONS
SAFETY INSTRUCTIONS - READ
ALWAYS ADD THE ACID TO WATER ALREADY IN THE DRUM. NEVER ADD WATER TO ACID.
PLEASE FOLLOW THESE IMPORTANT ACID SAFETY INSTRUCTIONS.
ACID SAFETY (WHEN USING BIODOSER TO DOSE ACID)
3. WARNING - Do not allow children to use this
product unless they are closely supervised at all
times. This is to prevent accidental injury.
3. Turn off the power to the BioDoser before
replacing the peristaltic dosing pump squeeze
tube.
2. Damage due to using undiluted or insufficiently
diluted acid is not covered by warranty.
It is important to follow basic safety precautions
when installing and using this electrical equipment,
including the following :
IMPORTANT :
2. WARNING - Always read and follow directions
and warning labels on containers of any
supplements that you will dose with BioDoser.
4. Keep all cables and tubes visible and do not bury
them. Also, position them so that they do not get
damaged by lawn mowers, hedge trimmers, etc.
CAUTION :
1. Ensure you read and follow all instructions. 1. The BioDoser must be installed and operated as
specified.
Your warranty could become invalid should you fail
to observe the following :
3. WARNING - ALWAYS USE DILUTED ACID AT A
RATIO OF NOT LESS THAN 4 PARTS WATER TO
1 PART ACID.
4. The life of the unit will be extended (as with most
other pool equipment) if it is placed indoors or in
an enclosed structure. This is recommended as
sunlight can damage the Liquid Crystal Display on
the face of the control unit. The LCD is covered
within the warranty on a pro-rata basis.
5. WARNING - To prevent electrical shock, acid
spillage or incorrect dosing, replace damaged
cords or tubes immediately.
5. Always power the BioDoser from a genuine
Bionizer power adaptor or cable. An incorrect
adaptor could damage the BioDoser and will void
your warranty.
1. WARNING - always use diluted acid at 1 part acid
to 4 or more parts water with BioDoser.
2. ALWAYS add acid to a larger volume of water.
NEVER add water to acid.
3. ALWAYS wear safety glasses and gloves.
4. ALWAYS dilute acid in a well ventilated area,
preferably outdoors.
5. ALWAYS have a source of fresh water nearby,
such as a hose, so you can wash down accidental
spillages.
6. ALWAYS ensure that the acid drum is BELOW
the level of the BioDoser Tee, to ensure that the
acid cannot syphon from the drum to the pool.
7. In case of acid spillage onto clothing, eyes, skin,
concrete etc, wash down with large amounts of
fresh water immediately. SE EK MEDICAL
ADVICE IF NECESSARY.
1. e.g. Add water to a
20 Litre acid drum
to approx 1/2 full.
_
In case of a larger
drum, add 1 part
acid to 4 parts
water to be mixed
as above
2. Add 4 Litres only of
Hydrochloric Acid.
3. Top off the drum
with more water.
1. WARNING - always use diluted acid at 1 part acid
to 4 or more parts water with BioDoser.
2. ALWAYS add acid to a larger volume of water.
NEVER add water to acid.
3. ALWAYS wear safety glasses and gloves.
4. ALWAYS dilute acid in a well ventilated area,
preferably outdoors.
5. ALWAYS have a source of fresh water nearby,
such as a hose, so you can wash down accidental
spillages.
6. ALWAYS ensure that the acid drum is BELOW
the level of the BioDoser Tee, to ensure that the
acid cannot syphon from the drum to the pool.
7. In case of acid spillage onto clothing, eyes, skin,
concrete etc, wash down with large amounts of
fresh water immediately. SE EK MEDICAL
ADVICE IF NECESSARY.
For pools of 25,000L (6,500 Ga) and under, dilute 8
parts water to 1 part acid. So add 2 Litres of acid
for the 20 Litre drum in the example above.

Filter
For sand filters,
glass or silica sand
media provides
optimum results.
Filter
Pressure
Pool
Pump
Oxidizing
Pod
pH BOSS
Tee
Ionizing
Pod
BioDoser
Tee
6BIODOSER INSTALLATION
READ THROUGH ALL STEPS BEFORE BEGINNING THE INSTALLATION.
BIODOSER INSTALLATION
NOTE: Turn off all valves prior to fitting the T-piece
(avoid leaks), and turn them back on again before
switching pool pump back on.
1. Installing your BioDoser takes around 30
minutes.
TEE PIECE INSTALLATION
The BioDoser can be installed onto a new pool or an
existing pool with minimal pool preparation. As
always, ensure that the pool is correctly balanced.
2. Alternatively engage a competent person to do
the job.
3. If installing it yourself you will need :
!PVC pressure glue and primer.
!A fine tooth saw.
4. The Injection Tee must be fitted on the pipe that
sends water back to the pool after it has been
filtered (the “Return Line”).
The Injection Tee should be installed LAST in the
return line, after any other equipment,
including Bionizer products, Salt Chlorinator
Cell, Heater, etc.
1. For 50mm (2") pipe, cut out a 2.5cm (1") section
of pipe sufficient for the Injection Tee. For 40mm
(1.5") pipe, where the reducing bushes will be
used, cut out a 3.5cm (1.5") section of pipe.
2. If the Tee piece diameter is larger than the pipe
then use the 50mm to 40mm reducing bushes
provided by glueing them in place in the Tee
piece before fitting. The pipe should now fit
snugly into the Tee piece.
3. The Tee piece can be installed in any orientation.
HINT : If you mount the Tee on a horizontal pipe
with the one way valve point downwards, then
the clear tube is less likely to kink over time.
If a heater is
installed, then
fit the BioDoser
Tee AFTER the
heater.
FLOW DIRECTION
BIODOSER INSTALLATION
2. Make sure that the unit is undercover and that the
Display is not in direct sunlight as it is not covered
by warranty if it is damaged by sunlight.
NOTE: Make sure that the BioDoser is positioned
near enough to a power outlet, to the T-piece and
supplement drum to allow the power connecting
and sensor cables to reach without straining.
2) Plug the optional AC/DC power adaptor into
one of the two mains power outlets provided
on the Bionizer unit.
3) When connecting to a pool control system,
connect the AC/DC adaptor to a suitable power
outlet on the control system, if available.
SET THE TIMER FOR THIS OUTLET TO THE
SAME SETTING AS THE POOL PUMP OUTLET.
1) Connect the short DC to DC adaptor lead from
one of the Bionizer DC outlet sockets to the
BioDoser DC Power Socket.
3. The BioDoser should only be powered on when the
pool pump is running. This can be done in 3 ways : D O N OT S W I T C H T H E P O W E R O N U N T I L
INSTALLATION HAS BEEN COMPLETED.
The control box MUST be mounted vertically, with
the cables at the bottom, in order to be weather
resistant. Any water ingress due to the unit being
incorrectly mounted is not covered by warranty.
CONTROL BOX INSTALLATION
1. Choose a position that will allow you to see the
BioDoser Display easily. Fix the control box in
position using screws at each corner of the box.
For USA installations, when there is no spare
outlet socket, cut the 110V plug off the AC/DC
adaptor cable, and hard wire to the control system
terminals.
5. Connect the low voltage plug to the BioDoser DC
Power Socket (see Page 4). Use only a genuine
Bionizer power adaptor or warranty may be void.
7
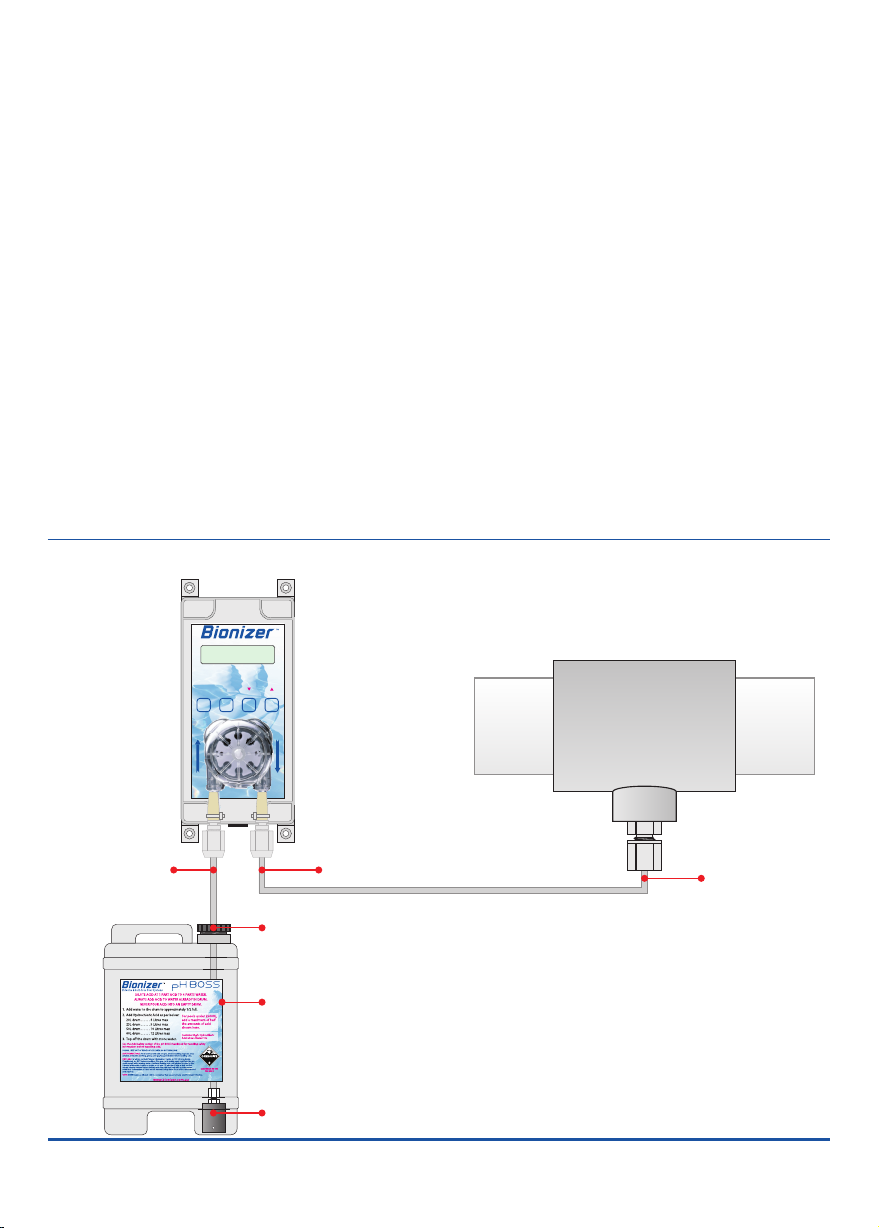
DOSING PUMP HOSE INSTALLATION.
Drum weight
inside drum.
Acid Safety and
Dilution Label
fitted to acid
drum.
(When BioDoser is being used for acid)
Delivery tube
firmly fixed
into one way
valve in Tee.
See page 9.
Supply tube fed
through 7.0mm
(1/4") hole, drilled
into drum lid.
Supply tube
on left side
of dosing pump
Delivery tube
on right side
of dosing pump
DOWN U P
AUTO /
OFF
CANCEL
PROGRAM /
SET
C h l o r i n e - F r e e F r e s h w a t e r P o o l s
TM
BioDoser

BIODOSER INSTALLATION
3. Push the end of the drum weight hose through
the drum lid.
DRUM WEIGHT HOSE INSTALLATION
2. Drill a 6.5mm or 1/4 inch hole into the top of the
drum lid.
1. Remove the lid from the supplement drum that
you will use.
4. Fit the hose onto the drum weight tube fitting in
the same way as described in the Tee Piece Hose
Installation section above and illustration below.
AFTER ALL HOSE FITTINGS ARE COMPLETED, TEST THE SYSTEM WITH FRESH WATER, USING THE
MANUAL DOSE FUNCTION (PAGE 9). CHECK CAREFULLY FOR ANY LEAKS AND CORRECT AS NEEDED.
4. Tighten the nut over the hose. Tighten firmly
with fingers. DO NOT USE A TOOL.
TEE PIECE HOSE INSTALLATION
3. Push the hose firmly onto the tube fitting.
1. Remove the nut from the one way valve fitting on
the Tee piece.
2. Slip the Nut over the hose.
8

AUTO: Unit will dose
supplement according
to the program.
!Press PROGRAM / SET to save the new setting.
This sets the volume to be dosed, each time the
BioDoser is scheduled to add supplement.
The BioDoser has a time clock with battery backup.
When a Dosing Schedule of every 1 to 14 days is
selected, the BioDoser will deliver the dose at the
same time of day as when this schedule is first set.
DELAY: This function
wi ll sto p t he un it
d o s i n g a n y
supplement for 24
Hours (for example,
choose this function
when buffer is added
to the pool).
The DOSING ON / OFF key is also the “Cancel” key to
exit without saving changes in programming screens.
Note for when pumping diluted acid:
Please note that the litres are the total litres of liquid
being pumped, and does not take into account the
dilution ratio of the acid. Take care when using this
function, that you do not overdose the pool with
acid.
This setting will move
between 50mL and
5000mL
MANUAL DOSE
!Use the and keys to enter setting 50 to 5000 Ç È
millilitres.
O F F : Unit will not
dose any supplement
again until this setting
is changed.
Press to alternatively select AUTO, DELAY and OFF :
SET DOSE SIZE
! to enter 5 Minutes to 14 Use the Ç and È keys
Days.
DOSING ON / OFF KEY
Alternatively, press DOSING ON / OFF to cancel
without saving.
!Press PROGRAM / SET to start pumping.
This will change from 5
Minutes to 14 Days.
This will change from 0
to 5 Litres.
SET DOSING SCHEDULE
!Use to enter 0.05 to 5 Litres.the Ç and È keys
Remember that 1 Litre equals 200 mL of acid when
the acid is diluted 1 part acid to 4 parts water.
!Press PROGRAM / SET to save the new setting.
This sets the dosing schedule for the dose size.
For example, dose once per hour, or once per
day, or once per 7 days etc. The BioDoser will
only dose when the filtration pump running.
Alternatively, press DOSING ON / OFF to cancel
without saving.
Use this function to add a measured dose of
supplement.
PROGRAMMING YOUR BIODOSER
!If no key has been pressed for 30 seconds, the unit will return to the normal readout display. Any changes
will not be saved.
!Use the Ç and È keys to change settings.
PROGRAMMING YOUR BIODOSER
!When changing a setting, press PROGRAM / SET after the desired setting is programmed to save the
changes and return to the normal readout display.
!To quit any screen without saving changes, press DOSING ON / OFF to cancel.
!Press the PROGRAM / SET button to move through each of the four user settings.
9
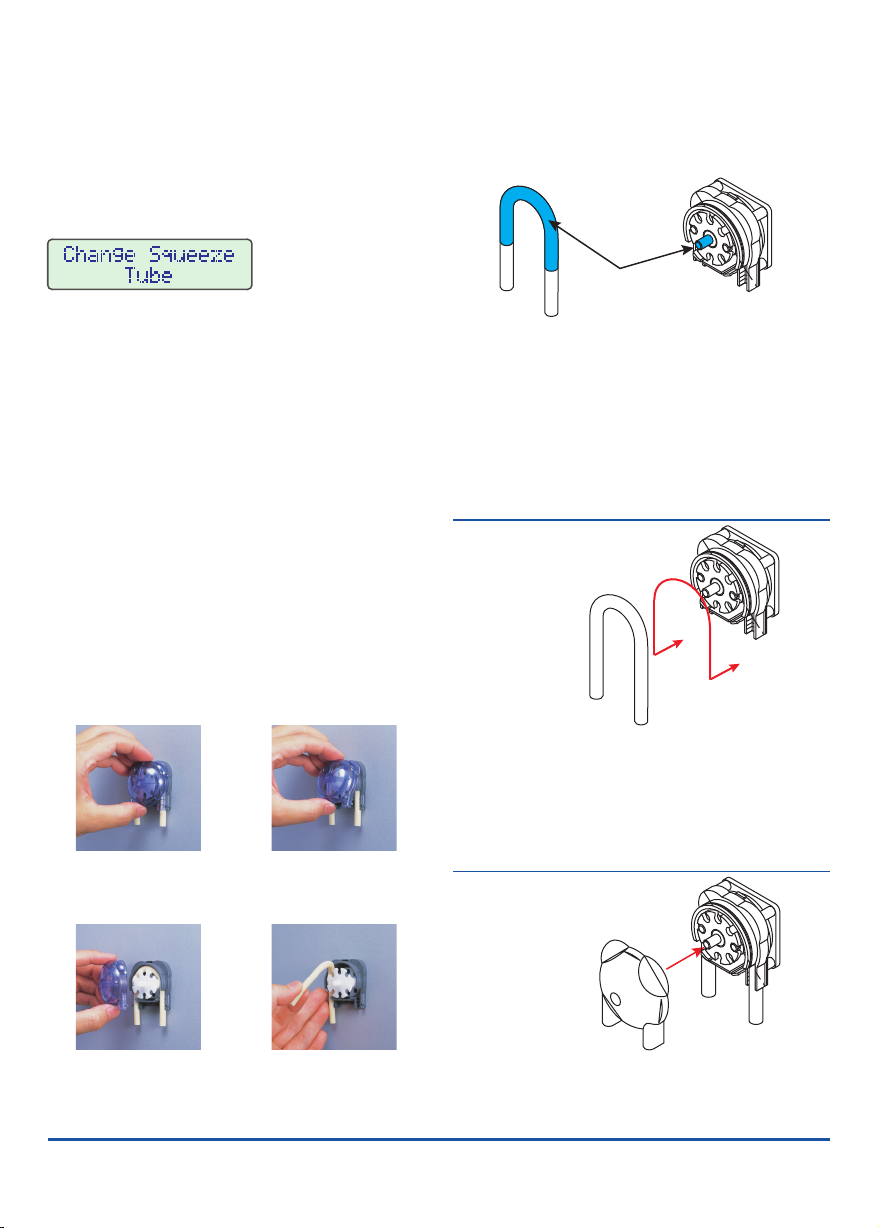
Removing the Squeeze Tube
At this time, the peristaltic pump squeeze tube either
needs to be lubricated or replaced as per the
instructions below.
The BioDoser monitors the running time of the
dosing pump and will display a reminder to replace
the squeeze tube when this time exceeds 50 hours.
PUMP SQUEEZE TUBE LUBRICATION AND
REPLACEMENT
! Switch off the BioDoser and ensure that the pool
pump is also off.
! Remove and inspect the squeeze tube. If it is
round and not flattened, and shows no visible
signs of wear, then it can simply be lubricated as
per the instructions in this section.
If the squeeze tube appears a little flattened and
has wear marks, then it is best to replace it. A new
squeeze tube can be ordered at bionizer.com.au.
Damage caused by acid leaking from a broken
squeeze tube is not covered by the warranty, so it
is your responsibility to check and replace it as
necessary.
DOSING PUMP MAINTENANCE
DOSING PUMP MAINTENANCE
10
Pu l l o ff t he p um p
cover.
Remove the Squeeze
tube. The rotor may
come out, but can be
pushed back in place.
H o l d t h e t o p a n d
bottom of the pump
cover.
Lift up the pump cover
from the bottom side.
Lubricating the Squeeze Tube
Refitting the Squeeze Tube
(Skip this step when replacing squeeze tube, as these
are supplied pre-lubricated.)
Apply a THIN SMEAR of Silicon grease to the
squeeze tube and pump rotor shaft as shown above.
DO NOT over-lubricate, as this will attract dirt and
grit, which will cause premature wear of the squeeze
tube and rollers.
WARNING : Use only silicon grease. Petroleum gel
and other oil-based lubricants may cause the
squeeze tube to break down, resulting in leakage.
Pull out the pump rotor a little, and place the
squeeze tube between the pump body and the two
rollers.
Push the squeeze tube and rotor into the pump body.
Ensure that the inlet and outlet are seated in the
guides on each side of the pump body.
Refitting the Pump Cover
Re-fit the pump cover until it clips into place. There
should be no gaps anywhere between the pump
body and cover. Ensure that the squeeze tube is not
pinched on either side, after the cover is replaced.
Apply Silicon
grease here.

11
TROUBLESHOOTING
Unit is not adding liquid
when dosing pump is
operating
Unit does not power up
!Replace power adaptor or cable. Please contact your distributor or Bionizer.
Faulty AC/DC power adaptor or DC Cable
!Faulty BioDoser main unit. Return to Bionizer for repair.
!Check that all suction and output hoses are fitted correctly, with no leakage.
Tighten Dosing Pump fittings further or replace with spare fittings (page 8).
!Check that the supplement acid drum is not empty.
!Check that squeeze tube inside pump is not leaking. Replace squeeze tube
and/or rollers as needed (see page 10).
WARNING : If any supplement has leaked out of hoses, wash down the area
with fresh water immediately. Take the lid off the pump, remove squeeze tube
and wash out with fresh water if squeeze tube was leaking.
If you need to return your BioDoser for service or repairs at any time, please use the manual dose function (page 9) to dose
1 litre (1 quart) of fresh water through the system before sending back. This will stop hazardous liquids leaking from the
pump during transport (which could damage your unit, voiding warranty), and is also a safety hazard for our technicians.
Symptom Possible Causes and Remedies
TROUBLESHOOTING

C h l o r i n e - F r e e F r e s h w a t e r P o o l s
SAVE TIME & MONEY
SAVE THE ENVIRONMENT
SAVE YOUR LONG-TERM HEALTH
INSTRUCTION BOOK
Suite 410
Toll Free.............1-855-8-IONIZE
Phone................1-480-696-2387
Scottsdale, AZ 85254
Web ........................bionizer.com
16427 N Scottsdale Rd
USA.
Email ...........relax@bionizer.com
Bionizer Ltd
Maroochydore
Bioniser Pty Ltd
1/173 Bradman Ave
Australia
Phone...................1800 10 62 74
International .....+61 7 5479 6100
QLD 4558
Fax....................+61 7 5443 6700
Email ........info@bionizer.com.au
Web ...................bionizer.com.au
Table of contents
Other Bionizer Lighting Equipment manuals


Popular Lighting Equipment manuals by other brands


PXM
PXM Merger DMX user manual

Lightolier
Lightolier Lighting Systems F7000-12 Specification sheet

Espa
Espa Jardino Pool NEAT Series instruction manual

Clevertronics
Clevertronics LP CWP2LIFE-PRO-WPPOD Series Installation & maintenance instructions

Sygonix
Sygonix 2361028 operating instructions

GTD
GTD GTD-LM660 II Profile user manual

Luminaire led
Luminaire led VPF4 Series installation guide

DÖRR
DÖRR ML-4030 LED instruction manual

LIGMAN
LIGMAN AUSTIN 1 installation manual

Vision & Control
Vision & Control LDLF30x360-G525/UDC Instructions for use

Genaray
Genaray SpectroLED SP-S-800BD user manual

Philips
Philips Selecon ACCLAIM FRESNEL Operation manual