Bionizer OxiBOSS User manual
DOWN UP
AUTO /
OFF
CANCEL
PROGRAM /
SET
TM
C h l o r i n e - F r e e F r e s h w a t e r P o o l s
TM
INSTRUCTION BOOK
Liquid Oxidizer & Sanitiser Control System
Please read before you call us for advice. Version 2.1a, 19-Sep-2019
bionizer.com.au bionizer.com
Bionizer highly
recommends that a
pH BOSS automatic
pH Controller is used
together with the
OxiBOSS Controller.
When using OxiBOSS
for liquid chlorine,
an anti-crystallising
agent should be
used with very new
drum of Chlorine.
C h l o r i n e - F r e e F r e s h w a t e r P o o l s

CONTENTS
2
TABLE OF CONTENTS
Page
INTRODUCTION . . . . . . . . . . . . . . . . . . . . . . . . . . . . . . . . . . . . . . . . . . . . . . . . . 3
OxiBOSS DISPLAY INFORMATION . . . . . . . . . . . . . . . . . . . . . . . . . . . . . . . . . . . 5
OxiBOSS ILLUSTRATION . . . . . . . . . . . . . . . . . . . . . . . . . . . . . . . . . . . . . . . . . . . 4
SAFETY INSTRUCTIONS . . . . . . . . . . . . . . . . . . . . . . . . . . . . . . . . . . . . . . . . . . . 6
CHEMICAL SAFETY . . . . . . . . . . . . . . . . . . . . . . . . . . . . . . . . . . . . . . . . . . . . . . . . . . . . . . . . . . . . . . 6
DRUM WEIGHT HOSE INSTALLATION . . . . . . . . . . . . . . . . . . . . . . . . . . . . . . . . . . . . . . . . . . . . . . 10
PROGRAMMING YOUR pH BOSS . . . . . . . . . . . . . . . . . . . . . . . . . . . . . . . . . . . 11
RESETTING THE SQUEEZE TUBE REMINDER . . . . . . . . . . . . . . . . . . . . . . . . . . . . . . . . . . . . . . . . . . . 16
TROUBLESHOOTING . . . . . . . . . . . . . . . . . . . . . . . . . . . . . . . . . . . . . . . . . . . . . 17
BIONIZER CONTACT INFORMATION . . . . . . . . . . . . . . . . . . . . . . . . . . . . . . . . 20
CONTROL BOX INSTALLATION . . . . . . . . . . . . . . . . . . . . . . . . . . . . . . . . . . . . . . . . . . . . . . . . . . . . . 9
MAINTENANCE . . . . . . . . . . . . . . . . . . . . . . . . . . . . . . . . . . . . . . . . . . . . . . . . . 13
PUMP SQUEEZE TUBE LUBRICATION AND REPLACEMENT . . . . . . . . . . . . . . . . . . . . . . . . . . . . . . 15
TEE PIECE INSTALLATION . . . . . . . . . . . . . . . . . . . . . . . . . . . . . . . . . . . . . . . . . . . . . . . . . . . . . . . . . 7
TEE PIECE HOSE INSTALLATION . . . . . . . . . . . . . . . . . . . . . . . . . . . . . . . . . . . . . . . . . . . . . . . . . . . 10
AUTO / OFF BUTTON . . . . . . . . . . . . . . . . . . . . . . . . . . . . . . . . . . . . . . . . . . . . . . . . . . . . . . . . . . . . 11
CHANGING THE pH SET POINT . . . . . . . . . . . . . . . . . . . . . . . . . . . . . . . . . . . . . . . . . . . . . . . . . . . . 12
ORP PROBE ORIENTATION. . . . . . . . . . . . . . . . . . . . . . . . . . . . . . . . . . . . . . . . . . . . . . . . . . . . . . . . . . 8
SANITISER PUMP TUBE INSTALLATION . . . . . . . . . . . . . . . . . . . . . . . . . . . . . . . . . . . . . . . . . . . . . . 9
DOSE SETTING . . . . . . . . . . . . . . . . . . . . . . . . . . . . . . . . . . . . . . . . . . . . . . . . . . . . . . . . . . . . . . . . . 11
MANUAL DOSE . . . . . . . . . . . . . . . . . . . . . . . . . . . . . . . . . . . . . . . . . . . . . . . . . . . . . . . . . . . . . . . . 12
ALARM FUNCTION . . . . . . . . . . . . . . . . . . . . . . . . . . . . . . . . . . . . . . . . . . . . . . . . . . . . . . . . . . . . . 12
ORP PROBE CALIBRATION. . . . . . . . . . . . . . . . . . . . . . . . . . . . . . . . . . . . . . . . . . . . . . . . . . . . . . . . 13
FITTING NEW SUPPLY AND DELIVERY TUBES . . . . . . . . . . . . . . . . . . . . . . . . . . . . . . . . . . . . . . . . . . 16
ORP PROBE INSTALLATION . . . . . . . . . . . . . . . . . . . . . . . . . . . . . . . . . . . . . . . . . . . . . . . . . . . . . . . 10
OxiBOSS INSTALLATION . . . . . . . . . . . . . . . . . . . . . . . . . . . . . . . . . . . . . . . . . . . 7

INTRODUCTION
IMPORTANT : SEE CHEMICAL SAFETY & WARRANTY SECTION.
PLEASE TAKE THE TIME TO READ THESE INSTRUCTIONS CAREFULLY AND NOTE HOW
THEY APPLY TO YOUR PARTICULAR POOL AND EQUIPMENT.
When Chlorine is the primary sanitiser in a
swimming pool application, an ORP level of around
650 mV is adequate to maintain a good level of
sanitising power all year round.
Please note that when running Chlorine at under
1.0 ppM, we highly recommend that an Eco-
Oxidizer is also installed. The Eco-Oxidizer will
prevent accumulation of combined chlorine (such
as chloramines), which are cause red eyes, itchy
skin and that “chlorine smell”. The Eco-Oxidizer will
oxidize combined chlorine back to free chlorine
continuously, whenever the pool filtration pump is
running.
ORP is not specifically a measurement of the ppM
of Chlorine, so there is no conversion from one to
the other. In many ways, ORP is a much easier way
to maintain a pool than attempting to maintain a
specific ppM of Chlorine. For example, a heated
pool with high bather load would need around
4ppM of Chlorine to maintain a chemical activity of
650 mV ORP. A pool that is not being used during
winter with low water temperature may need
1ppM of Chlorine to maintain the same level of
650mV of ORP.
WHAT IS “ORP” ?
“ORP” stands for “Oxidation Reduction Potential”.
It is also often referred to as “Redox”. In simple
terms, ORP is a measurement of chemical activity
in a body of water. The unit of measurement is
millivolts (”mV”).
When Chlorine is used as a backup sanitiser, for
example when a Bionizer is installed, an ORP level
of around 550 mV will help to maintain a crystal
clear pool, but with a lower Chlorine level.
When using the OxiBOSS, the only requirement for
testing chlorine is a regular test with a chlorine test
kit. The frequency of this should be once per week
in a commercial pool with heavy bather load, down
to once per month for a domestic swimming pool
with a small bather load.
So an ORP system can be used with the SAME set
point all year round, and will simply add the correct
amount of Chlorine to maintain a suitable level of
sanitising effectiveness. EASY ! The graph below
illustrates this point.
3
INTRODUCTION
SUMMER AUTUMN WINTER SPRING
Required Chlorine, ppM
Required ORP, mV
DOWN UP
AUTO /
OFF
CANCEL
PROGRAM /
SET
TM
C h l o r i n e - F r e e F r e s h w a t e r P o o l s
4OxiBOSS ILLUSTRATION
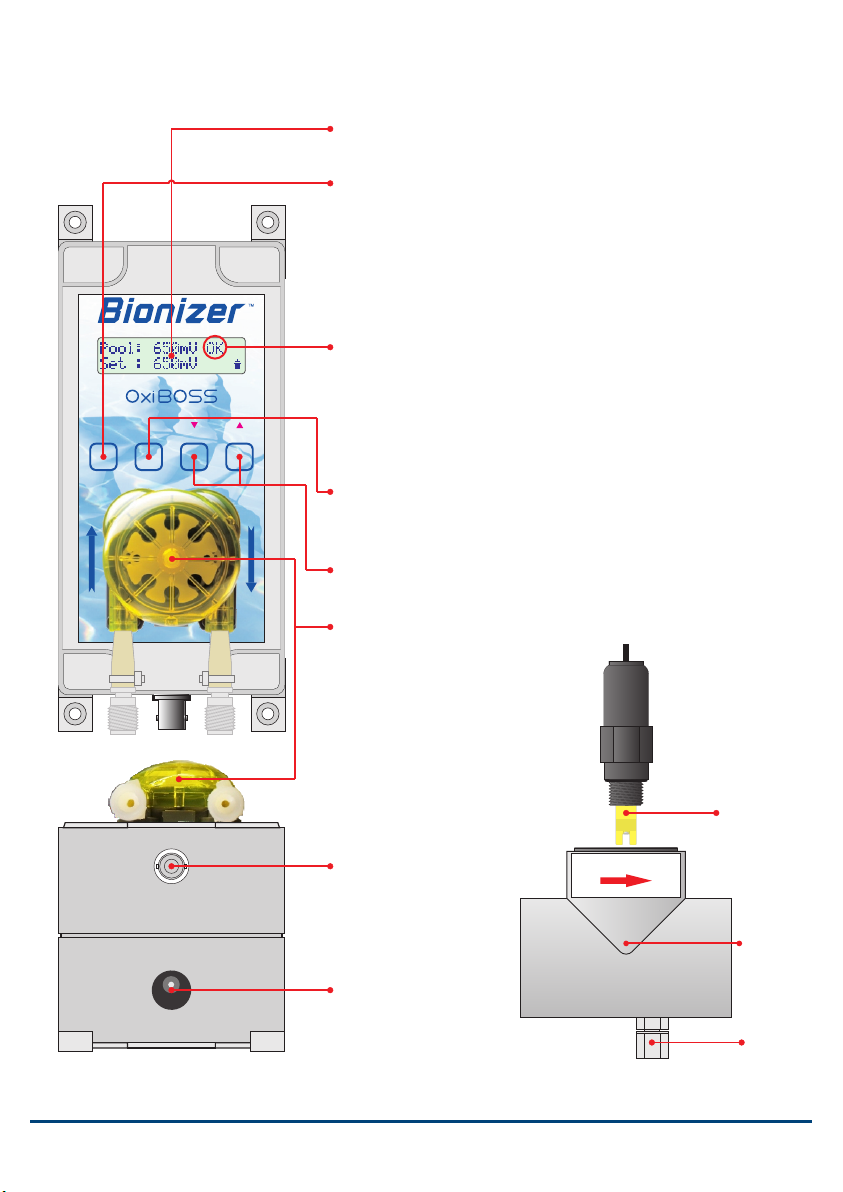
OxiBOSS ILLUSTRATION
DISPLAY
AUTO / OFF
PROGRAM / SET
STATUS INDICATOR
UP & DOWN SETTING ADJUSTMENT
PERISTALTIC DOSING PUMP
BNC ORP PROBE SOCKET
ORP PROBE
DC POWER SOCKET
Press to select:
Press this button to cancel without saving changes when adjusting
settings in the programming menus.
OFF..................Unit will not add any sanitiser automatically.
Auto ................Normal automatic sanitiser control
Press to scroll through the six user setting menus.
Press to save changes when adjusting settings.
16 x 2 Line alphanumeric LCD with LED backlight.
Press to makes changes to user settings.
Precision, high quality dosing
pump. 160mL/min flow rate
while running.
Connect ORP Probe by
pushing on, then
clockwise 1/4 turn to
lock into place.
Use only genuine
power adaptor
supplied by Bionizer to
avoid damage to your
OxiBOSS. Tee Piece, ORP Probe
and one way valve
One Way
Valve
FLOW DIRECTION
Tee Piece
Indicates the current status of the OxiBOSS, for example if it is
adding chemical, or waiting for the added chemical to mix in the
pool.
See page 5 for full information.

See page 13 for ORP Probe calibration instructions.
The OxiBOSS will show the ORP Probe calibration
reminder, 12 months after the last successful
calibration.
When the peristaltic dosing pump has operated for
a total of 50 hours, the OxiBOSS will show the
squeeze tube reminder.
See page 15 for instructions on how to lubricate or
change the Squeeze Tube.
Cal Age is the number of days since the last
successful ORP probe calibration.
Tube Age displays how many hours the peristaltic
dosing pump has pumped sanitiser with the current
squeeze tube.
OxiBOSS DISPLAY INFORMATION
OxiBOSS DISPLAY INFORMATION
The 32 character display in your OxiBOSS provides all the information you need to help ensure that the unit is
maintaining the sanitizer level in your pool accurately, and that you know when it is time to carry out some
basic maintenance. Additionally, the OxiBOSS will warn you when it detects that something is not working as it
should. This page is a summary of the information that your OxiBOSS may display at various times.
Main OxiBOSS Display
5
The current ORP of the Pool.
The Set Point at which the OxiBOSS will
maintain the ORP level. See page 12.
The arrow is also animated whenever
the dosing pump is adding chemical.
The Ç Arrow here indicates that the
OxiBOSS is set to increase ORP with
sanitiser when the ORP reading is too
low.
Status Indicator
Wait ....OxiBOSS is waiting for added sanitiser to mix
into the pool before adding more, if required.
Alrm ....ORP has been below the Set Point for 4
continuous hours of operation, without ever
reaching the Set Point. See page 12.
Add .....OxiBOSS is in Auto mode, reading is below the
Set Point, and dosing pump is adding sanitiser.
OK .......OxiBOSS is in Auto mode, and reading is within
the Set Point. No action required at this time.
“Wait” is also displayed at start-up while the
system is waiting for the ORP to stabilise.
Cool.....OxiBOSS has switched dosing pump off for 1
minute to cool the squeeze tube.
Off.......OxiBOSS dosing pump is switched off. No
sanitiser will be added, regardless of reading.
See page 11.
Alarm and Reminder Messages
When the ORP reading has been below the Set
Point for 4 hours, the display alternates between
the alarm screen, and “Alrm” in the status, and the
beeper sounds. See page 12 for how to reset the
alarm and rectify the cause.
Table of contents
Other Bionizer Lighting Equipment manuals


