BioSmart BIO-1400 OWA User manual

Therapeutic Infrared Heat
.
.
B IOS MART
®
Save these
Instructions
Includes:
Application Guidelines
User Information & Guidelines
Operating Instructions
Warranty & Servicing
On-Wall Heater
Owner’s Manual
Therapeutic infrared heating systems
for a green, healthy environment
with Patented BioSmart®
Air Filtration Technology
BioSmart®On-Wall Far Infrared Heaters. Feel the Difference.
BioSmart Technologies

Customer/Warranty Service: 800-595-9605
BioSmart® BIO-1400 OWA
On-Wall Edition Far Infrared Heater

Page 1
©2014 BioSmart Technologies
Table of Contents
Congratulations on Your Purchase! 2
Why Use a BioSmart®Heater 4
USE RESTRICTIONS 6
BioSmart® Air Filtration Technology Benefits 7
BioSmart®Heater Features & Functions 8
Unpacking Your New BioSmart®Heater 9
Heater Care & Storage 9
How many units do I need? 10
Mounting Guidelines 10
Operation Overview 11
Operating Instructions at a Glance 12
Detailed Operating Instructions 13
Turning Power On 13
Select your Operating Preference 13
Setting the Temperature 13
Switching Between Fahrenheit & Celsius 13
Setting the Timer 14
Turning Power Off 14
Calibrating the Internal Thermometer 15
Troubleshooting Your BioSmart®Heater 16
BioSmart®On-Wall Heater Specifications 17
Diagram of BioSmart®On-Wall Heater 18
BioSmart®On-Wall Heater Wiring Diagram 19
Warranty & Service Information 20

Page 2
Customer/Warranty Service: 800-595-9605
Congratulations on Your Purchase!
Congratulations on purchasing your
BioSmart®Therapeutic Ceramic Far Infrared Heater!
One of the best things about using your new
BioSmart®Therapeutic Ceramic Far Infrared
Heater is the money you will save on gas and
electric bills.
Utility field tests show that the BioSmart®
Ceramic Far Infrared Heater uses an average of 35% less energy than
conventional electric furnace/baseboard systems. And with current
fuel prices, the BioSmart®heater will save you even more money than
if you were using heating oil or gas heat.
That means drastic reductions in your heating bills -- up to 50%,
depending on the type of heating system you have currently installed.
The BioSmart® is a giant of unparalleled eciency. The far infrared
heating technology utilized in the heater warms the objects in the
room, as well as the walls and oor. It evenly heats everything in the
room, from top to bottom. The heat in the room will never hover
uselessly near the ceiling again!
In addition to helping you keep money in your pocket, the BioSmart®
goes a step beyond to also enhance your health and the quality
of comfort you experience in the heated room. The far infrared
Ceramic heating system will not burn, dry out, or pollute the air with
impurities. This protects the natural humidity level and produces a
soft, ion-balanced heat. Using this soft far infrared heat is a better,
more comfortable and more healthy way to heat a room.

Page 3
©2014 BioSmart Technologies
There are many therapeutic benets that can be attributed to far
infrared heat. Its use as an integral part of many medical therapies is
well documented. Now you can enjoy the benets of therapeutic far
infrared heat with the BioSmart®Ceramic Far Infrared Heater.
Please read the operating instructions carefully for safe and optimum
enjoyment of your new BioSmart®Therapeutic Ceramic Far Infrared
Heater.
Thank you for your purchase!
BioSmart® Infrared Heaters.
Live in Comfort.
BioSmart Technologies

Page 4
Customer/Warranty Service: 800-595-9605
Why Use a BioSmart®Heater
BioSmart® heating systems are the ultimate in green technology engineering
-- easy to install, exceptionally economical and extremely quiet, they produce
comfortable, healthy, therapeutic far infrared heat. BioSmart® heaters also purify
the air that is processed through them, making them a sanitary source of heat.
Far infrared heat is a highly efcient and therapeutic heat source. By virtue of its
shorter wavelength, far infrared is able to penetrate the body and solid objects
faster than conventional radiant heat. BioSmart® heating systems use this property
of far infrared to evenly and comfortably heat a room. Far infrared heat is the most
comfortable source of heat and has been used for years as a therapeutic treatment
for cardiovascular and general circulation problems.
Producing far infrared heat requires localized generation of the infrared wave in
order to optimize the efciency and money/energy savings produced when using
a far infrared heating source. This design advantage eliminates the need for a
ductwork system to distribute the heat through various rooms of a home or ofce.
Eliminating ductwork also eliminates the bacteria, dust, pollen and mold that
accumulates in a conventional air conditioning and heating duct system. These
pollutants can cause irritation and a potential health problem, especially for those
with respiratory sensitivities and allergies, including asthma.
Energy Saving Benets
It requires less energy to heat the room with far infrared heat than with other
conventional heating sources. Additionally, room temperatures of 68 degrees
(F) with far infrared heat feel like 72 degrees (F), so you can set the thermostat
back 4-5 degrees and experience the same comfort levels utilizing less energy.
The temperature on the oor and at the ceiling remains the same without any
supplemental fan circulation to keep the temperature balanced throughout the
room, even in rooms with high ceilings.
With a BioSmart® heating system you can heat only those spaces which are in
use and require the heat. Zoned heating is as much as 50% more economical to
use when the entire home or ofce does not require heat in all areas 100% of
the time. The cost savings from this feature alone makes initial installation of the
BioSmart® heating system pay for itself in a matter of months. If you really want
to save on energy costs, heating with BioSmart® far infrared heat is going to be
spectacular.
Quiet Operation
BioSmart® fan systems are virtually silent, distributing heat at over 150 cubic
feet per minute per heating unit. They are quieter than forced air systems and
do not have the typical cracking and popping sounds heard with baseboard
heaters. When rated against other conventional wall heating systems, there is no
comparison to the quiet operation of the BioSmart® fan system. BioSmart® fans
operate at 18 dB compared to the typical 65 dB for other wall heating systems.

Page 5
©2014 BioSmart Technologies
Better Heat Distribution
The nature of the far infrared wave allows the heater to be installed higher on the
wall than conventional wall heater systems without compromising the transfer
of the heat to the oor. The advantage of the higher installation on the wall
guarantees that furniture and other obstructions to the airow from the heater are
eliminated. Child tampering is also eliminated.
Even distribution of the infrared wave is also assured since the air space above
the furniture is virtually unrestricted. When conventional heat sources are vented
through the ceiling to save on construction costs, the heat remains on the ceiling
and must be pushed down with ceiling fans. This is not required with infrared
heat.
Accurate Temperature
BioSmart® heating systems utilize state of the art electronics and internal
electronic thermostats for pin-point, one-degree accuracy. That means more
accurate control of comfort level settings and a warm, comfortable environment
for you and your family.
Cost-Effective
Components in the BioSmart® heating system are designed to last 10 times longer
than other wall heaters. BioSmart® warranty coverage and service procedures are
simple to follow and they can be serviced in ten minutes or less should repair be
required. The cost to purchase and install a BioSmart® infrared heating system
for your entire home is usually much cheaper than the cost of installing a central
forced air heating system.
Flexible Size & Wattage Applications
BioSmart® On-Wall heaters have two settings: 1400 watts for conventional room
heating and 700 watts for smaller rooms, bathrooms, hallways, and closets.
Patented Proprietary Technology
BioSmart® heaters contain a proprietary, high-efciency far infrared heat exchanger
which produces more far infrared heat her kilowatt than conventional ceramic,
quartz, or carbon plates. Patent pending coverage of more than 30 distinct
features in the BioSmart® heater are what makes the BioSmart® technology a truly
unique energy efcient heat source for your home or ofce.
Quality Assurance
BioSmart® heating systems come with C-TUV-US certications representing
equivalent approvals both in UL and CSA classications. BioSmart® heaters are
manufactured in Taiwan and China through AcePower Electronics, which includes
a consortium of engineers, vendors and manufacturers. AcePower Electronics
is also a certied ISO 9000 manufacturer and the exclusive manufacturer for
BioSmart Technologies heaters and air puriers.

Page 6
Customer/Warranty Service: 800-595-9605
READ ALL INSTRUCTIONS BEFORE USING THE HEATER
• DO NOT plug heater into any other cord connected device such as power strip, surge
protector, multiple outlet adapter, grounding adapter, outlet-type air fresheners or extension
cords. Plug into a 3-prong 120V 15 amp or higher grounded circuit receptacle only.
• DO NOT plug the heater into a loose tting or broken receptacle.
• DO NOT alter the heater’s design, or you will void the warranty.
• DO NOT block the front or rear of the heater.
• DO NOT place anything directly in front of the heater.
• DO NOT cover the unit as this may block airow and cause the heater to malfunction.
• DO NOT use the heater outdoors or for heating construction sites.
• DO NOT locate the heater where it may fall into a bathtub or other water container.
• DO NOT force the lter to dry using any alternative methods when performing lter
maintenance; doing so could damage the lter.
• DO NOT run cord under carpeting.
• DO NOT cover cord with throw rugs, runners, or similar coverings. Arrange cord away
from trafc area and where it will not be tripped over.
• DO NOT insert or allow foreign objects to enter any ventilation or exhaust opening as this
may cause an electric shock or re, or damage the heater.
• Heater has hot and arcing or sparking parts inside. DO NOT use it in areas where gasoline,
paint, or ammable liquids are used or stored.
• Heater is hot when in use. To avoid burns, do not let bare skin touch hot surfaces. If
provided, use handled when moving this heater.
• DO NOT operate any heater with a damaged cord or plug or after the heater malfunctions,
has been dropped or damaged in any manner. Return heater to authorized service facility
for examination, electrical or mechanical adjustment, or repair.
• To disconnect heater, turn controls to off, then remove plug from outlet.
• Connect to properly grounded outlets only.
• To prevent a possible re, do not block air intakes or exhaust in any manner. Do not use
on soft surfaces, like a bed, where openings may become blocked.
• Use this heater only as described in this manual. Any other use not recommended by the
manufacturer may cause re, electrical shock, or injury to persons.
• Avoid the use of an extension cord because the extension cord may overheat and cause
a risk of re.
• This heater is for use on 120 volts. The adapter should not be used if a three-slot grounded
receptacle is available.
• Heater must not be located immediately below a socket-outlet.
SAVE THESE INSTRUCTIONS
!
WARNING
IMPROPER USE OF THIS HEATER COULD RESULT IN RISK
OF FIRE, ELECTRIC SHOCK, OR INJURY TO PERSONS
CAUTION
RISK OF ELECTRIC SHOCK. DO NOT OPEN WITHOUT
UNPLUGGING UNIT FIRST!
USE RESTRICTIONS

Page 7
©2014 BioSmart Technologies
BioSmart®Air Filtration Technology Benefits
3-Stage Air Purication
The BIO-1400 OWA infrared heater includes BioSmart’s patented state of the
art air purication technology. This advanced technology has been available in
BioSmart’s line of portable infrared heaters for the past 4 years. Now it is also
available in the BioSmart On-Wall and In-Wall heating systems.
The BioSmart air purication module consists of a UV emitter, a TiO2 membrane,
and a negative ion generator for conditioning the air. It can run year around with
or without the heater.
Features of the UV / TiO2 Air Filtration System
• The UV / TiO2 technology does not rely on lters to remove and destroy
harmful substances in the air.
• This type of purication technology converts harmful particulates (virus’
and bacteria) and toxic gases (VOC’s) into safer compounds such as carbon
dioxide and water.
• UV / TiO2 technology has the ability to eliminate particles as small as 0.001
microns, including angstrom size VOC’s that can absorb into your lungs and
cause damage (HEPA lters are only able to lter out particles as small as 0.3
microns).
• The UV / TiO2 units in the BioSmart heating systems produce no ozone.
These units have been found to be much safer than ozone and ionization,
and the technology works wonderfully well for those with asthma, allergies,
and multiple chemical sensitivities.
BioSmart Patented Air Filtration
Technology is number one world wide in
ltration efciency

Page 8
Customer/Warranty Service: 800-595-9605
BioSmart®Heater Features & Functions
Remote
Exhaust
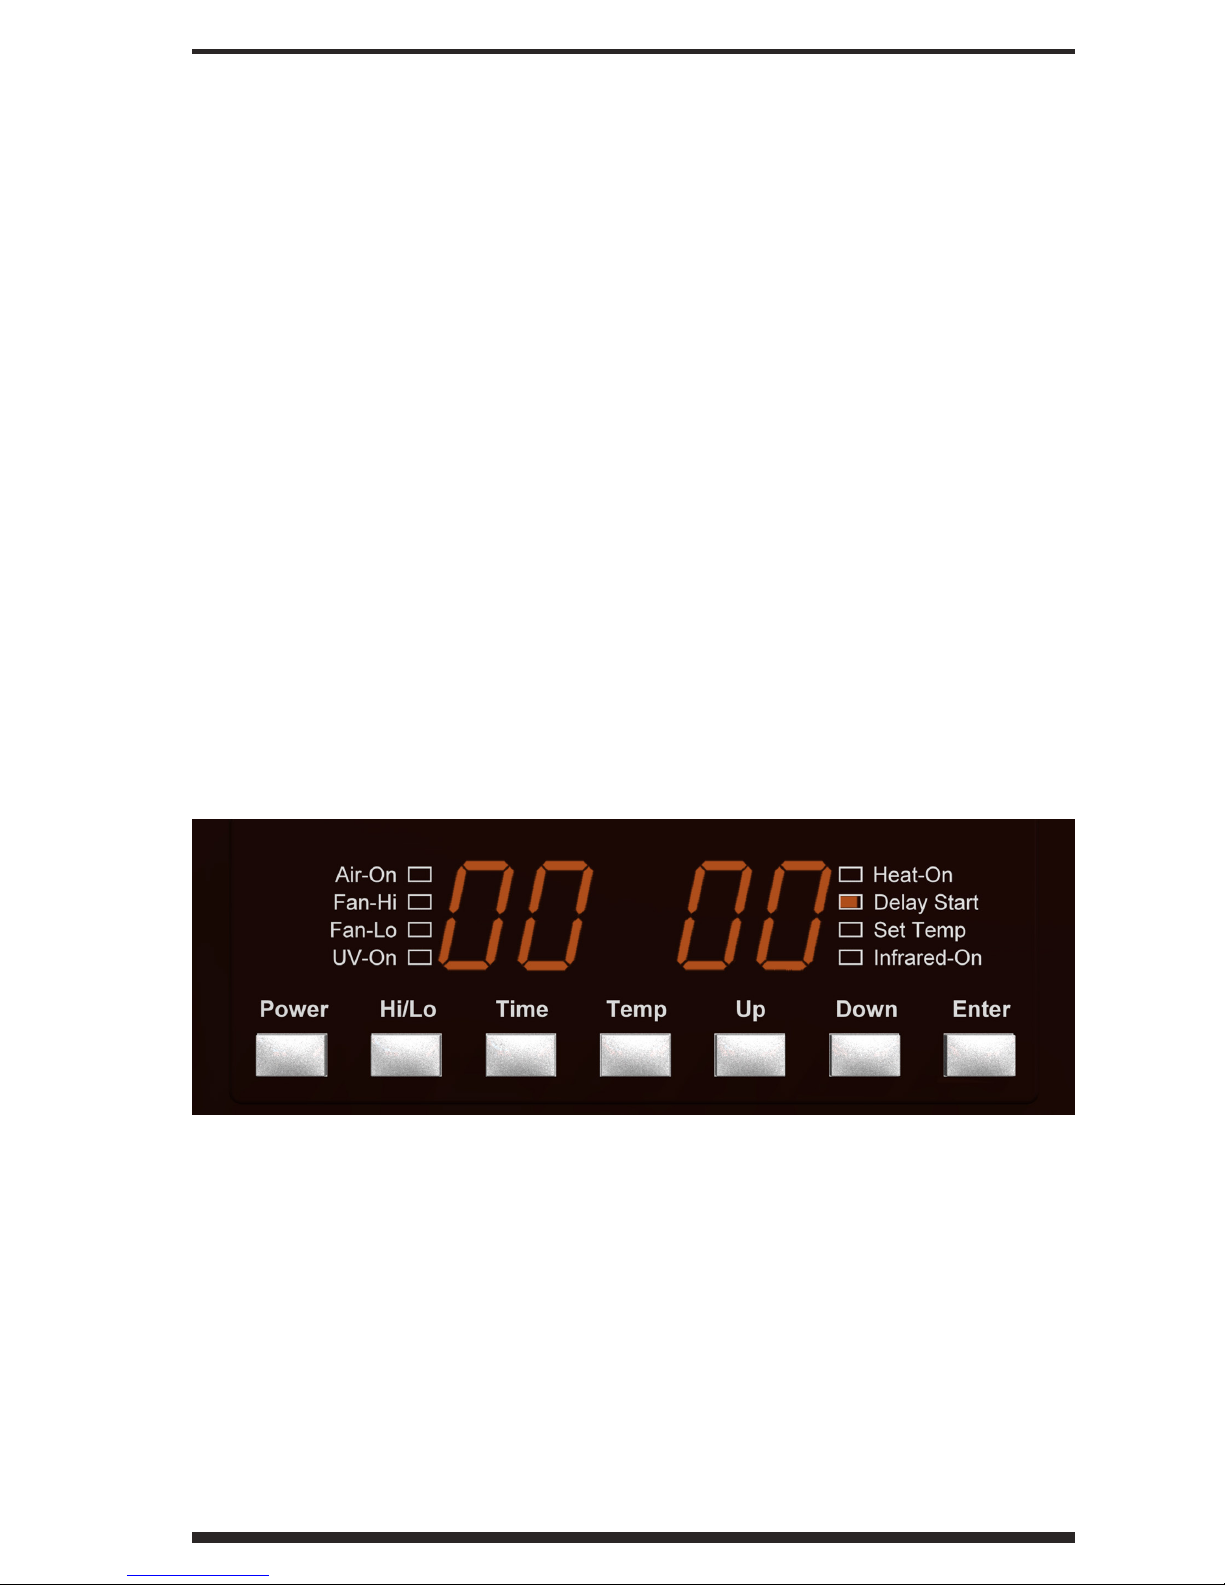
*Control Panel
*LED Display
Intake
Cabinet
Temp. Sensor
*Control Panel & LED Display
ENTER
DOWN
UP
TEMPERATURE
TIME
HI/LO
POWER

Page 9
©2014 BioSmart Technologies
Unpacking Your New BioSmart®Heater
1. INSPECT the package for any obvious damage.
2. UNPACK the heater: cut open taped box edges, fold back box aps. Gently
turn entire box upside down; lift box from protective packaging.
3. REMOVE the protective packaging materials from the inside of the heater’s
heat exchanger, making sure that all combustible materials have been
removed from around the black ceramic heating elements.
4. INSPECT the unit to make sure that there are no cracks in the black ceramic
heating elements.
5. PROCEED with the “Mounting Guidelines” on page 10.
Heater Care & Storage
General Maintenance and Care
Routinely inspect the air registers on the unit to make sure that no dust has
accumulated. Vacuum as you would any conventional air duct.
It is suggested that an annual dusting of the ceramic plates be performed in order
to eliminate any residual accumulation of dust during the summer months. In
order to accomplish this, the front plastic panel must be removed by removing
the four screws and lifting up to release the panel from the top clip.
Heater Storage
When the heater is not being used for an extended period of time, observe the
following steps to preserve the life and performance of the unit:
• Unplug heater (Do not unplug heater while heater is running. Please see
Operating Instructions - Turning Power Off.) - This will also help you
conserve energy in your home or ofce.
• Gently wrap the power cord into the cord storage compartment. This
will help prevent undue wear and tear on the cord.
• Cover the heater to prevent dust from accumulating on or in heater.
• Store heater in a dry, low dust environment.

Page 10
Customer/Warranty Service: 800-595-9605
How many units do I need?
When determining the number of units you will need, take into consideration:
• The insulation factor, and window size & placement
• The mean outside temperature during the coldest days of the year
• The size of each room
• The overall size of the home
• The number of oors involved
• The entrance and egress points
In lieu of overall engineering calculations and thermal loss calculations, a general
rule of thumb can be applied to determine the number of units you will need if
using the on-wall unit as a primary heating source:
New construction (coldest day above 5 degrees), standard insulation, one
window per room:
Room size up to 500 sq. feet: 1 unit
Room size above 500 to 1000 sq. feet: 2 units
New construction (coldest day below 5 degrees) & all remodels, standard
insulation:
Room size up to 350 sq. feet: 1 unit
Room size above 350 to 700 sq. feet: 2 units
Hallways and Nooks: 1 unit per 400 sq. feet
Closets and Bathrooms: 1 unit per 200 sq. feet
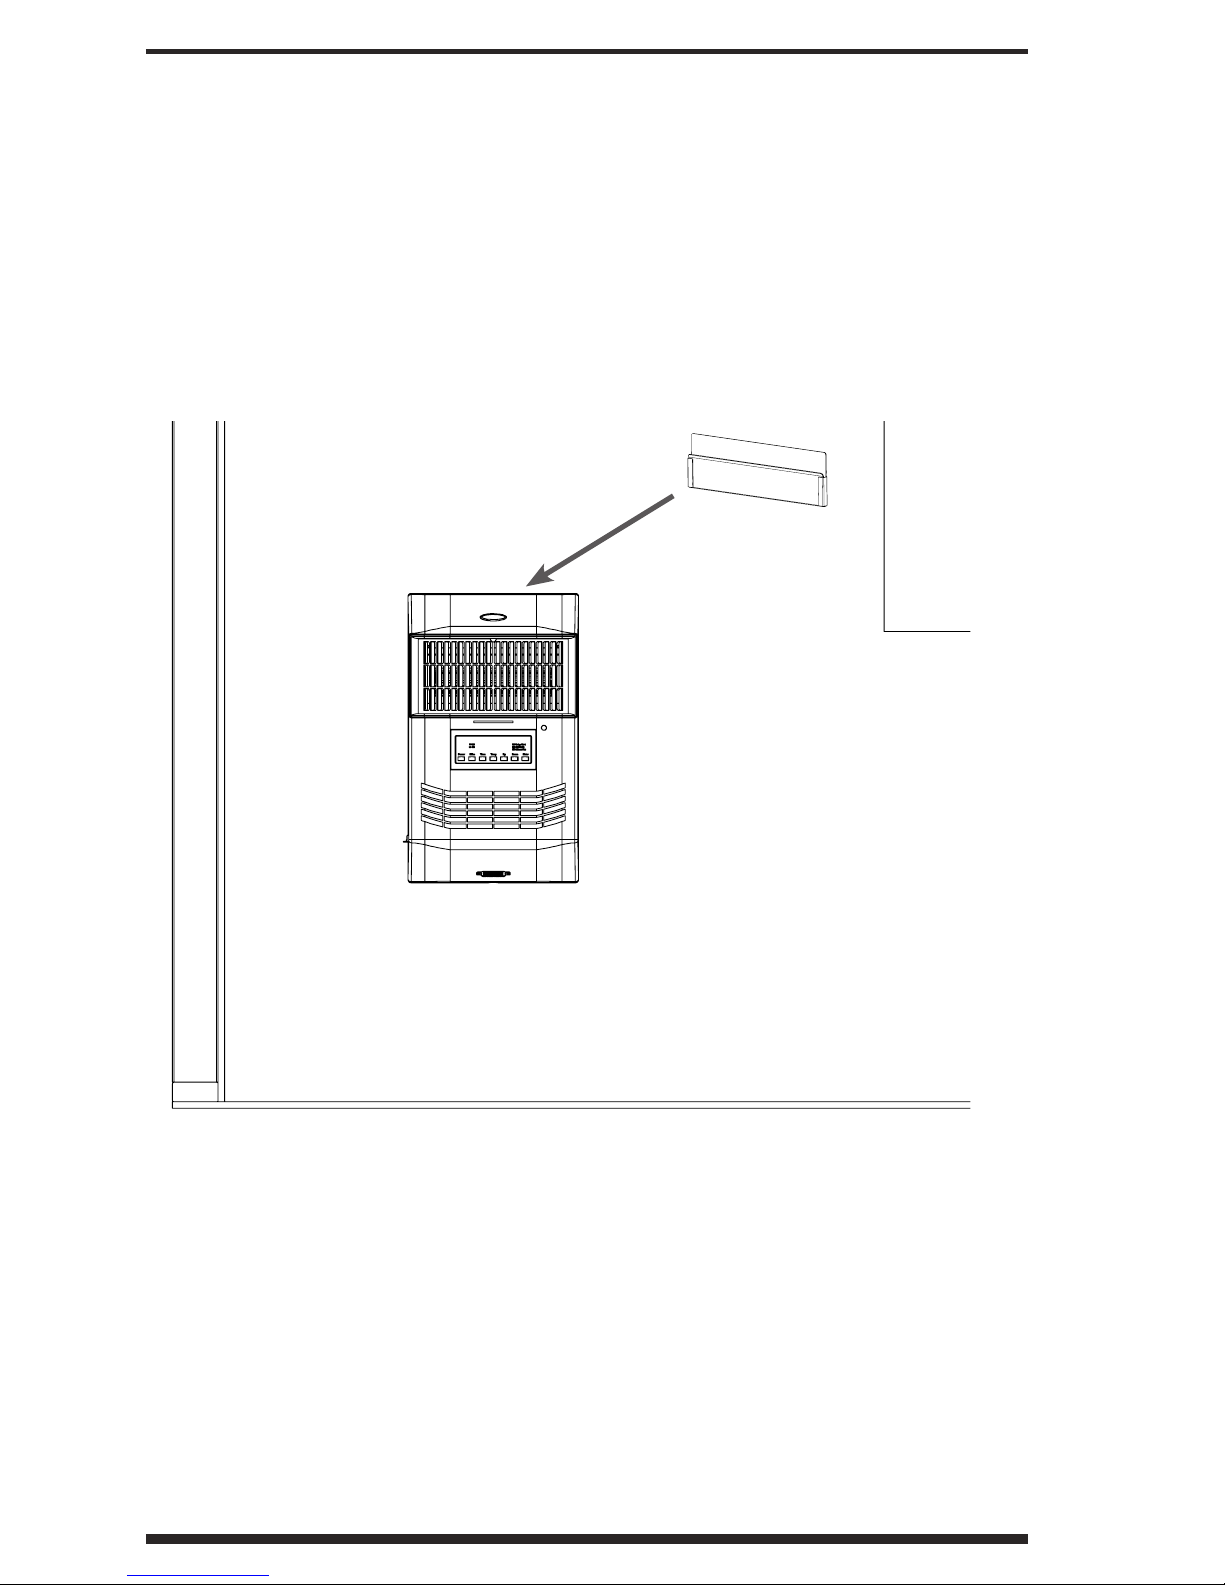
Mounting Guidelines
Mounting the Heater
The heater comes with a mounting bracket to attach the unit to the wall. It is
designed to be mounted to any wall between 12 to 24 inches off the oor. It can
also go higher if preferred but It should be located within 7 feet of a standard
120 volt wall receptacle.
The infrared heat will ow evenly from oor to ceiling so the location of the
heater on the wall is not pre-empted by normal in-wall heater considerations.
However, there should be no obstructions in front of the heater.
Page 11
©2014 BioSmart Technologies
Wall mounting of the heater takes about 5 minutes to complete and requires
a portable drill and two (2) screws. With an additional 2 screws (optional) the
unit can be secured to the wall permanently if desired. Alternately, the heater
can be mounted directly over the AC receptacle allowing the cord to be stored
in the heater’s internal cavity. This ‘look’ without the cord showing resembles a
professionally wired installation job.
The unit comes with an alternate control panel lens without buttons to prevent
child tampering. The remote supplied with the unit is then used to monitor and
control the functions of the heater.
Operation Overview
The units are self-regulating. When the heater is turned on and the heating
elements have come up to full temperature, the heater fan will turn on to increase
the airow into the room. The fan will remain running even after the heating
elements have been shut down by the thermostat, in order to distribute the
remaining heat in the heating elements into the room and to prevent overheating
of the heating elements. Once the heating elements have cooled sufciently, the
fan will turn off.
Note: If no stud is available use
the furnished buttery nuts to
attach the mounting bracket to
the wall.
Use the included
mounng brackets for
heater installaon.

Page 12
Customer/Warranty Service: 800-595-9605
Operating Instructions at a Glance
Turning Power On
Press the POWER button on the left side of the Control Panel. The heater’s ceramic
heating elements will light up inside the heater. After a few minutes, once the air
within the heater is warm, the heater fan will begin to operate.
Select your Operating Preference
The air purication can be set to run independently of the heating. Use the Enter
key to cycle between:
Heating only -> Heat plus air purication -> Air purication only
Pressing Enter again resets the cycle.
Setting the Temperature
This feature allows you to set the temperature that your heater will maintain.
Press the temperature (TEMP) button on the Control Panel; the SET TEMP
indicator will illuminate and the temperature display will ash. Use the UP
and DOWN buttons to select the temperature and press the ENTER button.
The SET TEMP light will turn off, and the temperature is now set.
Setting the Timer
This feature allows you to set a future time for the heater to turn itself on. For
example, if you set the time for 1 hour, the heater will turn on in 1 hour.
1. Turn the power off (heater must be powered off to use the timer feature).
2. Press the TIME button on the Control Panel—the two zeros to the right
will ash (:00), and the DELAY START indicator will illuminate.
3. Press the UP or DOWN button to select desired number of minutes (up to
59 minutes) that you would like the heater to wait to turn itself on.
4. Press the ENTER button—the two zero buttons to the left will ash (00:),
indicating 0 hours have been set.
5. Press the UP or DOWN button to the desired number of hours (up to 24
hours), and then press the ENTER button.
6. DELAY START indicator will ash until the unit comes on after waiting the
period of time you have set.
7. To cancel the timer, press the POWER button and the timer will stop.
Switching Between Fahrenheit & Celsius
Press the DOWN & ENTER buttons simultaneously and hold for about 3
seconds. The display will update automatically.
Turning Power Off
Press the POWER button located on the left side of the Control Panel. The sound
of the heater fan will continue until the heat has been completely vented, thus
protecting the unit and preventing waste by cycling the remaining heat into the
room. (NOTE: DO NOT unplug the heater until the sound of the fan has stopped.
Doing so may cause damage to the unit.)

Page 13
©2014 BioSmart Technologies
Detailed Operating Instructions
Turning Power On
1. Press the POWER button on the left side of the Control Panel. The heater’s
ceramic heating elements will turn on inside the heater.
2. After a few minutes, once the air within the heater is warm, the heater fan
will begin to operate.
Select your Operating Preference
The air purication can be set to run independently of the heating.
1. Press Enter once to select heating only.
2. Press Enter again for heat plus air purication.
3. Press Enter again for air purication only (can be used year around).
Pressing Enter again resets the cycle to heating only.
Setting the Temperature
This feature allows you to set the temperature that your heater will maintain.
1. Press the temperature (TEMP) button on the Control Panel; the SET TEMP
indicator will illuminate and the temperature display will ash.
2. Use the UP and DOWN buttons to select the temperature, press ENTER.
3. The SET TEMP light will turn off, and the temperature is now set.
Switching Between Fahrenheit & Celsius
Press the DOWN & ENTER buttons simultaneously and hold for about 3
seconds. The display will update automatically.
Page 14
Customer/Warranty Service: 800-595-9605
Detailed Operating Instructions - Continued
Setting the Timer
This feature allows you to set a future time for the heater to turn itself on. For
example, if you set the time for 1 hour, the heater will turn on in 1 hour.
1. Turn the power off (heater must be powered off to use the timer feature).
2. Press the TIME button on the Control Panel—the two zeros to the right
will ash (:00), indicating 0 minutes have been set, and the DELAY START
indicator will illuminate.
3. Press the UP or DOWN button to select desired number of minutes (up to
59 minutes) that you would like the heater to wait to turn itself on.
4. Press the ENTER button—the two zero buttons to the left will ash (00:),
indicating 0 hours have been set.
5. Press the UP or DOWN button to the desired number of hours (up to 24
hours), and then press the ENTER button.
6. DELAY START indicator will ash until the unit comes on after waiting the
period of time you have set.
7. To cancel the timer, press the POWER button and the timer will stop.
Turning Power Off
1. Press the POWER button located on the left side of the Control Panel. DO
NOT UNPLUG, read further:
2. The sound of the heater fan will continue until the heat has been
completely vented, thus protecting the unit and preventing waste by
cycling the remaining heat into the room. (DO NOT unplug the heater
until the sound of the fan has stopped. Doing so may cause damage to
the unit.)

Page 15
©2014 BioSmart Technologies
Calibrating the Internal Thermometer
The internal thermometer in the heater can be re-calibrated to match the room
thermometer if it is not sufciently accurate the way the heater arrived from the
factory. This procedure can be completed directly with the PCB controls on the
front panel:
1. Turn the heater on.
2. Determine base-line room temperature in the heater by pressing “up” and
“down” at the same time. The room temperature detected by the heater
thermostat will be displayed on the screen for 15 seconds. This may or
may not correspond with the wall thermostat setting. This is what you are
about to change.
3. Release the buttons and wait for 15 seconds for the unit to return to its
regular functions.
4. To continue with the recalibration, press “up” and “enter” at the same
time and hold until the following appears in the window: “8.8.8.8.8”
5. Press “enter” again. Ignore the existing number which is -9 to +9. This
number is the arbitrary adjustment between the thermostat sensor and the
temperature that was displayed on the screen when you pushed the “up
and “down” buttons at the same time in Step 1.
6. To adjust the temperature that was displayed on the screen in Step 1,
press the “up” or “down” buttons to obtain a higher or lower base-line
temperature for the internal thermostat on the heater.
7. Once the desired temperature is displayed on the screen, press the “enter”
button again to exit the programming mode. The temperature setting
displayed on the heater screen will now be measured against the new
thermostat setting you have programmed into the heater.
This entire procedure can be followed skipping step 1 and using the temperature
setting on any wall thermostat instead of the temperature setting on the internal
thermometer in the heater. Remember, the internal temperature measurement on
the thermostat is only your starting reference point and it is strictly arbitrary. It is
set at the factory and is usually within 2 degrees of reality.
By following this procedure, you are setting the unit to precisely match the wall
thermostat rather than the factory installed thermostat setting. Either set-point is
ne depending upon the customer’s preference.

Page 16
Customer/Warranty Service: 800-595-9605
Troubleshooting Your BioSmart®Heater
Problem Solution
Heater’s airow is
reduced.
Check for any objects that could obstruct airow. If
the heater’s airow is still diminished or has stopped,
please call Customer Service.
Heater stays on after
POWER is pushed.
The heater is cooling down, this is a normal function.
DO NOT unplug the heater until you no longer hear
the fan.
Heater fan still on 20
minutes after shut-
down.
This is most likely a defective fan relay. Please call
Customer Service.
Heater display shows a
line of dots.
After a period of inactivity, the heater will enter into
a “screen saver” mode to conserve power. When any
function key is pressed, the display will reappear.
Heater temperature
does not match central
thermostat temperature.
Refer to the Calibrating the Internal Thermometer
instructions in this manual for programming instructions
to match heater thermostat settings with your existing
wall thermostat.
Heater will not turn on.
Test the outlet to make sure there is power available
and then check the heater display for the ashing TIME
DELAY light. Press the POWER button to turn off the
timer and resume normal operation of the heater.
Heater doesn’t seem to
be getting hot enough.
Most likely, one of the ceramic elements is burnt out
or the connection to the element is bad. Call Customer
Service for help, the defective ceramic plate may need
replacing.
The power plug is
getting too hot.
There may be too many appliances running on the
circuit that the heater is on, including on other wall
plugs. Turn off any other appliances that share the same
circuit. The wall outlet may be old or worn, and is not
providing good contact with the plug. The wall outlet
should be changed. If the problem is not xed, there
may be an issue with the house wiring not being able
to carry enough current.
The heater is noisy.
Check for obstructions to the fan blades. If there are
none, you have a defective fan. Please call Customer
Service.

Page 17
©2014 BioSmart Technologies
BIO-1400 OWA
BioSmart®On-Wall Heater Specifications
Model BIO-1400 OWA
• Cabinet: All metal - 22 & 24 gauge with
synthetic, paintable shell
• Weight: 19 lbs
• Dimensions: 22” x 13” x 5” (HxWxD)
• Power Requirements: 120 Volt AC
• Power Consumption: 12.5A, 1400W
• Power Cord: 7 ft
• Chassis Safety Insulation: Exceeds all
government and independent laboratory
standards for safety in an installed heating
appliance (a safety standard that exceeds
other manufacturer’s specications).
• Internal Ceramic Blanket: Provides R45
insulation between the wall and the heater.
The heater cabinet remains cool to the touch while delivering warm (105°
C) far infrared heat into the room.
• Control Panel: Digital – large numbers
• Thermostat: 3 probe – Electronic Digital; Range 37 - 86 °F
• Thermostat Accuracy: ±1° (1 degree up and 1 degree down)
• Delayed Start Function • Automatic Restart • Safety Cut-Off
• Life Expectancy: 25+ Years
• Remote Control
• Cord Storage
• Zoned Heat Capability
• Heat Type: therapeutic far infrared heat
• Heat Chamber: Copper-lined for maximum ion transfer
• Heating Elements: 2 - 700 watt ceramic far infrared emitters
• Infrared Emitter Life Expectancy: 40,000 hours
• Heat Output: 5,800 BTU infrared heat
• Fan System: Dual Speed, high-output, ball bearing laminar-ow
• Fan Noise Level: 18 dB - practically silent
• Listed Approvals: C-TUV-US (International UL Equivalent)
• Warranty: 5-Year limited

Page 18
Customer/Warranty Service: 800-595-9605
Diagram of BioSmart®On-Wall Heater
A. Sensor Cover
B. Temperature Sensor
C. Cover
D. Control Panel
E. Exhaust Grill
F. CP Mounting Plate
G. Scroll Fan
H. Connection Plate
I. PC Board
J. Ionizer
K. Solid state relay
L. Wall Mounting Plate
M. Bottom Case Cover
N. Insulator Covers
O. Top Insulator Cover
P. Fan Sensor
Q. Heater Core
R. Ceramic Heating Elements
S. High Limit Reset
T. UV Light
U. UV Light Shield
V. Wall Standoff
W. Wall Mounting Bracket
Table of contents
Other BioSmart Heater manuals


Popular Heater manuals by other brands


Navien
Navien Comfort-Mate EQM301-SSUS quick start guide

Scarlett
Scarlett Comfort SCA H VER31 1000 instruction manual

Elnur Gabarron
Elnur Gabarron IFB-2000 Installation instructions and user guide

Zelmer
Zelmer ZFH1900 user manual

Glen Dimplex
Glen Dimplex Dimplex DSH Series owner's manual

Solpal
Solpal L Installation and operating manual


