manuals.online logo
Brands
  1. Home
  2. •
  3. Brands
  4. •
  5. Bird-X
  6. •
  7. Stereo System
  8. •
  9. Bird-X BB-PRO User manual

Bird-X BB-PRO User manual

PRIOR TO INSTALLATION
Your complete BB–Pro kit includes a con trol unit,
power ad apter and four spea kers. Open the con trol
unit by lifting the two latches on the side of the
enclosure.
Prior to operation, route the speakers and power
cables from their respective jacks on the control panel
down through the slotted rubber grommet in the lower
part of the enclosure, as shown in Fig. 1.
IM POR TANT: Be certain that the
power switch is in the OFF po si-
tion and the audio volume control
is set to the minimum (LOW) audio
vol ume level ( coun ter clock wise) as
shown in Fig. 2 while plugging the
speaker and power cords into the
control unit.
HOW IT WORKS
Sonic and ultrasonic sounds sequence through all
four speakers. Sonic sounds play according to the
programming options you choose. Ultrasonic sounds
are always active – day and night – regardless of
programming, however they won’t play during the
sonic sounds.
INSTALLATION
Important safety-related information:
a) Do not install the device during rain or snow conditions.
b) Installation shall be made in such a way that a power
supply and the internal part of the control unit never be
subjected to water or snow.
c) Note that a power supply powered from 230 VAC is
intended for indoor use only.
1) Use the mounting hardware (included) to mount the control
unit box to a wall, post or other vertical surface.
ULTRASONIC FREQUENCY SWITCH
The ultrasonic sounds play regardless of the other setting you
choose. HIGH, MED and LOW refer to the frequency of the
ultrasonic sound waves. We recommend you begin on LOW,
and then vary between the three every so often (during routine
maintenance, for example).
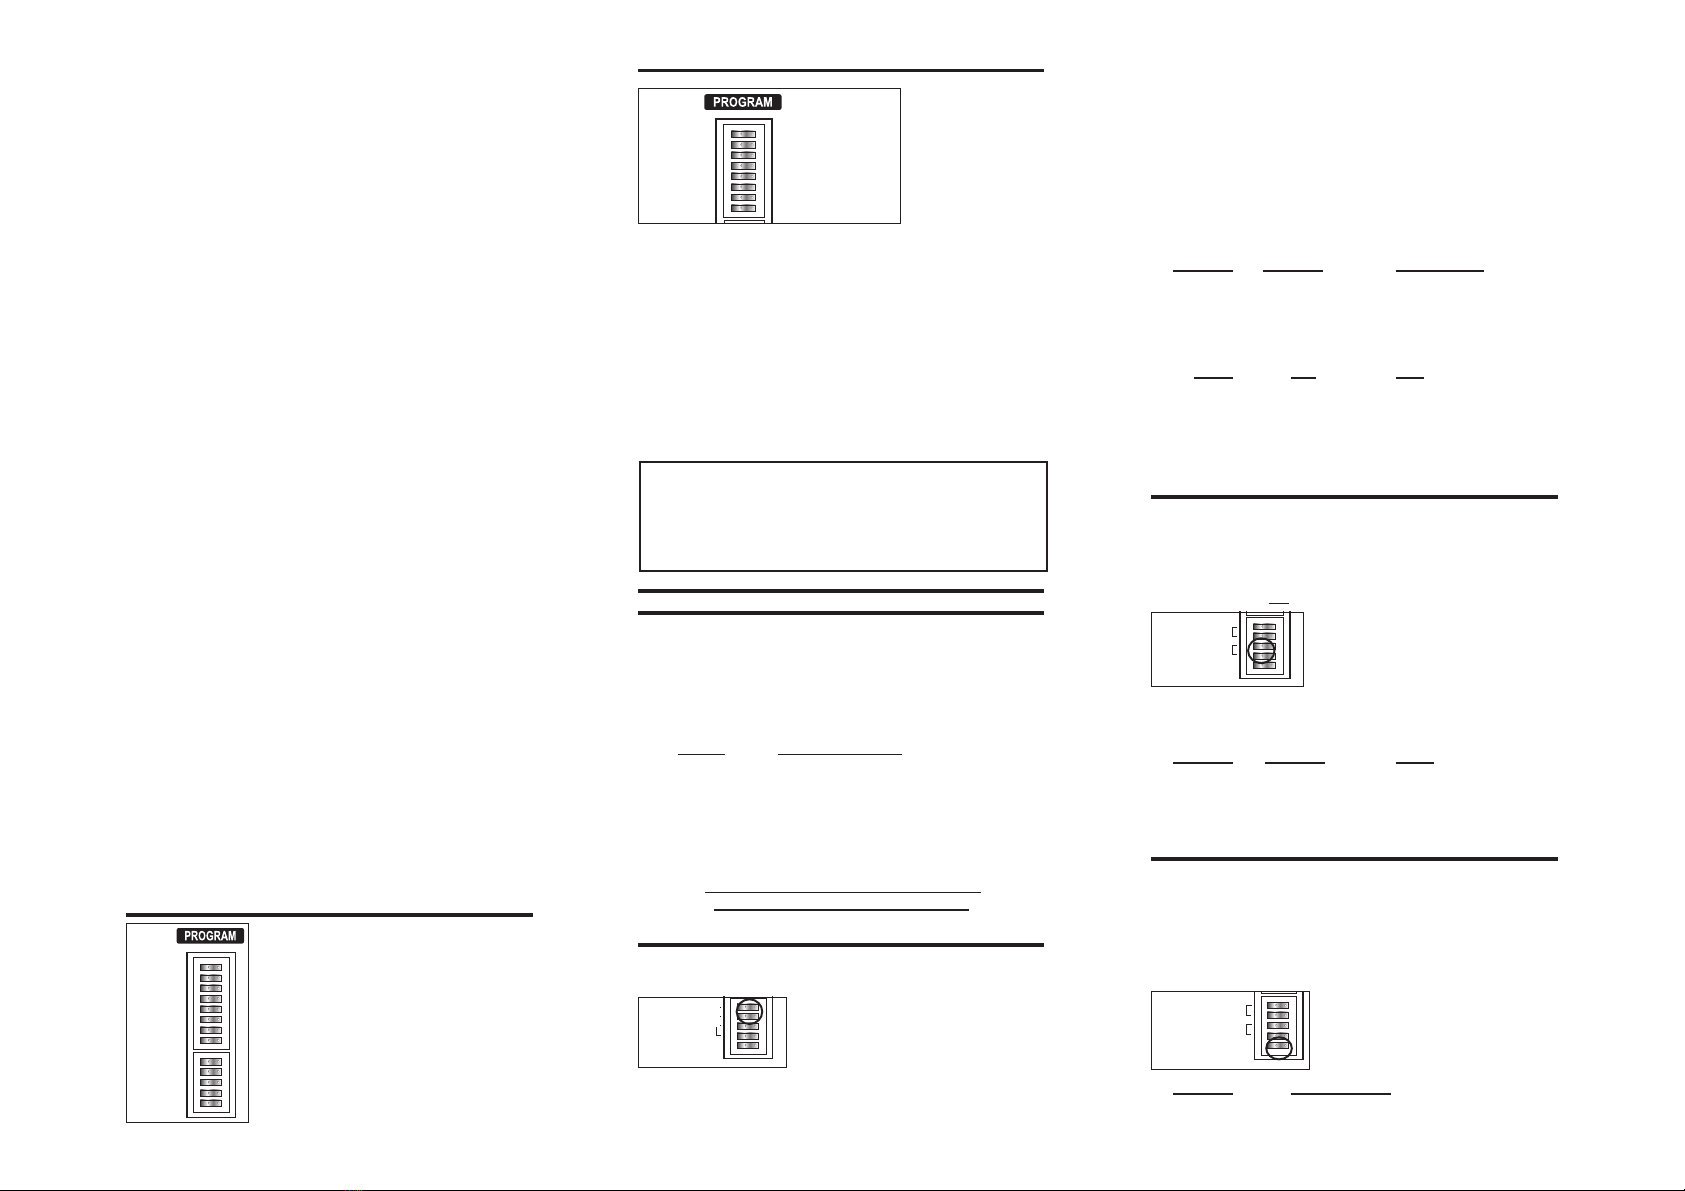
PROGRAMMING EXAMPLE
Recording Switches: Results:
1, 3, 5 and 6 to “ON” position Plays Sounds 1, 3, 5 & 6
Mode Switches:
1 = “OFF” position
2 = “ON” position (Medium), every 1 to 4 minutes
3 = “ON” position
4 = “OFF” position Operates during daylight hours only
5 = “ON” position In random, non-sequential order
VOLUME CONTROL
The unit has a volume control dial for the sonic (audio) sounds
on the front panel of the unit. Turning the dial toward LOW
will result in reduced sound output and rotating the dial toward
HIGH will result in an increase in sound output.
CAUTION: Take care when turning the dial since the unit may be in an
inactive state when the dial is rotated. It could then re ac ti vate at a very
high level of sound which could be painful to your ears.
POWER SWITCH
The power switch enables the unit to operate. Slide the switch
to the ON position to start the unit. If you turn the unit OFF, be
sure to leave it off for about 30 seconds before turning it back
on to allow the electronics to properly reset.
TROUBLESHOOTING
Unit is on, but no
sound is heard
Unit is on, but plays
the same sound over
and over, regardless
of the settings
Unit is not operating
properly in the
DAY or NIGHT mode
• Check volume settings
• Check time of operation settings.
• Check that at least one sound is
selected to play.
• Reset the unit by turning it off
for 30 seconds and then back on
• Double check Mode switch
settings
• Make sure photocell is not
obstructed
• Make sure the photocell is not
affected by bright lights in either
the front or the back of the unit.
BB–PRO INSTRUCTIONS P/N #655-0047-00 (Rev. H)
Audio Volume
S l o t t ed
Ru b b e r
Grommet
BB–PRO™
BB–PRO™
300 North Oakley Blvd. • Chicago, IL 60612
ph. (312) 226-2473 • fax (312) 226-2480
Toll Free US & Canada 800-662-5021
www.bird-x.com • [email protected]
EPA Est. No. 075130-OR-001
This BB-PRO unit is warranted against defects in material
and workmanship for six months from date of purchase
(extended warranty available). Bird-X will replace or
repair, provided defect occurs under normal use. Returns
accepted only with authorization from our Chicago office.
Limited Warranty
Product success takes time to build. Bird and pest habits may take several days or weeks to
break. Follow all suggestions for maximum efficacy. "Instant" tests do not replicate natural
conditions and give no indication of the unit's success with the infestation.
Bird-X, Inc. has been recognized worldwide as the critter and bird control x-perts for 40 years.
We have become experts through extensive experience and research. As a result, we are
happy to analyze problems and make reommendations based on each customer’s specific
situation and needs. In addition, we provide the following recommendations for greatest
success, even before activating the repeller.
Remove inducements. Clean the area of all evidence of critters or birds: nests, fledglings,
droppings, dead birds, and the residential scent. Because critters, birds and their droppings can
carry many diseases, use extreme caution when removing them. Do not breathe or come into
direct contact with them. If you have questions about how to do this safely, consult an expert.
(Adults are likely to return to their young in order to protect them or to assist them in leaving the
area.) Remove food spillage, garbage, nesting material and other appealing items.
Survey the critters and/or birds to determine flight or ground path and time patterns, entries and
exits, and nesting, feeding and roosting habits. This will suggest the unit placement, speaker
direction and time of operation you should choose. Make educated guesses as to where the
birds or critters will go when they are repelled from their current infestation, and consider
additional units to cover these alternative areas.
Maintain a clean and changing environment. Periodically clean the area of nests and
droppings, relocate or reposition the unit, vary the output, or turn off the unit for a short time.
Install early, before “season” begins, as it is easier to keep pests away than to rout them out
once they have established a living pattern.
Use products synergistically. Two or more different kinds of devices (this repeller plus a
visual scare product and/or a roost inhibiting device) will produce a synergistic effect -- i.e., in
combination, the products will yield much greater effectiveness than the one alone. Contact us
for information on “companion” products.
Prepare for Successful Critter Control
Successful Long-Term Behavior Modification
CAUTION: Bird droppings are unhealthy - even potentially fatal. At
least sixty transmissible diseases have been associated with birds
and exposure to their excrement. Prior to cleaning up any type of
droppings, it is important to take all necessary protective measures,
including but not limited to protective respiration devices, gloves,
clothing and safety eyewear. Your health and safety are important:
please seek professional advice and information appropriate to your
situation. Never clean up or risk other exposure to droppings without
using protection. Do not ask others to enter or clean up potentially
hazardous areas without ensuring that they are similarly protected.
2)
Plug the power adapter into an electrical outlet. The other
end of the cable should already be plugged into the power
jack located above POWER JACK on the front panel of the
con trol unit box. The adapter shall remain readily operable.
An optional battery cable may be used to connect the
control unit to a 12-volt battery. If this is done, first connect
the black battery clip to the negative terminal on the battery
and then connect the red battery clip to the positive terminal.
Both the connection to the electrical outlet (or battery) and
the connection of the power cable inside the control unit
must be protected from dripping or splashing water. Do not
set objects filled with liquids on the control unit.
3) Speaker positioning: On a billboard or sign, you will most
likely want to position speakers in between the double-
sided sign, or in the back of a single-sided sign. Place
two speakers high and two speakers low. Position them
either in the center facing OUT or on the outside edges
facing IN and ACROSS the sign. In this manner, birds will
be constantly “exposed” to the greatest sound diversity
without too much physical obstruction. If you’re not sure
exactly where you will want the speakers, we suggest
temporary installations with wire ties until you determine
where you will want them permanently. If the infestation
is on a tower, awning, rooftop or anyplace else, follow the
rough guidelines above: put some high and put some low,
and have them face different directions for greatest sound
variety.
4) Set the switches as desired. (See “PRO GRAM MING
YOUR BB–PRO” for complete details on how to program
your bird repeller.)
5) Make sure the volume setting is set to LOW (all the way
counter-clockwise).
6) Slide the SOUND FREQUENCY switch to the HIGH
position. The unit will immediately turn on.
7) Adjust the volume to the desired level.
8) Close the cover and latch shut. Ensure that the cover is
properly latched closed and do not open the cover during
rain or other conditions that would expose the inside of the
control unit to water.
PROGRAMMING YOUR BB–PRO UNIT
To program your BB–PRO unit you will
need a small screw driver, toothpick, or
other small, rigid object to move the
switches in the switch array. The switch
array is the switch bank located in the top
left corner of the unit (under “PROGRAM”).
A switch is ON if the switch is moved to
the right-hand side. The switch is OFF
if the switch is moved to the left-hand
side.
SOUND SETTING SWITCHES
The Sound
Setting Switches
are the first eight
switches in the
switch array, to set
the sonic (audio)
sounds only.
Each switch has a recording number to the left of
it that corresponds with the bird/sound descriptions
listed on the foil label (see above example) located
on the replaceable Memory Card with Sound Chip
to the right of the switch arrays. For best results,
choose a combination of both predator calls AND
bird distress recordings to create the most natural
scenario. We also recommend varying your
choices periodically for greatest effectiveness.
NOTE: Your BB-PRO features a replaceable Memory Card with Sound
Chip. You will notice that the sounds included on your BB-PRO unit are
listed on a silver foil label affixed to the chip. To remove, simply pull
Memory Card with Sound Chip straight out from the embedded socket.
Then, if desired, insert a different Memory Card with Sound Chip by
pressing firmly straight into the socket.
MODE SETTING SWITCHES
The Mode Setting Switches set the various modes of operation:
such as the amount of time between playing predator calls and
bird distress calls, when the unit will operate (day only, night
only, or 24 hours), and whether the unit will operate in the
random mode or normal mode.
Switch Mode or Function
1 Sets the Delay Period
2 Sets the Delay Period
3 Sets the Time of Operation
4 Sets the Time of Operation
5 Turns Random Mode On or Off
Remember, whatever your choices, the
ultrasonic sounds are always active.
DELAY SWITCHES
The two “Delay” switches are located just below the Bird
switches in the switch array. When the unit is set to one of
the various Delay modes, the unit
will delay a number of seconds or
minutes between recorded sounds.
The SHORT setting is appropriate
for testing, but is NOT recommended for long-term success.
Please note that the unit will play all of the selected recordings
(either sequentially or non-sequentially, depending on the
Random Mode) then it will go into a delay. The time the unit
stays off depends on the Delay and the Random Mode settings.
If the unit is op er at ing in Random Mode, the unit will delay
anywhere from the min i mum value to the maximum value for
that Delay setting. If the unit is not in Ran dom Mode, it will
delay only the minimum value. To set the Delay period (or delay
interval), use the following settings on switches 1 and 2 in the
Mode Function settings.
Switch 1 Switch 2 Delay Period
ON OFF Short
OFF ON Medium
ON ON Long
OFF OFF Extra Long
Mode Min Max
Short 17 sec 50 sec
Medium 1 min 4:15 min
Long 5:00 min 10:00 min
XLong 10 min 30 min
TIME OF OPERATION SWITCHES
The two “Time” switches are located just under the Delay
switches in the switch array. ‘Night Only’ operates the unit at
night and ‘Day Only’ operates the unit during the day. However,
the photocell that senses the sunlight is susceptible to bright
lights. Take care not to have bright lights shining towards the
unit since this can prevent the unit
from operating properly. In ‘24-
Hour Mode’, the unit will operate
continuously, regardless of the time
of day. To set the Time period for the unit to operate set
switches 3 and 4 in the Mode Function settings to the following:
Switch 3 Switch 4 Mode
ON OFF Day Only
OFF ON 24-Hour
OFF OFF Night Only
RANDOM OPERATION SWITCH
The “Random” switch is the bottom switch in
the
switch array. When operating in Random Mode, the unit
will randomly play the selected recordings in non-sequential
order. When the unit is not operating in the Random Mode,
the unit will play the selected recordings in a sequential order.
The Random Mode is recommended to keep birds from
adapting to a preset pattern of
sounds. To operate the unit in
Random mode, set switch 5 in
Mode settings as follows:
Switch 5 Mode Settings
ON RANDOM (Mode ON)
OFF NOT RANDOM (Mode OFF)
1234567 812345
BIRD #1
BIRD #2
BIRD #3
BIRD #4
BIRD #5
BIRD #6
BIRD #7
BIRD #8
DELAY
TIME
RANDOM
DELAY
1234567 812345
BIRD #1
BIRD #2
BIRD #3
BIRD #4
BIRD #5
BIRD #6
BIRD #7
BIRD #8
DELAY
TIME
RANDOM
DAY/24HR/NIGHT
1234567 812345
BIRD #1
BIRD #2
BIRD #3
BIRD #4
BIRD #5
BIRD #6
BIRD #7
BIRD #8
DELAY
TIME
RANDOM
1 Pigeon I
2 Pigeon II / Bird Predator I
3 Starling / Pigeon III
4 Sparrow
5 Gull I
6 Gull II
7 Bird Predator II
8 Bird Predator III
SOUND #1
SOUND #2
SOUND #3
SOUND #4
SOUND #5
SOUND #6
SOUND #7
SOUND #8
1234567 812345
BIRD #1
BIRD #2
BIRD #3
BIRD #4
BIRD #5
BIRD #6
BIRD #7
BIRD #8
DELAY
TIME
RANDOM
NOT RANDOM
1234567 812345
BIRD #1
BIRD #2
BIRD #3
BIRD #4
BIRD #5
BIRD #6
BIRD #7
BIRD #8
DELAY
TIME
RANDOM
SOUND #1
SOUND #2
SOUND #3
SOUND #4
SOUND #5
SOUND #6
SOUND #7
SOUND #8
TIME OFF
DAY/24HR/NIGHT
NOT RANDOM

Popular Stereo System manuals by other brands

Denon D-AJ03 operating instructions

Denon

Denon D-AJ03 operating instructions

Philips FW362/22 Instructions for use

Philips

Philips FW362/22 Instructions for use

Bush MCS-512 Set-up & operating instructions

Bush

Bush MCS-512 Set-up & operating instructions

THOMSON MIC200IDABBT operating instructions

THOMSON

THOMSON MIC200IDABBT operating instructions

Sony HCD-GV10AV Service manual

Sony

Sony HCD-GV10AV Service manual

Philips MCM240 user manual

Philips

Philips MCM240 user manual

LG CM2460 Simple manual

LG

LG CM2460 Simple manual

Sony CMT-EP707  (CMTEP707) operating instructions

Sony

Sony CMT-EP707 (CMTEP707) operating instructions

Panasonic SA-VKX80GA Service manual

Panasonic

Panasonic SA-VKX80GA Service manual

Philips FW538SR/P22 Instructions for use

Philips

Philips FW538SR/P22 Instructions for use

Aiwa Z-L70 operating instructions

Aiwa

Aiwa Z-L70 operating instructions

Sony WHG-CX5iP operating instructions

Sony

Sony WHG-CX5iP operating instructions

Panasonic SA-AKX50PH Service manual

Panasonic

Panasonic SA-AKX50PH Service manual

Sony HCD-ZX70DVD Service manual

Sony

Sony HCD-ZX70DVD Service manual

Sony HCD-DX2D - Dvd / Reciever Component Service manual

Sony

Sony HCD-DX2D - Dvd / Reciever Component Service manual

Harman Kardon SoundSticks III Setup guide

Harman Kardon

Harman Kardon SoundSticks III Setup guide

Geneva L user guide

Geneva

Geneva L user guide

JVC MX-J800 Service manual

JVC

JVC MX-J800 Service manual

manuals.online logo
manuals.online logoBrands
  • About & Mission
  • Contact us
  • Privacy Policy
  • Terms and Conditions

Copyright 2025 Manuals.Online. All Rights Reserved.