Bisado Technologies LOOKING F-1 Premium User manual

F-1 Premium Userʼs manual
Version 2.2
Thank you for purchasing LOOKING’s F-1 Premium DVR.
This manual will go through on how to use the On-Board Camera System and
provide you with detailed product information regarding operation, precautions, and
technical data. Please read this manual carefully.
Disclaimer
The material and information contained in this manual is for general information
purposes only.
To ensure the integrity of the video, please use a genuine high-speed Class 10
memory card and format it regularly.
The terms and conditions are subject to change at any time without prior notice.
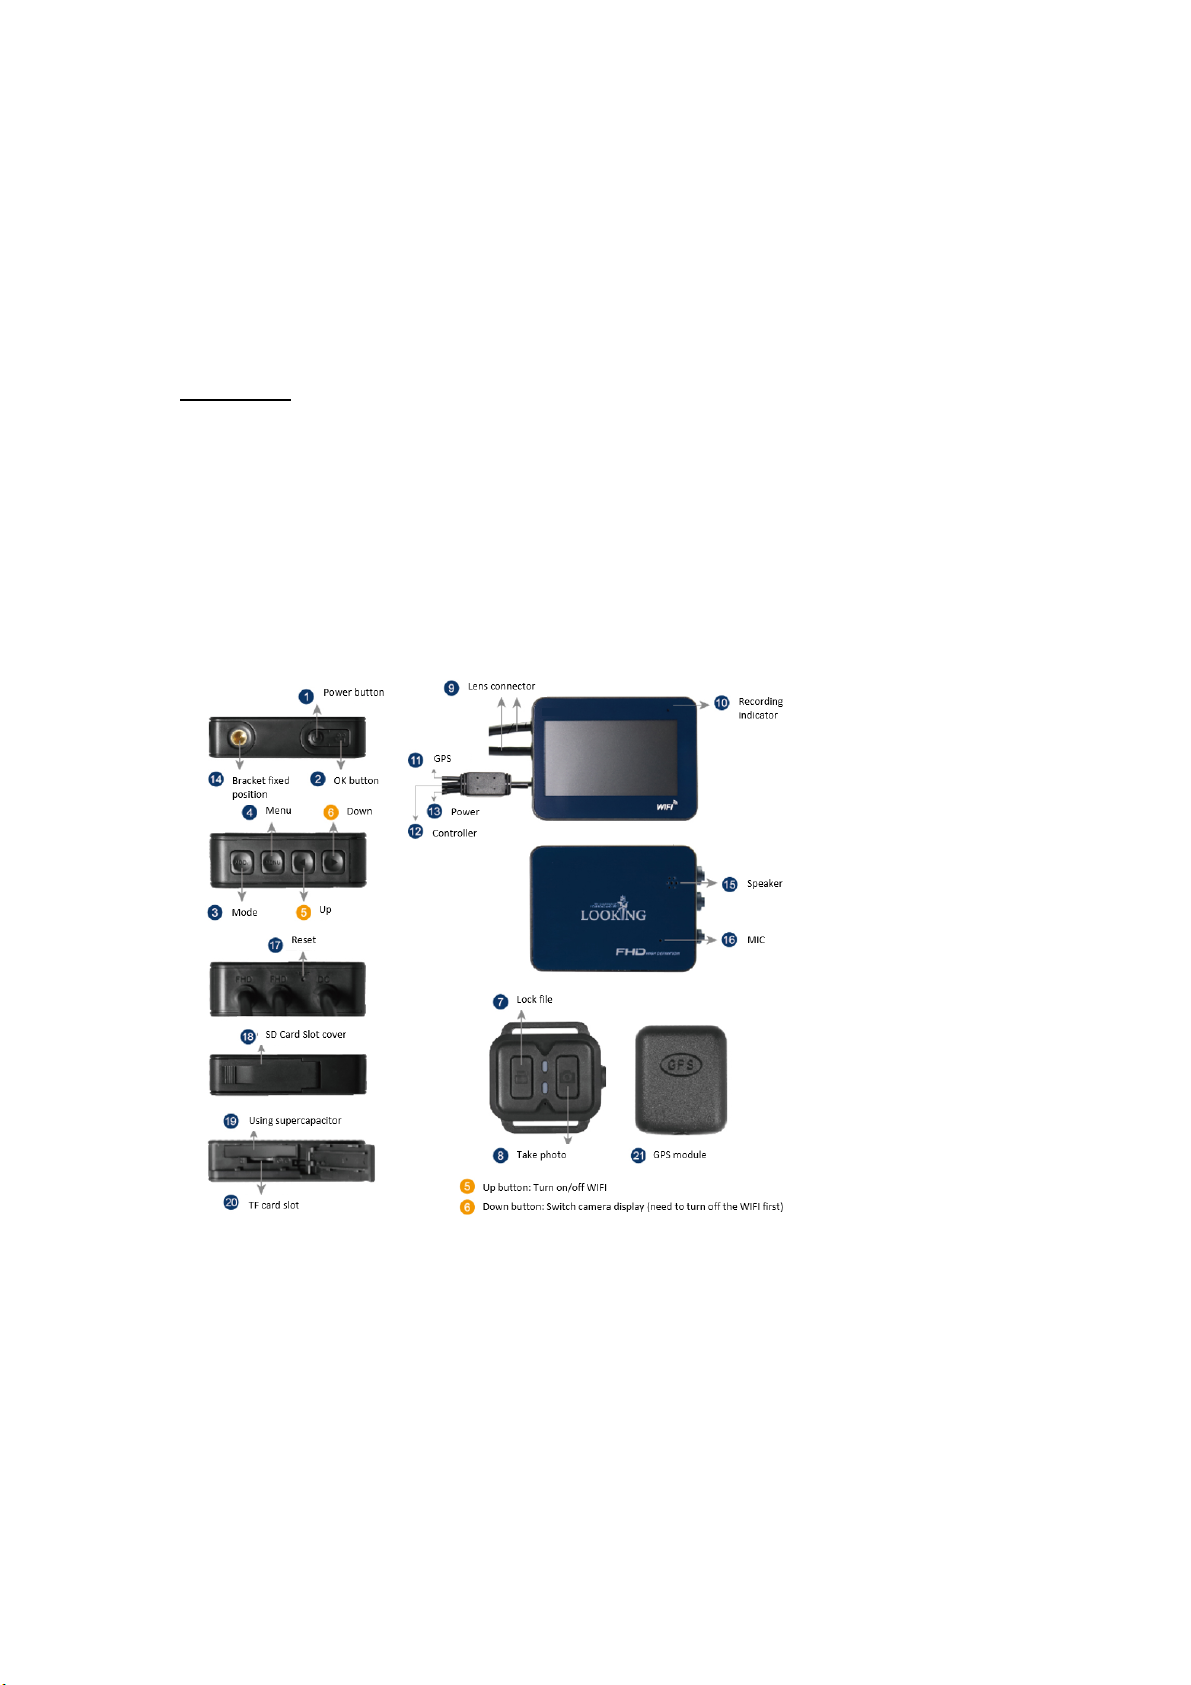
Product Structures
1. Power Button
2. OK Button
3. Mode Button
4. Menu Button
5. Up Button
6. Down Button
7. Controller: lock file
button
8. Controller: take
photo button
9. Lens Connector
10. Recording
Indicator
11. GPS connector
12. Controller
connector
13. Power connector
14. Bracket fixed
position
15. Speaker
16. MIC
17. Reset Button
18. SD Card slot cover
19. Using
supercapacitor
20. SD Card slot
21 GPS module:
record speed & route

Wired controller
GPS module

Product Features
1. Dual Channel: SONY IMX323 Sensor FHD 1920x1080
2. Auto white Balance adjustment
3. Lens angle 140 degree
4. 2.7inch TFT display (16:9)
5. Supports max. 128G micro SD card
6. Lean-angle auto lock function.
7. Wired controller to lock the current file and take photo easily.
8. GPS function to record the speed and route, the data can be viewed when
playback by using APP.
Key Operation
1. Power button: Press and hold 6 seconds to turn on/off the machine
2. OK button:
a. In video mode, press to start/stop recording
b. In photo mode, press to take pictures
c. In playback mode, press to start/stop playback
d. In the menu settings, press to confirm selection or enter selected
menu
3. Mode button: With recording paused, short press to switch between video,
photo, or playback modes.
4. Menu button: With recording paused, short press to enter the settings menu.
5. Up button:
a. Turn on/off WIFI.
b. Scrolls through menu items.
6. Down button: Scrolls through menu items

SD card
1. Insert the SD card according the indicated direction
2. To remove the memory card, push the card in and the card should
automatically pop out.
a. Important
i. Please format the memory card when using a new card.
ii. SD card must be a minimum of 80MB/s (Class: U3)
Power on/off and Auto shut-off
1. Press and hold the power button for 6 seconds to turn on/off the machine.
2. The machine can be programmed to shut down automatically to save power; if the
machine is not recording, it will automatically shut off.
Recording mode
1. Recording mode is the default mode for this device. When in recording mode,
you will see the
icon in the upper left-hand corner and a flashing icon.
2. In recording mode, press the recording button to start/stop recording.
3. Press menu button to enter the video settings menu, up and down buttons
can scroll through menu items. Under the video settings menu, you can
choose the resolution, segment of recording, audio on/off…etc.
4. Use controller: Press the lock button to save the current recording file; press
the camera button to take a photo.
Note:
The machine will be powered automatically when turn the key on, please do not
remove the SD card when the machine is recording.
Camera mode
1. Stop recording and enter the camera mode by using the mode button. When in
camera mode, you will see the
icon in the upper left-hand corner
2. Press menu button to enter the camera settings menu, up and down buttons can
scroll through menu items. Under the camera settings menu, you can choose the
resolution, color, contrast…etc.

Playback mode
1. Stop recording and enter the playback mode by using the mode button. When
in playback mode, you will see the icon in the upper left-hand corner
2. Press menu button to enter the playback settings menu, up and down buttons
can scroll through menu items. Under the playback settings menu, you can
delete or save the recordings.
General Settings
1. Press menu button to enter the settings menu, press twice the menu button to
enter the general settings menu.
2. Date/Time: Use the Up and Down buttons to set the correct values and press
Ok to confirm.
3. Auto shut-off: The machine can be programmed to shut down automatically to
save power.
4. Languages: Multiple languages supported.
5. Key tone: Turn on/off the key tone.
6. Format: Format the micro SD card.
7. Screen saver: Once the machine has started recording, the screen can be set
to turn off
8. Version: To view the current software version for the machine.
Troubleshooting
1. Unit not recording: Check the SD card if there is enough space.
2. Stop recording while riding:
a. Check the SD card if is Class 10 and with 80MB/S above. The SD
card writing & reading speed is required to this device.
b. Check the loop recording setting is on or not.
3. “Wrong file” or “damaged file” showed: Check the SD card and format it
(please use the device to format the SD card not by PC).
4. Fuzzy image: Check the camera lens and clean it.
5. Buttons not working: Turn off the WIFI first, if the WIFI function is on, the
buttons cannot work.
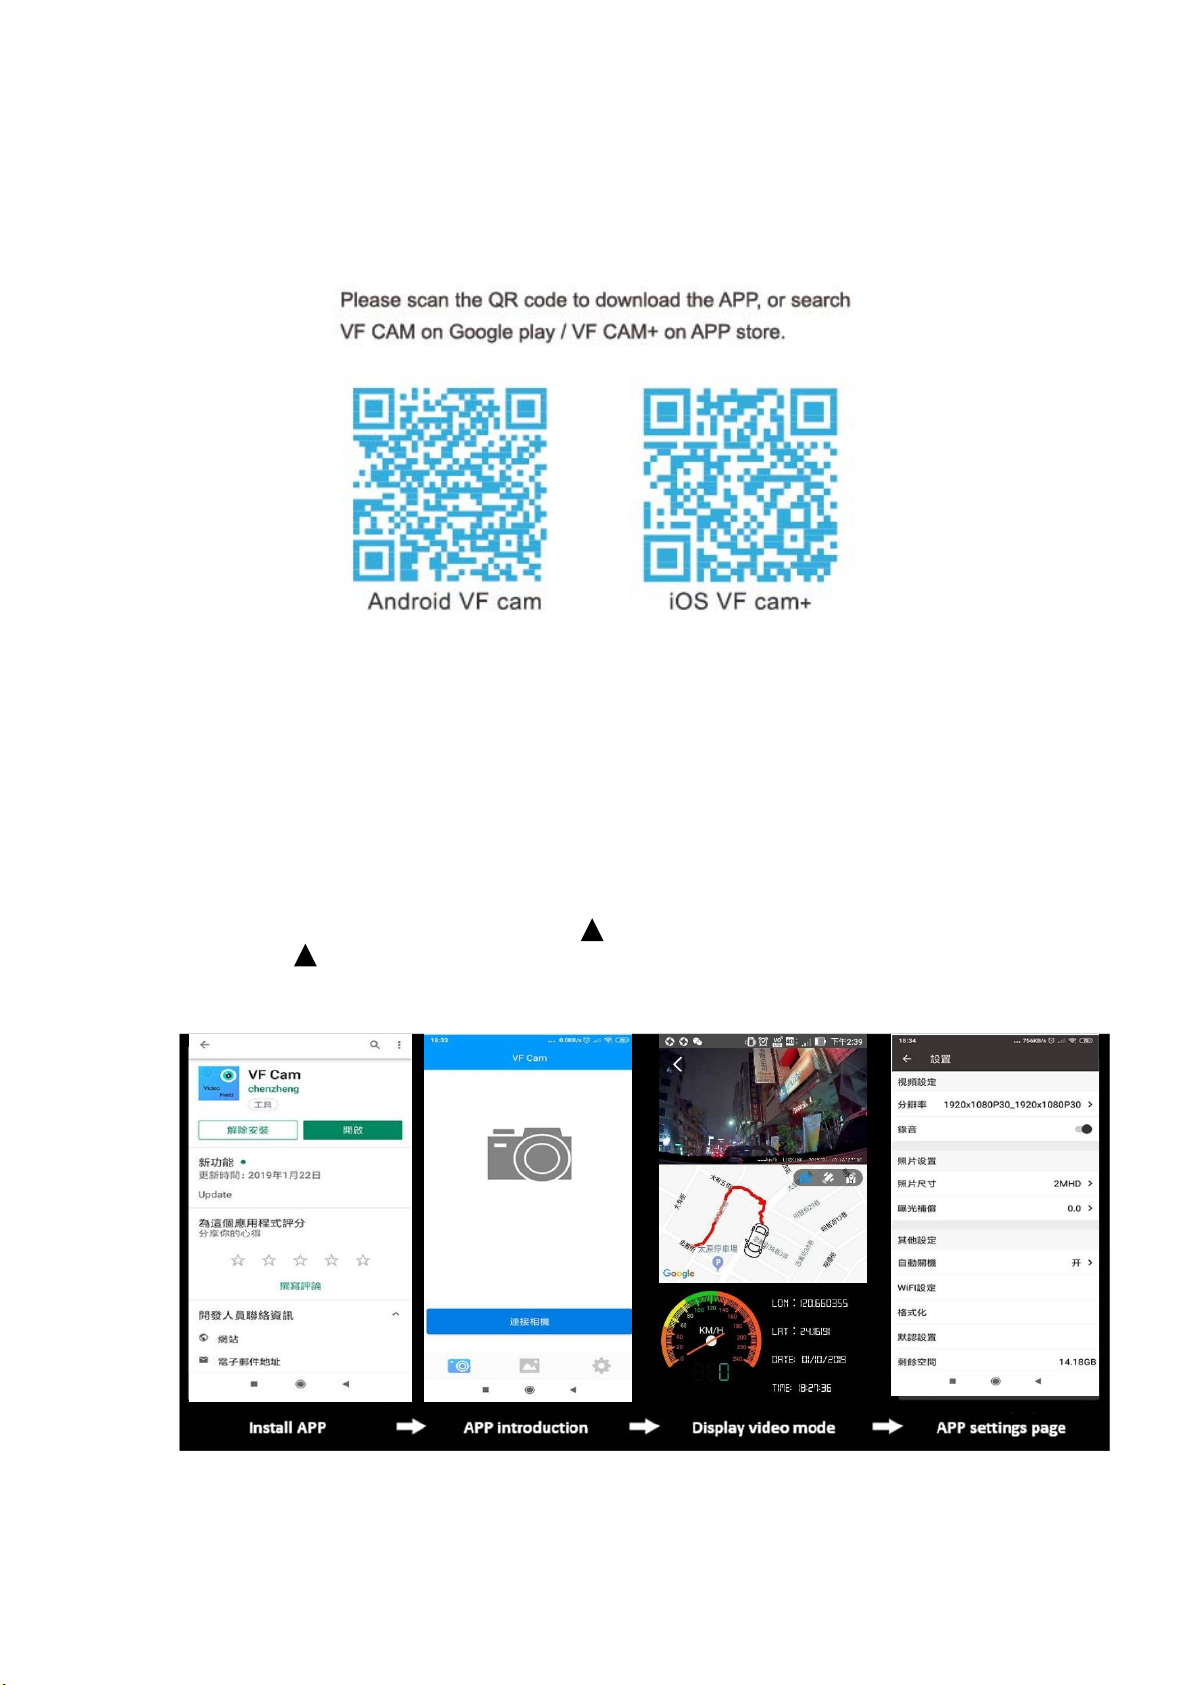
WIFI APP
1. Scan the QR code to download the app
2. Switch on the motorcycle DVR and WIFI function (the WIFI default setting is on)
3. The WIFI name & password will show on the display. Password: 12345678
4. After the device is linked, you may now use the APP
5. Only when connecting the GPS, you will find the route & speed when playback.
PS. When the device is on, short press you can turn off the Wi-Fi function, and
press the to turn on the wifi function.

Product Specification
Sensor Dual channel 1920x1080 SONY IMX323
Lens F1.9
Display 2.7” LCD TFT 16:9
Resolution Dual channel FHD1080P 30fps
Audio Build-in MIC/Speaker
Memory card Max. 128G micro SDHC (class 10)
White balance Auto
Power supply Multi-pin connector
Input: 12V-24V 2A
Output: 5V 2A
Battery Supercapacitor
Size 74 x 55 x 20 mm
Working humidity 10%-80%
Working Temperature -10 oC ~ +65oC
Table of contents
Other Bisado Technologies Dashcam manuals


