Bison 1800 User manual

ELECTRIC HIGH PRESSURE WASHER
INSTRUCTION MANUAL
Please read this book carefully before operating.

2
APPLICATION
High pressure washer mainly used for cleaning and maintaining
motor vehicle, project vehicle, project mechanism and agricultural
mechanism, such as cleaning car, bulldozer, concrete stirrer and so on,
also can be used to clean hotel, showplace, station, dock and so on.
ITEM DESCRIPTION
WORKING THEORY
Motor connect to crank directly, driving piston pump working, water
enter into pump through inlet hose, high pressure stream pass by outlet
connector, high pressure hose enter into trigger valve, press high
pressure , water sprayed by nozzle of spray pole.

MAIN TECHNICAL DATA
1800 2500 2600 2900 3600H 3600
Never
Never
Never
Never
Never
Never
Never
Never
SAFETY RULE
3

4
itself.
• To reduce the risk of injury, do not operate the machine near children.
• Learn how to stop the machine and release pressure quickly. Be
thoroughly familiar with the controls.
• Stay alert — watch what you are doing.
• Wear safety goggles.
• Do not use acids, solvents, or any flammable material in this product.
These products can cause physical injuries to the operator and
irreversible damage to the machine.
• Do not operate the product when fatigued or under the influence of
alcohol or drugs.
• Keep operating area clear of all persons.
• Do not stand on unstable surfaces. Stand with both feet balanced at
all times.
• To reduce the risk of electrocution, keep all connections dry and off
the ground. Do not touch plug with wet hands.
• The Trigger Gun Safety Lock PREVENTS the trigger from accidentally
being engaged. This safety feature DOES NOT lock trigger in the on
position.
Water Supply (Cold Water Only)
• Water hose must be at least 1/2 inch in diameter.

5
• Flow rate of water supply must not fall below 4 GPM (gallons per
minute).
• Flow rate can be determined by running the water for one minute into
an empty 5-gallon container.
• The water supply temperature must not exceed 104°F/40°C.
• Never use the pressure washer to draw in water contaminated with
solvents, e.g. paint thinner, gasoline, oil, etc.
• Always prevent debris from being drawn into the unit by using a clean
water source.
ASSEMBLY INSTRUCTIONS
To prepare your pressure washer for operation, you will
need to perform these tasks:
1. Attach handle, wheel, hook
2. Add oil to pump.
3. Connect high pressure hose to spray gun and pump.
4. Connect water supply to pump.
5. Attach nozzle extension to spray gun.
6. Connect power.
Attach Handle and wheel
1. Place handle (A) onto handle supports (B) connected to main unit.
Make sure holes (C) in handle align with holes (C) on handle supports.

6
NOTE: It may be necessary to move the handle supports from side to
side in order to align the handle so it will slide over the handle supports.
Hold the location pin in the wheel set backward in horizontal level and
press the locating pin into supporting tube until the click is heard, which
indicates the pin clutches at the supporting tube.(P1)
Until the pin is higher than the thickness of supporting wall.(P2)
P1 P2
Add pump Oil
• Place pressure washer on a level surface.
• For the convenience of transport, Pump without machine oil, and
Breather plug is not installed. Please add 15W/40 machine oil before

7
using. Machine oil quantity is subject to slightly not too oil lens center
line, then install the breather plug.
Connect Hose and Water Supply to Pump
1. Attach high pressure hose to gun. Tighten securely.
2. Connect spray wand to gun. Tighten securely.
3. Assemble grommet kit and quick-connect nozzles as described in
the instructions supplied.
4. Attach other end of high pressure hose to high pressure outlet on
pump. Tighten by hand.

8
5. Run water through your garden hose for 30 seconds to clean out any
debris. IMPORTANT: DO NOT siphon standing water for the water
supply. Use ONLY cold water (less than 104°F (40°C)).
6. Before connecting water inlet hose to water inlet, inspect inlet screen
(A). Clean screen if it contains debris or have it replaced if damaged.
DO NOT run pressure washer if inlet screen is damaged.
7. Connect the water inlet hose (not to exceed 50 feet in length) to the
water inlet. Tighten by hand.
CONNECT POWER
1. Choose right power supply nearly
2. Turn off power switch
3. Connect the power wire of high pressure washer.
4. Turn on power switch

9
GROUNDING Instructions
This product must be grounded. If it should malfunction or break down,
grounding provides a path of least resistance for electric current to
reduce the risk of electric shock. This product is equipped with a cord
having an equipment-grounding conductor and a grounding plug. The
plug must be plugged into an appropriate outlet that is properly installed
and grounded in accordance with all local codes and ordinances.
DANGER- Improper connection of the equipment-grounding conductor
can result in a risk of electrocution. Check with a qualified electrician or
service personnel if you are in doubt as to whether the outlet is properly
grounded. Do not modify the plug provided with the product - if it will not
fit the outlet, have a proper outlet installed by a qualified electrician. Do
not use any type of adapter with this product.
10
HOW TO USE
Turn on the pressure washer (I). The motor starts only if the trigger
of the gun is pulled and shuts off when the trigger is released.
Read instruction manual carefully before operating this machine, check
whether screw, nut loose, oil in crank tank dry. If no oil, shall inject to
half, exchange oil-cork with hole. Not allowed to be working without oil.
Connect one side of high pressure hose to pump body, the other side
connected to spray gun, then connect the inlet hose to inlet connector,
ensure not leakage, open water source, press spray gun, waiting for
drain all air inside then turn on switch, can be use.
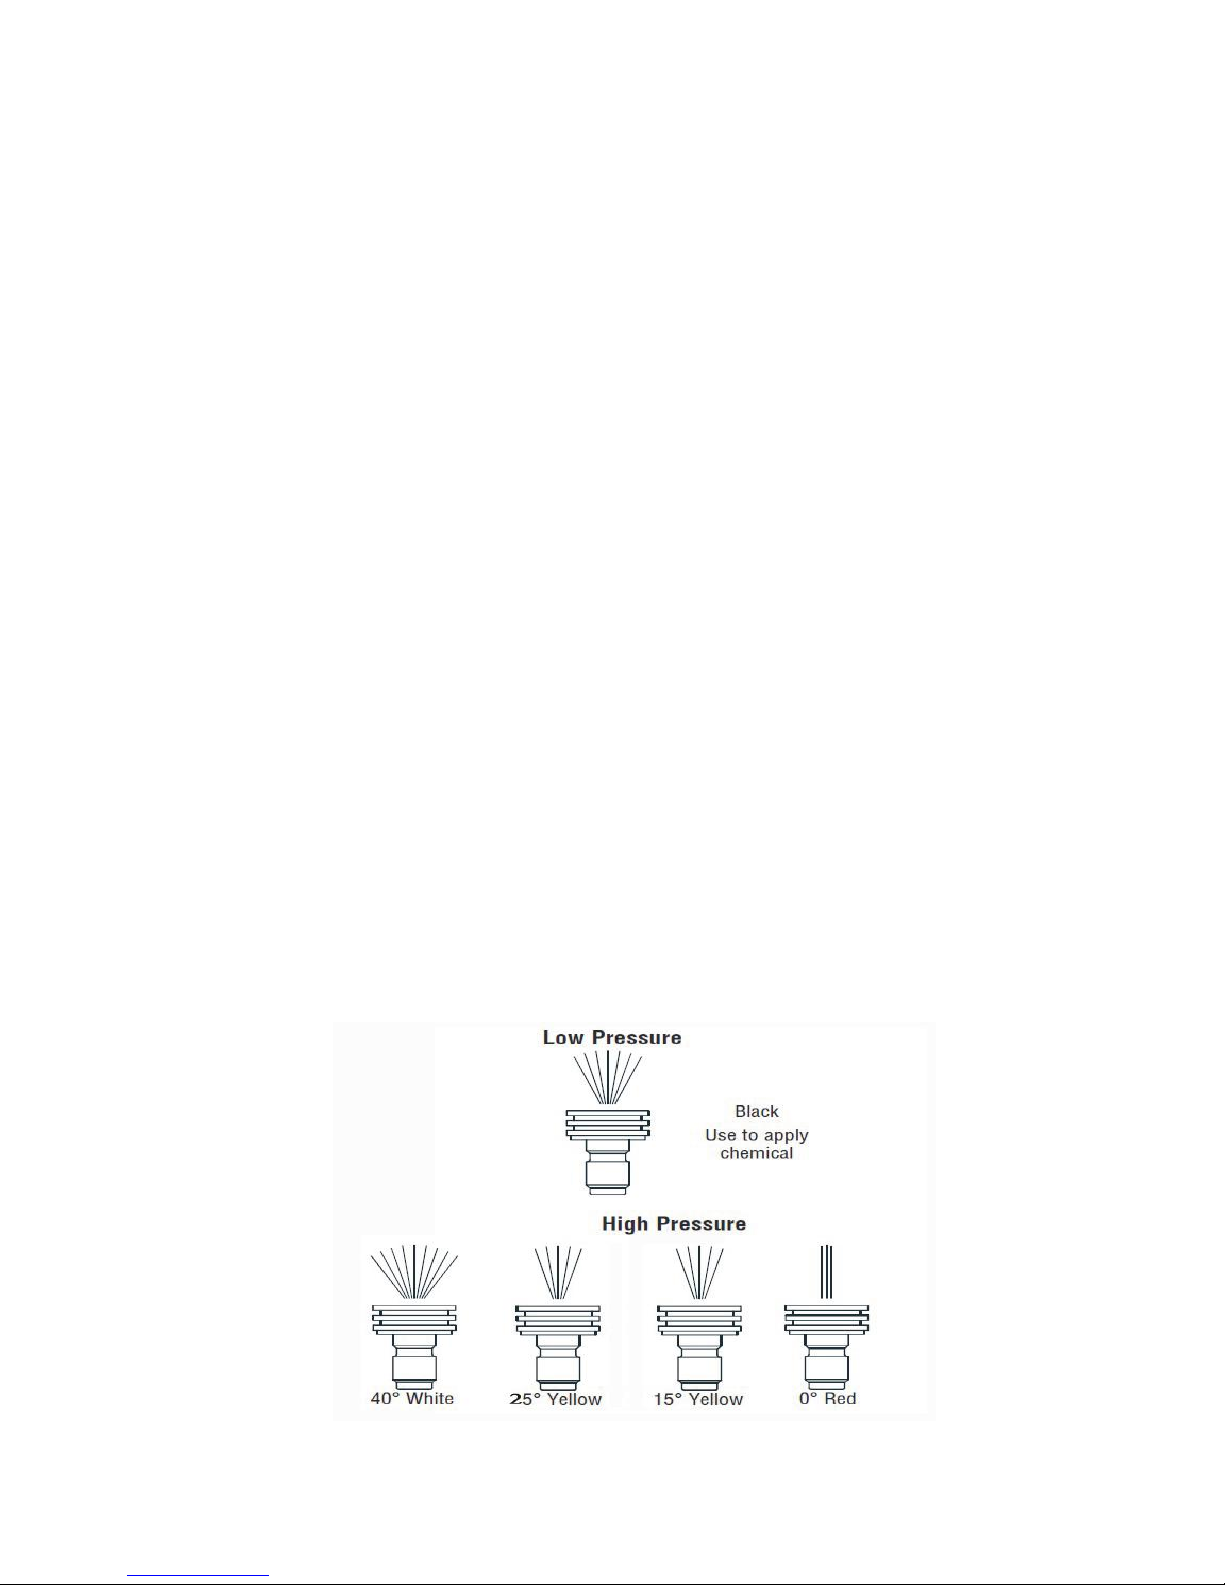
How to Use Spray Tips
The quick–connect on the nozzle extension allows you to switch
between four different quick connect spray tips. Spray tips can be
changed while pressure washer is running once spray gun trigger lock
is engaged. The spray tips vary the spray pattern as shown below.

11
1. Pull back collar on quick–connect and pull current spray tip
off. Store spray tips in holder provided on the nozzle extension.
2. Select desired spray tip:
•For gentle rinse, select white 40°spray tip.
•To scour surface, select yellow 15°or red 0°spray tip.
•To apply detergent, select black spray tip.
3. Pull back on collar, insert new spray tip and release collar. Tug
on spray tip to make sure it is securely in place.
Usage Tips
•For most effective cleaning, keep spray tip from 8 to 24 inches (20 to
61 cm) away from cleaning surface.
•If you get spray tip too close, especially using a high pressure Spray
tip, you may damage surface being cleaned.
•DO NOT get closer than 6 inches (15 cm) when cleaning tires.
OPERATING AND MAINTENANCE
When cleaning, the distance between spray nozzle to surface not too
far, shall be 10cm, because the pressure of the spray nozzle will be
reduce if too far.
The pressure not over working pressure, pressure shall be adjusted
under jet situation.
When operating, the bottom of pump if have few drips, not effect using.
It is normal.

12
When finished cleaning, release trigger valve, turn off motor (within 3
minutes), because after release trigger valve the will do bypass working,
water flowed in the pump body, if too long, will be very hot, broken seal
or other parts.
Spray pole is made of iron paint chrome, keep carefully when operating,
when not using, put the spray gun hung on the pothook, drain out the
balance water inside.
If Long-term stock, drain out all water in pump, separate inlet hose from
water source, running motor about 1 minutes without water source, take
inlet hose and high pressure hose drain all water in hose, when high
pressure hose drain shall press trigger valve.

13
TROUBLE SHOOTING
Trouble
Cause
Remedy
The motor fails to start
or when running
automatic stop
1. No power or socket
is not good enough
2. Switch is broken
3. No oil in crank tank
4. Voltage too low
5. Motor burn out
1. Check power, repair
socket
2. Change switch
3. Inject oil
4. Check voltage
5. Change motor
No jet from nozzle or
pressure not stabile.
1. Nozzle blocked
2. Inlet hose broken
3. air in the pipe
4. filter blockage
1. Dredge nozzle
2. Check connector of inlet
hose, drain air of hose or
change inlet hose.
3. First check whether the
connection of screw
thread end of water inlet
hose is tight, and then fill
the inlet hose with water,
next trigger the gun, and
start the motor.
4. clean the filter.
Spray gun and
connector leakage
1. Screw of connector
loosen or seal
broken
2. Quick connector
not in proper
position or O-ring
broken
1. Tighten screw or
change seal.
2. Re-insert quick
connector or change
seal.
Crankcase heats
1. Too much oil
2. The friction between
the connecting rod
and the crankshaft
caused by too little
oil.
1. let out the extra oil.
2. dismantle the pump to
remove friction marks ob
the connecting rod and
crankshaft.
No water or too little
water from the gun
1. the new pump can
not suck water
2. debris in the pump
3. water inlet and outlet
check valve
damaged
1. start the motor and fill
the water inlet hose with
the water to drain up the
air in the hose
2. dismantle and repair the
pump
3. change the check valve

14
This manual suits for next models
5
Table of contents
Other Bison Pressure Washer manuals


Popular Pressure Washer manuals by other brands

A-iPower
A-iPower PWE1801 Owner's Manual and Operating Instructions

Alto
Alto Triton 730 operating instructions

Craftsman
Craftsman 580.752722 Operator's manual

Kärcher
Kärcher 750mx manual

Landa
Landa VLP3-1100 Operator's manaul

DeVilbiss Air Power Company
DeVilbiss Air Power Company EXCELL VR2400 Operation manual


