BitronHome 902010/124 User manual

TECHNICAL INFORMATION & SUPPORT
CHARACTERISTICS
• Smoke detection by reflective photoelectric sensor
• Built-in siren................... 95 dB(A) @1m
• Radio system................. ZigBee Home Automation 1.2 - 2.4 GHz
• Encrypted communication, regular connectivity test, battery warning
• Power supply................. 3 Alkaline AA type batteries
• Battery lifetime............... ca 2½ years depending on usage profile
• Operating temperature.. -10 - to 50°C
• Humidity ........................ Up to 85% non-condensing
• Dimensions.................... Ø 105 X 42 mm
In order to use this product you need a Home Base with a ZigBee dongle
or a gateway with built-in ZigBee radio module.
SUPPORT
Please visit http://support.bitronhome.eu
for further information about the product and local support contacts.
DECLARATION OF CONFORMITY TO DIRECTIVE 1999/5/EC
Hereby Urmet S.p.A., declares that the Optical Smoke Detector mod.
902010/124 is in compliance with the essential requirements and other
relevant provisions of Directive 1999/5/EC. You may download the
declaration of conformity at support.bitronhome.eu or request a copy
through our support.
MANUFACTURER
BITRON HOME
Urmet S.p.A.
Via Bologna 188/C – 10154 Torino Italy
Subject to modifications and mistakes.
DS902010-014 LBT90364 MADE IN TAIWAN
ENGLISH
MOUNTING
The smoke detector shall be mounted on ceilings only. The minimum
distance to walls is 60cm. In stairwells and nested rooms, mount the
smoke detector always at the highest position as smoke moves upwards.
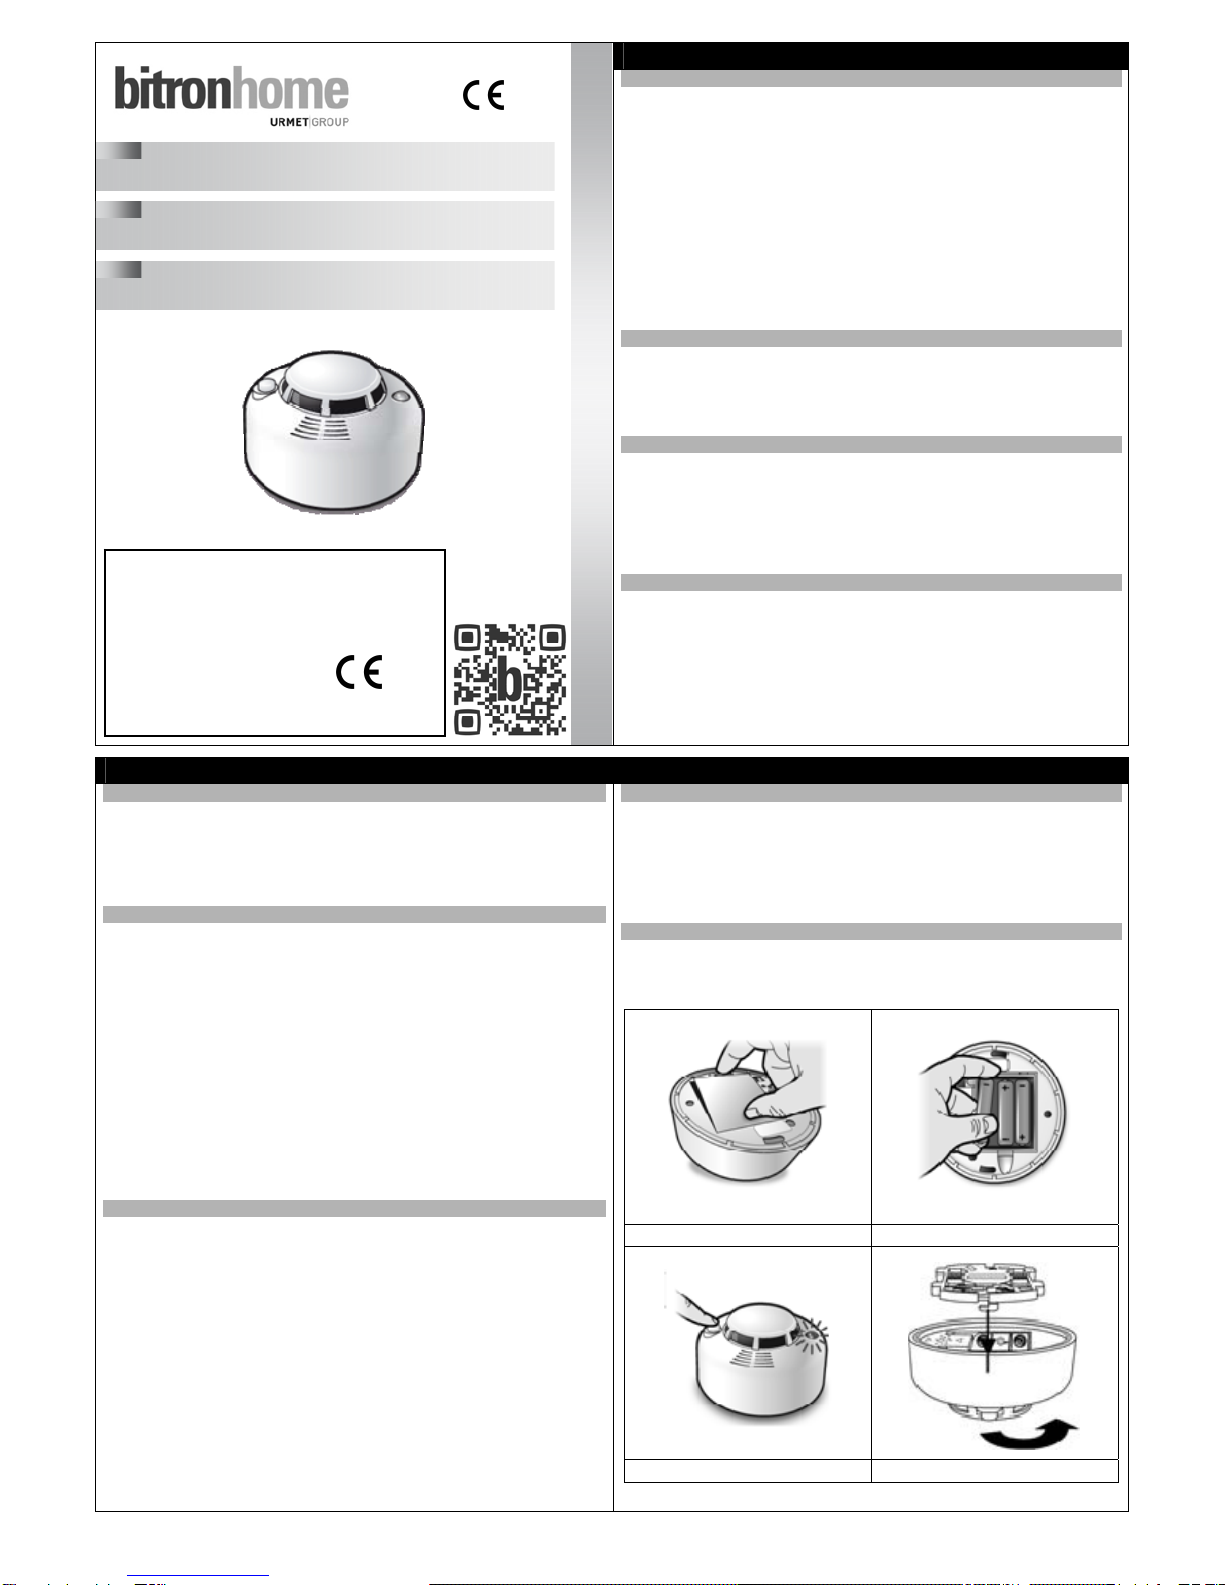
To install the smoke detector mount the mounting bracket first, then fix the
smoke detector by turning it on the bracket until it is fully stable (fig. 4).
SET-UP
This step requires that you have a Home Base with a ZigBee dongle or a
gateway with built-in ZigBee radio module.
1. Make sure that the batteries have been correctly placed as
described in the chapter “operation and maintenance”.
2. Follow the indications for the addition of new devices of the
installation wizard, which can be found in the app of your home
automation system. For further information on the registration
process, please consult http://support.bitronhome.eu.
If you wish to associate the device to a different home base / gateway, it is
sufficient to repeat the procedure of your system for the addition of new
devices. Once successfully concluded the installation process, the sensor
will not communicate with the system, to which it has been previously
registered, anymore.
OPERATION AND MAINTENANCE
In order to verify the correct functioning of the smoke detector, shortly
press the function key (fig. 3). One double-tone signal means that the
device is working correctly, 3 tone signals indicate an error. The smoke
detector works correctly even if it is not connected to a home automation
system or if the connection to the central is interrupted. The transmission
of alarms and the indoor burglar alarm siren function only work if the
sensor is connected to the system.
To insert or replace the batteries (3*AA) proceed as shown in figures 1
and 2, ensuring polarity is correct. In case the LED of the smoke detector
shall blink every 5 seconds, the batteries are running low. Please change
batteries. We suggest using high quality long-life alkaline batteries.
If the smoke concentration exceeds the threshold for 10 seconds, the siren
will activate and the LED start blinking fast. To mute the alarm press the
function key (fig.3). Shall the smoke concentration still exceed the
threshold after 10 minutes; the acoustic alarm will start again.
OPERATION AND MAINTENANCE CONT.
The smoke detector calibrates automatically. In case of false alarms, in
particular if moving to sensor to an environment with conditions differing
from those during installation, a manual re-calibration can be useful: keep
the button pressed (fig. 3). You will hear first one double tone signal, after
10 seconds you will hear two and after about 20 seconds 3. Now release
the button and the sensor will re-calibrate.
SUPPORT
In case of connection problems we advise to use smart plugs in order to
increase the range of the ZigBee radio network. For further information
and for product support, please consult http://support.bitronhome.eu.
Fig. 1 Fig. 2
Fig. 3 Fig. 4
902010/124
OPTICAL SMOKE DETECTOR
QUICK START GUIDE
ROOKMELDER
QUICK START GUIDE
DÉTECTEUR DE FUMÉE PHOTOÉLECTRIQUE
GUIDE DE DÉMARRAGE RAPIDE
13
0370
In compliance with EN14604:2005/AC:2008
Smoke alarm device mod. 902010/124
URMET S.p.A.
Via Bologna, 188/C - 10154 Torino (TO) – Italy
0370-CPR-1654
DoPn. 0370-CPR-1654
Further information can be
obtained from the manufacturer.
13
0370

902010/124
NEDERLANDS FRANCAIS
MONTAGE
De rookmelder moet worden gemonteerd aan het plafond. De minimale
afstand tot wanden moet 60cm bedragen. Monteer de rookmelder op het
hoogste punt in de buurt van de trap of in een ruimtes met plafonds op
meerdere hoogtes. Bevestig eerst de meegeleverde beugel. Monteer
vervolgens de sensor door deze op de beugel te draaien tot deze in de
geleider schiet (afb. 4).
INSTALLATIE
Voor deze stap dient u te beschikken over een Home Base met ZigBee-
stick of een gateway met ingebouwde ZigBee-module.
1. Verzeker u ervan dat de batterij correct is aangebracht, zie de
vorige paragraaf "gebruik en onderhoud".
2. Volg de aanwijzingen van de installatiehulp voor het toevoegen van
nieuwe apparaten aan de app van uw domotica installatie. Voor
overige informatie over het registratieproces, raadpleeg de website
http://support.bitronhome.eu.
Herhaal de registratieprocedure op het nieuwe systeem voor het gebruik
van een sensor met een andere Home Base / gateway. Als de
installatieprocedure met succes is afgesloten, zal de sensor niet langer
communiceren met het systeem waarin het eerder was geregistreerd.
GEBRUIK EN ONDERHOUD
Verifieer de correcte werking van de rookmelder door kort op de
functietoets (afb. 3) te drukken. Een dubbel geluidssignaal geeft aan dat
de sensor correct werkt. 3 geluidssignalen duiden echter op een fout. De
rookmelder functioneert ook op correcte wijze als deze niet is aangesloten
op een domotica installatie of als de verbinding met de centrale ontbreekt.
De verzending van de meldingen en de functie van de sirene tijdens een
alarm werken uitsluitend als de rookmelder is aangesloten op het systeem.
Om de batterijen aan te brengen of te vervangen, draai de rookmelder van
de beugel en open het klepje van het batterijvak (afb. 1/2). Breng
vervolgens de batterijen aan (3* Alkaline AA). Wanneer het led lampje elke
5 seconden knippert, zijn de batterijen bijna leeg. In dit geval wordt
aanbevolen om ze te vervangen. Om een juiste werking van de
rookmelder te waarborgen, wordt het gebruik van batterijen van een
uitstekende kwaliteit aanbevolen.
Als de rookconcentratie meer dan 10 seconden lang de alarmdrempel
overstijgt, gaat de sirene af en knippert het led lampje snel. Schakel het
alarm uit door kort te drukken op de functietoets (afb. 3). Als de
rookconcentratie boven de drempelwaarde blijft, zal het alarm na 10
minuten opnieuw worden ingeschakeld.
De rookmelder wordt automatisch gekalibreerd. Bij een vals alarm,
bijvoorbeeld na de verplaatsing van de rookmelder naar een andere
ruimte dan waar deze in bedrijf werd gesteld, wordt aanbevolen om de
kalibratie met de hand te verrichten: houd de functietoets ingedrukt (afb.
3). U hoort eerst een geluidssignaal. Na 10 seconden hoort u twee
geluidssignalen. Na nogmaals 10 seconden hoort u 3 geluidssignalen.
Laat de toets nu los. De rookmelder zal de kalibratie opnieuw verrichten.
HULP
In het geval van problemen in de verbinding raden we het gebruik aan van
een smartplug om het bereik van de ZigBee-radionetwerk te vergroten.
Voor overige informatie over het product en voor assistentie raadpleeg de
website http://support.bitronhome.eu.
POSE
Le détecteur de fumée doit être installé au plafond. La distance minimale
des parois est de 60cm. Près d'escaliers ou bien dans les milieux avec
plafonds multiniveaux installez le capteur au point le plus haut. Fixez
d'abord l'étrier en dotation et installez ensuite le capteur en le tournant sur
l'étrier tant qu'il ne s'enclenche dans le guide (fig. 4).
MISE EN FUNCTION
Cette étape nécessite d'une Home Base équipée avec clé USB ZigBee ou
bien d'une passerelle avec module ZigBee intégré.
1. Assurez-vous que la batterie est bien insérée selon la description
au paragraphe «utilisation et entretien».
2. Suivez les indications de l'assistant d'installation pour ajouter de
nouveaux dispositifs à l'intérieur de l'application de votre système
domotique. Pour plus d'informations sur le procédé
d'enregistrement consultez le site web http://support.bitronhome.eu.
Pour utiliser le capteur avec une autre Home Base / passerelle il suffit de
répéter la procédure d'enregistrement sur le nouveau système. Une fois la
procédure d'installation réussie, le capteur ne communiquera plus avec le
système sur lequel il a été enregistré auparavant.
UTILISATION ET ENTRETIEN
Pour vérifier le fonctionnement correct du détecteur de fumée appuyez
brièvement sur la touche de fonction (fig. 3). Un signal sonore double
indique que le capteur fonctionne correctement, 3 signaux sonores
indiquent une erreur. Le détecteur de fumée fonctionne correctement
même s'il n'est pas relié à un système domotique ou bien en cas
d'absence de connexion à la centrale. La transmission des alarmes et la
fonction de sirène d'intérieur d'un système antivol fonctionnent seulement
si le capteur est connecté au système.
Pour insérer ou remplacer les batteries enlevez le détecteur de fumée de
l'étrier et ouvrez le cache du logement batteries (fig. 1/2). Ensuite insérez
les batteries (3* Alcalines AA). Un clignotement de la LED dans une
intervalle de 5 secondes indique que les batteries sont presque à plat et
que leur remplacement est conseillé Pour assurer un fonctionnement
optimal du capteur nous vous conseillons d'utiliser des batteries haute
qualité.
Au cas où la concentration de fumée devrait atteindre le seuil d'alarme
pendant plus de 10 secondes, la sirène s'active et la LED clignote
rapidement. Pour désactiver l'alarme appuyez brièvement sur la touche
de fonction (fig. 3). Au cas où la concentration de fumée persisterait au-
delà du seuil, l'alarme s'active à nouveau après 10 minutes.
Le calibrage du détecteur de fumée est automatique. En cas de fausses
alarmes, par exemple suite au déplacement du capteur dans un milieu
différent par rapport à celui de la mise en fonction, nous vous conseillons
de démarrer le calibrage manuel : gardez enfoncée la touche de fonction
(fig. 3). Vous entendrez d'abord un signal sonore, après 10 secondes
deux autres signaux et enfin 3 signaux, au bout de 10 secondes encore. À
ce stade relâchez la touche, le détecteur de fumée effectuera le
calibrage).
ASSISTANCE
En cas de problèmes de connexion nous vous conseillons l'utilisation de
smartplug pour augmenter le rayon du réseau radio ZigBee. Pour plus
d'informations et pour l'assistance sur le produit consultez le site
http://support.bitronhome.eu.
13
0370
TECHNICAL INFORMATION & SUPPORT
CHARACTERISTICS
• Smoke detection by reflective photoelectric sensor
• Built-in siren................... 95 dB(A) @1m
• Radio system................. ZigBee Home Automation 1.2 - 2.4 GHz
• Encrypted communication, regular connectivity test, battery warning
• Power supply................. 3 Alkaline AA type batteries
• Battery lifetime............... ca 2½ years depending on usage profile
• Operating temperature.. -10 - to 50°C
• Humidity ........................ Up to 85% non-condensing
• Dimensions.................... Ø 105 X 42 mm
In order to use this product you need a Home Base with a ZigBee dongle
or a gateway with built-in ZigBee radio module.
SUPPORT
Please visit http://support.bitronhome.eu
for further information about the product and local support contacts.
LEGAL
Hereby Urmet S.p.A., declares that the Optical Smoke Detector mod.
902010/124 is in compliance with the essential requirements and other
relevant provisions of Directive 1999/5/EC. You may download the
declaration of conformity at support.bitronhome.eu or request a copy
through our support.
MANUFACTURER
BITRON HOME
Urmet S.p.A.
Via Bologna 188/C – 10154 Torino Italy
Subject to modifications and mistakes.
DS902010-014 LBT90364 MADE IN TAIWAN
ENGLISH
MOUNTING
The smoke detector shall be mounted on ceilings only. The minimum
distance to walls is 60cm. In stairwells and nested rooms, mount the
smoke detector always at the highest position as smoke moves upwards.
To install the smoke detector mount the mounting bracket first, then fix the
smoke detector by turning it on the bracket until it is fully stable (fig. 4).
SET-UP
This step requires that you have a Home Base with a ZigBee dongle or a
gateway with built-in ZigBee radio module.
1. Make sure that the batteries have been correctly placed as
described in the chapter “operation and maintenance”.
2. Follow the indications for the addition of new devices of the
installation wizard, which can be found in the app of your home
automation system. For further information on the registration
process, please consult http://support.bitronhome.eu.
If you wish to associate the device to a different home base / gateway, it is
sufficient to repeat the procedure of your system for the addition of new
devices. Once successfully concluded the installation process, the sensor
will not communicate with the system, to which it has been previously
registered, anymore.
OPERATION AND MAINTENANCE
In order to verify the correct functioning of the smoke detector, shortly
press the function key (fig. 3). One double-tone signal means that the
device is working correctly, 3 tone signals indicate an error. The smoke
detector works correctly even if it is not connected to a home automation
system or if the connection to the central is interrupted. The transmission
of alarms and the indoor burglar alarm siren function only work if the
sensor is connected to the system.
To insert or replace the batteries (3*AA) proceed as shown in figures 1
and 2, ensuring polarity is correct. In case the LED of the smoke detector
shall blink every 5 seconds, the batteries are running low. Please change
batteries. We suggest to use high quality long-life alkaline batteries.
If the smoke concentration exceeds the threshold for 10 seconds, the siren
will activate and the LED start blinking fast. To mute the alarm press the
function key (fig.3). Shall the smoke concentration still exceed the
threshold after 10 minutes, the acoustic alarm will start again.
OPERATION AND MAINTENANCE CONT.
The smoke detector calibrates automatically. In case of false alarms, in
particular if moving to sensor to an environment with conditions differing
from those during installation, a manual re-calibration can be useful: keep
the button pressed (fig. 3). You will hear first one double tone signal, after
10 seconds you will hear two and after about 20 seconds 3. Now release
the button and the sensor will re-calibrate.
SUPPORT
In case of connection problems we advise to use smart plugs in order to
increase the range of the ZigBee radio network. For further information
and for product support, please consult http://support.bitronhome.eu.
Fig. 1 Fig. 2
Fig. 3 Fig. 4
902010/124
OPTICAL SMOKE DETECTOR
QUICK START GUIDE
OPTISCHER RAUCHMELDER
KURZBEDIENUNGSANLEITUNG
SENSORE DI FUMO OTTICO
GUIDA RAPIDA
13
0370
In compliance with EN14604:2005/AC:2008
Smoke alarm device mod. 902010/124
URMET S.p.A.
Via Bologna, 188/C - 10154 Torino (TO) – Italy
0370-CPR-1654
DoPn. 0370-CPR-1654
Further information can be
obtained from the manufacturer.
13
0370

902010/124
DEUTSCH ITALIANO
MONTAGE
Befestigen Sie den Rauchmelder ausschließlich an Decken. Die
Mindestentfernung zu Wänden beträgt 60 cm. In Treppenhäusern oder
verschachtelten Räumen bringen Sie den Rauchmelder am höchsten
Punkt an, da Rauch nach oben steigt. Zur Montage befestigen Sie
zunächst die Installationsplatte an der Decke und drehen Sie dann den
Rauchmelder auf der Basis, bis er einrastet (Abb. 4).
SET-UP
Dieser Schritt setzt voraus, dass Sie über eine mit einem ZigBee Funkstick
ausgestattete Home Base oder einen Gateway mit integriertem ZigBee
Modul verfügen.
1. Stellen Sie sicher, dass die Batterien wie im Abschitt „Betrieb und
Wartung“ angegeben korrekt eingelegt sind.
2. Folgen Sie den Anweisungen des Verbindungsassistenten zum
Hinzufügen neuer Geräte, der sich in der App Ihres
Hausautomatisierungssystems befindet. Weitere Informationen zum
Registrierungsprozess finden Sie unter http://support.bitronhome.eu.
Zur Verwendung des Sensors an einer anderen Home Base / Gateway ist
es ausreichend, den Vorgang zum Hinzufügen neuer Geräte Ihres
Systems zu befolgen. Sobald der Installationsprozess erfolgreich
abgeschlossen wurde, wird sich der Sensor nicht mehr mit dem System,
an dem er zuvor registriert war, verbinden.
BETRIEB UND WARTUNG
Um die Funktion des Rauchmelders zu überprüfen, drücken Sie kurz die
Funktionstaste (Abb. 3): ein einfacher Doppelton bedeutet, dass der
Rauchmelder korrekt funktioniert, drei Töne signalisieren eine Störung.
Der Rauchmelder ist auch dann funktionsfähig, wenn er nicht mit einem
Hausautomatisierungssystem verbunden ist, oder keine Verbindung zur
Zentrale besteht. Die Übertragung von Alarmen sowie die
Innensirenenfunktion zur Signalisierung eines Einbruchsalarms erfordern
eine aktive Verbindung zur Zentrale.
Zum Einlegen bzw. zum Wechsel der Batterien (3x AA) folgen Sie Abb. 1
und 2 und achten Sie auf die richtige Polarität. Sollte die LED des
Rauchmelders alle fünf Sekunden blinken, so ist die Batterie schwach und
sollte ausgetauscht werden. Wir empfehlen die Verwendung hochwertiger
Alkalie Batterien mit langer Lebensdauer.
Sollte die Rauchkonzentration den Schwellenwert für 10 Sekunden
übersteigen, ertönt die Sirene und die LED blinkt schnell. Zum
Stummschalten des Alarms drücken Sie die Funktionstaste (Abb. 3). Sollte
die Rauchkonzentration nach 10 Minuten weiterhin über dem Grenzwert
liegen, schaltet sich der akustische Alarm wieder ein.
Die Kalibrierung des Rauchmelders erfolgt automatisch. Bei Fehlalarmen,
insbesondere wenn der Rauchmelder in einem Raum mit anderen
Umgebungsbedingungen als bei der Installation versetzt wird, empfiehlt
sich eine manuelle Kalibrierung: halten Sie die Funktionstaste (Abb. 3)
gedrückt. Es ertönt zunächst ein Doppelton, nach etwa 10 Sekunden zwei
Töne und nach 20 Sekunden drei. Lassen Sie nun die Taste wieder los,
die Neukalibrierung beginnt.
KUNDENDIENST
Bei Verbindungsproblemen empfehlen wir die Verwendung von Smart
Plugs zur Vergrößerung der Reichweite des ZigBee Funknetzes. Für
weitere Informationen und für Support zum Produkt besuchen Sie bitte
http://support.bitronhome.eu.
MONTAGGIO
Il sensore di fumo deve essere montato su soffitti mantenendo una
distanza dalle pareti di almeno 60 cm. In prossimità di scale o in ambienti
con soffitti a più livelli montare il sensore nel punto più alto. Fissare la
staffa, che si trova in dotazione, quindi montare il sensore avvitandolo alla
staffa fintanto che non si posizioni nella guida (fig. 4).
MESSA IN FUNZIONE
Per l’installazione è necessario disporre di una Home Base dotata di
chiavetta ZigBee oppure di un gateway con modulo ZigBee incorporato.
1. Assicurarsi che la batteria sia inserita correttamente, come descritto
nel paragrafo “uso e manutenzione”.
2. Seguire le indicazioni dell’assistente d’installazione per l’aggiunta di
nuovi dispositivi all’interno dell’app del vostro sistema di domotica.
Per ulteriori informazioni sul processo di registrazione consultare il
sito http://support.bitronhome.eu.
Per utilizzare il sensore con un'altra Home Base / gateway è sufficiente
ripetere la procedura di registrazione sul nuovo sistema. Una volta
conclusa con successo la nuova installazione, il sensore non
comunicherà più con il sistema su cui era stato registrato
precedentemente.
USO E MANUTENZIONE
Per verificare il corretto funzionamento del sensore di fumo premere
brevemente il tasto di funzione (fig. 3). Un doppio segnale acustico è
indice di corretto funzionamento; 3 segnali acustici denotano un errore. Il
sensore di fumo funziona correttamente anche se non è collegato ad un
sistema di domotica o se manca il collegamento con la centrale. La
trasmissione di allarmi e la funzione di sirena da interno, integrata in un
sistema antifurto, funzionano solo se il sensore è connesso al sistema.
Per inserire o sostituire le batterie togliere il sensore di fumo dalla staffa e
aprire il coperchio del vano batterie (fig. 1/2); quindi inserire le batterie (3*
Alcaline AA). Per garantire il perfetto funzionamento del sensore si
consiglia di utilizzare batterie di alta qualità.
Se la concentrazione di fumo, raggiunta la soglia d’allarme, dovesse
perdurare per oltre 10 secondi, la sirena si accende e il LED lampeggia
velocemente. Per spegnere l’allarme premere brevemente il tasto di
funzione (fig. 3). Se la concentrazione di fumo continua a rimanere oltre la
soglia, l’allarme si accende nuovamente dopo 10 minuti.
Il lampeggiamento del LED protratto per 5 secondi indica un basso livello
di batteria; si consiglia pertanto di sostituirle quanto prima.
La calibrazione del sensore di fumo avviene in automatico. In caso di falsi
allarmi, che possono verificarsi, ad esempio, spostando il sensore in un
ambiente diverso da quello in cui è stato messo in funzione, consigliamo
di effettuare la calibrazione manuale. Tenere premuto il tasto di funzione
(fig. 3). Dapprima si sente un solo segnale acustico, seguito, dopo 10
secondi, da altri due; infine dopo altri 10 secondi si odono tre segnali
acustici. Rilasciando il tasto, il sensore di fumo eseguirà la ricalibrazione.
ASSISTENZA
Qualora sussistessero problemi di connessione consigliamo l’utilizzo di
smart plug per aumentare il raggio della rete radio ZigBee. Per ulteriori
informazioni e assistenza sul prodotto consultare il sito
http://support.bitronhome.eu.
13
0370
Other BitronHome Accessories manuals


