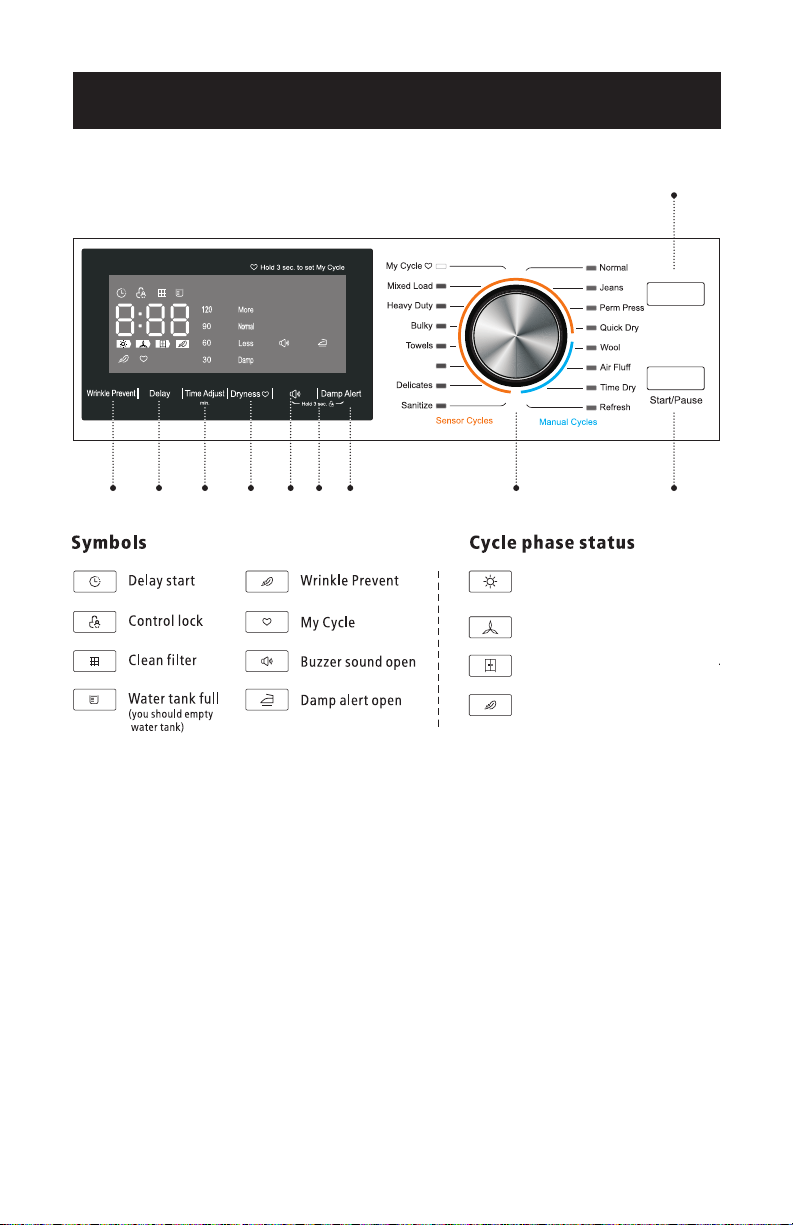
Black & Decker BDFH44M User manual

INSTRUCTION MANUAL
4.4 CU. FT.
ELECTRIC VENTLESS DRYER
WITH HEAT PUMP
Thank you for choosing BLACK+DECKER!
PLEASE READ BEFORE RETURNING THIS PRODUCT FOR
ANY REASON.
If you have a question or experience a problem with your BLACK+DECKER
purchase, go to www.blackanddecker.com/instantanswers.
If you can’t find the answer or do not have access to the Internet, call
844-299-0879 from 10:30 a.m. to 6:30 p.m. EST Mon. - Fri. to speak with an
agent. Please have the catalog number available when you call.
SAVE THIS MANUAL FOR FUTURE REFERENCE.
CATALOG NUMBER
BDFH44M

Page 2

Page 3
CONTENTS
PRODUCT REGISTRATION
SAFETY INFORMATION
Important Safety Instructions......................................................................................................................................... 4-6
SET UP & USE
Quick Start Guide ...................................................................................................................................................................... 7
Control Panel..........................................................................................................................................................................8-10
Operating Instructions......................................................................................................................................................10-12
CLEANING & CARE
Cleaning and Maintenance.............................................................................................................................................12-15
INSTALLATION INSTRUCTIONS
Installation Warnings and Precautions.....................................................................................................................15-16
Parts and Features ...................................................................................................................................................................18
Choose the Proper Location....................................................................................................................................... 19-20
Tools Needed..............................................................................................................................................................................21
Electrical Requirement...........................................................................................................................................................21
Grounding Instructions .........................................................................................................................................................22
3-Wire Connection Using a Strain Relief Cord .................................................................................................. 23-24
4-Wire Connection Using a Strain Relief Cord.................................................................................................. 24-25
3 Wire Direct Connections................................................................................................................................................. 26
4 Wire Direct Connections................................................................................................................................................. 26
Leveling the Dryer ...................................................................................................................................................................27
Connecting The Drain Hose................................................................................................................................................28
TROUBLESHOOTING & WARRANTY
Before You Call For Service............................................................................................................................................... 29
Troubleshooting................................................................................................................................................................30-32
Limited Warranty.....................................................................................................................................................................33
Staple your receipt to your manual.
You will need it to obtain warranty service.
Thank you for purchasing our
BLACK+DECKER product. This
easy-to-use manual will guide you
in getting the best use of your
product.
Remember to record the model and
serial numbers. They are on a label
on the back of the product.
_____________________________
Model number
_____________________________
Serial number
_____________________________
Date of purchase

Page 4
SAFETY INFORMATION
DANGER
DANGER - Immediate hazards
which WILL result in severe
personal injury or death
WARNING
WARNING - Hazards or unsafe
practices which COULD result in
severe personal injury or death
CAUTION
CAUTION - Hazards or unsafe
practices which COULD result in
minor personal injury
1. READ ALL INSTRUCTIONS BEFORE USING THE APPLIANCE.
2. Use this appliance only for its intended purpose as described in this Instruction
Manual.
3. Before use, the dryer must be properly installed as described in this manual.
4. ALWAYS follow the fabric care instructions supplied by the garment
manufacturer.
5. Do not dry articles that have been previously cleaned in, washed in, soaked in,
or spotted with gasoline, dry-cleaning solvents, other flammable or explosive
substances as they give off vapors that could ignite or explode.
6. Do not use the dryer to dry clothes which have traces of any flammable
substance, such as vegetable oil, cooking oil, machine oil, flammable chemicals,
thinner, etc., or anything containing wax or chemicals, such as mops and cleaning
clothes. Flammable substances may cause the fabric to catch fire by itself.
7. Do not store or use gasoline or other flammable vapors and liquids near this or
any other appliance.
8. Do not allow children to play on or in the appliance. Close supervision of children
is necessary when the appliance is used near children.
9. Before the appliance is removed from service or discarded, remove the door of
the drying compartment.
10. Do not reach into the appliance if the drum is moving.
11. Do not install or store this appliance where it will be exposed to the weather or
freezing temperatures.
12. Do not tamper with the controls.
13. Do not repair or replace any part of the appliance or attempt any servicing
unless it is specifically recommended in the user-maintenance instructions or in
published user-repair instructions that you understand and have the skills to carry
out.
IMPORTANT SAFETY INSTRUCTIONS
WARNING
When using electrical appliances, basic safety precautions
should be followed, including the following:
READ ALL INSTRUCTIONS BEFORE USING THE UNIT
WARNING: To reduce the risk of re, electric shock, or injury to persons when
using your appliance, follow basic precautions, including the
following:

Page 5
SAFETY INFORMATION
14. Keep the area underneath and around your appliances free of combustible
materials (lint, paper, rags, etc.), gasoline, chemicals and other flammable vapors
and liquids.
15. Do not place items exposed to cooking oils in your dryer. Items contaminated
with cooking oils may contribute to a chemical reaction that could cause a load
to catch fire. To reduce the risk of fire due to contaminated loads, the final part
of a tumble dryer cycle occurs without heat (cool down period). Avoid stopping
a tumble dryer before the end of the drying cycle unless all items are quickly
removed and spread out so that the heat is dissipated.
16. Packaging material can be dangerous for children. There is a risk of suffocation!
Keep all packaging away from children.
17. Always check the inside of the dryer for foreign objects before loading laundry.
Keep the door closed when not in use.
18. Do not use fabric softeners or products to eliminate static unless recommended
by the manufacturer of the fabric softener or product.
19. Clean the lint screen before or after each load.
20. Keep the area around the exhaust opening and surrounding areas free from lint,
dust, and dirt.
21. Do not place items exposed to cooking oils in your dryer. Items contaminated
with cooking oils may contribute to a chemical reaction that could cause a load to
catch fire.
22. This appliance must be grounded. See “Electric requirements” and “Grounding”.
23. This appliance must be properly grounded. Never plug the power cord into a
receptacle that is not grounded adequately and in accordance with local and
national codes. Refer to installation instructions for grounding this appliance.
24. Ensure pockets are free from small irregularly shaped hard objects and foreign
material, i.e. coins, knives, pins, etc. These objects could damage your dryer.
25. Do not use heat to dry articles containing foam rubber or similarly textured
rubber-like materials.
26. Clothes dryer installation must be performed by a qualified installer. Install the
clothes dryer according to the manufacturer’s instructions and local codes.
27. To reduce the risk of severe injury or death, follow all installation instructions.
28. Save these instructions.
SAVE THESE INSTRUCTIONS
HOUSEHOLD USE ONLY
WARNING

Page 6
SAFETY INFORMATION
CAUTION
• Do not sit on top of the dryer.
• Do not dry clothing with large buckles, buttons, or other heavy metal or solid
things.
• Install and use in accordance with the manufacturer’s instructions.
• Do not place items in your dryer that have been spotted or soaked with
vegetable oil or cooking oil. Even after being washed, these items may contain
signicant amounts of these oils.
• Residual oil on clothing can ignite spontaneously. The potential for spontaneous
combustion increases when items containing vegetable oil or cooking oil are
exposed to heat. Heat source such as your dryer can warm these items, allowing
an oxidation reaction in the oil to occur.
• Oxidation creates heat. If this heat cannot escape, the items can become hot
enough to catch re. Piling, stacking, or storing these kinds of items may prevent
heat from escaping and can create a re hazard.
• Take care that children’s ngers are not caught in door when closing it. This may
result in injury.

Page 7
SET UP & USE
QUICK START GUIDE
DRYING A LOAD OF LAUNDRY
1. Load the dryer with wet clothes. The drum should not be loaded more than ½
full.
2. Close the Door.
NOTE: Unit will not start with the door open.
3. Press POWER to turn the unit ON.
4. Turn the selector dial to an appropriate cycle for the load such as NORMAL.
5. Continue to touch the DRYNESS key repeatedly to select Damp Dry, Less Dry,
Normal Dry or More Dry. The corresponding selection will illuminate on the LED
display.
6. Press the Start/Pause button to start the cycle.
7. The dryer will beep 3 times after the cycle is complete.
NOTE: Clean the lter after every load once the laundry is unloaded and empty the
water tank after each use.

Page 8
SET UP & USE
CONTROL PANEL
Power
Activewear
4 5 6 7 8 10 932
1
1. Power button
Press POWER to turn your dryer ON. If the dryer is powered ON for more than
10 minutes without any buttons being pressed, it automatically goes into stand-
by mode.
2. Start/Pause button
Press START/PAUSE to start a cycle after all settings are programmed. Press
START/PAUSE to pause a cycle. A cycle can be paused to add a garment.
3. Cycle selector
Select your desired cycle for the type of load. The cycle you select determines
the heat control for the cycle.
Normal, Jeans, Perm Press, Quick Dry, My Cycle, Mixed Load, Heavy Duty, Bulky,
Towels, Activewear, Delicates, Sanitize are Sensor cycles.
Wool, Air Fluff, Time Dry, Refresh are Manual cycles.
Machine is drying with
heat
Machine is working with
cool air
Opening the dryer door
is available
Wrinkle care cycle is
active

Page 9
SET UP & USE
Dry Cycle Load Description Type of cycle
Normal Cotton, cotton blends and most linens Sensor Cycle
Jeans Jeans Sensor Cycle
Perm Press Easy care synthetic fabric Sensor Cycle
Quick Dry Small quantities of clothing Sensor Cycle
Wool Wool suitable for a dryer Manual Cycle
Air Fluff Use to uff pillows or down items Manual Cycle
Time Dry
Manually set cycle according to time. Suitable
for fabrics that can be dried using high heat.
This cycle is useful for damp items where only
a small amount of drying time is needed.
Manual Cycle
Refresh Smooths out wrinkles Manual Cycle
Sanitize High heat sanitizes clothes Sensor Cycle
Delicates Loosely woven, delicate fabrics suitable for a
dryer Sensor Cycle
Activewear Sportswear, spandex and high performance
synthetic bers Sensor Cycle
Towel Towels Sensor Cycle
Bulky Sheets and other bedding that need to be
dried on high heat Sensor Cycle
Heavy Duty Fabrics suitable for high heat Sensor Cycle
Mixed Load Polyester and Polyester Blends Sensor Cycle

Page 10
SET UP & USE
4. Wrinkle Prevent
Press to activate Wrinkle Prevent. Press again to cancel selection.
If Wrinkle Prevent is active, it will provide approximately 90 minutes of intermittent
tumbling using unheated air at the end of the cycle to reduce wrinkling.
Since the load is already dry, it can be removed at any time during the wrinkle care
cycle.
5. Delay
To delay the start of your dryer up to 24 hours, press the Delay button to activate
after the dry cycles have been selected. The number shown on the digital display will
indicate when the dry cycle will start. 1 hour will be added to the start time each time
you press the Delay button up to 24 hours. Once the delay time has been selected,
press Start/Pause to activate. Pressing the delay button to exceed 24 hours until the
display indicates 0H will deactivate the delay function and the display will turn off.
To cancel the Delay Start function after the program has started, press POWER.
6. Time Adjust
For manual cycles, the drying time needs to be selected. Press Time Adjust
repeatedly to select desired drying time and scroll between 120 minutes, 90 minutes,
60 minutes and 30 minutes. The selected drying time will be illuminated on the LED
display.
7. Dryness
Press the button to select the dryness level, including More, Normal, Less or Damp
Dry. The selection will illuminate on the LED display.
Different dry levels will result in different drying time. For clothes to be ironed
manually, a lower dry level should be selected.
My Cycle
The DRYNESS button is also used to save a drying cycle as a My Cycle setting. Select
the settings you wish to save. Press and hold DRYNESS for 3 seconds. This will
illuminate on the control panel. Turn the dial to My Cycle to use the saved setting. To
change the saved setting to a different program, select the new settings. Press and
hold DRYNESS again to save the new settings.
8. Signal
Press the button 3 seconds to mute the audible buzzer at the end of the cycle.
9. Damp Alert
The unit will beep for 10 seconds when the moisture in the clothes is ideal for ironing.
At this time, you can take garments out and continue drying remaining items by
pressing the “START/PAUSE” button once.
10. Control Lock
Acts as a Child Safety feature that prevents others from inadvertently changing
settings. Press the and “Damp Alert” together to activate the Control Lock
function. The Control Lock light will turn on.
When activated, all buttons except the “Power” will not be functional. Press these
buttons again for 3 seconds to deactivate the Control Lock and the Control Lock
light will turn off.
If the unit is powered Off using the “Power” button while Control Lock is active, the
unit will resume the previous cycle when powered On again. Control Lock will be
cancelled automatically if power is cut off from the unit, is unplugged during a cycle,
a power outage occurs, or the unit is out of service.
OPERATING INSTRUCTIONS
Opening the door during any cycle will instantly stop operation and will require pressing
Start/Pause button to resume operation.

Page 11
SET UP & USE
Cycle Maximum
Load Size (for
wet clothes)
Dryness Level Delay Time Adjust Damp Alert Wrinkle
Prevent
My Cycle
This is a setting to save a frequently used program. Select the setting you wish to save. Press
and hold DRYNESS for 3 seconds. The will illuminate on the control panel. Turn the dial to
My Cycle to use the saved setting. To change the saved setting to a different program select
the new setting. Press and hold DRYNESS again to save the new settings.
Normal
Damp
Less
Normal
More
O-- O O
Jeans
Damp
Less
Normal
More
O-- O O
Perm Press
Damp
Less
Normal
More
O-- O O
Quick Dry
Damp
Less
Normal
More
O-- O O
Wool /O-- -- O
Air Fluff /O O -- O
Time Dry /O O -- O
Refresh /O O -- O
Sanitize More O-- -- O
Delicates
Damp
Less
Normal
More
O-- O O
Activewear
Damp
Less
Normal
More
O-- O O
Towels
Damp
Less
Normal
More
O-- O O
Bulky
Damp
Less
Normal
More
O-- O O
Heavy Duty
Damp
Less
Normal
More
O-- O O
Mixed Load
Damp
Less
Normal
More
O-- O O
O= Optional
• This dryer utilizes heat pump technology. The air is not as hot as a traditional vented dryer. It is more
energy efcient and gentler on clothes but results in a longer drying time.
• For better drying, select higher dryness level and do not load more than ½full with wet clothes.
Load size recommendations:
Small Load: Fill the drum with 3-4 items, not more than ¼ full.
Large Load: Fill the drum to about ½ full.
Dry Program Chart

Page 12
SET UP & USE
WARNING
To reduce the risk of fire or explosion, do not dry items that have been previously
cleaned, washed, soaked, or spotted with gasoline, dry cleaning solvents, or other
flammable or explosive substances. They emit vapors that could ignite or explode.
Any material that has been in contact with cleaning solvents or flammable liquids or
solids should not be placed in the dryer until all traces of these flammable liquids or
solids and their fumes have been removed. There are many highly flammable items
used in homes, such as acetone, denatured alcohol, gasoline, kerosene, some liquid
household cleaners, some spot removers, turpentine, waxes, and wax removers.
Do not dry items containing foam rubber (may be labeled latex foam) or similarly
textured rubber-like materials on a heat setting. Heated foam rubber materials can,
under certain circumstances, produce fire by spontaneous combustion.
Sorting and Loading
• Always follow fabric manufacturer’s care label.
• If using fabric softener or other products to eliminate static, follow all instructions
on the product package. Improper use may cause stains.
• Do not overload. Overloading restricts tumbling action, resulting in uneven
drying as well as excessive wrinkling of some fabrics. The drum should not be
loaded more than ½full.
• Mixed loads of heavy and light weight fabrics will dry dierently, which may
result in lightweight fabrics being dry while heavy fabrics remain damp at the
end of a drying cycle. Add one or more similarly sized items to your dryer when
only one or two articles of clothing need drying. This improves the tumbling
action and drying eciency.
• Small articles or items that can be tangled, can be dried in a laundry bag.
• Items with buttons should be buttoned up. Items with zippers should be zipped
up. These items should be turned inside out to dry.
CLEANING AND MAINTENANCE
WARNING
Unplug the power cord before cleaning any part of the unit. The dryer should be
cleaned regularly. Failure to maintain the unit in a clean condition could lead to
deterioration of the surface which could adversely aect the life of the appliance.
Do not use harsh chemicals or solvents on any part of the machine or pour water or
cleaner directly on it.
Cleaning the Exterior
Clean with a soft, damp cloth or a mild soap and water solution. Do not use abrasive
powders or pads. Do not spray cleaners directly onto the control panel.
Cleaning the Drum
Use a damp cloth with a mild non-abrasive cleaner suitable for stainless steel and
anodized surfaces. Remove the cleaner residue and dry with a clean cloth.

Page 13
CLEANING AND CARE
Cleaning the Lint Filter
WARNING
Do not operate your dryer without the lint filter in place.
Do not use a damaged or broken lint lter. This may reduce performance and/or cause
re.
To prevent a risk of re, make sure to clean the lint lter after every load.
1. Pull out the water tank using both hands to avoid spilling water.
2. Empty the water.
3. Reinsert the water tank.
WARNING
The water tank needs to be emptied after each use.
Do not operate the dryer without the water tank in place.
WARNING
To avoid overflow, the dryer cycle will pause when the water tank is at capacity.
The symbol will illuminate.
Once the water tank is emptied press Start/Pause to resume the cycle.
Empty the Water Tank
Lint lter
Pull out the lint lter. Remove
the lint. Reinstall the lter.
Water tank

Page 14
CLEANING AND CARE
Cleaning the Base Filter and Heat Exchanger
WARNING
Unplug before Cleaning.
Do not operate the dryer without the base lter and heat exchanger in place.
Clean the Base Filter Every 5th Cycle
1. Open the heat exchanger access cover on the bottom left of the dryer by
pressing on the tabs.
2. Unlock the three levers and grasp the handle to pull out to remove.
3. Remove lint and rinse using tap water to make sure all debris is removed.
4. Clean all the rubber seals.
5. Make sure it is completely dry before re-installing.
6. Put the levers back into the lock position.
7. Close the cover. There will be a click sound when it is closed completely.
Cleaning the Heat Exchanger Every 2 Months
The heat exchanger is located behind the base filter.
WARNING
Do not touch the heat exchanger after the dryer has been in use. It may be hot and
cause burns.
1. Remove the lint from the heat exchanger using a vacuum cleaner with a dusting
brush attached.
2. Clean the heat exchanger without applying any pressure. Otherwise, the heat
exchanger could be damaged. The dryer will not dry if the cooling fins are
damaged or bent.
Base Filter
Press Press
The heat
exchanger is
located behind
the base filter.

Page 15
INSTALLATION INSTRUCTIONS
STORAGE:
Do not store the dryer in any area that it can be exposed to outdoor weather or cold
temperatures.
For long term storage, or if dryer will not be used for a long period of time,
disconnect the power supply. Clean inside of the unit and keep door open until dried
thoroughly. Clean all filters and empty lint traps.
INSTALLATION
INSTALLATION WARNINGS AND PRECAUTIONS
1. Plug the power cord into an AC 240 volt 60Hz wall socket rated at 30 amps or
higher. Use the socket for this dryer unit only.
2. Do not use an extension cord.
- Sharing a wall socket with another appliance, using a power strip, or extending
the power cord may result in electric shock or fire.
- Do not use an electric transformer. It may result in electric shock or fire.
- Ensure that the power voltage, frequency, and current match the product’s
specications. Failing to do so may result in electric shock or re.
3. Have this appliance installed by a qualied technician or service company.
- Failing to do so may result in electric shock, re, explosion, problems with the
product, or injury.
4. Remove all foreign substances such as dust or water from the power plug
terminals and contact points using a dry cloth on a regular basis.
- Unplug the power plug and clean it with a dry cloth.
- Failing to do so may result in electric shock or re.
5. Plug the power cord into the wall socket in the correct orientation so the prongs
align with the slots in the receptacle.
- If you attempt to plug the power plug into the socket incorrectly, the electric
wires within the cable may be damaged and this may result in electric shock or
re.
6. Plug the power plug into the wall socket rmly. Do not use a damaged power
plug, or loosen wall socket.
- This may result in electric shock or re.
7. Do not pull or excessively bend the power cord.
8. Do not twist or tie the power cord.
9. Do not hook the power cord over a metal object, place a heavy object on the
power cord, insert the power cord between objects, or push the power cord into
the space behind the appliance.
- This may result in electric shock or re.
10. Do not pull the power cord when unplugging the power plug.
- Unplug the power plug by holding the plug.
- Failing to do so may result in electric shock or re.
11. If the power plug or power cord are damaged, contact your nearest service
center.
12. Do not install this appliance near a heater or inammable material.
13. Do not install this appliance in a humid, oily, or dusty location, or in a location
exposed to direct sunlight or water (rain drops).

Page 16
ENGLISH
INSTALLATION INSTRUCTIONS
14. Do not install this appliance in a location where gas may leak.
- This may result in electric shock or re.
15. If the dryer is moved to a new location, have it checked and re-installed by a
qualied service technician.
- Failing to follow this warning may result in electric shock or re.
16. Do not install on carpet. Install dryer on a level and solid oor that can support
its weight.
- Failing to do so may result in abnormal vibrations, noise, or problems with the
product.
17. The dryer is heavy. Two or more people may be needed to install and move the
appliance.
- Failing to do so may result in bodily or other injuries.
18. Store and install the dryer where it will not be exposed to temperatures below
freezing or exposed to outdoor weather conditions.
- Failing to do so may result in serious leak damage.
19. Position the appliance so that the power plug is easily accessible.
- Failing to do so may result in electric shock or re due to electric leakage.
20. To reduce the risk of injury to persons, adhere to all industry recommended
safety instructions.
- Failing to follow all safety warnings in this manual may result in property
damage, or injury to persons.

Page 17
INSTALLATION INSTRUCTIONS
PLEASE READ THE FOLLOWING
INSTRUCTIONS CAREFULLY BEFORE
INSTALLING THE DRYER.
These instructions should be kept for future reference.
The dryer is not suitable for installation in a mobile home.
Remove the door from all discarded appliances to avoid the danger of a child being
trapped and suffocating.
When discarding unit, cut off Power Cord after unit is unplugged.
TRANSPORTING THE MACHINE
Handle the machine carefully. The door cannot be used as the handle while moving
the unit.
UNPACKING AND REMOVING SHIPPING MATERIAL
WARNING:
Packaging materials can be dangerous to children;
Keep all packaging material (plastic bags, polystyrene, etc.) well out of children’s
reach.
Remove the packing box and lift the dryer up and away from the foam base.
NOTE: The dryer should be unpacked by 2 or more people due to the weight.
Remove the packing box and lift the dryer up and away from the foam base.
Open the door to remove the accessories.
Lay the unit down on its side to make sure all the small foam triangular pieces
are removed from the bottom of the unit.
CAUTION:
Do not operate this appliance on the foam base. It should be placed on a level floor.

Page 18
INSTALLATION INSTRUCTIONS
PARTS & FEATURES
Water Tank Control Panel
Door
Lint Filter
Vent
Heat Exchanger
Access
Adjustable
Leg (two legs)
Wiring Box
Drain Hose
Drain hose extender and
connector
Back of water tank
Bracket

Page 19
INSTALLATION INSTRUCTIONS
CHOOSE THE PROPER LOCATION
Move your dryer to an appropriate location for the installation. Consider installing the
dryer and washer side-by-side, to allow access to the electrical connections.
LOCATION REQUIREMENTS
1. The dryer should be located where there is enough space at the front for loading
the dryer, and enough space behind for the exhaust system.
2. Make sure the room in which the dryer is located has enough fresh air. The dryer
must be located where there are no air-flow obstructions.
3. The dryer must not be installed or stored in an area where it will be exposed to
water and/or weather.
WARNING: The dryer area must be kept clear of combustible materials,
gasoline, and other flammable vapors and liquids.
4. A dryer produces lint. The area around the dryer should be kept lint-free.
Alcove or closet or wall insert/recessed installations
WARNING:
No other fuel-burning appliance should be installed in the same closet as the dryer.
Minimum clearances between the dryer and adjacent walls or other surfaces:
A
AA
B B
CE
D F
Sides 1 in. (25.4mm) Rear 2 in. (50.8mm)
Top 2 in. (50.8mm) Closet front 2 in. (50.8mm)
A1 in. (25.4mm) C2 in. (50.8mm) E25.7 in. (653mm)
B23.4 in. (595mm) D2 in. (50.8mm) F2 in. (50.8mm)

Page 20
INSTALLATION INSTRUCTIONS
Undercounter installation
A
CB D
E
F
A≥ 35.5 in.
(≥ 901mm) C23.4 in.
(595mm) E42.2 in.
(1072mm)
B1 in. (25mm) D1 in. (25mm) F33.5 in. (850mm)
Sides 1 in. (25.4mm) Rear 2 in. (50.8mm)
Top 2 in.
2 in.
Table of contents
Languages:
Other Black & Decker Dryer manuals