Black & Stone VFC 1100C Programming manual

Occasional Fireplaces
Now that’s living
Owners manual and installation guide

2
Now that’s living
Please keep these instructions in a safe place for future reference.

Before you install or use this product for the first time, read and
follow the supplied installation and operating instructions and safety
warnings to prevent the potential of fire, personal injury or death or
property damage to the appliance as a result of improper usage.
Improper installation, adjustment, alteration, service or
maintenance may cause injury, death or property damage.
Occasional Fireplaces
© Copyright 2009 Black and Stone Inc All rights reserved
All material within this document is protected under copyright.
No part of this document shall be reproduced for any purpose
without the express written consent of Black and Stone Inc. 3
IMPORTANT
Please read these instructions before
installing or operating this appliance
Thank You
Thank you for choosing this Black and Stone product.
VioFlame Occasional Fireplaces offer a delightful experience to
anyone in an apartment, office, or home without the need for a
traditional chimney or fireplace structure. No major installation is
required with these fabulous Bioethanol fuelled fireplaces.
Black and Stone Inc.
PO Box 22386
Flagstaff AZ 86002 – 2386
United States of America
Tel: 1 800 605 2515
Fax: 1 800 605 2515
web: www.blackandstone.com
Table of Contents
Introduction 3
Pack contents 4
Safety warnings 5-7
Positioning your fireplace 8-9
Assembling your fireplace 10
Installing your fireplace 11-13
Operating your fireplace 14-16
Caring for your fireplace 17-18
Warranty 19
Product Information 20

4
Pack contents
Hardware checklist
Unpacking your replace
When unpacking the fireplace from the carton, use the checklist
below to ensure that all components are present for your model.
Note: The fireplace and fittings depicted in these instructions are
for demonstration purposes only. Your fireplace or fittings may be
different to what is shown.
The hardware kit supplied will be specific to your model. The
hardware kit provides components for a variety of installation types.
Not all components will be required, these should be stored in a
safe place, should you decide to reinstall the fireplace in another
configuration in the future.
2 x Wall restraining chains (A)
2 x Masonry wall plugs (C)
4 x Zip toggles (D)
2 x 65mm (2 1/2”) screws (F)
2 x 50mm (2”) screws (G)
2 x 18mm (23/32”) washers (H)
2 x 8mm (5/16”) screws (fender) (K)
2 x Wall restraining chains (A)
2 x Wall mounting brackets (B)
4 x Masonry wall plugs (C)
6 x Zip toggles (D)
4 x Hex head screws (E)
4 x 65mm (2 1/2”) screws (F)
4 x 50mm (2”) screws (G)
4 x 18mm (23/32”) washers (H)
8 x 12mm (1/2”) washers (I)
1 x Allen key (J)
2 x 8mm (5/16”) screws (fender) (K)
1 x Fireplace main body
1 x Damper control rod
1 x Installation & owners manual (this document)
1 x Warranty registration card and envelope
1 x Burner (includes fibre material insert)
1 x Fender (2 x screws provided in hardware pack)
1 x Fender/Burner mounting plate
2 x Wall mounting brackets (B)
4 x Masonry wall plugs (C)
6 x Zip toggles (D)
4 x Hex head screws (E)
4 x 65mm (2 1/2”) screws (F)
4 x 50mm (2”) screws (G)
4 x 18mm (23/32”) washers (H)
8 x 12mm (1/2”) washers (I)
1 x Allen key (J)
2 x 8mm (5/16”) screws (fender) (K)
Hardware Kit - Floor models:
(VFC 1100C and VFC 2100F)
Hardware Kit - Floor / Wall models:
(VFC 2100C, VFC 2100R, VFC 3100R)
Fireplace main components - all models
Hardware Kit - Wall model:
(VFR 210W)
(D) Zip toggle
(A) Wall restraining chain
(F) 65mm (2 1/2”) Phillips head screw
(K) 8mm (5/16”) Phillips head screw
(C) Masonry wall plug
(G) 50mm (2”) Phillips head screw
(H) 18mm (23/32”) washer
(J) Allen key
(E) Hex head screw
(B) Wall mounting brackets
Fireplace body
Burner
Fender/Burner mounting plate
Fender
Damper control rod
(I)12mm (1/2”)washer
Fireplace and fittings depicted within these instructions
are for demonstration purposes only. Your fireplace
and/or fittings may be different to what is shown.

5
Your safety
Appliance safety
Before you use this product for the first time, read and follow the
supplied installation and operating instructions and safety warnings
to prevent the potential of fire, personal injury or death or, property
damage to the appliance as a result of improper usage.
Installation safety
· Improper installation, adjustment, alteration, service or
maintenance may cause injury, death or property damage. This
appliance must be operated in accordance with the instructions
provided. Failure to observe these instructions may lead to a fire
resulting in personal injury or death or property damage.
· Installation clearances, ventilation and minimum room size
requirements must be adhered to. Please read the section on
installation clearances and ventilation requirements before
installing or placing this appliance.
· The fireplace will use oxygen from the air inside the room where
it is operated. The room where this fireplace is installed must be
well ventilated with enough fresh air being supplied, for example;
an open window or door.
· This appliance must not be installed or operated in a room with a
volume of less than 70 cubic metres. (2500 ft 3) Please read the
instructions on calculating room dimensions before proceeding
with installation.
· Do not install or operate this appliance in the vicinity of gas or
liquid fuels, explosives or chemicals of any type.
· This appliance is intended for household or office use only. It
must not be installed or operated within an industrial environment
or an environment where chemicals or fuels of any description
are present.
· Do not attach a secondary fuel feeding supply system or tank to
the burner or fireplace.
· Do not disassemble or modify the burner or fireplace in any
manner other than as described within these instructions for the
purpose of assembly or installation.
· To prevent fire and smoke damage, remove all packaging
before operating.
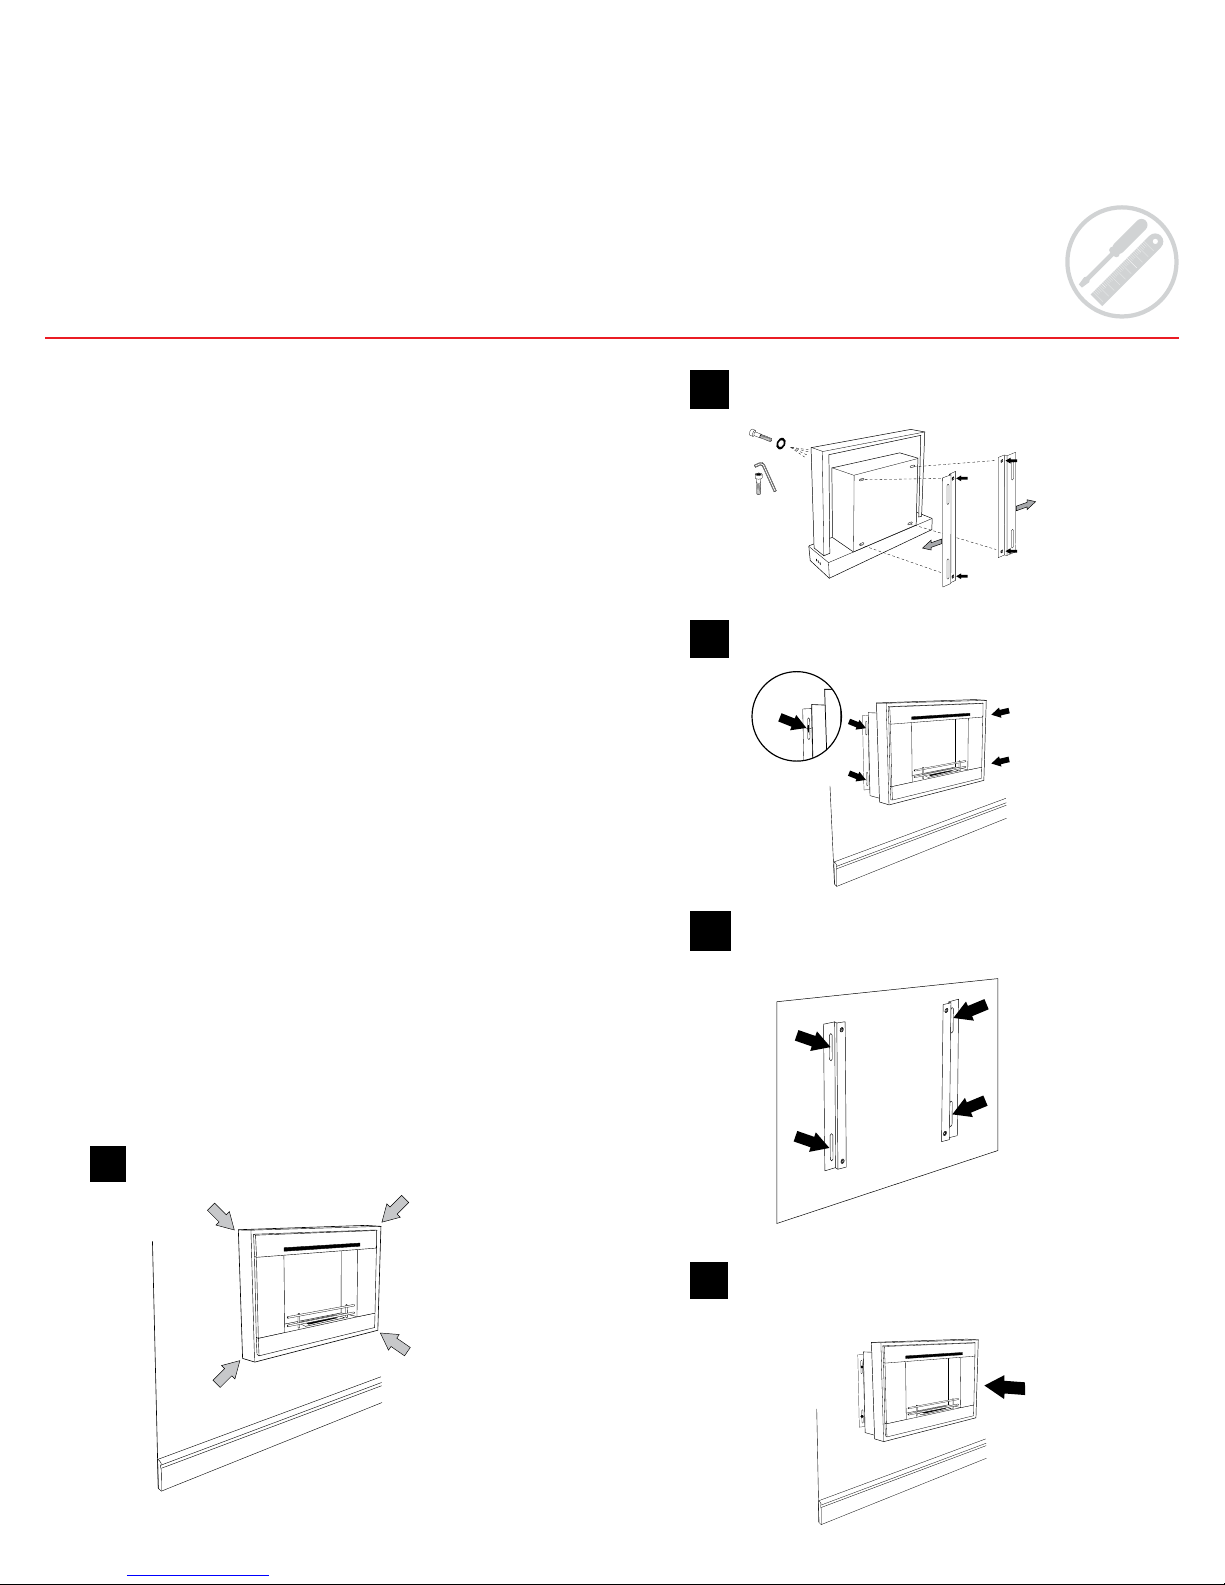
· This fireplace can only be installed on or against a wall using
the wall mounting brackets, wall restraint system and mounting
hardware provided.
· Never install the fireplace directly to a wall without the inclusion
of the supplied wall mounting brackets and hardware.
Rear ventilation of the fireplace is required – observe the
recommended minimum clearances at all times.
· This fireplace is not to be installed into an alcove or
enclosure made of combustible materials.
· Never install or operate this fireplace in an unventilated
basement or air tight sealed room.
· It is not recommended to install or operate more than one
appliance at a time in one room.
· Do not place any flammable fuels or materials within 1metre/40
inches around the fireplace.
· Avoid installing or operating the fireplace where a direct draft
from an adjacent room or window may affect or fan the flames
of the burner.
· A safety distance of at least 1 metre/40 inches should be
maintained from any window covering or curtain. All window
coverings must be restrained from movement near the fireplace.
· Fireplace must not be used with a mantle or shelving above the
fireplace - within 600mm (24 inches) of the top of the firebox
opening.
· Do not cover or surround the fireplace with insulating materials.
· The fireplace should be restrained or fixed in position to avoid
tipping or displacement
Operating safety
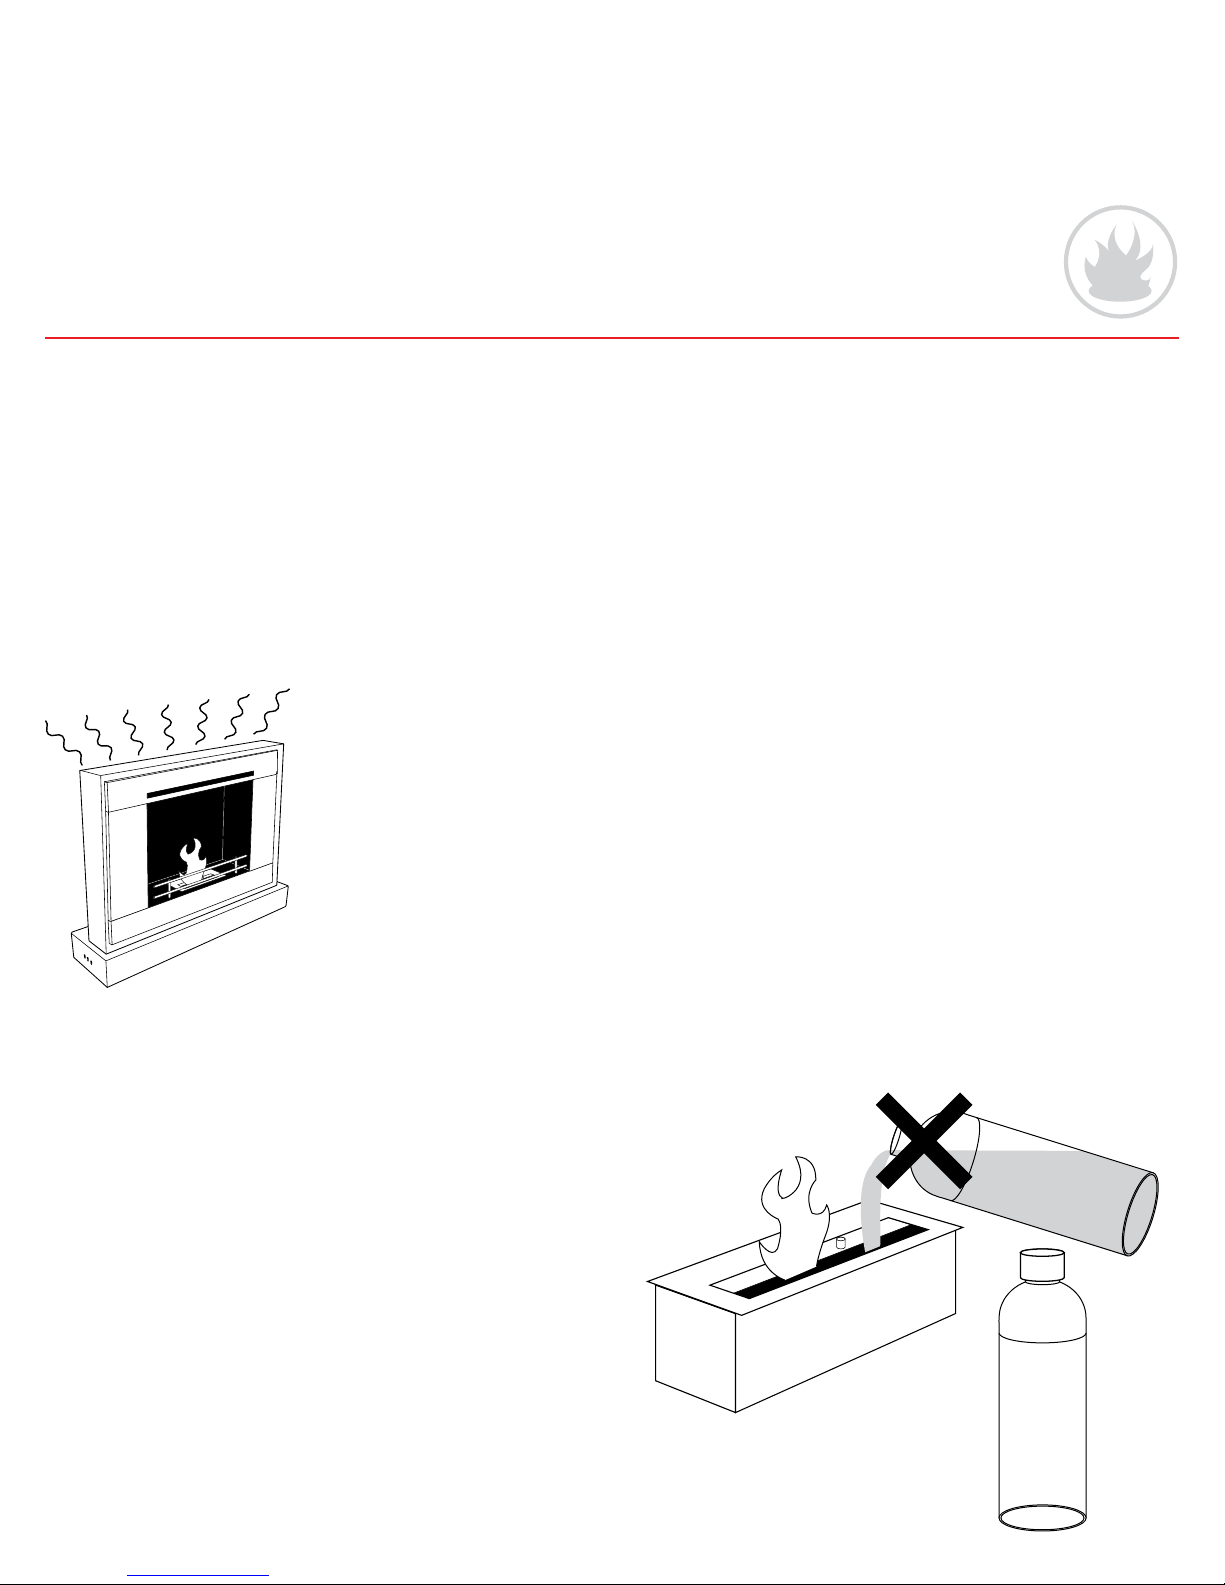
· While the fireplace is operating or hot, do not touch the main
heating surfaces, appliance body, burner or immediate
surroundings as these areas can cause burns.
· Do not use the appliance for any purpose other than its
intended use.
· Use only the damper control rod provided to operate the
appliance.
· This appliance is designed to run on ethanol or denatured
alcohol (methylated spirits) only. Under no circumstances is this
appliance to be fuelled by any other type of liquid, gas or solid
fuel including: gasoline, petrol, oil, kerosene, turpentine, natural
gas, LPG (propane) timber, briquettes, charcoal or coal.
· This fireplace must not be used in conjunction with a gas log set
or other fuel effect fire.
· Under no circumstances is this fireplace to be modified or
retrofitted to burn any fuel other than what is described in these
instructions.
· Under no circumstances is this fireplace or burner to be modified
in any manner that will change the burning characteristics or
flame pattern. (Cont)

Never ll the unit while it is operating
6
Your safety
· Do not cover the front opening of the fireplace with glass or
doors of any type.
· Do not operate the appliance after it has been dropped or
damaged in any manner. Call our customer service number for
information on examination or mechanical repair or adjustment
of this appliance.
· Do not leave the appliance unattended while in use.
· Do not heat any unopened glass or metal container of food on
the appliance. Pressure may build up and cause the container
to burst, possibly resulting in serious personal injury or damage to
the fireplace.
· Never pour fuel into an open flame or into the burner reservoir
unless it has been turned off and allowed to cool for at least 15
minutes.
· Never move the fireplace when it is operating. Always turn off the
fireplace and allow to cool before moving.
· The burner and fuel must not be exposed to direct heat such as
direct sunshine or central heating.
· If you suffer from respiratory problems, consult your physician
before installing or using this fireplace.
· Do not use this appliance as an incinerator.
· Do not burn waste materials such as: paper, plastics or garbage
in this fireplace.
Fuel handling safety
· Never fill or refill the fireplace when the fireplace is operating or
when the burner is still hot. Failure to observe this warning may
lead to personal injury, death or, property damage.
· Always allow the fire to burn out and, the burner to cool
completely by waiting for 15 minutes before refilling.
· Keep fuels away from children and animals.
· To fill or refill the burner, first remove the burner from the fireplace
and take it outdoors. Fill the burner and then place the burner
back into the fireplace.
· Do not store fuel or flammable liquids in your apartment or
living area. It is important to check and comply with your local
regulations regarding safe storage and handling of flammable
liquids.
· Keep fuel containers closed tightly.
· Do not smoke while handling the fuel.
· Avoid spilling fuel when filling or refilling
· Please pay attention when filling the burner fuel:
· Do not store liquid fuel containers within 1 metre (40”)of the
fireplace. Liquid fuel stored near the fireplace could ignite
unexpectedly.
· Only used approved, sealable containers for storing fuel.
· Spilt fuel could damage or stain floor finishes or coverings. If
fuel is spilt, clean up affected area immediately with a damp
sponge. Rinse out sponge in cold water.
Important warning
Ethanol / Methylated Spirits, burns with a flame that is difficult
to see in bright daylight.
As a normal operating practice, before refilling the burner,
always fully close the burner damper plate and wait 15
minutes before refilling the burner.
Never fill the burner while it is operating or hot.

Child safety
7
Your safety
· Never leave children unattended in the area where the fireplace
is being used.
· Close supervision of children is necessary when this appliance
is operating. Fireplaces contain hot working surfaces that, if
touched may cause skin burns or scalding.
· Do not store items of interest to children on, around or below the
fireplace. Children climbing on the appliance, to reach items,
could damage the appliance or be burned or seriously injured.
· Never allow children to sit or stand on any part of the fireplace.
· Children should not be allowed to play with controls or other
parts of the appliance.
· Allow hot utensils (damper rod) to cool in a safe place, out of
reach of children.
· Fireplace surfaces are hot during use. The fireplace and
burner can remain hot, even after it is turned off. When using
the fireplace or, while it is hot, do not touch the main heating
surfaces, appliance body, burner or immediate surroundings as
these areas become extremely hot and can cause burns.
· We recommend the fitting and use of a fire screen to prevent
children or pets from coming into direct contact with the
surfaces of the fireplace while it is in use or hot. Fire screens are
available from your fireplace retailer.
Maintenance and repair safety
· Unless specifically recommended in this manual, do not repair
or replace any part of the appliance.
· Only use genuine replacement parts.
· Repairs to this appliance must be carried out by a qualified
technician or appliance service technician. Do not attempt to
repair this appliance yourself.
· Do not operate the appliance after it has been dropped or
damaged in any manner. Call our customer service number for
information on examination or mechanical repair or adjustment
of this appliance.
In case of accidental re
· In the event of a fire, immediately turn the appliance off by
closing down the damper control plate.
· To extinguish an accidental fire, use a dry chemical or foam-
type fire extinguisher. These are available from all hardware
stores. (Always read and follow the manufacturer’s instructions
before using)
· For emergency purposes, we recommend the installation of an
approved fire extinguisher in the vicinity of where the fireplace is
installed.
· Never use water or other liquids to extinguish a fire on this
appliance.
Notice
The manufacturer, its authorized agents, distributors and re-sellers
do not accept responsibility for any damage that occurs to this
appliance or any injury sustained or death resulting from a failure
to observe the instructions supplied with this appliance.
If you have any questions regarding this appliance please contact
your local distributor or Black and Stone Inc.
In the interests of ongoing product development and
improvement, the manufacturer reserves the right to modify or
improve the design of its products without notice.

600mm / 24”
1000mm / 40”
450mm / 18”
450mm / 18”
Room volume must be a
minimum of 70 cubic metres / 2500 ft3
height
length
width
Room volume is calculated by multiplying: height x width x depth
Ventilate room by opening
windows or doors slightly
Window
Open slightly eg 50mm / 2”
Door
Open slightly eg 50 -100mm / 2”- 4”
8
Positioning your fireplace
Minimum room size and ventilation requirements
This fireplace must not be installed or operated within a room
having a volume of less than:
· For VFC1100C: 45 cubic metres ( approx 1600ft3)
· For all other models: 70 cubic metres (approx 2500 ft3).
To determine the volume of a room, measure the length width and
height of the room with a tape measure. Multiply the width by the
length and then by the height. This value will be the room volume.
For example: (metric)
Room dimensions Calculation
Height 2.4 metres 2.4m x 7.0m x 5.0m = 84m3
Length: 7.0 metres
Width: 5.0 metres
or (imperial)
Room dimensions Calculation
Height 8 ft 8 ft x 24 ft x 16 ft = 3073 ft3
Length: 24 ft
Width: 16 ft
Room ventilation requirements
The space or room this fireplace is installed must have an adequate
supply of fresh air from the outdoors.
Room ventilation can be achieved by opening a window or door
slightly to allow entry and circulation of fresh air.
Warning:
Never install or operate this fireplace in an unventilated basement
or air tight sealed room.
Installation requirements
Installation clearances (Front, side and top)
Before placing or installing the fireplace, please read these
instructions carefully. Safety clearances must be adhered to.
Minimum clearances to combustible materials:
Side: 450mm / 18”
Front: 1000mm / 40”
Top: 600mm / 24”

Fuel safety clearance
Do not store fuel within 1 metre (40”) of the fireplace.
Min
100mm / 4”
Floor mounted models
Min 15mm
(½”)
Wall mounted models
Minimum
450mm / 18”
1 metre (40”)
9
Positioning your fireplace
Installation clearances (Rear wall)
Rear clearance - Floor Models
Floor models must be installed with a rear clearance (ventilation
space) of no less than 100mm (4”) to allow sufficient air to circulate
behind the fireplace.
Rear clearance - Wall Mounted Models
Wall mounted models must be installed with a rear clearance -
ventilation space - of no less than 15mm (1/2”) to allow sufficient air
to circulate behind the fireplace.
Wall mounted models must be installed using the wall mounting
brackets and hardware supplied with the appliance. Use of
hardware or fixings other than those supplied with this appliance is
not recommended.
Safety clearances
The fireplace must not be installed within close proximity to window
coverings, curtains or other free flowing materials or fabrics. To
ensure that any window coverings cannot touch the appliance,
maintain a minimum clearance of 450mm / 18” with the curtain
fully extended towards the appliance as in the figure below.
The use of ‘tie backs’ to restrain any window coverings or fabrics is
highly recommended.

Assembled Fender
& mounting plate
Burner
Burner
Fender
8mm (5⁄16”) Screws
Mounting
Plate (Flat face up)
X 4
10
Assembling your replace
For freestanding units
Remove the fireplace from the carton and remove all components
from the unit. Ensure all packaging material is removed from the
fireplace before assembly and use.
Set aside all mounting hardware. (Check you have all components
before disposing of packaging)
Fit the Fender to the Fender/Burner mounting plate, secure with two
screws provided.
Insert the fender/burner mounting plate into the fireplace.
Insert the burner. Ensure the fibre wool material is placed inside the
burner and padded down evenly across the bottom of the burner
chamber.
For wall mounted units
Remove the fireplace from the carton and remove all components
from the unit. Ensure all packaging material is removed from the
fireplace before assembly and use.
Set aside all mounting hardware. (Check you have all components
before disposing of packaging)
To ready the fireplace for wall mounted installation, remove the
base from the fireplace as shown, using the Allen key supplied. The
base and screws should be stored for future use (as a floor unit) if
required.
The following steps are best done after the fireplace has been
mounted on the wall:
Fit the Fender to the Fender/Burner mounting plate, secure with two
screws provided.
Insert the fender/burner mounting plate into the fireplace.
Insert the burner. Ensure the fibre wool material is placed inside the
burner and padded down evenly across the bottom of the burner
chamber.
Assembling your fireplace

Installing your fireplace
11
Wall
Firebox
Transfer marks to wall
Fix chains to wall
Insert chains in slotted holes
on both sides of replace
Before installing your fireplace, read the section on clearances
and ventilation (pages 8-9). For your safety and well-being,
clearances, installation warnings and ventilation requirements
must be observed.
Indoor installation
The fireplace must be placed on a level surface, preferably
near a wall rather than in the middle of a room or near a highly
trafficked part of the room where the fireplace is likely to be
knocked or bumped.
Avoid placing the fireplace in a location that is close to an
external window or door, where strong air movement may affect
the operation of the fireplace.
Outdoor installation
Where the fireplace is being placed in an outdoor room or
outside entertainment area, ensure it is placed on a firm level
surface. Preferably near a wall rather than in the middle of a room
or entertainment area.
Avoid placing the fireplace near a highly trafficked part of the
room or outdoor area where the fireplace is likely to be knocked
or bumped.
In an outdoor environment, the fireplace may operate in a
different manner due to outdoor air movement. Avoid placing the
fireplace in a area that is exposed to strong breezes.
In conditions of high wind, we strongly recommend the fire is not
used. Please always observe local fire restrictions and weather
warnings.
Your VioFlame fireplace is designed to be solid and stable when
placed on a level surface. However, as a precaution, a wall
restraining kit is supplied. We recommend using this restraining kit
to secure the fireplace against a wall. This will prevent the fireplace
from being accidentally moved or tipped over during use.
To t the restraining chains
Position the fireplace in your desired location along a suitable wall.
(Please observe all clearance and safety warnings in this manual).
Note the location of the two top slotted holes at the back of the
fireplace firebox. Copy the position of these two holes to the wall,
behind where the fireplace is to be located and mark them using
a scribe or pencil.
See page 13 for instructions on which wall anchor system to use.
Depending on your wall type, drill two holes - (suitable for the wall
anchor system required) - in the locations you have marked.
The restraining chains have a T Piece at one end and a plain link at
the other. Using the appropriate screw and washer, place the screw
through the washer and then through the last link of the chain and
secure to the wall. Tighten firmly. Repeat for other side.
The ‘T Piece’ end of the chain(s) is designed to fit into the slotted
holes at the back of the firebox. Move the fireplace into position (no
less than 100mm (4”) from the wall, to allow for air circulation) and
insert the T Piece ends of the chains into the slotted holes at the top
of the firebox at the back of the fireplace.
The T Pieces can be removed by sliding them to one side of the
slotted hole and withdrawing them from the hole.
Your fireplace is now ready to use. (Please read the operating and
safety instructions before use).
Freestanding installation Floor mount - wall restraining kit

12
Lightly mark desired position of replace on wall
1.
X 4
Temporarily attach brackets to back of replace
(note orientation of brackets)
2.
Mark center position of vertical slots to the wall
3.
Ret replace to brackets using hex head screws.
and washers. Tighten rmly with Allen Key.
5.
Wall
Fix brackets to wall using method described
for your wall type - on next page
4.
Installing your fireplace
Wall mount installation
Caution: when drilling into walls of any type, ensure you have
located the position of any electrical cables, conduits or water/
gas pipes. Failure to do this may damage these services or result
in personal or property damage or death. Please read the sections
on clearances and safety warnings before installing this appliance.
Note: Wall installation is best completed using at least two people.
To install
1) Locate a suitable position on the wall where your fireplace is to
be installed. Lightly mark this position on the wall
2) Temporarily attach brackets to back of fireplace using four hex
head screws and washers. (Tighten with Allen Key)
3) Lift the fireplace into position and using the four vertical slotted
holes on the brackets, carefully transfer the center position of
each of these holes to the wall using a scribe, punch or pencil.
(Note orientation of brackets. Face of brackets with long slots
must face outwards to the sides of the fireplace).
Now place the fireplace on the floor and remove the brackets
from the back of the fireplace.
4) Fix the brackets to wall using appropriate method described for
your wall type, on the next page.
5) Refit the fireplace to the brackets as in step 2 and tighten firmly
with the Allen Key.

Anti Turn Flanges
Installing your fireplace
13
B
Zip Toggles and 65mm (2 ½”) screw -
for wallboard/gyprock/sheetrock walls
20mm (⁄”) washer
wall stud
wall stud
wall bracket
Zip Toggle
65mm (2 ½”)
screw
wallboard
Wall plug and 50mm (2”) screw -
for brick / masonry / concrete walls
10mm (⁄”) diameter hole
min 42mm (1 ⁄”) deep
20mm (⁄”) washer
masonry / concrete wall
10mm (⁄”) x 40mm (1 ½”) wall plug
50mm (2”)
screw
A
wall bracket
65mm (2 ½”) screw -
into wall stud/timber frame
20mm (⁄”) washer
wallboard
wall stud
wall stud
65mm (2 ½”) screw
C
wall bracket
Installation - Wall mount models
There are different fixing requirements, depending on the wall type
to which the fireplace is to be installed. (See diagrams A, B or C).
The diagrams on this page cover the three installation types.
For installation in other configurations, advice from the material
manufacturer should be sought.
For all installation types, use the mounting template supplied to
mark out the mounting hole positions - where your fireplace is to be
installed.
Caution: when drilling into walls of any type, ensure you have
located the position of any electrical cables, conduits or water/gas
pipes. Failure to do this may damage these services.
For installation on Gyprock/Sheetrock (Plaster wallboard) use the Zip Toggles
supplied. Note Zip Toggles can only be used on plaster wallboards. They must not
be used directly on a timber wall stud or frame.
To t, tap the Zip Toggle into the wall slightly so that the cutting head bites into the
wallboard. Then, screw the Zip Toggle into the wall until the ‘anti turn anges’ are
just touching the wall. Now tap the Zip Toggle the remainder of the way into the
wall. Place the wall bracket(s) in position and x with two 65mm (2 1/2”) screws and
washers to each bracket Tighten the screw(s) rmly
For masonry walls, make a 10mm (13/32”) x 42mm (1 21/32”) deep hole using a
masonry drill. Insert the wall plug into the wall - you may need to gently tap
the wall plug into place with a hammer. Place the wall bracket(s) in position
and x with two 50mm (2”) screws and washers to each bracket Tighten the
screw(s) rmly
When mounting the wall brackets directly on a wall stud (timber frame),
predrill a small hole, approximately 2mm (3/32”) in diameter and approximately
30-40mm (1 1/2”) deep. This will prevent the timber from splitting. Place the
wall bracket(s) in position and x with two 65mm (2 1/2”) screws and washers
to each bracket Tighten the screw(s) rmly.

Never ll the unit while it is operating
14
Operating your fireplace
Before the fire is installed or used for the first time, please ensure you
have read and fully understand the instructions.
When using the appliance for the first time, you may notice a slight
odor from the paint finish as it cures. This odor will pass within two or
three uses.
While not harmful, we recommend that during this time, you keep
the room ventilated.
A slight odor - from the paint finish
as it cures - is normal and will pass
after one or two uses.
Filling and relling safety
Never fill the burner while it is operating or alight.
Never fill the burner while it is hot.
Always wait 15 minutes after the fire has extinguished and the
burner has cooled before refilling.
Filling procedure
To fill the burner:
· Remove burner from the fireplace and take outdoors.
· Pour fuel into the burner fuel chamber, ensuring fuel is not spilt
during while filling.
· Do not overfill the burner. The fuel level when full should be
approximately 15mm (1/2”) below the top of the burner opening.
(About the thickness of your finger).
· When finished filling the burner, close the damper plate.
· Place the burner back into the fireplace..
First time use Filling/relling your replace

open
close
Step 1
Step 2
Step 3
15
Fully Open / High Typical low setting
Controlling the re
After lighting the fireplace, allow approximately 15 minutes for the
burner to achieve effective working temperature. The burner is at
working temperature when the flames are full and mostly yellow in
appearance.
After this time, you can regulate the damper control to govern both
the flame appearance and heat output. To regulate the fire use the
damper control rod to push or pull the control plate backwards or
forwards.
Only use the damper control rod supplied with this appliance, never
use a timber or plastic tool and never use your bare hands.
Pulling the plate towards the front of the burner will reduce the
flame height - and reduce the heat output.
To turn off the fire, pull the damper plate briskly to the front of the
burner and the fire will extinguish. If the fire does not shut down,
reopen the dampler plate and repeat the shutdown procedure.
Pushing the plate towards the back of the burner will increase
the flame height and increase the heat output. After lighting the
fireplace, allow approximately 15 minutes for the burner to achieve
effective working temperature. The burner is at working temperature
when the flames are full and mostly yellow in appearance.
Operating your fireplace
To light the burner:
1) Open the damper plate
and place the hooked end
of the damper control rod into
the fuel chamber and push the
rod down slightly into the
fibre material so that the
rod picks up a small
amount of fuel.
2) Withdraw the rod from
the burner and manually
light the end of the rod with
a lighter. We do not
recommend directly lighting
the burner with a match as
it could present a hazard
while starting the fire.
3) Place the lit end of the
damper rod into the burner
chamber. The fire will now
light.
If the burner fails to light,
repeat steps 1-3.
A cold burner will normally start
with a sudden rushing effect
indicated by a small puff. This
is normal and is not a matter of
concern.
Lighting procedure
Prior to lighting your fireplace, ensure the burner is filled to the
desired level. Close the burner damper control after filling.
When the burner is lit, ensure the damper rod flame is extinguished
before placing the rod on a non combustble surface before storing
the rod.
Start up phase
The burner takes approximately 15 minutes to achieve effective
working temperature. This is the start up phase. Until the burner has
reached its working temperature, the flames will tend to stay low
and be somewhat bluish in appearance with yellow tips. Full flame
height will be achieved when the burner is at the correct operating
temperature.
Lighting your replace Controlling your replace

16
Caring for your fireplace
Cleaning your replace
General cleaning procedures
To ensure safe and proper maintenance, we recommend you
follow these directions carefully.
Clean internal parts of the fireplace regularly as determined by
the amount of use. The entire fireplace should be cleaned at least
once a year. In addition, keep the area around your fireplace
clear and free from combustible materials, gasoline, and other
flammable vapours and liquids.
To prevent staining or discoloration of the floor or floor coverings,
clean appliance outdoors.
If a part is removed from the fireplace, be sure it is correctly
replaced before operating the fireplace again.
Fireplace body
To clean the body; remove the fireplace from the wall or floor
and take outdoors. Remove the burner and set to one side. Use a
vacuum cleaner - on a low setting - to remove dust and particles
from the body of the fireplace. Gently vacuum the front and back
of the fireplace.
Use a solution of detergent and warm water, Wring out the wet cloth
or sponge and gently wipe down all surfaces.
Gently dry with a dry, soft polishing cloth.
Burner
Do not attempt to clean the burner if it contains fuel or if it is
operating or still hot from previous use. Before cleaning, remove
the fibre material from the burner and set this to one side. Use a
solution of mild detergent and warm water. Wring out the wet cloth
or sponge and gently wipe down the outside of the burner.
Burner bre material
The fibre material inside the burner has a life expectancy of
approximately 3-4 years, after which time it should be replaced.
Do not wash or immerse this material in water or other liquids. Only
replace this material with an identical material, available from Black
and Stone. Never replace the fibre material with any other material.
Care of stainless steel trim
Do not use wire wool pads, scrapers, scouring materials, bleaches,
or harsh abrasive cleaners on your fireplace. Do not allow salt and
vinegar mixtures or other acidic foods (such as lemon or tomato for
example) to remain in contact with stainless steel for a long period
of time. This can cause scratching, scoring, corrosion or pitting.
We recommend that you clean stainless steel components with
either a mild detergent and water solution or, a cleaner that is
approved for stainless steel. Only clean the fireplace when it is cool
and out of direct sunlight. Rinse and dry components thoroughly
when finished cleaning and before using the appliance.
Special note: Stainless steel burner
From time to time, a brown colored tint may build up on the
surfaces of the burner that are closest to the direct effects of heat
from the combustion process. This tinting is a natural occurrence,
when the metal is subjected to high heat. The discoloration can
be removed from the stainless by using an approved stainless steel
cream cleanser When removing the tint, always rub the steel in the
visible direction of the grain of the steel. This will eliminate unsightly
scratches
Care of high temperature paint
Do not use wire wool pads, scrapers, scouring materials, bleaches,
or harsh abrasive cleaners on your barbecue. Do not allow salt and
vinegar mixtures or other acidic foods (such as lemon or tomato
for example) to remain in contact with hi temperature paint for a
long period of time. This will cause scratching, scoring, corrosion or
pitting.
We recommend cleaning the hi temperature paint with an
approved cleaner or a mild detergent with warm to hot water. Rinse
and dry components thoroughly when finished cleaning and before
using the appliance.

17
Caring for your fireplace
Storage
If you intend to store your fireplace for extended periods, please
observe the following directions.
For your safety, burn off any residual fuel within the burner before
storing your fireplace. Do not store a fireplace while residual fuel
remains inside the burner, this is a fire hazard.
Make sure the appliance has cooled completely before storing.
Do not store the fireplace wrapped in newspaper or other paper
containing printing inks etc as the printing inks may transfer to the
body or stainless trim on the fireplace.
For storage, we recommend using the plastic shipping bag to
cover the appliance. The cardboard packing carton can also serve
as a solid storage container for the fireplace.
Transporting / moving
If you intend moving the appliance from one location to another,
for example - moving house - please observe the following
directions.
Ensure the burner fuel chamber is free of residual fuel. Do not
transport a burner with fuel remaining in the burner fuel chamber.
Ensure the fireplace is adequately packed to prevent damage to
the body and burner.
Service requirements
Other than cleaning as described in the previous section, your
VioFlame fireplace does not need to be serviced on a regular
basis. However, you should inspect the fireplace and burner at least
once per month during the main operating season to ensure the
burner is functioning correctly and that the burner fuel chamber is
not leaking.
Under the following conditions, you may need to have your
fireplace inspected or serviced by a qualified service person.
If the fireplace or burner is dropped, it should be inspected to
ensure that the burner and fireplace body are not damaged
in such a manner as to impair operation of the damper control
system or, to allow fuel to leak from the burner fuel chamber.
Do not operate the fireplace if you suspect it has sustained
damage. Contact our service center to obtain advice on getting
repairs.
Storing or transporting your replace Servicing your replace

18
Warranty
Warranty terms and conditions
This limited warranty does not cover:
· Negligence, alteration, abuse or misuse.
· Incorrect electrical installation.
· Lack of maintenance, abuse, neglect, misuse, accident or
improper installation of this appliance.
· Scratches, dents, corrosion or discoloring caused by
heat,abrasive or chemical cleaners or chipping on porcelain
enamel parts.
· Unauthorized repairs during the warranty period
· Corrosion or damage caused by grease fires, insects, weather,
hail, exposure to the elements, prolonged exposure to direct
sunlight, chemicals or foods acids or juices.
· Cleaning, maintenance and normal wear and tear.
· Scratches caused by normal use.
· Damage caused by dirt, sand, and/or water damage.
· Commercial use of the appliance.
· Damage caused by continued operation of the appliance with
a known problem.
· Damage caused as a result of failure to follow the operating
instructions included with the appliance.
· Removal or re-installation costs.
This appliance is warranted against defects in material and workmanship for a period of one year from the original date of purchase. In the
USA and North America, warranty is provided by Black and Stone Inc. In other countries, contact your authorized Black and Stone distributor.
Conditions of warranty
· It is a condition of this warranty that the appliance is
returned to Black and Stone’s distributor, service department or
authorized service agent and freight charges both ways are paid
by the owner. No liability is accepted for loss or damage during
transit.
· The appliance is installed by a qualified person and operated
and maintained in accordance with the instructions supplied.
Repairs or service must be carried out by an authorized person.
· No alterations or repairs have been carried out without obtaining
the distributors prior consent. Such repair or any replacement
does not extend the warranty period.
· This warranty applies only to the original owner of the product and
is not transferable.
· The warranty period is calculated from the date of purchase only.
· Where this warranty is inconsistent with any state laws, the statutory
rights of the purchaser shall prevail.
· You must retain your receipt or proof of purchase. When claiming
warranty for this appliance you must provide a copy of your proof
of purchase receipt.
· Claims for warranty will not be accepted with proof of purchase.

19
VFR 210BCO VFR 210BRO VFBURN-XL
For your records
DM Y YM D Y Y
VFC 1100C VFC 2100C VFC 2100R
VFC 3100R VFC 2100F VFR 210W
Model Purchased:
Place of purchase: __________________________________________________
City/Suburb/Town: __________________________________________________
Date of purchase:
Warranty
Warranty registration
Warranty Service
Please register your product warranty within 30 days of the date of
purchase by using the warranty registration card and the envelope
provided.
For all warranty and customer service enquiries, please call our
customer service number 1 800 605 2515 or email us at:
To assist when contacting our after sales service centre, please
complete the following details and have them ready when you call.

VFC 1100C VFC 2100F VFC 2100C VFC 2100R VFC 3100R VFR 210W
Mounting Type Floor only Floor only Wall or oor Wall or oor Wall or oor Wall only
Burner Capacity 0.8 litres / 0.2 Gal 2.2 litres / 0.5 Gal 2.2 litres / 0.5 Gal 2.2 litres / 0.5 Gal 2.2 litres / 0.5 Gal 2.2 litres / 0.5 Gal
Weight 17kgs / 37lbs 23kgs / 50lbs 27kgs / 61lbs 25kgs / 55lbs 25kgs / 55lbs 20kgs / 44lbs
Dimensions
A 500mm [19 ⁄” ] 595mm [23 ⁄”] 845mm [33 ¼”] 850mm [33 ⁄”] 850mm [33 ⁄”] 805mm [31 ⁄”]
B 545mm [21 ⁄”] 650mm [25 ⁄”] 890mm [35 ⁄”] 900mm [35 ⁄”] 900mm [35 ⁄”] N/A
C 690mm [27 ⁄”] 1000mm [39 ⁄”] 785mm [30 ⁄”] 680mm [26 ⁄”] 680mm [26 ⁄”] N/A
D 590mm [23 ⁄”] 900mm [35 ⁄”] 685mm [26 ⁄”] 580mm [22 ⁄”] 580mm [22 ⁄”] 605mm [23 ⁄”]
E 220mm [8 ⁄”] 235mm [9 ¼”] 270mm [10 ⁄”] 195mm [7 ⁄”] 195mm [7 ⁄”] 215mm [8 ⁄”]
F 250mm [9 ⁄”] 260mm [10 ¼”] 290mm [11 ⁄”] 210mm [8 ¼”] 210mm [8 ¼”] N/A
VFR 210BRO VFR 210BCO
Mounting Type Build In Build In
Burner Capacity 2.2 litres / 0.5 Gal 2.2 litres / 0.5 Gal
Weight 20kgs / 44lbs 20kgs / 44lbs
Dimensions
A 740mm [29 ⁄”] 740mm [29 ⁄”]
B 610mm [24 ⁄”] 610mm [24 ⁄”]
C 630mm [24 ⁄”] 630mm [24 ⁄”]
D 210mm [8 ¼”] 210mm [8 ¼”]
E 15mm [ ½”] 70mm [2 ¾”]
Floor mount
Floor and wall mount models Build In models
Wall or oor mount Wall mount
A
B
DC
E
F
A
C
B
D
E
Black and Stone Inc.
PO Box 22386
Flagstaff AZ 86002 – 2386
United States of America
Tel: 1 800 605 2515
Fax: 1 800 605 2515
web: www.blackandstone.com
© Copyright 2009 Black and Stone Inc All rights reserved
Specifications
Models & Specications
All information correct at time of printing. In the interest of ongoing product improvement,
Black and Stone reserves the right to change specifications at any time without notice.
Please read the installation manual before installing this product. Build In fireplaces must be installed into a non
combustible enclosure. Please read the full installation
manual supplied before installing this product.
BSVFINS -USA v1.0 2009
Floor and wall mount models Build In models
This manual suits for next models
7
Table of contents
Popular Indoor Fireplace manuals by other brands

Jøtul
Jøtul i 520 Installation and operating instructions

Focal Point
Focal Point Envy Installation and user instructions

Konigshutte
Konigshutte Taurus Aqua Instruction

Ortech
Ortech LEDFP-3-43 manual

Bellfires
Bellfires RDL3 R LF Installation instructions & manual for maintenance

Enviro
Enviro Westport Steel owner's manual

Desa
Desa 36RS installation instructions

Regency Fireplace Products
Regency Fireplace Products L390E-NG Installation, commissioning and servicing instructions

EUROM
EUROM Malmo 363463 instruction manual

Empire Comfort Systems
Empire Comfort Systems DVCT40CSP95N-1 installation instructions

Dimplex
Dimplex Opti-V PGF10 instructions

Taurus Alpatec
Taurus Alpatec TORONTO manual