Black Diamond Video XPS PRO1000 User manual

XPS PRO1000 User Guide
Edition 1.02
December 7, 2009
BDV
BLACK DIAMOND VIDEO

Edition 1.02 XPS PRO 1000 User Guide
Trademarks
The Black Diamond Video logo and XPS PRO1000 are registered trademarks of Black Diamond Video, Inc.
Warranty
Warranty and Warranty Disclaimer: Black Diamond Video warrants to the original purchaser ("Buyer") that the products
delivered by Black Diamond Video that accompany this manual ("Products") will be in accordance with Black Diamond
Video’s published specifications under normal use and service for a period of one (1) year from delivery. Deviations from
published specifications which do not materially affect performance of Products covered hereby shall not be deemed to
constitute defects of material or workmanship or a failure of Products to comply with such specifications. Warranty claims
and the return of Products under warranty shall be subject to, and governed by, Black Diamond Video’s return material
authorization (RMA) policy. This warranty shall not apply to any Product that has been subject to misuse or neglect or
damaged by weather or accident (including, without limitation, damage due to fall, fire, exposure to water and abnormal
electrical exposure), or that has been modified by anyone other than Black Diamond Video. The warranties contained herein
shall extend only to Buyer and shall not apply to Buyer’s affiliates or customers or subsequent purchasers. SELLER’S
ENTIRE LIABILITY, AND BUYER'S SOLE AND EXCLUSIVE REMEDY, SHALL BE LIMITED SOLELY TO
SELLER, AT ITS OPTION AND ELECTION, REPAIRING OR REPLACING THE DEFECTIVE PRODUCT.
WARRANTY CLAIMS MUST BE MADE WITHIN THE WARRANTY PERIOD OR ARE FOREVER WAIVED.
EXCEPT FOR THE EXPRESS WARRANTY MADE IN THIS PARAGRAPH, BLACK DIAMOND VIDEO
EXPRESSLY DISCLAIMS AND EXCLUDES ALL WARRANTIES, WHETHER STATUTORY, EXPRESS OR
IMPLIED, INCLUDING, BUT NOT LIMITED TO, THE IMPLIED WARRANTIES OF MERCHANTABILITY,
FITNESS FOR A PARTICULAR PURPOSE AND NON-INFRINGEMENT OF THIRD PARTY RIGHTS WITH
RESPECT TO THE PRODUCTS FURNISHED BY BLACK DIAMOND VIDEO HEREUNDER AND ALL
WARRANTIES WHICH, BUT FOR THIS PROVISION, MIGHT ARISE FROM COURSE OF DEALING, CUSTOM OR
TRADE OR THAT ARE OTHERWISE IMPLIED BY LAW. Certain jurisdictions do not permit the disclaimer of certain
warranties, so this limitation may not apply to Buyer.
Limitation of Liability. IN NO EVENT SHALL BLACK DIAMOND VIDEO BE LIABLE FOR ANY
CONSEQUENTIAL, INCIDENTAL, INDIRECT, EXEMPLARY, PUNITIVE OR SPECIAL DAMAGES WHATSOEVER
ARISING OUT OF, IN CONNECTION WITH OR RESULTING FROM THE FURNISHING, PERFORMANCE OR USE
OF THE PRODUCTS, WHETHER DUE TO BREACH OF CONTRACT, BREACH OF WARRANTY, STRICT
LIABILITY, PRODUCT LIABILITY, THE NEGLIGENCE OF SELLER OR OTHERWISE. IN NO EVENT SHALL
SELLER’S LIABILITY EXCEED THE U.S. DOLLAR AMOUNT EQUAL TO THE AMOUNT PAID BY BUYER FOR
THE APPLICABLE PRODUCT. THE DAMAGE LIMITATIONS PROVIDED AND THE REMEDIES STATED HEREIN
SHALL BE EXCLUSIVE AND SHALL BE BUYER’S SOLE REMEDY. THESE LIMITATIONS SHALL SURVIVE
FAILURE OF ANY ESSENTIAL PURPOSE. Certain jurisdictions do not permit the limitation of certain types of liability,
so this limitation may not apply to Buyer.

XPS PRO 1000 User Guide Edition 1.02 Installation i
. . . . .
. . . . . . . . . . . . . . . . . . . . . . . . . . . . . . . . . . .
Contents
Chapter 1 “Welcome” ...............................................1
“About this Manual” ................................................ 1
“Safety Information and Instructions” ..................... 1
“Customer Service and Support” ............................. 2
Chapter 2 “Product Information” .............................3
“Introducing the XPS PRO1000” ............................ 3
“Key Features” ........................................................ 4
“Options” ................................................................. 5
“Front Panel Detail” ................................................ 6
“Rear Panel Detail” ................................................. 7
“XPS PRO1000 Product Specifications” ................ 8
Chapter 3 “Getting Ready to Install” .....................11
“Overview of the Installation Process” ................. 11
“System Test Installation Overview” .................... 12
“Final System Installation Overview” ................... 13
“Using DVI Converters” ....................................... 14
“Using Black Diamond Cable and Cable Kits” ..... 14
Chapter 4 “Installation Instructions” .....................17
“System Test Installation” ..................................... 17
“Final System Installation” .................................... 20
“Startup Macro”......................................................... 29
Chapter 5 “About the Web-Server GUI” ................31
“Appearance and Functions of the GUI” ............... 31
“Custom Labelling of Input/Output Buttons” ....... 32

ii Installation Edition 1.02 XPS PRO 1000 User Guide
Chapter 6 “Matrix Switching” .................................35
“About Matrix Switching” .................................... 35
“Matrix Switching Control- GUI” ......................... 35
“Matrix Switching Control- RS-232/ 10/100T” .... 37
Appendix A “RS-232 and 10/100T Protocol” ...............41
“XPS PRO1000 Command Set” ............................ 41
“RS-232 Pinout” .................................................... 47
Appendix B “Upgrading Firmware”..............................49

XPS PRO 1000 User Guide Edition 1.02 1
. . . . .
. . . . . . . . . . . . . . . . . . . . . . . . . . . . . . . . . . .
W
ELCOME
1
. . . . . . . . . . . . . . . . . . . . . . . . . . . . . . . . . . . . . . . . . . . . . . . . . . . .
ABOUT THIS MANUAL
This manual contains information about the XPS PRO1000 processor. Material is presented
under the following chapters:
. . . . . . . . . . . . . . . . . . . . . . . . . . . . . . . . . . . . . . . . . . . . . . . . . . . .
SAFETY INFORMATION AND INSTRUCTIONS
The following safety instructions are to ensure the safety of personnel using this equipment
and to protect this device and working environment from potential damage.
CAUTION!
1ELECTRIC SHOCK HAZARD. DO NOT OPEN.
2REMOVAL OF COVER MAY RESULT IN ELECTRIC SHOCK. There are no user-
serviceable parts inside. Contact Black Diamond Video for authorized repair service.
IMPORTANT SAFETY INFORMATION:
• Read and follow all instructions – Read all safety and operating instructions before
operating this equipment. Follow all operating instructions in this manual and adhere to
all warnings on this equipment and in this manual.
Chapters Description
.
.
.
.
.
.
.
.
.
.
.
.
.
.
.
.
.
.
.
.
.
.
.
.
.
.
.
.
.
.
.
.
.
.
.
.
.
.
.
.
.
.
.
.
.
.
.
.
.
.
.
.
.
.
.
Chapter 1, “Welcome.”
Chapter 2, “Product Information.” Use this section to get to know this product manual,
understand key safety measures, and learn about the key
features and functionality of the XPS PRO1000.
Chapter 3, “Getting Ready to Install.”
Chapter 4, “Installation Instructions.” Use this section to learn about installing the XPS
PRO1000. Included in this section are both an overview
of the installation process, and detailed, step-by-step
installation instructions.
Chapter 5, “About the Web-Server GUI.”
Chapter 6, “Matrix Switching.” Use this section to learn about the capabilities of the XPS
PRO1000. Get detailed instructions on how to use the
matrix switching feature.
Appendix A, “RS-232 and 10/100T Protocol.”
Appendix B, “Upgrading Firmware.” Use this section to refer to detailed remote control
command set information, firmware upgrade information
and instructions, and a glossary of key terms used in this
manual.

WELCOME
Customer Service and Support
2Edition 1.02 XPS PRO 1000 User Guide
• Keep all documentation – Retain the User Guide and accompanying safety instructions
for future reference.
• Maintain proper ventilation – This equipment should be maintained in a well-ventilated
room with adequate air flow. Do not obstruct the ventilation slots on the device.
• Keep away from heat – Do not place this device near a heat source. Failure to comply
could result in overheating and damage to the equipment.
• Keep away from water and moisture – Do not place this equipment near areas of running
water or dense condensation.
• Cleaning - Unplug the device before cleaning. The device can then be wiped with a
water-dampened soft cloth.
• Proper electrical grounding - This device must be plugged into a properly grounded
outlet in order to avoid electric shock. Do not bypass the grounding features of the power
cable or plug. When using an extension cord, make sure the cord is designed for
grounded plugs.
. . . . . . . . . . . . . . . . . . . . . . . . . . . . . . . . . . . . . . . . . . . . . . . . . . . .
CUSTOMER SERVICE AND SUPPORT
For technical support and service, contact Black Diamond Video at:
Black Diamond Video
1000 Atlantic Ave, Suite 114
Alameda, California, 94501
Phone: (510) 769-2959
Fax: (510) 769-2949
Visit us on the web at www.blackdiamondvideo.com.

XPS PRO 1000 User Guide Edition 1.02 3
. . . . .
. . . . . . . . . . . . . . . . . . . . . . . . . . . . . . . . . . .
P
RODUCT
I
NFORMATION
2
. . . . . . . . . . . . . . . . . . . . . . . . . . . . . . . . . . . . . . . . . . . . . . . . . . . .
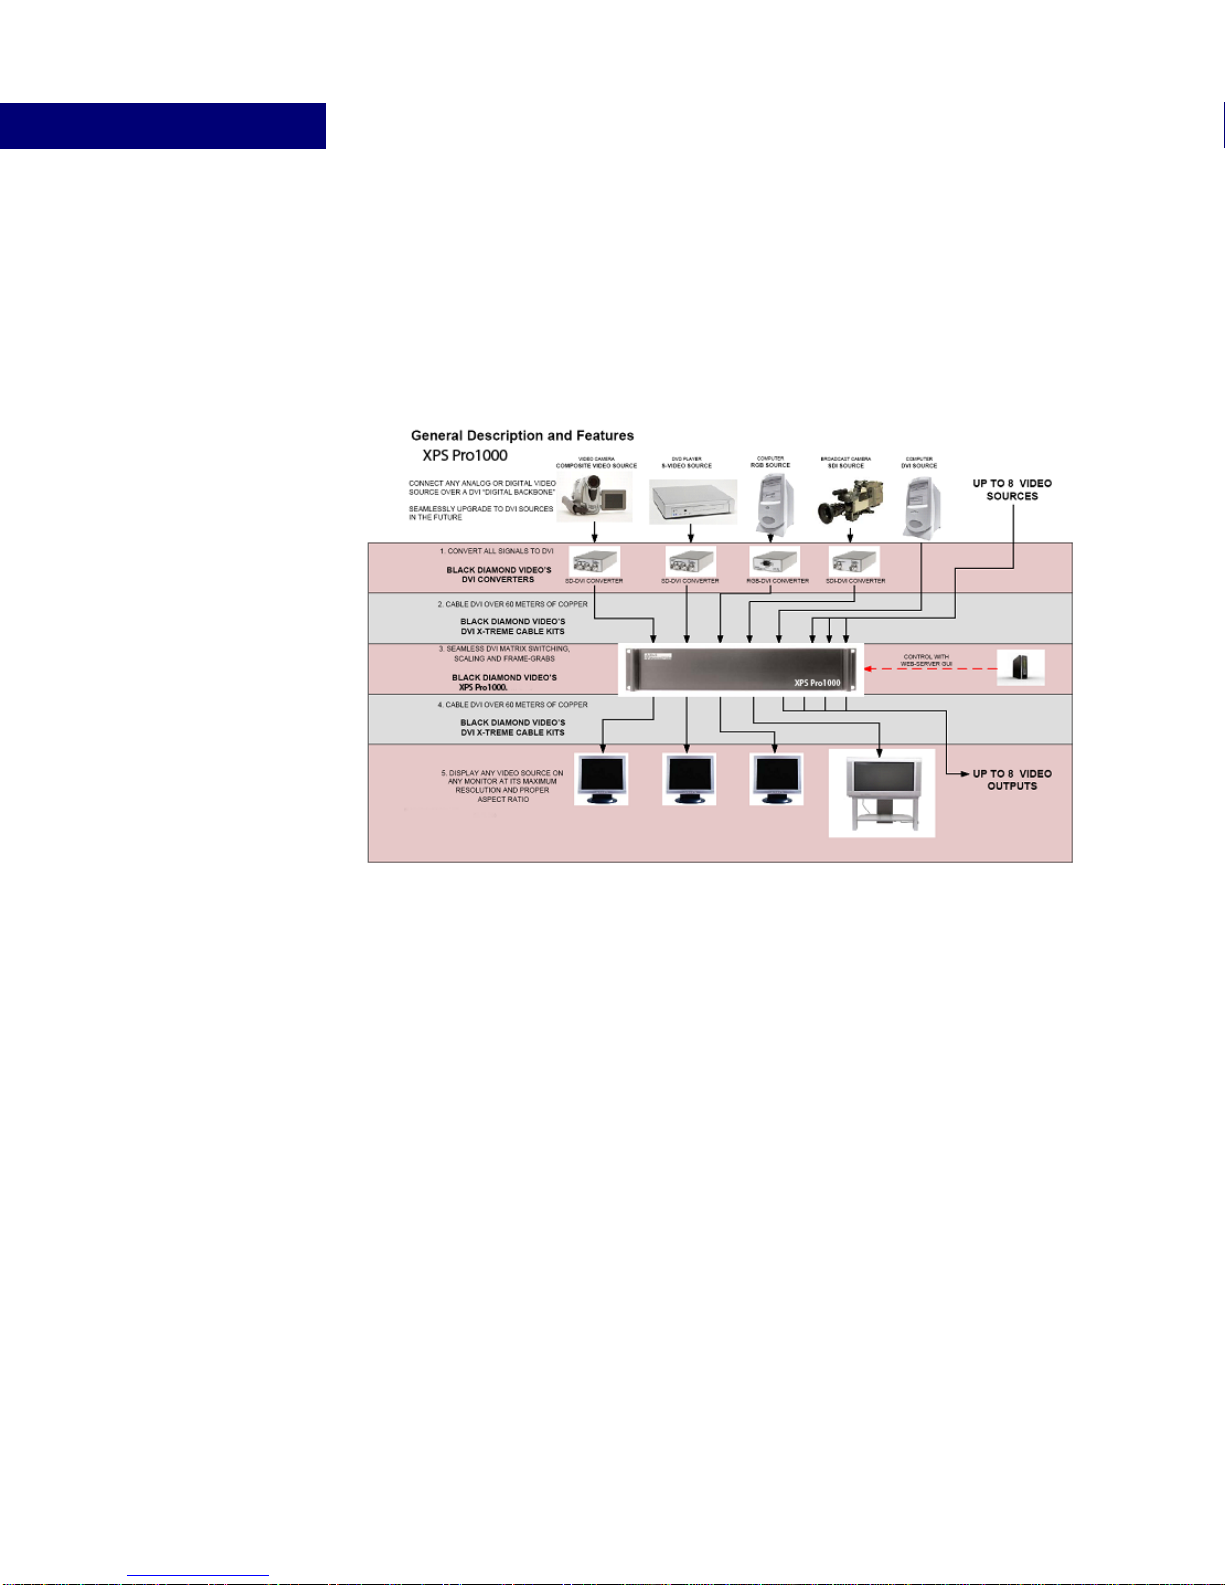
INTRODUCING THE XPS PRO1000
The XPS PRO1000 is an all-digital DVI matrix switch. When combined with Black
Diamond Video’s DVI converters, the XPS PRO1000 provides the same level of matrix
switching for many combinations of analog or SDI sources, eliminating the need for multi-
format switched and cables. SDI signal source eliminating the need for multi-format
switches and cables.
The XPS PRO1000 supports DVI operation at the maximum TMDS rate of 1.65 Gb/s. The
XPS PRO1000 works seamlessly with Black Diamond Video's DVI X-treme Cable Kits,
allowing the transmission of DVI signals over 60 meters of copper on both the input and
output sides of the processor.
Phantom-Power
The XPS PRO1000 provides phantom-power to Black Diamond Video’s DVI Converters,
including the standard-definition-to-DVI converter (SD-DVI), the RGB-to-DVI converter
(RGB-DVI), and the SDI-to-DVI converter (SDI-DVI), as well as to DVI Xtreme Signal
PRODUCT INFORMATION
Key Features
4Edition 1.02 XPS PRO 1000 User Guide
Conditioners. The XPS PRO1000 system diagram (Figure 1), gives an example of video
sources and how they can be integrated using the XPS PRO1000.
Control
The XPS PRO1000 processor has three control methods. The processor has both RS-232
and 10/100T Ethernet controls. For remote applications, the XPS PRO1000 is equipped
with a built-in, customizable, web-server graphical user interface (GUI).
. . . . . . . . . . . . . . . . . . . . . . . . . . . . . . . . . . . . . . . . . . . . . . . . . . . .
KEY FEATURES
Features include the following:
SWITCHING
• Non-blocking 8 x 8 DVI matrix switching
• Supports single-link DVI matrix switching at the maximum TMDS rate of 1.65 Gb/s
• Input and output rates from 640 x 480 up to and including 1920 x 1200, interlaced or
progressive
FIGURE 1. XPS PRO1000 System Diagram

. . . . .
PRODUCT INFORMATION
Options
XPS PRO 1000 User Guide Edition 1.02 5
PHANTOM-POWER AND CONVERTER CONTROLS
• Phantom-power to Black Diamond Video’s DVI X-treme Cable Kits
• Phantom-power and control for Black Diamond Video’s DVI Converters
CONTROLS
• RS-232 serial
• 10/100T Ethernet
• Customizable Web-server GUI
GENERAL
• Compact size (2U high)
• Rack mountable
• Remote diagnostic capability
• Test pattern generator
. . . . . . . . . . . . . . . . . . . . . . . . . . . . . . . . . . . . . . . . . . . . . . . . . . . .
OPTIONS
The following options are available for the XPS PRO1000:
•DVI X-treme Cable Kits are phantom-powered and allowed DVI signals to be
transmitted up to 60 meters on both the input and output sides of the switch for a
cumulative distance of 120 meters.
•RGB-DVI Converters convert any analog RGB signal to DVI. They are phantom-
powered and controlled, and integrate seamlessly with the XPS PRO1000.
•SDI-DVI Converters convert any HD-SDI source to DVI. They are phantom-powered
and controlled, and integrate seamlessly with the XPS PRO1000.
•Front Panel Controls are optional.

PRODUCT INFORMATION
Front Panel Detail
6Edition 1.02 XPS PRO 1000 User Guide
. . . . . . . . . . . . . . . . . . . . . . . . . . . . . . . . . . . . . . . . . . . . . . . . . . . .
FRONT PANEL DETAIL
Figure 2 details the standard XPS PRO1000 front panel.
FIGURE 2. XPS PRO1000 Front Panel
. . . . .
PRODUCT INFORMATION
Rear Panel Detail
XPS PRO 1000 User Guide Edition 1.02 7
. . . . . . . . . . . . . . . . . . . . . . . . . . . . . . . . . . . . . . . . . . . . . . . . . . . .
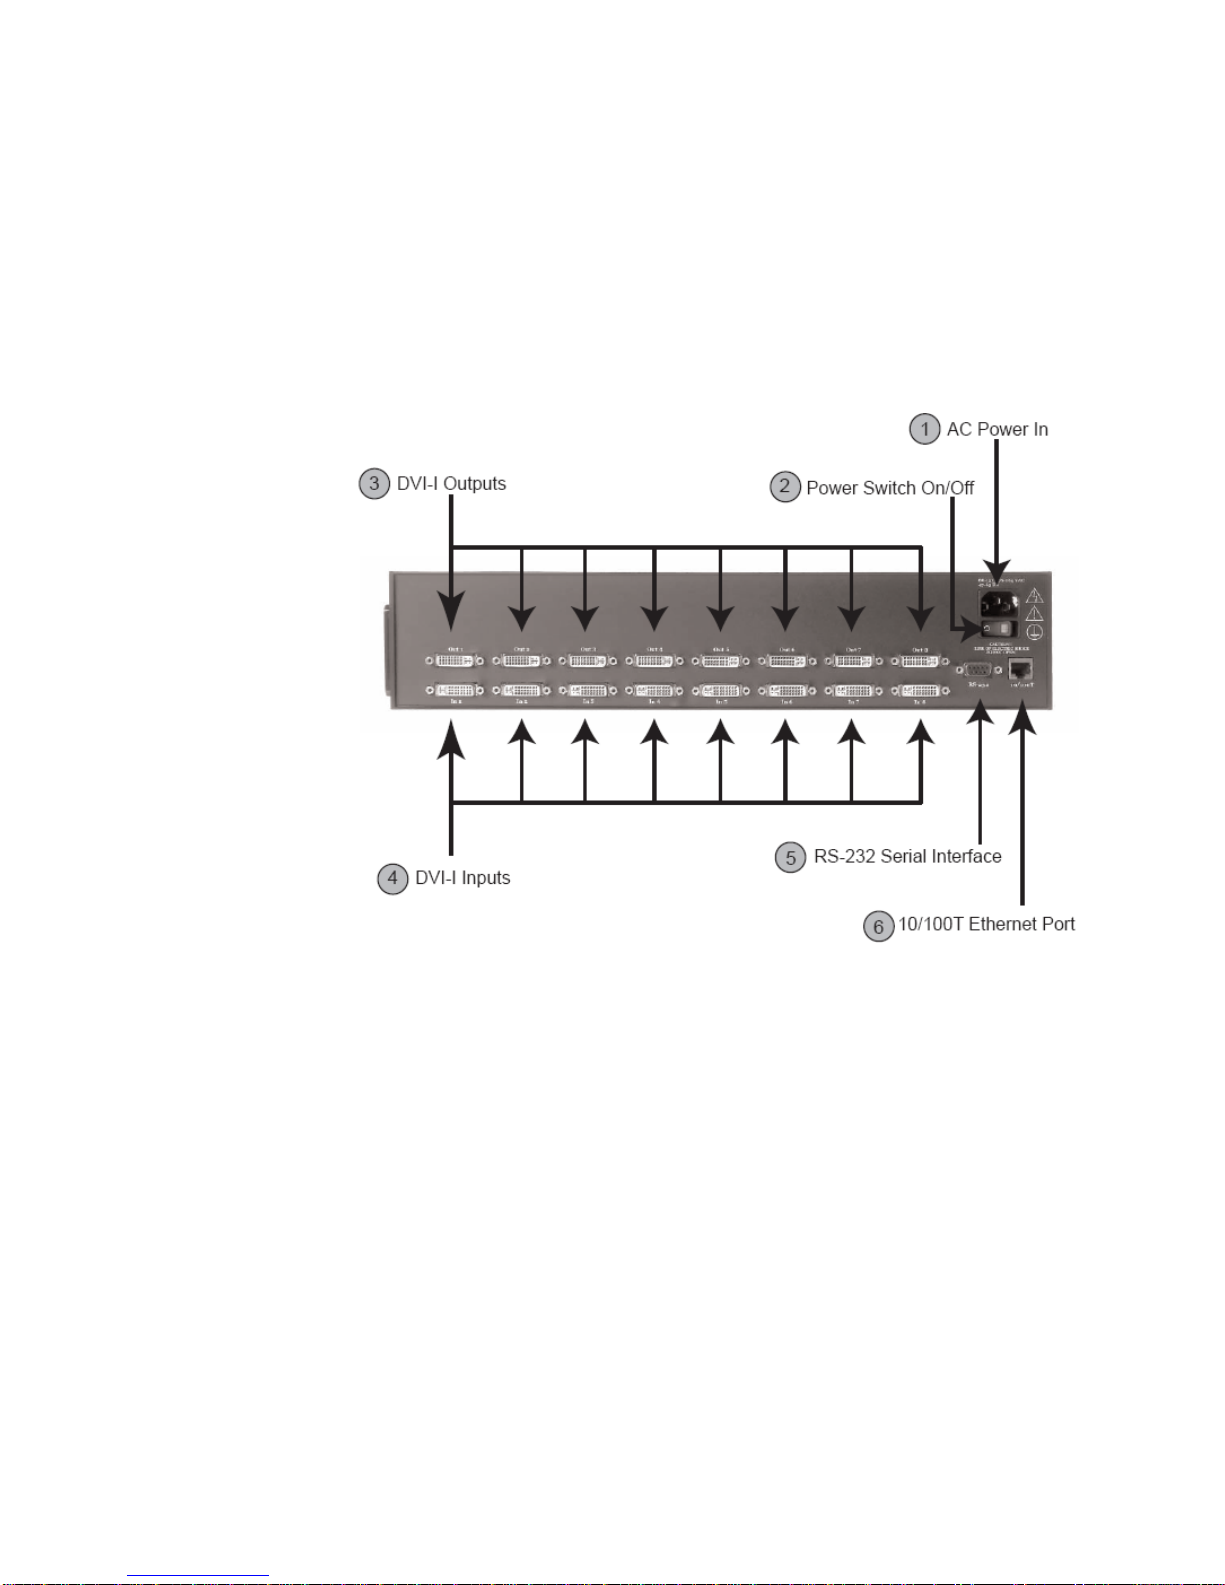
REAR PANEL DETAIL
Figure 3 details the XPS PRO1000 rear panel.
1. AC POWER IN
AC input power connection (120/240 VAC).
2. POWER SWITCH ON/OFF
The power switch is used to turn the unit on or off. The system status light on the front panel
indicates when the unit is powered on.
3. DVI-I OUTPUT CONNECTIONS
The DVI-I output connectors are digital DVI outputs used to connect to a digital display
device. When connecting to a display device more than 15 feet from the XPS PRO1000, a
DVI X-treme Cable Kit should be used with the DVI X-treme conditioner placed on the
display side of the cable.
FIGURE 3. XPS PRO1000 Rear Panel

PRODUCT INFORMATION
XPS PRO1000 Product Specifications
8Edition 1.02 XPS PRO 1000 User Guide
4. DVI-I INPUT CONNECTIONS
The DVI-I input connectors are used to connect a video source to the XPS PRO1000. If the
input source is a DVI source, it can be connected directly to the device. If the input source is
an analog or SDI source, the signal must first be converted to DVI using a Black Diamond
Video DVI converter before connecting it to the XPS PRO1000.
For cable distances greater than five meters, Black Diamond Video certified DVI cable
should be used. Black Diamond Video certified DVI cable is factory tested and guaranteed
for distances up to 60 meters. A DVI X-treme conditioner is not required on the input side
of the XPS PRO1000.
5. RS-232 SERIAL INTERFACE
The RS-232 interface is a DCE type used to control the XPS PRO1000 by an external host
over a serial-com port or alternate RS-232 controller.
6. 10/100T ETHERNET PORT
The 10/100T Ethernet port is used for controlling the XPS PRO1000 from a remote
location. This port is also used for firmware upgrades in the field. The 10/100T Ethernet
port can control the XPS PRO1000 through commands similar to the RS-232 port.
. . . . . . . . . . . . . . . . . . . . . . . . . . . . . . . . . . . . . . . . . . . . . . . . . . . .
XPS PRO1000 PRODUCT SPECIFICATIONS
VIDEO SPECIFICATIONS
• Video Format: DVI Single-link, supports maximum TMDS rate of 1.65 Gb/s
• Video Resolution: DVI I/O rates from 640 x 480 to 1920 x 1200, interlaced or
progressive, 25-165 MHz
• Connectors: DVI-I female
CONTROLS
• Serial Controls: RS-232, DB9 female connector
• Ethernet Controls: 10/100T Ethernet, Protocols: Telnet, FTP, HTTP
• GUI: Customizable web-server GUI
GENERAL
• Dimensions/Weight: 2U, 19" rack-mountable enclosure, 16.73"W x 12"D x 3.5"H, 12
pounds
• Temperature Rating: 0-55° C

. . . . .
PRODUCT INFORMATION
XPS PRO1000 Product Specifications
XPS PRO 1000 User Guide Edition 1.02 9
• Power: 90-240 VAC, 47-63Hz, 200 Watts

PRODUCT INFORMATION
XPS PRO1000 Product Specifications
10 Edition 1.02 XPS PRO 1000 User Guide

XPS PRO 1000 User Guide Edition 1.02 11
. . . . .
. . . . . . . . . . . . . . . . . . . . . . . . . . . . . . . . . . .
G
ETTING
R
EADY
TO
I
NSTALL
3
This chapter presents on overview of the installation process. Read this chapter to get an
introduction to how to install the XPS PRO1000. Included is information about using DVI
converters (required if you have video sources that are not in DVI format) and Black
Diamond cable kits.
For detailed installation instructions see Chapter 4, “Installation Instructions.”
. . . . . . . . . . . . . . . . . . . . . . . . . . . . . . . . . . . . . . . . . . . . . . . . . . . .
OVERVIEW OF THE INSTALLATION PROCESS
Installing the XPS PRO1000 can be divided into two phases:
System Test Installation. Begin your installation process by performing a complete system test installation. The
purpose of this phase is to establish remote control of the XPS PRO1000, and verify that all
input and output channels are working. You will use a single test video input and at least one
of the display devices you plan to use in your final system installation. You will verify that
your test video input is properly displayed on the display device when routed through each
input and output channel.
Final System Installation. Complete the installation process by doing the final system installation. In this phase, you
will install the XPS PRO1000 in its final location. You will establish permanent remote
control, connect all necessary input and output cabling, apply all input sources (including
any DVI converters as necessary), and connect all display devices. Finally, you will verify
that each video source is properly displayed on each display device.
IMPORTANT!
This product must be tested with the intended equipment
before being permanently installed. Failure to do so voids any
warranty and limited liability. Although Black Diamond Video
tests the product to its fullest extent, situations may arise
giving marginal results or potential compatibility issues when
used with digital video display devices that are non-compliant
or incompatible.
GETTING READY TO INSTALL
System Test Installation Overview
12 Edition 1.02 XPS PRO 1000 User Guide
. . . . . . . . . . . . . . . . . . . . . . . . . . . . . . . . . . . . . . . . . . . . . . . . . . . .
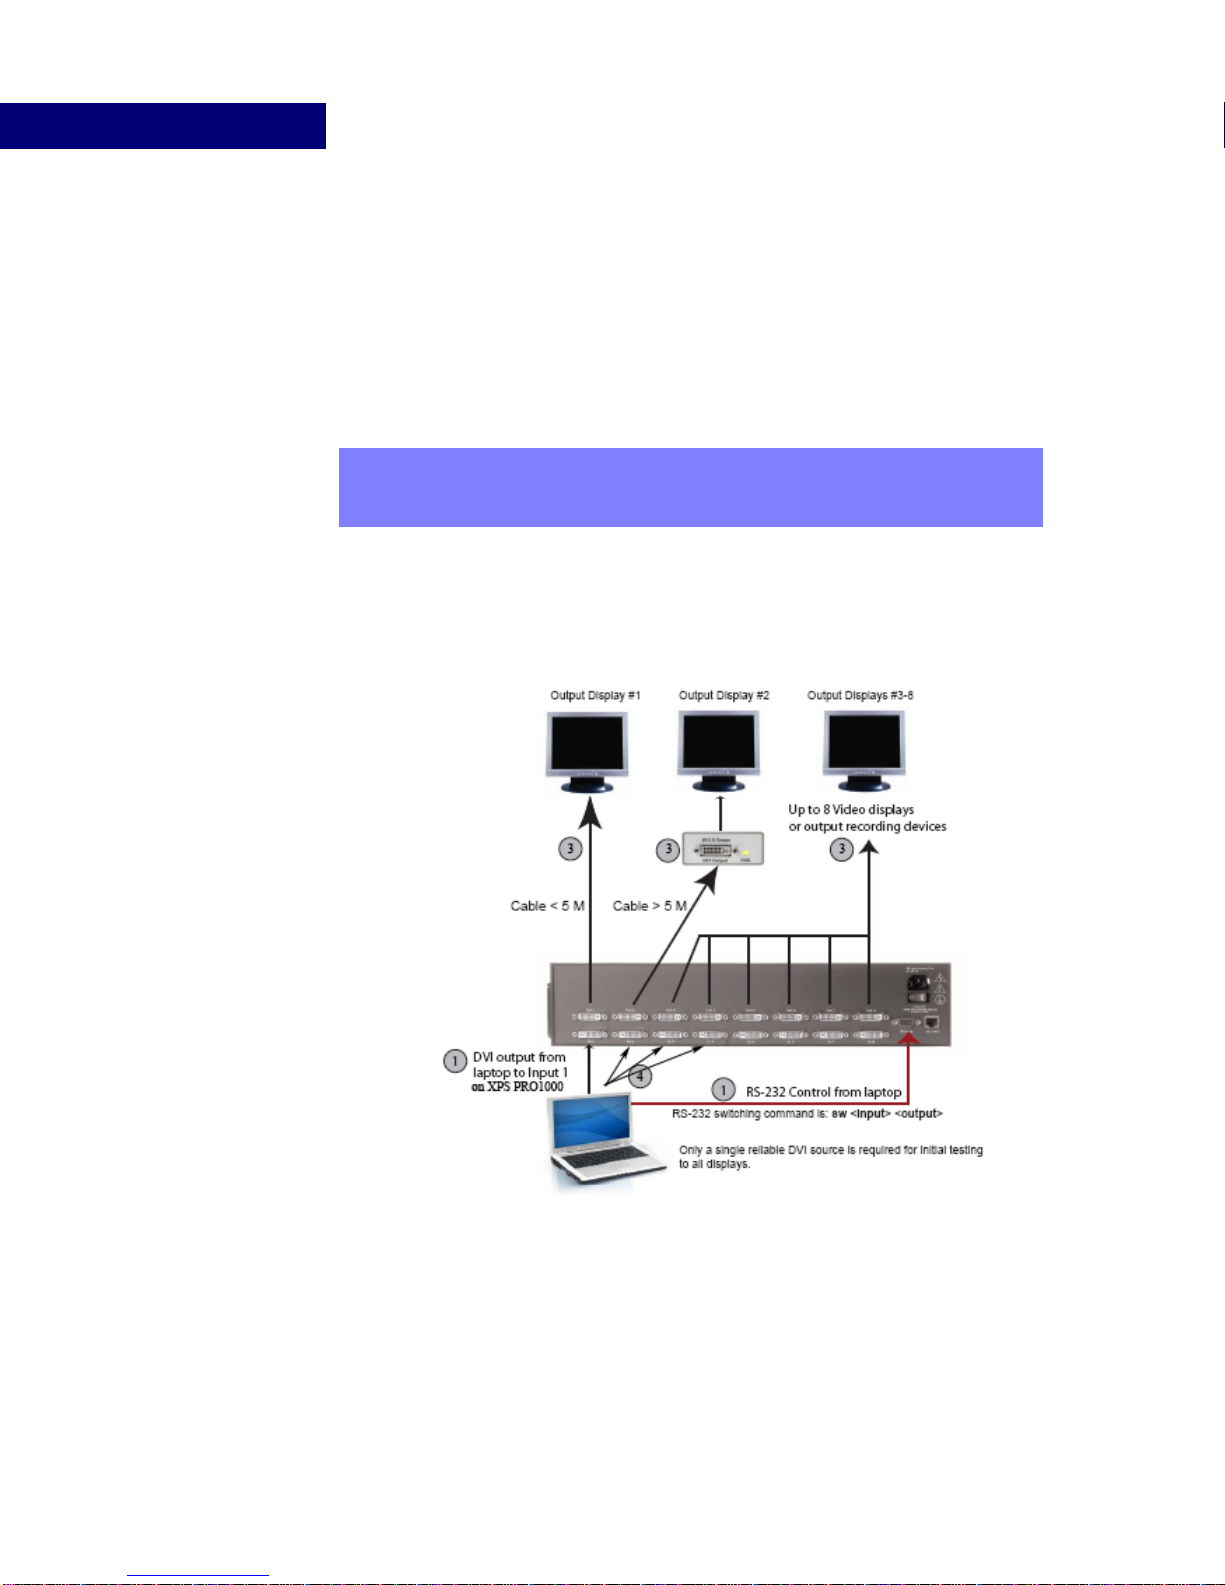
SYSTEM TEST INSTALLATION OVERVIEW
The system test installation should be performed first to verify your equipment is working
properly. It will also help you begin to plan for and organize the video sources, cabling
equipment, and display devices in preparation for the final system installation.
The system test installation consists of four steps. These steps are described below and
illustrated in Figure 4.
Step 1. Establish Temporary Remote Control of the XPS PRO1000
Establish temporary remote control of the XPS PRO1000 through a laptop computer or
personal computer using the RS-232 serial interface. This allows control of the XPS
PRO1000 so that the video signals going into and out of the processor can be tested.
NOTE: This is an overview of the system test installation to help inform and
prepare you for the actual installation process. For detailed installation
instructions, see Chapter 4, “Installation Instructions.”
FIGURE 4. XPS PRO1000 System Test Installation Diagram

. . . . .
GETTING READY TO INSTALL
Final System Installation Overview
XPS PRO 1000 User Guide Edition 1.02 13
Step 2. Connect a Test DVI Input Source
Connect a test DVI video source to Input 1 on the XPS PRO1000. Only a single DVI source
is required for the system test installation phase. Use Black Diamond Video tested DVI
cable to connect your DVI source to the XPS PRO1000.
Step 3. Connect one or more Display Devices and Establish Video Output
Connect a display device to Output 1 on the XPS PRO1000. Connect additional display
devices as desired. Using the test DVI input connected in Step 2, use serial commands to
switch the input to each connected display device. Verify that all video displays or output
devices (such as DVD recorders, etc.) are functioning correctly.
Step 4. Test all Remaining Input Channels
Verify that all remaining input channels are functioning properly. Using the test DVI video
source, connect it to each input channel on your XPS PRO1000 and then route the signal to
each connected display device.
. . . . . . . . . . . . . . . . . . . . . . . . . . . . . . . . . . . . . . . . . . . . . . . . . . . .
FINAL SYSTEM INSTALLATION OVERVIEW
The final system installation should be performed after you have completed the system test
installation. You should have all of your video sources, cabling equipment, and display
devices assembled in preparation for the final system installation.
The final system installation consists of four steps. These steps are described below.
Step 1. Place the XPS PRO1000 into the Rackmount or Other Permanent Location
The XPS PRO1000 can be installed in a 2U rackmount. Place your unit in its permanent
location before making any other system connections. Be sure to follow the safety warnings
regarding proper ventilation of the equipment.
Step 2. Connect all Video Inputs
Connect all DVI sources directly to the XPS PRO1000 input channels. All non-DVI sources
must first be converted to DVI using a Black Diamond Video DVI Converter. See “Using
DVI Converters” on page 14 for more information.
NOTE: If the computer you used in Step 1 has a DVI output, you can use it for the
test DVI video source in this step. This computer should have a built-in DVI
graphics card.
NOTE: This is an overview of the system test installation to help inform and
prepare you for the actual installation process. For detailed installation
instructions, see Chapter 4, “Installation Instructions.”

GETTING READY TO INSTALL
Using DVI Converters
14 Edition 1.02 XPS PRO 1000 User Guide
All cabling from the DVI Converters to the XPS PRO1000 should be done using Black
Diamond Video tested DVI cable. Black Diamond Video can not guarantee the quality of
cable purchased from other manufacturers. See “Using Black Diamond Cable and Cable
Kits” for more information.
Step 3. Connect all Display and Output Devices
Connect all display and output devices to the XPS PRO1000 output channels. All cabling
from the XPS PRO1000 to the display devices should be done using Black Diamond Video
tested DVI cable. Black Diamond Video can not guarantee the quality of cable purchased
from other manufacturers. See “Using Black Diamond Cable and Cable Kits” for more
information.
Step 4. Establish Permanent Remote Control
Establish permanent remote control to the XPS PRO1000 using RS-232 or 10/100T
Ethernet control.
Step 5. Test all Input/Output Switching Configurations
Route each input to each output in turn and verify the video displays properly on the display
device. If video output option boards are installed, test the video processing functions of
these boards.
. . . . . . . . . . . . . . . . . . . . . . . . . . . . . . . . . . . . . . . . . . . . . . . . . . . .
USING DVI CONVERTERS
The XPS PRO1000 accepts DVI video inputs only. Black Diamond Video offers a line of
DVI converters which you can use to convert your RGB, SD or S-Video (NTSC and PAL),
and SDI video signals to DVI. With the appropriate DVI converter, you can use any of these
video formats as a source for the XPS PRO1000.
The converter should be located as close to the video source as possible to eliminate cabling
problems such as attenuation and noise.
See “Options” on page 5 for more information about the available DVI converters and the
converters’ product documentation.
USING BLACK DIAMOND CABLE AND CABLE
. . . . . . . . . . . . . . . . . . . . . . . . . . . . . . . . . . . . . . . . . . . . . . . . . . . .
KITS
All cabling from the video source to the XPS PRO1000, and from the XPS PRO1000 to the
display devices, should be done using Black Diamond Video tested DVI cable.

. . . . .
GETTING READY TO INSTALL
Using Black Diamond Cable and Cable Kits
XPS PRO 1000 User Guide Edition 1.02 15
Signal conditioners should be applied within the last three meters of cabling before each
display device. Black Diamond Video offers both single-link DVI and a dual-link DVI cable
kits which include Black Diamond Video tested DVI cable and a signal conditioner.
See Chapter 2, “Product Information,” for more information about DVI converters, cable,
and cable kit options.

GETTING READY TO INSTALL
Using Black Diamond Cable and Cable Kits
16 Edition 1.02 XPS PRO 1000 User Guide
Table of contents
Popular Computer Hardware manuals by other brands

Arctic
Arctic Alpine 11 Passive Welcome guide

Panasonic
Panasonic CF-BAK0512U operating instructions

Ascon tecnologic
Ascon tecnologic TLZ 20 operating instructions

Jefftron
Jefftron EXTREME PROCESSOR UNIT quick start guide

Curtiss-Wright
Curtiss-Wright DTI-VME/S user manual

Manhattan
Manhattan 702980 user manual


