Furniture Use and Maintenance
EN
§
Furniture Assembly
Explanations / Possible notes used in the Assembly Instructions:
§1
§2
§3
1. 2. 4. 5. 6. 7.
1. Furniture units must be placed on a level surface and levelled.2.Check the condition of the cam pins while the furniture is in use. Tighten if necessary.4.Furniture must be placed in dry rooms, with working ventilation, and at least 1 m from active heat sources. The rooms must be protected againstdetrimental weather conditions (sunlight, rain, etc.).6.Furniture must be moved by being lifted it with no load on it. Note: shifting or dragging furniture may cause permanent damage. When moving,hold the vertical elements of the unit, i.e. the sides and legs. Do not grab the horizontal elements, e.g. structural shelves or drawers, as these areprone to damage.7.Clean furniture using a damp cloth or paper towel.3. NOTE!! Do not climb on furniture.
5.NOTE!! Placing excessive loads on furniture is dangerous to users and may cause permanent damage.
§5
§6
§7
§8
§9
§4 Drill holes according to drawings. During this operation takespecial care not to cut yourself or damage the component!
§10
§11
§12
§13
§14
§15
§16
§18
§17
NOTE!!
Componentsymbol
CodePackABCDEDimensions[mm]Quantity[pcs]NOTE!!
NOTE!!
NOTE!!
The first stage of the assembly involves fitting the components withthe proper accessories as specified on the drawings below. The symboldenotes places where special caution is required during assembly. NOTE!! L ack o for improper adjustment poses risk of flap door
falling freely.
Attach unit to wall when completely assembled. Improperly
attached furniture may break free and fall while being mounted
or used.The unit may only be attached to the wall by a qualifiedperson. Check that the wall is suitable fo rhaving furniture
attached to it before hand. Choose a suitable anchor bolt and
check the strength and quality of the attachment.
Place the top unit on the base unit then join them using
connector plate n52 and screws p25. The unit may break free
and fall during use if this instruction is not followed.
Assemble the unit according to the drawings below using the specified connectors and/or joints. The drawer must be assembled with great caution so as not todamage its fragile frame connections. Apply glue y1 into the holes of the depicted component, attach it andwait for the glue to dry. Clean the glued area thoroughly. AdjustmentTighten the screws e8 so they do not project over the rim. OptionPlace the insert upside down onto the frame in place designed forthat component using the unfolded top unit. Install the mattress.
Use security tape as this is essential to ensure the safety of
those who use your furniture.
NOTE!! Handle glass components with extra caution so as not to cutyourself or damage or break the components.Connect the adjoining units using VHS connecting screws.
§19
The door may be installed either on the left or the right side of the unit.
§20
NOTE!! B ed unit and flap have a tendency to slam whenclosing. There is a risk of injury.
§21
Apply masking strip/unit in visible places.
§22
2ABA=B4
f1
3613. 5n261p38
x16mm
§23
NOTE!! High gloss fronts are covered with a protective film which is to be removed once the component has been hung up. The surface of these fronts cannot be cleaned until least 4 weeksafter removing the protective film. NOTE!! Furniture may break free and fall if not used with caution. Note: Before starting to assemble furniture, please read all the Furniture Assembly Instructions including the rules for maintenance and use. Follow the sequence of individual assembly stages according to the paragraphs provided in the General Rules for Furniture Assembly. KEEP THESE INSTRUCTIONS FOR THE DURATION OF FURNITURE USE.
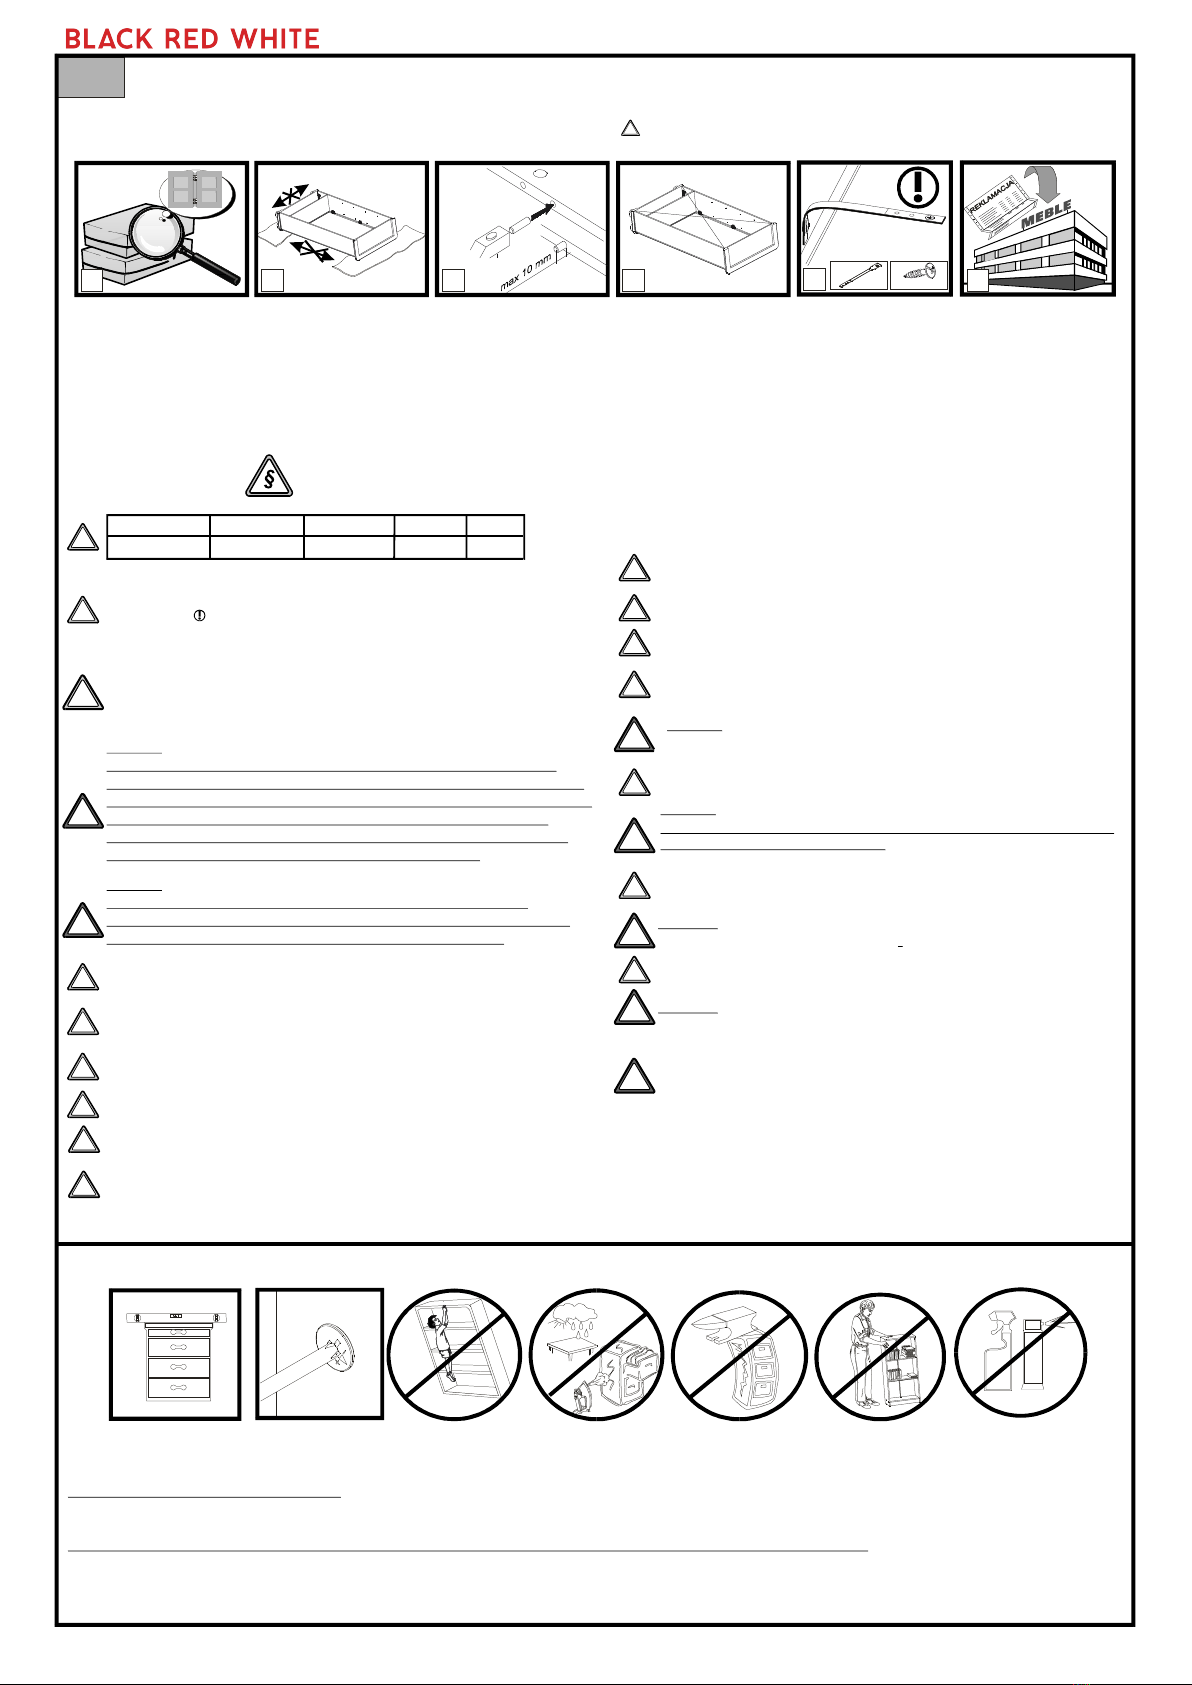
1. NOTE! Do not proceed with assembly if any components are defective or damaged. 2. Place the components on a soft, clean surface, e.g. a towel or blanket, during assembly. Do not assemble furniture on rags, carpets, etc. 3. Drive the dowel pins f1 into the 8mm diameter holes, located on components' edges. Leave the cam bolt holes free. Any pin that sticks out by more than 10mm needs to be taken out, replaced and shortened as it may damage the side wall during assembly. 4. Make sure that the diagonals are of equal length before attaching the back wall. 5. NOTE! Safety strap. Install according to instructions. Improperly secured furniture may break free and fall during use. 6. Dear Customer, in case of complaints please quote the code number provided on the first page of the Assembly Instructions. Report all comments and complaints where you purchased the furniture. If possible, provide a label of defective product indicating the packing date and the packer. Set screw adjusts cabinet flap door opening (tighten the screw for the cabinet flap door to fall more freely).


