Blackboxav SoundClip-V2 User manual

SoundClip V2 / 12
Manual

www.interpretationshop.co.uk Manual Version 1 2
Contents
Safety Guide
......................................................................
Product Codes....................................................................
Warranty
.............................................................................
Your new SoundCli
p...........................................................
Overview............
................................................................
Connections
.......................................................................
Configuration Modes..........................................................
Programming Content.........................................................
Master Volume....................................................................
Status LED..........................................................................
Trigger and Buttons............................................................
Unique AutoPlay functionality.............................................
GPIO Connection................................................................
Troubleshooting..................................................................
Triggers and Buttons..........................................................
Autoplay Functionality........................................................
Technical Information
.........................................................
Technical Drawings
...........................................................
3
4
4
5
5
6
7
8
9
9
9
9
9
9
9
9
10
11

www.interpretationshop.co.uk 3
Safety Guide
Read this guide carefully before using or installing the product.
Preventing damage to the product and
malfunctions
• If the unit is not being used for long
periods of time it is recommended to
turn off the power as it will prolong the
life of it‘s electronic circuitry.
• Do not operate the unit below -10 or
above 50 degrees Celsius. Do not bring
the unit from a very cold environment
to a warm environment without allowing
it time to acclimatise as condensation
may affect its operation.
• When using different types of push
buttons, PIR’s and other hardware
connected to the button inputs and
GPIO connections make sure they are
compatible with the device. Please see
the technical spec page for details on
these connections. Failure to use care
with these connections may result in
damaging the device and subsequently
affect the blackbox-av warranty.
• When attaching headphones or
speakers please use certified and good
quality accessories. Failure to use care
with these connections may result in
damaging the device and subsequently
affect the blackbox-av warranty.
Warning
• Thisproductisnotdesignedtobe
resistant to moisture or excessive dirt /
dust. When deciding on a suitable
installation point ensure there is
reasonable protection from
environmental damage.
• Ifthereisdamagetothepowersupply
in any way, arrange for a replacement
unit by contacting blackbox-av. If you
wish to source your own power supply a
CE, FC or UKCA certified double
insulated and regulated supply is
required.TheSoundCliphasanoutput
rating of 12vDC at 2A, 24W. Using a
power supply with a higher voltage will
irreparablydamagetheSoundClipunit.
• Donotplacetheunitindirectsunlight.
• Fordisposalofoldelectricalequipment,
please follow the guidelines associated
with your country / territory or ship the
unit back to blackbox-av and we will
dispose/recycletheunit.Thesymbol
below indicates that this product shall
not be treated as household waste.
• Ifyoudisposeofthisunitcorrectlyyou
will be helping prevent future harm to
the environment which is caused by
poor waste management of this type of
equipment.
www.interpretationshop.co.uk 2023 Manual Version 1 4
Product Codes
SC-V2
SC-12
-SoundClip-V2
-SoundClip-12
Warranty
Blackbox-av provides a 12 month return-to-manufacturer
warranty with this product. For further information or
advice please contact info@blackboxav.co.uk
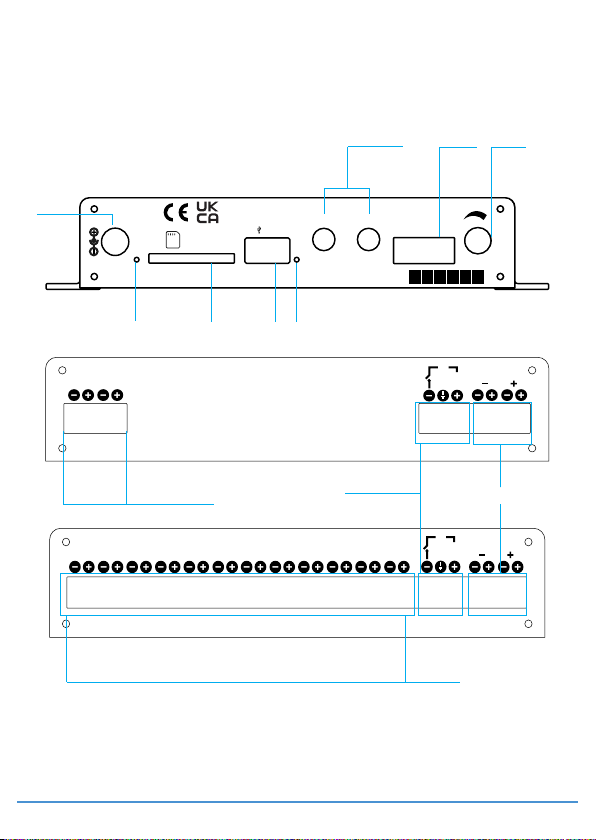
1 2 3 4 5 6 7 8 9 10 11 12
BUTTONS VOLUME
0v 12v
OUTPUT
LED
SOUNDCLIP 12
1 2
BUTTONS
0v 12v
VOLUME
OUTPUT
LED
SOUNDCLIP V2
STATUS
LED
POWER
12vDC
SD CARD
POWER
LED
USB L+ L- R+ R-
SPEAKER
OUTPUT
10W (X2) VOLUME
www.interpretationshop.co.uk
SERIAL NO:
AUDIO AUDIO
2ButtonTerminal VolumeButtonTerminal
GPIO /
12VTerminal
12ButtonTerminal
Headphone
Outputs
Speaker
Outputs
Power
Input
Master
Volume
USBPort
SDCardPortPower LED StatusLED

www.interpretationshop.co.uk 5
In the Box:
• SoundClip
• SDCard
• PrecisionScrewdriver
• 12VDCPowerSupply(suitablefor
destination country)
• TerminalBlocks
• User Manual
Your new SoundClip
SoundClip
TheSoundClipisourrangeofcompact,
standalone, high-quality stereo audio players.
Theycanbeusedtopresentaudiothrough
headphones via two 3.5mm audio jacks or
stereo speakers via wired terminal.
Power Adapter
Connect your supplied 12V DC adapter to the
‘12V DC in’ to give power to the device. Once
turned on, the power LED will light up.
SD Card and USB
StoreyourcontentoneitheraUSBorSDCard
(128MBSDCardissupplied).
Button Inputs
TheSoundClip-V2canacceptuptotwobuttons
/triggers.TheSoundClip-12acceptsupto12.
Headphone Output
Thisdevicehas2xstereohigh-quality
headphone3.5mmjackoutputs(headphone
amplified).
Volume
Adjustable in order to dictate the maximum
volume available to users.
Status LED
TheblueLEDindicatestheplayerstate.
Overview
Speaker Outputs
Theonboardamplifierhas2x10winto8Ω
speakersconnectedviaterminalblocks.These
can be connected to various speakers.
GPIO Out
ThisGPIOisswitchedonduringaudio
playback. It can be used to power LED’s or
relays etc.
Button Volume
Dedicated volume terminals allow users the
ability to increase or decrease the volume.
SoundClipV2
SoundClip12

www.interpretationshop.co.uk 6
Headphones
Up to 2 headphones can be connected through
the 3.5mm jacks.
AutoPlay Headphones / Devices
TheSoundCliprangesupportsourAutoPlay
Headphones. For connection instructions
please refer to the individual headphone
manuals.
Speakers
Wirespeakerstothe‘SpeakerLeft’and
‘SpeakerRight’terminalblocks.Followthe‘+’
and ‘-‘ directions as appropriate and insert
wires by screwing into place with the supplied
screwdriver.
Lighting
TouselightingwiththeSoundClip,connectthe
LEDpositivewireto12v(+),andconnectthe
LEDnegativewireLED(-).Thelightswillbe
activated when content is playing and
deactivated when content stops.
Connections
Activation Buttons
Connect 2 - 12 buttons to the designated
terminals.Todothissimplyinsertthewire
ends and screw in place with the supplied
screwdriver.
Volume Buttons
Connect 2 buttons to the designated terminals.
Todothissimplyinsertthebuttonwireends
and screw in place with the supplied
screwdriver.
PIR
ToutiliseaPIRtrigger,youmustwirethe
triggercable(yellow+)andgroundwire
(blue-)intothebutton1terminal,withthe
powerconnection(red+)wiredintothe12V
out terminal. Follow the colour coded diagram
below.(1)
TheSoundClipsupportsthefollowingconnections:
Button 1 (-) = Blue
Button 1(+)=Yellow
12v output(+)=Red
1 2
BUTTONS
0v 12v
VOLUME
OUTPUT
LED
SOUNDCLIP V2
(1)

www.interpretationshop.co.uk 7
Conguration Modes
HowtheSCplayscontentcanbeconfiguredviatheMode.txtfile.Youmustpoweron/offyour
SoundClipafterchangingmodes.
Type Description Mode
Non-Interruptible
Button Triggers
- Buttons 1 – 12 are assigned to individual tracks of the same number.
- When playing, tracks cannot be interrupted by another button press.
Button1=Track01.mp3
Button2=Track02.mp3Etc…
6
Interruptible
Button Triggers
- Buttons 1 – 12 are assigned to individual tracks of the same number.
- When playing, tracks can be interrupted by another button press.
Button1=Track01.mp3
Button2=Track02.mp3Etc…
5
PIR Activation - When used with a PIR trigger, detected movement activates a single track
(Track01.mp3).
6
Holding Track
Active
-Track00.mp3willplayonloopuntilanotherinputisselected.
Button1=Track01.mp3
Button2=Track02.mp3Etc…
- When activated track ends, holding track will begin again.
3
Single Button
Next
- Button 1 - Unused.
-Button2-ActivatesTrack01.mp3,pressingagainactivatesTrack02.mp3,
then 03.mp3 and so on.
1
Next / Previous
(SC12 Only)
-Button2activatesTrack01.mp3
-Button2thenactivatesthenexttrack(s)
-Button3activatestheprevioustrack(s).
1
Autoplay / Next - For use with our Autoplay handsets.
- Lifting the handset activates track 01.mp3
- Button 2 moves to track 02.mp3, pressing again activates track 03.mp3
and so on.
1
Autoplay / Next
& Previous
(SC12 Only)
- For use with our Autoplay handsets.
- Lifting the handset activates track 01.mp3
-Button2thenactivatesthenexttrack(s)whilebutton3activatesprevious
track.
1
Autoplay with
buttons 2 - 12
(SC12 Only)
- Lifting the handset activates track 01.mp3.
- Buttons 2 – 12 activates tracks 02.mp3 – 12.mp3.
2
Multiple Tracks
within Folders
-Button1activatesTrack01.mp3infolder01.
Pressingbutton1againmovestoTrack02.mp3infolder01andsoon.
-Button2activatesTrack01.mp3infolder02
Pressingbutton2againmovestoTrack02.mp3infolder02andsoon.
- Buttons 3 – 12 do the same for folders 03 – 12.
4
www.interpretationshop.co.uk 8
ContentforyourSoundClipisstoredonan
SDcard(suppliedpre-programmedtomode
5). We suggest you use this as a template for
uploadingyourowncontent.Youcanalsouse
aUSBStickforthisprocess.
ShouldyouneedtouseadifferentSDCardwe
suggestyouformatthenewcardfirstto‘FAT’
or‘FAT32’.
Toprogramyourcontentyouwillneed;
1.APCorlaptopwithWindowsOS
2. Audio Content in .mp3 format
(supportsupto99files).
3.SDCard(Supplied)orUSBStick
1. Windows OS
WindowsOSisrequiredtoprogramyour
SoundClipusingaPCorLaptop(Xp–11).
MacOSisnotsupportedduetohiddenfiles
generatedbytheOS.
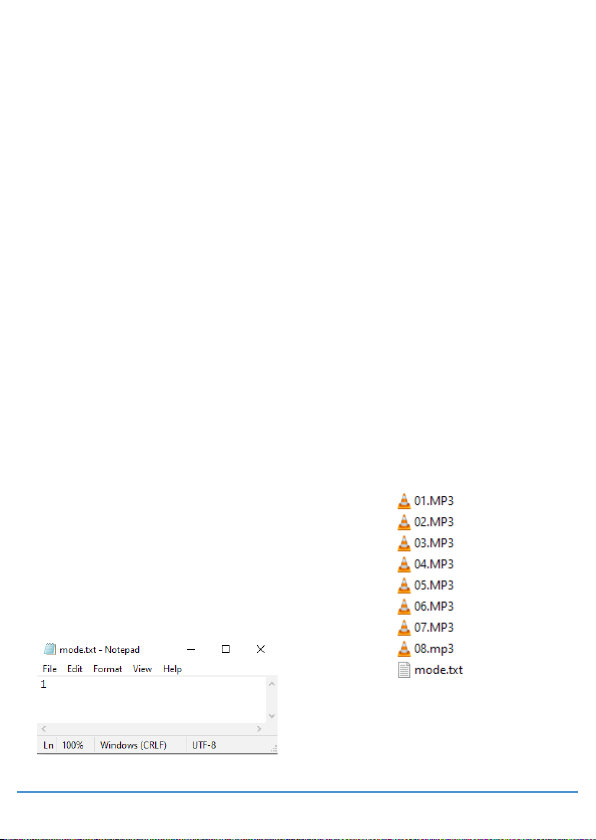
2. Mode File
Youwillneedtocreateaconfigfileinorderto
settheSoundClip’smode.
RightClick>New>TextDocument.
Youmustrenamethisto‘Mode’.
Open your Mode file and simply type a number
between1and6.Settinganumberwillassigna
playback mode for the device. More details are
on the previous page.
Templatesareavailableonourwebsite.
Programming Content
3. Audio Content
TheSoundClipcanplayupto99.mp3tracks.
ThesearestoredintherootoftheUSBor
SDCard.
Youmustnumberyourfiles01–99.Theorder
in which your files play and the buttons they are
assigned to is dependent on their name and /
or folder structure.
4. Add Content
Once you have your audio files ready and
correctly named, you simply need to load this
allontoaUSBorSDCard.
InserttheUSBorSDCardintoaspareporton
your PC and open the folder.
Now simply drag and drop all the required files
ontotheUSBorSDCard.InserttheUSBorSD
CardintoyourSoundClipandpoweron.

www.interpretationshop.co.uk 9
Themastervolumesetsthedefaultvolume
level. If volume buttons are used users are
able to decrease this level but are unable to go
beyond it.
TheSoundClipwillautomaticallyresettothe
default level when powered down / on.
Red - On/Off
TheredLEDwillbelitwhentheunitispowered.
Blue - Status
TheBlueLEDislitwhenthedeviceispowered
on. It will also blink on / off when content is
being played.
TheGPIOportcanbeusedtoconnectpower
to other circuitry such as LED’s or a sensor
such as PIR.
Master Volume
Connecting Buttons
Buttons are wired directly to the screw terminals
at each of the two inputs.
Push-buttons work as standard with the player
and are required to be the normally open ‘push
to close’ type.
Piezo, vandal and water-resistant buttons can
be purchased from our online shop if your
installation requires a more robust switch.
Other Triggers
Other triggers can be connected such as a PIR
orWaveSensor.Ifyouwanttoattachdifferent
hardwaretotheSoundClip,youneedtoensure
the device is compatible or uses optical or
mechanical relays to isolate its circuitry.
Theinputsare3.3Vmaximum.
TheSoundCliphasbeenspecificallydesigned
to work with our AutoPlay range of handsets
andheadphones.Thesegivethefunctionality
of being able to lift the headphone or handset
toautomaticallytriggeryourcontent.Seethe
manual for your specific handset / headphone
for in-depth connection instructions.
IfyouhaveanytroublewiththeSoundClipunit,
make sure your program files are correctly
formatted. Performing a on / off reset may also
resolve issues.
If you require further assistance contact us at
support@blackboxav.co.uk
Status LED
Triggers and Buttons
GPIO Connection
Autoplay Functionality
Troubleshooting

www.interpretationshop.co.uk 10
Unpackaged Weight 0.4Kg
Dimensions 155x130x28mm
Message Storage
Medium
USBStickorSDCard
Maximum Number of
Audio Files
99Files(modedependant)
Number of Lighting
Outputs
1 via the ‘GPIO / 12V Out’ terminal
12V Out Power accessories such as low power
LED’sorPIRSensors
LED Power Output 1.2W @ 12V
Output Max Switching Open Collector 45V, 100mA
Message Encoding
Format
.MP3
Speaker Audio Output 10Wperchannelinto8ΩSpeakers
Frequency Response 20Hz - 22KHz
Headphone Audio
Output
2x3.5mmaudiojack(headphones/
handsets etc.)
Speaker Output Screwterminals(phoenix)
Power Supply External 5.5 x 2.1 DC12V 2A Power
Connector
Power Consumption Standby-0.75W
Playback-0.9W
Included
1xSoundClip,1xSDCard-128MB,1xPrecisionScrewdriver,1x
12VDCPowerSupply(suitablefordestinationcountry),1xManual&
5/6xTerminalBlocks
Technical Information
www.interpretationshop.co.uk 11
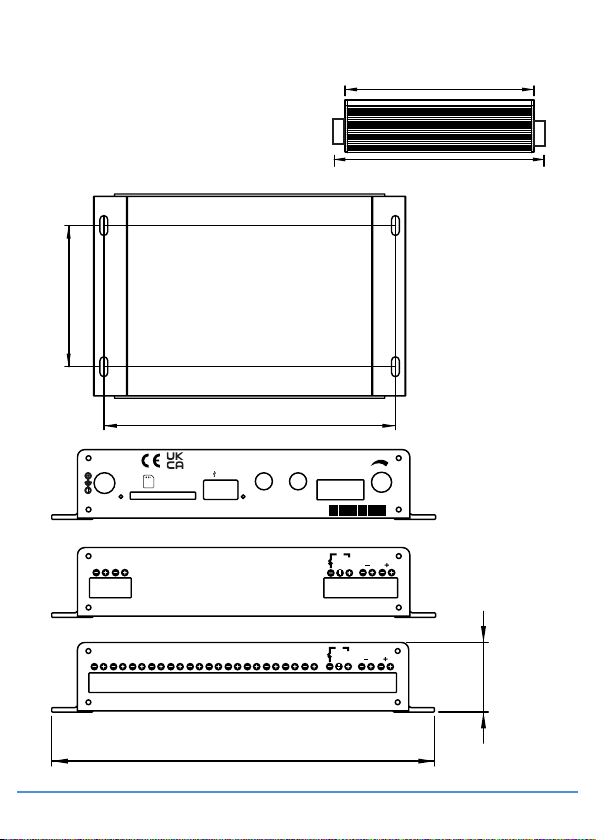
Technical Drawings
(not to scale)
STATUS
LED
POWER
12vDC
SD CARD
POWER
LED
USB L+ L- R+ R-
SPEAKER
OUTPUT
10W (X2) VOLUME
www.interpretationshop.co.uk
SERIAL NO:
AUDIO AUDIO
1 2 3 4 5 6 7 8 9 10 11 12
BUTTONS VOLUME
0v 12v
OUTPUT
LED
SOUNDCLIP 12
1 2
BUTTONS
0v 12v
VOLUME
OUTPUT
LED
SOUNDCLIP V2
156.40
130mm
28.50
146.10
70.80
102.40
This manual suits for next models
3
Table of contents
Popular Media Converter manuals by other brands

Vertex
Vertex LT-3000 SERIES Operation & maintenance manual

ISOMAG
ISOMAG ML 110 OPERATING AND INSTALLATION Manual

DENAFRIPS
DENAFRIPS IRIS owner's manual

GREISINGER
GREISINGER USB 100 Installation and operating manual

Euphonix
Euphonix MADI Converters manual

Aurora Design
Aurora Design World Converter WC-01 quick start guide


Microchip Technology
Microchip Technology MCP16251 Reference design

REED
REED AC-006 instruction manual

Philips
Philips Triple high-speed Analog-to-Digital Converter 110 Msps... specification

Playvision
Playvision MINI MHL TO SCART Converter user manual

ICT
ICT ISOLATED 2 Series instruction manual

Converters.TV
Converters.TV 659 Operation manual