blackVault AR4131 User manual

AR4131
Instruction Booklet
AR 2.1 speaker system with universal dock for iPod®
blackVault
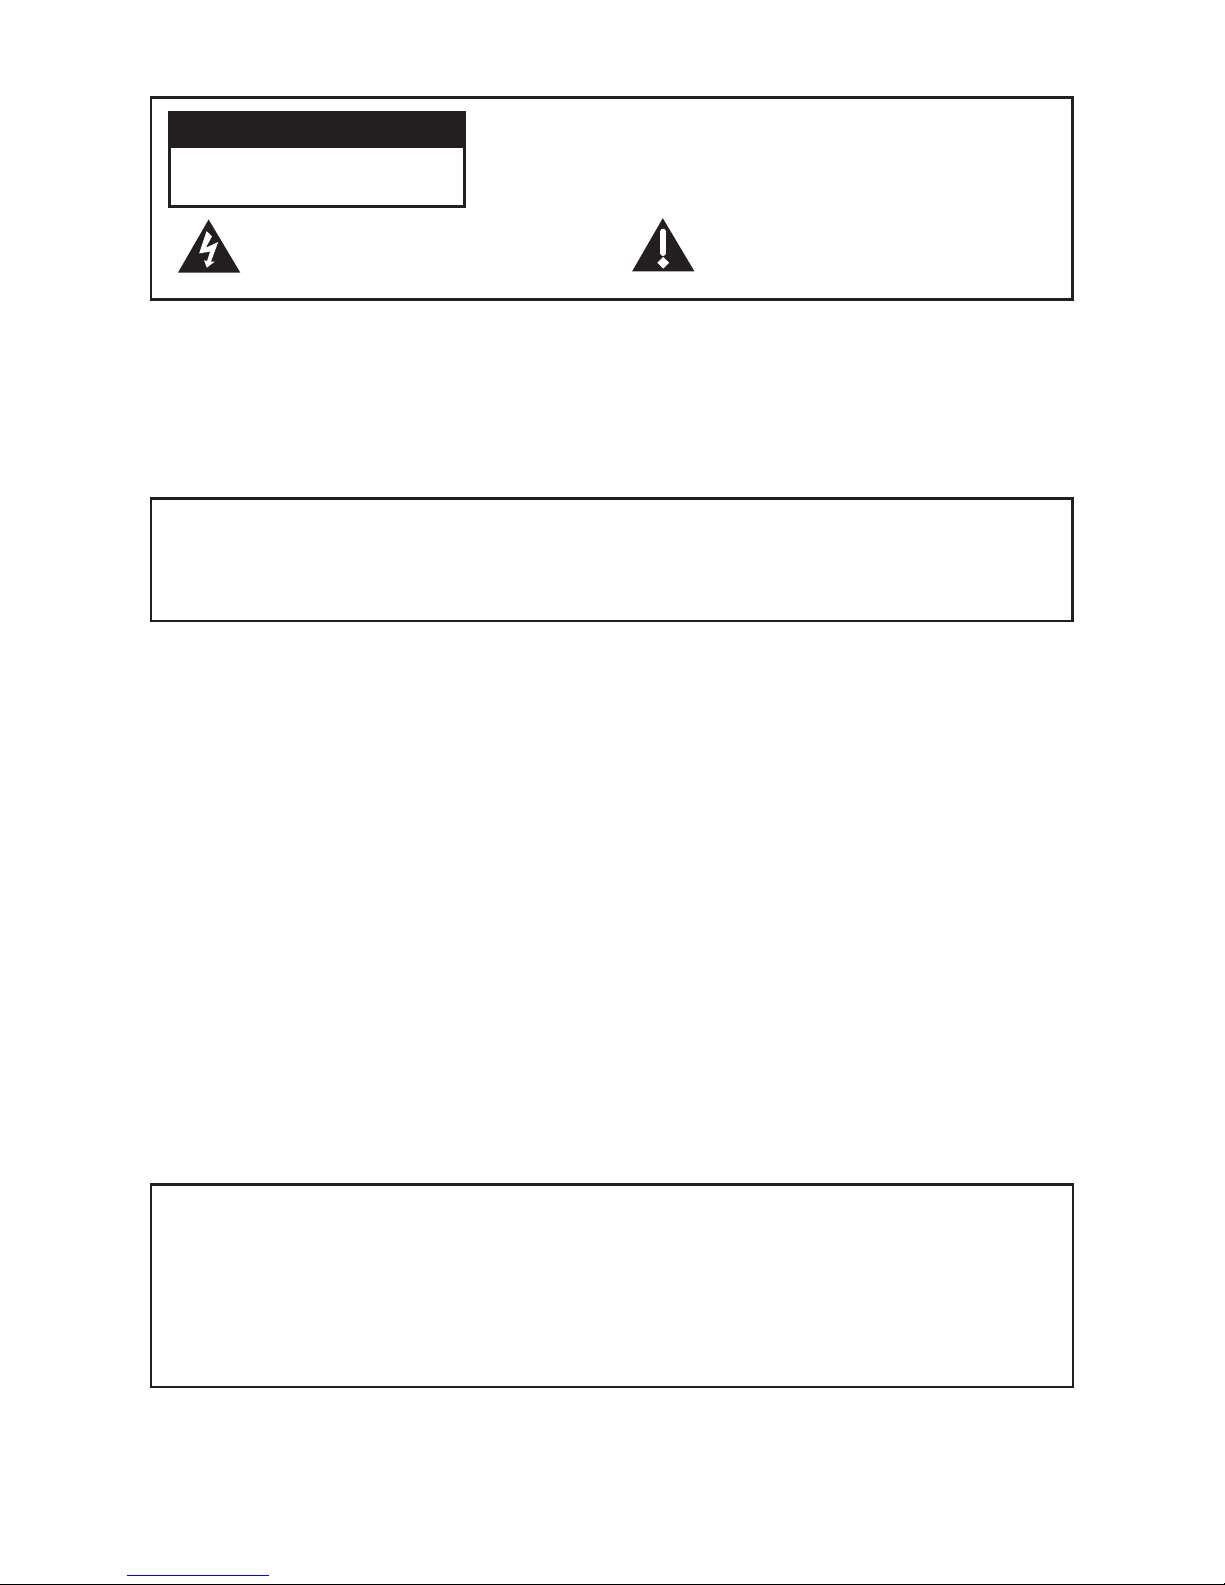
WARNING
To reduce the risk of fire or electric shock, do not expose this product to rain or moisture. The
apparatus shall not be exposed to dripping or splashing. No objects filled with liquids, such as vases,
shall be placed on the apparatus.
This symbol indicates "dangerous
voltage" inside the product that presents
a risk of electric shock or personal injury.
This symbol indicates important
instructions accompanying the
product.
Caution: To reduce the risk of electric shock, do not remove
cover (or back). No user serviceable parts inside. Refer
servicing to qualified service personnel.
RISK OF ELECTRIC SHOCK.
DO NOT OPEN.
CAUTION
CAUTION: To prevent electric shock, match the wide blade of the plug to the wide slot of the
electrical outlet and fully insert.
Do not obstruct the unit’s ventilation openings with newspapers, tablecloths, curtains, and similar items.
Do not place sources of naked flames, such as lighted candles, on the unit.
Dispose of batteries in an environmentally-friendly manner.
FCC Regulations state that unauthorized changes or modifications to this equipment may void the
user’s authority to operate it.
Safety Precautions and Instructions
1. Read all safety precautions and instructions thoroughly before using the speaker system.
2. Follow all instructions provided.
3. Keep this instruction book in a safe place where you can review it as needed. DO NOT throw
the instruction book away!
4. Do not use water or other liquids on or near the speaker system. When cleaning the speaker
system, use only a soft, dry cloth.
5. Make sure the speaker system is located on a hard, flat and sturdy surface area, such as a table,
counter top, bookcase, etc.
6. Do not place the speaker system on or near an open-source flame or any other heat-generating
source, such as microwave and conventional ovens, radiators, portable heaters, etc.
7. Do not crimp or pinch the power cord. Make sure that the power cord is unobstructed and do
not place heavy objects on top of the power cord.
8. Before moving, cleaning or working on the speaker system, make sure that the power cord is
unplugged from the wall’s power outlet.
9. Unplug the speaker system’s power cord during inclement weather or when you do not
anticipate using the speaker system for an extended period of time.
10.Do not attempt to service the speaker system at any time! Repairs to the speaker system should
ONLY be made by a qualified service technician or electrician.
11.Do not overload wall outlets or extension cords. Doing so may present a risk of shock to you
and/or damage to the speaker system.
Product Information
Keep your sales receipt to obtain warranty parts and service and for proof of purchase. Attach
it here and record the model number in case you need it. This number is located on the product.
Model No.: ____________________________________________________________________________
Purchase Date:_________________________________________________________________________
Dealer/Address/Phone:__________________________________________________________________
All rights reserved. All trade names are trademarks of respective manufacturers listed.
iPod is a registered trademark and iPod nano is a trademark of Apple Computer, Inc.

1
Congratulations!
You will soon be enjoying a superlative listening experience with your new
AR 2.1 speaker system with universal dock for iPod®. The subwoofer’s
wooden cabinet and illuminated vacuum tube provide a warm, rich sound.
The system’s sharp, retro-modern look evokes the attention-getting style
of classic stereo pieces while simultaneously remaining very contemporary.
The speaker system’s high quality sound is due in large part to the
vacuum tube amplier in the main unit. Vacuum tubes have been used
for decades, and even though the basic technology behind them has
remained unchanged, they are still widely regarded by serious audiophiles
and high-end stereo manufacturers as the most rened method for music
reproduction and amplication available today.
In addition to its classic good looks and elegantly simple vacuum tube
technology, the speaker system’s versatility only enhances its appeal:
• Any iPod with a 30-pin dock connector can be played through
the speaker system.
• An auxiliary input allows for the connection of any digital
music player or other audio source to the speaker system.
• A compact infrared remote control lets you control your iPod
from nearly any location in the room.
• The speaker system charges your iPod while it’s connected to
the docking port.
Unpacking the Product
Carefully remove the speaker system from its carton in a clean and well-lit
area, along with the included accessories. Perform a complete inventory count
to ensure that all of the following components and accessories are present:
1 Main unit
1 Remote control
2 Speakers
2 Speaker cables
2 Mini-Jack to Stereo RCA cables
4 Adapter inserts
1 Spare vacuum tube
2
Setting Up the Speaker System and
Connecting an iPod or MP3 Player
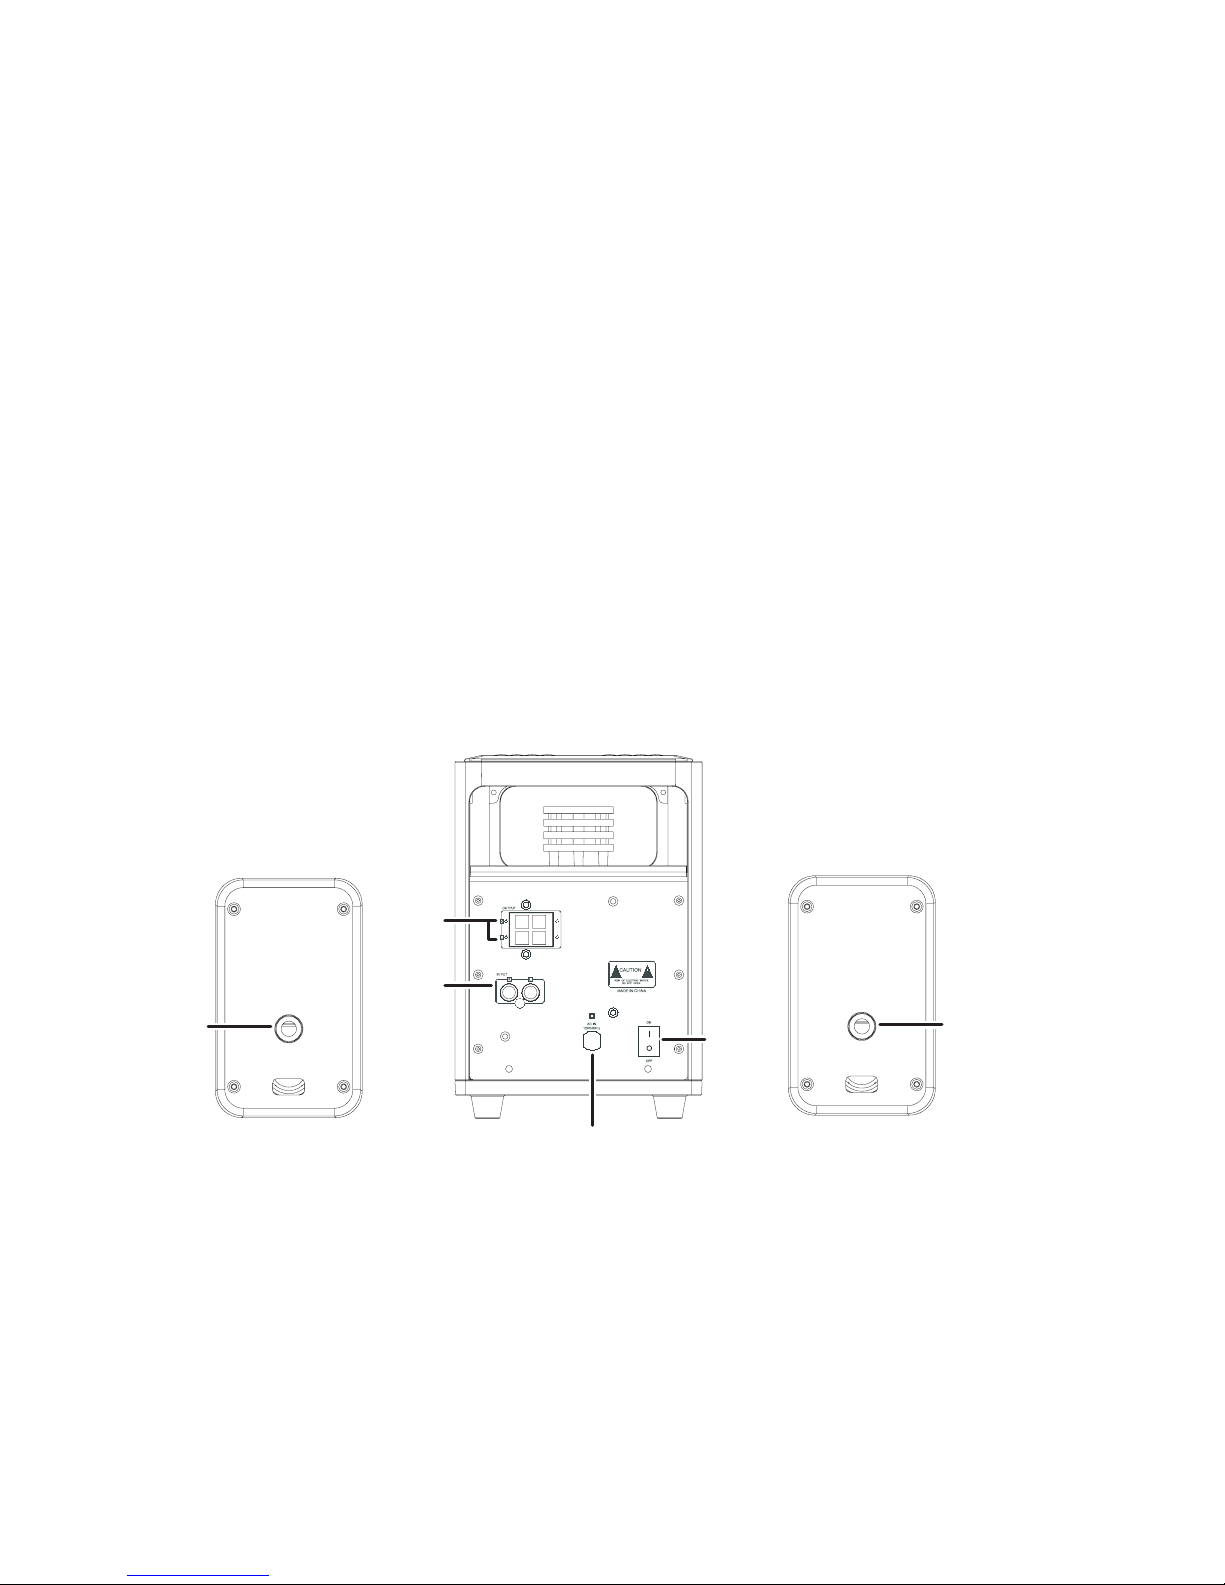
Setting Up the Speakers
1. Place the speaker system’s main unit and two speakers on a hard and
stable surface.
2. Find the two speaker cables that were included with the speaker
system. One end of each cable is split and has two wires; the other
end has a single connector. Take one of the audio cables and
connect the end that has the single connector to the input jack on
the back of left speaker. Attach the two wires on the other end of
the audio cable to the corresponding spring clips for the left speaker
on the back of the main unit [dark wire to positive (+), light wire to
negative (-)]. Repeat this process for the right speaker.
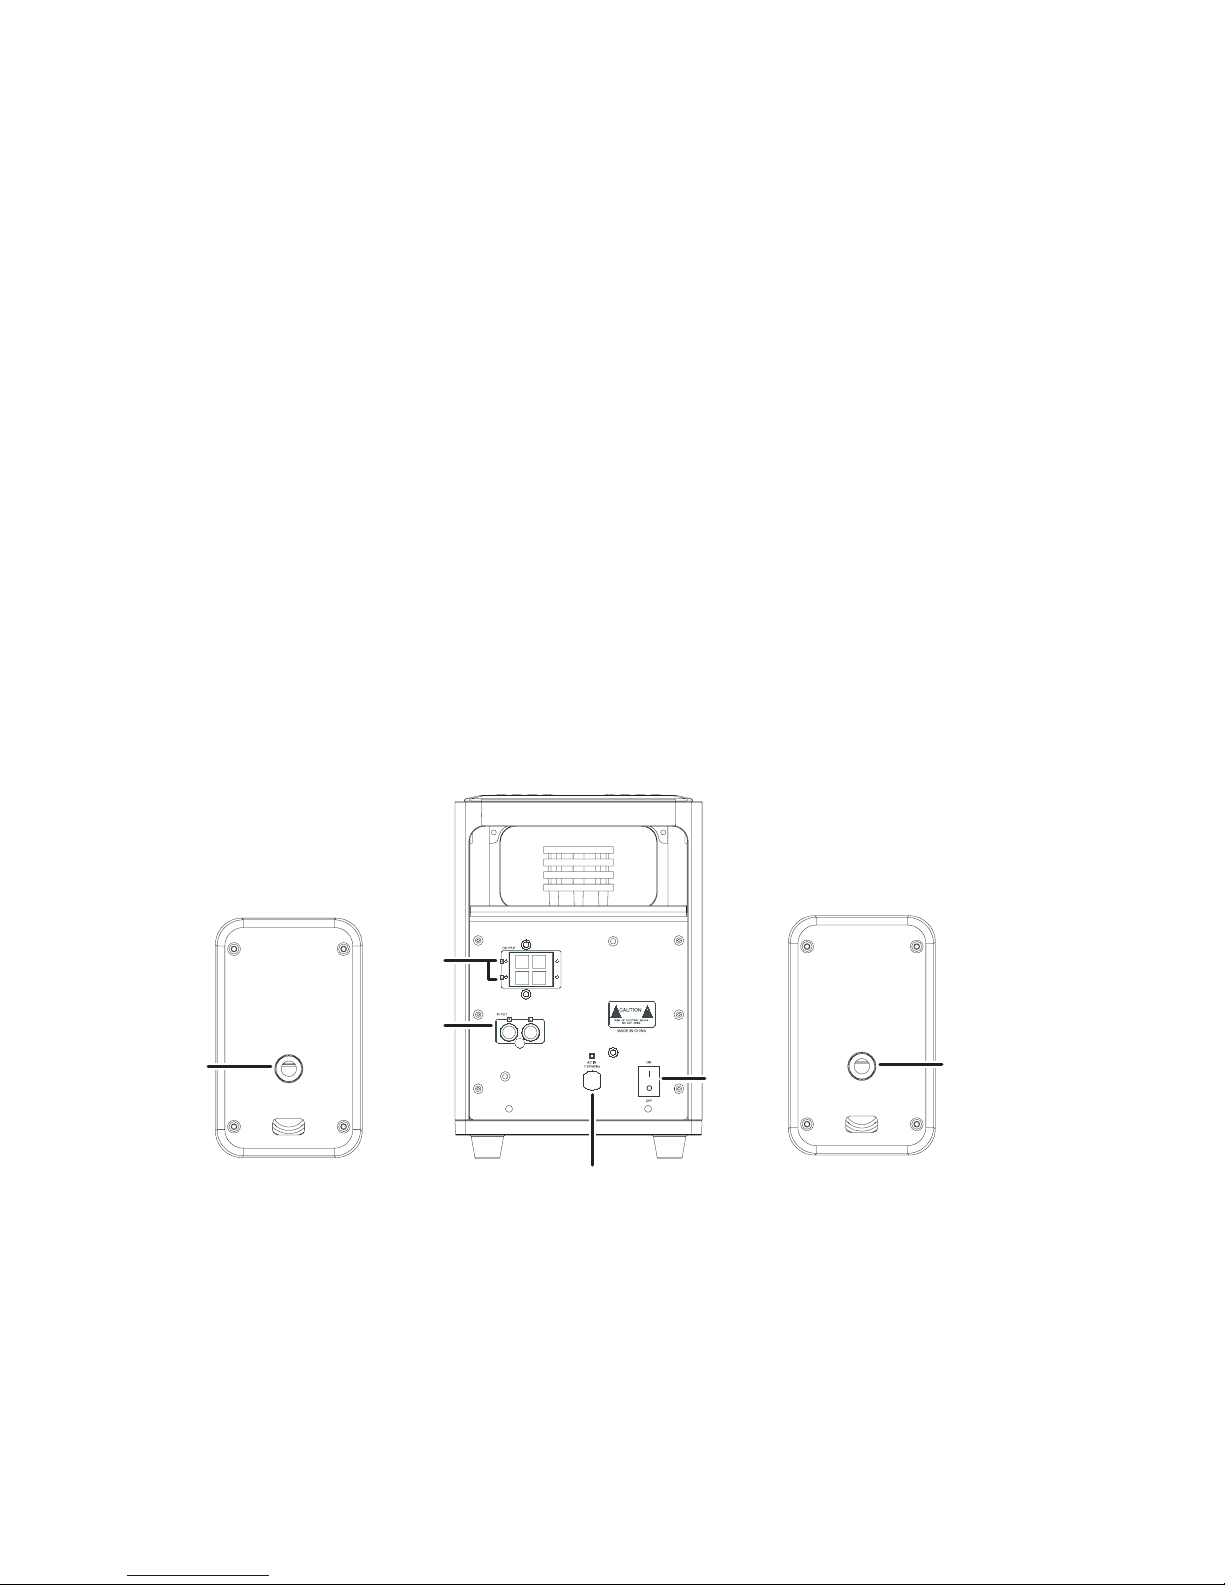
3. Plug the main unit’s power cord into an appropriate wall outlet.
Place the main power switch on the back of the main unit in the
ON position.
Speaker
Cable
Spring Clips
AUX
Input
Speaker
Cable
Input
Speaker
Cable
Input
Main Power
Switch
Power Cord
Main Unit (Back)
3
Connecting iPod with 30-pin Dock
Connector
1. In the table below, identify the adapter insert that corresponds
to your iPod model and locate the adapter insert in the group of
inserts that was included with the speaker system:
Insert
labeled ...works with iPod model
8 iPod nano™ 1 GB, 2 GB and 4 GB
9 Fifth Generation iPod 30 GB
10 Fifth Generation iPod 60 GB and 80 GB
11 iPod nano (Second Generation) 2 GB, 4 GB and 8 GB
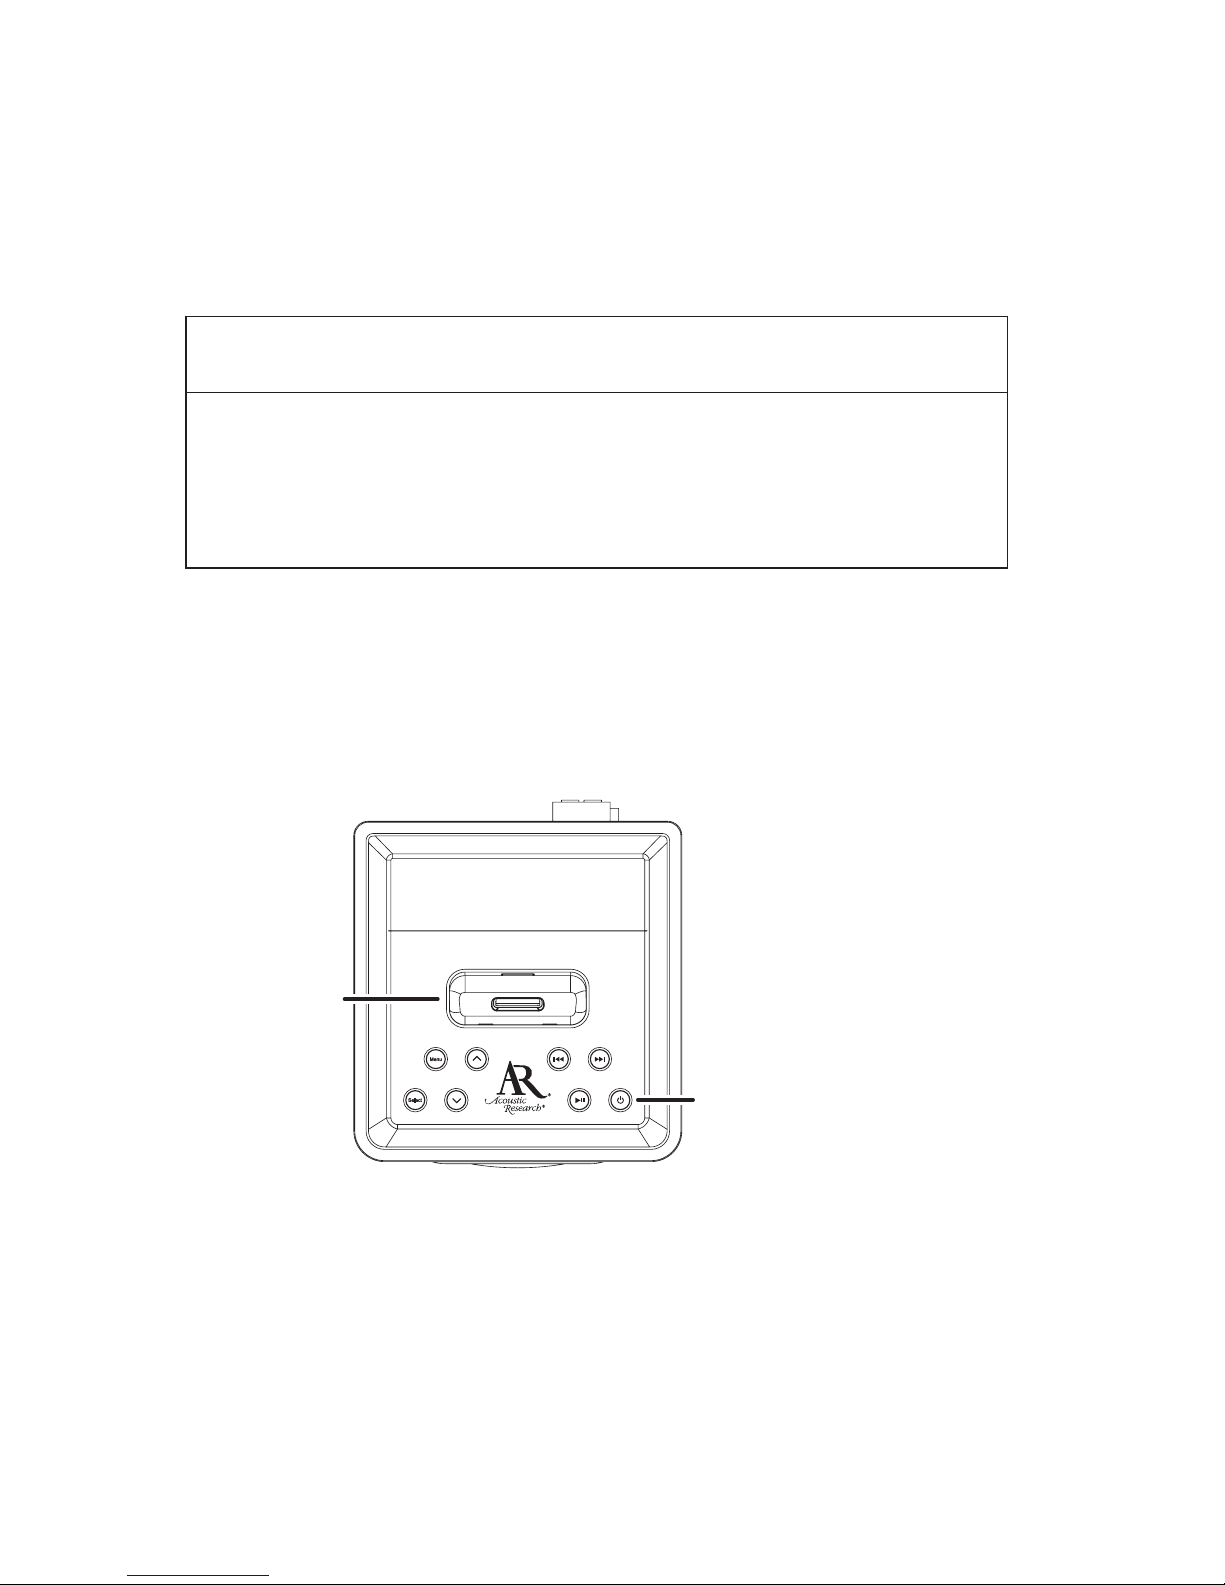
2. Insert the appropriate adapter insert into the recessed docking port
on the top of the main unit and press the power button on the top
of the main unit to turn the speaker system on.
Main Unit (Top)
Universal Dock
for iPod®
Power Button
3. Insert your iPod into the adapter insert. The speaker system will
sense if an iPod is properly attached to the main unit.
4. The speaker system is now ready to play your iPod.
4
Connecting MP3 Players and iPod models
without 30-Pin Dock Connector
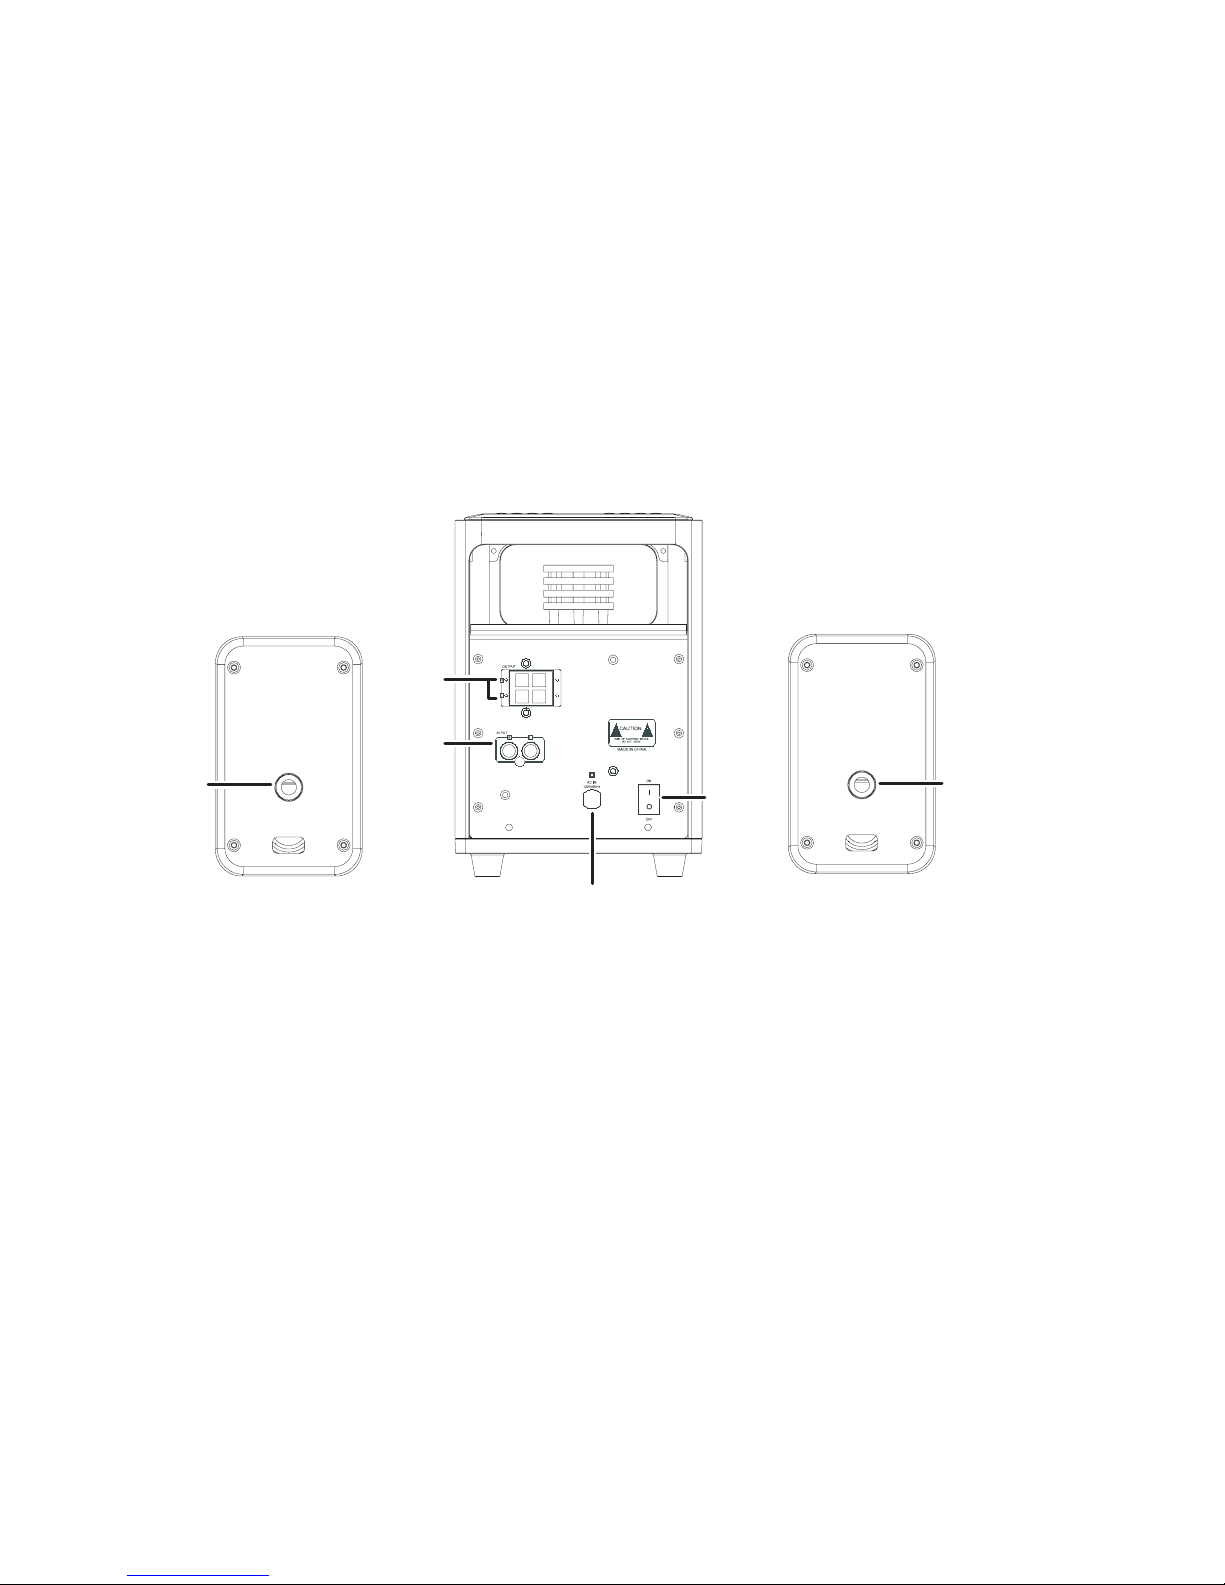
1. Locate the mini-jack to RCA stereo cable that was included with
your speaker system. Please note that each end of this cable is
distinctive: one end is split and has two male connectors (color-
coded red and white); the other end has a single male connector.
2. Plug the split end of the mini-jack to RCA stereo cable that has the
two male connectors into the AUX input jacks on the back of the
main unit.
3. Plug the other end of the AUX line-in cable (the end with the single
male connector) into the input jack of your MP3 player and press
the power button on the top of the main unit to turn the speaker
system on.
4. The speaker system is now ready to play your MP3 player.
Speaker
Cable
Spring Clips
AUX
Input
Speaker
Cable
Input
Speaker
Cable
Input
Main Power
Switch
Power Cord
Main Unit (Back)
5
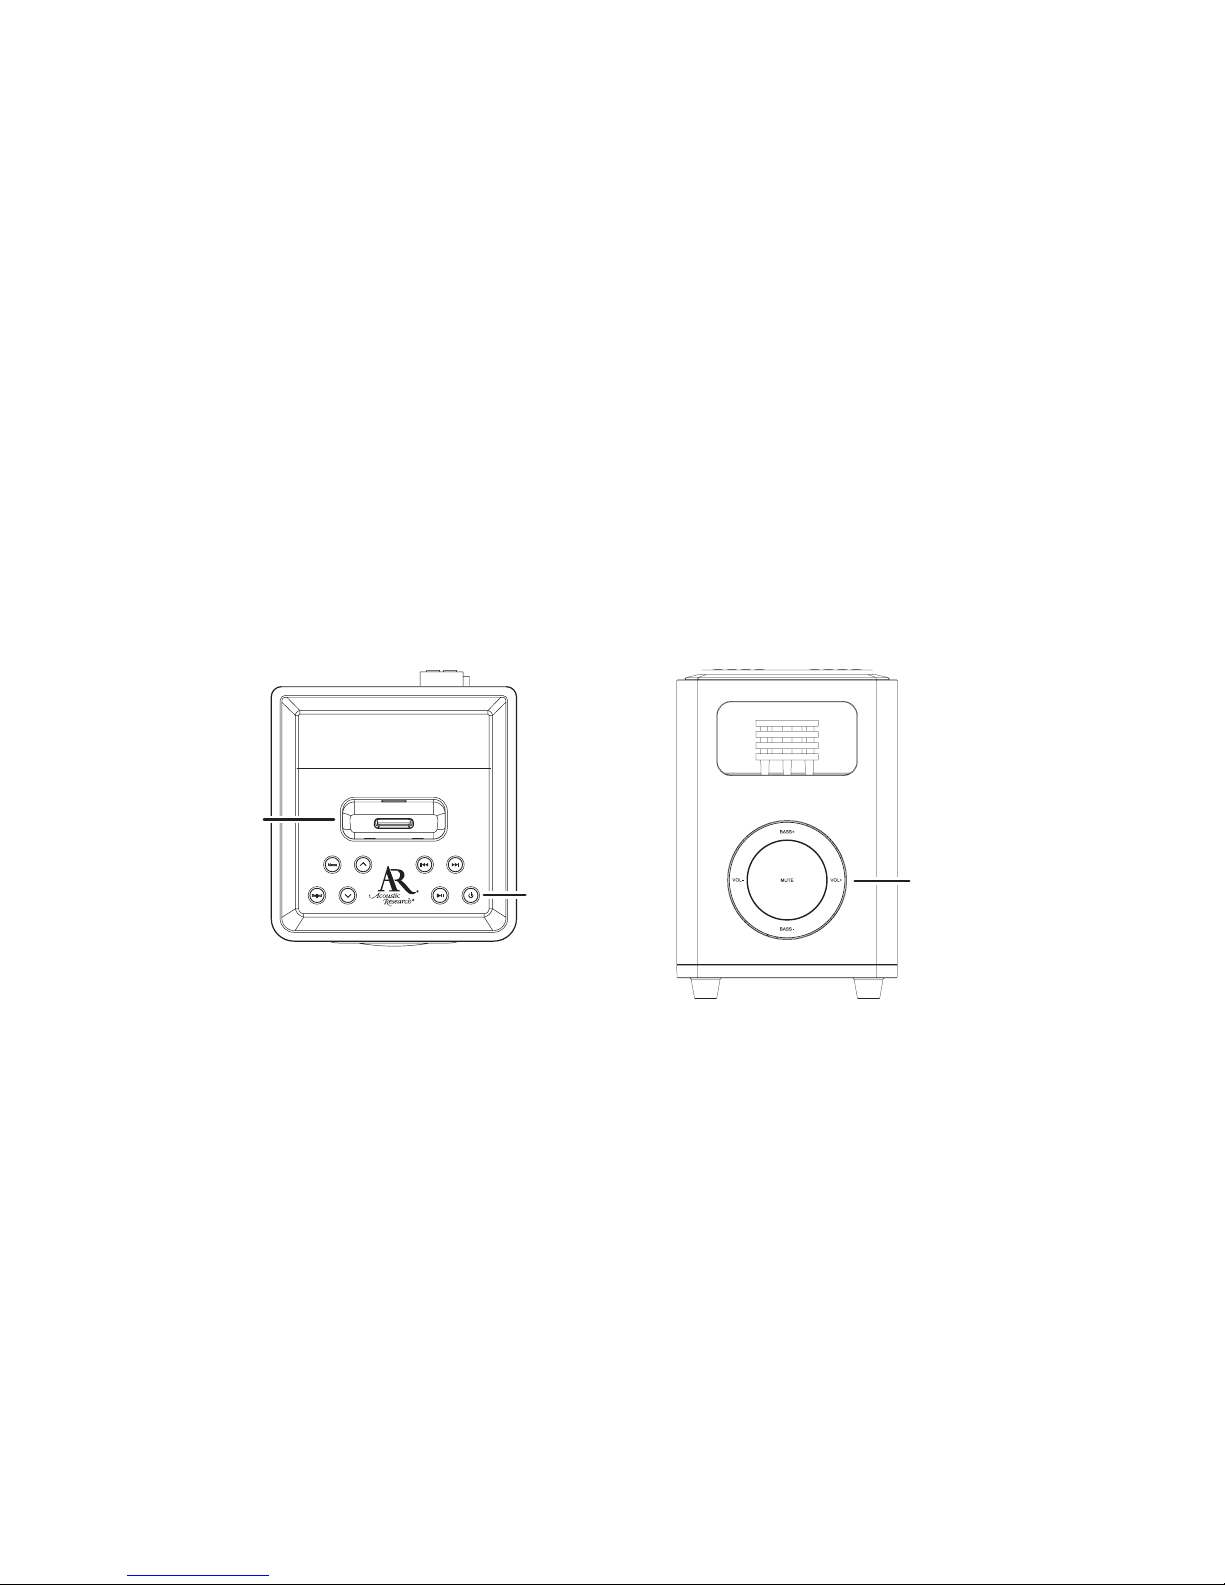
Controlling the Speaker System
Operation of Main Unit Controls
The main unit and the remote control (discussed in the following section)
have various buttons and controls that allow you to operate the speaker
system and an iPod that is docked. The buttons on top of the main unit
control the iPod through the 30-pin connector. Digital music players without
a dock connector (or any type of audio source with a mini-jack output) can
be plugged into the AUX “Line in” input. Please note that when using the
AUX input, only the Volume, Bass and Mute buttons on the top of the
main unit and the remote control will work. The controls provided with
your digital music player will be used to select and play music.
Main Unit (Top)
Universal Dock
for iPod®
Power Button
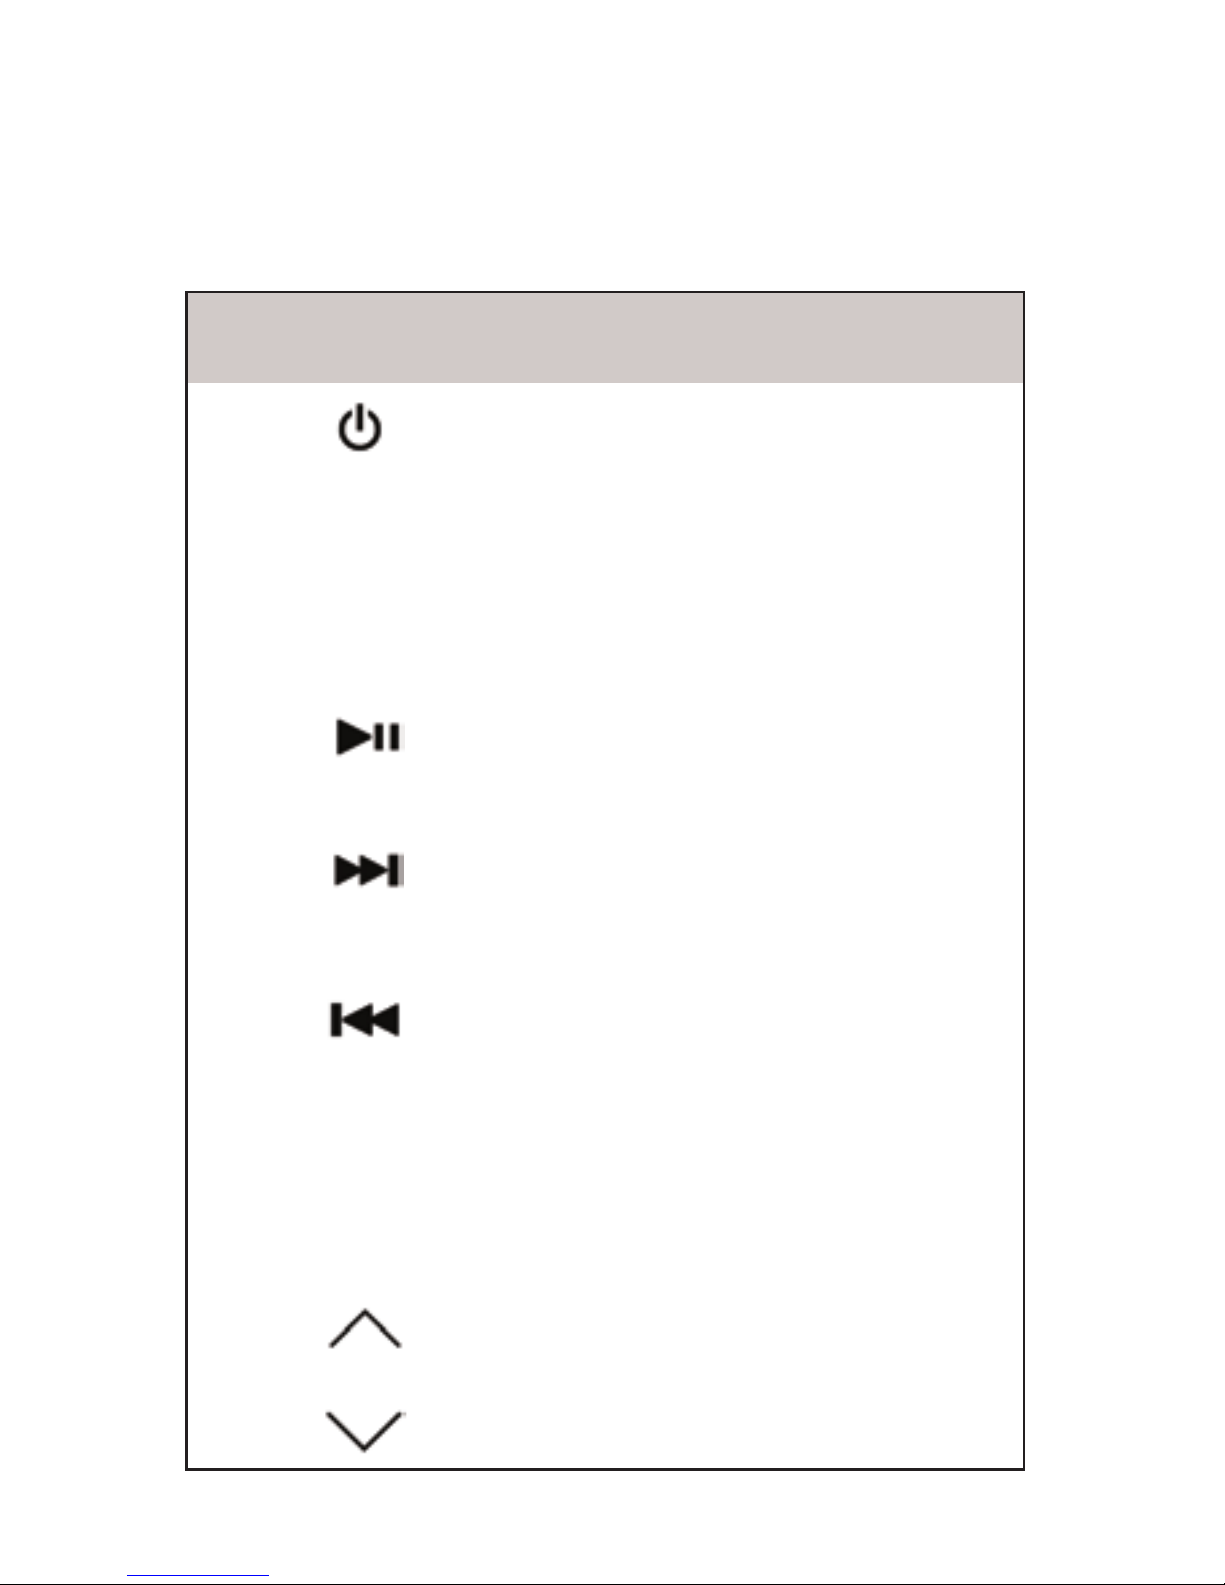
In addition to the POWER button, there are seven buttons (MENU,
SELECT, UP, DOWN, SKIP, REVIEW, PLAY-PAUSE) on top of the
main unit for control of the iPod, and ve buttons on the front face of
the main unit for control of VOLUME, BASS and MUTE.
Main Unit (Front)
Volume, Bass,
Mute Controls
6
IMPORTANT! The power SWITCH on the BACK of the main
unit must rst be switched on in order for the power BUTTON on
the TOP of the main unit or the remote control to turn the speaker
system on.
BUTTON
LABEL
OR
ICON
DESCRIPTION
Power
Turn unit power on/off. If unit has an iPod docked, also
send command to iPod to turn power on/off.
Vol + VOL+ Increase the Volume level.
Vol - VOL- Decrease the Volume level.
Bass + BASS+ Increase the Bass level.
Bass - BASS- Decrease the Bass level.
Mute MUTE Toggle audio output on/off.
Play/
Pause
Send command to docked iPod to toggle between Play
and Pause modes. If button is pressed and held down,
send command to docked iPod to turn off.
Next/Fast
Forward
If button is pressed once, send command to docked iPod
to skip forward to the next song. If button is pressed and
held down, send command to docked iPod to fast forward
through the song, until button is released or the end of
the song is reached. (Same functions as iPod Next/Fast
Forward button)
Previous/
Rewind If button is pressed once, send command to docked iPod
to skip backward to the beginning of the current song. If
already at the start of a song, skip to the previous song in.
If the button is pressed and held down, send command to
docked iPod to reverse through the song, until button is
released or the beginning of the song is reached. (Same
functions as iPod Previous/Rewind button)
Select SELECT Send command to docked iPod to select the currently
highlighted item.
Menu MENU Send command to docked iPod to go up one menu level.
Up Send command to docked iPod to go up one item in the
current list.
Down Send command to docked iPod to go down one item in
the current list.
7
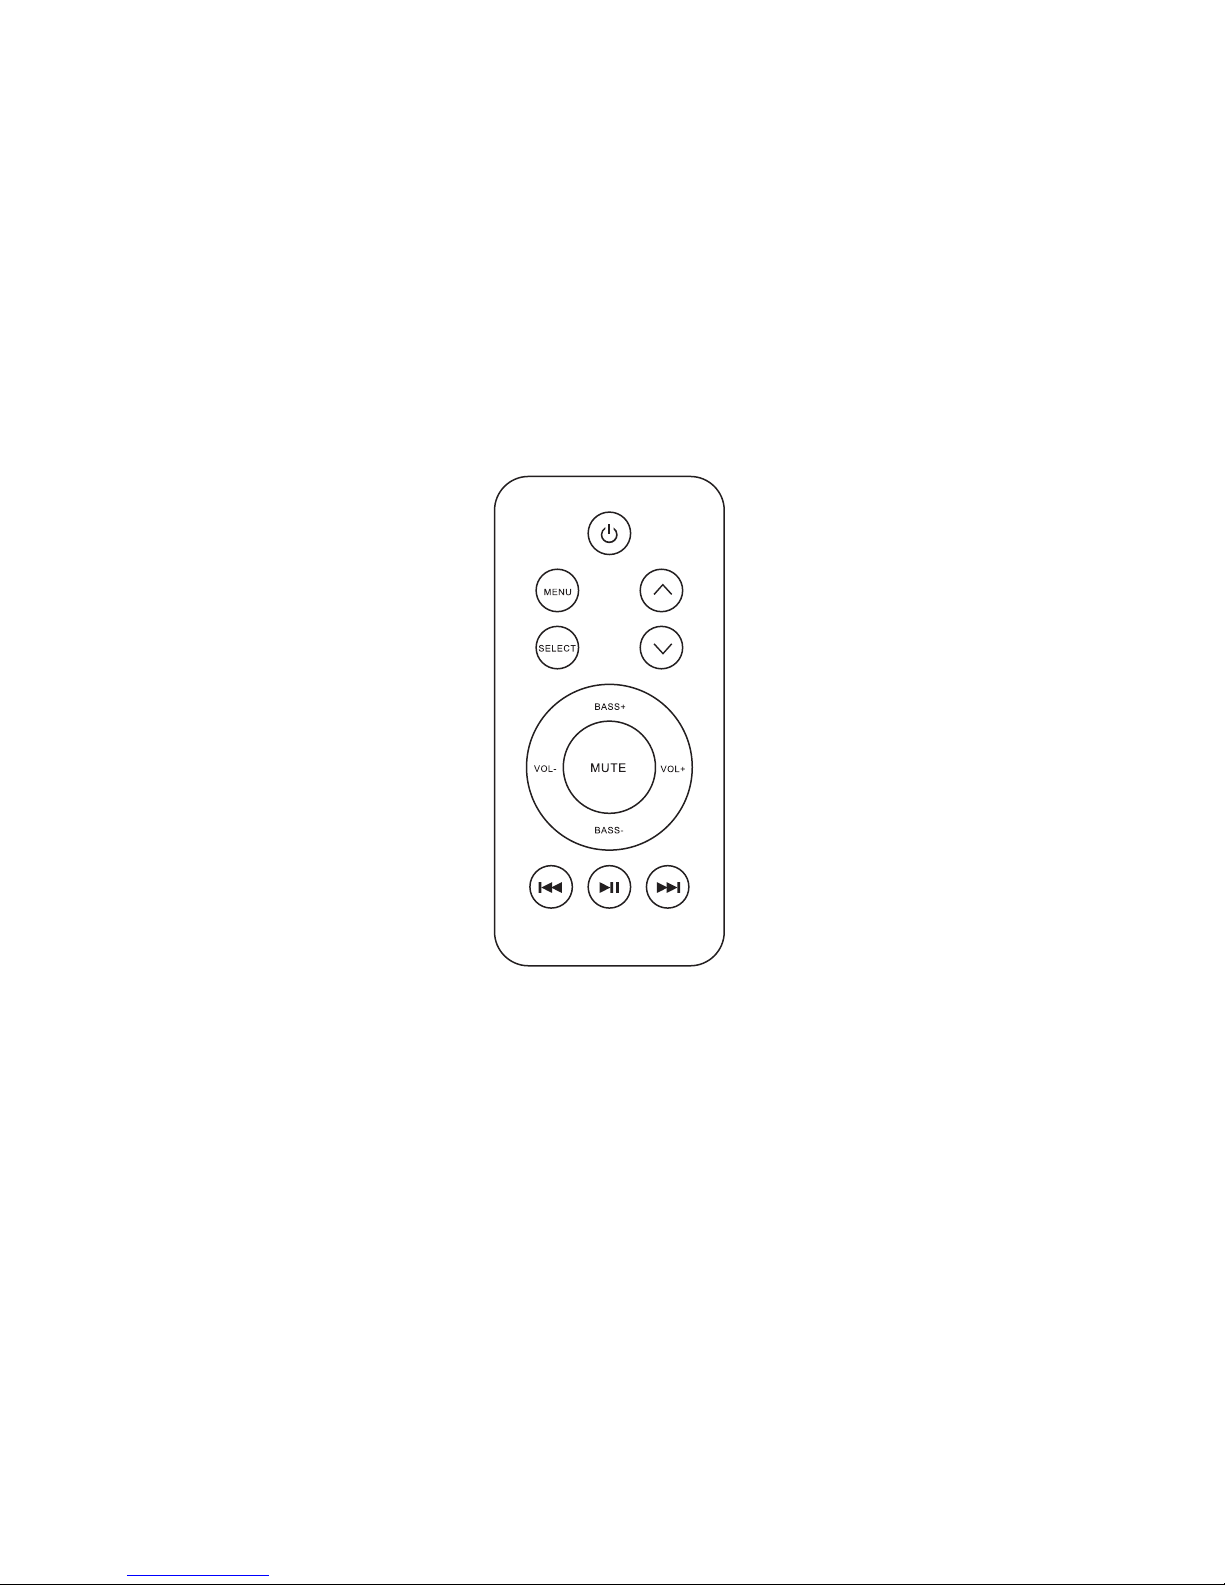
Remote Control
The remote control that came with your speaker system can operate the
functions of an iPod that is docked (the iPod may also be controlled using
the buttons on the main unit). Please note that for audio sources connected
through the AUX input, the remote control and main unit controls can only
be used to adjust the volume level, bass level, mute and power functions
for the speaker system. The remote control cannot be used to control the
functions of the source connected through the AUX input.
In order to use the remote control, the power switch on the back of the
main unit must rst be switched to the ON position (NOTE: the remote
control will not work if the main power switch is in the OFF position).
Turn on the speaker system from the remote control by pressing the
power button on the remote control. You can now use the remote control
to select music, play, pause and perform other functions on an iPod that is
docked.

8
Charging Your iPod
In addition to playing music, the speaker system has been designed to
act as a charger for your iPod when the iPod is inserted into the recessed
docking port on top of the main unit. To charge your iPod, simply attach
it to the docking port on top of the main unit. The power switch on the
back of the main unit must be left on in order for the speaker system to
charge the iPod.
Routine Maintenance
Cleaning the Speaker System
Before you clean the speaker system, make sure that the main unit has
been unplugged from the wall outlet. Use a soft and dry lint-free cloth to
wipe away dust from the outside surfaces of the main unit and speakers.
IMPORTANT! When cleaning the speaker system:
• DO NOT Use water or solvents.
• DO NOT Spray the unit with any cleaning chemicals.
• DO NOT Clean any interior areas of the unit.
Replacing the Battery
The battery in the remote control may be changed as needed. Usually
this will only be necessary every one to two years; however, the battery
may be changed at any time when the remote control’s effectiveness has
diminished.
Battery Precautions:
• Do not mix old and new batteries.
• Do not mix alkaline, standard (carbon-zinc) or rechargeable
(nickel cadmium) batteries.
• Always remove old, weak or worn-out batteries promptly
and recycle or dispose of them in accordance with Local and
National Regulations.

9
Replacing the Vacuum Tube
Instructions
When to Replace the Vacuum Tube
The vacuum tube that is housed in the main unit of the speaker system
has been designed to provide years of trouble-free use. Even so, it may
become necessary to replace the tube at some point in the future. If the
quality of sound produced by the speaker system diminishes over time,
inspect the vacuum tube for any of the following signs that indicate
changing the vacuum tube is necessary:
• Vacuum tube is completely dark while the speaker system is
powered on
• The silver coating on the inside of the vacuum tube has turned
white
• The vacuum tube shows any signs of cracks in its glass casing
Note: In order to extend the life of the speaker system’s vacuum
tube, it is recommended that the power button on top of the main
unit be turned off when the unit is not in use.
Changing the Vacuum Tube
Your speaker system came with a replacement vacuum tube (model
number 6DJ8 or equivalent). In order to replace the old tube with the new
tube:
1.Turn off the power to the main unit, unplug the power cord and
wait ten minutes for the vacuum tube to cool down.
2. Carefully remove the protective acrylic housing piece that covers the
vacuum tube by gently pulling the piece straight up. After the acrylic
housing is clear of the vacuum tube, turn the acrylic housing to the
side in order to remove it from the main unit.

10
3.Carefully remove the old vacuum tube by pulling it up until it is free
and clear of the pinholes in the top of the main unit.
4. Place the new vacuum tube in the main unit so that the connector
pins on the end of the tube are orientated to securely t into the
corresponding connecting pinholes in the top of the main unit. DO
NOT force the tube into the housing!
5. Plug the power cord into the wall outlet and power on the main unit.
Note: Please contact us at www.araccessories.com if you have
any questions about replacing the vacuum tube.
Main Unit (Front)
Acrylic Housing
for Vacuum Tube

11
Troubleshooting
iPod Does Not Connect to Speaker System
• Remove iPod from the docking port on top of the main unit and
conrm that you are using the appropriate insert for the model of
iPod you have.
• Detach the iPod from the speaker system and check for obstructing
debris that may have lodged in the recessed docking port on top of
the main unit.
• Reinsert iPod into docking port and establish a secure connection.
No Sound Is Produced
• Inspect wall outlet and ensure that the power cord is rmly plugged
into the outlet.
• Make sure the audio cables are securely connected to the speakers
and the main unit.
• Make sure the main power SWITCH on the BACK of the main unit
is switched on. Then make sure the power BUTTON on the TOP
of the main unit is powered on. (NOTE: light from the light well
beneath the vacuum tube will illuminate the acrylic housing when
power is on)
• Select and play the desired music you wish to play.
• Make sure that the volume is turned up.
• If there still is no sound, remove the iPod from the docking port,
put the main power switch on the back of the main unit in the
OFF position, unplug the unit from the wall outlet, wait one to two
minutes, and then plug the power cord back into the wall outlet, put
the main power switch on the main unit in the ON position and
repeat the above steps.

12
Remote Control Does Not Control Docked iPod
• Remove the iPod from the docking port and reattach it, making sure
that there is a secure t between the iPod and the docking port.
• Make sure that the main power switch on back of the main unit
is switched on. The remote control will not function if the power
switch on back of the main unit is switched off.
• Make sure that there is a clear path between the remote control and
the speaker system, and make sure that you are pointing the remote
control directly at the front panel of the speaker system’s main unit.
• Remove the remote control’s battery to ensure that it is correctly
inserted in the battery compartment. If not inserted properly,
realign the battery to t securely into the compartment.
• Move around the room and try to use the remote from more than
one location.
• Press the remote control’s power button on and off to verify that
the remote signal is controlling the main unit.
• If you still cannot operate the docked iPod with the remote control,
make sure the remote control operates the other speaker system
functions (volume, bass, power). If it does not control these
functions, replace the battery in the remote control with a new battery.
iPod Does Not Charge
• Switch the power switch on the back of the main unit to the off
position.
• Remove iPod from the docking port and conrm that you are using
the appropriate insert for the model of iPod you have.
• Detach the iPod from the speaker system and check for obstructing
debris that may have lodged in the recessed docking port on top of
the main unit.
• Reinsert iPod into docking port and establish a secure connection.
• Switch the power switch on the back of the main unit to the on
position.

13
Product Specifications
Model AR4131
Sound pressure level 96 dB SPL (at 1 meter)
Input sensitivity 750mV High voltage
200mV Average voltage
Frequency Response (-3 dB) Subwoofer: 50Hz – 160 Hz
Speakers: 100Hz – 20KHz
S/N Subwoofer: greater than 75 dB
Speakers: greater than 80 dB
Harmonic Distortion Subwoofer: less than 0.1% (1W)
Speakers: less than 0.05% (1W)
Separation Speakers: greater than 50dB
Vacuum Tube Type 6DJ8, 6922, 6N2
Rated Load Subwoofer: 4 Ohms
Speakers: 4 Ohms
12 Month Limited Warranty
Audiovox Electronics Corporation (the “Company”) warrants to the original retail purchaser of this product
that should this product or any part thereof, under normal use and conditions, be proven defective in material or
workmanship within 12 months from the date of original purchase, such defect(s) will be repaired or replaced (at the
Company’s option) without charge for parts and repair labor. To obtain repair or replacement within the terms of
this Warranty, the product along with any accessories included in the original packaging is to be delivered with proof
of warranty coverage (e.g. dated bill of sale), specication of defect(s), transportation prepaid, to the Company at the
address shown below. Do not return this product to the Retailer.
This Warranty is not transferable and does not cover product purchased, serviced or used outside the United States or
Canada. The warranty does not extend to the elimination of externally generated static or noise, to costs incurred for
the installation, removal or reinstallation of the product. The warranty does not apply to any product or part thereof
which, in the opinion of the company, has suffered or been damaged through alteration, improper installation,
mishandling, misuse, neglect, accident or exposure to moisture. This warranty does not apply to damage caused by an
AC adapter not provided with the product, or by leaving non-rechargeable batteries in the product while plugged into
an AC outlet.
THE EXTENT OF THE COMPANY’S LIABILITY UNDER THIS WARRANTY IS LIMITED TO THE
REPAIR OR REPLACEMENT PROVIDED ABOVE AND, IN NO EVENT, SHALL THE COMPANY’S
LIABILITY EXCEED THE PURCHASE PRICE PAID BY PURCHASER FOR THE PRODUCT.
This Warranty is in lieu of all other express warranties or liabilities. ANY IMPLIED WARRANTIES, INCLUDING
ANY IMPLIED WARRANTY OF MERCHANTABILITY OR FITNESS FOR A PARTICULAR PURPOSE,
SHALL BE LIMITED TO DURATION OF THIS WARRANTY. ANY ACTION FOR BREACH OF ANY
WARRANTY HEREUNDER, INCLUDING ANY IMPLIED WARRANTY, MUST BE BROUGHT WITHIN
A PERIOD OF 24 MONTHS FROM THE DATE OF ORIGINAL PURCHASE. IN NO CASE SHALL THE
COMPANY BE LIABLE FOR ANY CONSEQUENTIAL OR INCIDENTAL DAMAGES WHATSOEVER.
No person or representative is authorized to assume for the Company any liability other than expressed herein in
connection with the sale of this product.
Some states/provinces do not allow limitations on how long an implied warranty lasts or the exclusion or limitation
of incidental or consequential damage so the above limitations or exclusions may not apply to you. This Warranty
gives you specic legal rights and you may also have other rights which vary from state/province to state/province.
U.S.A.: Audiovox Electronics Corporation, 150 Marcus Blvd., Hauppauge, New York 11788
CANADA: Audiovox Return Center, c/o Genco, 6685 Kennedy Road, Unit 3, Door 16,
Mississauga, Ontario L5T 3A5

Audiovox Accessories Corporation
111 Congressional Blvd., Suite 350
Carmel, IN 46032
© 2007 Audiovox Accessories Corporation
Trademark(s) ® Registered
www.araccessories.com
Made in China
AR4131 NA IB 02
FCC Information
This equipment has been tested and found to comply with the limits for a Class B digital
device, pursuant to Part 15 of the FCC rules. These limits are designed to provide
reasonable protection against harmful interference in a residential installation. This
equipment generates, uses, and can radiate radio frequency energy and, if not installed
and used in accordance with the instructions, may cause harmful interference to radio
communications. However, this is no guarantee that interference will not occur in a
particular installation. If this equipment does cause harmful interference to radio or
television reception, which can be determined by turning the equipment off and on,
you are encouraged to try to correct the interference by one or more of the following
measures:
• Reorient or relocate the receiving antenna.
• Increase the separation between the equipment and receiver.
• Connect the equipment to an outlet on a different circuit than the one to which
the receiver is connected.
• Consult the dealer or an experienced radio/TV technician for help.
Modications not expressly approved by the manufacturer could void the user’s authority
to operate the equipment under FCC rules.
Industry Canada Information
This product complies with the Canadian ICES-003 Class B specication.

Folleto de instrucciones del
AR4131
Sistema de altavoces AR 2.1
con conexión universal para iPod®
blackVault
ADVERTENCIA
Para disminuir el riesgo de incendios o descargas eléctricas, no exponga este producto a la lluvia ni a
la humedad. El aparato no deberá exponerse a goteos o salpicaduras. No se debe colocar objetos que
contengan líquidos, como por ejemplo floreros, sobre el aparato.
Este símbolo indica la presencia de un “voltaje
peligroso” en el interior del producto, que puede
producir una descarga eléctrica o ocasionar lesiones.
Este símbolo indica instrucciones
importantes que acompañan al
producto.
Precaución: Para reducir el riesgo de un choque eléctrico, no
retire la cubierta (ni la parte posterior. No contiene piezas que
el usuario pueda reparar. Sólo el personal calificado de servicio
puede repararlo o darle mantenimiento.
RIESGO DE CHOQUE ELÉCTRICO.
NO ABRIR.
PRECAUCIÓN: Para evitar un choque eléctrico, alinee la paleta ancha del enchufe con la ranura ancha
del tomacorriente e insértela completamente.
No obstruya las aberturas de ventilación de la unidad con periódicos, manteles, cortinas u objetos similares.
No coloque fuentes de llamas expuestas, tales como velas encendidas, sobre la unidad.
Deseche las pilas de una manera compatible con el medioambiente.
Las disposiciones de la Comisión Federal de Comunicaciones establecen que los cambios o modificaciones no
autorizados a este equipo podrían anular la autoridad del usuario para utilizarlo.
Precauciones e instrucciones de seguridad
1. Lea atentamente todas las precauciones e instrucciones de seguridad antes de utilizar el sistema
de altavoces.
2. Siga todas las instrucciones.
3. Mantenga este folleto de instrucciones en un sitio seguro para que pueda consultarlo cuando lo
necesite. ¡NO tire el folleto de instrucciones a la basura!
4. No utilice agua ni ningún otro líquido en el sistema de altavoces ni cerca del mismo. Para limpiar
el sistema de altavoces utilice únicamente un paño suave y seco.
5. Asegúrese de que el sistema de altavoces esté situado en una superficie dura, plana y sólida, por
ejemplo una mesa, mesón, librero, etc.
6. No coloque el sistema de altavoces en una fuente de llamas expuestas o cerca de la misma, ni
de ninguna otra fuente de calor tal como hornos de microondas convencionales ni radiadores,
calefactores portátiles, etc.
7. No enrosque ni prense el cable de alimentación. Cerciórese de que el cable de alimentación no esté
obstruido y no le ponga objetos pesados encima.
8. Antes de mover, limpiar o reparar el sistema de altavoces, verifique que el cable de alimentación esté
desconectado del tomacorriente de la pared.
9. Desconecte el sistema de altavoces durante inclemencias del clima o cuando no planee utilizar el
sistema de altavoces durante un período prolongado.
10. ¡No intente reparar el sistema de altavoces en ningún momento! ÚNICAMENTE un técnico o electricista
calificado debe reparar el sistema de altavoces.
11. No sobrecargue el tomacorriente de la pared ni los cables de extensión. De lo contrario, se crearía el
riesgo de descarga eléctrica para usted y/o daños al sistema de altavoces.
Información sobre el producto
Guarde el recibo como prueba de su compra y preséntelo para obtener repuestos o solicitar servicio
bajo garantía. Anéxelo aquí y anote el número de modelo en caso de que necesite consultarlo. Este
número se encuentra en el producto.
Número de modelo: __________________________________________________________________________
Fecha de compra: ____________________________________________________________________________
Distribuidor/Dirección/Teléfono: _______________________________________________________________
Reservados todos los derechos. Todos los nombres comerciales son marcas comerciales de los respectivos
fabricantes enumerados.
iPod es una marca comercial registrada y iPod nano es una marca comercial de Apple Computer, Inc.
PRECAUCIÓN

1
¡Felicitaciones!
Pronto disfrutará de una experiencia superior al escuchar sonidos a través de
su nuevo sistema de altavoces AR 2.1 con conexión universal para iPod®. El
gabinete de madera del altavoz de tonos graves y el tubo al vacío iluminado
le ofrecen un sonido cálido y rico, mientras que el diseño retro-moderno de
líneas definidas evoca el llamativo estilo de los equipos de sonido clásicos y
a la vez conserva un aspecto contemporáneo.
La alta calidad del sonido del sistema de altavoces se debe en gran parte al
amplificador de tubo al vacío que se encuentra en la unidad principal. Los
tubos al vacío se han utilizado durante décadas y aunque la tecnología básica
que les dio origen no ha cambiado, los aficionados experimentados y fabricantes
de equipos de sonido de alta tecnología siguen considerándolos ampliamente
como el método actual más sofisticado de reproducción y amplificación musical.
Además de su bello estilo clásico y la simpleza y elegancia de la tecnología de
tubo al vacío, la versatilidad del sistema de altavoces aumenta su atractivo:
• El sonido de todo iPod que tenga un conector de 30 pines puede
reproducirse a través del sistema de altavoces.
• A través de una entrada auxiliar es posible conectar cualquier reproductor
digital de música u otros equipos de sonido al sistema de altavoces.
• Un control remoto compacto de infrarrojos le permite controlar
su iPod casi desde cualquier sitio del salón.
• El sistema de altavoces carga su iPod mientras se encuentre conectado
al puerto de conexión.
Cómo desempacar el producto
Saque cuidadosamente el sistema de altavoces de la caja en un sitio limpio y bien
iluminado, al igual que los accesorios incluidos. Realice un recuento completo de
inventario para asegurarse de que los siguientes componentes y accesorios estén
incluidos:
1 unidad principal
1 control remoto
2 altavoces
2 cables para altavoces
2 cables mini-toma a estéreo RCA
4 insertos para adaptador
1 tubo al vacío de repuesto
2
Cómo instalar el sistema de
altavoces y conectar un iPod o
reproductor de MP3
Cómo instalar los altavoces
1. Coloque la unidad principal del sistema de altavoces y dos altavoces en una
superficie dura y estable.
2. Busque los dos cables para altavoz incluidos con el sistema de altavoces. Uno
de los extremos de cada cable está dividido y tiene dos filamentos, y el otro
extremo tiene un solo conector. Tome uno de los cables de sonido y conecte
el extremo que tiene un solo conector a la entrada de la parte posterior del
altavoz izquierdo. Conecte los dos filamentos del otro extremo del cable de
sonido con las pinzas amortiguadas correspondientes del altavoz izquierdo
en la parte posterior de la unidad principal [el filamento oscuro con el
lado positivo (+), y el filamento claro con el lado negativo (-)]. Repita
este proceso con el altavoz derecho.
3. Conecte el cable de alimentación de la unidad principal a un tomacorriente
de pared adecuado. Coloque el interruptor principal de encendido de la
parte posterior de la unidad principal en la posición de encendido (ON).
Presillas para
los cables de
los altavoces
Entrada
AUX
Entrada
de cable
Entrada
de cable
Interruptor
principal de
encendido
Cable de
alimentación
Unidad principal (atrás)
Table of contents
Languages:


