BLAZING BULL BB-1001-LP-SS User manual

USER
MANUAL
TABLE OF CONTENTS
PAGE 1
PAGE 5
PAGE 7
PAGE 9
PAGE 11
PAGE 17
PAGE 21
PAGE 23
PAGE 25
PAGE 27
PAGE 29
PAGE 35
SAFETY FIRST
GRILLING EVOLUTION
WHAT’S IN THE BOX
TECHNICAL SPECIFICATIONS
SETTING UP YOUR GRILL
FIRING UP YOUR GRILL
HOW TO GRILL
GRILLING THE PERFECT STEAK
HOW TO CLEAN
TROUBLESHOOTING
ACCESSORIES
WARRANTY

12
SAFETY FIRST
SAFETY FIRST
READ BEFORE USING!
This instruction manual contains important information necessary for the proper assembly and
safe use of the appliance. Read and follow all warnings and instructions before assembling and
using the appliance. Follow all warnings and instructions when using the appliance.
Keep this manual for future reference. Keep product packaging for potential warranty claims.
WARNING: This product can expose you to chemicals including carbon monoxide, which is
known to the State of California to cause birth defects or other reproductive harm. For more
information, go to www.P65Warnings.ca.gov
DANGER
If you smell gas:
Shut off gas to the appliance.
Extinguish any open flame.
If odor continues, keep away from the appliance and immediately call your fire department.
Failure to follow these instructions could result in fire or explosion which could cause
property damage, personal injury or death.
DANGER
Never operate this appliance unattended.
Never operate this appliance within 25 ft (7.5 m) of any flammable liquid.
Never allow oil or grease to get hotter than 400°F (200°C). If the temperature exceeds 400°F
(200°C) or if oil begins to smoke, immediately turn the burner or gas supply OFF.
Heated liquids remain at scalding temperatures long after the cooking process. Never
touch cooking appliance until liquids have cooled to 115°F (45°C) or less.
If a fire should occur, keep away from the appliance and immediately call your fire
department. Do not attempt to extinguish an oil or a grease fire with water. A Type BC or
ABC fire extinguisher may, in some circumstances contain the fire.
Failure to follow these instructions could result in fire, explosion or burn hazard which
could cause property damage, personal injury or death.
!
!
!
THIS PRODUCT
Shall only be used outdoors. Never use this
appliance indoors!
Shall not be used in a building, garage or
any other enclosed area
Shall not be used under an overhead
unprotected combustible construction
Shall always maintain required clearances
to combustibles (See Figure 1)*
Is not intended to be used in or on a boat
Is not intended to be used in or on
recreational vehicles
Is not intended for commercial use
Required Clearances (Figure 1)
*Measurement units are displayed in inches

34
SAFETY FIRST
SAFETY FIRST
WARNING!
The use of alcohol, prescription or non-prescription drugs may impair the consumer’s ability
to properly assemble or safely operate the appliance.
When cooking with oil or grease, have a type BC or ABC fire extinguisher readily available.
When cooking, the appliance must be on a level, stable non-combustible surface in an area
clear of combustible material. An asphalt surface (blacktop) may not be acceptable for this
purpose.
Do not leave the appliance unattended. Keep children and pets away from the appliance at
all times.
Do not place empty cooking vessel on the appliance while in operation. Use caution when
placing anything in cooking vessel while the appliance is in operation.
Do not move the appliance when in use. Allow the grill to cool to 115°F (45°C) before moving
or storing.
This appliance is not intended for and should never be used as a heater.
This appliance will be hot during and after use. Use insulated oven mitts or gloves for
protection from hot surfaces or splatter from cooking liquids.
If the temperature exceeds 400°F (200°C) or if oil begins to smoke, immediately turn the
burner or gas supply OFF and wait for the temperature to decrease to less than 350°F
(175°C) before relighting burner according to the manufacturer’s instructions.
Avoid bumping or impact with the appliance to prevent spillage or splashing of hot cooking
liquid.
Keep appliance area clear and free from combustible materials, gasoline and other
flammable vapors and liquids.
Keep the ventilation opening(s) of the cylinder enclosure free and clear from debris.
This unit is only designed for grilling food, do not heat or dry other goods.
This model is intended for use with Propane (LP) only and CANNOT be used with Natural Gas
(NG). Never attempt to use this model with a Natural Gas connection.
Do not attempt to use the Blazing Bull Infrared Grill with any regulator or gas hose other than
the one supplied with the unit. If there is evidence of abrasion, wear, cuts or leaks contact our
customer service team to order a replacement regulator.
This grill, like any other gas or charcoal grill, produces carbon monoxide. Carbon Monoxide
can cause death if used inside a building, tent, caravan, RV, boat or other structure and/or
vehicle.
!
!
!
!
!
!
!
!
!
!
!
!
!
!
!
!

56
Ever wonder why home cooked steaks never taste like one
you order at a premium steakhouse? That’s because infrared
technology is used only by the world’s best steakhouses to reach
temperatures up to 1500°F to grill the best steak you’ve ever tasted.
We’ve decided to take the next step in grilling innovation. We’ve
packaged the power of infrared heat technology — the same
technology used by the world’s best steakhouses — and delivered
it in a portable grilling solution so anyone can achieve premium
quality steak, anywhere they like.
After several years of engineering, we’ve discovered something
incredible. Steak isn’t the only thing that tastes better on the
Blazing Bull, EVERYTHING tastes better - chicken, lamb, fish,
burgers, pizza, vegetables, and even fruit.
Blazing Bull is a very unique product and offers different methods
of grilling compared to a traditional grill. Follow this user manual
carefully in order to enhance your grilling experience with
technology used only by best steakhouses in the world....well not
anymore.
That’s right, a Grilling Evolution.
IT’S TIME FOR AN EVOLUTION
GRILLING EVOLUTION
Scan the QR Code on the right or visit blazingbullgrills.com/setup to view
How-to Videos on proper installation and how to cook the perfect steak
Tip:
GRILLING EVOLUTION
78
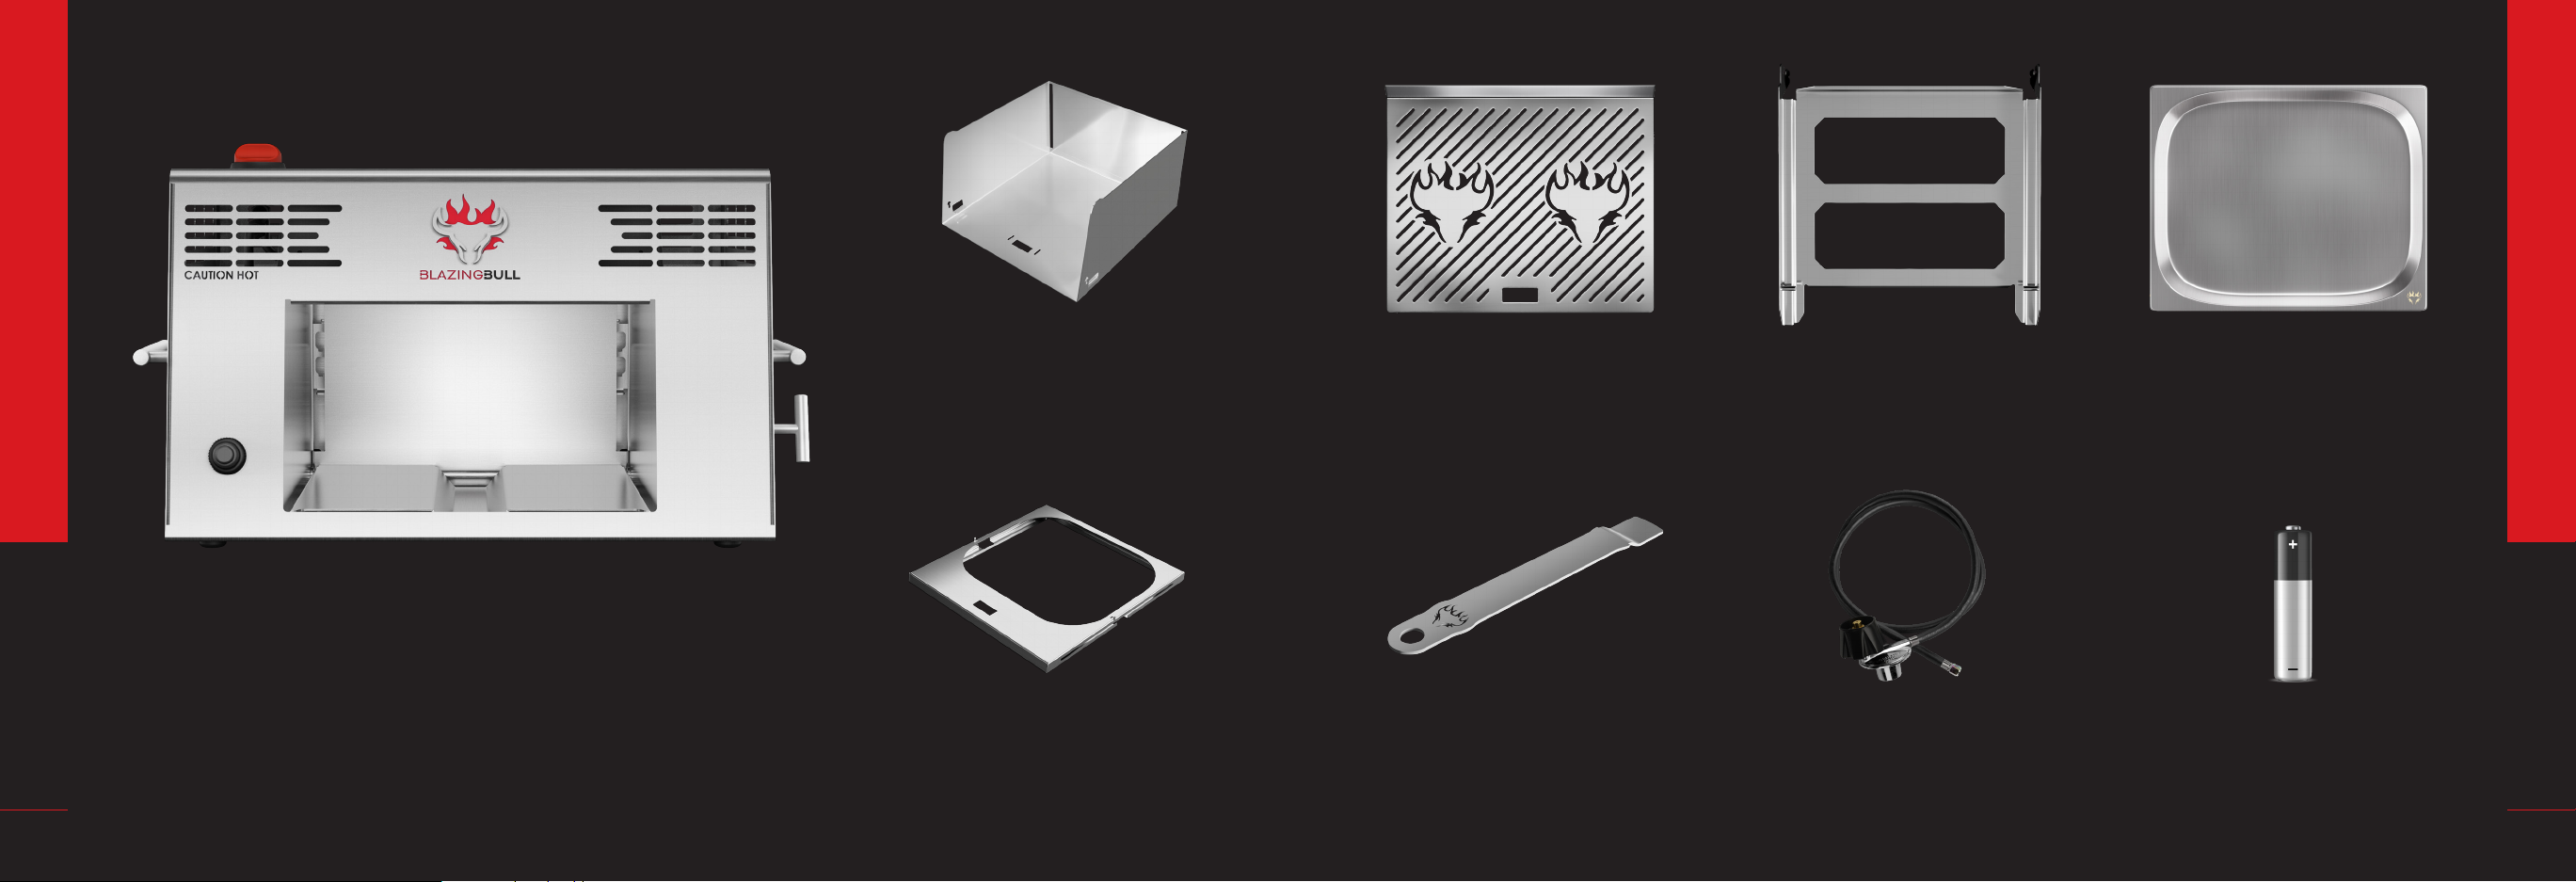
WHAT’S IN THE BOX?
Grill Shelf
Your grill grate sits here. The pins at
the front of the shelf hold the grill grate
securely in place while you flip your food
Grill Grate
The Blazing Bull Logos are positioned in the
center of the infrared burners. Center your
steak on the bull for the perfect sear
Drip Tray
Don’t waste those delicious juices! Allow
them to drip into the drip tray while grilling
to intensify the flavor of your food
Grill Handle
Use this handle to pull out the grill grate and
drip tray drawer. It is also used to remove
the liner from the grill when cleaning
Regulator & Gas Hose
Quickly install the hose to the unit and
tighten the other end to a propane tank
(1 lb bottle adapter sold separately)
Blazing Bull Portable Infrared Grill
Fire up the grill! Blazing Bull revolutionizes home grilling by heating
overhead at temperatures up to 1500°F. Your unit includes carrying
handles, a side lift handle to adjust the grill grate up and down and a
gas knob and battery operated igniter to fire it up in seconds.
Liner and Drip Tray Drawer are already pre-installed. AAA Battery
Install this battery by unscrewing the
igniter button cap to quickly fire up your
grill within seconds of pushing the button
Liner
Cleaning is a breeze when you can remove
the entire grilling area. Place the liner in the
dishwasher and grill again in no time
Drip Tray Drawer
Slide the drawer out with the grill handle for
easy access to the drip tray. The drawer is
removable for easy cleaning
WHAT’S IN THE BOX?

910
*Measurement units are displayed in inches
*Measurement units are displayed in inches
1
2
3
4
66
5
TECHNICAL SPECIFICATIONS
TECHNICAL SPECIFICATIONS
Side View
Top View
Front View
Grill Grate & Shelf
Drip Tray & Drawer
Carrying Handles
Gas Knob
Igniter Button
Lift Handle
1.
2.
3.
4.
5.
6.

11 12
SETTING UP YOUR GRILL
BEFORE FIRST USE
SETTING UP YOUR GRILL
1
2
3
Lift the Blazing Bull Infrared Grill out of the box using the carrying handles and place it on a
level, heat resistant surface. This product is for outdoor use only.
Remove all remaining packaging material and ensure the gas knob is in the OFF position.
Clean the grill grate, grill shelf, and drip tray with warm soapy water and dry thoroughly
with a soft cloth.
Liner - The liner is locked
into position when installed
in the unit. To re-install
the liner once it has been
removed, simply slide the
liner in with both hands
until it locks into position.
Drip Tray Drawer - The
drawer is locked into
position when installed in
the unit. To re-install the
drawer once it has been
removed, align the drawer
slots with the liner tabs and
allow the drawer to fall into
place. Slide the drawer to
the back of the unit until it
is fully inserted.
LINER & DRIP TRAY DRAWER
1
2
The liner and drip tray drawer are already pre-installed. Never fire up the grill without inserting
the liner and drip tray drawer first.
11
22
123
13 14
SETTING UP YOUR GRILL
SETTING UP YOUR GRILL
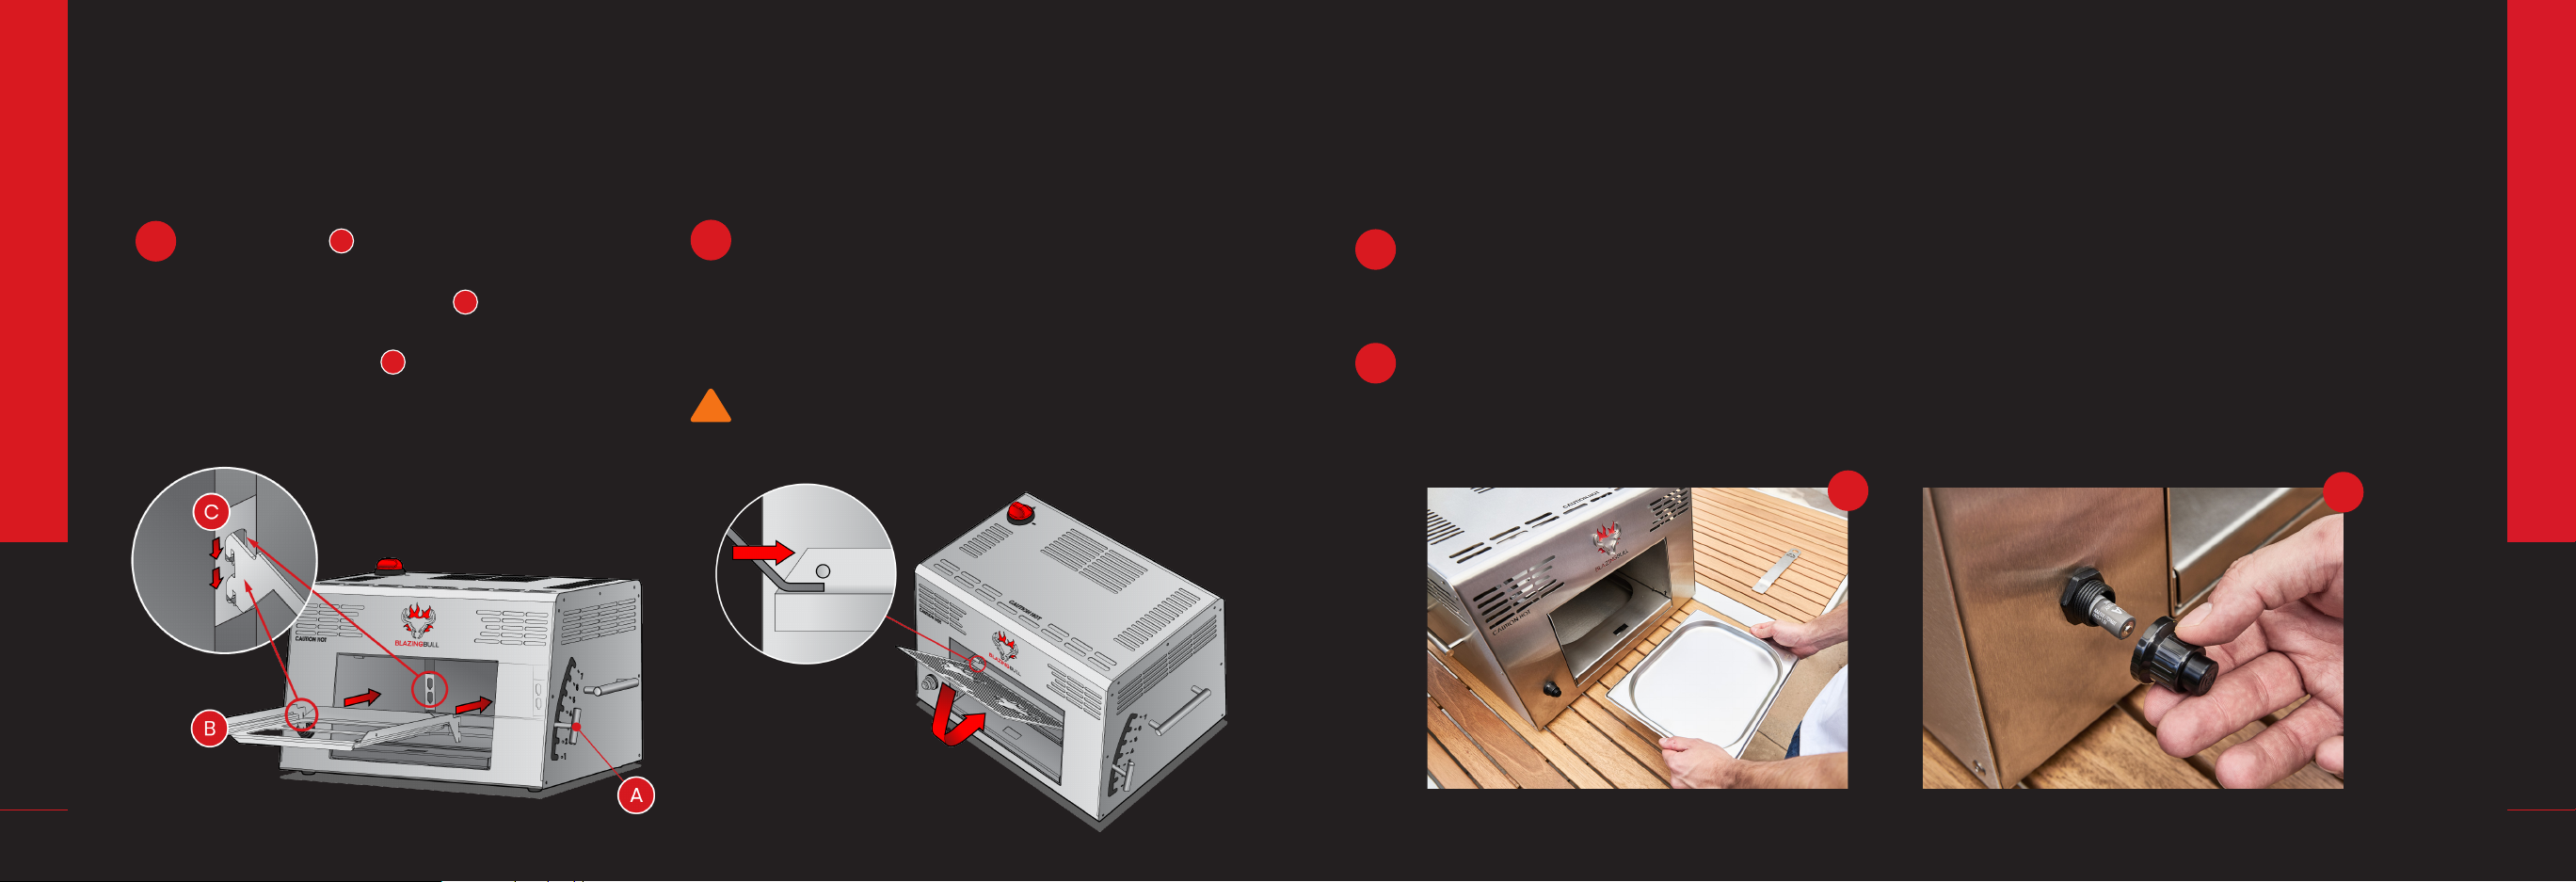
1Drip Tray - Remove the plastic wrap and insert the drip tray into the drip tray drawer; the
drip tray is used to collect meat juices and can additionally be used for enhancing flavors
such as added spices, butter or oils.
Igniter Battery - Unscrew the igniter button cap with your fingers, install the AAA battery
with the (+) side facing out, and screw the cap back on. If you hear a clicking sound when
the button is pressed, your igniter is operating correctly.
Grill Shelf - Position the lift handle to
level 3 or 4 in order to center the tabs
at the back of the unit. Insert the grill
shelf, aligning it with the tabs in the
back of the unit. Push the shelf down
to lock it into position. Make sure the
shelf is fully inserted before operation.
DRIP TRAY & IGNITER BATTERY
1
2
GRILL SHELF & GRILL GRATE
Always ensure that the liner is inserted in the grill before inserting the grill shelf and grill grate.
Never fire up the unit without inserting the grill shelf and grill grate first.
The drip tray drawer and drip tray are already pre-installed. Never fire up the unit without
inserting the drip tray first.
2Grill Grate - Tip the grill grate vertically
and insert the top lip between the grill
shelf pins and slide the grate to the back
until it is fully inserted. The grill grate is now
locked in the shelf.
NEVER TRY TO REMOVE THE GRILL GRATE
FROM THE UNIT DURING OPERATION
!
A
B
C
12
15 16
SETTING UP YOUR GRILL
SETTING UP YOUR GRILL
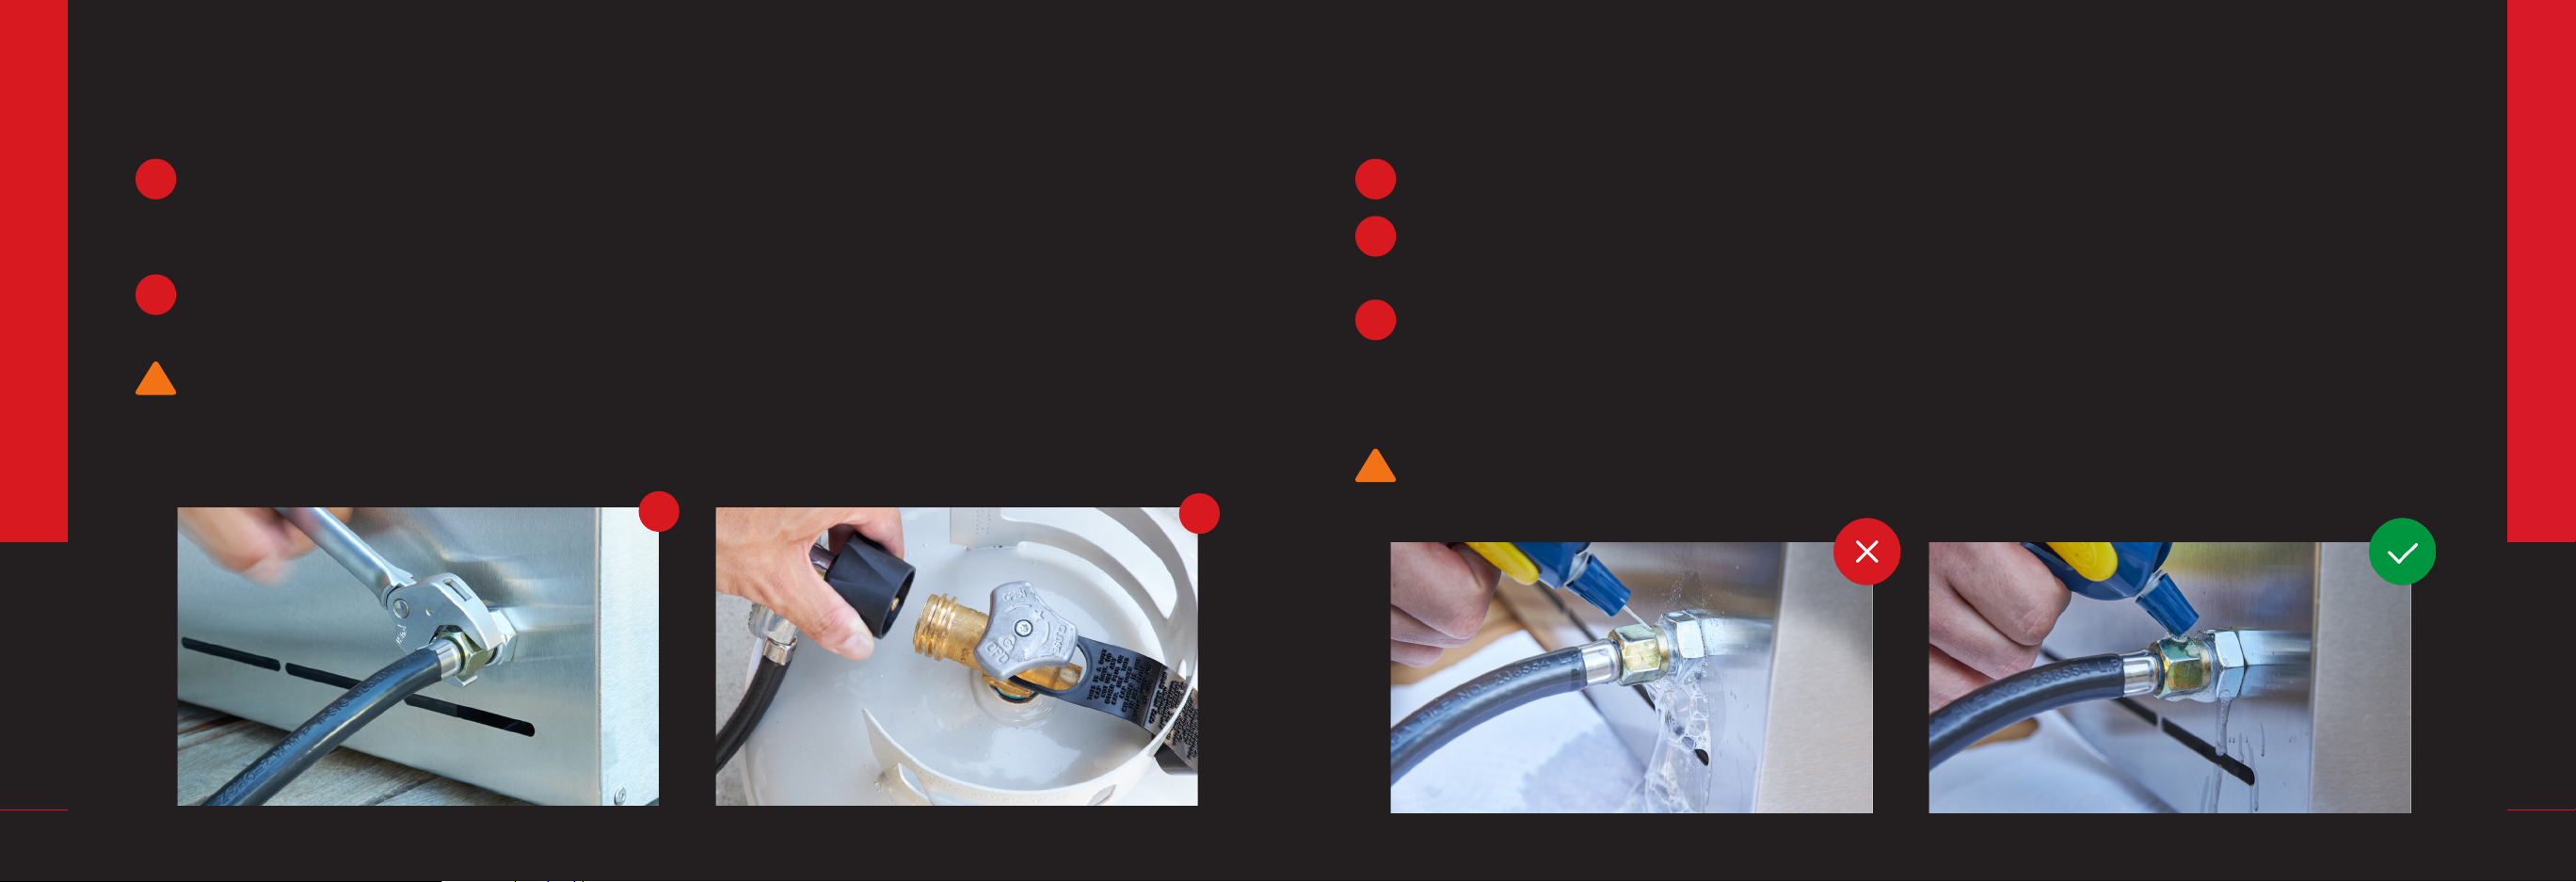
Mix dish soap and water into a spray bottle or cup.
Turn the gas cylinder on and apply soapy water to the hose connection on the back of the
unit and the gas cylinder.
If bubbles start to form, there is a leak, immediately turn off your gas from the propane
cylinder. You can try to disconnect and reconnect the hose to ensure it is not an assembly
error and perform the leak test again. No bubbles means the connection is safe and you
are ready to go. Use a towel to clean off the excess soapy water.
NEVER USE AN OPEN FLAME TO SEARCH FOR A GAS LEAK AND NEVER USE YOUR GRILL IF YOU
NOTICE A LEAK
LEAK TEST
1
2
3
Installation - Screw the regulator hose on and lightly tighten with a 3/4 inch wrench no more
than 1/8th of a turn clockwise. DO NOT overtighten any more than 1/8th or you could damage
the gas manifold. Always keep the fuel supply hose away from any heated surface(s).
Connecting to LP Gas Cylinder - Connect the opposite end to a propane cylinder and ensure
it is fully tightened. Always ensure your propane cylinder is fully closed when the unit is off.
MAKE SURE TO CLEAN AND INSPECT THE HOSE BEFORE EACH USE. IF THERE IS EVIDENCE
OF ABRASION, WEAR, CUTS OR LEAKS, THE HOSE MUST BE REPLACED PRIOR TO USING THE
APPLIANCE. CONTACT CUSTOMER SUPPORT TO ORDER A REPLACEMENT HOSE
REGULATOR & GAS HOSE
1
2
12
!
!

OFF FIRING UP
HEATING UP FULL TEMPERATURE
17 18
FIRING UP YOUR GRILL
FIRING UP YOUR GRILL
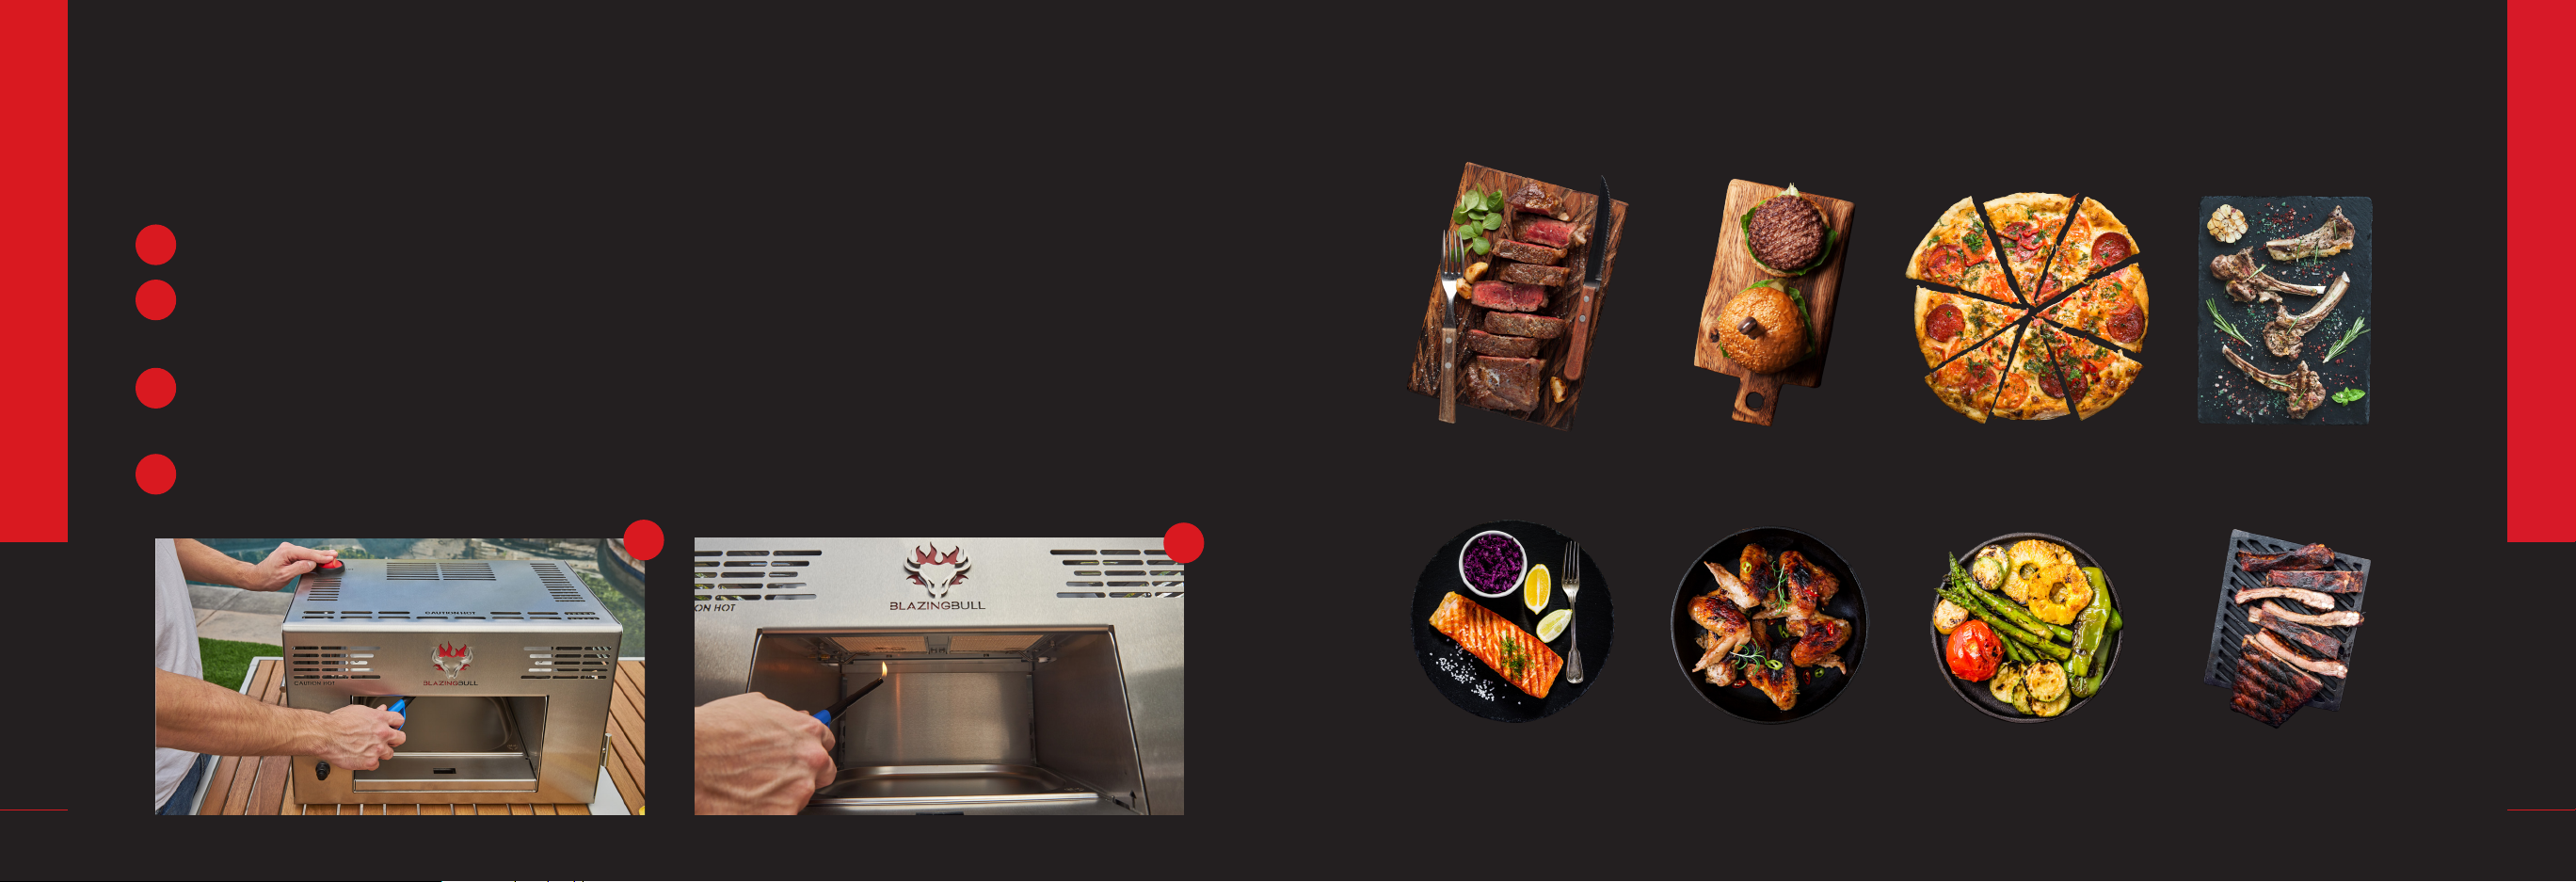
The gas knob is locked in the OFF position. Push down and rotate the gas knob until the
indicator line is pointing to the flame icon.
Always stand on the left side of the grill away from the opening while lighting. Press and
hold down the gas knob for at least 3 seconds. While still holding down the gas knob, press
and hold the igniter button. You will hear a clicking sound and the burners will ignite.
Release the igniter button and continue holding down the gas knob for about 5 more
seconds to allow the safety sensor to heat up. Release the gas knob. The gas knob is now
locked in the ON position.
LET’S GET FIRED UP
1
2
Allow 5 minutes to heat up to full
temperature. You will be at full
temperature when the tiles are bright
orange. In daylight, your tiles may
appear to be white rather than orange,
this is normal. You’re now ready to grill!
Note: Before first use, let the grill run for
10 minutes before cooking.
DURING OPERATION THE BLAZING BULL
GRILL IS EXTREMELY HOT! NEVER TOUCH
THE BURNER TILES OR OUTSIDE SURFACES
DURING USAGE. NEVER STICK YOUR
HANDS INSIDE THE GRILL
ALWAYS ENSURE CHILDREN AND PETS
MAINTAIN A SAFE DISTANCE AWAY FROM
THE GRILL
IF THE BURNER FLAME IS ACCIDENTALLY
EXTINGUISHED, IMMEDIATELY SHUT THE
GAS OFF FROM THE PROPANE CYLINDER
AND WAIT AT LEAST 5 MINUTES BEFORE
FIRING UP YOUR GRILL AGAIN
4
!
3
!
!
12 3
19 20
FIRING UP YOUR GRILL
FIRING UP YOUR GRILL
Steak Hamburgers Pizza Lamb
Chicken Wings Fruits & Vegetables
Fish Ribs...and more!
WHAT CAN YOU GRILL WITH INFRARED?MANUAL LIGHTING (OPTIONAL)
Push down and rotate the gas knob until the indicator line is pointing to the flame icon.
While still holding down the gas knob, insert your lighter or lit match under the burner tiles
and the burners will ignite.
Continue holding down the gas knob for about 5 more seconds to allow the burners to
heat up. Release the gas knob.
Allow 5 minutes to heat up to full temperature.
1
2
3
4
In the rare situation where your igniter button is not working, you may use a lighter or match to
fire up your grill. Use only a barbecue lighter or long match when lighting your grill manually.
22

21 22
1
2
HOW TO GRILL
HOW TO GRILL
The gas knob controls the flow of gas delivered to
the infrared burners. It only has 2 positions - ON
(Figure 1) and OFF (Figure 2).
The amount of heat delivered while cooking is
controlled by lifting the grill grate closer or further
away from the infrared burners. The burners will
always stay at maximum temperature (1500°F).
To change your grilling temperature, simply raise
the lift handle up or down from levels 1 to 7 (Figure
3). Temperatures vary based on food thickness.
DO NOT COVER ANY VENTILATION OPENINGS WITH
ANY OBJECTS DURING OPERATION
DO NOT PLACE ANY OBJECTS DIRECTLY IN FRONT OF
THE UNIT DURING OPERATION
IN THE EVENT OF A GREASE FIRE, DO NOT TRY TO
BLOW OUT THE FLAME. TURN OFF THE UNIT AND
EXTINGUISH THE FLAME BEFORE RE-LIGHTING
HOW TO GRILL
3
TURN THE GRILL OFF & LET’S EAT
The gas knob is locked in the ON position. Push down and rotate the Gas Knob until the
indicator is lined up with the OFF icon and locked in position.
Your Blazing Bull Grill is now off. Always remember to shut the gas off from your propane
cylinder after use.
ALWAYS ALLOW THE UNIT TO COOL DOWN FOR AT LEAST 30 MINUTES BEFORE CARRYING,
HANDLING, STORING, TOUCHING ANY COMPONENTS OR CLEANING
1
!
2
!
The grill handle is used to pull
out the grill grate and drip
tray drawer. It is also used
to easily remove the liner for
cleaning. Always pull out the
drip tray first before the grill
grate to collect the juices.
DO NOT LEAVE THE GRILL
HANDLE IN THE GRILL GRATE
OR IN DIRECT SUNLIGHT FOR
LONG PERIODS OF TIME OR IT
MAY BE TOO HOT TO TOUCH
4
!
!
!
ON Position
(Figure 1)
OFF Position
(Figure 2)
Temperatures listed above should only be used as rough guidelines
and are not intended to be used as precise cooking temperatures
44
Approximate
Temperatures
(Figure 3)
!

23 24
1
2
3
GRILLING THE PERFECT STEAK
Now that your steak is seared, lower the grill grate by adjusting the lift handle on the right
side of the unit to Level 3. While you’re grilling your steak, you will notice the meat juices
dripping down and collecting in the drip tray. This is the key to enhancing the flavor of your
steak. Optional: Add butter and/or herbs to the drip tray.
Allow the steak to cook to your desired doneness from rare to well done. Cooking time will
vary depending on the size and thickness of your steak. Using a meat thermometer is the
best way to ensure you are grilling the steak to the accurate temperature you prefer.
GRILL TO YOUR DESIRED DONENESS
Start by placing your steak on the grill grate. The Blazing Bull logos on the grill grate are
perfectly centered to the infrared burners. Try to place your steak vertically center over
the Blazing Bull logos on the left or right side. If your steak is too large to fit on one side
vertically, you may need to place it horizontally across the grill grate.
Now that your steak is properly positioned, slide the grill grate to the back of the unit and
adjust the lift handle on the right side to raise grill grate so that the steaks are about 1 to 1.5
inches away from the burner tiles. Allow the steak to sear for at least 60 seconds.
Pull the drip tray out first and then grill grate using the grill handle. Flip the steaks using a
set of tongs and repeat step 2 to sear the other side for at least 60 seconds.
SEARING THE STEAK
1
2
3
GRILLING THE PERFECT STEAK
The key to grilling the perfect steak is to create a delicious crust by searing the steak on each
side. Make sure the drip tray is inserted in the drawer to collect those delicious meat juices.
12313
3
Blazing Bull: Rare: 120 to 125°F | Medium rare: 125 to 135°F | Medium: 135 to 145°F | Medium well: 145 to 155°F | Well done: 155°F+
USDA: Rare: N/A | Medium rare: 145°F | Medium: 160°F | Medium well: N/A | Well done: 170°F
When you are close to your preferred steak temperature, place the steak in the drip tray at
the bottom and let it soak in the tasty meat juices. Remove the steak from the drip tray and
let it rest on a plate or cutting board for 3-5 minutes and enjoy!
25 26
HOW TO CLEAN
HOW TO CLEAN
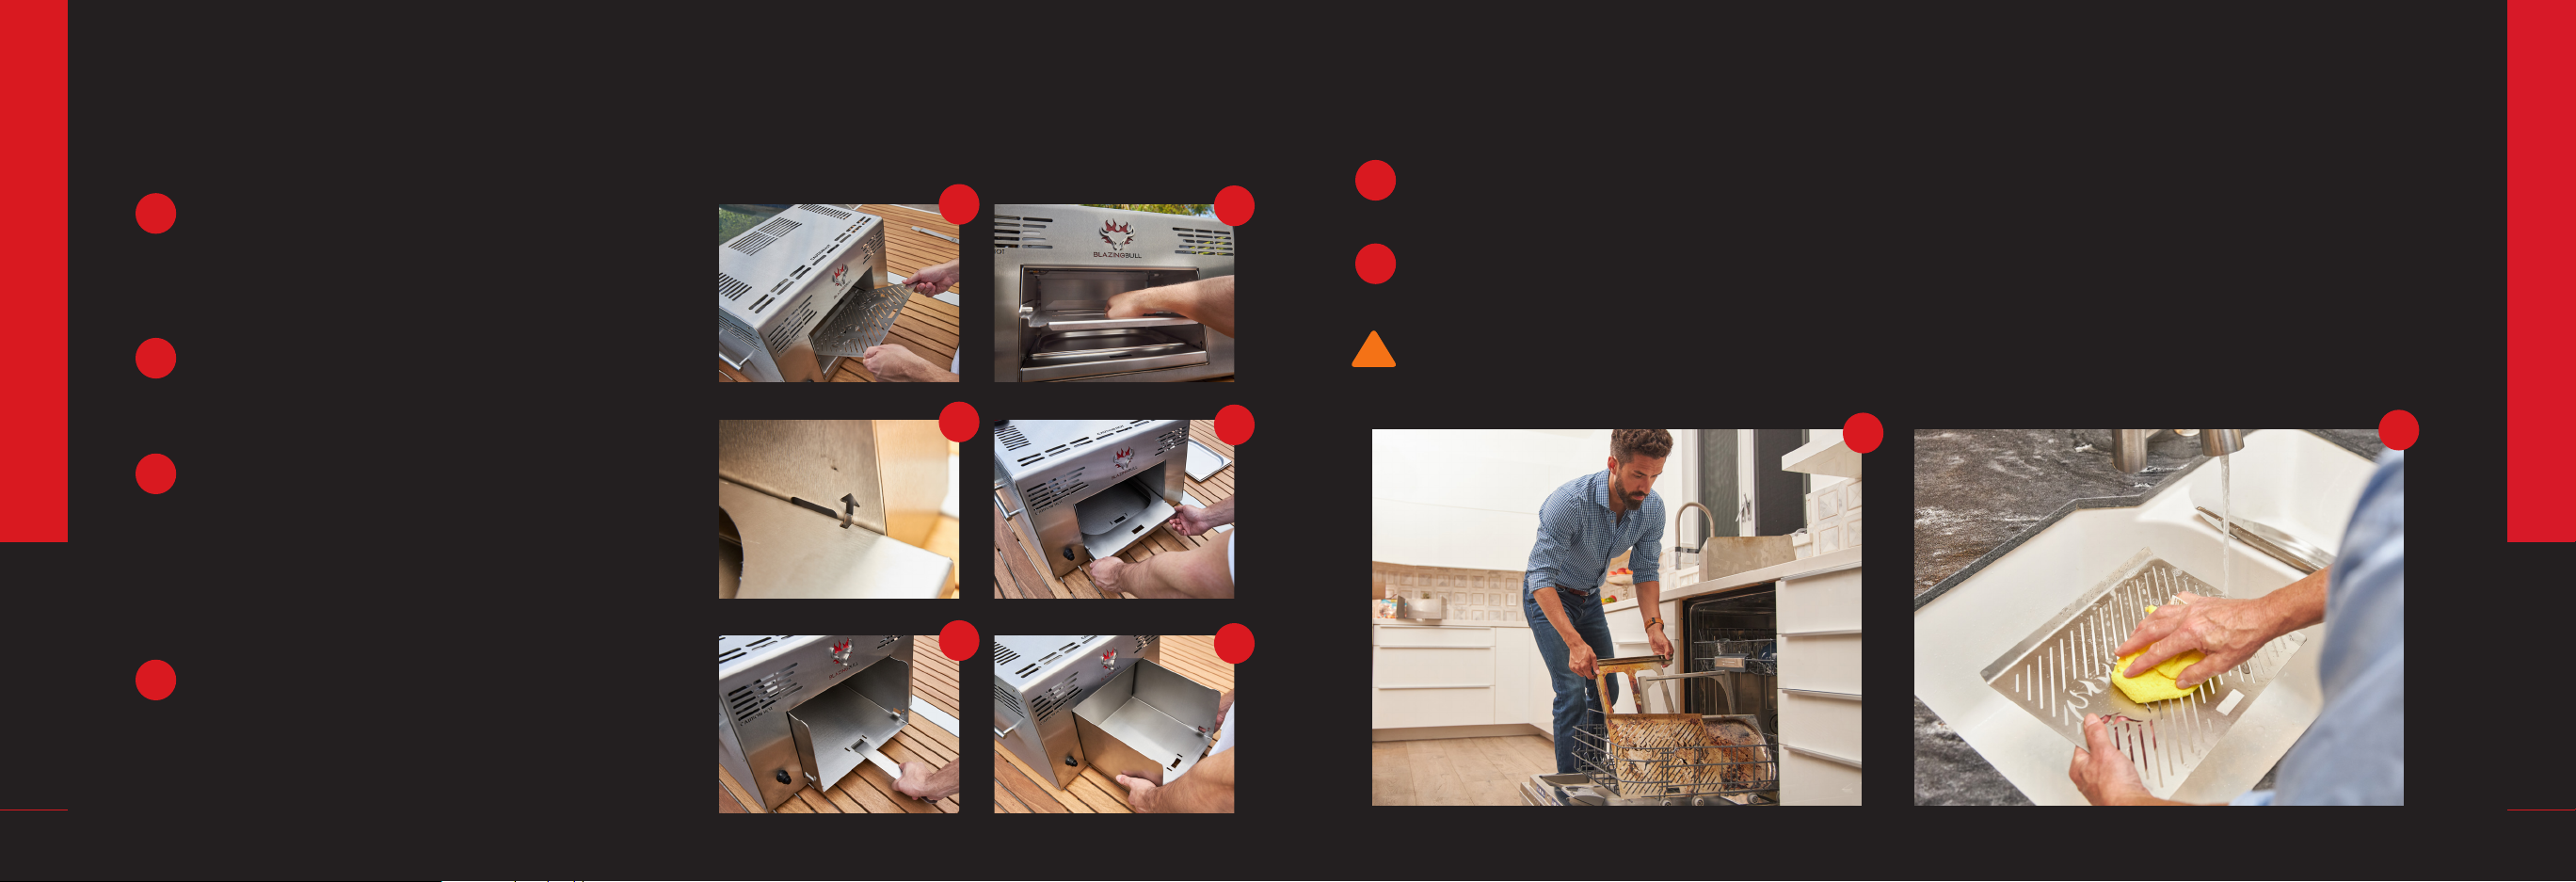
Remove the grill grate by sliding it out
towards you until the lip reaches the pins,
lift the grill grate vertically and slide out to
release it from the grill shelf.
Remove the grill shelf by gripping the
middle bar and lifting upwards and out of
the grill.
Remove the drip tray from the drawer and
set aside. Insert the grill handle and pull the
drawer out until the side tabs of the drawer
align with the arrows on the liner. Set aside
grill handle, and use both hands to lift the
drawer up and remove it from the grill.
Remove the liner by inserting the grill
handle into the liner and sliding it towards
you about an inch. Remove the grill handle
and set aside. Use both hands to remove
the liner from the unit.
1
2
3
1
2
Use a cloth and warm, soapy water to clean components or simply throw them in the
dishwasher. All removable stainless steel components are dishwasher safe.
Clean the external stainless steel surfaces with a soft cloth and warm, soapy water. Do not
let any water come into contact with the burner tiles.
DO NOT TRY TO CLEAN OR TOUCH THE BURNER TILES OR THEY MAY DAMAGE
!
CLEANING COMPONENTS
4
1
REMOVING COMPONENTS
Always ensure your Blazing Bull has cooled off for at least 30 minutes before handling any parts.
1
2
1
33
44

27 28
TROUBLESHOOTING
TROUBLESHOOTING
Burners do not ignite
Burner ignites but tiles
appear to be more white
than orange
Valve on propane tank is not
open
Regulator hose is squeezed,
bent, or leaking
Gas isn’t getting to the
burners
No spark occurs when
pressing igniter button
Propane bottle is empty
Sunlight may affect the
appearance of the burner
tiles even though the unit is
on and operating correctly
Make sure valve on propane
tank is fully open
Check the hose routing and
remove obstacles
Push and hold down the
gas knob in the ON position
when pressing igniter button
Replace igniter battery
Refill propane tank at an
authorized LP gas dealer
Wait 5 minutes for burners
to heat up and continue
normal usage
PROBLEM POSSIBLE
CAUSE SOLUTION
Burner tiles remain blue for
over 5 minutes
Burner appears to be
fluttering
Burner extinguishes during
operation
Liner, drawer, or grill grate is
stuck in unit
Rain or water may have
affected the burner
Burner tile may be cracked
Food has touched the safety
shut off sensor
Propane bottle is empty
Unit was fired up without
inserting all components
Allow unit to run for 15-20
minutes and continue usage
(Purchase optional Blazing
Bull Cover to prevent this)
Turn unit off, wait 5 minutes
and fire up again. If problem
persists, contact customer
support
Turn unit off, shut off propane
tank and lower grill grate.
Wait 2-3 minutes, turn on
propane tank and re-ignite
Refill propane tank at an
authorized LP gas dealer
Turn off and allow unit to cool
down before removing
PROBLEM POSSIBLE
CAUSE SOLUTION
29 30
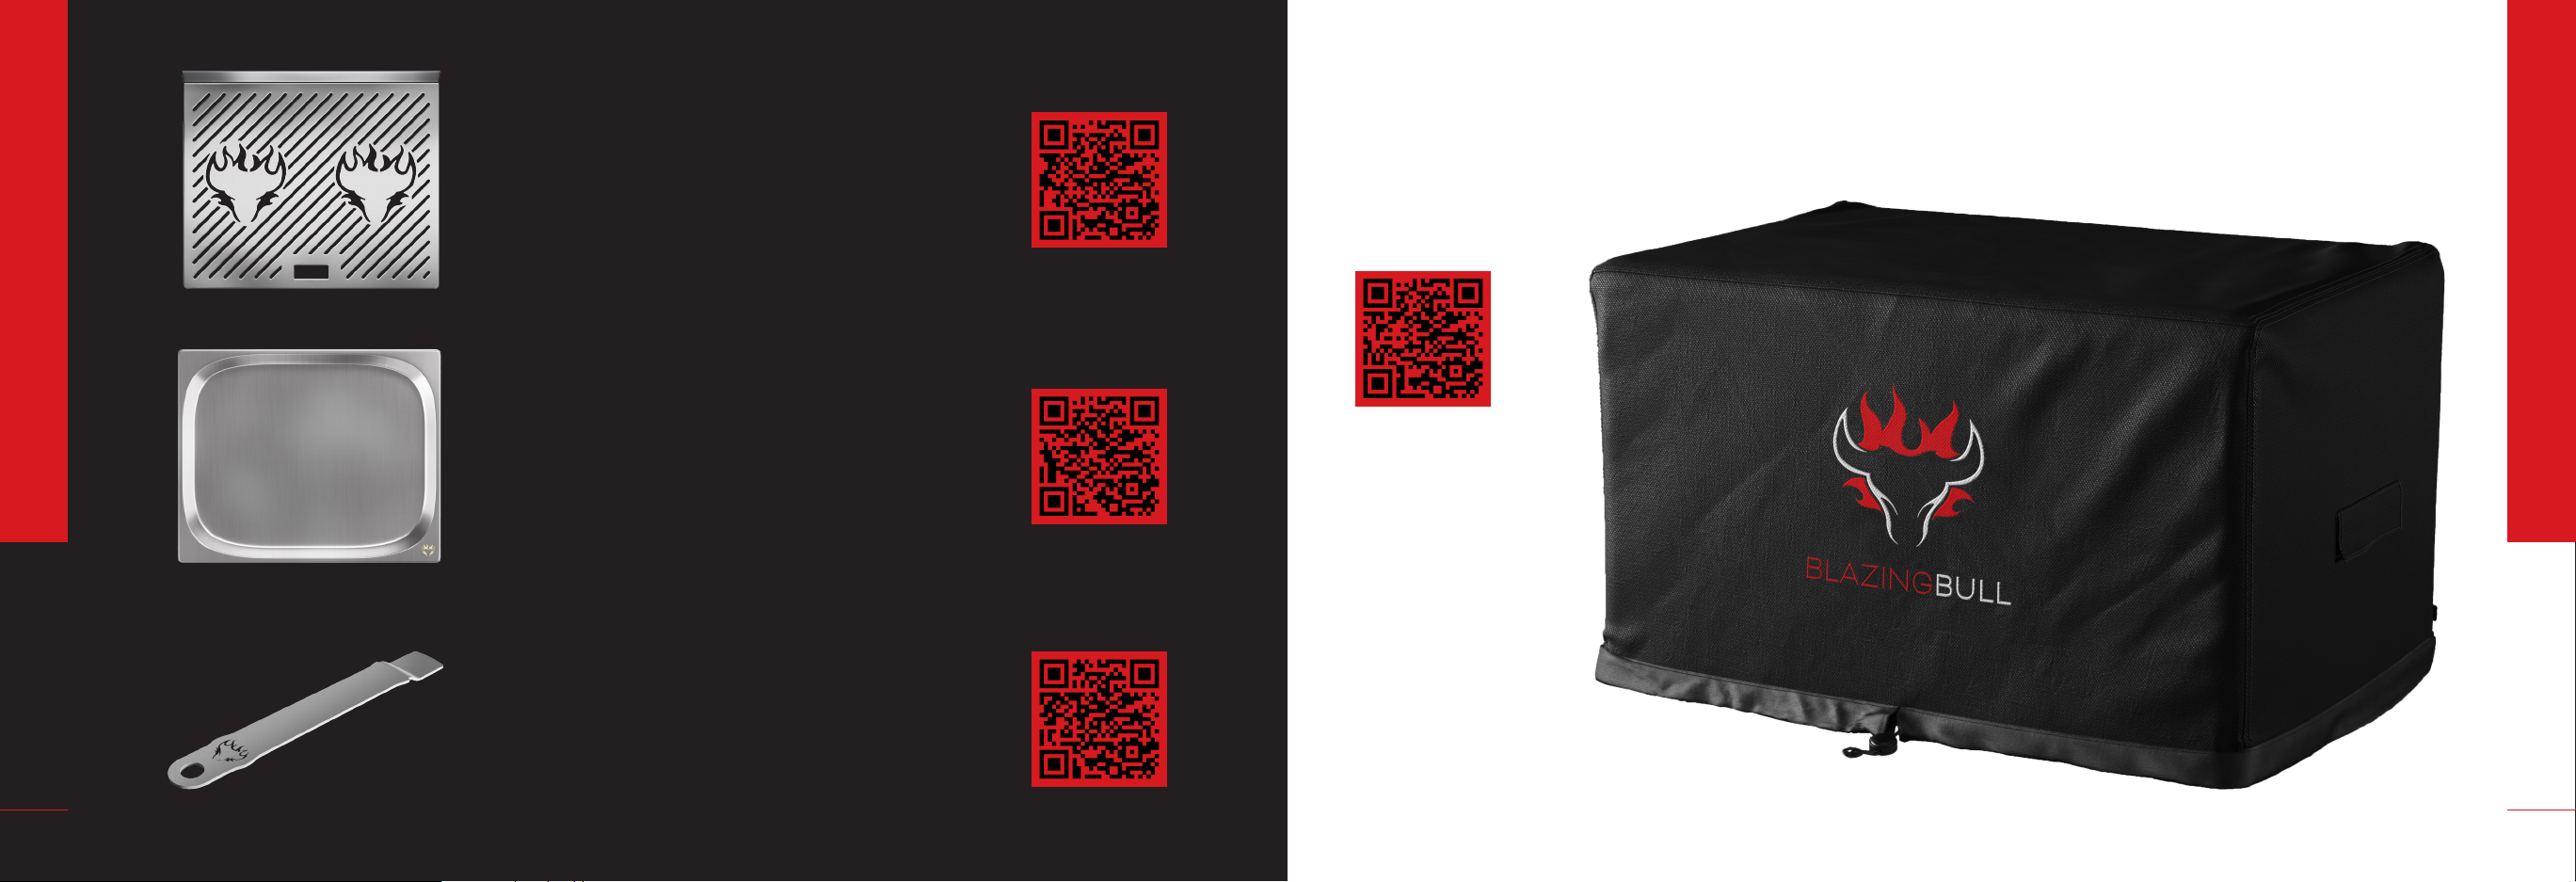
Grill Grate
The Blazing Bull Logos are positioned in
the center of the infrared burners. Center
your steak on the bull for the perfect
sear
Scan QR Code to
View Price
Drip Tray
Don’t waste those delicious juices! Allow
them to drip into the drip tray while
grilling to intensify the flavor of your food
Grill Handle
Use this handle to pull out the grill grate
and drip tray drawer. It is also used to
remove the liner from the grill when
cleaning
Blazing Bull Cover
Protect your grill with the UV
resistant, weatherproof grill
cover. Equipped with a draw
string and side handle cutouts
so you can carry your grill even
with the cover on
ACCESSORIES
ACCESSORIES

31 32
Pizza Peel
This stainless steel pizza peel is
extremely durable and contains a non-
stick coating for pizza to slide on and off
easily. The ergonomic folding handle
makes it easy to store
Scan QR Code to
View Price
Pizza Stone
Easily transform your Blazing Bull Grill
into a Pizza Oven with the addition of our
cordierite pizza stone accessory
Cutting Board
Our cutting board is made from 100%
natural Bamboo making it more
resistant to bacteria and less prone to
cracking and warping
ACCESSORIES
ACCESSORIES
33 34
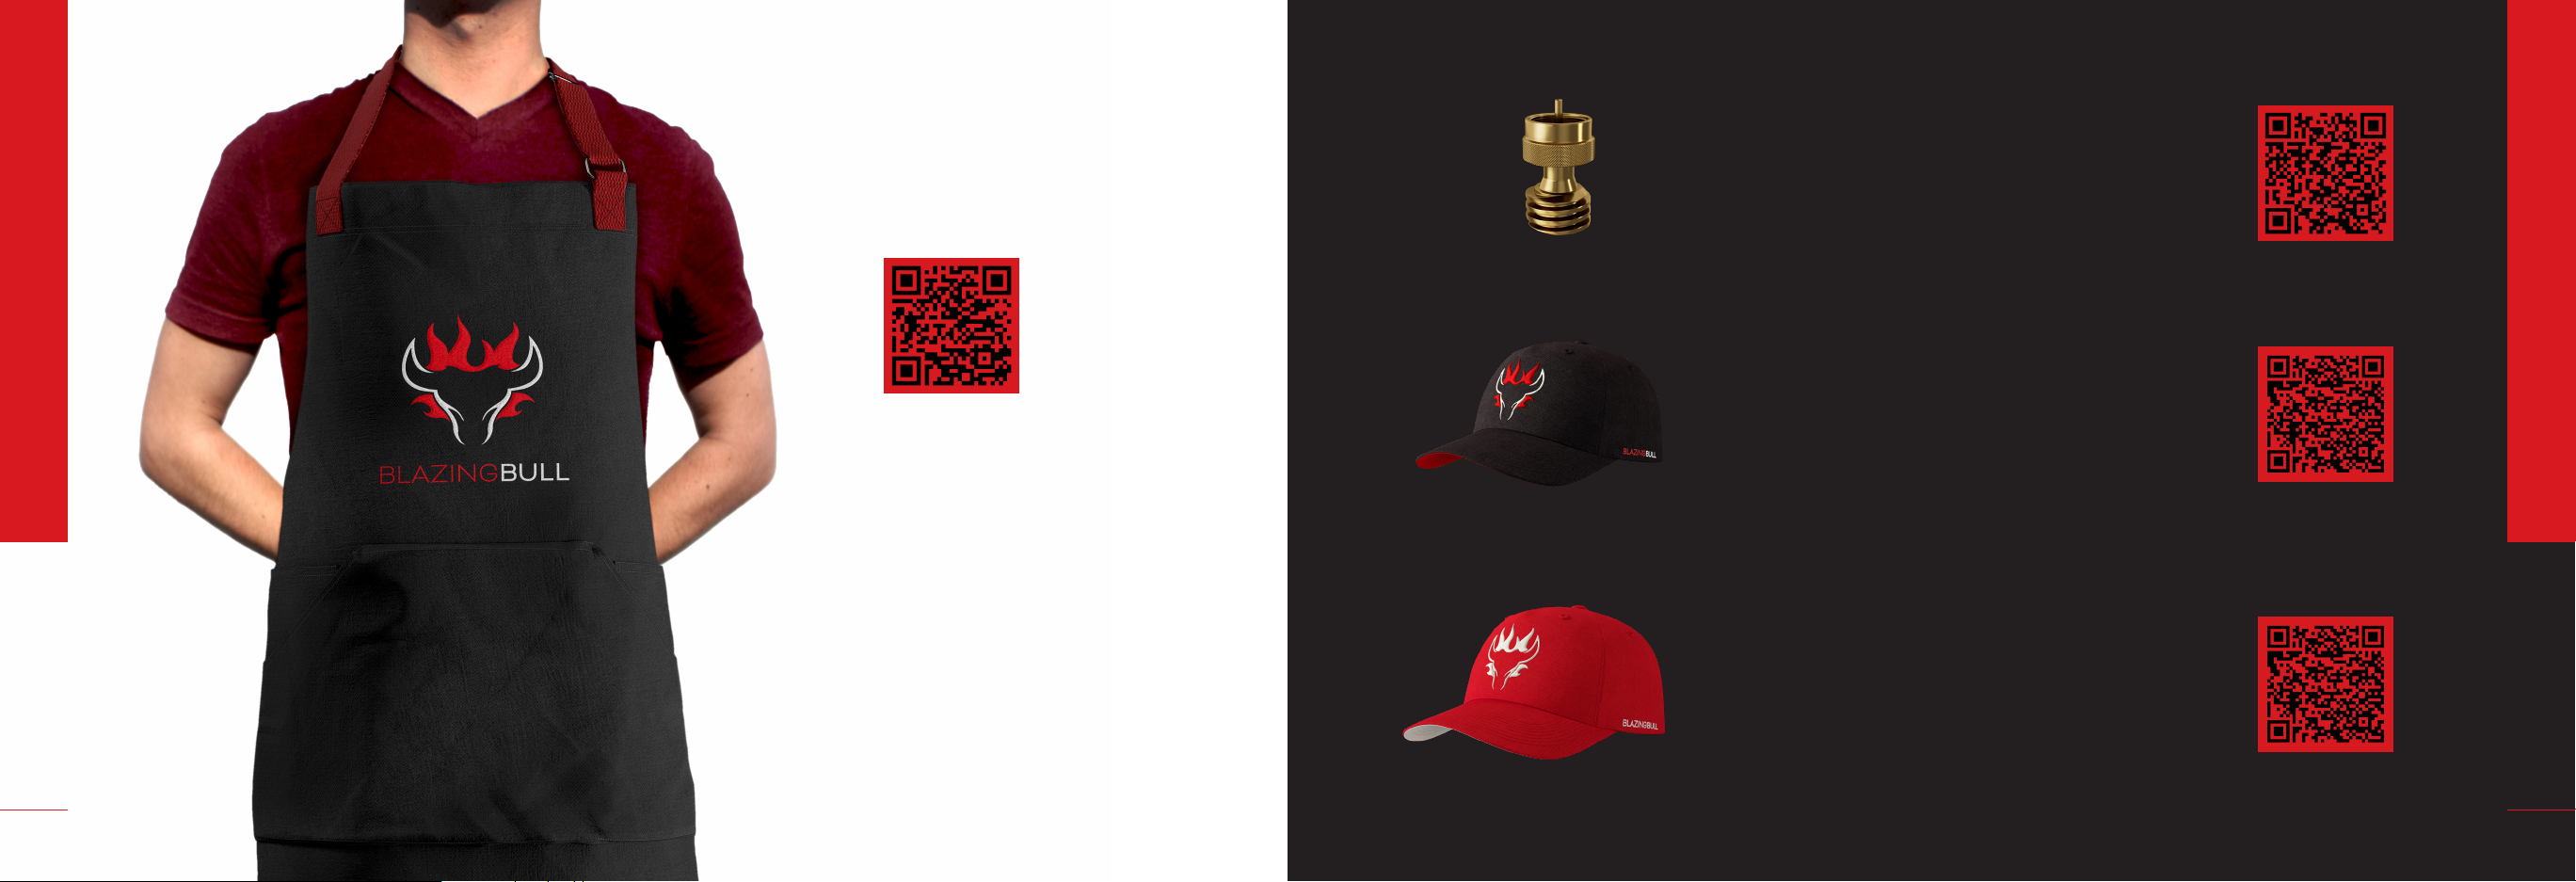
Blazing Bull Cap - Red
This cap features a special edition, all
white Blazing Bull logo with a red and
white color scheme to stand out of
the crowd. The cap is adjustable for a
comfortable and secure fit
Scan QR Code to
View Price
Blazing Bull Cap - Black
The stylish red and black color scheme
is a great complement to any outfit and
features a sleek Blazing Bull logo. The
cap is adjustable for a comfortable and
secure fit
1 lb Propane Adapter
This adapter allows you to connect your
Blazing Bull to any 1 lb propane tank for
even more portability
Blazing Bull Apron
Perfect for outdoor barbecues, the
Blazing Bull apron makes you look
like a true grill master. Made of
black denim and features a sleek
3D embroidered Blazing Bull logo
ACCESSORIES
ACCESSORIES

35 36
WARRANTY
WARRANTY
Blazing Bull warrants, to the purchaser of the Blazing Bull product (or in the case of a gift or
promotional situation, the person for whom it was purchased as a gift or promotional item), that
the Blazing Bull product is free from defects in material and workmanship for the period of one
(1) year from the original date of purchase when assembled and operated in accordance with
the accompanying User Manual.
Blazing Bull will, upon investigation, repair or replace (at its option) a defective part that is
covered by this warranty. In the event that repair or replacement are not possible, Blazing Bull
may choose (at its option) to replace the grill in question with a new grill of equal or greater
value. Blazing Bull may ask you to return parts for inspection.
Proof of purchase is required in order to claim Warranty. If you are unable to provide proof of
purchase before warranty has expired, you will be subject to parts, shipping and handling fees.
This warranty does not cover chips, dents, deformation and scratches of the unit or any damage
by abrasive or chemical cleaners.
If you lose or misplace your Blazing Bull User Manual, a replacement is available online at
blazingbullgrills.com/support
For replacement parts please contact Customer Support at 1-888-677-2649 or by email at
support@blazingbullgrills.com
Under normal, private single family home use and maintenance, Blazing Bull agrees within
the framework of this warranty to repair or replace defective parts within the applicable time
periods, limitations, and exclusions listed below.
This warranty lapses if there are damages, deteriorations, discolorations, and/or rust for which
Blazing Bull is not responsible caused by:
Abuse, misuse, alteration, modification, misapplication, vandalism, neglect, improper assembly
or installation, and failure to properly perform normal and routine maintenance;
Insects (such as spiders) and rodents (such as squirrels), including but not limited to damage
to burners and/or gas hoses;
Exposure to salt air and/or chlorine sources such as swimming pools and hot tubs/spas;
Severe weather conditions such as hail, hurricanes, earthquakes, tsunamis or surges,
tornadoes or severe storms.
The use and/or installation of parts on your Blazing Bull product that are not genuine Blazing
Bull parts will void this Warranty, and any damages that result hereby are not covered by this
Warranty. Any conversion of a gas grill not authorized by Blazing Bull will void this Warranty. Never
try to disassemble or repair your Blazing Bull unit, doing so will void this warranty.
ONE-YEAR LIMITED WARRANTY EXCLUSION OF WARRANTY
Table of contents
Popular Grill manuals by other brands


Masport
Masport MS304H-1B1 owner's manual

Fiammetta
Fiammetta MOMENTUM HS-18MA9401 Assembly & operating instructions

Dangrill
Dangrill 88221 instruction manual

Grandhall
Grandhall 5009XBHN Operating and assembly instructions

Grandhall
Grandhall OD3208SLP Operator's manual

Onward
Onward Broil King REGAL 500 owner's manual


