blossom-ic HERA+ PRIMUS PRO User manual

HERA+PRIMUS PRO
Assembly instructions
intelligent | economic | cost-saving | individual | flexible | user-friendly | smart | profitable | innovative
1.0
Version
Radio underfloor heating bar (6-zone basic module) in combination with
the Hera+ radio room thermostats/Hera Direct+ room thermostats and
the Hera+ actuators Optional connection of the Hera+ return temperature
sensors. With digital hydraulic balancing. Also suitable for retrofitting. In
conjunction with Gateway GT-100.
Up to 5 Hera+ Primus PRO wireless underfloor heating bars can be con-
nected to a gateway.
Brief description:

blossom-ic GmbH & Co. KG |Intelligent Controls
2
Table of contents...
Connection of the Gateway GT-100 ............3
Connecting actuators to radio underfloor
heating bar .........................................3
Connect the return temperature sensor to
the underfloor heating strip...................... 4
Registration of the radio underfloor
heating bar ......................................... 4
Register the Hera+ thermostat with the
bar and assign a port.............................. 4
Assign multiple ports to a thermostat..........6
Download of the blossomic App ................. 7
Technical data......................................8
Settings & key functions .........................9
• Explanation of the heating programs.......10
• Settings via the thermostat ................10
• Reset thermostat to factory settings .....10
• Reset radio-controlled underfloor heating
bar to factory settings ...................... 11
• Further information .......................... 11
Safety Instructions .............................. 11
Mounting on the valve ........................... 11
Declaration of conformity ....................... 11
Warning notice ................................... 11
Intended use ...................................... 11
Assembly instructions: Hera+ Primus PRO 3
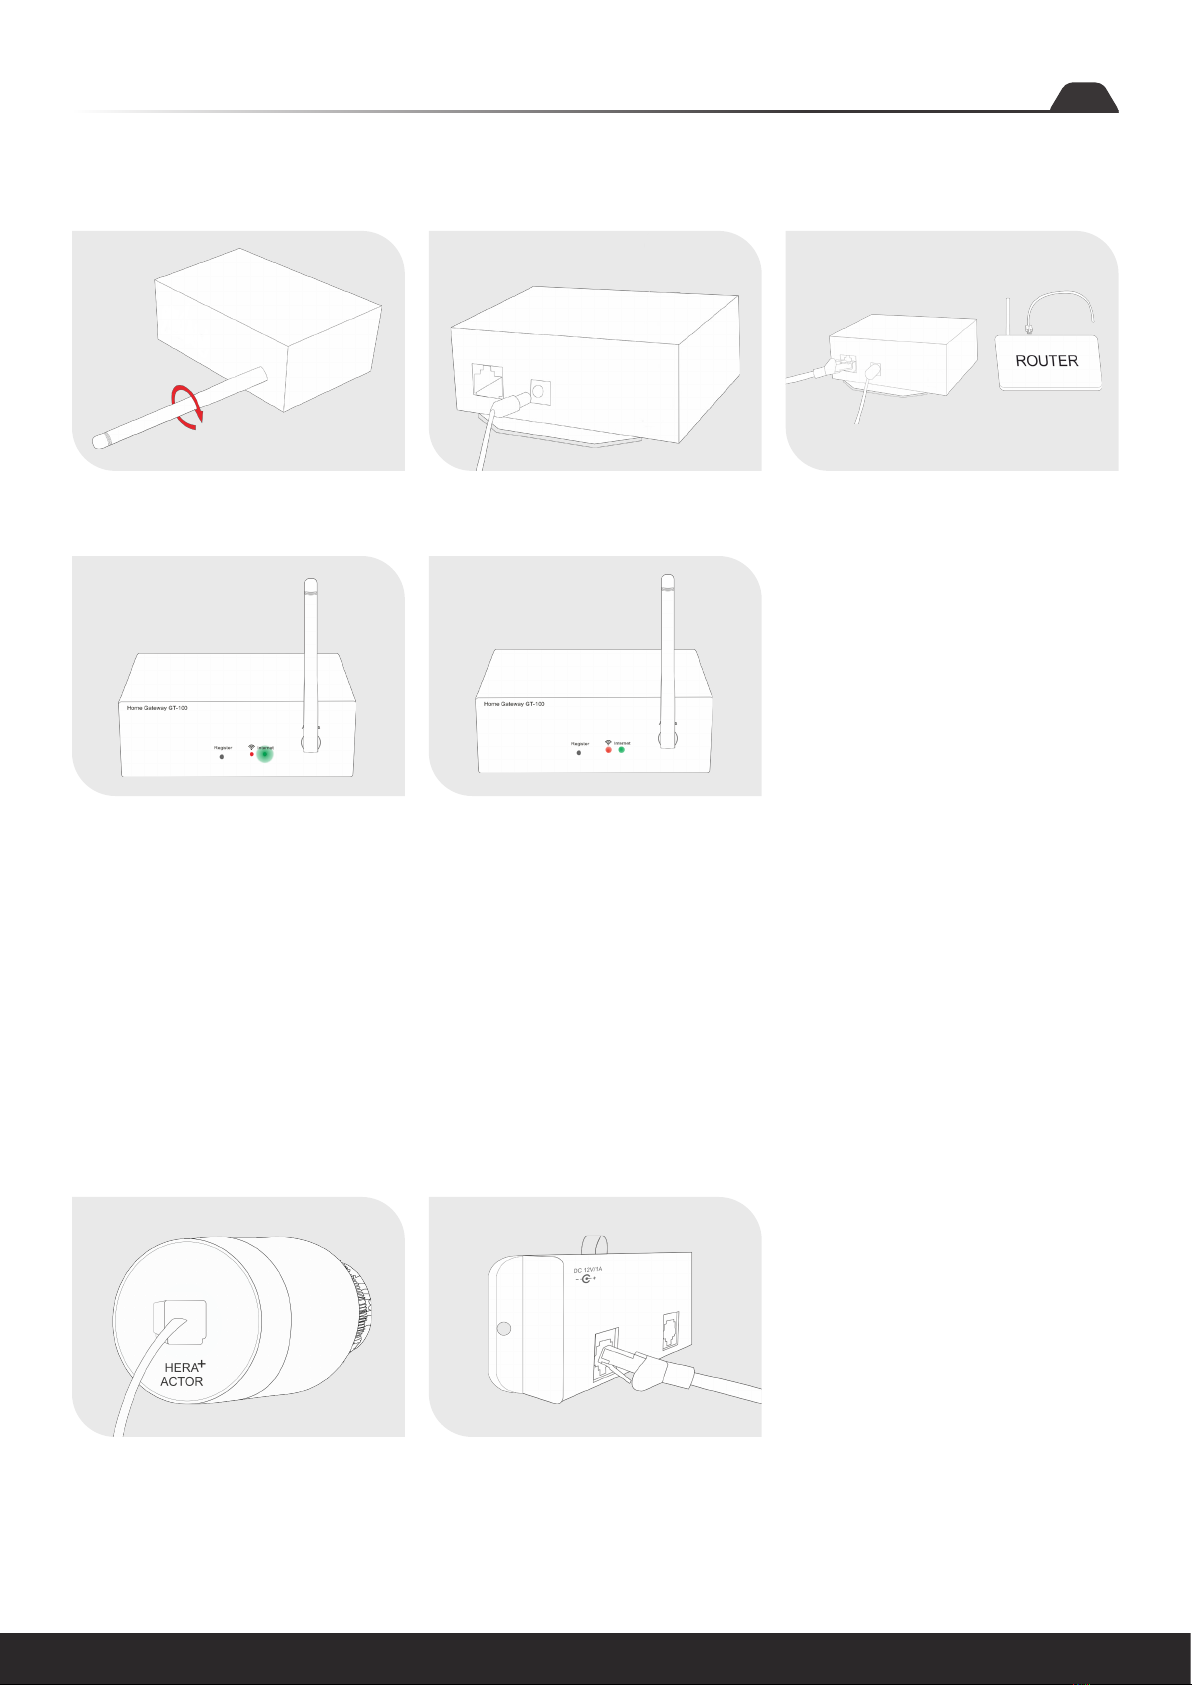
Connection of the Gateway GT-100
Screw on the antenna Connect power supply unit Connect the network cable
Both diodes light up
permanently: Gateway active
Check status
Green diode flashes: Internet connection is
being established
Green diode lights up continuously: Internet
connection successfully established
1. 2. 3.
4. 5. Note:
Functioning in the home-safe area.
Internet connection is used for convenient
setting and control via the smartphone.
The system functionality is also ensured if no
internet connection is available.
An internet connection is mandatory for the
first installation!
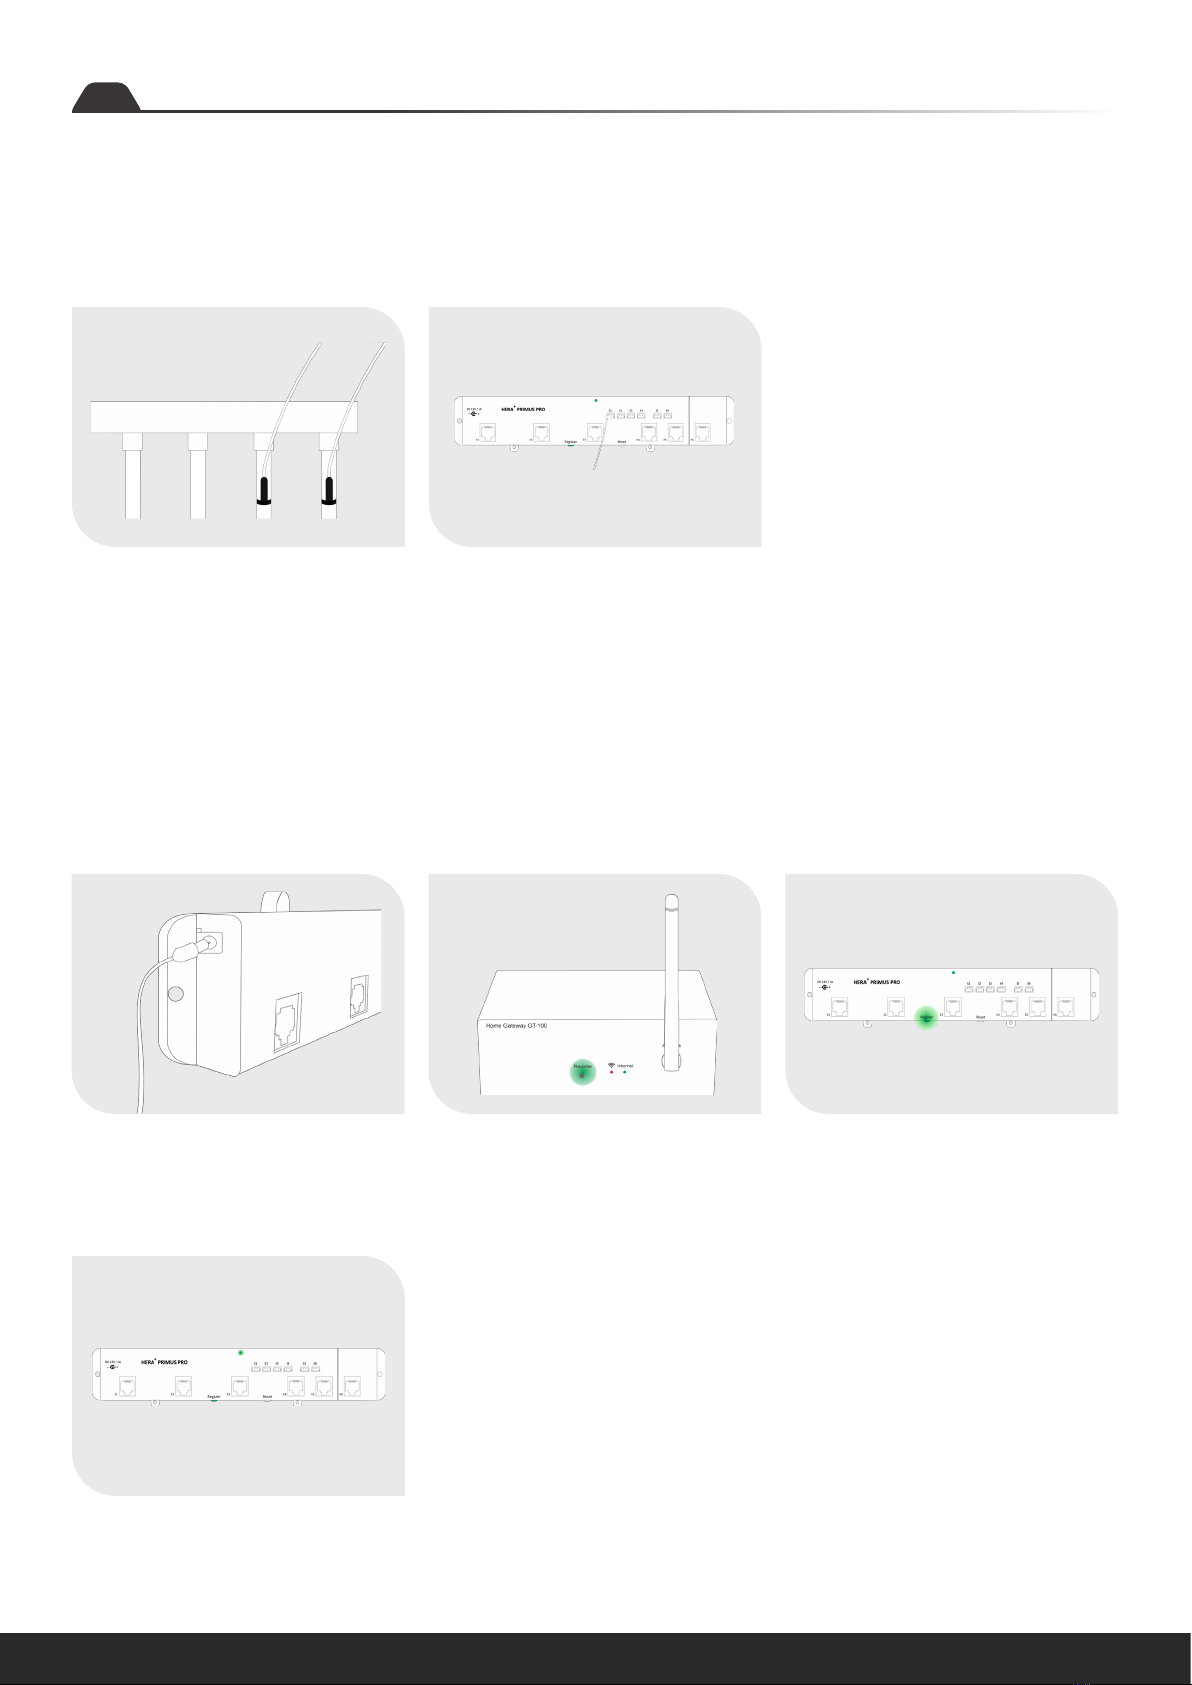
Plug the patch cable into the
actuator
Connect the patch cable to
the desired port on the bar
1.
Connecting actuators to radio
underfloor heating bar
2.
blossom-ic GmbH & Co. KG |Intelligent Controls
4
The LED on the bar lights up
continuously -> connection
successfully established
4.
Mount the return
temperature sensor on the
return pipe
Connect the return
temperature Sensor to the
desired slot on the bar
Connect the return temperature
Sensor to the underfloor heating bar
2. Note:
The return temperature Sensors are required
for a room with several circles. These ensure
that there are no cold spots in the room. A re-
turn temperature Sensor is required for each
circuit in this room.
Registration of the radio underfloor
heating bar
Connect the power supply unit
and place the bar in a suitable
place in the distributor
Press the „Register“ button on
the gateway
Press the „Register“ button on
the bar for 3 seconds
1. 2. 3.
Important notice:
The antenna must be installed outside of the
distribution box!
For the power supply a conventional 230V
socket in the distribution box is required!
1.
Return pipe
Return pipe
Assembly instructions: Hera+ Primus PRO 5
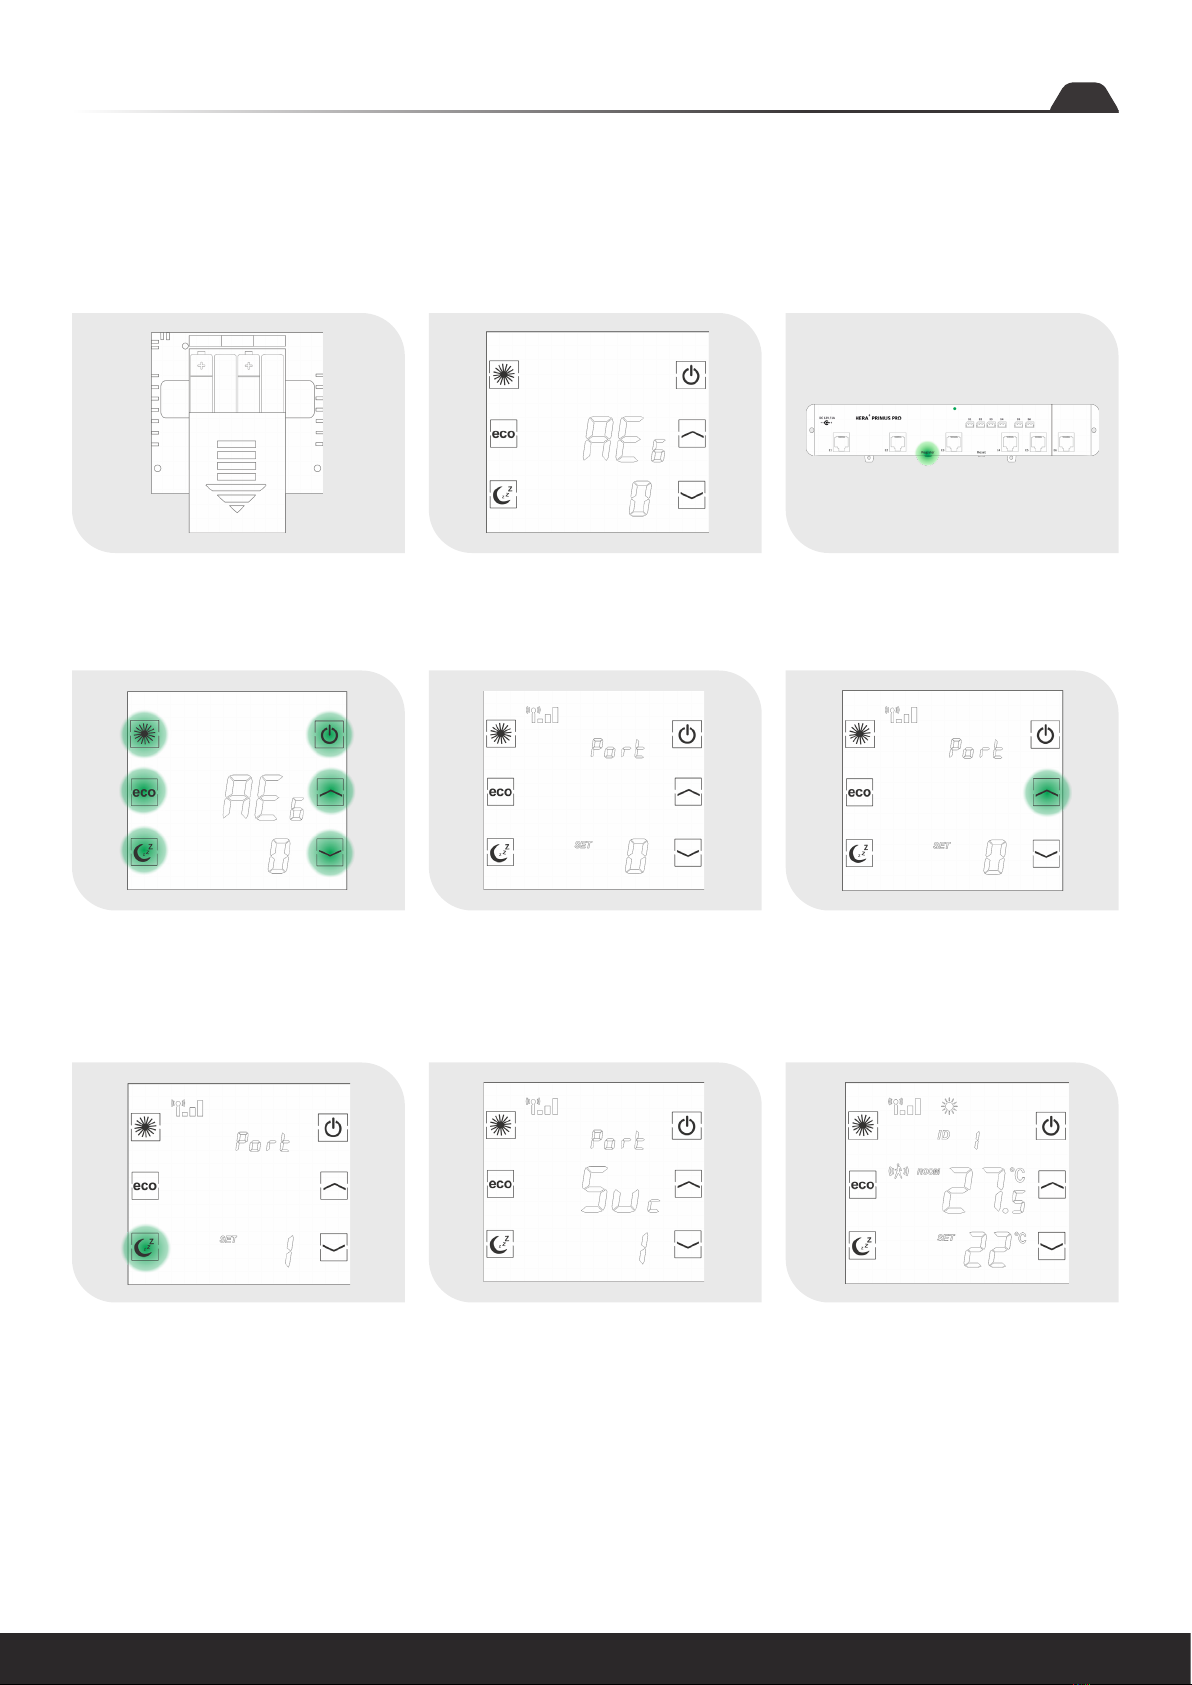
If the connection is
successful, „Port 0“ appears
Press a button on the
thermostat within 60
seconds
Use the arrow keys to select
the desired port
4. 5. 6.
Thermostat shows „Suc“ ->
Registration was successful
Press the „Sleep“ button to
confirm the port
Thermostat shows the
current room temperature
etc.
8. 9.7.
If registration to the Hera+ Primus PRO bar fails, the screen will continue to display “REG”.
Press a button on the thermostat again and it will try to connect to the bar again.
If the port on the Hera+ Primus PRO/ Hera+ Extensia PRO wireless underfloor heating bar
is already occupied, the error message “FAi” will appear.
Register the Hera+ thermostat with the
bar and assign a port
Insert batteries Thermostat shows “REG”
1. 3.2.
Press the “Register” button
on the Hera+ Primus PRO bar
Table of contents
Other blossom-ic Thermostat manuals


Popular Thermostat manuals by other brands


Charmeg
Charmeg MP-R user manual

dixell
dixell WING XW40LS Installing and operating instructions

Network Thermostat
Network Thermostat NetX X7C-WIFI Installation and programming manual

Radio Thermostat
Radio Thermostat CT80 Operation guide

HAI
HAI Omnistat RC-120 installation manual

Lennox
Lennox iComfort E30 Installation and setup guide

Lux Products
Lux Products PSD011Ba Installation and operating instructions

Computherm
Computherm Q20 operating instructions

Heatmiser
Heatmiser neoStat user manual

Mars
Mars HEAT CONTROLLER IR Wireless Thermostat user manual

LUX
LUX LP0511D user manual

Saswell
Saswell SAS920XWHB-7-S-RF User manual and warranty card