Blu ARIA POD+ User manual
BLU ARIA POD+
Quick Guide

Dual-ear mode: Initial use of headsets
Take out both left and right earphones fromthe charging box
when using it for the first time. Tear off the film. Put both
earphones back into the charging box. The two earphone
indicator lights is on. The headset is activated.
Basic Operations
Automatic power on/off: Open the lid of the charging box,
the headset will automatically turn on and the TWS
connection is successful. The headsets automatically shut
down after 3 minutes of pairing timeout. Put the earphone
back into the charging box and close the charging cover.
The earphone will automatically shut down after
disconnecting the phone and enter the charging state.
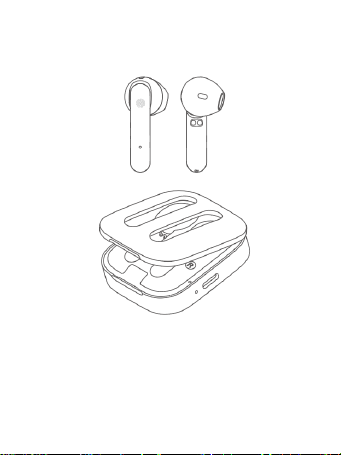
Product overview
1. Headsets
2. Multifunction key
3. Charging contacts
4. Sound hole
5. Microphone
6. Charging box
7. Charging interface
8. Indicator light

Connection: After the left and right earphones are paired,
open the cover of the charging box, the white LED of the
earphone is flashing quickly. Search for the pairing name on
your mobile phone, click Connect, and the phone will have
an electronic alert tone if it is successfully connected.
Apparel
Please follow the diagram to penetrate the earphone into
the ear, press the R<> right ear and LRR<> ear
correspondence. Please rotate the headset slightly and
adjust to a comfortable angle to ensure that the headset is
stable and tight to prevent the headset from falling off.

Receive a call: When there is an incoming call, you can
double-tap either the left earphone (L) or the right earphone
(R) to receive the call.
Terminate a call: During a call, you can double-tap the left
earphone (L) or right earphone (R) to terminate the call.
Cancel outgoing call: When the call is made, double-tap
the left earphone (L) or right earphone (R) to cancel the
outgoing call.
Music play/pause: When the music is being played, you
can double-tap the left earphone (L) or right earphone (R) to
pause the music, or repeat the same action to start playing
the music again.
Previous Track: Long touch the left earphone (L) for 3
seconds.
Next Track: Long touch the right earphone (R) for 3
seconds.
Game mode: Touch the headset 3 times to turn on the
low-latency mode, accompanied by a "beep-beep" tone,
repeat the operation to turn off the low-latency mode,
accompanied by a "beep-beep-beep" tone.
Automatic re-connection: After the earphone are powered

on, they are actively re-connected to the last paired one
devices.
iOS battery level display: After the earphone is connected
to the iOS, the battery level of the earphone can be
displayed.
Charger and Battery
Before using any charger to charge this earphone, check
whether the specifications of the charger meet requirements.
The recommended output voltage of the charger is
DC5V+/-0.25V, and the recommended output current is 100
mA to 500 mA. An over-high charging voltage may damage
the earphone.
Warning: Use the recommended charger whenever
possible. Use of other types of chargers may violate the
warranty terms of the equipment and results in danger. If the
charging cable is delivered with the earphone, connect the
cable to a CCC-certified charger or computer to charge the
earphone.
Charging the Battery
The earphone use embedded charging battery that cannot
be removed. Do not attempt to remove the battery from the
earphone or the charging box;
otherwise, the earphone may be damaged. If the earphone

is not used in a long time, keep it in a cool and
well-ventilated place, and charge the earphone once every
two months.
1.When the white LED light of the connected headset
flashes with a "beep" tone, it indicates that the headset is
low on power. If you continue to use it, it will automatically
shut down.At this time, you need to put the headset back
into the charging box to charge.
2.If both the earphone and charging box are out of power,
plug in the cable of the charger into the TYP-C USB port on
the charging box, and plug the charger into theAC socket.
The charging box and earphone will be charged
simultaneously.
3.The earphones are charged in the charging box through
two metal contacts. The white LED lights of the earphones
are on when charging. It may take about 2 hours to fully
charge the battery. After the battery is fully charged, the
white LED lights are off. The earphones are ready for use at
this time. When the charging box is charging, the white LED
light flashes. It may take about 2 hours to fully charge the
battery. After the battery is fully charged, the white LED light
is always on. At this time, disconnect the charger from the
power socket and the charging box.
4.A fully charged battery of earphone can provide about 3.9
hours of talk time, or 94 hours of standby time. The actual

talk time and standby time may vary with cell phones,
settings, use methods, and environment.
FCC Caution.
This device complies with part 15 of the FCC Rules.
Operation is subject to the following two
conditions:
(1) This device may not cause harmful interference, and
(2) this device must accept any interference received,
including interference that may cause
undesired operation.
Any Changes or modifications not expressly approved by
the party responsible for compliance
could void the user's authority to operate the equipment.
Note: This equipment has been tested and found to comply
with the limits for a Class B digital
device, pursuant to part 15 of the FCC Rules. These limits
are designed to provide reasonable
protection against harmful interference in a residential
installation. This equipment generates
uses and can radiate radio frequency energy and, if not
installed and used in accordance with the
instructions, may cause harmful interference to radio

communications. However, there is no
guarantee that interference will not occur in a particular
installation. If this equipment does
cause harmful interference to radio or television reception,
which can be determined by turning
the equipment off and on, the user is encouraged to try to
correct the interference by one or
more of the following measures:
-Reorient or relocate the receiving antenna.
-Increase the separation between the equipment and
receiver.
-Connect the equipment into an outlet on a circuit different
from that to which the receiver is
connected.
-Consult the dealer or an experienced radio/TV technician
for help.
The device has been evaluated to meet general RF
exposure requirement. The device can be used
in portable exposure condition without restriction.
Table of contents


