Blue Bird Coachworks 450 LXi User manual


~ i - 1 ~
Rev. “C”
INTRODUCTION
450 LXi Owner Manual
Introduction
Dear Coachworks Owner:
Welcome - Thanks for choosing a Blue Bird Coachworks Motor Home!
We want to personally welcome you to our Family of Friends and we invite you
to visit us at our Fort Valley facilities whenever you wish. We are always happy to
see you and we are deeply interested in your experiences as you use and enjoy
your Coachworks motor home. We recognize that it is our relationship to you, the
Coachworks owner, which contributes most to the prestige of ownership of this
finest over-the-road motor home.
We trust that as you become more intimately acquainted with your new
motor home, the sound, careful thoughts behind every aspect of its design will
become increasingly evident and your initial decision to choose Coachworks will
be positively reinforced with every mile.
We encourage that you take the time to become familiar with this introduction
section before taking your first trip in your new motor home. Inside you will find
information that will be beneficial on future trips with your motor home such as:
vehicle loading, emergency exits, safety information, etc.
Coachworks acknowledges the good faith you have demonstrated in choosing
this product. All of us at Coachworks take great pride in our handiwork and want
to do everything possible to beget in you what has become the Coachworks
experience; the deep satisfaction that comes from years of a sure confidence of
having chosen the very best.
~ i - 2 ~ Rev. “C”
INTRODUCTION
450 LXi Owner Manual
NOTE: This information was correct at time of printing. For any vendor changes made
to equipment and/or manual after printing date refer to the actual vendor owner manual
supplied with motor home.
Limited Warranty
Wanderlodge Recreational Vehicle
Blue Bird Coachworks, a division of Complete Coachworks, Inc., warrants each Wanderlodge to the original purchaser to be free
from defects in material and workmanship under normal use and service within the limits described below:
For a period of five (5) years/50,000 miles/80,000 kilometers, whichever occurs first, from date of delivery to the original
purchaser, Coachworks warrants the:
Chassis frame rails and cross members to be free from defects in structural integrity (breaking or cracking).
Body shell (those structural metal components welded or riveted together forming floor, sidewalls, roof, from and rear
sections) to be free from defects in structural integrity (breaking or cracking) including rust-through.
Paint adhesion to the body shell (those structural components forming side walls, roof, front and rear sections). Paint
failures caused by corrosive atmospheric conditions and road chemicals are specifically not covered.
For a period of three (3) years/36,000 miles/60,000 kilometers, whichever occurs first from the date of delivery to the
original purchaser, Coachworks warrants all other components not covered in sections 1 and 3 except diesel engines,
automatic transmissions, tires and batteries, which are warranted by their manufacturers.
For a period of one (1) year from the date of delivery to the original purchaser, Coachworks warrants plasma televisions
installed by Coachworks.
For demonstrators, the delivery date to the dealer will be the warranty start date. Mileage accumulated by the factory or dealer
apply to any warranty mileage limits stated above. This limited warranty applies to the original purchaser during the warranty
period. A transfer request and fee are required within thirty (30) days of resale to transfer the warranty.
Blue Bird Coachworks’ obligation covered in this limited warranty is limited to the repair or replacement of such parts as shall,
under normal use and service, appear to have been defective in workmanship or material. Without restricting the generality of
this limitation, loss of use, commercial loss, maintenance, towing charges, lodging, telephone calls, inconvenience, and loss of
time are specifically not covered. This warranty shall not apply to any parts or components which must be repaired or replaced
during the warranty period as a result of what is, in the opinion of Coachworks, normal wear and/or deterioration in the course
of normal operations and use, accident damage, misuse and/or abuse.
If distributors, dealers or customers have any vehicle modifications or equipment installations performed without the written
approval of Coachworks to the extent of modifications or equipment installations adversely affect other vehicle components or
performance. Coachworks shall not accept any product liability or claims under the terms of the limited warranty. These claims
become the sole responsibility of the company performing the modifications and/or installations.
ANY IMPLIED WARRANTIES, INCLUDING THOSE OF MERCHANTABILITY OR FITNESS, ARE LIMITED TO THE WARRANTY PERIOD
OF THIS WRITTEN WARRANTY. BLUE BIRD COACHWORKS SHALL NOT BE LIABLE FOR INCIDENTAL OR CONSEQUENTIAL
DAMAGES RESULTING FROM BREACH OF THIS WRITTEN WARRANTY OR ANY IMPLIED WARRANTY. NO PERSON, INCLUDING
SALESPEOPLE, DEALERS, SERVICE CENTERS, OR FACTORY REPRESENTATIVES OF BLUE BIRD COACHWORKS, IS AUTHORIZED
TO MAKE ANY REPRESENTATION OR WARRANTY CONCERNING COACHWORKS PRODUCTS EXCEPT TO REFER TO THIS LIMITED
WARRANTY.
Blue Bird Coachworks reserves the right to make changes in design and changes or improvements upon its products without
imposing any obligations upon itself to install the same option upon products theretofore manufactured. Defects shall
be repaired promptly after discovery of the defect and within the warranty period as stated herein. All claims for warranty
adjustments must be received by Blue Bird Coachworks not later than 30 days after the repair date, and shall be channeled
through an authorized Blue Bird Coachworks dealer or factory representative. Any suit alleging a breach of this limited warranty
or any other alleged warranty must be filed within one year of breach.
All rights under this limited warranty shall be governed by the law of Georgia, U.S.A.
Blue Bird Coachworks
One Wanderlodge Way • Fort Valley, Georgia 31030, U.S.A.
North American (USA & CAN) Eff: 09/2002 (2003YM) Rev: 12/2004 WLCN(eng) Policy: W2
1.
a.
b.
c.
2.
3.

~ i - 3 ~
Rev. “C”
INTRODUCTION
450 LXi Owner Manual
INTRODUCTION
This section of your Owner’s Manual contains general hints and recommendations for using your motor home. Checklists and
suggestions are offered which cover just about every phase of motor home travel.
The remaining sections of this manual describe the operation and use of the individual items and systems which comprise
your motor home.
Manufacturer’s manuals for components and appliances are included in your owner’s kit. If the information you need is not
contained in this manual, refer to the specific manufacturers literature supplied in the owner’s kit.
We hope that this manual will help answer questions that may arise about the use, operation and maintenance of your motor
home. Any suggestions or recommendations that you might have for including or expanding on material of interest will be
carefully considered for incorporation in future publications. We are always interested in providing our motor home owners
with the most current and comprehensive information about their product.
Some Other Thoughts to Consider before Travel
Automobile insurance to cover you and your family.
Avoid cash. Use traveler’s checks and credit cards wherever possible.
Confirm reservations well in advance of arrival.
Make a clothing check list for everyone.
Citizen’s Band Transceiver
You might also bear in mind that your motor home is equipped with a CB unit (Citizen’s Band receiver-transmitter) In the
event of an emergency situation which requires outside assistance; remember to call for help on Channel 9. This channel is
restricted to emergency use only and it is monitored 24 hours per day! Don’t hesitate to use your CB if you see someone else
in need of assistance.
Hot Weather Operation
Wherever possible, choose a shaded parking site so that the motor home will be cooler during the hottest part of the day.
The optional patio awning will be especially useful in lowering inside temperature. Air conditioning units are indispensable in
hot climates. Keep in mind that their proper operation depends on adequate line voltage. Low voltage causes motors to run
hotter and reduces compressor motor life. Supply voltage in some campgrounds may not be as high as necessary, especially
where there are heavy loads on the lines from other air conditioners. Check the right hand overhead auxiliary panel 120 VAC
meters when in doubt.
Cold Weather Operation
If frost or condensation accumulates in closets or cabinets during long periods of cold weather operation, leave the doors to
these areas slightly ajar to provide air circulation. Be sure that roof vents are open when using the cook top.
Campground Courtesy
Don’t forget the “Golden Rule”. Being considerate of your neighbors will help make friends. A few of the “do’s” and “don’ts”
are:
Good housekeeping – put all litter in the proper receptacles and leave your site neat and clean.
Don’t allow your water or sewer hook-ups to leak.
Respect your neighbor’s desire to retire at an early hour. Avoid loud noises and bright lights after dark.
Drive slowly through camp areas at any hour for the safety of pedestrians.
Insurance
As with your automobile, it is important that you have adequate protection with insurance coverage for personal liability,
property damage, comprehensive, collision, medical payments, loss of use, etc.
•
•
•
•
•
•
•
•

~ i - 4 ~ Rev. “C”
INTRODUCTION
450 LXi Owner Manual
Canadian and Mexican Insurance
Insurance for travel in Canada can usually be covered by your present U.S. policy for the recreational vehicle, often at no extra
cost. Consult your individual company for procedures and be sure of your coverage before entry.
For travel in Mexico (at the present time), there are no U.S. insurance companies that can provide recognized Mexican
coverage, with the exception of that required for travel through a narrow strip of Mexican territory in and around parts of entry
and the U.S./Mexican border.
Mexican insurance is controlled and rates are set by the Mexican government. There are several reliable companies handling
Mexican insurance, with similar rates for the necessary coverage. The principle differences between them are the “fringe
benefits”, received in the form of informational travelogues and other helpful information, such as dining places considered
acceptable for sanitary conditions, fuel stations, and so on.
Some insurance services include detailed route maps with “where to stay” recommendations and “things to see” mile-by-mile
(or kilometer-by-kilometer post). While the rates set by Mexico may seem quite expensive at first glance, you usually end up
not spending quite as much as expected because you can usually arrange to hold your state-side policy in abeyance during
the same period you are in Mexico, thus not having to pay unnecessarily for double coverage. In addition, you may be able
to obtain substantial refunds on the Mexican collision insurance after your return to the U.S. Be sure to obtain a certification
from the park operator at each location in Mexico to certify the dates that your motor home was parked there. If your motor
home is parked for most of the time, instead of constantly traveling, your refund may be a major portion of the original cost.
This feature is referred to as the ‘in-storage” credit. (It is a good idea to always check with your insurance company before
taking a trip to find out whether applicable insurance rules and regulations have changed. Keep up to date on your coverage.)
Carry insurance papers at all times!
Safety Considerations
Using LP Gas
Check for leaks at the connections on the LP gas system soon after purchase and initial filling of the LP tank; continued
periodic checks of the system are recommended. Even though the manufacturer and dealer have already made tests for
leakage, this check is advisable because of the vibrations encountered during travel. Apply a soapy water solution to the
outside of gas piping connections to find gas leakage (bubbles). Do not use products that contain ammonia or chlorine.
Usually, tightening of connections will be sufficient. If not, ask your authorized dealer service to make the needed repairs.
Liquefied Petroleum Gas (LPG) is heavier than air. Leaking gas tends to flow to low places, and will sometimes pocket in a low
area. LP gas can usually be detected by an identifiable odor characteristic to garlic.
CAUTION!!
Never light a match or allow any open flame in the presence of leaking
gas! Be sure that the main LP gas supply valve is closed or galley panel
switch is OFF during refueling to prevent accidental ignition of gas
fumes by appliance ignitors.
WARNING!!
When motor home is to be stored in a confined area, turn off the LPG at the
main tank shutoff valve, or more conveniently, at the galley systems control
panel. Your Wanderlodge has been provided with an automatic 80% fill
valve to protect you from the dangers of an overfilled LPG tank.

~ i - 5 ~
Rev. “C”
INTRODUCTION
450 LXi Owner Manual
Electrical Systems
Your motor home has been engineered and checked for your complete electrical system safety. The motor home is wired with
Multiplex wiring throughout. Circuit breakers and fuses are installed to protect electrical circuits from overloading. Before
making modifications or additions to the electrical system, consult your dealer for assistance in obtaining a safe and secure
installation. For more information on the wiring system refer to Electrical Information found later in manual.
Do not “jump” circuit protectors!
Emergency Stops
Always carry road flares and/or reflective triangular highway warning markers for emergency warning display. Pull off the
roadway as far as possible when changing flats or for other emergency situations. Turn on your hazard warning flashers when
parked alongside a roadway, even if only for a short while. Have your motor home occupants leave the vehicle and stand clear
of the area when parked on the edge of a highway.
In Case of Tire Blowout
As a result of extensive tests, leading tire manufacturers recommend the following when a blowout occurs:
Quickly step on the gas
Adjust steering as needed.
Stay off the brakes.
Keep driving until you find a safe place to pull over.
Engine Exhaust Gas
Avoid inhaling exhaust gases because they contain carbon monoxide, which by itself is colorless and odorless. Carbon
monoxide is a dangerous gas that can cause unconsciousness and is potentially lethal. If at any time you suspect that any
exhaust fumes are entering the passenger compartment, have the cause determined and corrected as soon as possible.
The best protection against carbon monoxide entry into the vehicle body is properly maintained engine exhaust system, body
and ventilation system. It is a good practice to have the exhaust system and body inspected by a competent mechanic each
time the vehicle is raised for lubrication or oil change. It should also be inspected whenever a change is noticed in the sound of
the exhaust system, and if the exhaust system, underbody or rear of the vehicle has been damaged.
To allow proper operation of the vehicle’s ventilation system, keep ventilation inlets clear of snow, leaves or other obstructions.
Sitting in a parked vehicle with the engine on for extended periods of time, without proper ventilation, is not recommended!
More Safety Considerations
Sanitize fresh water supply system periodically.
Prevent water connection fittings from contacting the ground or drain the hose to reduce chances of contamination.
Consider using a qualified technician for repairing gas or electrical appliances.
Check fire extinguishers periodically for proper charge.
Avoid overloading your vehicle.
Be careful not to cause an improper load distribution which can adversely affect road ability.
Ensure that tires are in good condition and properly inflated at all times.
Under-inflated tires overheat and are prone to blowouts!
Check and tighten wheel lug nuts; manufacturer recommends after first 50-100 miles and every 1,000 miles thereafter.
1.
2.
3.
4.
•
•
•
•
•
•
•
•
•

~ i - 6 ~ Rev. “C”
INTRODUCTION
450 LXi Owner Manual
Emergency Exits
Sliding windows, which can be easily opened, may be
used as an emergency exit. Squeeze the window latch
and slide the window open. Emergency exit windows
are identified by an EXIT decal on the glass.
Owner’s Manual Requirements
The minimum required educational information in the
owner’s manual shall include:
A sample of the weight label’s contents affixed to
the unit as appropriate.
An explanation of the following:
Vehicle weight distribution
How to weigh the vehicle
These definitions:
Gross Axle Weight Rating (GAWR)
Gross Combination Weight Rating (GCWR)
Gross Vehicle Weight Rating (GVWR)
Unloaded Vehicle Weight (UVW)
Net Carrying Capacity (NCC)
Towing guidelines.
1.
2.
•
•
»
»
»
»
»
»
3.

~ i - 7 ~
Rev. “C”
INTRODUCTION
450 LXi Owner Manual
MOTOR HOME WEIGHT INFORMATION (to be filled out by owner for future reference)
Model ________________________________________________________________
GVWR ________________________________________________________________
UVW ________________________________________________________________
NCC ________________________________________________________________
GCWR ________________________________________________________________
GVWR
(Gross Vehicle Weight Rating) means the maximum permissible weight of this motor home. The GVWR is equal to or greater
than the sum of the Unloaded Vehicle Weight plus the Net Carrying Capacity.
UVW
(Unloaded Vehicle Weight) means the weight of this motor home as built at the factory with full fuel, engine oil, and coolants.
The UVW does not include cargo, fresh water, LP gas, occupants, or dealer installed accessories.
NCC
(Net Carrying Capacity) means the maximum weight of all occupants including the driver, personal belongings, food, fresh
water, LP gas, tools, tongue weight of towed vehicle, dealer installed accessories, etc., that can be carried by this motor home.
(NCC is equal to or less than GVWR minus UVW).
GCWR
(Gross Combination Weight Rating) means the value specified by the motor home manufacturer as the maximum allowable
loaded weight of this motor home with its towed trailer or towed vehicle.
This motor home is capable of carrying up to 98 gallons of fresh water (including water heater) for a total of 816 pounds.
Reference: Weight of fresh water is 8.33 lbs./gal.; Weight of LP gas is 4.5 lbs./gal. (average).
CONSULT WEIGHT DECAL LOCATED IN MOTOR HOME FOR ACTUAL WEIGHTS
Vehicle Loading
The Federal Certification Label, located inside and above the driver’s windshield between the sun visor mounting brackets
describes the maximum weight-carrying capacities of your motor home and for each axle, respectively abbreviated by “GVWR”
and “GAWR”.
The Gross Vehicle Weight Rating (GVWR) is the maximum motor home weight allowable with all systems filled and with
passengers and supplies aboard.
Each axle also has a maximum load-bearing capacity referred to as the Gross Axle Weight Rating (GAWR).
The load capacity is the difference between the GVWR and the actual weight. This means that the total weight of all food,
clothing, other supplies and passengers must not permit the load capacity to be exceeded.
To find the actual weight, with the motor home fully loaded, drive to a scale and read the weight on the front and rear wheels
separately to determine axle loading. The load on each axle should not exceed its GAWR. If weight ratings are exceeded, move
or remove items to bring all weights below the ratings.
When loading your motor home, store heavy gear first. Be sure to keep heavy gear on or as close to the floor as possible. Heavy
items should be stored centrally to distribute the weight evenly between the front and the rear axles. Store only light objects
on high shelves. Distribute weight to obtain even side-to-side balance of the loaded unit. Secure loose items to prevent weight
shifts that could adversely affect the balance and road ability of the vehicle.

~ i - 8 ~ Rev. “C”
INTRODUCTION
450 LXi Owner Manual
Motor Home Service – Replacement Parts
A paint color label is located adjacent to the Federal Certification Label above the pilot’s sun visor.
Data plates located on the rear of the chassis (raise rear engine compartment door for access) provide information useful for
identifying your motor home if you are planning on ordering parts. Identification plates provide information such as:
Body Serial Number
Model Year
Body Service Number
Chassis Serial Number
Chassis Service Number
Economical Driving
How you drive, where you drive and when you drive – these factors all have an effect on determining how many miles you can
get from a gallon of fuel. Careful maintenance will also contribute to fuel economy.
Frequent stops and starts during a trip diminish miles per gallon. Planning even short shopping trips so you can take
advantage of through-streets to avoid the traffic lights. Pace your driving like the professional drivers to avoid unnecessary
stops.
An idling engine also consumes fuel. If you are faced with more than a few minutes wait, and you are not in traffic, it may be
advisable to shut off the engine and re-start later.
A properly lubricated vehicle means less friction between moving parts. Consult the maintenance schedules for proper
lubricants, lubrication intervals and general motor home maintenance scheduling.
Fuel economy is also related directly to the amount of work accomplished by the engine. Heavier loads require more power:
Keep excess weight to a minimum.
Cellular Phone Wiring
A roof mounted antenna and wiring (terminals in driver’s area) are supplied for cellular phone hookup.
Fog Lights
Clear fog lamps are mounted stationary in the front bumper. The fog lamps illuminate only with low beam headlights, provided
the dash switch is activated.
Traveling in Your Motor Home
1.
2.
3.
4.
5.
On overnight short weekend trips, your motor home has more than adequate holding tanks and water supply capacity in the
event that campgrounds or parking sites are not equipped with these facilities.
On longer trips, where sewer connections and utility hookups are unavailable, it will be necessary to stop from time to time
to dispose of holding tank wastes and replenish the water supply. Many gas stations (chain and individually-owned) have
installed sanitary dumping stations for just this purpose.
When stopping for the night, park the motor home in a location that is relatively level and where the ground is firm. This will
ensure your comfort as well as the leveling of your refrigerator (for most efficient operation).
Making a long trip is not very different from making a weekend excursion since everything you need is right at hand and you
are home wherever you travel. When packing for an extended trip, try to avoid taking nonessential items.
NOTE:
1. Overall length - 44’-0”, Interior Height - 83”, Interior Width - 95”, Exterior Width - 102”, Wheelbase
- 296”, Front Overhang - 85”, Rear Overhang 99”, Cargo Carrying Capacity - 3,800 lbs. (depending on
options).
2. It is recommended that compartment doors be locked so they do not open while in transit. There
are many modern recreational vehicle parks with good facilities, including State, County and Federal
Parks, where electrical, water and sewer connections are readily available. Directories are published
which describe these parks in detail, and list available services and hookups.

~ i - 9 ~
Rev. “C”
INTRODUCTION
450 LXi Owner Manual
When planning to stay in the same location for several days, weeks, or even months, be sure to maintain the motor home level.
Use the leveling jacks system for this purpose. (See Leveling Jacks in Section 4-5 of this manual).
Hook up to the water supply by attaching the water hose to the commercial water supply inlet.
Plug the electrical cable into the shoreline receptacle. Be sure to observe all grounding and connection precautions!
Connect sewage hookup into the disposal facility.
Winter Traveling
Certain precautions should be taken when traveling in your motor home during the cold winter months. Keep these
suggestions in mind:
Provide heat in the motor home at all times.
Have a plentiful supply of LPG and diesel.
If your stay is longer than overnight and you do not use the generator, try to have a shoreline hooked up to outside AC
power.
Minimize your use of electricity if 120 vac is unavailable.
Leave cabinet doors and wardrobe doors slightly open at night to allow for proper air circulation.
Remember that low temperatures in combination with high winds will cause an equivalent chill temperature much below that
indicated by your thermometer. For instance, with an outside temperature of zero degrees and a wind velocity of 10 miles per
hour the equivalent chill temperature would be -20°F!
There is no substitute for common sense when traveling in cold weather.
General Storage Notes
Drawing draperies will reduce fading of rugs and upholstery. Leaving an air freshener agent will minimize odors from plastics
and other materials. Slight opening of windows and vents will allow air circulation without worry of water entering. Covering
wheels to eliminate direct rays of the sun on tires will reduce sidewall cracking.
•
•
•
•
•
Countertop Care
Reporting Safety Defects
If you believe your vehicle has a safety defect which could cause a crash or could cause injury or death, you should
immediately inform the National Highway Traffic Safety Administration (NHTSA) in addition to notifying Blue Bird Wanderlodge.
If NHTSA receives similar complaints, it may open an investigation, and if it finds that a safety defect exists in a group of
vehicles it may order a recall and remedy campaign. However, NHTSA cannot become involved in individual problems between
you, your dealer, or Blue Bird Wanderlodge.
To contact NHTSA, you may either call the Auto Safety Hotline toll free at 1-800-424-9393 (or 366-0123 in Washington, D.C.,
area). Or write to: NHTSA, U.S. Department of Transportation, Washington, D.C. 20590. You can also obtain other information
about Motor Vehicle Safety from the hotline.
NOTE: Remove all items from the motor home that may freeze, including canned foods, miscellaneous
liquids, etc. Remove all contents of the refrigerator/freezer, clean unit and leave doors ajar.
NOTES:
Proper care of all countertops is the owner’s responsibility. Scratches will occur if proper care is not
implemented. Use cleaners and cleaning materials only recommended for these types of countertops. For
example, using a scrub brushes or abrasive cleaners not recommended for this type of countertop could cause
unsightly scratches.
Chipping of countertops is not covered under the warranty. Abrasive cleaners can cause chipping. Please take
special care to avoid the chipping of countertops.

450 LXi Owner Manual
Rev. “C”
~ - ~
NOTES:

~ 1-1-1 ~
450 LXi Owner Manual
1-1 Safety Features
Rev. “C”
1-1 Safety Features
1-1.1 Seat Belts and Restraint
Systems
1-1.1.1 Pilot and Co-Pilot Seats
The seatbelts in the pilot and co-pilot area use a 3-point system built into the seat itself.
Seatbelts can be operated by grasping the shoulder buckle and moving it diagonally
across the body and buckling it into the red and black receptacle. To remove simply
press red button located at receptacle on seatbelt. Seatbelts automatically retract.
1-1.1.2 Living Room Area
Two lap belts are provided at the sofa area in living room. These are manual non-
retracting lap belts. These belts are operated by sitting between the belts and manually
latching over your waist. Be sure to pull snug to your waist. An improperly adjusted
seatbelt can be hazardous. To remove, simply press red button on seatbelt buckle.
1-1.2 Smoke Alarm
Your motor home is equipped with two Safe T Alert smoke alarms located on the
ceiling in the front and rear of the coach. These alarms meet U.L. Standard 217
and NFPA Standard 74 for operation of smoke detection devices.
1-1.2.1 Smoke Alarm Features
Listed to UL 10/1/99 smoke alarm standard for Residential and Recreational Vehicle.
New distinctive horn sound. Loud 85-decibel alarm horn.
Test button checks smoke alarm functions.
Alarm mute Models (S/SLL) feature Mute/Test button used to temporarily silence the
alarm during ventilation. Alarm automatically resets.
•
•
•
•
IMPORTANT SAFETY INFORMATION READ AND SAVE THESE INSTRUCTIONS
NOTE: these are the only four approved areas for seating while motor home is in transit.
Pic of Pilot
Safety Belt
Pic of Living Room
Safety Belt

~ 1-1-2 ~
1-1 Safety Features
450 LXi Owner Manual
Rev. “C”
1-1.2.2 Warnings and Cautions
Smoke Alarms can only work if they are properly located, installed, and maintained, and if smoke reaches them.
They are not foolproof.
This alarm meets the 10/1/1999 UL standard for a new horn “alarm” pattern for smoke alarms. This sound is
different than other Smoke Alarms you may have installed or may have heard in other locations. You must test this
alarm and educate all members and guests of the residence of this different horn pattern.
Different Smoke Alarm Sounds. If this unit replaces another 9 volt smoke alarm or is being used for additional
protection where other smoke alarms are present, than everyone who might hear this alarm must be made aware
of the different smoke alarms horn sounds.
Smoke Alarms cannot work without power. Battery operated units cannot work if the batteries are missing,
disconnected or dead, if the wrong type of batteries are used, or if the batteries are not installed correctly AC units
cannot work if the AC power is cut off by an electrical fire, an open fuse, a circuit breaker or any other reason. If
you are concerned about the limitations of battery of AC power, install both types of units.
Smoke Alarms cannot detect fires if the smoke does not reach them. Anything preventing smoke from reaching
the alarm may delay, or prevent an alarm. A smoke alarm cannot detect fire in the walls, chimney or roof unless
and until a significant amount of smoke reaches the alarm. A closed door may prevent smoke from reaching an
alarm on the other side of the door.
Smoke Alarms may not be heard. Though the alarm horn in this unit meets or exceeds current UL standards, it
may not be heard for many reasons. These include, but are not limited to: the unit is located outside a closed
or partially closed door, residents recently consumed alcohol or drugs, the alarm is drowned out by other noise
like the TV, stereo, traffic, weather, air conditioner or other appliances, residents are hearing impaired or sound
sleepers.
Smoke alarms have a limited life and are not foolproof. Smoke alarms will wear out over time like any appliance.
Test your alarm at least once per week. Always replace detectors immediately if they are not working properly,
if they display any type of problem, or prior to 10 years of use. They are not a substitute for property or life
insurance.
Smoke alarms may not have time to alarm before the fire causes damage, injury or even death. Examples of
this include persons smoke in bed, children playing with matches or lighters, fires caused by violent explosions,
natural causes like lighting, arson, escaping gas, overloaded electrical circuits, carelessness or by other safety
hazards.
Never disconnect the battery to silence the alarm.
This unit will not alert hearing-impaired residents. Special alarms with flashing strobe lights are needed for the
hearing impaired.
This is a single station alarm. Do not attempt to connect this to any other device.
Do not install this alarm over an electrical box. Do not use this detector as a replacement for an AC or AC/DC
smoke alarm. Only use as an additional alarm for greater protection or as a replacement for a battery operated
smoke alarm.
•
•
•
•
•
•
•
•
•
•
•
•
CAUTION!!
Do not paint this unit. Paint may clog the openings to the sensing chamber and will prevent
the unit from working properly
CAUTION!!
Do not stand too close to the unit when testing, silencing or during an alarm as the loud horn
could damage your hearing. When testing move away when the horn starts sounding.

~ 1-1-3 ~
450 LXi Owner Manual
1-1 Safety Features
Rev. “C”
1-1.2.3 Practice Fire Safety
Putting up smoke alarms is just one part of protection against fires. You must also reduce the chances of a fire starting and
have a plan that you have practiced for everyone escaping if a fire does occur.
1-1.2.4 Escape Planning
Determine a meeting location outside the coach where you can safely meet if a fire does occur.
Familiarize everyone with the sound of this smoke alarm. Train them to safely exit the coach when the smoke alarm
occurs.
Update and practice your escape plan at least every six months. Inform guests and others of your plan and meeting place.
Teach everyone how to check doors and not to open them if they are hot. Also to stay low and not to breathe smoke,
fumes or gases.
•
•
•
•
CAUTION!!
This smoke alarm may not give adequate warning to those with physical limitations of any
kind. Additional measures should be taken to insure their safe evacuation if a fire does occur.
Install a professional fire alarm system that is connected to a call center.
CAUTION!!
!!CAUTION: Smoke alarms sound their horns when they detect smoke. They do not detect heat,
flame or gas. They will not operate if smoke does not reach them.
1-1.2.5 What to Do When the Alarm Sounds
WARNING!!
Never ignore any alarm. If the alarm sounds and you are not absolutely certain of the source
of the smoke, get everyone out of the coach immediately.
Leave immediately by your plan of escape. Every second counts, do not waste time getting dressed or
picking up valuables.
Feel doors before opening them to see if they are hot. If a door is cool, open it slowly and check for fire and
heat before you proceed. Do not open a hot door - use an alternate escape route.
Stay close to the floor of air is smoky. Take short shallow breaths through a wet cloth if possible.
Once outside, go to your selected meeting place and make sure everyone is there.
Call the Fire Department from outside of the coach with the activated alarm, at a safe location.
Do not return to coach until fire officials say that it is safe.
•
•
•
•
•
•

~ 1-1-4 ~
1-1 Safety Features
450 LXi Owner Manual
Rev. “C”
1-1.2.6 Operation, Testing and Maintenance
Operation: The smoke alarm is operating once the battery is correctly connected. The LED will flash every
minute to show the battery is supplying power to the alarm. When production of combustion are sensed, the unit
sounds a loud alarm which continues until the air is cleared.
False Alarms “Mute” control: Models (S/SLL) with the mute feature have the capability of temporarily
reducing the sensitivity of the alarm circuit for approximately 10 minutes. This feature is to be used only when a
known alarm condition such as smoke from cooking activates the smoke alarm. The smoke alarm horn is muted
by pushing and holding the test button on the alarm cover for 5 seconds. The smoke alarm will automatically
reduce sensitivity and the LED will “flash” every 10-20 seconds for approximately 10 minutes to indicate the alarm
is in temporary mute condition. The smoke alarm is completely operational during the mute cycle and will alarm
if the smoke density increases. After the 10 minute mute cycle the alarm will “beep” twice letting you know it has
automatically returned to normal sensitivity.
Testing: Test the alarm by pushing the test button on the smoke alarm cover for at least three seconds, until the alarm
sounds. The alarm sounds if all electronic circuitry, horn and battery are working. If no alarm sounds, the unit has a defective
battery or other failure and should be replaced immediately.
Test each smoke alarm weekly to be sure it is installed correctly and operating properly.
Stand at arm’s length from the smoke alarm when testing. The alarm horn is loud to alert you to an emergency. The
alarm horn may be harmful to your hearing.
The test button accurately tests all functions. Never use an open flame from a match or lighter to test this smoke alarm.
You may ignite and set fire to the smoke alarm and your home.
Test smoke alarm operation after vehicle has been in storage, before each trip, and at least once per week during use.
Maintenance: This smoke alarm has been designed to be as maintenance free as possible, but there are a few simple
things you must do to keep it working properly.
Test each smoke alarm at least once a week.
Keep a supply of approved 9 volt replacement batteries on hand.
Test smoke alarms used in RVs after vehicle has been in storage, before each trip and at least once per week during use.
Failure to test smoke alarm used in RV’s as described may remove your protection.
Gently vacuum off any dust on the cover of the smoke alarm monthly with your vacuum’s soft brush attachment. Test unit
once you have vacuumed the cover.
Never use water, cleaners or solvents since they may damage the smoke alarm.
Relocate the smoke alarm if it sounds frequently with unwanted alarms.
When the battery becomes weak, the unit will “beep” about once a minute (the low battery warning). This, low battery
warning should last for 30 days, but you should replace the battery immediately to continue your protection.
Replace your Smoke Alarms at least every 10 years. This includes models with 10-year batteries (SA-668LL and SA-
668SLL). Manufacturers date code is on the back of the Alarm.
•
•
•
•
•
•
•
•
•
•
•
•
•
CAUTION!!
Before using the “mute” feature, identify the source of smoke and be certain that safe conditions exist.

~ 1-1-5 ~
450 LXi Owner Manual
1-1 Safety Features
Rev. “C”
1-1.2.7 Battery Information
Battery Removal Indicator - This Unit will not operate without a battery. When the battery is removed from the
alarm, the battery flag in the compartment will pop up; therefore the alarm cannot be installed to the mounting bracket
without a battery.
Battery Replacement - This smoke alarm requires one standard 9V battery. The Battery Gold Peak #1604P is
approved (its reference: Gold Peak #16048; Eveready #522, #1222, #216; Duracell #MN1604 and #MN1604B). You
may also use the long-life 10 Year Lithium battery Ultralife #89VL-J.
1-1.3 LP-Gas Detector
The LP-Gas detector is provided for safety. The gas leakage detector sounds an alarm
and closes down the main LPG supply in the event of an LPG leak. This unit does
meet California requirements. It detects both LP-Gas and methane gas. Liquefied
Petroleum (LP) Gas is heavier than air; methane gas is lighter than air. LP-Gas will
settle to the lowest point, generally the floor of the motor home. Methane gas will rise.
The gas detector is also sensitive to other fumes such as hair spray, of which most
contain butane as the propellant. Butane, like propane, is heavier than air and will
settle to the floor level where it will be detected. When this occurs, press reset button
for 60 seconds to stop the alert.
Other combustibles, which will be detected, include alcohol, liquor, deodorants, colognes, perfumes, wine, adhesives, lacquer,
kerosene, gasoline, glues, most cleaning agents and propellant of aerosol cans. Most are lighter than air in their vapor state
and will only be detected when the motor home is closed up.
1-1.3.1 Operation
Upon first application of power, the LED will flash yellow for three minutes, while the detector is stabilizing. At the end of the
start cycle, the LED will turn Green, indicating full operation. If the detector senses unsafe levels of gas, it will immediately
sound an alarm. The gas detector operates on 12 Volt DC, with a current draw less than 1/10th of one amp.
WARNING!!
Use only the replacement batteries listed. The unit may not operate properly, with other
batteries. Never use rechargeable batteries since they may not provide a constant charge.
NOTE: Most carbon zinc batteries have an average service life of 1 year, most alkaline
batteries have an average service life of 1-2 years. All the batteries specified above are
acceptable replacement batteries for this unit.
CAUTION!! The detector will not alarm during the three minutes warm up cycle.
IMPORTANT! Regardless of the manufacturer’s suggested battery life, you MUST replace it
immediately once the unit starts “beeping” (“the low battery warning”).
~ 1-1-6 ~
1-1 Safety Features
450 LXi Owner Manual
Rev. “C”
1-1.3.2 Alarm
The red LED will flash and the alarm will sound whenever a dangerous level of propane or methane gas is detected. The
detector will continue to alarm until the gas clears or the TEST/MUTE switch is pressed.
1-1.3.3 Procedures to take during an alarm:
Turn off all gas appliances, (stove, heaters, furnace), extinguish all flames and smoking material. Evacuate, leave doors
and windows open.
Turn off the propane tank valve.
Determine and repair the source of the leak. Seek professional help if necessary.
1.
2.
3.
1-1.3.4 Fault Alarm:
Should the microprocessor sense a fault in the gas detector, a fault alarm will sound twice every 15 seconds. The LED will
alternately flash red to green and the MUTE switch will not respond to any command. The gas detector must be repaired or
replaced.
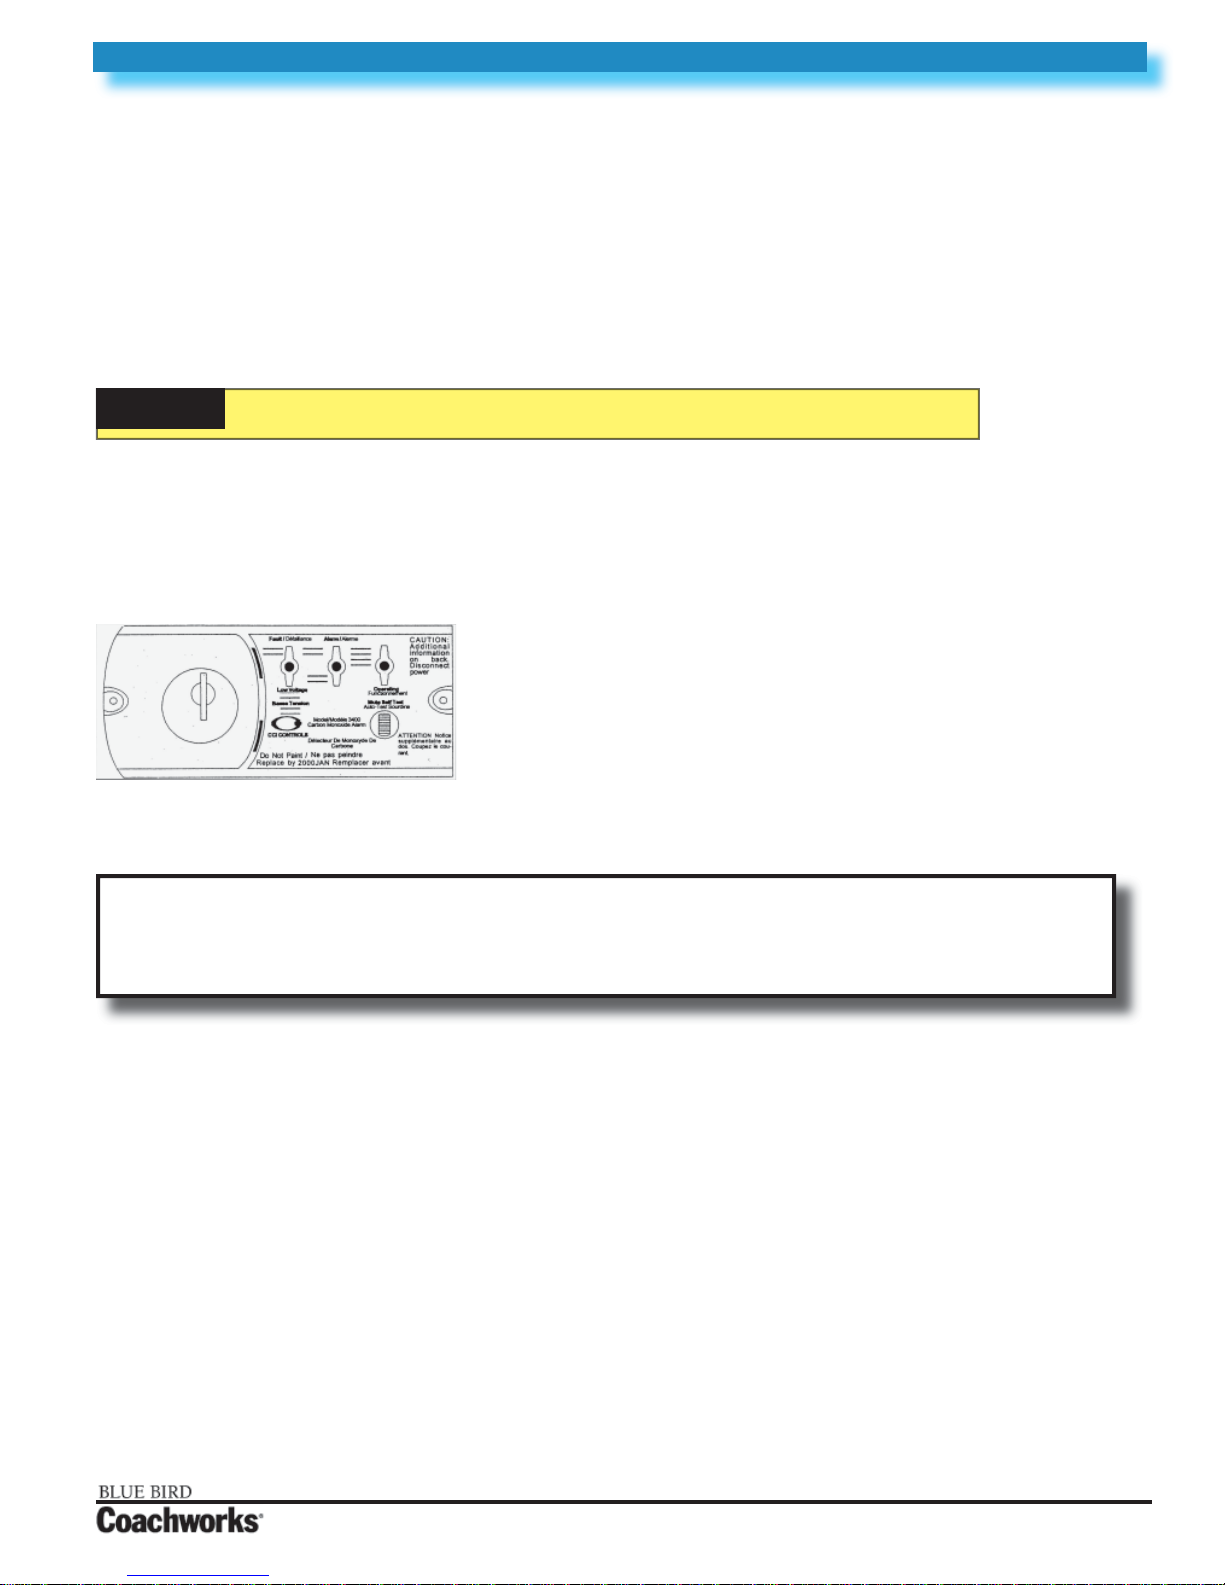
1-1.4 Carbon Monoxide Detector
This motor home is equipped with a CCI Controls Carbon Monoxide detector.
Carbon monoxide (CO) is a colorless, odorless and tasteless gas. Even low levels
of CO have been known to cause brain and other vital organ damage in unborn
infants, with no effect on the mother. In cases of mild exposure, the symptoms
may include: a slight headache, drowsiness, confusion and fast heart rate.
Extreme exposure can result in unconsciousness, convulsions, cardio-respiratory
failure and death. Young children and household pets may be the first affected.
The CO detector is designed to detect the toxic CO fumes that result from vehicle exhaust and incomplete combustion
sources like a furnace, gas stove or water heater. Consequently, it is uncommon for household smoke from cigarettes or
normal cooking to cause the alarm to sound.
1-1.4.1 Getting Started
These instructions include information on the installation, maintenance, and operation of the carbon monoxide (CO) alarm
that is installed in your recreational vehicle (RV). It is important to keep these instructions in a handy location so you can refer
to them as necessary. A properly installed and maintained CO alarm is an important part of your RV safety plan. Therefore,
you and your family should read this manual thoroughly before operating your RV.
Your CO gas detector is operating at all times when it is connected to its power source. This detector will only operate when
supplied with the stated operating voltage. This detector is a safety device. It must not be connected in such a way as to allow
it to be switched off by the use of a wall switch or similar device, or to become disconnected from its power supply due to
the use of a GFCI protected circuit. When the coach is equipped with an optional master cutoff switch for storage only, the
detector will be turned off when this switch is turned OFF. This is acceptable as the coach is not to be used with the optional
master cutoff switch in the off position.
In the event you have questions regarding the use of this CO alarm, call (800) 521-5228, Monday through Friday, 8 a.m. to 5
p.m. Pacific Standard Time. For the most current information visit the CCI website at: http://www.ccicontrols.com.
CAUTION!! Do not re-enter until the problem is corrected.
NOTE: Activation of this device indicates the presence of carbon monoxide (CO), which can be fatal. A
concentration of above 100 PPM will cause a warning condition. Individuals with medical problems may
consider using detection devices with lower carbon monoxide alarming capabilities. Prolonged exposure to
the horn at a close distance may be harmful to your hearing.
New Pic
~ 1-1-7 ~
450 LXi Owner Manual
1-1 Safety Features
Rev. “C”
When the alarm sounds on this device and the RED Alarm Indicator light flashes, they indicate the presence
of carbon monoxide (CO) which can be FATAL. The alarm will continue to sound until the carbon monoxide has
dissipated or until the mute button is activated.
If alarm sounds:
Press the MUTE button.
Call for emergency services. (fire department 911)
Immediately move to fresh air outside or by an open door or window. Do a head count to check that all persons
are accounted for. Do not re-enter the premises or move away from the open door or window until the emergency
service personnel have arrived, the premises have been aired out, and your alarm returns to its normal condition.
After following steps 1-3, if your alarm reactivates within a 24 hour period, repeat steps 1-3 and call a qualified
appliance technician.
Have the technician investigate for sources of CO from fuel burning equipment and appliances, and inspect for proper
operation of this equipment. If problems are identified during this inspection have the equipment and appliances
serviced immediately.
1.
2.
3.
4.
1-1.4.2 Operation
The CO alarm will only detect CO gas if the proper power is supplied. Once power is supplied (or re-supplied) to the alarm, it
will perform a brief warm-up and self-check process before beginning to monitor for carbon monoxide gas.
1-1.4.3 CO Alarm Indicator Lights and Conditions
Power. Once 12 volts DC power is supplied, the GREEN power indicator will turn on indicating the alarm is ready to detect CO gas.
Alarm Condition. When CO gas is present in alarm concentrations, an alarm will sound and the RED alarm indicator light
will flash. The detector will continue to alarm until the CO gas has dissipated or until the MUTE button is momentarily pressed.
If the MUTE button is pressed during an alarm condition, the alarm will stop sounding and the RED alarm indicator light will
also stop flashing. If CO gas is still present in alarm concentrations, the alarm will resume within a few minutes depending on
the concentration.
Fault/Low Voltage.In addition to sounding an alarm when CO gas reaches a specific concentration at the gas sensor,
the CO alarm also performs two other valuable functions:
An automatic self diagnostic system check (called supervision) on the alarm’s electronics to ensure reliable, trouble-free
operation.
CO device acts as a low voltage indicator for the battery that supplies voltage to the alarm.
1.
2.
WARNING!! Actuation of your CO alarm indicates the presence of carbon monoxide (CO) which can KILL YOU.
NOTE: Have technician inspect any combustion equipment or appliance and consult the manufacturer’s
instructions, or contact the manufacturers directly, for more information about CO safety of this equipment.
Make sure that coach is not, and has not been, operating in an attached garage or adjacent to the residence.
CAUTION!!
This alarm will only indicate the presence of carbon monoxide (CO) gas at the sensor. CO gas may be
present in other areas of the RV.
CAUTION!!
This alarm will only indicate the presence of carbon monoxide gas at the sensor. Carbon monoxide gas
may be present in other areas.

~ 1-1-8 ~
1-1 Safety Features
450 LXi Owner Manual
Rev. “C”
Fault Condition. In the event the CO alarm senses a fault in its electronics, the ORANGE Fault indicator light will illuminate
continuously (not flashing) and then sound a beep once every five seconds. The GREEN power indicator will then turn off,
indicating that the alarm is no longer monitoring for CO gas. If such action should occur, call CCI Controls for assistance
during normal business hours. (8 a.m. to 5 p.m. PST).
Low Voltage Condition. This CO alarm has been designed to operate from a 12 volt DC power source. Without the
correct voltage, the CO alarm may not detect carbon monoxide at the gas sensor. In the event that the CO alarm senses that
a low voltage condition exists, the ORANGE Low Voltage indicator will illuminate continuously (not flashing) and then sound
a beep once every sixty seconds. The GREEN Power indicator light will then turn off indicating that the alarm is no longer
monitoring for CO gas.
In many instances, low voltage is an indication that the battery supplying voltage to the CO alarm needs recharging. If
recharging your battery does not cause the ORANGE Low Voltage Indicator to turn off and the GREEN Power Indicator to turn
on, call CCI Controls for assistance during normal business hours. (8 a.m. to 5 p.m. PST)
Mute/Self-Test. The Mute/Self-Test button serves two purposes: (1) to mute or silence the alarm and (2) to perform a self-
test. See Alarm Condition above and Testing Your CO Alarm.
1-1.4.4 Testing Your CO Alarm
It is important to test your CO alarm regularly.
To test the electronics of the CO alarm, press and release the test button. The alarm should sound a beep four times and the
RED alarm indicator light will flash four times. In addition, the indicator lights are also tested. The GREEN power indicator light
will turn off and the ORANGE Fault/Low Voltage indicator light will illuminate temporarily. If the CO alarm does not respond in
this manner, then refer to the troubleshooting section.
1-1.4.5 Cleaning
Use a vacuum cleaner to remove dust or any other buildup on the detector. Do not wash. Wipe the detector with a damp cloth
and dry it with a towel. Do not open the detector for cleaning. Do not paint the detector. It is recommended that the carbon
monoxide detector be replaced every 10 years.
1-1.4.6 Troubleshooting
Description Green Light Red Light Orange Sounder Resolution
Normal Operation On Off Off No Sound
CO Gas Detected On Flashing Off Four Beeps then a pulse,
every 5 seconds
Follow “What you should
know if the CO alarm
sounds” section
Low Battery
Condition Off Off On A single beep once every
60 seconds.
Recharge the vehicle
battery.
No Power Off Off Off Off You only have protection if
the unit is powered.
Fault Condition Off Off On Beep Once every 5
seconds Call CCI Controls
Test Mode Dims off, then
turns back on.
Flashes four
times, then stops.
Dims on, then
turns back off.
Four Beeps then a pulse,
every 5 seconds.
Unit functional when
Green light turns back on.
WARNING!!
Test alarm operation after vehicle has been in storage, before each trip, and at least once
per week during use.
NOTE: Unlike the separate indicator lights for the GREEN power and the RED alarm, the Fault and Low
Voltage conditions share the same ORANGE indicator light.

~ 1-1-9 ~
450 LXi Owner Manual
1-1 Safety Features
Rev. “C”
1-1.4.7 What You Should Know About Interaction with Other Products
Never ignore a CO alarm. A true alarm is an indication of potentially dangerous levels of carbon monoxide. This CO alarm is
designed to provide an early warning signal to alert you to the presence of CO gas at the gas sensor. The alarm is designed
to sound before most people will experience dangerous symptoms of CO poisoning. If you have special health conditions or
medical problems, you should consider purchasing other warning devices which provide audible and visual signals for CO
concentrations under 30 parts per million (PPM).
The glues, paints and other materials used in construction of new RV’s and RV’s that have been in storage often produce
hydrocarbon vapors that may be detected. These hydrocarbon vapors may cause the alarm to sound. When this occurs, air
out the RV.
In concentrated amounts, some common household products may cause the alarm to sound. These items could include
alcohol, liquor, kerosene, gasoline, deodorants, colognes, and household cleaning products and aerosols. When this occurs,
air out the RV and the CO alarm with fresh air.
1-1.4.7.1 Sometimes the CO Alarm Will Sound Because Of:
Simultaneous use of several fuel burning appliances competing for internal air.
Negative air pressure resulting from the use of exhaust fans
High outside wind causing CO to back up in the air vent pipes
Vent pipe connections vibrating loose from clothes dryers, heaters or furnaces
Obstructed vent pipes or unvented fuel burning appliances
Temperature inversions which can trap exhaust gases near the ground.
Car or RV idling nearby
Installed too low where items such as water and other household chemicals can pollute the sensor
Covered, obstructed or painted
Exposed to sulfur products or powders of any kind
1-1.4.8 Technical Information
Sensor Level 70 ppm or more of carbon monoxide gas and before 10% carboxyhermoglobin (COHb)
exposure level.
Operating Green LED Illuminated
Alarm Alarm will sound and red LED will flash.
Fault Condition Orange LED illuminated. Alarm will beep every 5 seconds.
Low Voltage Condition Orange LED illuminated. Alarm will beep every 60 seconds.
Audio Alarm 85dB at 10 Feet
Supply Voltage 12 volts DC nominal
Current Draw 50 milliamps maximum
Dimensions 3½ x 7 x 1-⅝ inches 8.89x17.78x4.12 cm
Storage Temperature -40°F to 100°F -40°C to 37.8°C Humidity 95% max noncondensing
Operating Temperature 40°F to 100°F 4.4°C to 37.8°C Humidity 95% max noncondensing
Listing Humidity 95% max noncondensing UL/CSA Listed
•
•
•
•
•
•
•
•
•
•
IMPORTANT NOTES: Some products may prevent or delay your CO gas alarm from detecting carbon
monoxide. Therefore, your CO gas alarm should not be:
C
all (800) 521-5228 If
y
ou have an
y
questions about
y
our Carbon Monoxide Gas Alarm
Table of contents
Popular Motorhome manuals by other brands

Explorer Group
Explorer Group Avante 362 Owner's handbook

Roadtrek
Roadtrek 170 Chevrolet owner's manual

Winnebago
Winnebago 2015 Journey Operator's manual

Tiffin Motorhomes
Tiffin Motorhomes Allegro Bus 2016 owner's manual

Monaco
Monaco LaPalma owner's manual

Carefree
Carefree FREEDOM OTD AWNING installation manual


