BLUE JAY MICO-RACE User manual

User Manual
Tel: +0086-023-67628702 Email:tech@cqbluejay.com
www.cqbluejay.com
Add: 1802,Building 2,No.88,Jianxin East Road,Chongqing,400020,China
MICO-RACE
Wireless temperature monitor
User Manual
Version:2.1

User Manual
Tel:+0086-023-67628702 Email:tech@cqbluejay.com
www.cqbluejay.com
Add: 1802,Building 2,No.88,Jianxin East Road,Chongqing,400020,China - 1 -
Read me
When you use MICO-RACE wireless temperature monitor, be sure to read this
user manual carefully, and be able to fully understand the implications, the correct
guidance of operations in accordance with user manual, which will help you make
best use of MICO-RACE wireless temperature monitor, and help to solve the
various problems at the scene.
1. Before the MRR receiver turning on the power supply, be sure that the power supply
within the provisions of the instrument;
2. Be sure the MRR wiring consistent with the label marked;
3. MRS remote sensor must be installed in standard distance(less than 100m outside and
less than 20m in room), between sensor and receiver without electromagnetic
shielding layer;
4. Communication port (RS232/RS485 or Ethernet) is strictly prohibited to impose on high
pressure;
5. When commissioning on PC, please make sure use series port(RS232/RS485), or use
serial port simulation tools for conversion.
●Please read this user manual carefully
●Please save this document

User Manual
Tel:+0086-023-67628702 Email:tech@cqbluejay.com
www.cqbluejay.com
Add: 1802,Building 2,No.88,Jianxin East Road,Chongqing,400020,China - 2 -
Directory
CONTENTS Page
1. - Guide for MRR-E and software operation......................................... - 3 -
1.1- MRR-E wiring................................................................................. - 3 -
1.2-MRR-E configuration....................................................................... - 4 -
1.2.1- Part I: Ethernet Port configuration in MRR-E ........................ - 5 -
1.2.2- Part II: Ethernet Port configuration in MRR-ED..................... - 6 -
1.3. - How to use Microtemp Desktop ................................................... - 7 -
2. - Guide for MRR-R................................................................................ - 14 -
2.1- MRR-R wiring............................................................................... - 14 -
2.2- MRR-R configuration.................................................................... - 15 -
3.- Guide for MRR-M................................................................................. - 16 -
3.1- Front Panel Description................................................................ - 16 -
3.2- System configuration- GPRS router............................................. - 17 -
3.3.- Remote config & check MRR-M.................................................. - 20 -
4. - Access Blue Jay cloud software.......................................................... - 22 -
5.- Trouble shooting.................................................................................. - 23 -

User Manual
Tel:+0086-023-67628702 Email:tech@cqbluejay.com
www.cqbluejay.com
Add: 1802,Building 2,No.88,Jianxin East Road,Chongqing,400020,China - 3 -
1. - Guide for MRR-E and software operation
1.1- MRR-E wiring
Mico-Race data receiver MRR-E standard use RJ45 port(Ethernet connection) and
6~34VDC power supply;
Blue Jay Technology standard provide 12VDC 1A adapter.
MRR-E
Pictures
Notes:
Ethernet chip will emits some of heat in working, please make sure MRR-E device body in
cool and well-ventilated place!
Package list:
MRR-E
MRR-E device *1
12VDC 1A adapter *1
1.5m 433Mhz Antenna *1

User Manual
Tel:+0086-023-67628702 Email:tech@cqbluejay.com
www.cqbluejay.com
Add: 1802,Building 2,No.88,Jianxin East Road,Chongqing,400020,China - 4 -
1.2-MRR-E configuration
MRR-E has a built-in Ethernet chip for TCP/IP communication, and there have two version
of MRR-E, standard MRR-E do not support DHCP, advanced MRR-ED type with DHCP
function, please follow the guide step for initial configuration:
1:Close the firewall of your computer system.
2: Please disable the excess NIC(Network Interface Card) in your PC or wireless NIC in
your laptop, leave only one physical NIC connected to MRR.
3: Connect the MRR-E to the Ethernet Router and power ON; please make sure your PC
in same network.
4: Use the configuration software TCP232-E45_V1.4.2(DHCP types) or
TCP232-T24_V5.1.0.1(Standard types) for initial configuration
Ethernet chip had done the initial setting, default parameter as following:
Module IP: 192.168.0.7
Subnet mask: 255.255.255.0
Default Gateway: 192.168.0.1
Destination IP: 192.168.0.2
Destination Port: 16254

User Manual
Tel:+0086-023-67628702 Email:tech@cqbluejay.com
www.cqbluejay.com
Add: 1802,Building 2,No.88,Jianxin East Road,Chongqing,400020,China - 5 -
1.2.1- Part I: Ethernet Port configuration in MRR-E
Use [TCP232-T24-V5.1.0.1]
Step 1: Run [USR-TCP232-T24 V5.1.0.1.exe] in your PC, press button Search in LAN,
software will auto scan your network to find MRR-E device, device shown in right
box:
Step 2: Double click the searched device can read the configuration parameters in left
chart:
Step 3: Please change the following configuration:
Module IP:
Assign the MRR-E device IP to any one you like in your sub-network, do
not duplicate existing equipment, otherwise there will be a network error.
Default Gateway:
Change Gateway IP that matched with your network setting.
Notes: if you purchase DHCP type please see Part II
Destination IP
Destination port
Change the IP and TCP port that direction to your PC run [Microtemp]
Notes:Please do not change other parameter in Ethernet Port, or MRR-E may unable to
work.
Step4: Press button Set selected item via LAN to end the Set

User Manual
Tel:+0086-023-67628702 Email:tech@cqbluejay.com
www.cqbluejay.com
Add: 1802,Building 2,No.88,Jianxin East Road,Chongqing,400020,China - 6 -
1.2.2- Part II: Ethernet Port configuration in MRR-ED
Use [TCP232-E45_V1.4.2]
Step1- Press Search Device button for auto find the MRR device
Step2- Choose the MRR device in lists, software will update the device configuration info
Step3- If MRR-E connects to router, you can choose DHCP mode, please make sure
your router can assign IP; if connected directly to host PC, please chose Static IP
mode, and configuration the MRR Ethernet gateway & IP address related your
host PC setting.
Note: Only Port0 is available, and do not change other parameter in Ethernet Port, or
MRR-E may unable to work.
Please do not change the Baud rate(9600)or MRR will not work
User Manual
Tel:+0086-023-67628702 Email:tech@cqbluejay.com
www.cqbluejay.com
Add: 1802,Building 2,No.88,Jianxin East Road,Chongqing,400020,China - 7 -
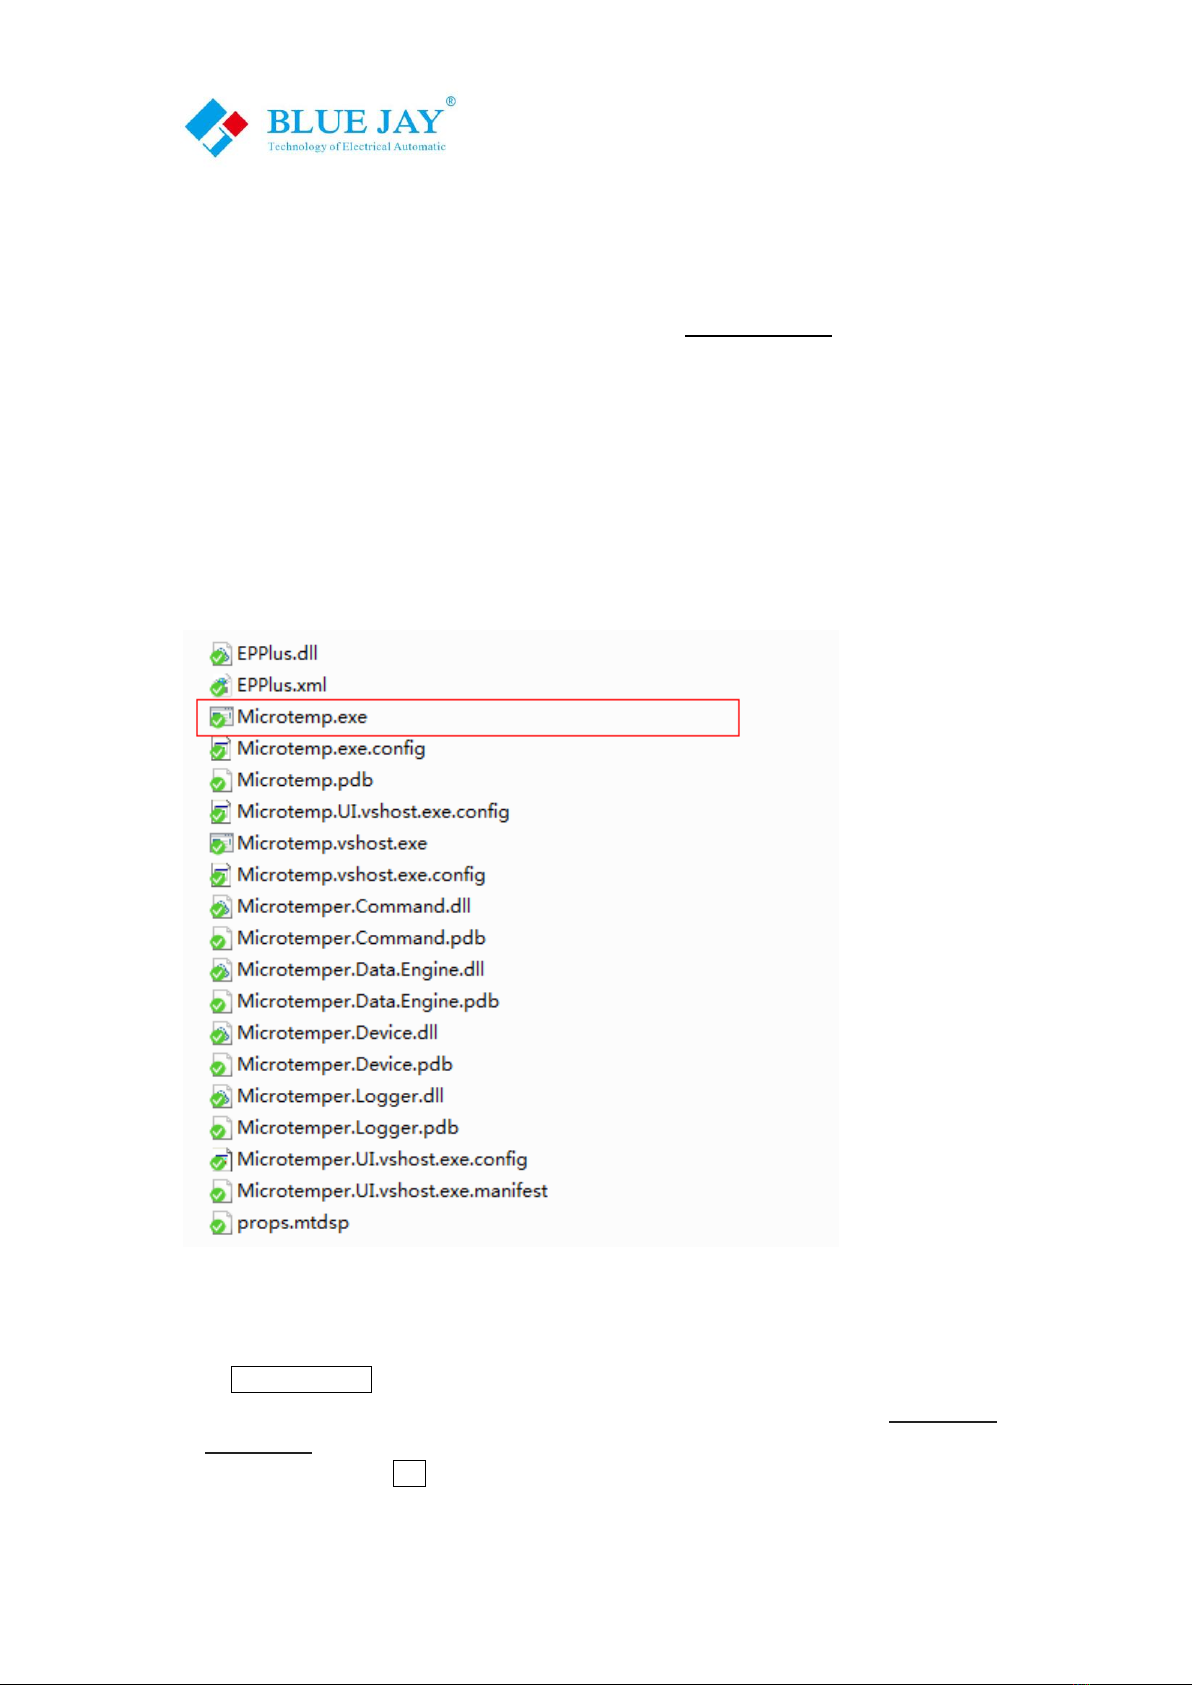
1.3. - How to use Microtemp Desktop
Blue Jay Technology provide standard local software "Microtemp.exe" for MRS sensor
setting and test operation, it provide MRS parameter configuration and basic monitor &
record on your Desktop PC, please follow the guide to start.
Notes: Software only have Chinese character, if the software displayed shows garbled
code, please install the windows Chinese Language Pack.
Run "Microtemp.exe" to show temperature data from MRS in your PC
Step 1: Set communication parameter
Click COMM Config, software will automatic detect LAN IP of your PC and show in the
dialog window, please make sure the IP same as preset "Destination IP" in Chart 1.2.1
or Chart 1.2.2, then input the preset " Destination port" (in example we use default is
16254), after that click OK:

User Manual
Tel:+0086-023-67628702 Email:tech@cqbluejay.com
www.cqbluejay.com
Add: 1802,Building 2,No.88,Jianxin East Road,Chongqing,400020,China - 8 -
Step 2: Add MRS sensor
Click Add MRS,you can add MRS sensor in record list, please make sure your MRS
types, and input the ID on the MRS label, then click OK; repeat this step until all the MRS
sensor added:

User Manual
Tel:+0086-023-67628702 Email:tech@cqbluejay.com
www.cqbluejay.com
Add: 1802,Building 2,No.88,Jianxin East Road,Chongqing,400020,China - 9 -
Step 3: Start operation
Click RUN in toolbar, then switch to "Raw_data" page, you should see a upload command,
it contain MRR ID inside, mean connection success. Otherwise, the connection is
unsuccessful, please check the connection of MRR-E or configuration in Chart 1.2.1 or
Chart 1.2.2:
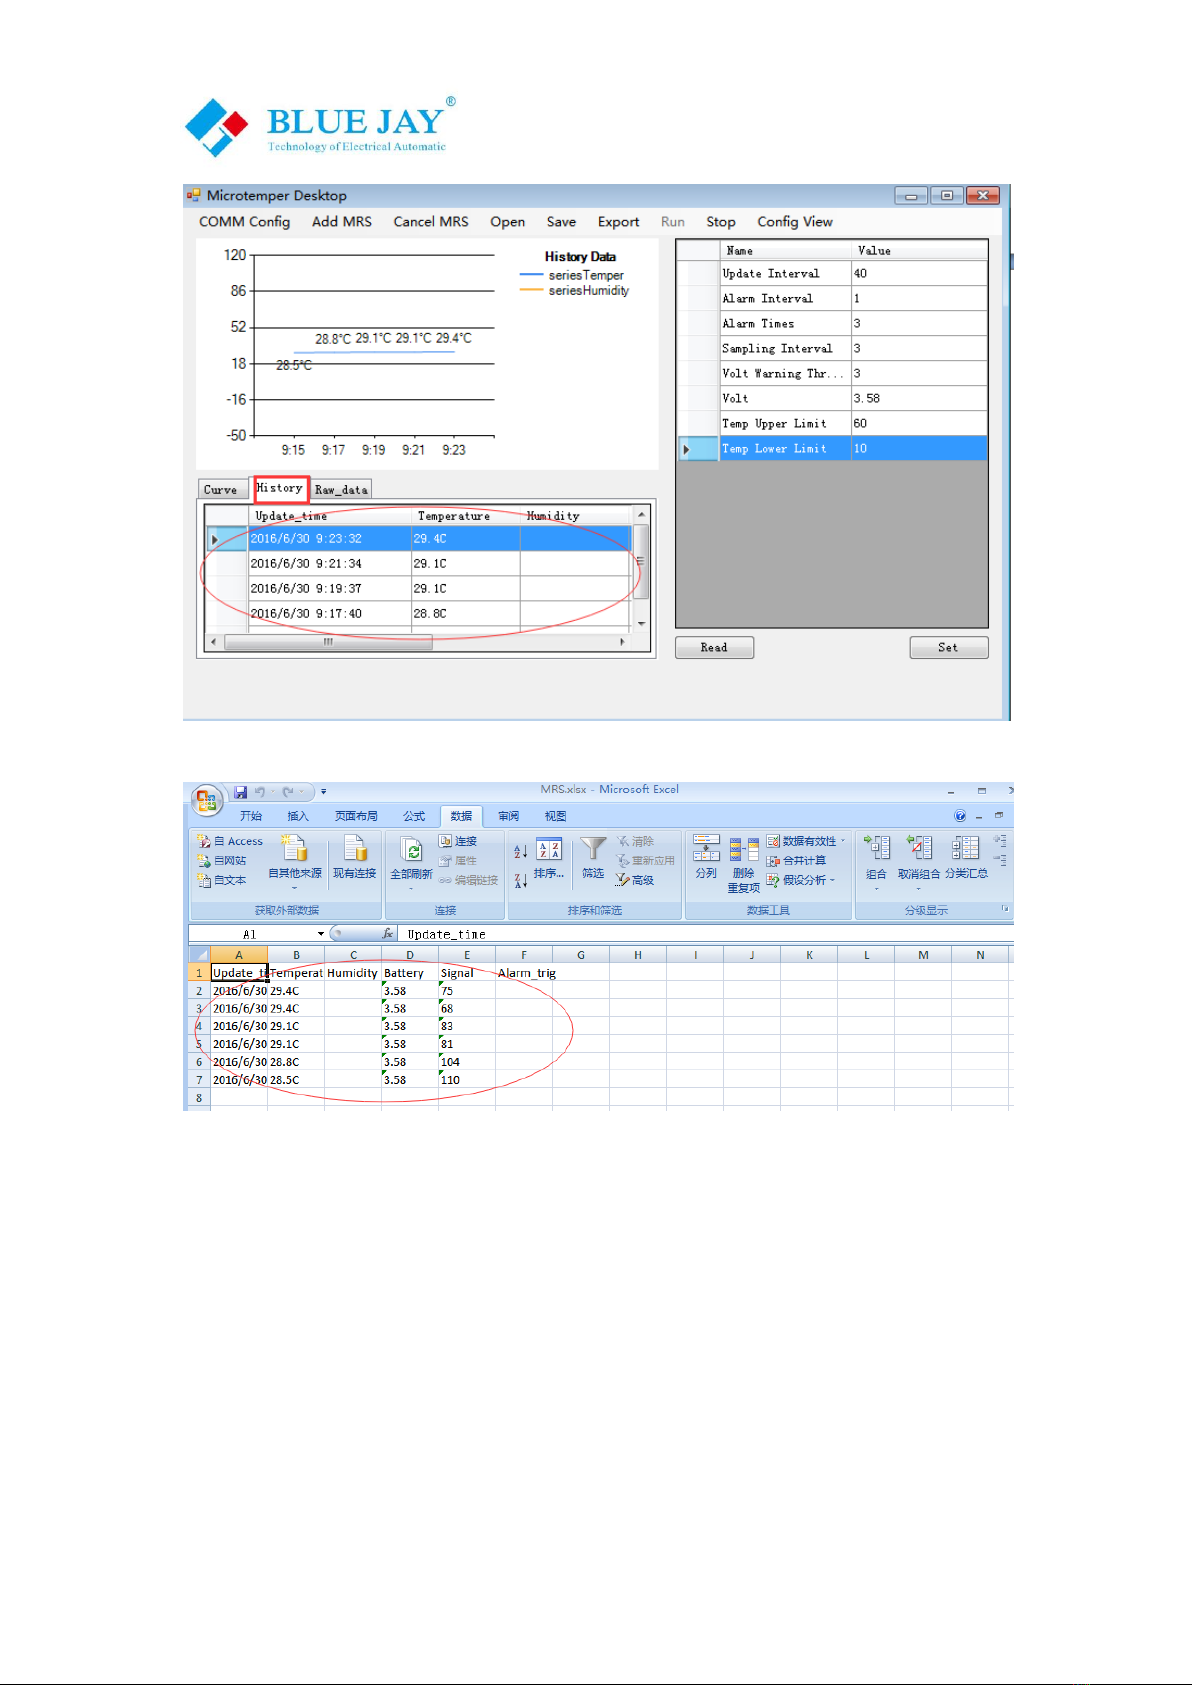
Step 4: basic configuration
In "Curve" page, click each MRS line, you can see record curve drawn by latest 10 record
point. also you can see the "Basic Config" table in the right part of screen. detail of each
parameter please refer to the " Mico Race Data Format_1.6 "

User Manual
Tel:+0086-023-67628702 Email:tech@cqbluejay.com
www.cqbluejay.com
Add: 1802,Building 2,No.88,Jianxin East Road,Chongqing,400020,China - 10 -
in example show setting of MRS (000075B6):
Choose any parameter you want to know in 000075B6, press Read, you can see the data
in "value" column; Double-click column can input the setting value, then press Set.
In configuration operation, after set one MRS, you can switch to the "Raw_Data" screen
to see detail data flow, that can easy help test engineer understand MICO-RACE protocol.

User Manual
Tel:+0086-023-67628702 Email:tech@cqbluejay.com
www.cqbluejay.com
Add: 1802,Building 2,No.88,Jianxin East Road,Chongqing,400020,China - 11 -
Step 5: Advanced configuration
In [Config View] in toolbar, you can change the operation screen in "MRS Advanced
Config" or "MRR Advanced Config" page:
Notes: we do not suggest client change the advance configuration, if operation step wrong,
may cause MICO-RACE disable erro; please contact Blue Jay Tech Team for more
support --tech@cqbluejay.com--
If you understand the operation step and accept this risk, input password "00000000" for
entry the advanced configuration page:
detail meaning of each parameter please refer to the " Mico Race Data Format_1.6 "
Notes: in Forest Network (FN), if you want add other MRS in existed MRR group, just
configuration "Update ID" same as this existed MRR, you can do this work from any MRR
device.
Other function:
1. Save MRS list, click [Save] on tool bar, you can save the MRS list in "Microtemp".
Next time you can press [Open] to load the MRS list and continue work.

User Manual
Tel:+0086-023-67628702 Email:tech@cqbluejay.com
www.cqbluejay.com
Add: 1802,Building 2,No.88,Jianxin East Road,Chongqing,400020,China - 12 -
2. Cancel MRS in your list, select the MRS you want to delete. (need switch to "Curve"
page), Click Cancel MRS on the toolbar.
3. MRS record value, Software will record the latest 100 data in "History" page for each
listed MRS, you can press [Export] on toolbar to save the record data in Excel file.
User Manual
Tel:+0086-023-67628702 Email:tech@cqbluejay.com
www.cqbluejay.com
Add: 1802,Building 2,No.88,Jianxin East Road,Chongqing,400020,China - 13 -
----------------------------------------------------------------------------------------------------------------------
Notes: this guide is only for standard MRS sensor. If purchase special types, some of the
function parameter read/write is disable, please refer to the "Mico Race Data Format
Introduction " for more details
User Manual
Tel:+0086-023-67628702 Email:tech@cqbluejay.com
www.cqbluejay.com
Add: 1802,Building 2,No.88,Jianxin East Road,Chongqing,400020,China - 14 -
2. - Guide for MRR-R
Blue Jay provide MRR-R for special client for connect third party router(RS232 or RS485
port), only communication port is different with MRR-E
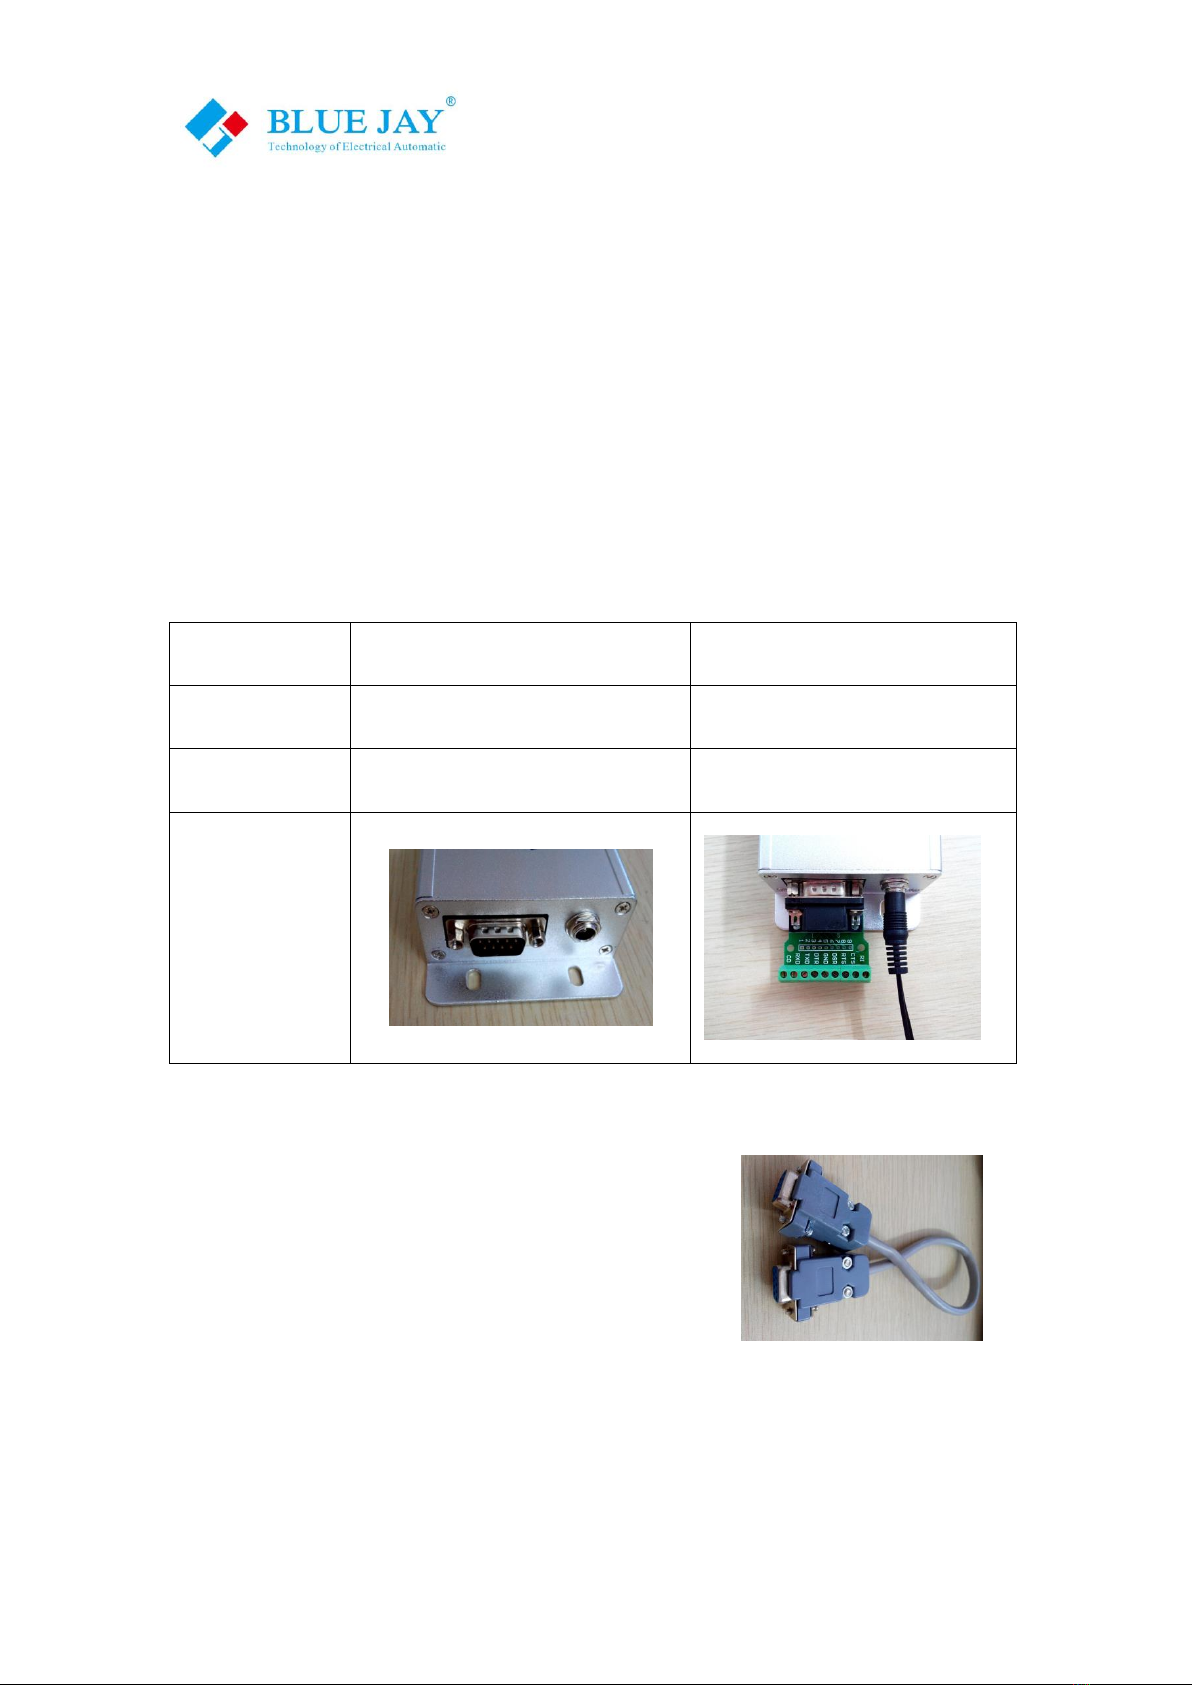
2.1- MRR-R wiring
Mico-Race data receiver MRR-R standard use DB9 PIN male port(RS232/RS485) and
used 6~34VDC power supply;
Blue Jay Technology standard provide 12VDC 1A adapter (85~265VAC input), and
DB9P adapter (for MRR-R-485).
MRR-R-232
MRR-R-485
Terminal No.
2-RX / 3-TX
6-A/ 1-B
Baud ratio
9600
9600
Pictures
Notes:
Please refer to the wiring drawing on product label!
Please use the cross-connect wire kit in package for
MRR-R-232 communicate with PC, If you use the USB
adapter cable, please also connect the cross-connect wire
between adapter and MRR-R
Package list:

User Manual
Tel:+0086-023-67628702 Email:tech@cqbluejay.com
www.cqbluejay.com
Add: 1802,Building 2,No.88,Jianxin East Road,Chongqing,400020,China - 15 -
MRR-R-232
MRR-R-485
MRR-R-232 device *1
RS232 cross-connect female cable *1
12VDC 1A adapter *1
1.5m 433Mhz Antenna *1
MRR-R-232 device *1
RS485 connect kit *1
12VDC 1A adapter *1
1.5m 433Mhz Antenna *1
2.2- MRR-R configuration
MRR-R do not need special configuration, Blue Jay Tech Team had preset the device
working parameter, user can use any series port scan software to check MRR-R
connection is success.
Notes: please make sure your series port scan software use 9600 baud ratio and send
the following code to MRR
55 7A 07 82 00 01 04 00 00
if you can received the following code mean MRR-R connect well and prepared working
AA 75 0C 83 00 00 00 01 3C 00 04 01 00 00
User Manual
Tel:+0086-023-67628702 Email:tech@cqbluejay.com
www.cqbluejay.com
Add: 1802,Building 2,No.88,Jianxin East Road,Chongqing,400020,China - 16 -
3.- Guide for MRR-M
MRR is special designed for MICO-RACE system, with standard MRR-R and one GPRS
router inside. GPRS router support 850/900/1800/1900 frequency, GSM network, default
use 900/1800 frequency.
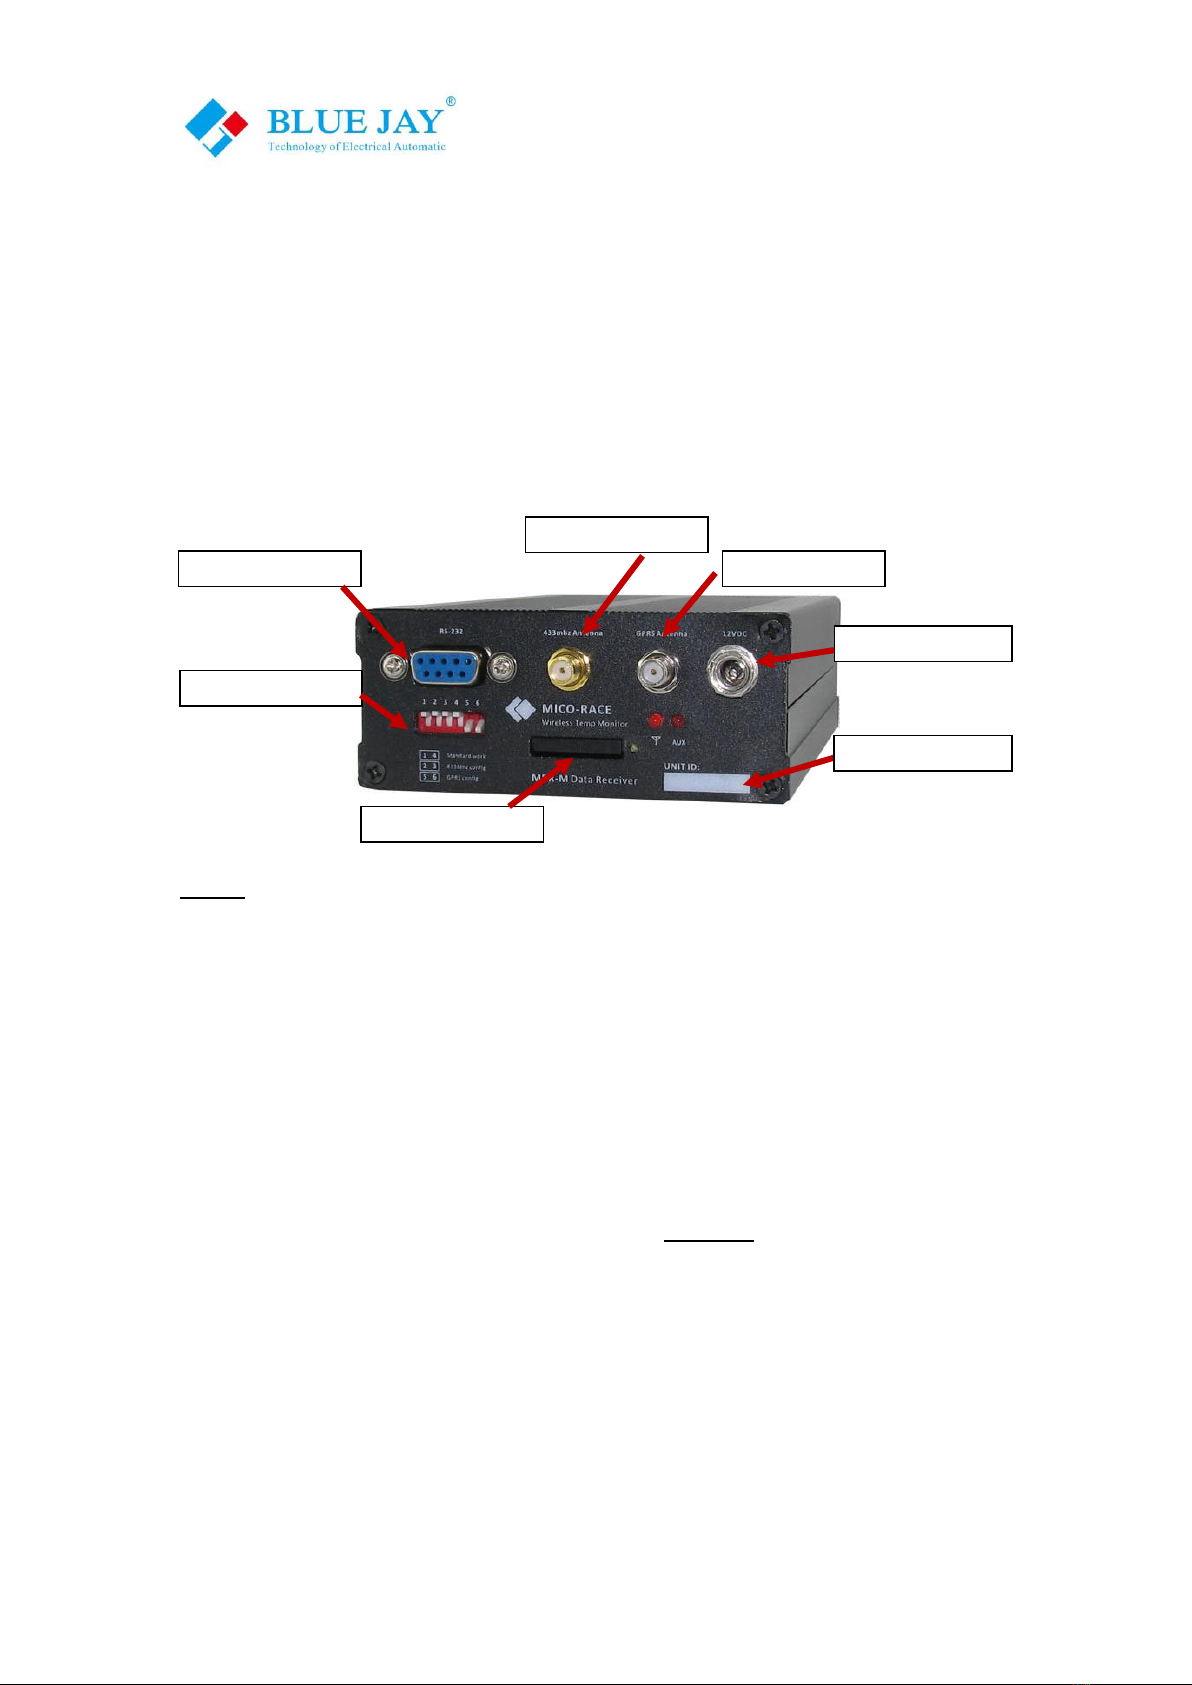
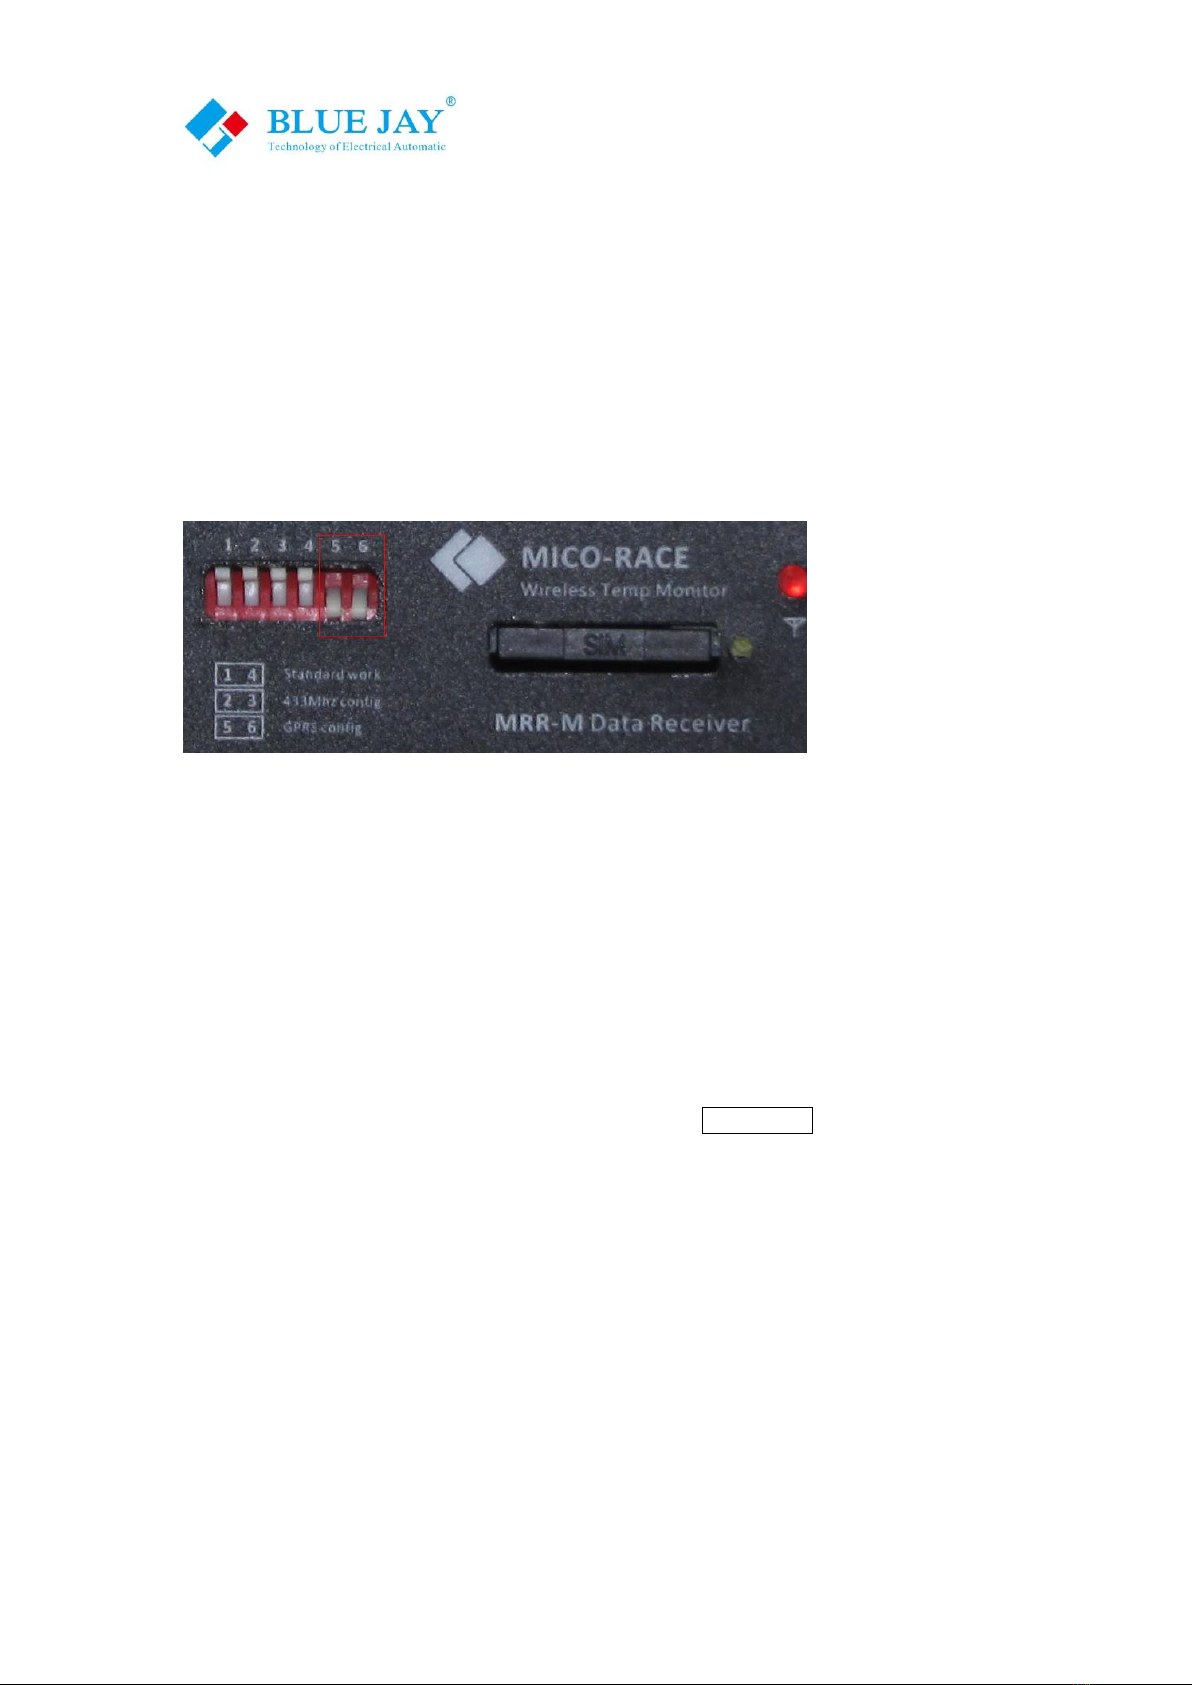
3.1- Front Panel Description
Notes:
1. Antenna have different sharp, depends one client requirement, all use standard SMA
port, if antenna damaged or dissatisfied with signal performance, users can change
higher gain antenna with same specification and port.
2.Aux power support standard 12/24VAC-DC adapter or battery, if power less than 6V
MRR-M may work abnormal.
3. Pease make sure your SMS card support GPRS network (2G), if your local mobile
network service providers other frequency, please contact Blue Jay Tech team
4. User can use any types of RS232 adapter for configuration, or use SMS command to
set basic parameter, more details please refer to Chart 3.3
433MhzAntenna
GPRS Antenna
MRR device ID
AUX power port
RS232 DB9 port
PID select switch
SMS card holder
User Manual
Tel:+0086-023-67628702 Email:tech@cqbluejay.com
www.cqbluejay.com
Add: 1802,Building 2,No.88,Jianxin East Road,Chongqing,400020,China - 17 -
3.2- System configuration- GPRS router
MRR-M communication port is RS232, you can use any type of RS232 adapter to connect
host PC, every MRR-M default setting is send data to Blue Jay Cloud Server
www.microtemper.com, if you want send data to other IP, please follow this guide:
Step 1: Set PID switch for GSM configuration
Change the PID switch 5.6 ON, as photo shown; and connect RS232 port to your host PC.
Step 2: Open [DTU-RTU tool.exe] (You can choose 64/32bit only for PC Windows OS).
Software provides English display, press button as indicate change to English.
1. Change Comport to right port no. (In demo is COM5).
2. Choose Baud Rate to “9600”.
3. Leave other buttons do not change or set, then press Open COM button.
4. Make sure SIM card in holder and powered on MRR-M.
The left screen window show welcome info as follow, mean GPRS router is connect to PC
and prepare configuration.

User Manual
Tel:+0086-023-67628702 Email:tech@cqbluejay.com
www.cqbluejay.com
Add: 1802,Building 2,No.88,Jianxin East Road,Chongqing,400020,China - 18 -
Notes: MRR-M default set to automatic connect remote server, please do all the
configuration in 30sec, that parameter setting will invalid after screen window
show "CONNECTED". in this situation only needs to repower the MRR-M.
Step 3: Set APN (Access Point Name) info
Please contact your local mobile network service providers for confirm the APN account
and password, in demo use china mobile.
After enter right APN info, press button Set to confirm setting, user can press button Get
to check presetting in left screen window.

User Manual
Tel:+0086-023-67628702 Email:tech@cqbluejay.com
www.cqbluejay.com
Add: 1802,Building 2,No.88,Jianxin East Road,Chongqing,400020,China - 19 -
Step 4: Set destination IP to remote server
MRR-M support URL or IP setting, send data to max 6 different remote IP (named from A
to F). In demo use BLUE JAY cloud server(User can get a 6 month free account for testing,
you can find your own Server Port and account info in products package, or contact your
sale manager. more details please refer Chart 3.
After enter right Server info, press button Set to confirm setting, user can press button
Get to check presetting in left screen window.
Notes: Please do not change other parameter in GPRS router, if you want advanced
function, please contact Blue Jay Tech Team: tech@cqbluejay.com
After set the GPRS configuration, powered off the MRR-M, then disconnect RS232
adapter and recovery PID switch 1.4 ON, as following photo, repower the MRR-M it will
send data to the destination IP.
Table of contents
Other BLUE JAY Monitor manuals


