Blue Line Innovations H460S Series User manual

MODELS : H460S*, H461S*, H551S*,
H461M*, H551M*

Contents Major features...............................................................................................2
Safety Information........................................................................................2
Be sure to understand ..................................................................................4
Check the accessories list .............................................................................5
Proper location for product installation......................................................5
Title and function of each part ....................................................................6
Support timing for HDMI/DVI....................................................................11
Support timing for PC.................................................................................12
Adjusting OSD and explanation of its function .......................................13
Diagnosis .....................................................................................................30
Specifications ..............................................................................................32
* REMOTE CONTROL / RS232C COMMAND SPEC
DIGITAL SIGNAGE

2
DIGITAL SIGNAGE
Major features
Safety Information
This product has been designed to enable users ease of use and display information effectively
and conveniently.
• Anti-vandalism glass • All Weather Capable
• Automatic temperature control • Auto Light Sensor function
• High brightness level for readability against direct sunlight
This product is designed to ensure user's safety.
Avoid the following items to prevent serious electric shock and other dangers.
- Do not cover the ventilation holes with anything or insert anything into the ventilation holes.
- Do not place product on a location where damage can be caused by oil, smoke and etc.
- The product is not suitable for use at visual display workplaces according to §2 of the German
Ordinance for Work with Visual Display Units.
- An apparatus with CLASS I construction shall be connected to a Mains socket outlet with a
protective earthing connection.
- Make sure that the power cord and other cables are properly plugged in.
- When not connecting proper power plug into power outlet, otherwise this may cause fire by
electric shock.
- Do not touch the power cord with wet hands, otherwise it may cause electric shock.
- Overloaded AC outlets and extension cables are as dangerous as the power cord being damaged.
Call service engineer for replacement since it may cause electric shock or fire.
- Do not use multiple devices in a single power outlet, otherwise this may cause overheating or fire.
- The main plug of the power supply cord shall remain readily operable. The disconnect device shall
remain readily operable.
- The socket-outlet shall be installed near the equipment and shall be easily accessible.

3
DIGITAL SIGNAGE
- Do not use or place sharp objects near the LCD surface because this can cause in itself damage to
the product.
- When cleaning the LCD screen / surface, do not use strong chemicals such as ethyl, ethyl or a
Isopropyl. This can seriously damage the special coatings on the screen. Use the soft cloths only
adding a little water.
- When cleaning the product, make sure to remove the power cord and wipe with a dry cloth.
- Keep batteries for the remote control being out of children's sight.
- Batteries should be inserted with correct polarity (+,-).
- Use only new batteries. Do not use new battery and used battery at the same time.
- When the product keeps un-using for a long time, make sure to unplug the power cord.
- In case of damage or breakage, do not attempt to self repair.
Please contact the local service engineer.
- Ensure that more than 4 people at least should work together when moving, lifting or installing.
- When a cart is used, use it with cautious when moving the cart/apparatus
combination to avoid injury from tip-over.

4
DIGITAL SIGNAGE
Image quality of the product
CAUSE
Due to the nature of LCD's property, afterimage can occur. Afterimage appears when
identical frames / images are displayed continuously. If displayed for prolonged periods of
time this can become permanent.
PREVENTION
When you display a freeze frame for a long time, lower the brightness and contrast
(Brightness, 70/ Contrast, 80). Also it can be prevented by using moving frame.
COUNTERMEASURES
Temporary afterimage can be alleviated by displaying white or moving frame about 10
hours. (But, permanent afterimage cannot be disappeared according to the property of
LCD) This method is used to remove temporary afterimage that may occur after
displaying a still frame for a certain time.
It can take several minutes or hours to remove afterimage according to the severity. In
the case that your cannot avoid displaying identical still image continuously, you can
prevent it by displaying moving image for 2 or 3 minutes in every hour. As the brightness
of still image and time of display are the cause of afterimage, you are recommended to
lower the brightness in that case.
!
Above problem shall not be covered by warranty.
Be sure to understand

5
DIGITAL SIGNAGE
Check the accessories list
Please check the following components provided with the product after you open the box.
Remote control User's manual
!
Please check the following components provided with the product after you open the box
and contact the dealer if any missing. The contents may vary depending on models and
sometimes the contents may be attached on the product.
Proper location and
recommended installation
- Place product on a stable surface.
- Product is installed at where the place is clean and product does not sink under water even though
heavy raining. It must be installed at where water does not flood at least over the bottom of the
product.
- Locate the product at least 1 m away from the electric appliance or heating product.
- Keep the product out of direct ray of light and locate screen not to be reflected by the sunlight.
- Install product in a well ventilated location. Ensure that there is a clearance of more than 100 cm from
the wall.
- On LCD panel direction basis, install product avoiding western and eastern direction.
- Make sure anchors to be tightened firmly before installation.
!
For further details such a base construction and anchor, refer to appendix guide on installation.
Please take extra care during installation, It can cause damage if the unit is handled
badly or knocked.

6
DIGITAL SIGNAGE
Title and function of each
part
Control panel
1
Remote control receiving sensor.
2
Power display LED red-stand by/ Green-working.
3
~
0
OSD button.
3
Power button : to turn the power on or off.
4
Input selection button : to select other connected
device. (Option)
5
Menu button : to display menu or exit from the menu.
6
Select button.
7
To move down in OSD menu.
8
To move up in OSD menu.
9
To move left and control the volume down in OSD menu.
0
To move right and control the volume up OSD menu.
* The locations of OSD board and remote control receiving sensor may vary depending on models.
POWER SOURCE MENU SELECT VOL
1 2 3 4 5 6 7 8 9 0
7
DIGITAL SIGNAGE
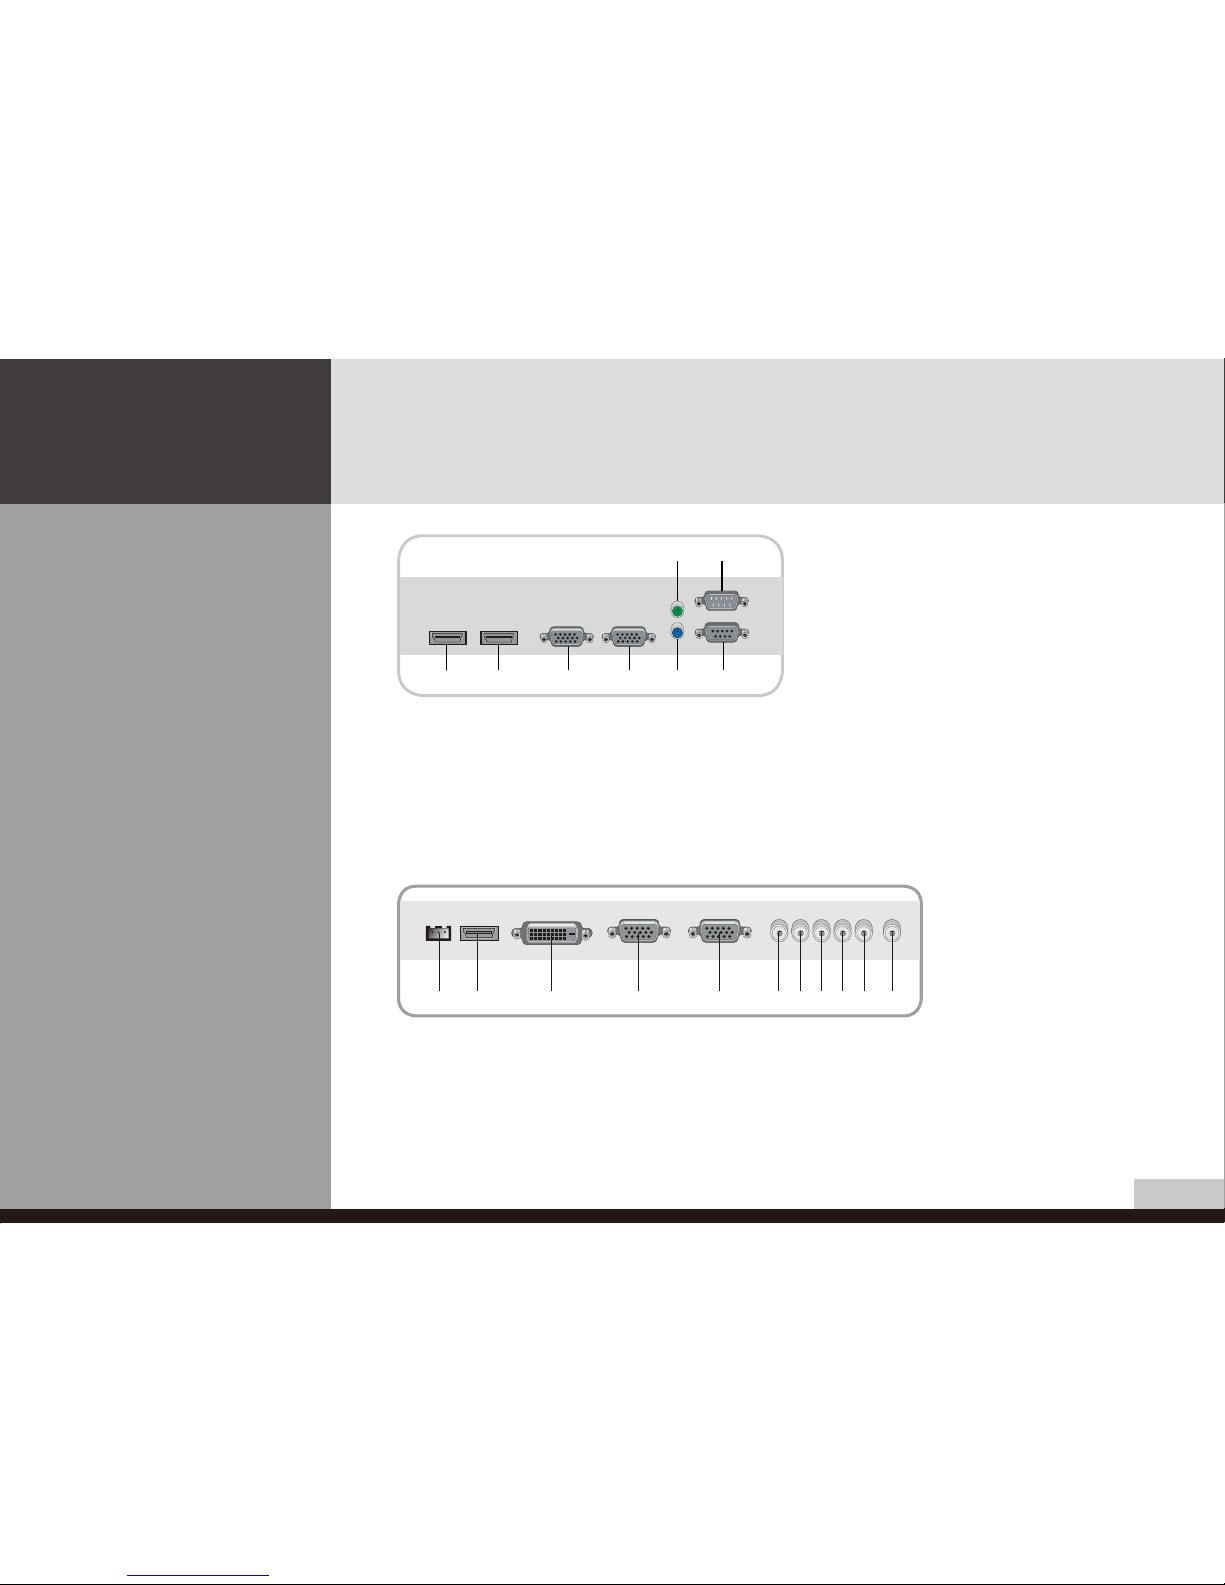
Terminal panel - Type A
Terminal panel - Type B
5 7
1 2 3 4 6 8
1
PIR SENSOR IN (Option)
2
HDMI IN
3
DVI OUT
4
PC D-SUB IN
5
PC D-SUB OUT
6
PC AUDIO IN
70!
UPGRADE Port :
*this port is used for upgrade
service and not for general users.
8
RS-232C IN
9
RS-232C OUT
1
HDMI IN
2
DVI OUT
3
D-SUB IN
4
D-SUB OUT
5
UPGRADE
6
PC AUDIO IN
7
RS-232C OUT
8
RS-232C IN
1 2 3 4 5 6 789 0 !

8
DIGITAL SIGNAGE
• Model: H460S* - Rear • Model: H461S*, H551S* - Front
Terminal Panel
Control Panel
Terminal Panel
Control Panel

9
DIGITAL SIGNAGE
• Model: H461M* - Front
• Model: H551M* - Front
Control &
Terminal Panel Control &
Terminal Panel

10
DIGITAL SIGNAGE
Remote control
1
To turn the power on or off.
2
Move up in OSD menu.
3
To move left or control the volume down in OSD
menu.
4
To move right or control the volume up in OSD menu.
5
To move down in OSD menu.
6
[ENTER] Select in OSD menu.
7
Display the OSD menu.
8
Close the OSD menu.
9
Display the menu of signal source and choose it.
0
Temporary sound switch off.
[TIP] If it doesn’t need to control display by a remote-controller, press button of remote-controller in order following.
MENU → SOURCE → EXIT → ▼ → ENTER(↵)
* Press button once again in order above so that original condition is returned.

11
DIGITAL SIGNAGE
Support timing for
HDMI / DVI
NO Resolution Horizontal frequency
(KHz)
Vertical frequency
(Hz)
1480p 640 x 480p 60
2576p 720 x 576p 50
3720p 1280 x 720p 50 / 60
41080i 1920 x 1080i 50 / 60
5640 x 480 31.47 59.94
6800 x 600 37.88 60.32
71024 x 768 48.36 60
81360 x 768 47.70 60
9* 1600 x 1200 75.00 60
10* 1920 x 1080 67.50 60
11* 1080p 1920 x 1080p 60
!9, 10 and 11 are only for Full HD

12
DIGITAL SIGNAGE
Support timing for PC
NO Resolution Horizontal frequency
(KHz)
Vertical frequency
(Hz)
1640 x 480 31.47 / 37.5 59.94 / 75
2720 x 400 37.5 70
3800 x 600 37.88 / 46.88 / 48.28 60.32 / 72.19 / 75
41024 x 768 48.36 / 60.02 60.00 / 75.03
51360 x 768 47.71 60.00
6* 1280 x 1024 64.00 60.00
7* 1600 x 1200 75.00 60.00
8* 1920 x 1080 67.50 60.00
!6, 7 and 8 are only for Full HD
13
DIGITAL SIGNAGE
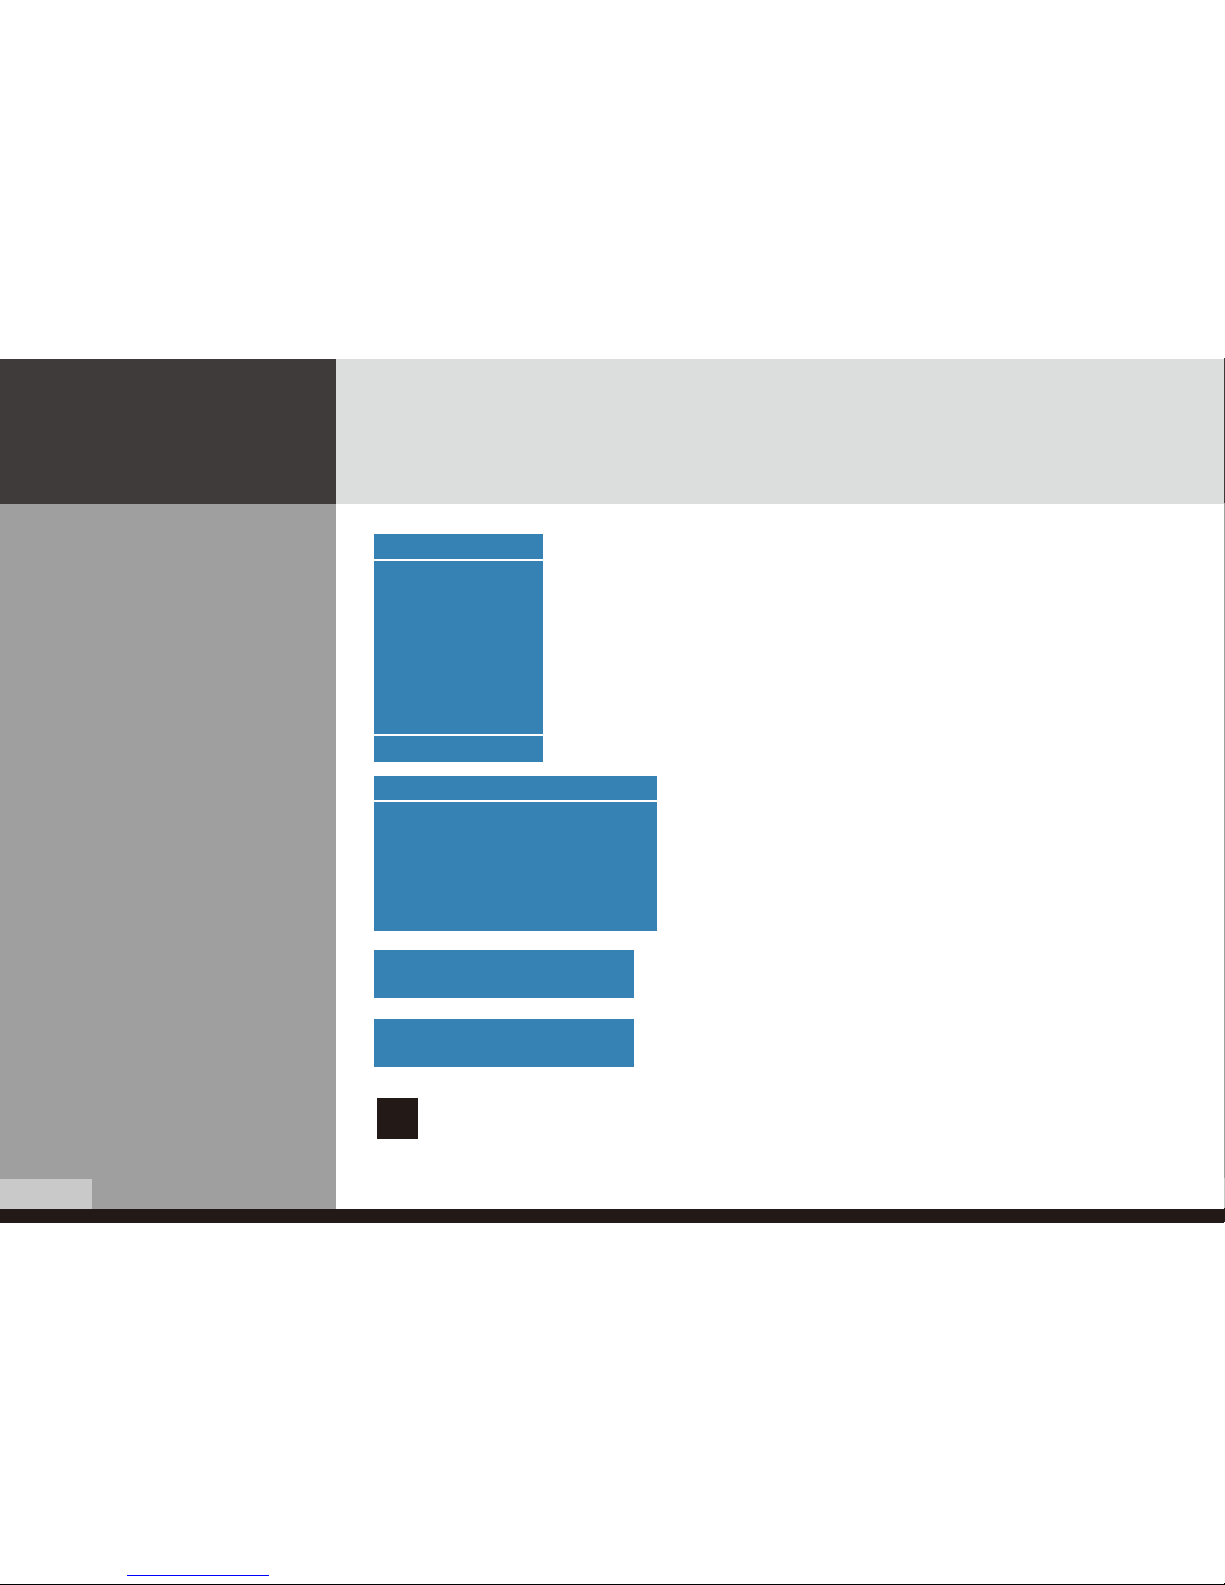
Adjusting OSD and
explanation of its
function
Input & Information
Press ↲ button and the information about input source,
signal, set-up is displayed as shown on the picture.
Information PC
1360 x 768 60 Hz
Picture Mode Middle
Sound Mode Standard
Sleep Timer Off
Clock 12 : 30
Size Wide
Input Source
PC
HDMI
AV
Component
U Move Enter
"No Signal" message is shown in case of no connected signals.
No Signal
"Out of Range" Message is shown in case of the excess of an
input source range.
Out of Range
!The brightness of the display product may go dark in case the temperature inside the
product is too high.
It's the protection function and restores the brightness to its original state after a while.
1. Press the SOURCE button.
2. Press ▲ / ▼ button to select the desired Source.
3. Press ↲ button to selection.
* AV or COMPONENT source is optional.

14
DIGITAL SIGNAGE
How to Select the Picture
Mode
✔Menu of PC doesn’t appear on OSD when user uses HDMI and DVI signal.
Users can automatically adjust the picture mode according to the input mode.
Picture
Picture Mode : Custom
Custom
High
Colour Tone
Middle
Size : Low
PC
U Select Enter Menu
1. Press Menu button.
Menu items appear on the screen.
2. Press ↲ button to select “Picture” Icon. “Picture mode” is
highlighted.
3. Press ▶ or ↲ buttons to select “Picture mode”.
4. The menu changes in the following order.
Custom -> High -> Middle -> Low
5. Press EXIT button to escape OSD MENU or press MENU
button to return to the previous menu.

15
DIGITAL SIGNAGE
How to Set the Desired
Picture
Users can manually adjust their desired picture
Custom PC
Brightness :70
Contrast : 80
U Move Adjust Menu
1. Press Menu button. Menu items appear on the screen.
2. Press ▶ or ↲ buttons to select "Picture Mode".
3. Press ▲ / ▼ button to move to "Custom" and press ▶or ↲ buttons to go to the sub menu.
Custom menu will appear.
4. Select required option by pressing the ▲ / ▼ or ↲ button, then Press ◀ / ▶ button to adjust.
5. Press EXIT button to escape from OSD MENU or press MENU button to return to the previous menu.
- Brightness : Adjust the brightness of the entire picture.
- Contrast : Adjust the contrast of the object and backgrounds.
Picture PC
Picture Mode : Middle
Custom
Colour Tone
Size :
PC
U Adjust Enter Menu

16
DIGITAL SIGNAGE
Users can adjust color as users want.
How to Select a Colour Tone
Colour Tone PC
Colour Tone :Normal
Red : 50
Green : 50
Blue : 50
U Move Enter Menu
1. Press Menu button. Menu items appear on the screen.
2. Press ▶ or ↲ buttons to select "Picture Mode".
3. Press ▲ / ▼ button to move to "Colour Tone" and press ▶or ↲ buttons to go to the sub menu.
Colour Tone menu will appear.
4. Press ▶ or ↲ buttons to select "Colour Tone"
5. Press ▲ / ▼ button, then the menu changes in the following order.
Custom -> Cool2 -> Cool1 -> Normal -> Warm1 -> Warm2
6. If you choose Custom, then “Red”, “Green”, “Blue” is activated.
7. Press the Menu button or ◀button to go back to the previous menu, “Red”, “Green”, “Blue” is
enabled.
8. Select required option by pressing the ▲ / ▼ or ↲ button, then Press ◀ / ▶ button to adjust.
9. Press EXIT button to escape from OSD MENU or press MENU button to return to the previous menu.
Picture PC
Picture Mode : Middle
Custom
Colour Tone
Size :
PC
U Adjust Enter Menu

17
DIGITAL SIGNAGE
How to Set the Display Size Users can adjust the display scale as they want
1. Press Menu button. Menu items appear on the screen.
2. Press ↲ button to select “Picture” Icon. “Picture Mode” is highlighted.
3. Press ▲ / ▼ buttons to move to “Size”.
4. Press ◀ / ▶ or ↲ buttons and press ▲ / ▼ then the mode change in the following order.
Wide -> 4 : 3
*
The display size aspect mode change in the HDMI, DVI mode in the following order.
Wide -> 4 : 3 -> 16 : 9
5. Press EXIT button to escape OSD MENU or press MENU button to return to the previous menu.
✔Menu of PC doesn’t appear on OSD when user uses HDMI and DVI signal.
Picture PC
Picture Mode :
Custom
Colour Tone
Wide
Size : 4 : 3
PC
U Select Enter Menu
Picture HDMI
Picture Mode :
Custom
Colour Tone
Wide
Size : 4 : 3
PC
16 : 9
U Select Enter Menu

18
DIGITAL SIGNAGE
How to set image adjustment
in PC mode
(Supported only in PC mode)
1. Press Menu button.
Menu items appear on the screen.
2. Press ↲ button to select "Picture" Icon.
"Picture Mode" is highlighted.
3. Press ▲ / ▼ buttons to move to PC and press
▶or ↲ buttons to select to "PC"
"Auto Adjust" is high lighted.
4. Press ↲ button to execute the "Auto Adjust"
5. Select the required option by pressing the ◀ / ▶ or ↲
button, then press ◀ / ▶button to adjust
6. Press EXIT button to escape OSD MENU or press MENU button to return to the previous menu.
- Auto Adjust : Horizontal/vertical positions are automatically adjusted.
- Phase : To eliminate the shake of the picture.
- H-Position : To adjust the horizontal position of the picture.
- V-Position : To adjust the vertical position of the picture.
- Frequency : To eliminate the shake of picture.
- Resolution : Selecting resolution is allowed to only set to 1024x768, 1280x768, 1360x768, 1366x768.
Select corresponsive resolution with specified resolution of image.
Picture
Auto Adjust
Phase : 52
H-Posilion : 16
V-Posilion : 24
Fiequency :-78
Resolution :
U Move Enter Menu

19
DIGITAL SIGNAGE
How to Select the Audio
Mode (Speaker Option)
Users can adjust sound mode automatically as they want.
- Custom : When the user wants to set the values directly.
- Standard : For the general sound. Most audio contents are appropriate to this mode.
- Music : For enjoying original sound.
- Movie : Grandiose sound.
- Speech : Clear sound.
1. Press Menu button. Menu items appear on the screen.
2. Press ▲ / ▼ buttons to move to “Sound” Icon.
3. Press ↲ button to select “Sound” Icon. “Mode” is
highlighted.
4. Press ▶ or ↲ buttons, to select to Sound mode.
then the menu changes in the following order.
Custom->Standard -> Music -> Movie -> Speech
5. Press EXIT button to escape OSD MENU or press MENU
button to return to the previous menu.
Sound
Mode : Custom
Volume : Standard
Balance : Music
Equalizer
Movie
Auto Volume : Speech
Sound Mode :
HDMI Sound :
U Select Enter Menu
This manual suits for next models
4
Table of contents


