Blue Max 20360 User manual
*Actual product may vary slightly
Please carefully read and save these instructions before attempting to assemble, maintain, install, or operate this product.
Observe all safety information to protect yourself and others. Failure to observe the instructions may result in property
damage and/or personal injury. Please keep instructions for future reference.
For warranty purchases, please keep your dated proof of purchase. File or attach to the manual for safe keeping.
For Customer Service, Call 1-800-348-5004
10” ELECTRIC POLE SAW
This product contains or, when used, produces a chemical
known to the State of California to cause cancer and birth
defects or other reproductive harm.
(California Health & Safety Code § 25249.5, et seq.)
WARNING

DESCRIPTION OF THE SYMBOLS
Warning – To reduce the risk of injury, user must read instruction manual
Read the instruction manual and follow all warnings and safety instructions.
Wear ear protection, eye protection, safety helmet and gloves when using the product
Clothing must be sturdy and snug-fitting, but allow complete freedom of movement.
Wear protective footwear
Remove plug from the main power source immediately if cable is damaged or cut.
Do not expose to rain.
Keep bystanders away.Danger of injury from flying parts! Always maintain a
sufficiently safe distance. Beware of thrown objects.
Danger from overhead electric-power lines

INTENDED USE
The chainsaw with telescoping arm is intended for removing branches from trees. It is not
suitable for extensive sawing work and felling trees or for the sawing of materials other than
wood. Please observe that our machine was not designed for use in commercial, technical
or industrial applications. We assume no liability if the machine is used in commercial,
technical or industrial applications or for equivalent activities.
SPECIFICATION
GENERAL SAFETY WARNINGS
WARNING! Read all safety warnings and instructions.
Failing to follow the warnings and instructions may result in an electric shock, a fire
and/or a serious injury.
Keep all warnings and all instructions to be able to refer to them later on.
The term “tool” in the warnings refers to your electric pole saw.
1. Safety of the work area
a) Keep the work area clean and well lit.
b) Do not operate electric tools in explosive atmospheres, for example in the presence of
flammable liquids, gases or dust.
c) Keep children and bystanders away while operating the tool.
2. Electrical safety
a) The electric tool plugs must match the outlet. Never modify the plug in any way. Do not use
adapters with earthed (grounded) tools.
b) Avoid any body contact with earthed or grounded surfaces such as pipes, radiators,
cookers and refrigerators.
c) Do not expose tools to rain or wet conditions.
d) Do not abuse the cord. Never use the cord for carrying, pulling or unplugging the tool. Keep
the cord away from heat, lubricants, edges and moving parts.
e) When using a tool outside, use an extension cable suitable for outside use.
f) If use of a tool in a humid location is unavoidable, use a supply protected by a residual
current differential device (RCD).
Model 20360
Rated Voltage 120V ~ 60Hz
Nominal Consumption
4.8AMP
No-load Speed
5,500 RPM
Max cutting length
10 INCH
Variable height adjustment
from 5.5FT to 8.3FT
Oil tank 0.02 GAL
Weight without cutting attachment and harness 8.8 LB
Chain type
OREGON 91P040X
Guide Bar type
OREGON 100DEA041(518693)

3. Personal safety
a) Stay alert, watch what you are doing and use common sense when operating the tool. Do
not use the tool when you are tired or under the influence of drugs, alcohol or medication.
b) Use safety equipment. Always wear eye protection.
c) Avoid unintentional starting. Make sure that the switch is in the off position before plugging
the tool into the main power source and/or fitting the batteries, picking it up or carrying it.
d) Remove any adjustment key before operating the tool.
e) Do not overreach. Keep a proper position and balance at all times.
f) Dress in a suitable manner. Do not wear loose clothing or jewelry. Keep hair, clothing and
gloves away from moving parts.
g) DANGER! People with pacemakers should not use pole saw.
4. Use and maintenance of the tool
a) Do not force the tool. Use the correct tool for your application.
b) Do not use the tool if the power switch is not operational.
c) Disconnect the power cord before any adjustment, before changing an accessory, or
before storing the tool.
d) Keep idle tools out of the reach of children and do not allow persons unfamiliar with the tool
or these instructions to operate it.
e) Maintain the tool. Check that there is no misalignment or obstruction of the moving parts,
broken parts or any other condition that could affect the operation of the tool. In the event of
damage, have the tool repaired before using it.
f) Keep cutting tools sharp and clean.
g) Use the tool, accessories and blades etc., in accordance with these instructions, while
taking into account the work conditions and the work to be done.
OTHER SAFETY WARNINGS
•Keep all parts of the body away from the saw chain
•Before you start the chain saw, make sure the saw chain is not contacting anything.
•Do not use the machine when the operator is tired, ill or under the influence of alcohol or
other drugs.
•Always disconnect the main plug before performing any maintenance work, when the
chain saw is not in use and before changing any tools.
•Hold the saw firmly with both hands, with fingers and thumbs hooked around the handles.
Steady yourself with your body and arms in a position in which you can control the
kickback forces.
•Always hold the chainsaw with your right hand on the rear handle and your left hand on
the front handle.
•Wear safety glasses, hearing and head protection, as well as adequate clothing.
•Use slip resistant foot protection as well as close fitting clothes.
•Do not use the chainsaw while in a tree.
•Always keep proper footing and operate the tool only when standing on fixed, secure and
level surface.
•When cutting a limb that is under tension , be alert for spring back.
•Carrythe chainsaw with tool switched off and away from your body.
•Follow instructionsfor lubricating, chain tensioning and changing accessories.
•Keep handles dry, clean, andfree from oil and grease.

•Cut wood only. Do not use chain saw for purposes not intended.
•Follow the manufacturer’s instructions for operation, sharpening and maintaining the saw
chain.
•The risk of kickback is increased when the pole is in short position.
•Take special care when cutting undergrowth and young trees.
•Do not cut into the ground, metal fences or similar unsuitable items and materials.
•We recommend that people who are using a chainsaw for the first time should arrange
for a well-versed person to instruct them on how to work with a chainsaw and the safety
equipment.
•Keep your working area free of obstacles and ensure that you have adequate freedom of
movement.
•Keep your working area tidy and free of debris and other obstacles over which you could
stumble.
•Before you start felling branches: Make sure that there is nobody within a range of at
least 2-2.5 times the length of the branch.
•Take the weather conditions into account when felling trees.
•Never allow children or people unfamiliar with these instructionsto use the machine.
•Plan an escape route from falling trees or branches in advance. Make sure that this
escape route is free of obstacles which could restrict or prevent free movement. Keep in
mind that freshly cut grass or bark is slippery.
•Ensure that somebody is in the vicinity (but at a safe distance) in case of an accident.
•When the chain is moving, do not let the tip of the chain bar come into contact with any
objects.
•Start sawing only after the chain has reached full speed.
•Watch out for moving branches or other forces which could interfere with a cut and
impact with the chain.
•Never try to cut a branch with a diameter larger than the cutting length of the equipment.
•Keep the equipment at a minimum distance from overhead power cables.
•Laythe power cable so that it will not come into contact with branches or similar objects.
Kickback
The term kickback refers to when the chainsaw suddenly jumps up and back. This is usually
caused by the workpiece coming into contact with the guide bar tip or the clamping of the
saw chain. A kickback generates abrupt, powerful forces. Therefore, the chainsaw usually
reacts in an uncontrolled manner.
The consequence is often the severe injury of the user or nearby persons. The danger of a
kickback is greatest if you apply the area near the guide bar tip to a branch, because the
leverage effect is greatest there. Therefore, always apply the saw as flatly as possible.
Causes and operator prevention of kickback:
Kickback may occur when the nose or tip of the guide bar touches an object, or when the
wood closes in and pinches the saw chain in the cut.
Tip contact in some cases may cause a sudden reverse reaction, kicking the guide bar up
and back towards the operator.
Pinching the saw chain along the top of the guide bar may push the guide bar rapidly back
towards the operator.
Either of these reactions may cause you to lose control of the saw, which could result in
serious personal injury. Do not rely exclusively upon the safety devices built into your saw.

As a chain saw user, you should take all necessary stepsto keep your cutting jobs free from
accident or injury.
Kickback is the result of tool misuse and/or incorrect operating procedures or conditions and
can be avoided by taking proper precautions as given below:
a) Maintain a firm grip, with thumbs and fingers encircling the pole saw handles, with both
hands on the saw and position your body and arm to allow you to resist kickback forces.
Kickback forces can be controlled by the operator, if proper precautions are taken. Do not let
go of the pole saw.
b) Always use the correct replacement bars and saw chains recommended by the
manufacturer. The use of incorrect replacement bars or saw chains may result in breakage
of the chain or kickback.
c) Follow the manufacturer’s sharpening and maintenance instructions for the saw chain.
Decreasing the depth gauge height can lead to increased kickback.
Residual risks
Even if you use this electric power tool in accordance to instructions, certain residual risks
cannot be eliminated. The following hazards may arise in connection with the equipment’s
construction and layout:
a) Cut injuries if no safety clothing is used.
b) Lung damage if no suitable protective dust mask is applied.
c) Damage to hearing if no suitable ear protection is applied.
d) Health damage caused by hand-arm vibrations if the equipment is used over a longer
period or is not properly guided and maintained
ASSEMBLY
Attention!
Only connect the chainsaw tothe main power supply once it has been completely
assembled and the chain tension has been set. Always wear protective gloves when
carrying out work on the chainsaw in order to prevent injury.
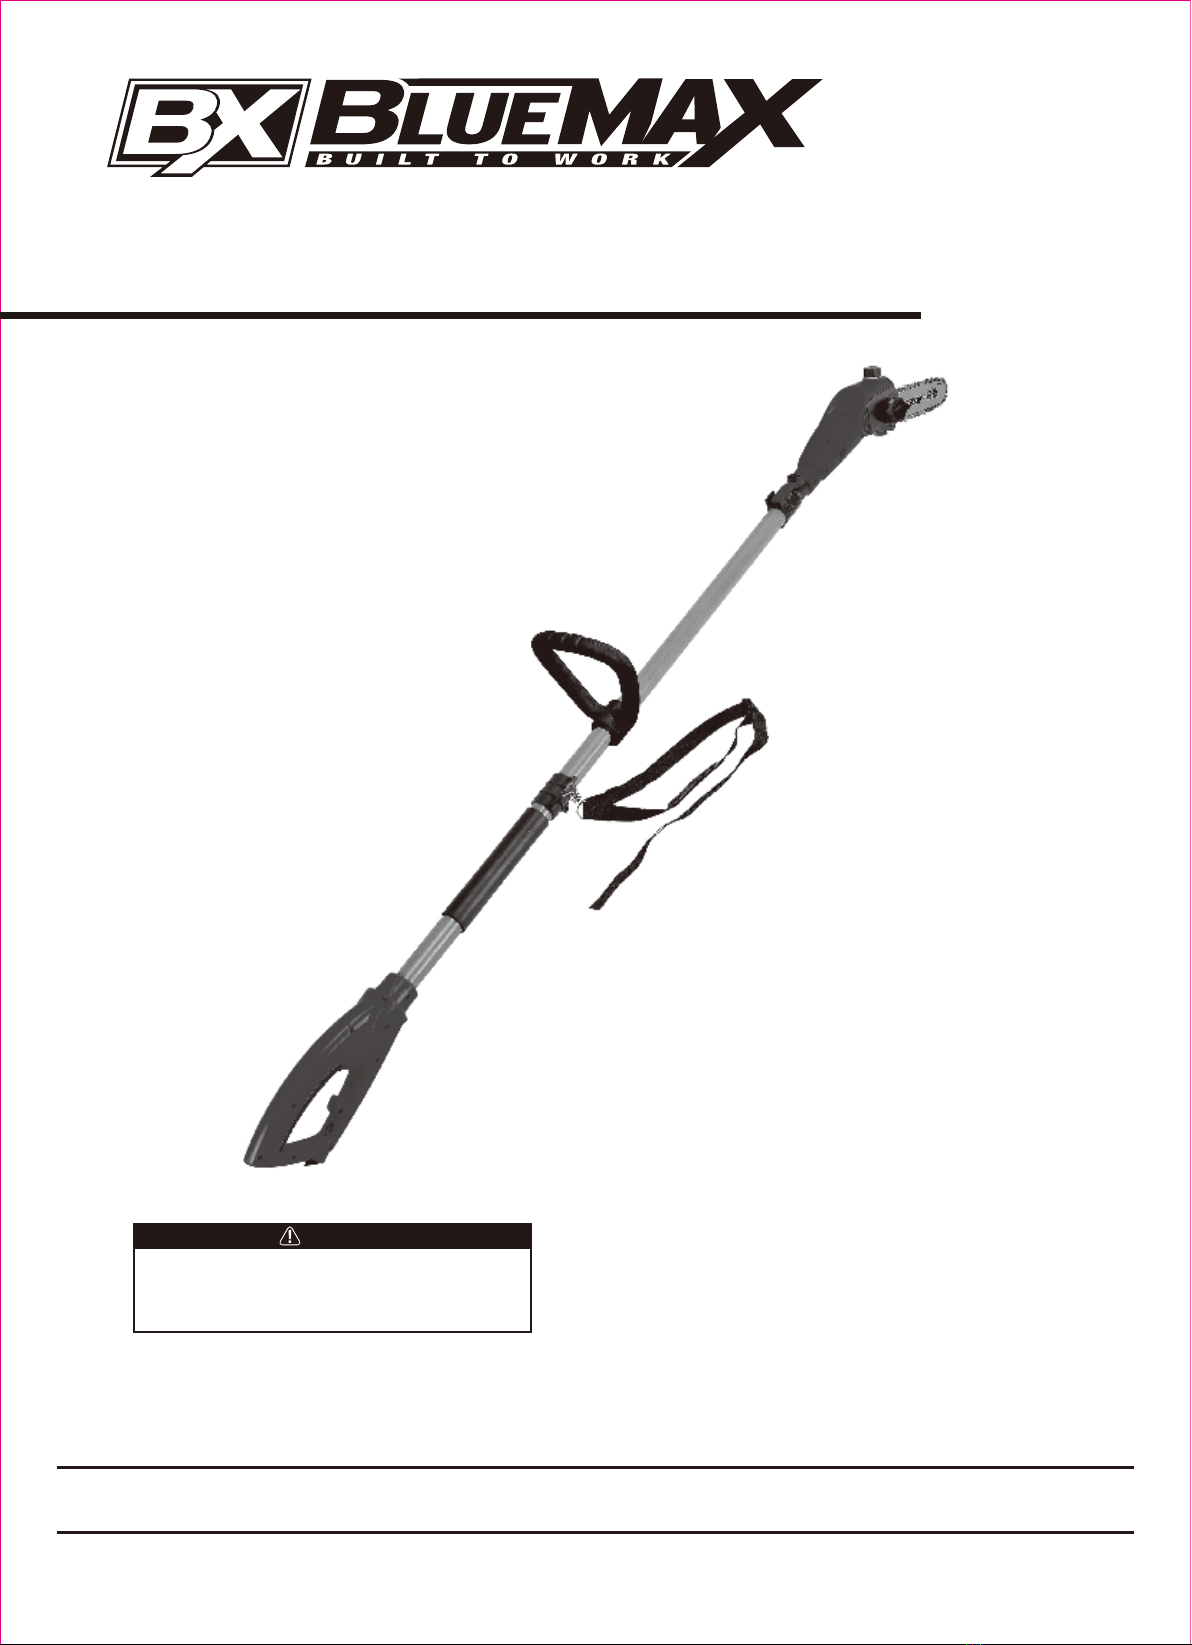
Assembling the auxiliary handle (Fig.1)
The Allen key (21) can be found in its holder on the telescopic handle lock (5)
1. Unscrew the two screws on the auxiliary handle (4) supplied and take off support (20).
2. Place the auxiliary handle in the desired position on the telescopic handle (22) and fit the
support.
3. Screw togetherthe auxiliary handle (4) and support (20).
4. The height or holding angle of the auxiliary handle can be adjusted at any time by slightly
loosening both screws, pushing/turning and retightening the screws.
Fig.1
Assembly of guide bar and saw chain
1. Place the chainsaw on a suitable flat surface.
2. Loosen nut (8) on sprocket cover (13), and remove sprocket cover (13) (fig.2)
Fig 2
3. Place the chain (9) in the groove of the guide bar (10). Pay attention to the correct
running direction, as shown by the rotation direction symbol (fig.3)
Fig.3
4. Place the chain around the sprocket (15) and put the bar on such that the locating peg(14)
fits into the slotted hole of the bar. (fig.4)
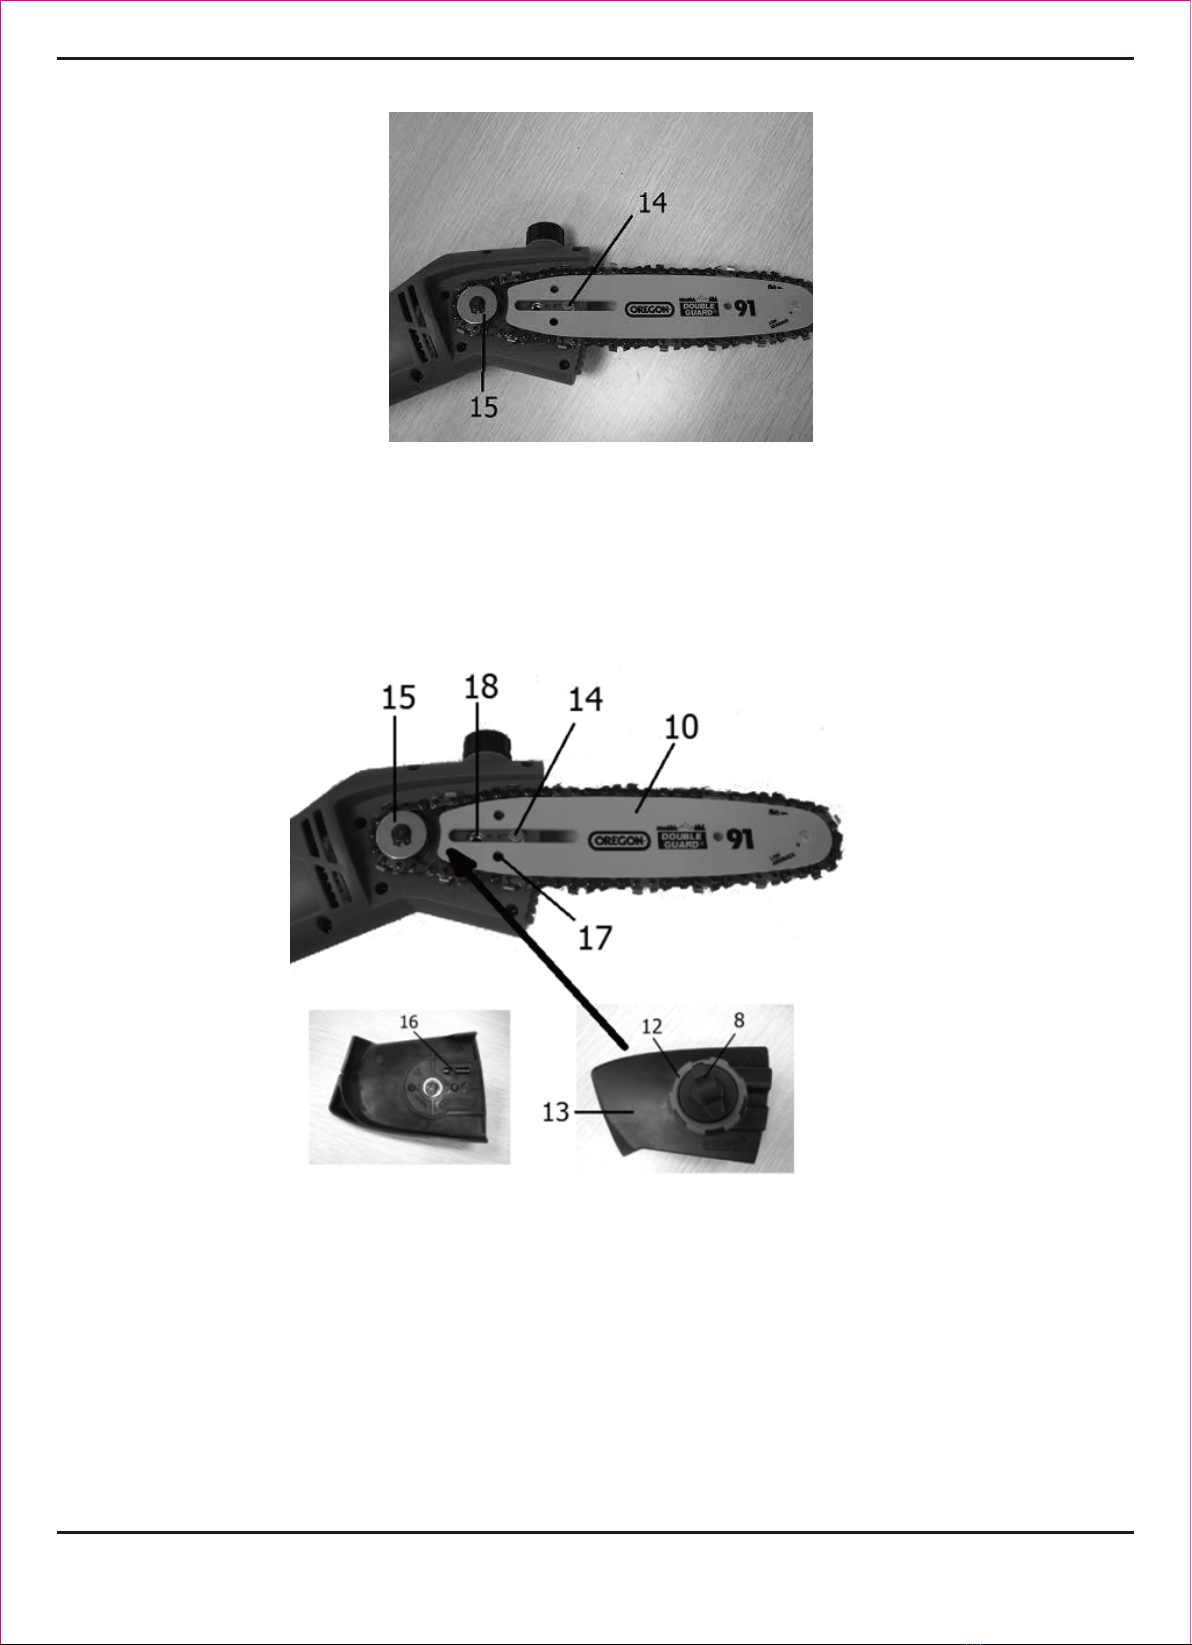
Fig.4
5. Install the sprocket cover (13) (fig.5):
The thread bolt (18) is the holder for the nut (8).
The hole (17) in the guide bar (10) is the holder for the chain tensioning pin (16).
Turn the hand wheel (12) to adjust the chain tensioning pin (16) and make it into the hole
(17).
6. Tighten the nut (8) lightly by hand, as the saw chain still hasto be tensioned. (fig.5)
Fig.5
PREPARATION BEFORE WORK
Attention! Always pull out the main plug before inspection and adjustment work.
Always wear protective gloves when carrying out work on the chainsaw in order to
prevent injury.
Setting the chain saw tension
1. Loosen the nut (8) by turning it counter-clockwise approximately 1-2 turns, but do not
remove it. (fig.6)
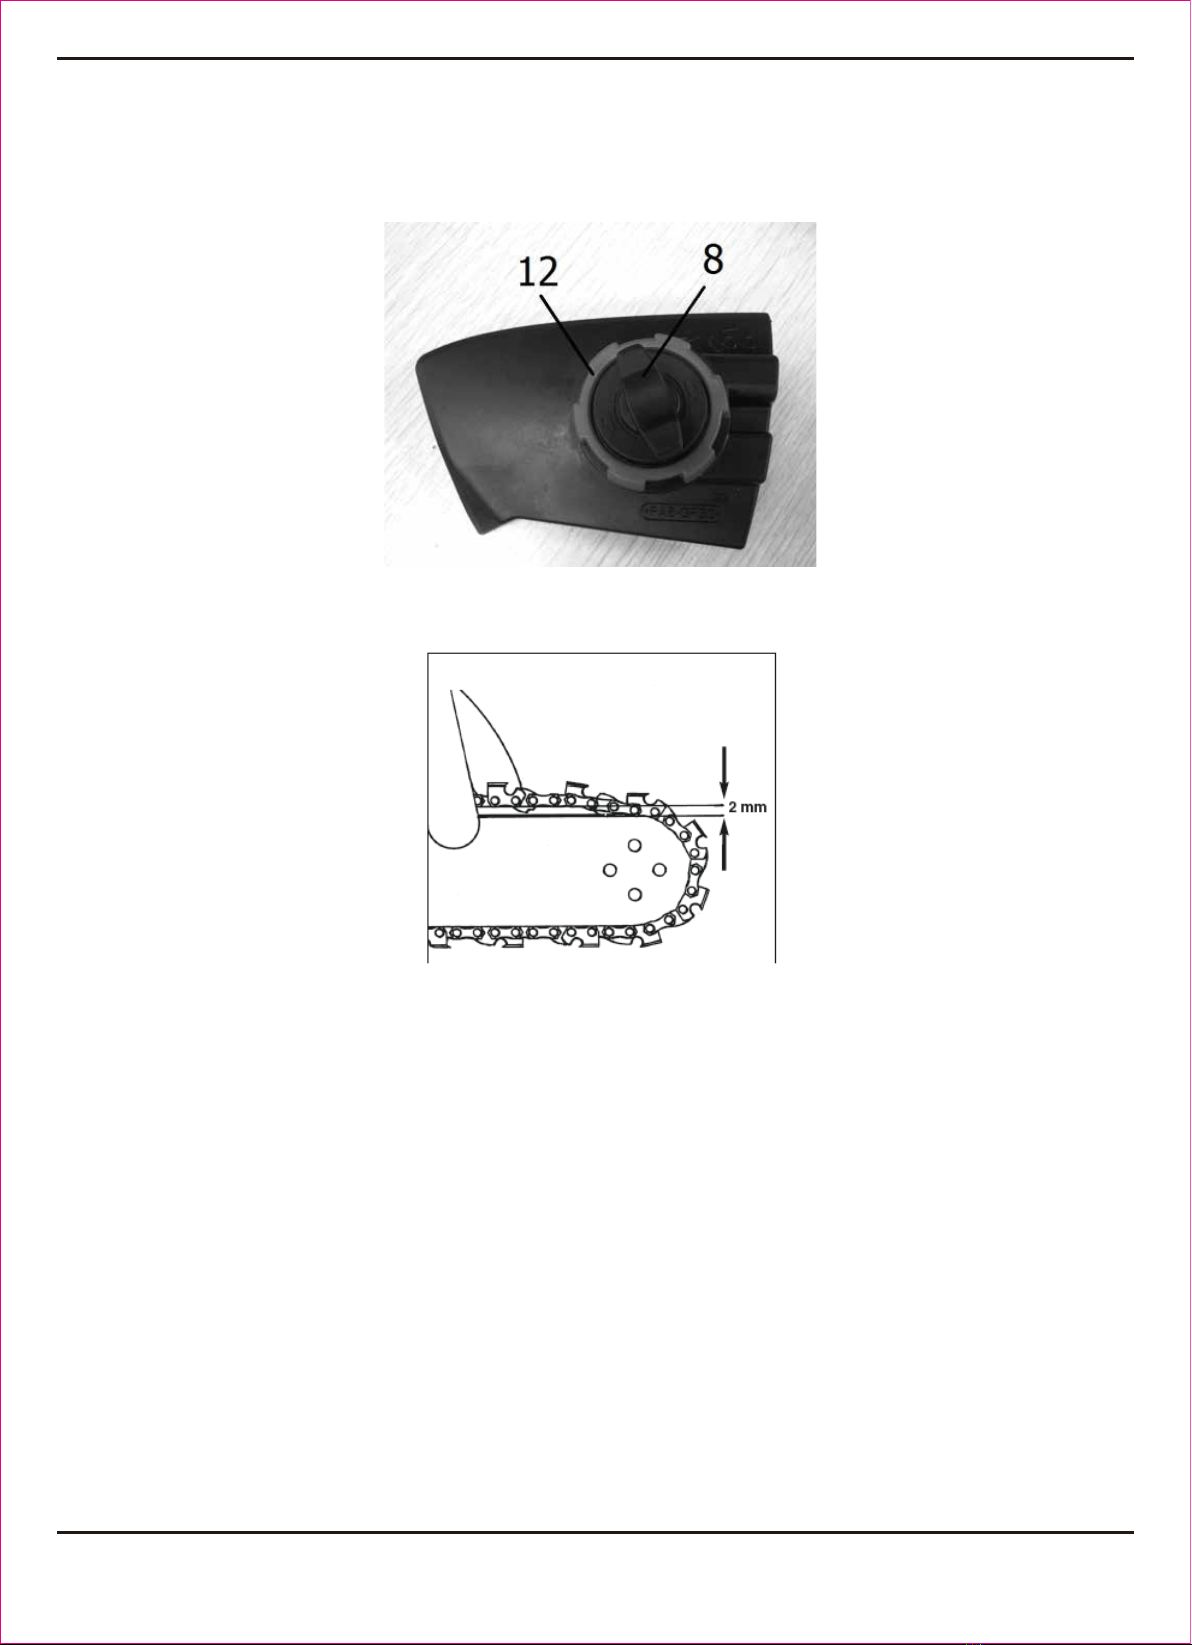
2. Turn hand wheel (12) in a clockwise direction until the correct chain tension is reached.
(fig.6)
Fig.6
3. The correct chain tension is reached when the chain in the middle of the bar can only be
lifted by approximately 2 mm.(fig.7)
Fig.7
4. Tighten the nut by turning it clockwise. (fig.6)
5. Check whether all chain links lie correctly in the guide tracks of the bar.
Attention! Tensioning saw chain too tightly will overload the motor and cause damage.
Insufficient tension can cause chain to derail.
Note: The saw chain must be tensioned properly in order to ensure safe operation. The
chain tension is optimal if the saw chain can be lifted 2 mm in the centre of the guide bar.
Since the saw chain heats up during the sawing process, whereby its length changes, you
must check the chain tension at least once every 10 min. and adjust it as necessary. This
applies in particular for new saw chains. Slacken the saw chain after work is completed,
because it shortens when cooling down. In doing so, you can prevent damage tothe chain.
Saw chain lubrication
Attention! Never operate the chain without chainsaw oil! The use of the chainsaw without
chainsaw oil or with an oil level (19) below the minimum oil level mark results in damage to
the chainsaw ! (Fig.8) Only use special chainsaw oil.
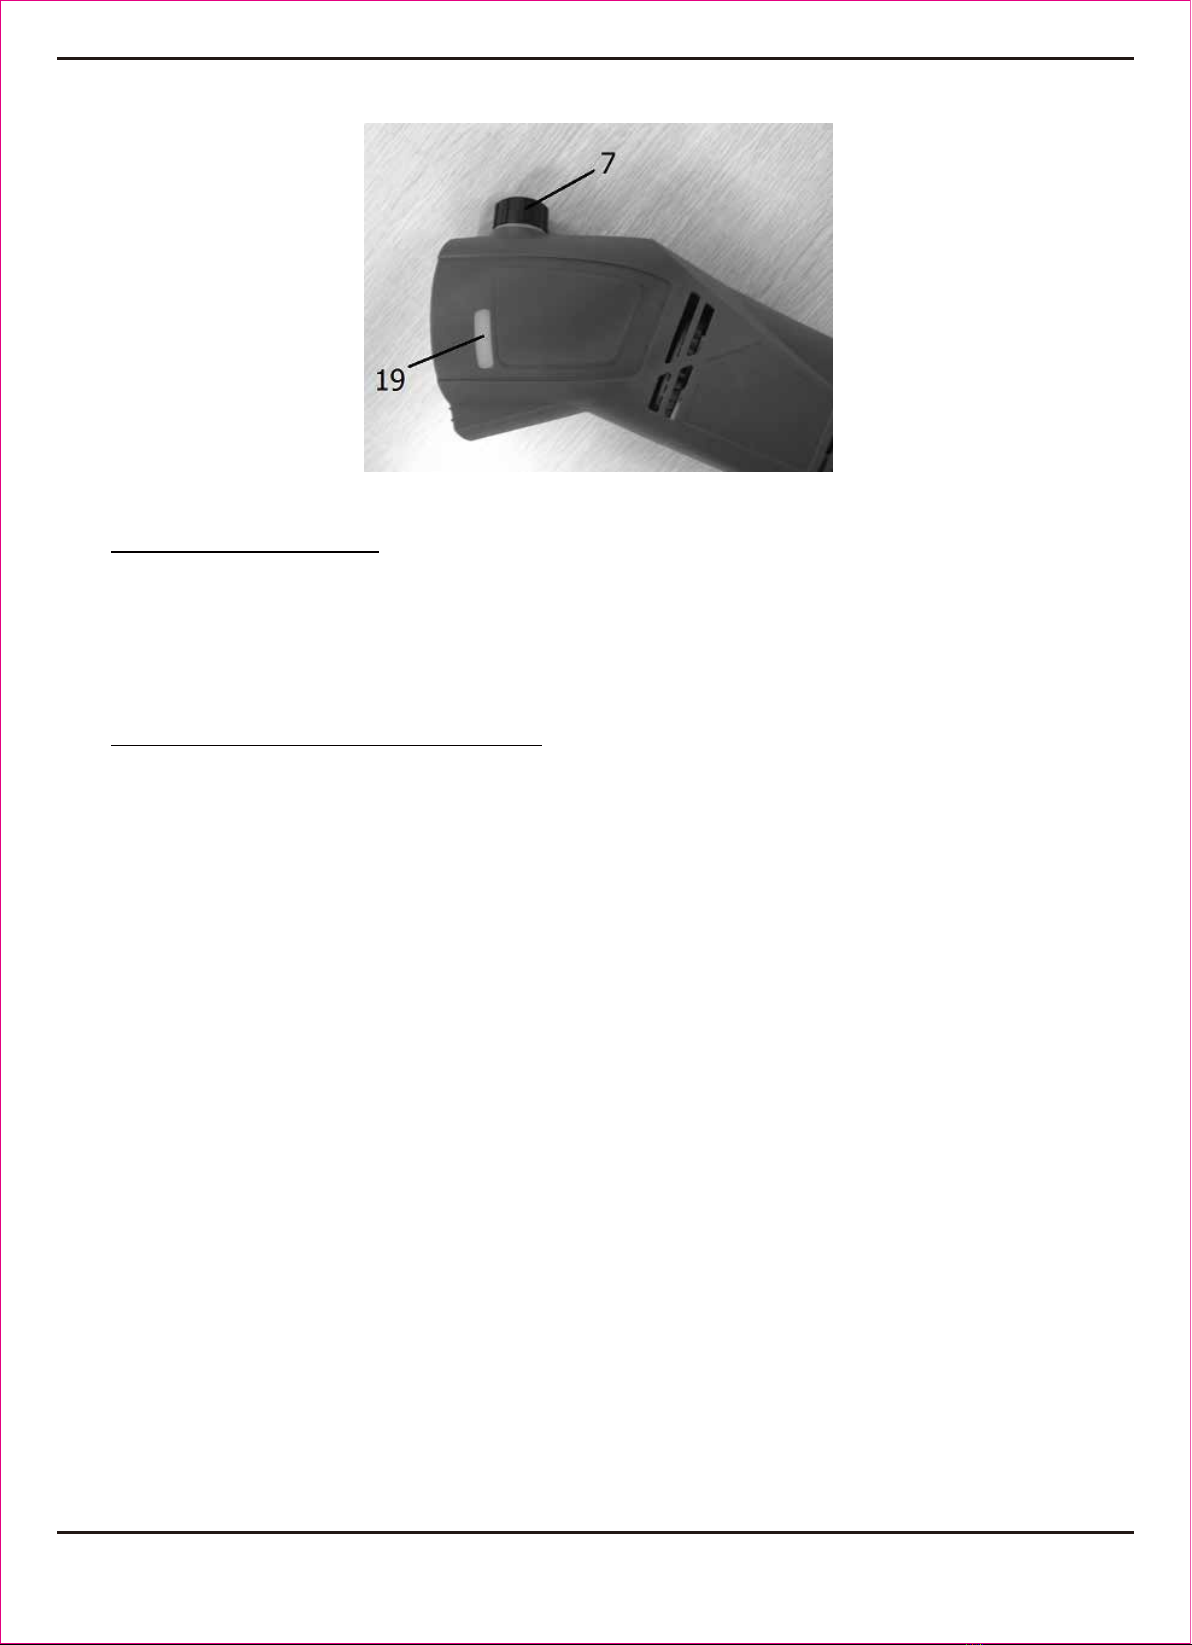
Fig.8
Filling the oil tank (Fig. 8)
• Place the chainsaw on a level surface.
• Clean the area around the oil tank cap (7) and then open it.
• Fill the oil tank with chainsaw oil. In doing so, make sure that no dirt gets into the oil tank so
that the oil nozzle does not clog.
• Close the oil tank cap (7).
Checking the automatic chain lubrication
Regularly check the functionality of the automatic chain lubrication in order to prevent
overheating and the subsequent damage to the guide bar and saw chain associated with it.
For this purpose, align the guide bar tip against a smooth surface (board, cut-in of a tree)
and allow the chainsaw to run. If an increasing amount of oil appears, the automatic chain
lubrication functions properly. If no clear trace of oil appears, please read the appropriate
information in the Troubleshooting section!
Attention!
Do not touch the surface during the process. Maintain a sufficient safety clearance (approx.
8 inches).
On average, an oil filling is sufficient for 10 minutes of operation, depending on the duration
of pauses and the stress.
Adjusting the telescope length (Fig.9)
The telescopic handle (22) is adjustable using the telescopic handle lock (5)
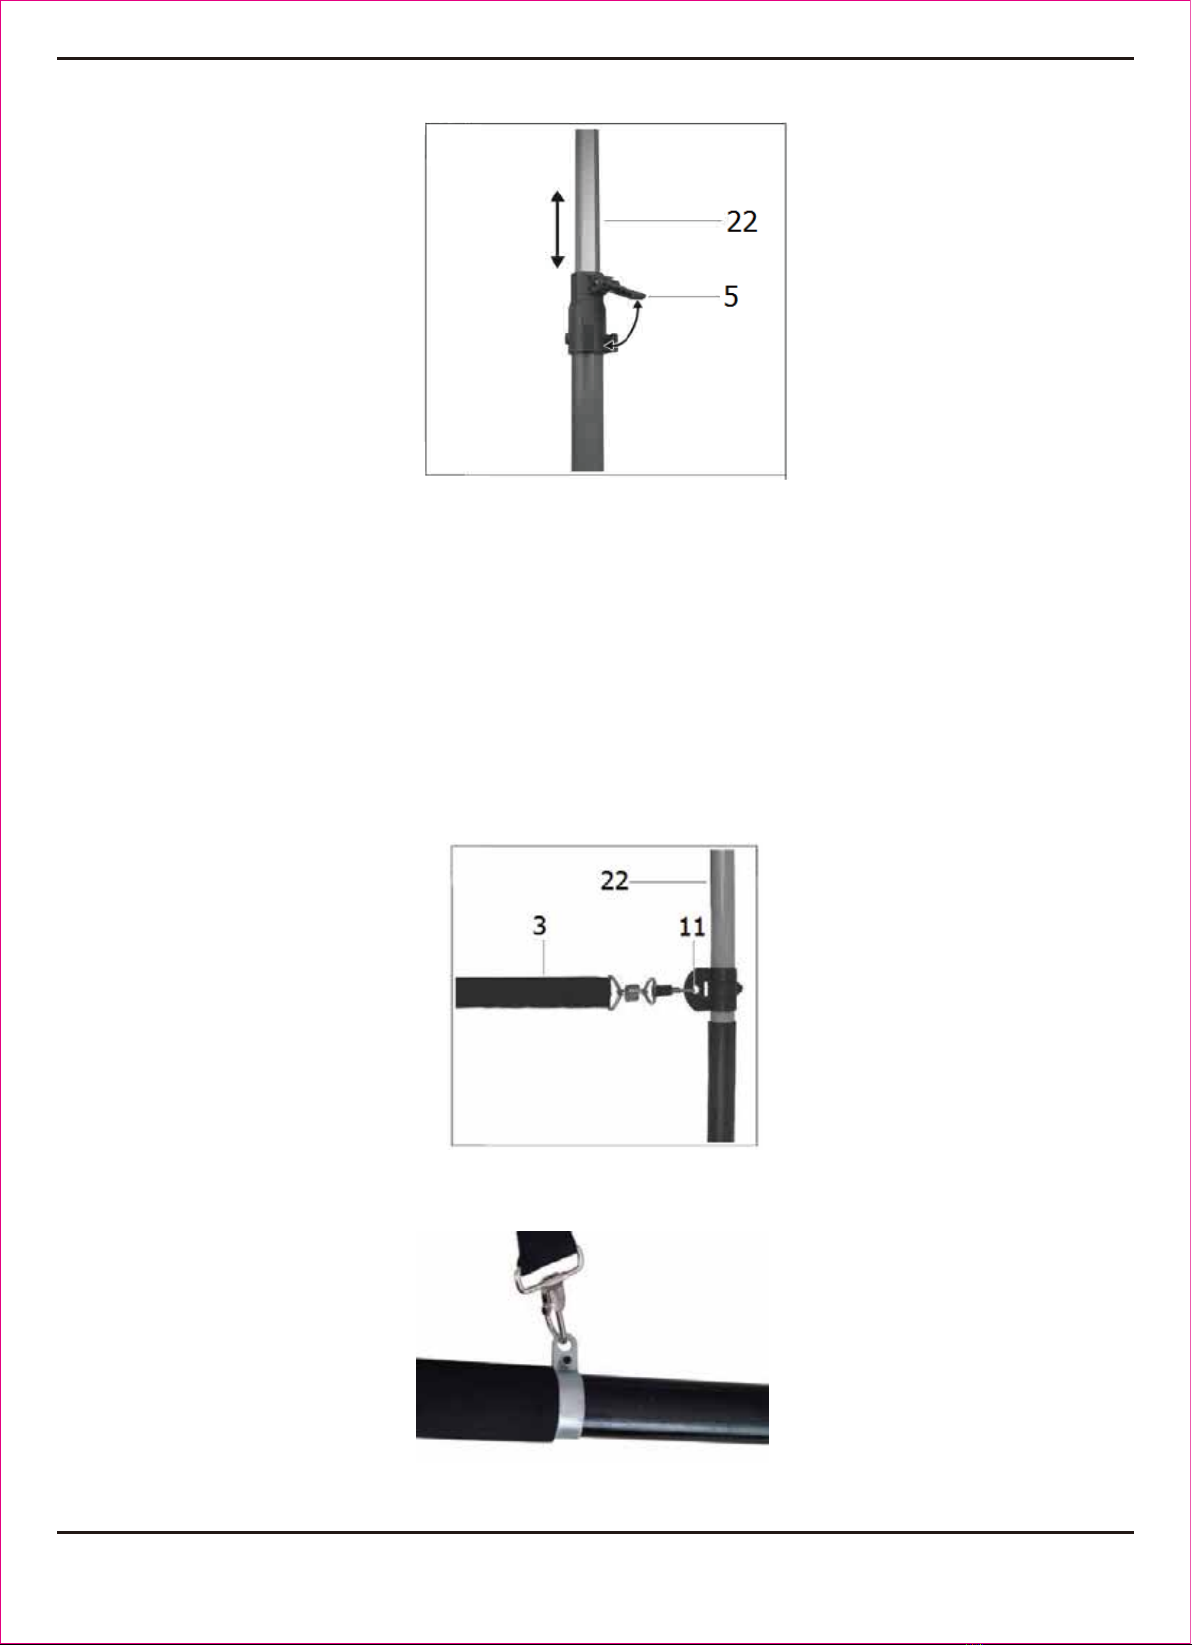
Fig.9
1. Swing out the telescopic handle lock (5) on the telescopic handle (22).
2. Pull or push to adjust the length of the telescopic handle (22).
3. Lock the telescopic handle lock (5).
Putting on the shoulder strap (Fig.10)
Always wear a shoulder strap when working with the equipment.
Always switch off the equipment before loosening the shoulder strap.
1. Put on the shoulder strap (3).
2. Adjust the strap length so that the carabiner hook is at hip height.
Fig.10
3. Fix the carabiner hook of the shoulder strap (3) tothe eyelet (11) on the telescopic
handle (22) of the equipment. (Fig. 11)
Fig. 11

3. Wearthe shoulder belt so that it lies over the left shoulder (Fig. 12).
Fig 12
Connection to the main power supply
• Connect the main power cable to a suitable extension cable. Make sure that the extension
cable is designed to accommodate the power of the chain saw.
• Secure the extension cable against tractive forces and accidental unplugging as shown in
(Fig.13).
Fig 13
OPERATION
Switching on/off (Fig.14)
Switching on
• Hold the chainsaw firmly with both hands on the handle (thumb under the handle).
• Press and hold the switch lock (24)
• Switch the chainsaw on with the on/off switch (23). The switch lock (24) can now be
released again.

Fig 14
Switching off
• Release the on/off switch (23). Always pull out the main plug when discontinuing the work.
Safe work
• Before beginning work and after dropping or other impacts, inspect the chainsaw in
orderto identify any significant damage tothe housing, the main cable, the saw chain
and the guide bar. Never use an obviously damaged machine.
• Before beginning work and regularly during work, check oil level, lubrication system
and chain tension.
• Wear hearing protection and protective goggles and a safety helmet with integrated
hearing protection and a face guard. This provides protection against falling branches
and recoiling branches.
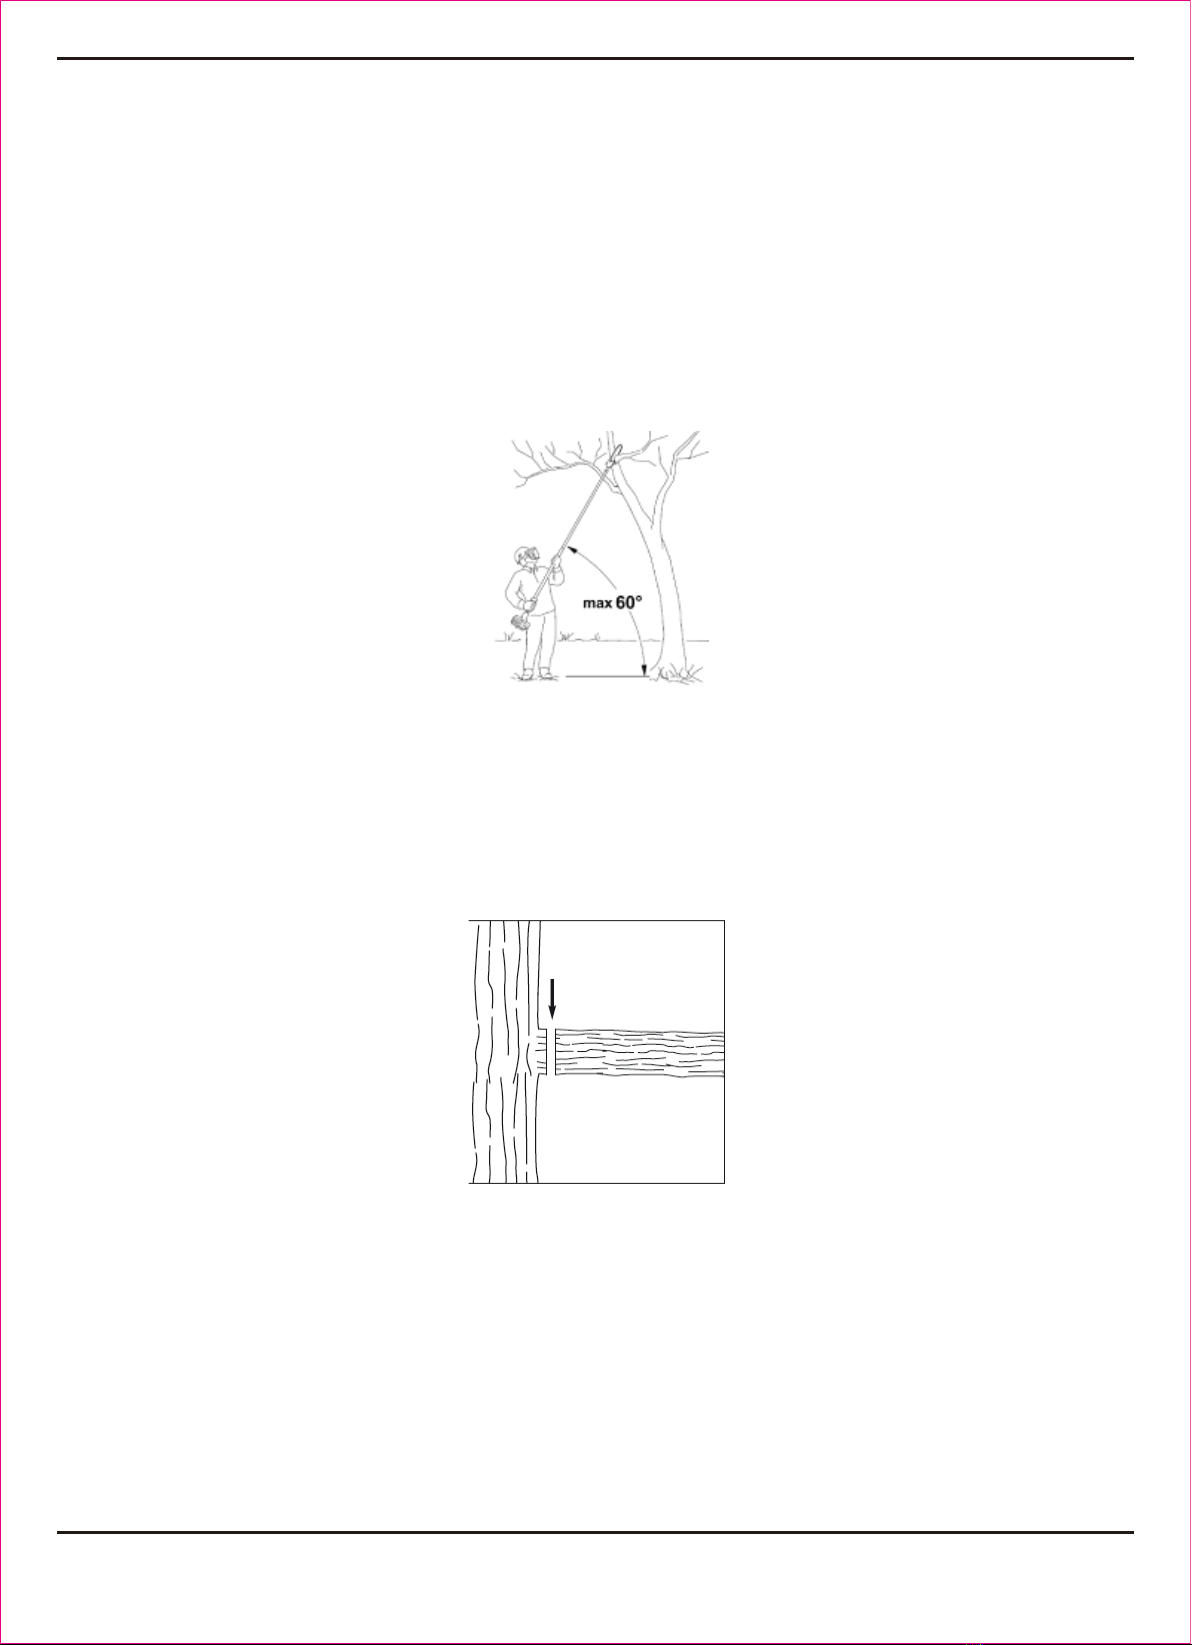
• In order to ensure safe work, a maximum working angle of 60° is prescribed.
• Never stand below the branch to be sawed.
• Exercise caution when sawing branches undertension or splintering wood.
• Potential risk of injury from falling branches and flying wood projectiles!
• If the machine is in operation, keep persons and animals away from the danger area.
• The machine is not protected against electric shock when coming into contact with
high-voltage lines.
• Maintain a minimum clearance of 3ft from live electrical lines. Life-threatening danger
from electric shock!
• When working on an incline, always stand above or to the side of the branch to be
sawed.
• Hold the machine as close as possible to your body. By doing so, you maximise your
balance. Make absolutely sure to wear appropriate, close fitting protective clothing,
such as chainsaw-protective pants, gloves and safety shoes.
Sawing techniques:
• Make sure the chain is running at full speed before touching the branch to be cut
• When removing branches, hold the machine at an angle ranging from a maximum 60°
to horizontal in order to avoid being struck by a falling branch.
• Saw off the lower branches on the tree first. By doing so, it is easier for the cut
branches to fall to the ground.
• At the end of the cut, the weight of the saw suddenly increases for the user, because
the saw is no longer supported on the branch, which increases the risk of losing
control of the saw.
• Only pull the saw out of the cut with the saw chain running. By doing so, you can
prevent it from getting jammed.
• Do not saw with the tip of the guide bar.
• Important! Use the shoulder strap ! Always use the shoulder strap when working with
the equipment. Switch off the equipment before you take off the shoulder strap (risk of
injury). And hold the pole saw firmly with both hands
Working time and working posture
Always keep a firm footing and balance position during operation.
It takes lots of energy to cut the branches. Please make sure to take a proper rest every 15
minutes in order to avoid any potential danger due to over-fatigue.
Always use the correct posture to cut the branches of high trees. The max angle shall be no
more than 60° from the horizontal level (Fig 15).
Fig 15
Advice : Remove branches in sections for safer work.
Warnings :
Some operating positions may be dangerous and can lead to damage and personal injuries.
Always follow the instructions of this manual.
Sawing off thin branches (Fig.16)
Fig 16
Place the stop face of the saw on the branch. This prevents fitful movements of the saw at
the beginning of the cut. Applying light pressure, guide the saw through the branch from top
to bottom.
Sawing off thick and long branches (Fig.17)

Fig 17
Make a relief cut when sawing thick branches.
a) First saw through 1/3 of the branch diameter from bottom to top using the top side of the
guide bar.
b) Then saw from top to bottom tothe first cut using the bottom side of the guide bar.
c) Saw off longer branches in sections in order to maintain control over the location of
impact.
Sawing wood under tension
Sawing wood which is under tension necessitates elevated caution!
Wood that is under tension and is then released from that tension when cut occasionally
reacts in a completely uncontrolled manner. This can result in severe to deadly injuries.
Such work may only be performed by trained specialists.
Attention!
• Always make sure that the chain tension is correct!
•Only use properly functioning chainsaws!
•Only work with a saw chain sharpened according to regulations!
• Always hold the chainsaw firmly with two hands!
CLEANING AND MAINTENANCE
Turn off and unplug the machine before performing any cleaning or maintenance.
• Regularly clean the clamping mechanism by blowing it out with compressed air or
cleaning it with a brush. Do not use tools for cleaning.
• Keep the handles free of grease so that you can maintain a firm grip.
• Clean the equipment as required with a damp cloth and, if necessary, mild liquid
soap.
• Never immerse the machine in water or other liquids.
Never use non approved cutting attachments and never remove the safety devices. This
could damage the machine or lead to serious injury.

Replacing the saw chain and guide bar
The guide bar must be replaced if:
• groove of the guide bar is worn out
• the guide bar is worn or cracked
For this purpose, proceed as described in the Assembly of the guide bar and saw chain
section!
Sharpening the saw chain
Effective work with the chainsaw is only possible if the saw chain is in good condition and
sharp. This also reduces the danger of a kickback. The saw chain can be re-sharpened by a
specialty dealer. Do not attempt to sharpen the saw chain yourself if you do not have a
suitable tool and the necessary experience.
Empty the oil
Before emptying oil, switch off the equipment and disconnect the main power plug.
1. Place the machine on a suitable flat surface.
2. Loosen the oil tank cover and remove it.
3. Drain oil into a container thoroughly.
4. Tighten the oil tank cover.
Maintenance Daily
maintenance
Weekly
maintenance
Monthly
maintenance
Clean the outside of the machine. X
Check that the on/off switch works
correctly.
X
Check the tension of the saw chain. X
Check that the saw chain is undamaged
and shows no signs of cracking or other
damage. Replace the saw chain if
necessary.
X
Check that the guide bar is secure,
undamaged and not deformed.
X
Check that the nuts and screws are tight.
X
Check that the oil supply works correctly.
X
Check the power cord and plug
condition.
X

TROUBLE SHOOTING
Chainsaw does not
operate
No current power supply Check current power
supply
Defective Plug Have a qualified electrician
check power cord and plug
Power cord damaged
Chainsaw operates
irregularly
Main power cable damaged Take saw to a specialty
workshop
External loose connection Take saw to a specialty
workshop
Internal loose connection Take saw to a specialty
workshop
Defective on/off switch Take saw to a specialty
workshop
Saw chain dry
No oil in the tank Re-fill oil
Ventilation in the oil tank cap clogged Clean oil tank cap
Oil tank flow channel clogged Unclog oil flow channel
Chain/guide rail hot
No oil in the tank Re-fill oil
Ventilation in the oil tank cap clogged Clean oil tank cap
Oil tank flow channel clogged Unclog oil flow channel
Dull chain Re-sharpen or replace
chain
Chainsaw jumps up,
vibrates or does not
saw properly
Chain tension too loose Adjust chain tension
Dull chain Re-sharpen or replace
chain
Chain worn out Replace chain
Saw teeth pulling in the wrong
direction
Re-mount saw chain with
teeth in the correct
direction

COMPONENTS
1. Cable strain relief
2. Padded grip
3. Shoulder strap
4. Auxiliary handle
5. Telescopic handle lock
6. Motor housing
7. Oil tank cap
8. Nut
9. Chain
10. Guide bar
11. Carrying eyelet for shoulder strap
12. Hand wheel
13. Sprocket cove

Limited Manufacturer Warranty
FOT makes every effort to ensure that this product meets high quality and durability
standards. FOT warrants to the original retail consumer a 1-year limited warranty
from the date the product was purchased at retail and each product is free from
defects in materials. Warranty does not apply to defects due directly or indirectly
to misuse, abuse, negligence or accidents, repairs or alterations, or a lack of
maintenance. FOT shall in no event be liable for death, injuries to persons or
property, or for incidental, special or consequential damages arising from the
use of our products. To receive service under warranty, the original manufacturer
part must be returned for examination by an authorized service center. Shipping
and handling charges may apply. If a defect is found, FOT will either repair or
replace the product at its discretion.
DO NOT RETURN TO STORE
For Customer Service:
Table of contents


