Makita UC100D User manual

UC100D
EN Cordless Pruning Saw INSTRUCTION MANUAL 8
FR Scie délagage sans l MANUEL D’INSTRUCTIONS 18
DE Akku-Astsäge BETRIEBSANLEITUNG 30
IT Motosega da potatura a
batteria ISTRUZIONI PER L’USO 42
NL Accusnoeizaag GEBRUIKSAANWIJZING 54
ES Sierra Inalámbrica para Podar MANUAL DE
INSTRUCCIONES 65
PT Cortador de Galho a Bateria MANUAL DE INSTRUÇÕ ES 77
DA Akku beskæringssav BRUGSANVISNING 88
EL Φορητό πριόνι κλαδέματος ΕΓΕΙΙΔΙ ΔΗΓΙΝ 99
TR Akülü Budama Testeres KULLANMA KILAVUZU 111

2
Fig.1
1
2
3
4
5
8
10
9
6
12 7
11
Fig.2
3
1
2
Fig.3
1
2
Fig.4

3
1
2
Fig.5
1
Fig.6
2
1
Fig.7
1
Fig.8
1
2
Fig.9
1
3
2
Fig.10

4
1
2
Fig.11
1
Fig.12
1
Fig.13
1
2
3
Fig.14
3
2
1
Fig.15
1
2
Fig.16
1
Fig.17
2
1
Fig.18

5
1
2
Fig.19
1
2
Fig.20
1
23
Fig.21
21
Fig.22
Fig.23
Fig.24

6
1
2
Fig.25
22
11
31
Fig.26
30
30
55 55
Fig.27
1
2
Fig.28
30
1/5
1
Fig.29
Fig.30
Fig.31
Fig.32

7
2
1
Fig.33
1
2
Fig.34
2
1
Fig.35

8ENGLISH
ENGLISH (Original instructions)
SPECIFICATIONS
Model: UC100D
O v e r a l l l e n g t h
( w i t h o u t g u i d e b a r a n d b a t t e r y )
350 m m
R a t e d v o l t a g e D.C . 10.8 V - 12 V m a x
N e t w e i g h t * 1 1.0 k g
* 2 1.5 - 1.6 k g
S t a n d a r d g u i d e b a r l e n g t h 100 m m
R e c o m m e n d e d g u i d e b a r l e n g t h 100 m m
A p p l i c a b l e s a w c h a i n t y p e
( r e f e r t o t h e t a b l e b e l o w )
80T X L
S p r o c k e t N u m b e r o f t e e t h 7
P i t c h .5
C h a i n s p e e d 0 - 8.0 m / s
( 0 - 4 80 m / m i n )
C h a i n o i l t a n k v o l u m e 55 c m 3
Due to our continuing program of research and development, the specications herein are subject to change
w i t h o u t n o t i c e .
Specications may dier from country to country.
* 1: W e i g h t , w i t h o u t t h e s a w c h a i n , g u i d e b a r , g u i d e b a r c o v e r , o i l a n d b a t t e r y c a r t r i d g e ( s ) .
: The lightest and heaviest combination of weight, according to EPTA-Procedure 1/1. The weight may dier
d e p e n d i n g o n t h e a t t a c h m e n t ( s ) , i n c l u d i n g t h e b a t t e r y c a r t r i d g e ( s ) .
Saw chain, guide bar, and sprocket combination
Saw chain type 80TX L
N u m b e r o f d r i v e l i n k s 26
G u i d e b a r G u i d e b a r l e n g t h 100 m m
C u t t i n g l e n g t h 111 m m
P i t c h .5
G auge 1.1 m m
T y p e H a r d n o s e b a r
S p r o c k e t N u m b e r o f t e e t h 7
P i t c h .5
WARNING: Use appropriate combination of the guide bar and saw chain. Otherwise personal injury may
r e s u l t .
Applicable battery cartridge and charger
B a t t e r y c a r t r i d g e B L 1016 / B L 1021B / B L 104 1B
C harger DC 10S A / DC 10S B / DC 10W C / DC 10W D / DC 18R E
•S o m e o f t h e b a t t e r y c a r t r i d g e s a n d c h a r g e r s l i s t e d a b o v e m a y n o t b e a v a i l a b l e d e p e n d i n g o n y o u r r e g i o n o f
r e s i d e n c e .
WARNING: Only use the battery cartridges and chargers listed above. U s e o f a n y o t h e r b a t t e r y c a r t r i d g e s
and chargers may cause injury and/or re.

9ENGLISH
Symbols
T h e f o l l o w i n g s s h o w t h e s y m b o l s w h i c h m a y b e u s e d
f o r t h e e q u i p m e n t . B e s u r e t h a t y o u u n d e r s t a n d t h e i r
m e a n i n g b e f o r e u s e .
R e a d i n s t r u c t i o n m a n u a l .
W e a r s a f e t y g l a s s e s a n d e a r p r o t e c t i o n .
A l w a y s u s e t w o h a n d s w h e n o p e r a t i n g
t h e t o o l .
B e w a r e o f k i c k b a c k a n d a v o i d c o n t a c t w i t h
b a r t i p .
Do n o t e x p o s e t o m o i s t u r e .
M a x i m u m p e r m i s s i b l e c u t l e n g t h
Di r e c t i o n o f c h a i n t r a v e l
Ni-MH
Li-ion
O n l y f o r EU c o u n t r i e s
Du e t o t h e p r e s e n c e o f h a z a r d o u s c o m -
p o n e n t s i n t h e e q u i p m e n t , w a s t e e l e c t r i c a l
a n d e l e c t r o n i c e q u i p m e n t , a c c u m u l a t o r s
a n d b a t t e r i e s m a y h a v e a n e g a t i v e i m p a c t
o n t h e e n v i r o n m e n t a n d h u m a n h e a l t h .
Do n o t d i s p o s e o f e l e c t r i c a l a n d e l e c t r o n i c
a p p l i a n c e s o r b a t t e r i e s w i t h h o u s e h o l d w a s t e !
In a c c o r d a n c e w i t h t h e Eu r o p e a n Di r e c t i v e
o n w a s t e e l e c t r i c a l a n d e l e c t r o n i c e q u i p m e n t
a n d o n a c c u m u l a t o r s a n d b a t t e r i e s a n d
w a s t e a c c u m u l a t o r s a n d b a t t e r i e s , a s w e l l a s
t h e i r a d a p t a t i o n t o n a t i o n a l l a w , w a s t e e l e c -
t r i c a l e q u i p m e n t , b a t t e r i e s a n d a c c u m u l a t o r s
s h o u l d b e s t o r e d s e p a r a t e l y a n d d e l i v e r e d
t o a s e p a r a t e c o l l e c t i o n p o i n t f o r m u n i c i p a l
w a s t e , o p e r a t i n g i n a c c o r d a n c e w i t h t h e
r e g u l a t i o n s o n e n v i r o n m e n t a l p r o t e c t i o n .
T h i s i s i n d i c a t e d b y t h e s y m b o l o f t h e
c r o s s e d -o u t w h e e l e d b i n p l a c e d o n t h e
equipm ent.
G u a r a n t e e d s o u n d p o w e r l e v e l a c c o r d i n g
t o EU O u t d o o r N o i s e Di r e c t i v e .
S o u n d p o w e r l e v e l a c c o r d i n g t o A u s t r a l i a
N S W N o i s e C o n t r o l R e g u l a t i o n .
Intended use
T h i s t o o l i s i n t e n d e d f o r c u t t i n g b r a n c h e s o f t r e e s o r
b u s h e s b y m e a n s o f a s a w -c h a i n .
Noise
T h e t y p i c a l A -w e i g h t e d n o i s e l e v e l d e t e r m i n e d a c c o r d -
i n g t o EN 6 284 1-4 -1:
S o u n d p r e s s u r e l e v e l ( L p A ) : 7 6 d B ( A )
S o u n d p o w e r l e v e l ( L W A ) : 87 d B ( A )
U n c e r t a i n t y ( K ) : 3 d B ( A )
NOTE:
T h e d e c l a r e d n o i s e e m i s s i o n v a l u e ( s ) h a s b e e n
m e a s u r e d i n a c c o r d a n c e w i t h a s t a n d a r d t e s t m e t h o d
a n d m a y b e u s e d f o r c o m p a r i n g o n e t o o l w i t h a n o t h e r .
NOTE:
T h e d e c l a r e d n o i s e e m i s s i o n v a l u e ( s ) m a y
a l s o b e u s e d i n a p r e l i m i n a r y a s s e s s m e n t o f e x p o s u r e .
WARNING: Wear ear protection.
WARNING:
The noise emission during actual
use of the power tool can dier from the declared val-
ue(s) depending on the ways in which the tool is used
especially what kind of workpiece is processed.
WARNING: Be sure to identify safety mea-
sures to protect the operator that are based on an
estimation of exposure in the actual conditions of
use (taking account of all parts of the operating
cycle such as the times when the tool is switched
o and when it is running idle in addition to the
trigger time).
Vibration
T h e v i b r a t i o n t o t a l v a l u e ( t r i -a x i a l v e c t o r s u m ) d e t e r -
m i n e d a c c o r d i n g t o EN 6 284 1-4 -1:
W o r k m o d e : c u t t i n g w o o d
V i b r a t i o n e m i s s i o n ( a h , W ) : 4 .8 m / s 2
U n c e r t a i n t y ( K ) : 1.5 m / s 2
NOTE: T h e d e c l a r e d v i b r a t i o n t o t a l v a l u e ( s ) h a s b e e n
m e a s u r e d i n a c c o r d a n c e w i t h a s t a n d a r d t e s t m e t h o d
a n d m a y b e u s e d f o r c o m p a r i n g o n e t o o l w i t h a n o t h e r .
NOTE: T h e d e c l a r e d v i b r a t i o n t o t a l v a l u e ( s ) m a y a l s o
b e u s e d i n a p r e l i m i n a r y a s s e s s m e n t o f e x p o s u r e .
WARNING: The vibration emission during
actual use of the power tool can dier from the
declared value(s) depending on the ways in which
the tool is used especially what kind of workpiece
is processed.
WARNING: Be sure to identify safety mea-
sures to protect the operator that are based on an
estimation of exposure in the actual conditions of
use (taking account of all parts of the operating
cycle such as the times when the tool is switched
o and when it is running idle in addition to the
trigger time).
Declarations of Conformity
For European countries only
T h e De c l a r a t i o n s o f c o n f o r m i t y a r e i n c l u d e d i n A n n e x A
t o t h i s i n s t r u c t i o n m a n u a l .
SAFETY WARNINGS
General power tool safety warnings
WARNING Read all safety warnings, instructions,
illustrations and specications provided with this
power tool. F a i l u r e t o f o l l o w a l l i n s t r u c t i o n s l i s t e d b e l o w
may result in electric shock, re and/or serious injury.
Save all warnings and instruc-
tions for future reference.
T h e t e r m " p o w e r t o o l " i n t h e w a r n i n g s r e f e r s t o y o u r
m a i n s -o p e r a t e d ( c o r d e d ) p o w e r t o o l o r b a t t e r y -o p e r a t e d
( c o r d l e s s ) p o w e r t o o l .

10 ENGLISH
General pruner saw safety warnings
1. Keep all parts of the body away from the
saw chain when the pruner saw is operating.
Before you start the pruner saw, make sure
the saw chain is not contacting anything. A
m o m e n t o f i n a t t e n t i o n w h i l e o p e r a t i n g p r u n e r s a w s
m a y c a u s e e n t a n g l e m e n t o f y o u r c l o t h i n g o r b o d y
w i t h t h e s a w c h a i n .
2. Always hold the pruner saw with one hand
on the rear handle and the other hand on the
auxiliary handle.
3. Hold the pruner saw by insulated gripping
surfaces only, because the saw chain may con-
tact hidden wiring. S a w c h a i n s c o n t a c t i n g a " l i v e "
w i r e m a y m a k e e x p o s e d m e t a l p a r t s o f t h e p r u n e r
s a w " l i v e " a n d c o u l d g i v e t h e o p e r a t o r a n e l e c t r i c
s h o c k .
4 . Wear eye protection. Further protective equip-
ment for hearing, head, hands, legs and feet is
recommended. A d e q u a t e p r o t e c t i v e e q u i p m e n t
will reduce personal injury from ying debris or
a c c i d e n t a l c o n t a c t w i t h t h e s a w c h a i n .
5. Do not operate a pruner saw in a tree, on a lad-
der, from a rooftop, or any unstable support.
O p e r a t i o n o f a p r u n e r s a w i n t h i s m a n n e r c o u l d
result in serious personal injury.
6 . Always keep proper footing and operate the
pruner saw only when standing on xed,
secure and level surface. S l i p p e r y o r u n s t a b l e
s u r f a c e s m a y c a u s e a l o s s o f b a l a n c e o r c o n t r o l o f
t h e p r u n e r s a w .
7 . When cutting a branch that is under tension,
be alert for spring back. W h e n t h e t e n s i o n i n t h e
wood bres is released, the spring loaded branch
m a y s t r i k e t h e o p e r a t o r a n d / o r t h r o w t h e p r u n e r
s a w o u t o f c o n t r o l .
8. Use extreme caution when cutting brush and
saplings. T h e s l e n d e r m a t e r i a l m a y c a t c h t h e s a w
chain and be whipped toward you or pull you o
balance.
9. Carry the pruner saw with the pruner saw
switched o and away from your body. When
transporting or storing the pruner saw, always
t the guide bar cover. P r o p e r h a n d l i n g o f t h e
p r u n e r s a w w i l l r e d u c e t h e l i k e l i h o o d o f a c c i d e n t a l
c o n t a c t w i t h t h e m o v i n g s a w c h a i n .
10. Follow instructions for lubricating, chain
tensioning and changing the bar and chain.
Im p r o p e r l y t e n s i o n e d o r l u b r i c a t e d c h a i n m a y
e i t h e r b r e a k o r i n c r e a s e t h e c h a n c e f o r k i c k b a c k .
11. Cut wood only. Do not use pruner saw for pur-
poses not intended. For example: do not use
pruner saw for cutting metal, plastic, masonry
or non-wood building materials. U s e o f t h e
pruner saw for operations dierent than intended
c o u l d r e s u l t i n a h a z a r d o u s s i t u a t i o n .
12. This pruner saw is not intended for tree felling.
Use of the pruner saw for operations dierent than
intended could result in serious injury to the opera-
t o r o r b y s t a n d e r s .
13. Follow all instructions when clearing jammed
material, storing or servicing the pruner saw.
Make sure the switch is o and the battery
pack is removed.
14 . Causes and operator prevention of kickback:
K i c k b a c k m a y o c c u r w h e n t h e n o s e o r t i p o f t h e
guide bar touches an object, or when the wood
c l o s e s i n a n d p i n c h e s t h e s a w c h a i n i n t h e c u t .
T i p c o n t a c t i n s o m e c a s e s m a y c a u s e a s u d d e n
r e v e r s e r e a c t i o n , k i c k i n g t h e g u i d e b a r u p a n d
b a c k t o w a r d s t h e o p e r a t o r .
P i n c h i n g t h e s a w c h a i n a l o n g t h e t o p o f t h e g u i d e
b a r m a y p u s h t h e g u i d e b a r r a p i d l y b a c k t o w a r d s
t h e o p e r a t o r .
Ei t h e r o f t h e s e r e a c t i o n s m a y c a u s e y o u t o l o s e
c o n t r o l o f t h e s a w w h i c h c o u l d r e s u l t i n s e r i o u s
personal injury. Do not rely exclusively upon the
s a f e t y d e v i c e s b u i l t i n t o y o u r s a w . A s a p r u n e r s a w
u s e r , y o u s h o u l d t a k e s e v e r a l s t e p s t o k e e p y o u r
cutting jobs free from accident or injury.
K i c k b a c k i s t h e r e s u l t o f p r u n e r s a w m i s u s e a n d / o r
i n c o r r e c t o p e r a t i n g p r o c e d u r e s o r c o n d i t i o n s a n d
c a n b e a v o i d e d b y t a k i n g p r o p e r p r e c a u t i o n s a s
g i v e n b e l o w :
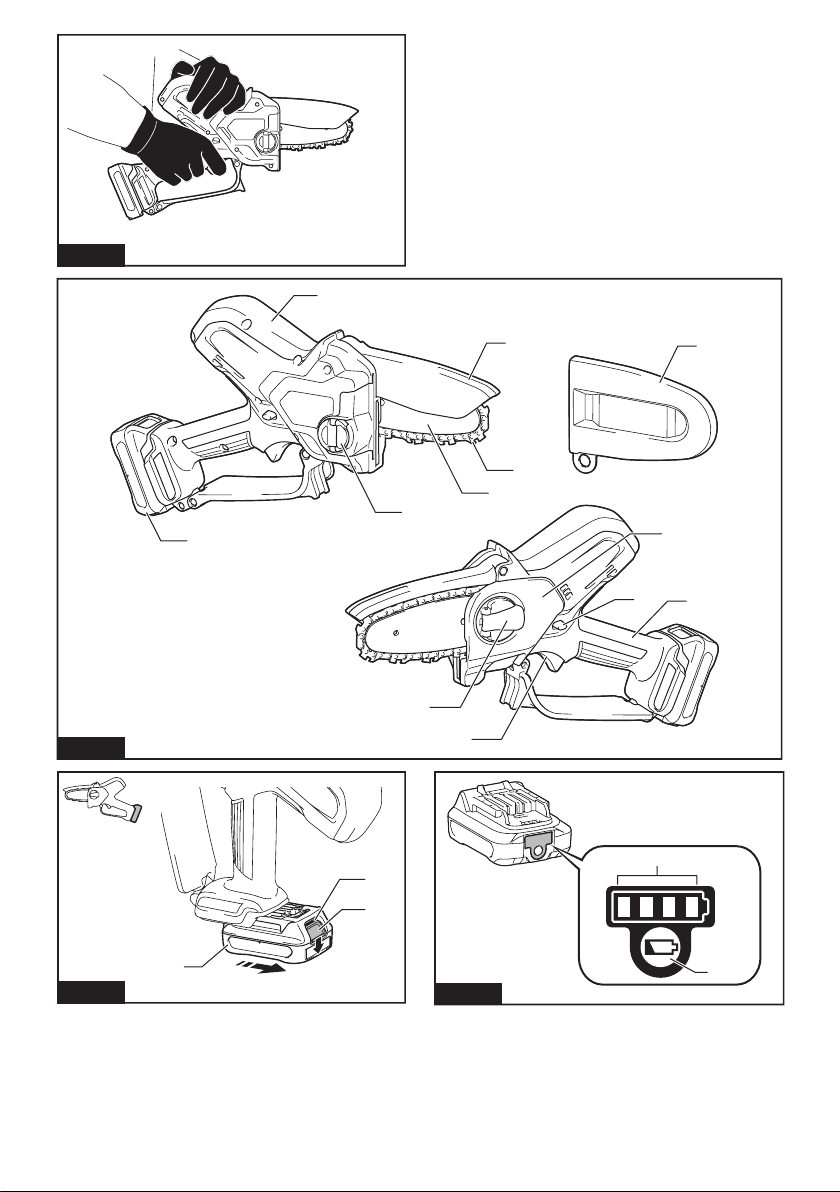
•Maintain a rm grip, with thumbs and n-
gers encircling the pruner saw handles,
with both hands on the saw and position
your body and arm to allow you to resist
kickback forces. K i c k b a c k f o r c e s c a n b e
c o n t r o l l e d b y t h e o p e r a t o r , i f p r o p e r p r e c a u -
t i o n s a r e t a k e n . Do n o t l e t g o o f t h e p r u n e r
s a w .
Fig.1
•Do not overreach and do not cut above
shoulder height. T h i s h e l p s p r e v e n t u n i n -
t e n d e d t i p c o n t a c t a n d e n a b l e s b e t t e r c o n t r o l
o f t h e p r u n e r s a w i n u n e x p e c t e d s i t u a t i o n s .
•Only use replacement guide bars and saw
chains specied by the manufacturer.
In c o r r e c t r e p l a c e m e n t g u i d e b a r s a n d s a w
c h a i n s m a y c a u s e c h a i n b r e a k a g e a n d / o r
k i c k b a c k .
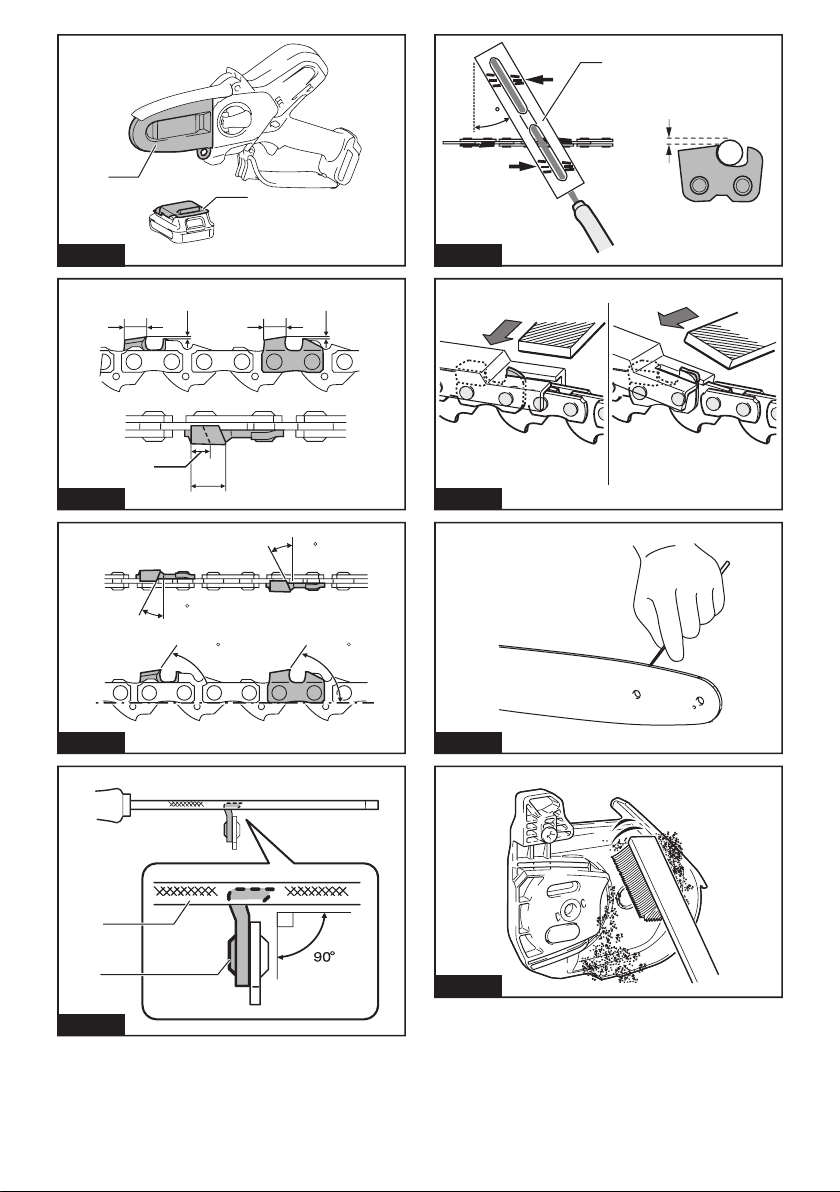
•Follow the manufacturer’s sharpening
and maintenance instructions for the saw
chain. De c r e a s i n g t h e d e p t h g a u g e h e i g h t
c a n l e a d t o i n c r e a s e d k i c k b a c k .
15. Follow all instructions when clearing jammed
material, storing or servicing the pruner saw.
Make sure the switch is o and the battery
pack is removed.
Additional Safety Instructions
Personal protective equipment
1. Clothing must be close-tting, but must not
obstruct mobility.
2. Wear the following protective clothing during
work:
•A t e s t e d s a f e t y h e l m e t , i f a h a z a r d i s p r e -
s e n t e d b y f a l l i n g b r a n c h e s o r s i m i l a r ;
•A f a c e m a s k o r g o g g l e s ;
Suitable ear protection (ear mus, custom or
m o u l d a b l e e a r p l u g s ) . O c t a v e b r a n d a n a l y s i s
upon request.
•F i r m l e a t h e r s a f e t y g l o v e s ;
•L o n g t r o u s e r s m a n u f a c t u r e d f r o m s t r o n g
f a b r i c ;
•P r o t e c t i v e d u n g a r e e s o f c u t -r e s i s t a n t f a b r i c ;

11 ENGLISH
•S a f e t y s h o e s o r b o o t s w i t h n o n -s l i p s o l e s ,
s t e e l t o e s , a n d c u t -r e s i s t a n t f a b r i c l i n i n g ;
•A b r e a t h i n g m a s k , w h e n c a r r y i n g o u t w o r k
w h i c h p r o d u c e s d u s t ( e .g . s a w i n g d r y w o o d ) .
Operation
1. Before starting work, check that the tool is in
proper working order and that its condition
complies with the safety regulations. Check in
particular that:
•T h e r u n -d o w n b r a k e i s w o r k i n g p r o p e r l y ;
The bar and the sprocket cover are tted
c o r r e c t l y ;
•T h e c h a i n h a s b e e n s h a r p e n e d a n d t e n -
s i o n e d i n a c c o r d a n c e w i t h t h e r e g u l a t i o n s .
2. Do not start the tool with the chain cover being
installed on it. S t a r t i n g t h e t o o l w i t h t h e c h a i n
c o v e r b e i n g i n s t a l l e d o n i t m a y c a u s e t h e c h a i n
c o v e r t o t h r o w n o u t f o r w a r d r e s u l t i n g i n p e r s o n a l
injury and damage to objects around the operator.
3. Do not stand directly under the branch that
is being cut. Pay attention to the falling
branches.
4 . Do not operate the tool in bad weather or if
there is a risk of lightning.
5. When you use the tool on muddy ground, wet
slope, or slippery place, pay attention to your
footing.
Electrical and battery safety
1. Avoid dangerous environment. Don' t use the
tool in dump or wet locations or expose it to
rain. W a t e r e n t e r i n g t h e t o o l w i l l i n c r e a s e t h e r i s k
o f e l e c t r i c s h o c k .
2. Do not dispose of the battery(ies) in a re.
T h e c e l l m a y e x p l o d e . C h e c k w i t h l o c a l c o d e s f o r
p o s s i b l e s p e c i a l d i s p o s a l i n s t r u c t i o n s .
3. Do not open or mutilate the battery(ies).
R e l e a s e d e l e c t r o l y t e i s c o r r o s i v e a n d m a y c a u s e
d a m a g e t o t h e e y e s o r s k i n . It m a y b e t o x i c i f
s w a l l o w e d .
4 . Do not charge battery in rain, or in wet
locations.
5. Do not charge the battery outdoors.
6 . Do not handle charger, including charger plug,
and charger terminals with wet hands.
7 . Do not replace the battery with wet hands.
8. Do not leave the battery in the rain, nor charge,
use, or store the battery in a damp or wet
place.
9. Do not wet the terminal of battery with liquid
such as water, or submerge the battery. If t h e
t e r m i n a l g e t s w e t o r l i q u i d e n t e r s i n s i d e o f b a t t e r y ,
t h e b a t t e r y m a y b e s h o r t c i r c u i t e d a n d t h e r e i s a
risk of overheat, re, or explosion.
10. After removing the battery from the machine or
charger, be sure to attach the battery cover to
the battery and store it in a dry place.
11. If the battery cartridge gets wet, drain the
water inside and then wipe it with a dry cloth.
Dry the battery cartridge completely in a dry
place before use.
SAVE THESE INSTRUCTIONS.
WARNING: DO NOT let comfort or familiarity
with product (gained from repeated use) replace
strict adherence to safety rules for the subject
product. MISUSE or failure to follow the safety
rules stated in this instruction manual may cause
serious personal injury.
Important safety instructions for
battery cartridge
1. Before using battery cartridge, read all instruc-
tions and cautionary markings on (1) battery
charger, (2) battery, and (3) product using
battery.
2. Do not disassemble or tamper with the battery
cartridge. It may result in are, excessive heat,
o r e x p l o s i o n .
3. If operating time has become excessively
shorter, stop operating immediately. It may
result in a risk of overheating, possible burns
and even an explosion.
4 . If electrolyte gets into your eyes, rinse them
out with clear water and seek medical atten-
tion right away. It may result in loss of your
eyesight.
5. Do not short the battery cartridge:
( 1) Do not touch the terminals with any con-
ductive material.
( 2) Avoid storing battery cartridge in a con-
tainer with other metal objects such as
nails, coins, etc.
( 3) Do not expose battery cartridge to water
or rain.
A battery short can cause a large current
ow, overheating, possible burns and even a
breakdown.
6 . Do not store and use the tool and battery car-
tridge in locations where the temperature may
reach or exceed 50 ° C (122 ° F).
7 . Do not incinerate the battery cartridge even if
it is severely damaged or is completely worn
out. The battery cartridge can explode in a re.
8. Do not nail, cut, crush, throw, drop the battery
cartridge, or hit against a hard object to the
battery cartridge. S u c h c o n d u c t m a y r e s u l t i n a
re, excessive heat, or explosion.
9. Do not use a damaged battery.
10. The contained lithium-ion batteries are subject
to the Dangerous Goods Legislation require-
ments.
F o r c o m m e r c i a l t r a n s p o r t s e .g . b y t h i r d p a r t i e s ,
f o r w a r d i n g a g e n t s , s p e c i a l r e q u i r e m e n t o n p a c k -
a g i n g a n d l a b e l i n g m u s t b e o b s e r v e d .
F o r p r e p a r a t i o n o f t h e i t e m b e i n g s h i p p e d , c o n s u l t -
i n g a n e x p e r t f o r h a z a r d o u s m a t e r i a l i s r e q u i r e d .
P l e a s e a l s o o b s e r v e p o s s i b l y m o r e d e t a i l e d
n a t i o n a l r e g u l a t i o n s .
Tape or mask o open contacts and pack up the
b a t t e r y i n s u c h a m a n n e r t h a t i t c a n n o t m o v e
a r o u n d i n t h e p a c k a g i n g .
11. When disposing the battery cartridge, remove
it from the tool and dispose of it in a safe
place. Follow your local regulations relating to
disposal of battery.

12 ENGLISH
12. Use the batteries only with the products
specied by Makita. In s t a l l i n g t h e b a t t e r i e s t o
non-compliant products may result in are, exces-
s i v e h e a t , e x p l o s i o n , o r l e a k o f e l e c t r o l y t e .
13. If the tool is not used for a long period of time,
the battery must be removed from the tool.
14 . During and after use, the battery cartridge may
take on heat which can cause burns or low
temperature burns. Pay attention to the han-
dling of hot battery cartridges.
15. Do not touch the terminal of the tool imme-
diately after use as it may get hot enough to
cause burns.
16 . Do not allow chips, dust, or soil stuck into the
terminals, holes, and grooves of the battery
cartridge. It may cause heating, catching re,
b u r s t a n d m a l f u n c t i o n o f t h e t o o l o r b a t t e r y c a r -
tridge, resulting in burns or personal injury.
17 . Unless the tool supports the use near
high-voltage electrical power lines, do not use
the battery cartridge near high-voltage electri-
cal power lines. It m a y r e s u l t i n a m a l f u n c t i o n o r
b r e a k d o w n o f t h e t o o l o r b a t t e r y c a r t r i d g e .
18. Keep the battery away from children.
SAVE THESE INSTRUCTIONS.
CAUTION: Only use genuine Makita batteries.
U s e o f n o n -g e n u i n e M a k i t a b a t t e r i e s , o r b a t t e r i e s t h a t
h a v e b e e n a l t e r e d , m a y r e s u l t i n t h e b a t t e r y b u r s t i n g
causing res, personal injury and damage. It will
a l s o v o i d t h e M a k i t a w a r r a n t y f o r t h e M a k i t a t o o l a n d
c h a r g e r .
Tips for maintaining maximum
battery life
1. Charge the battery cartridge before completely
discharged. Always stop tool operation and
charge the battery cartridge when you notice
less tool power.
2. Never recharge a fully charged battery car-
tridge. Overcharging shortens the battery
service life.
3. Charge the battery cartridge with room tem-
perature at 10 ° C - 40 ° C (50 ° F - 104 ° F). Let
a hot battery cartridge cool down before
charging it.
4 . When not using the battery cartridge, remove
it from the tool or the charger.
PARTS DESCRIPTION
Fig.2
1A u x i l i a r y h a n d l e 2S a f e t y c o v e r 3S a w c h a i n
4G u i d e b a r 5O i l t a n k c a p 6G u i d e b a r c o v e r
7S p r o c k e t c o v e r 8Lock-o lever 9R earhandle
10 S w i t c h t r i g g e r 11 L e v e r 12 B a t t e r y c a r t r i d g e
FUNCTIONAL
DESCRIPTION
CAUTION: Always be sure that the tool is
switched o and the battery cartridge is removed
before adjusting or checking function on the tool.
Installing or removing battery
cartridge
CAUTION: Always switch o the tool before
installing or removing of the battery cartridge.
CAUTION: Hold the tool and the battery car-
tridge rmly when installing or removing battery
cartridge. F a i l u r e t o h o l d t h e t o o l a n d t h e b a t t e r y
cartridge rmly may cause them to slip o your hands
a n d r e s u l t i n d a m a g e t o t h e t o o l a n d b a t t e r y c a r t r i d g e
and apersonal injury.
Fig.3: 1. R e d i n d i c a t o r 2. B u t t o n 3. B a t t e r y c a r t r i d g e
T o r e m o v e t h e b a t t e r y c a r t r i d g e , s l i d e i t f r o m t h e t o o l
w h i l e s l i d i n g t h e b u t t o n o n t h e f r o n t o f t h e c a r t r i d g e .
T o i n s t a l l t h e b a t t e r y c a r t r i d g e , a l i g n t h e t o n g u e o n t h e
b a t t e r y c a r t r i d g e w i t h t h e g r o o v e i n t h e h o u s i n g a n d s l i p
i t i n t o p l a c e . In s e r t i t a l l t h e w a y u n t i l i t l o c k s i n p l a c e
w i t h a l i t t l e c l i c k . If y o u c a n s e e t h e r e d i n d i c a t o r a s
shown in the gure, it is not locked completely.
CAUTION: Always install the battery cartridge
fully until the red indicator cannot be seen. If n o t ,
it may accidentally fall out of the tool, causing injury to
y o u o r s o m e o n e a r o u n d y o u .
CAUTION: Do not install the battery cartridge
forcibly. If t h e c a r t r i d g e d o e s n o t s l i d e i n e a s i l y , i t i s
n o t b e i n g i n s e r t e d c o r r e c t l y .

13 ENGLISH
Indicating the remaining battery
capacity
Only for battery cartridges with the indicator
Fig.4: 1. In d i c a t o r l a m p s 2. C h e c k b u t t o n
P r e s s t h e c h e c k b u t t o n o n t h e b a t t e r y c a r t r i d g e t o i n d i -
c a t e t h e r e m a i n i n g b a t t e r y c a p a c i t y . T h e i n d i c a t o r l a m p s
l i g h t u p f o r a f e w s e c o n d s .
Indicator lamps Remaining
capacity
Lighted O
7 5% t o 100%
50% t o 7 5%
25% t o 50%
0% t o 25%
NOTE: De p e n d i n g o n t h e c o n d i t i o n s o f u s e a n d t h e
ambient temperature, the indication may dier slightly
f r o m t h e a c t u a l c a p a c i t y .
Tool / battery protection system
T h e t o o l i s e q u i p p e d w i t h a t o o l / b a t t e r y p r o t e c t i o n s y s -
tem. This system automatically cuts o power to the
m o t o r t o e x t e n d t o o l a n d b a t t e r y l i f e . T h e t o o l w i l l a u t o -
m a t i c a l l y s t o p d u r i n g o p e r a t i o n i f t h e t o o l o r b a t t e r y i s
p l a c e d u n d e r o n e o f t h e f o l l o w i n g c o n d i t i o n s :
Overloaded:
T h e t o o l i s o p e r a t e d i n a m a n n e r t h a t c a u s e s i t t o d r a w
a n a b n o r m a l l y h i g h c u r r e n t . In t h i s s i t u a t i o n , t u r n t h e
tool o and stop the application that caused the tool to
b e c o m e o v e r l o a d e d . T h e n t u r n t h e t o o l o n t o r e s t a r t .
If t h e t o o l d o e s n o t s t a r t , t h e b a t t e r y i s o v e r h e a t e d . In t h i s
s i t u a t i o n , l e t t h e b a t t e r y c o o l b e f o r e t u r n i n g t h e t o o l o n a g a i n .
Low battery voltage:
T h e r e m a i n i n g b a t t e r y c a p a c i t y i s t o o l o w a n d t h e t o o l
w i l l n o t o p e r a t e . If y o u t u r n t h e t o o l o n , t h e m o t o r r u n s
a g a i n b u t s t o p s s o o n . In t h i s s i t u a t i o n , r e m o v e a n d
r e c h a r g e t h e b a t t e r y .
Switch action
WARNING: For your safety, this tool is
euipped with lock-o lever which prevents the
tool from unintended starting. NEVER use the tool
if it runs when you simply pull the switch trigger
without pressing the lock-o lever. Return the
tool to our authorized service center for proper
repairs BEFORE further usage.
WARNING: NEVER tape down or defeat pur-
pose and function of lock-o lever.
CAUTION: Before installing the battery car-
tridge into the tool, always check to see that the
switch trigger actuates properly and returns to
the " OFF" position when released.
NOTICE: Do not pull the switch trigger hard with-
out pressing the lock-o lever. This can cause
switch breakage.
T o p r e v e n t t h e s w i t c h t r i g g e r f r o m b e i n g a c c i d e n t a l l y
pulled, alock-o lever is provided. To start the tool,
depress the lock-o lever and pull the switch trigger.
R e l e a s e t h e s w i t c h t r i g g e r t o s t o p .
Fig.5: 1. S w i t c h t r i g g e r 2. Lock-o lever
Checking the run-down brake
CAUTION: If the saw chain does not stop
within a few seconds in this test, stop using the
tool and consult our authorized service center.
R u n t h e t o o l , a n d t h e n r e l e a s e t h e s w i t c h t r i g g e r c o m -
p l e t e l y . T h e s a w c h a i n m u s t c o m e t o a s t a n d s t i l l w i t h i n
a f e w s e c o n d s .
ASSEMBLY
CAUTION: Always be sure that the tool is
switched o and the battery cartridge is removed
before carrying out any work on the tool.
CAUTION: Do not touch the saw chain with
bare hands. Always wear gloves when handling
the saw chain.
Removing or installing saw chain
CAUTION: The saw chain and the guide bar
are still hot just after the operation. Let them cool
down enough before carrying out any work on
the tool.
CAUTION: Carry out the procedure of install-
ing or removing saw chain in a clean place free
from sawdust and the like.
Removing the saw chain
T o r e m o v e t h e s a w c h a i n , p e r f o r m t h e f o l l o w i n g s t e p s :
1. P u l l t h e l e v e r u p .
Fig.6: 1. Lever
2. T u r n t h e l e v e r c o u n t e r c l o c k w i s e u n t i l t h e s p r o c k e t
cover comes o.
Fig.7: 1. S p r o c k e t c o v e r 2. Lever
3. R e m o v e t h e s p r o c k e t c o v e r t h e n r e m o v e t h e s a w
c h a i n a n d g u i d e b a r f r o m t h e t o o l b o d y .
Installing the saw chain
T o i n s t a l l t h e s a w c h a i n , p e r f o r m t h e f o l l o w i n g s t e p s :
1. P u l l t h e l e v e r u p .
Fig.8: 1. Lever
2. T u r n t h e l e v e r c o u n t e r c l o c k w i s e u n t i l t h e s p r o c k e t
cover comes o.
Fig.9: 1. L e v e r 2. S p r o c k e t c o v e r

14 ENGLISH
3. R e m o v e t h e s p r o c k e t c o v e r .
4. A l i g n t h e h o l e o n t h e g u i d e b a r w i t h t h e p i n o n t h e
t o o l b o d y , a n d t h e n p l a c e t h e g u i d e b a r a s s h o w n i n t h e
gure.
Fig.10: 1. G u i d e b a r 2. H o l e 3. P i n
5. S l i d e t h e g u i d e b a r t o w a r d t h e s p r o c k e t t o l o c k t h e
p i n .
Fig.11: 1. G u i d e b a r 2. P i n
6. R e m o v e t h e g u i d e b a r f r o m t h e t o o l b o d y .
7. C h e c k t h e d i r e c t i o n o f t h e s a w c h a i n . M a t c h t h e
d i r e c t i o n o f t h e s a w c h a i n w i t h t h a t o f t h e m a r k o n t h e
t o o l b o d y .
Fig.12: 1. M a r k o n t o o l b o d y
8. F i t o n e e n d o f t h e s a w c h a i n o n t h e t o p o f t h e
g u i d e b a r .
9. F i t t h e o t h e r e n d o f t h e s a w c h a i n a r o u n d t h e
s p r o c k e t , t h e n a t t a c h t h e g u i d e b a r t o t h e t o o l b o d y s o
t h a t t h e h o l e o n t h e g u i d e b a r i s a l i g n e d w i t h t h e p i n o n
t h e b o d y .
Fig.13: 1. S p r o c k e t
P r e s s t h e g u i d e b a r a g a i n s t t h e t o o l b o d y t o r e l e a s e t h e
pin. The saw chain tension is automatically adjusted.
Fig.14: 1. S a w c h a i n 2. P i n 3. S p r o c k e t
10. P l a c e t h e s p r o c k e t c o v e r s o t h a t t h e b o l t a n d p i n
o n t h e t o o l b o d y m e e t t h e i r c o u n t e r p a r t s o n t h e s p r o c k e t
c o v e r .
Fig.15: 1. S p r o c k e t c o v e r 2. B o l t 3. P i n
11. T u r n t h e l e v e r c l o c k w i s e u n t i l t h e s p r o c k e t c o v e r i s
s e c u r e d t h e n r e t u r n i t t o t h e o r i g i n a l p o s i t i o n .
Fig.16: 1. L e v e r 2. S p r o c k e t c o v e r
M a k e s u r e t h a t t h e s a w c h a i n d o e s n o t l o o s e a n d t h e
s a w c h a i n c a n b e m o v e d s m o o t h l y b a c k a n d f o r t h . If
necessary, adjust the tension of the saw chain by refer-
ring to the section for adjusting saw chain tension.
Adjusting saw chain tension
CAUTION: A chain which is too loose can
jump o the bar and it may cause an injury or
accident.
T h e s a w c h a i n m a y b e c o m e l o o s e a f t e r m a n y h o u r s
o f u s e . F r o m t i m e t o t i m e c h e c k t h e s a w c h a i n t e n s i o n
b e f o r e u s e .
If the saw chain is loose, adjust the saw chain tension.
1. P u l l t h e l e v e r u p .
Fig.17: 1. Lever
2. T u r n t h e l e v e r c o u n t e r c l o c k w i s e a l i t t l e t o l o o s e n
the sprocket cover lightly. The chain tension is adjusted
a u t o m a t i c a l l y .
Fig.18: 1. S p r o c k e t c o v e r 2. Lever
3. T u r n t h e l e v e r c l o c k w i s e u n t i l t h e s p r o c k e t c o v e r i s
s e c u r e d t h e n r e t u r n i t t o t h e o r i g i n a l p o s i t i o n .
Fig.19: 1. L e v e r 2. S p r o c k e t c o v e r
OPERATION
Lubrication
CAUTION: Do not operate the tool when the
tank is empty. Replenish the oil in due time before
the tank is empty.
CAUTION: Prevent the oil from coming into
contact with the skin and eyes. Contact with the
eyes causes irritation. In the event of eye contact,
ush the aected eye immediately with clear
water, then consult a doctor at once.
CAUTION:
Never use waste oil. Waste oil contains
carcinogenic substances. The contaminants in waste
oil cause accelerated wear of the oil pump, the bar and
the chain. Waste oil is harmful to the environment.
NOTICE: When the tool is used for the rst time,
it may take up to two minutes for the saw chain oil
to begin its lubricating eect upon the saw mech-
anism. Run the saw without load until it does so.
NOTICE:
When lling the chain oil for the rst time,
or relling the tank after it has been completely emp-
tied, add oil up to the bottom edge of the ller neck.
The oil delivery may otherwise be impaired.
NOTICE:
Use the saw chain oil exclusively for
Makita tools or equivalent oil available in the market.
NOTICE: Never use oil including dust and parti-
cles or volatile oil.
NOTICE: When pruning trees, use botanical oil.
Mineral oil may harm trees.
NOTICE: Before the cutting operation, make sure
that the provided oil tank cap is screwed in place.
S a w c h a i n i s a u t o m a t i c a l l y l u b r i c a t e d w h e n t h e t o o l i s i n
o p e r a t i o n . C h e c k t h e a m o u n t o f r e m a i n i n g o i l i n t h e o i l
t a n k p e r i o d i c a l l y t h r o u g h t h e o i l i n s p e c t i o n w i n d o w .
Fig.20: 1. O i l i n s p e c t i o n w i n d o w 2. O i l t a n k c a p
To ll the oil, perform the following steps:
1. C l e a n t h e a r e a a r o u n d t h e o i l t a n k c a p t h o r o u g h l y
t o p r e v e n t a n y d i r t f r o m e n t e r i n g t h e o i l t a n k .
2. L a y t h e t o o l o n i t s s i d e .
3. P u s h t h e b u t t o n o n t h e o i l t a n k c a p s o t h a t t h e
b u t t o n o n t h e o t h e r s i d e s t a n d s u p , a n d t h e n r e m o v e t h e
o i l t a n k c a p b y t u r n i n g i t .
Fig.21: 1. O i l t a n k c a p 2. T i g h t e n 3. Loosen
4.
F i l l t h e o i l t a n k w i t h t h e o i l . T h e p r o p e r a m o u n t o f o i l i s 55 m l .
5. Screw the oil tank cap rmly back in place.
6. W i p e a w a y a n y s p i l t c h a i n o i l c a r e f u l l y .
NOTE: If it is dicult to remove the oil tank cap, insert
t h e t i p o f s l o t t e d s c r e w d r i v e r i n t o t h e s l o t o f t h e o i l
t a n k c a p , a n d t h e n r e m o v e t h e o i l t a n k c a p b y t u r n i n g
i t c o u n t e r c l o c k w i s e .
Fig.22: 1. S l o t 2. S l o t t e d s c r e w d r i v e r
After relling, hold the tool away from the material to be cut.
S t a r t i t a n d w a i t u n t i l l u b r i c a t i o n o n s a w c h a i n i s a d e q u a t e .
Fig.23

15 ENGLISH
Working with the tool
CAUTION: Keep all parts of the body away
from the saw chain when the tool is operating.
CAUTION: Hold the tool rmly with both
hands when the tool is operating.
CAUTION: Do not overreach. Keep proper
footing and balance at all times.
NOTICE: Never toss or drop the tool.
NOTICE: Do not cover the vents of the tool.
B e f o r e s t a r t i n g t h e t o o l , b r i n g t h e r o o t o f g u i d e b a r a n d
t h e s u p p o r t p a r t o f t o o l b o d y i n c o n t a c t w i t h t h e b r a n c h
to be cut as shown in the gure. While contacting the
b r a n c h w i t h t h e t o o l a n d g u i d e b a r , s t a r t t h e t o o l a n d
s a w t h e b r a n c h b y m o v i n g t h e t o o l d o w n a l o n g t h e
branch.
Fig.24
CAUTION: Before the cutting operation, make
sure that the branch to be cut is in contact with
the root of guide bar and the support part of tool
body. O t h e r w i s e , t h e t o o l m a y b e p u l l e d t o w a r d t h e
t i p o f g u i d e b a r a n d t h e g u i d e b a r m a y w o b b l e , a n d
may result in an injury.
Carrying tool
B e f o r e c a r r y i n g t h e t o o l , a l w a y s r e m o v e t h e b a t t e r y
c a r t r i d g e f r o m t h e t o o l . T h e n a t t a c h t h e g u i d e b a r c o v e r .
A l s o c o v e r t h e b a t t e r y c a r t r i d g e w i t h t h e b a t t e r y c o v e r .
Fig.25: 1. G u i d e b a r c o v e r 2. B a t t e r y c o v e r
MAINTENANCE
CAUTION: Always be sure that the tool is
switched o and the battery cartridge is removed
before attempting to perform inspection or
maintenance.
CAUTION: Always wear gloves when perform-
ing any inspection or maintenance.
NOTICE: Never use gasoline, benzine, thinner,
alcohol or the like. Discoloration, deformation or
cracks may result.
T o m a i n t a i n p r o d u c t S A F ET Y a n d R EL IA B IL IT Y ,
repairs, any other maintenance or adjustment should
b e p e r f o r m e d b y M a k i t a A u t h o r i z e d o r F a c t o r y S e r v i c e
C e n t e r s , a l w a y s u s i n g M a k i t a r e p l a c e m e n t p a r t s .
Sharpening the saw chain
Sharpen the saw chain when:
•M e a l y s a w d u s t i s p r o d u c e d w h e n d a m p w o o d i s
c u t ;
The chain penetrates the wood with diculty, even
w h e n h e a v y p r e s s u r e i s a p p l i e d ;
•T h e c u t t i n g e d g e i s o b v i o u s l y d a m a g e d ;
•T h e s a w p u l l s t o t h e l e f t o r r i g h t i n t h e w o o d .
( c a u s e d b y u n e v e n s h a r p e n i n g o f t h e s a w c h a i n o r
d a m a g e t o o n e s i d e o n l y )
S h a r p e n t h e s a w c h a i n f r e q u e n t l y b u t a l i t t l e e a c h t i m e .
Two or three strokes with ale are usually sucient for
r o u t i n e r e s h a r p e n i n g . W h e n t h e s a w c h a i n h a s b e e n
r e s h a r p e n e d s e v e r a l t i m e s , h a v e i t s h a r p e n e d i n o u r
a u t h o r i z e d s e r v i c e c e n t e r .
Sharpening criteria:
WARNING: An excessive distance between
the cutting edge and depth gauge increases the
risk of kickback.
Fig.26: 1. C u t t e r l e n g t h 2. Di s t a n c e b e t w e e n c u t t i n g
e d g e a n d d e p t h g a u g e 3. M i n i m u m c u t t e r
l e n g t h ( 3 m m )
All cutter length must be equal. Dierent cutter
l e n g t h s p r e v e n t t h e s a w c h a i n f r o m r u n n i n g
s m o o t h l y a n d m a y c a u s e t h e s a w c h a i n t o b r e a k .
—Do n o t s h a r p e n t h e c h a i n w h e n t h e c u t t e r l e n g t h
h a s r e a c h e d 3 m m o r s h o r t e r . T h e c h a i n m u s t b e
r e p l a c e d w i t h n e w o n e .
—
T h e c h i p t h i c k n e s s i s d e t e r m i n e d b y t h e d i s t a n c e b e t w e e n
t h e d e p t h g a u g e ( r o u n d n o s e ) a n d t h e c u t t i n g e d g e .
—T h e b e s t c u t t i n g r e s u l t s a r e o b t a i n e d w i t h f o l l o w i n g
d i s t a n c e b e t w e e n c u t t i n g e d g e a n d d e p t h g a u g e .
•C h a i n b l a d e 80T X L : 0.6 5 m m
Fig.27
—T h e s h a r p e n i n g a n g l e o f 30° m u s t b e t h e s a m e o n
all cutters. Dierent cutter angles cause the chain
t o r u n r o u g h l y a n d u n e v e n l y , a c c e l e r a t e w e a r , a n d
l e a d t o c h a i n b r e a k s .
Use asuitable round le so that the proper sharp-
e n i n g a n g l e i s k e p t a g a i n s t t h e t e e t h .
•C h a i n b l a d e 80T X L : 55°
File and le guiding
Use aspecial round le (optional accessory) for
s a w c h a i n s t o s h a r p e n t h e c h a i n . N o r m a l r o u n d
les are not suitable.
—
Diameter of the round le for each saw chain is as follows:
•C h a i n b l a d e 80T X L : 4 .0 m m
The le should only engage the cutter on the for-
ward stroke. Lift the le o the cutter on the return
s t r o k e .
Sharpen the shortest cutter rst. Then the length
o f t h i s s h o r t e s t c u t t e r b e c o m e s t h e s t a n d a r d f o r a l l
o t h e r c u t t e r s o n t h e s a w c h a i n .
Guide the le as shown in the gure.
Fig.28: 1. F i l e 2. S a w c h a i n
—
The le can be guided more easily if ale holder
(optional accessory) is employed. The le holder has
m a r k i n g s f o r t h e c o r r e c t s h a r p e n i n g a n g l e o f 30° ( a l i g n
t h e m a r k i n g s p a r a l l e l t o t h e s a w c h a i n ) a n d l i m i t s t h e
depth of penetration (to /5 of the le diameter).
Fig.29: 1. F i l e h o l d e r
—
A f t e r s h a r p e n i n g t h e c h a i n , c h e c k t h e h e i g h t o f t h e d e p t h
g a u g e u s i n g t h e c h a i n g a u g e t o o l ( o p t i o n a l a c c e s s o r y ) .
Fig.30
Remove any projecting material, however small,
with aspecial at le (optional accessory).
Round o the front of the depth gauge again.

16 ENGLISH
Cleaning the guide bar
C h i p s a n d s a w d u s t w i l l b u i l d u p i n t h e g u i d e b a r g r o o v e .
They may clog the bar groove and impair the oil ow.
C l e a n o u t t h e c h i p s a n d s a w d u s t e v e r y t i m e w h e n y o u
s h a r p e n o r r e p l a c e t h e s a w c h a i n .
Fig.31
Cleaning the sprocket cover
C h i p s a n d s a w d u s t w i l l a c c u m u l a t e i n s i d e o f t h e
s p r o c k e t c o v e r . R e m o v e t h e s p r o c k e t c o v e r a n d s a w
c h a i n f r o m t h e t o o l t h e n c l e a n t h e c h i p s a n d s a w d u s t .
Fig.32
Cleaning the oil discharge hole
S m a l l d u s t o r p a r t i c l e s m a y b e b u i l t u p i n t h e o i l d i s c h a r g e
h o l e d u r i n g o p e r a t i o n . T h e s e d u s t o r p a r t i c l e s m a y i m p a i r t h e
oil to ow and cause an insucient lubrication on the whole
s a w c h a i n . W h e n a p o o r c h a i n o i l d e l i v e r y o c c u r s a t t h e t o p o f
g u i d e b a r , c l e a n t h e o i l d i s c h a r g e h o l e a s f o l l o w s .
1.
R e m o v e t h e s p r o c k e t c o v e r a n d s a w c h a i n f r o m t h e t o o l .
2. R e m o v e t h e s m a l l d u s t o r p a r t i c l e s u s i n g a s l o t t e d
s c r e w d r i v e r o r t h e l i k e .
Fig.33: 1. S l o t t e d s c r e w d r i v e r 2. O i l d i s c h a r g e h o l e
3. In s e r t t h e b a t t e r y c a r t r i d g e i n t o t h e t o o l . P u l l t h e
switch trigger to ow built-up dust or particles o the oil
d i s c h a r g e h o l e b y d i s c h a r g i n g c h a i n o i l .
4. R e m o v e t h e b a t t e r y c a r t r i d g e f r o m t h e t o o l .
R e i n s t a l l t h e s p r o c k e t c o v e r a n d s a w c h a i n a n d g u i d e
b a r o n t h e t o o l .
Replacing the sprocket
CAUTION: A worn sprocket will damage a
new saw chain. Have the sprocket replaced in this
case.
Before tting anew saw chain, check the condition of
t h e s p r o c k e t .
Fig.34: 1. S p r o c k e t 2. A r e a s t o b e w o r n o u t
Always t anew locking ring when replacing the
s p r o c k e t .
Fig.35: 1. L o c k i n g r i n g 2. S p r o c k e t
NOTICE: Make sure that the sprocket is installed
as shown in the gure.
Storing the tool
1. C l e a n t h e t o o l b e f o r e s t o r i n g . R e m o v e a n y c h i p s
a n d s a w d u s t f r o m t h e t o o l a f t e r r e m o v i n g t h e s p r o c k e t
c o v e r .
2. A f t e r c l e a n i n g t h e t o o l , r u n i t u n d e r n o l o a d t o l u b r i -
c a t e t h e s a w c h a i n a n d g u i d e b a r .
3. C o v e r t h e g u i d e b a r w i t h t h e g u i d e b a r c o v e r .
4. Em p t y t h e o i l t a n k .
Instructions for periodic maintenance
T o e n s u r e l o n g l i f e , p r e v e n t d a m a g e a n d e n s u r e t h e f u l l f u n c t i o n i n g o f t h e s a f e t y f e a t u r e s , t h e f o l l o w i n g m a i n t e n a n c e
m u s t b e p e r f o r m e d r e g u l a r l y . W a r r a n t y c l a i m s c a n b e r e c o g n i z e d o n l y i f t h i s w o r k i s p e r f o r m e d r e g u l a r l y a n d p r o p e r l y .
F a i l u r e t o p e r f o r m t h e p r e s c r i b e d m a i n t e n a n c e w o r k c a n l e a d t o a c c i d e n t s ! T h e u s e r o f t h e t o o l m u s t n o t p e r f o r m
m a i n t e n a n c e w o r k w h i c h i s n o t d e s c r i b e d i n t h e i n s t r u c t i o n m a n u a l . A l l s u c h w o r k m u s t b e c a r r i e d o u t b y o u r a u t h o -
r i z e d s e r v i c e c e n t e r .
Check item / Operating time Before
operation
Everyday Every week Every 3
month
Annually Before
storage
W h o l e t o o l In s p e c t i o n . -----
C leaning. -----
C h e c k a t
a u t h o r i z e d
s e r v i c e c e n t e r .
----
S a w c h a i n In s p e c t i o n . -----
S h a r p e n i n g i f
n e c e s s a r y .
-----
G u i d e b a r In s p e c t i o n . ----
R e m o v e f r o m
t h e t o o l .
-----
C h a i n
l u b r i c a t i o n
C h e c k t h e o i l
f e e d r a t e .
-----
S w i t c h t r i g g e r In s p e c t i o n . -----
Lock-o lever In s p e c t i o n . -----
O i l t a n k c a p C h e c k
t i g h t n e s s .
-----
S c r e w s a n d
n u t s
In s p e c t i o n . - - ---

17 ENGLISH
TROUBLESHOOTING
Before asking for repairs, conduct your own inspection rst. If you nd aproblem that is not explained in the manual,
d o n o t a t t e m p t t o d i s m a n t l e t h e t o o l . In s t e a d , a s k M a k i t a A u t h o r i z e d S e r v i c e C e n t e r s , a l w a y s u s i n g M a k i t a r e p l a c e -
m e n t p a r t s f o r r e p a i r s .
Malfunction status Cause Action
T h e t o o l d o e s n o t s t a r t . B a t t e r y c a r t r i d g e i s n o t i n s t a l l e d . In s t a l l a c h a r g e d b a t t e r y c a r t r i d g e .
B a t t e r y p r o b l e m ( l o w v o l t a g e ) . R e c h a r g e t h e b a t t e r y c a r t r i d g e . If r e c h a r g -
ing is not eective, replace the battery
c a r t r i d g e .
T h e m o t o r s t o p s r u n n i n g a f t e r a l i t t l e u s e . B a t t e r y ' s c h a r g e l e v e l i s l o w . R e c h a r g e t h e b a t t e r y c a r t r i d g e . If r e c h a r g -
ing is not eective, replace the battery
c a r t r i d g e .
N o o i l o n t h e c h a i n . O i l t a n k i s e m p t y . F i l l t h e o i l t a n k .
O i l g u i d e g r o o v e i s d i r t y . C l e a n t h e g r o o v e .
T h e t o o l d o e s n o t r e a c h m a x i m u m R P M . B a t t e r y c a r t r i d g e i s i n s t a l l e d i m p r o p e r l y . In s t a l l t h e b a t t e r y c a r t r i d g e a s d e s c r i b e d i n
t h i s m a n u a l .
B a t t e r y p o w e r i s d r o p p i n g . R e c h a r g e t h e b a t t e r y c a r t r i d g e . If r e c h a r g -
ing is not eective, replace the battery
c a r t r i d g e .
T h e d r i v e s y s t e m d o e s n o t w o r k c o r r e c t l y . A s k t h e a u t h o r i z e d s e r v i c e c e n t e r i n y o u r
r e g i o n f o r r e p a i r .
A b n o r m a l v i b r a t i o n :
Stop the tool immediately!
L o o s e g u i d e b a r o r s a w c h a i n . Adjust the guide bar and saw chain
t e n s i o n .
T o o l m a l f u n c t i o n . A s k t h e a u t h o r i z e d s e r v i c e c e n t e r i n y o u r
r e g i o n f o r r e p a i r .
T h e s a w c h a i n c a n n o t b e i n s t a l l e d . T h e c o m b i n a t i o n o f s a w c h a i n a n d
s p r o c k e t i s n o t c o r r e c t .
U s e t h e c o r r e c t c o m b i n a t i o n o f s a w c h a i n
a n d s p r o c k e t b y r e f e r r i n g t o t h e s e c t i o n f o r
specications.
OPTIONAL
ACCESSORIES
CAUTION: These accessories or attachments
are recommended for use with your Makita tool
specied in this manual. T h e u s e o f a n y o t h e r
a c c e s s o r i e s o r a t t a c h m e n t s m i g h t p r e s e n t a r i s k o f
injury to persons. Only use accessory or attachment
f o r i t s s t a t e d p u r p o s e .
If y o u n e e d a n y a s s i s t a n c e f o r m o r e d e t a i l s r e g a r d -
i n g t h e s e a c c e s s o r i e s , a s k y o u r l o c a l M a k i t a S e r v i c e
C e n t e r .
•S a w c h a i n
•G u i d e b a r
•G u i d e b a r c o v e r
•F i l e
•T o o l b a g
•M a k i t a g e n u i n e b a t t e r y a n d c h a r g e r
NOTE: S o m e i t e m s i n t h e l i s t m a y b e i n c l u d e d i n t h e
t o o l p a c k a g e a s s t a n d a r d a c c e s s o r i e s . T h e y m a y
dier from country to country.

18 FRANÇAIS
FRANÇAIS (Instructions originales)
SPÉ CIFICATIONS
Modè le :UC100D
Longueurtotale
( s a n s l e g u i d e -c h a î n e e t l a b a t t e r i e )
350 m m
T e n s i o n n o m i n a l e 10, 8 V - 12 V c .c . m a x .
P o i d s n e t * 1 1, 0 k g
* 2 1, 5 - 1, 6 k g
L o n g u e u r d u g u i d e -c h a î n e s t a n d a r d 100 m m
L o n g u e u r r e c o m m a n d é e d u g u i d e -c h a î n e 100 m m
T y p e d e c h a î n e a p p l i c a b l e
( R e p o r t e z -v o u s a u t a b l e a u c i -d e s s o u s .)
80T X L
P i g n o n N o m b r e d e d e n t s 7
P a s ,5
V i t e s s e d e l a c h a î n e 0 - 8, 0 m / s
( 0 - 4 80 m / m i n )
C a p a c i t é d u r é s e r v o i r d ’ h u i l e p o u r c h a î n e 55 c m 3
tant donné l’évolution constante de notre programme de recherche et de développement, les spécications
contenues dans ce manuel sont sujettes àmodication sans préavis.
Les spécications peuvent varier suivant les pays.
* 1 : P o i d s , s a n s l a c h a î n e , l e g u i d e -c h a î n e , l e g a r d e -c h a î n e , l ’ h u i l e e t l a o u l e s b a t t e r i e s .
:Le poids combiné le plus léger et le plus lourd selon la procédure EPTA 1/1. Le poids peut être diérent
s e l o n l e o u l e s a c c e s s o i r e s , n o t a m m e n t l a o u l e s b a t t e r i e s .
Combinaison de chaî ne, guide-chaî ne et pignon
Type de chaî ne 80TX L
N o m b r e d e m a i l l o n s d ’ e n t r a î n e m e n t 26
G u i d e -c h a î n e L o n g u e u r d u g u i d e -c h a î n e 100 m m
Longueurde coupe 111 m m
P a s ,5
Jauge 1, 1 m m
T y p e G u i d e -c h a î n e s t e l l i t é
P i g n o n N o m b r e d e d e n t s 7
P a s ,5
AVERTISSEMENT : A s s o c i e z c o r r e c t e m e n t g u i d e -c h a î n e e t c h a î n e . L e n o n -r e s p e c t d e c e t t e c o n s i g n e p e u t
e n t r a î n e r d e s b l e s s u r e s .
Batterie et chargeur applicables
B a t t e r i e B L 1016 / B L 1021B / B L 104 1B
C hargeur DC 10S A / DC 10S B / DC 10W C / DC 10W D / DC 18R E
•C e r t a i n s c h a r g e u r s e t b a t t e r i e s r é p e r t o r i é s c i -d e s s u s p e u v e n t n e p a s ê t r e d i s p o n i b l e s s e l o n l a r é g i o n o ù v o u s
r é s i d e z .
AVERTISSEMENT : N’utilisez que les batteries et les chargeurs répertoriés ci-dessus. L ’ u t i l i s a t i o n
d ’ a u t r e s b a t t e r i e s e t c h a r g e u r s p e u t p r o v o q u e r d e s b l e s s u r e s e t / o u u n i n c e n d i e .

19 FRANÇAIS
Symboles
V o u s t r o u v e r e z c i -d e s s o u s l e s s y m b o l e s s u s c e p t i b l e s
d’être utilisés pour l’appareil. Veillez àcomprendre leur
signication avant toute utilisation.
L i r e l e m o d e d ’ e m p l o i .
P o r t e z d e s l u n e t t e s d e s é c u r i t é e t u n
d i s p o s i t i f d e p r o t e c t i o n a u d i t i v e .
Servez-vous toujours de vos deux mains
l o r s q u e v o u s u t i l i s e z l ’ o u t i l .
Méez-vous du choc en retour et évitez
t o u t c o n t a c t a v e c l ’ e x t r é m i t é d u g u i d e .
Ne pas exposer àl’eau.
L o n g u e u r d e c o u p e m a x i m a l e a d m i s e
S e n s d e d é p l a c e m e n t d e l a c h a î n e
Ni-MH
Li-ion
P o u r l e s p a y s d e l ’ U n i o n e u r o p é e n n e
uniquem ent
En r a i s o n d e l a p r é s e n c e d e c o m p o s a n t s
d a n g e r e u x d a n s l ’ é q u i p e m e n t , l e s d é c h e t s
d ’ é q u i p e m e n t s é l e c t r i q u e s e t é l e c t r o -
n i q u e s , l e s a c c u m u l a t e u r s e t l e s b a t t e r i e s
p e u v e n t a v o i r u n i m p a c t n é g a t i f s u r l ’ e n v i -
r o n n e m e n t e t l a s a n t é h u m a i n e .
Ne jetez pas les appareils électriques et
é l e c t r o n i q u e s o u l e s b a t t e r i e s a v e c l e s
ordures m énagères !
Conformément àla directive européenne
r e l a t i v e a u x d é c h e t s d ’ é q u i p e m e n t s é l e c -
t r i q u e s e t é l e c t r o n i q u e s e t a u x d é c h e t s
d’accumulateurs et de batteries, ainsi qu’à
son adaptation àla législation nationale,
l e s d é c h e t s d ’ é q u i p e m e n t s é l e c t r i q u e s ,
l e s b a t t e r i e s e t l e s a c c u m u l a t e u r s d o i v e n t
ê t r e c o l l e c t é s s é p a r é m e n t e t d é p o s é s
d a n s u n p o i n t d e c o l l e c t e d i s t i n c t p o u r
d é c h e t s u r b a i n s , c o n f o r m é m e n t a u x r é g l e -
m e n t a t i o n s e n m a t i è r e d e p r o t e c t i o n d e
l ’ e n v i r o n n e m e n t .
C e l a e s t i n d i q u é p a r l e s y m b o l e d e l a p o u -
belle àroulettes barrée sur l’équipement.
N i v e a u d e p u i s s a n c e s o n o r e g a r a n t i s e l o n
l a d i r e c t i v e e u r o p é e n n e s u r l e b r u i t d a n s
l ’ e n v i r o n n e m e n t .
N i v e a u d e p u i s s a n c e s o n o r e s e l o n l a
r é g l e m e n t a t i o n a u s t r a l i e n n e N S W s u r l e
c o n t r ô l e d u b r u i t
Utilisations
C e t o u t i l e s t c o n ç u p o u r c o u p e r d e s b r a n c h e s d ’ a r b r e s
o u d e s b u i s s o n s a u m o y e n d ’ u n e c h a î n e .
Bruit
N i v e a u d e b r u i t p o n d é r é A t y p i q u e , d é t e r m i n é s e l o n
EN 6 284 1-4 -1 :
N i v e a u d e p r e s s i o n s o n o r e ( L p A ): 7 6 d B ( A )
N i v e a u d e p u i s s a n c e s o n o r e ( L W A ) : 87 d B ( A )
In c e r t i t u d e ( K ) : 3 d B ( A )
NOTE : L a o u l e s v a l e u r s d ’ é m i s s i o n d e b r u i t d é c l a -
rées ont été mesurées conformément àla méthode
d e t e s t s t a n d a r d e t p e u v e n t ê t r e u t i l i s é e s p o u r c o m -
p a r e r l e s o u t i l s e n t r e e u x .
NOTE : L a o u l e s v a l e u r s d ’ é m i s s i o n d e b r u i t d é c l a -
r é e s p e u v e n t a u s s i ê t r e u t i l i s é e s p o u r l ’ é v a l u a t i o n
p r é l i m i n a i r e d e l ’ e x p o s i t i o n .
AVERTISSEMENT : Portez un serre-tê te
antibruit.
AVERTISSEMENT : L’émission de bruit
lors de l’usage réel de l’outil électrique peut ê tre
diérente de la ou des valeurs déclarées, suivant
la façon dont l’outil est utilisé, particuliè rement
selon le type de piè ce usinée.
AVERTISSEMENT : Les mesures de sécurité
à prendre pour protéger l’utilisateur doivent ê tre
basées sur une estimation de l’exposition dans
des conditions réelles d’utilisation (en tenant
compte de toutes les composantes du cycle
d’utilisation, comme par exemple le moment de
sa mise hors tension, lorsqu’il tourne à vide et le
moment de son déclenchement).
Vibrations
V a l e u r t o t a l e d e v i b r a t i o n s ( s o m m e d e v e c t e u r t r i a x i a l )
d é t e r m i n é e s e l o n EN 6 284 1-4 -1 :
M o d e d e t r a v a i l : c o u p e d e b o i s
É m i s s i o n d e v i b r a t i o n s ( a h , W ): 4 , 8 m / s 2
In c e r t i t u d e ( K ) : 1, 5 m / s 2
NOTE : L a o u l e s v a l e u r s d e v i b r a t i o n t o t a l e s d é c l a -
rées ont été mesurées conformément àla méthode
d e t e s t s t a n d a r d e t p e u v e n t ê t r e u t i l i s é e s p o u r c o m -
p a r e r l e s o u t i l s e n t r e e u x .
NOTE : L a o u l e s v a l e u r s d e v i b r a t i o n t o t a l e s d é c l a -
r é e s p e u v e n t a u s s i ê t r e u t i l i s é e s p o u r l ’ é v a l u a t i o n
p r é l i m i n a i r e d e l ’ e x p o s i t i o n .
AVERTISSEMENT : L’émission de vibrations
lors de l’usage réel de l’outil électrique peut ê tre
diérente de la ou des valeurs déclarées, suivant
la façon dont l’outil est utilisé, particuliè rement
selon le type de piè ce usinée.
AVERTISSEMENT : Les mesures de sécurité
à prendre pour protéger l’utilisateur doivent ê tre
basées sur une estimation de l’exposition dans
des conditions réelles d’utilisation (en tenant
compte de toutes les composantes du cycle
d’utilisation, comme par exemple le moment de
sa mise hors tension, lorsqu’il tourne à vide et le
moment de son déclenchement).
Déclarations de conformité
Pour les pays européens uniquement
L e s d é c l a r a t i o n s d e c o n f o r m i t é s o n t f o u r n i e s e n A n n e x e
A à ce mode d’emploi.

20 FRANÇAIS
CONSIGNES DE SÉ CURITÉ
Consignes de sécurité générales
pour outils électriques
AVERTISSEMENT Veuillez lire toutes les consignes
de sécurité, instructions, illustrations et spécications
qui accompagnent cet outil électrique. L e n o n -r e s p e c t d e
t o u t e s l e s i n s t r u c t i o n s i n d i q u é e s c i -d e s s o u s p e u t e n t r a î n e r
u n e é l e c t r o c u t i o n , u n i n c e n d i e e t / o u d e g r a v e s b l e s s u r e s .
Conservez toutes les mises en
garde et instructions pour réfé-
rence ultérieure.
L e t e r m e « o u t i l é l e c t r i q u e » d a n s l e s a v e r t i s s e m e n t s
fait référence àl’outil électrique alimenté par le secteur
(avec cordon d’alimentation) ou àl’outil électrique fonc-
t i o n n a n t s u r b a t t e r i e ( s a n s c o r d o n d ’ a l i m e n t a t i o n ) .
Consignes de sécurité générales
pour scie d’élagage
1. É loignez la chaî ne de votre corps pendant
l’utilisation de la scie d’élagage. Avant de faire
démarrer la scie d’élagage, assurez-vous que
la chaî ne n’est pas en contact avec quoi que
soit. R e s t e z a t t e n t i f e n p e r m a n e n c e , p o u r é v i t e r
t o u t c o n t a c t e n t r e l a c h a î n e e t v o t r e c o r p s , e t q u e
v o s v ê t e m e n t s n e s e p r e n n e n t d a n s l a c h a î n e
l o r s q u e v o u s u t i l i s e z u n e s c i e d ’ é l a g a g e .
2. Tenez toujours la scie d’élagage en plaçant
une main sur la poignée arriè re et l’autre main
sur la poignée auxiliaire.
3.
Tenez la scie d’élagage uniquement par ses sur-
faces de prise isolées, car la chaî ne pourrait entrer
en contact avec le câ blage caché. L e c o n t a c t d e s
chaînes avec un l sous tension peut transmettre du
c o u r a n t d a n s l e s p i è c e s m é t a l l i q u e s e x p o s é e s d e l a
s c i e d ’ é l a g a g e e t é l e c t r o c u t e r l ’ u t i l i s a t e u r .
4 . Portez une protection oculaire. De plus, nous
vous recommandons de porter des équipe-
ments de protection pour les oreilles, la tê te,
les mains, les jambes et les pieds. L e p o r t
d ’ é q u i p e m e n t s d e p r o t e c t i o n a d é q u a t s r é d u i t l e
risque de blessure causée par les débris éjectés
o u p a r l e c o n t a c t a c c i d e n t e l a v e c l a c h a î n e .
5. N’utilisez pas la scie d’élagage dans un arbre,
ou sur une échelle, depuis un toit ou tout sup-
port instable. L ’ u t i l i s a t i o n d ’ u n e s c i e d ’ é l a g a g e
d e c e t t e f a ç o n p o u r r a i t p r o v o q u e r d e g r a v e s b l e s -
s u r e s c o r p o r e l l e s .
6 . Conservez toujours un bon appui au sol et uti-
lisez toujours la scie d’élagage en vous tenant
sur une surface stable, sû re et horizontale.
V o u s r i s q u e z d e p e r d r e l ’ é q u i l i b r e o u l a m a î t r i s e
d e l a s c i e d ’ é l a g a g e s i v o u s t r a v a i l l e z s u r u n e
s u r f a c e g l i s s a n t e o u i n s t a b l e .
7 . Lorsque vous coupez une branche en tension,
prenez garde au retour de la branche. L o r s q u e
la tension exercée sur les bres du bois est libé-
r é e , l a b r a n c h e r i s q u e d e s e d é t e n d r e c o m m e u n
r e s s o r t e t d e f r a p p e r l ’ u t i l i s a t e u r e t / o u d e p r o v o -
q u e r u n e p e r t e d e m a î t r i s e d e l a s c i e d ’ é l a g a g e .
8. Faites preuve d’une grande prudence lorsque
vous coupez des broussailles ou de jeunes
arbres. De ns morceaux de bois peuvent se
coincer dans la chaîne et être projetés vers vous
o u e x e r c e r u n e t r a c t i o n q u i v o u s f e r a i t p e r d r e
l ’ é q u i l i b r e .
9. Transportez la scie d’élagage éteinte et éloi-
gnée de votre corps. Avant de transporter ou
de ranger la scie d’élagage, remettez toujours
le garde-chaî ne en place. U n e m a n i p u l a t i o n
a d é q u a t e d e l a s c i e d ’ é l a g a g e r é d u i t l e r i s q u e d e
c o n t a c t a c c i d e n t e l a v e c l a c h a î n e e n m o u v e m e n t .
10. Suivez les instructions de lubrication, de
réglage de la tension de la chaî ne et de chan-
gement du guide et de la chaî ne. U n e m a u v a i s e
tension ou une mauvaise lubrication de la chaîne
a u g m e n t e l e s r i s q u e s d e r u p t u r e e t d e c h o c e n
r e t o u r .
11. Coupez uniquement du bois. N’utilisez pas la
scie délagage dautres ns ue celles pré-
vues. Par exemple, n’utilisez pas la scie d’éla-
gage pour couper du métal, du plastique, des
matériaux de maçonnerie ou des matériaux de
construction qui ne sont pas à base de bois.
L ’ u t i l i s a t i o n d e l a s c i e d ’ é l a g a g e p o u r d e s t â c h e s
diérentes de celles prévues pourrait entraîner
u n e s i t u a t i o n d a n g e r e u s e .
12. Cette scie d’élagage n’est pas conçue pour
l’abattage de bois. L ’ u t i l i s a t i o n d e l a s c i e d ’ é l a -
gage pour des tches diérentes de celles pré-
v u e s p o u r r a i t g r a v e m e n t b l e s s e r l ’ u t i l i s a t e u r o u
d e s p a s s a n t s .
13. Suivez toutes les instructions lorsque vous
dégagez un matériau bloqué, rangez ou dépan-
nez la scie d’élagage. Assurez-vous que l’in-
terrupteur est sur la position d’arrê t et que la
batterie est retirée.
14 . Causes des chocs en retour et mesures pré-
ventives :
Il y a r i s q u e d e c h o c e n r e t o u r l o r s q u e l e n e z o u
l’extrémité du guide-chaîne touche un objet, ou
l o r s q u e l e b o i s s e r e f e r m e e t c o i n c e l a c h a î n e
d a n s s a l i g n e d e c o u p e .
Da n s c e r t a i n s c a s , l e c o n t a c t d e l ’ e x t r é m i t é d u
guide-chaîne avec un objet peut entraîner une
réaction instantanée en sens inverse, qui projette
l e g u i d e -c h a î n e v e r s l e h a u t e t l ’ a r r i è r e e n d i r e c -
t i o n d e l ’ u t i l i s a t e u r .
Le guide-chaîne risque d’être projeté tout àcoup
v e r s l ’ a r r i è r e e n d i r e c t i o n d e l ’ u t i l i s a t e u r s i l a
c h a î n e s e c o i n c e l e l o n g d e l a p a r t i e s u p é r i e u r e d u
guide-chaîne.
L ’ u n e o u l ’ a u t r e d e c e s r é a c t i o n s p e u t e n t r a î n e r
u n e p e r t e d e c o n t r ô l e d e l a s c i e e t e n t r a î n e r d e s
blessures graves. Ne vous ez pas uniquement
aux dispositifs de sécurité intégrés àla scie. En
t a n t q u ’ u t i l i s a t e u r d e l a s c i e d ’ é l a g a g e , v o u s d e v e z
p r e n d r e d e s m e s u r e s p o u r é v i t e r l e s a c c i d e n t s o u
l e s b l e s s u r e s p e n d a n t l e s t r a v a u x d e c o u p e .
L e c h o c e n r e t o u r e s t l e r é s u l t a t d ’ u n e u t i l i s a t i o n
i n c o r r e c t e d e l a s c i e d ’ é l a g a g e e t / o u d e l ’ i n o b s e r -
v a t i o n d e s p r o c é d u r e s o u c o n d i t i o n s d ’ u t i l i s a t i o n .
Il p e u t ê t r e é v i t é e n p r e n a n t l e s p r é c a u t i o n s a d é -
q u a t e s i n d i q u é e s c i -d e s s o u s :
Other manuals for UC100D
4
Table of contents
Languages:
Other Makita Pole Saw manuals

Makita
Makita DUC101 User manual

Makita
Makita UA003G User manual

Makita
Makita UA003G User manual

Makita
Makita DUC101 User manual

Makita
Makita DUA300PT2 User manual

Makita
Makita UA004G User manual

Makita
Makita UA001G User manual

Makita
Makita EY2650H User manual

Makita
Makita UA003GM101 User manual

Makita
Makita EY2650H User manual

Makita
Makita GAU01 User manual

Makita
Makita DUC101Z User manual

Makita
Makita DUA300 User manual

Makita
Makita DUC101Z01 User manual

Makita
Makita DUA301 User manual

Makita
Makita DUA301 User manual

Makita
Makita DUC101SF User manual

Makita
Makita EY402MP User manual

Makita
Makita DUA300 User manual

Makita
Makita UA004G User manual