Blue Thumb Elite Skimmer User manual

Elite Skimmer
Installation Manual
View our
Installation
Video Online

Choose Skimmer Location
The skimmer should be positioned at the pond
edge, opposite the waterfall, to circulate the
water properly.
Excavation of Skimmer Area
Set skimmer box in intended area and spray
outline of skimmer for area to be excavated.
The skimmer should be positioned so that the
face of the skimmer will meet with the pond
liner at the side of the pond. Excavate the hole
a few inches larger than the width and length
of the skimmer box.
The skimmer should be set at a depth
that positions the top of the skimmer box
approximately 5” above your desired pond
water level. This will set your water level 1”
below the top edge of the snout opening
allowing clearance for surface debris to ow
into the skimmer during normal operation.
1
2c
2b
2a
STEP 1
STEP 2
INCLUDED PARTS
(1) Skimmer Box (1) Faceplate
Snout
(1) Lid (1) Mat Holder &
Matala Mat
(1) Skimmer Net
Self-Tapping
Screws & Caps
Black Silicone (2) Rubber
UniSeals
Overow Fitting
a
b
c
Male Adapter
& PVC Slip Plug

Install Overow Assembly
From inside the skimmer, screw the threaded
PVC 90 degree elbow into the overow
spinweld located on the back of the skimmer
box (use included Teon tape on the threads).
You can rotate the elbow tting to one side to
control the pond water level. The water level
in the pond and skimmer will be able to rise
until it begins overowing into the top of the
elbow. The further the elbow is angled down
the lower the maximum pond water level will
be maintained.
From outside the skimmer, screw the male
adapter into the overow spinweld (use Teon
tape on the threads). Then glue exible PVC
hose into the male adapter and run the hose
to wherever you’d like the overow water to
drain to.
Insert UniSeal Fittings
From outside the skimmer, insert the UniSeal
rubber ttings into the pipe discharge holes
of the skimmer. When you are ready to run
your pipe into your skimmer you will slide
the pipe in through the UniSeal (you may
need to lubricate the UniSeal with soap to
slide the pipe through). If you are only using
one discharge line insert the slip plug into
the unused discharge hole.
Install Automatic Water Fill Assembly
(optional)
If you have purchased the optional Blue Thumb
Automatic Water Fill Assembly for this system
install it now using the instructions provided
with the auto-ll kit. If you are not using the
auto-ll kit, from the outside of the skimmer,
install the plug into the auto-ll spinweld.
STEP 3
3b
4
STEP 4
STEP 5 (OPTIONAL)
5
3a
a
b

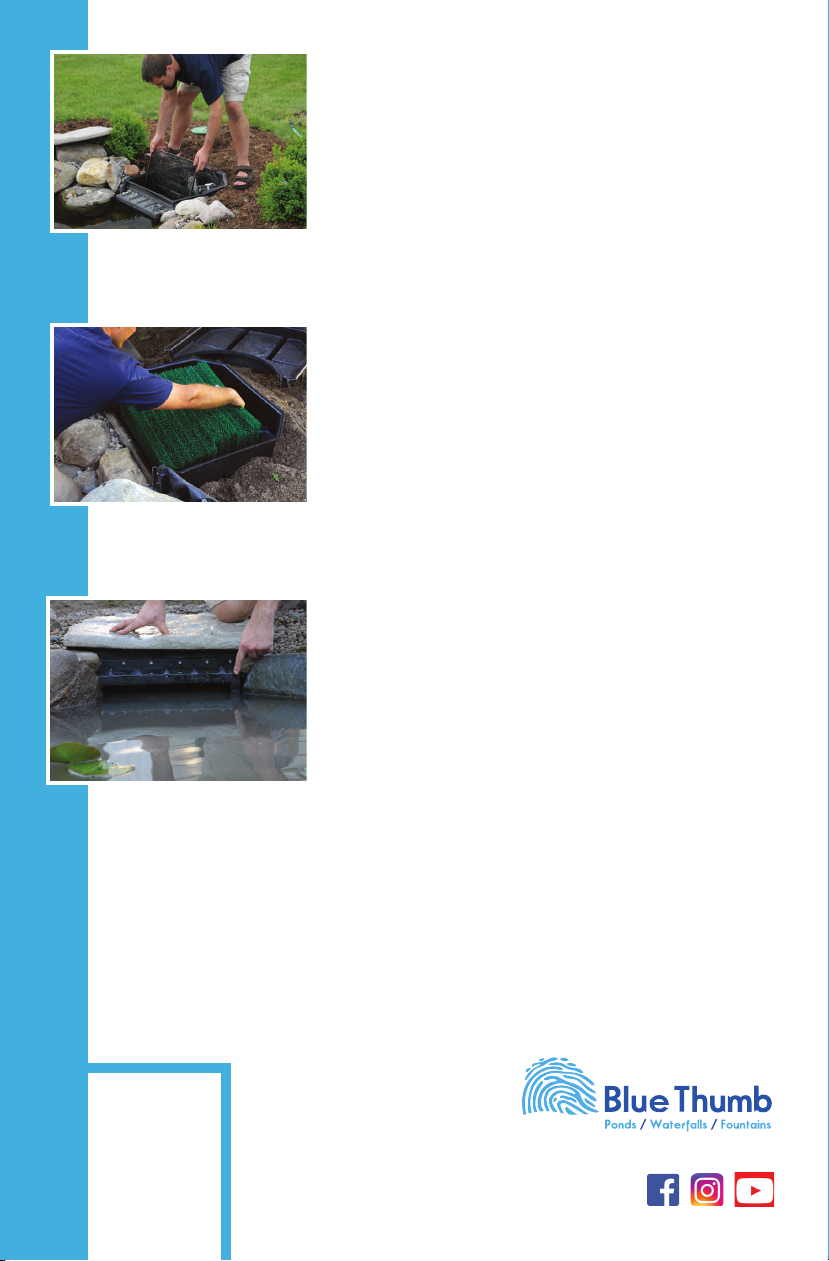
Position & Backll Skimmer
Your skimmer should be level from front to
back and side to side. Make sure the base below
your skimmer is compacted well to prevent settling
in the future.
Once the skimmer is properly positioned
insert the lower secondary support rod and
begin lling the soil in around the back and
sides. Be sure to pack the soil as you go to
help keep the skimmer in position and to limit
any settling around the skimmer. You should
pack the soil tight enough so that the skimmer
is held in position tightly but not so much as
to distort the sides of the skimmer. When
installing the larger skimmers, it helps to have
someone stand inside the skimmer during
the backll process to keep the skimmer from
moving while you are packing the dirt around it.
Attach Rubber Liner to Skimmer
Bring the liner up to the skimmer and check
the positioning of the liner against the skimmer.
Use the included liner clips to temporarily hold
the liner to the face of the skimmer. Be sure
the liner follows the contours of the pond and
the face of the skimmer.
It is a good idea to leave a little slack in the
liner where it transitions from the pond ledge
to the face of the skimmer. This will ensure
that the weight of any rockwork and water in
the pond do not pull down on the liner where
it is attached to the skimmer. [For the next
steps you will need: cordless screwdriver
(set to lowest torque), 5/16” nut driver bit, 3”
bit extension, plastic guide nails (included),
skimmer snout (included), silicone (included),
stainless steel self-tapping screws (included),
black vinyl screw caps (included), utility knife
(with new blade), & a clean rag.]
6b
7a
6a
STEP 6
STEP 7
7b
a
b
a
b

Kneel in front of the skimmer and remove the
liner clips and fold the liner back toward you
leaving it rest on your lap. Using the clean
rag wipe down the face of the skimmer. Also,
wipe the surface of the liner that will be coming
in contact with the area you cleaned on the
skimmer box.
Apply a bead of silicone along the sides
and bottom of the opening of the face of the
skimmer. Use one of the two guide holes at
the top corners of the opening as the starting
point and begin by running your bead straight
down from that point. The bead of silicone
should be about an inch out from the edge of
the opening; this will position it in-line with the
screws when you attach the skimmer snout.
Bring the liner back up into position against
the face of the skimmer. Hold the liner in
place again with the liner clips to help keep
it from moving around as you prepare to attach
the snout. Gently run your ngers along the
liner over the area you applied the silicone
and atten the bead out slightly. This will help
ensure a more even distribution of the silicone
as you compress it while screwing down
the snout.
Push the guide nails through the guide holes
and liner from the inside of the skimmer (this
will puncture a small hole in the liner). Place
the snout into position by sliding the top corner
holes of the snout over the guide nails. (The
snout should be installed so that the snout
door hinges at the bottom and opens into
the skimmer).
7c
7d
7e
7f
c
d
e
f

While holding the snout in position remove
one of the guide nails and drive the rst screw
into that hole. Keeping the snout in position,
remove the other guide nail and drive a screw
into the second guide hole. With the snout
now held into position by the rst two screws,
continue driving the remaining screws into the
pre-drilled holes around the snout. Be sure to
install screws into all pre-drilled holes to prevent
water from leaking around the snout.
From inside the skimmer use your utility knife
to cut out the liner in the snout area so water
can ow from the pond into the skimmer.
Simply follow the edge of the skimmer opening
with your knife to cut away liner. This works
best with a new, sharp blade. At this time
you can also trim away any excess liner
that extends above the front top edge of
the skimmer box.
Use your remaining silicone to run an
additional bead along the joint inside of the
snout where the skimmer, liner, and snout
come together. Use your nger to smooth
out the excess silicone.
Install Black Screw Caps
Push the black screw caps onto each of the
screw tips on the inside of the skimmer box.
We recommend placing a small dab of silicone
on the end of the screw rst before pushing the
black cap over the screw. This will help keep
the screw caps in place.
7i
8
STEP 8
7g
7h
g
h
i

Install Submersible Pump
(not included)
Screw your pre-assembled pump discharge
assembly into your pump.
Position your pump and discharge assembly
in the back chamber of the skimmer so that
the top of the discharge assembly faces your
chosen discharge hole. Bring the exible
pipe into the skimmer through the discharge
hole/UniSeal and attach it to your discharge
assembly.
Run the pump power cord over to the
power source and position the cord so that
it transitions out of the skimmer at the cord
notch; this will allow the Natural Landscape
Lid to sit ush on the skimmer.
Finishing Touches
Slide the mechanical media mat and mat holder
into position.
Slide the black mesh skimmer net into position.
During normal operation the skimmer net will
remove larger leaves and debris while the mat
will remove the smaller particles allowing the
clean water to ow into the pump chamber
area where it can be re-circulated back to
the pond, preferably via the appropriately
sized Blue Thumb Biological Waterfall Filter.
Place the Natural Landscape Lid on top of
the skimmer to disguise the skimmer within
the landscape.
9a
9b
9c
STEP 9
STEP 10
10c
10b
10a
a
b
c
a
b
c

www.bluethumbponds.com
Facebook“f ” Logo CMYK/ .ai Facebook“f ” Logo CMYK/ .ai
When necessary remove and clean the net
and mat located in the skimmer. If the water
level, where the pump is located, is lower than
the water level in the pond than the skimmer mat
and net need to be cleaned. This typically needs
to be done every 10-14 days but will vary depending
on the amount of debris falling into the pond, sh
load, and feeding regimen.
Winter Maintenance: Remove pump in climates
that have prolonged freezing periods, then store
the pump in a bucket of water where it can not
freeze. This will help keep the pump seals from
drying out. Rinse out your media mat and net and
store for the winter.
Usually once per year you should remove the
lter media located in your waterfall box and clean
thoroughly to remove the debris that has collected
over time. This should only be done when water
temperatures are coldest or below 50 degrees.
Clean and rinse the media using water collected
from the pond when possible. Chlorinated tap water
can kill the benecial bacteria living on the media.
If you are not using the Blue Thumb Automatic
Fill Valve then you will need to occassionally
replace any evaporated water. This can be done
using a garden hose. If you are using tap water
that contains chlorine and you have sh then be
sure to add Blue Thumb’s Purify to the pond as
you add water. Add water until the water level
reaches to within 3/4” - 1” below the opening of
the skimmer box.
Reconnect your pump and re-install any media that
was removed for winter storage. It is generally a
good idea to drain the pond and clean any debris
that has accumulated out each spring.
SKIMMER MAINTENANCE
WATERFALL BOX MAINTENANCE
EVAPORATION
SPRING START-UP
For use with:
#PB1199
#PB1137
#PB1144
Table of contents
Popular Swimming Pool Filter manuals by other brands

Deltec
Deltec MC 500 Operating instructions and spare parts list

Procopi
Procopi MAGIC GTi-400 Installation and operating instructions

Hayward
Hayward S210SV owner's guide

Pentair
Pentair BERMUDA GUNITE SKIMMER Design installation and user guide

PoolRite
PoolRite ENDURO Chlor SC25-TS owner's manual

Fox
Fox GALAXY Digital 60 Installation and operation manual