Blue Torrent Sand Shark User manual

10475
INCLUDES BASE FOR FILTER AND PUMP
TOOLS
REQUIRED
•Phillips head screwdriver
•Flat head screwdriver
•O-ring lube
SAND SHARK
UNIVERSAL
INSTRUCTIONS

PARTS FOR SAND FILTER
FILTER
TANK
CLOSURE CLAMP STAND PIPE VALVE O-RING
4 WAY VALVE
NOTE
See breakdown on following page for model specific part lists.
DRAIN PLUG
HOSE CLAMPS (6)
STRAIGHT FITTING (3)
TEFLON TAPE
SHORT HOSE (1) LONG HOSE (2)
BASE
2
PRESSURE GAUGE
HOSE ADAPTERS (2)

3
FILTER PARTS BY MODEL
PART #
MODEL # DESCRIPTION QTY
1 AC 85685 Filter Base 1
2 AC 83402 Drain Plug 1
3 AC 83380 Stand Pipe 1
4 AC 83399 Filter Tank 1
5 AC 83348 O-Ring 1
6 AC 83364 Flange Clamp 1
7 AC 83321 4 Way Valve 1
8 AC 84514 Bolt Kit 1
9 BS 40061 Straight Fitting 3
10 BS 35815 Clamps 6
11 AC 52221 1.25” x 24” Hose 1
12 BS10014 1.5”x3’Hose 2
13 AC 76473 Rear Mount Pressure Gauge 1

STEP 1
•Remove the valve from the box and place it to the side until instructed to attach it.
ASSEMBLY INSTRUCTIONS
FOR SAND FILTER
•Inside the tank you will find the standpipe and
a plastic bag containing various parts, remove
from tank and set aside.
NOTE
Filter may be partially assembled; however, nothing has been
properly tightened. DO NOT operate filter system without
completing assembly instructions.
4

STEP 2
ATTACHING THE DRAIN ASSEMBLY
If drain assembly is all together, take it apart.
Take one rubber gasket and put over threaded
part of the drain assembly. Flat part of gasket
must be flush against sealing plate.
From inside the tank insert drain
assembly through hole in bottom of
tank, you will see the threaded part on
the outside of the tank.
5
Place other gasket on threaded part of the
drain assembly that is outside of tank flat
side to the tank.
Place locking nut on threaded part and
thread until snug. Hand tighten only. Be
sure to hold drain assembly from inside
while tightening locking nut.
1
2
3
4
Place drain cap over threaded port on outside of
tank. Hand tighten only.
5

STEP 3
•The filter and pump should be attached to the base prior to filling the filter with sand as it
will be difficult to maneuver after the tank is full.
A. CRADLE STYLE MOUNT
•Pumps with cradles located directly under the motor should be aligned
with the 4 holes that match up to the cradle. This type of mount will
require the use of four mounting bolts and nuts from the hardware
supplied with the base.
•Place nuts underneath the base, in
the properly aligned hole
6
•Bolt the housing of the pump through the base
and tighten.
•Cover the threads of each straight fitting with
teflon tape and thread one fitting into the front of
the motor and one fitting to the top of the motor.
•Attach the 1 1/4” hose with a clamp on each
fitting.

STEP 4
•Before filling tank with sand, place nub on bottom
of tank into notched out piece of the base, twist to
the right till snug.
7
NOTE
Sand should be filled no less than 1/2 way up the tank and no more
than 3/4. Over-filling will result in permanent damage to your
Filter System.
•Add filter grade sand (sold separately) to
filter tank around standpipe.
12” Tank ...... 50 Lbs.
•Remove plastic protector and fill tank with water until the tank is filled right below
opening of standpipe.
NOTE
NEVER FILL SAND TANK MORE THAN 1/2 TO 3/4 OF THE
WAY.
•Place standpipe inside the filter, cover standpipe
with the round plastic standpipe protector to
prevent sand from entering standpipe.

STEP 4 — CONTINUED
•Lubricate with o-ring lube to ensure proper seal
on tank.(O-Ring lube not included)
•Push o-ring against the lip of the valve.
It MUST sit flat against the lip to protect from
leaking at the valve.
•Clean off any sand or debris on top lip of filter and
position valve over the opening of the standpipe.
•Valve will slide ONTO standpipe when positioned
properly in tank (as shown). Push down firmly to make
sure valve slides on all the way.
NOTE
You CANNOT pull standpipe up to secure the valve.
Pulling up can damage the hub and cause sand to get
sent back with water flow to pool.
8
•Place valve so that pump port is directly
over the pump.

STEP 4 — CONTINUED
•Make sure that the screws of the clamp are lined up with the
seams of the tank. Tighten two screws on clamp a little at a time.
Alternating from side to side so that both sides are tightened
equally. Failure to follow these instructions will result in
a leak at the clamp.
•Cover threads of pressure gauge with Teflon tape.
Remove temporary plug from valve and thread
gauge into opening.
9
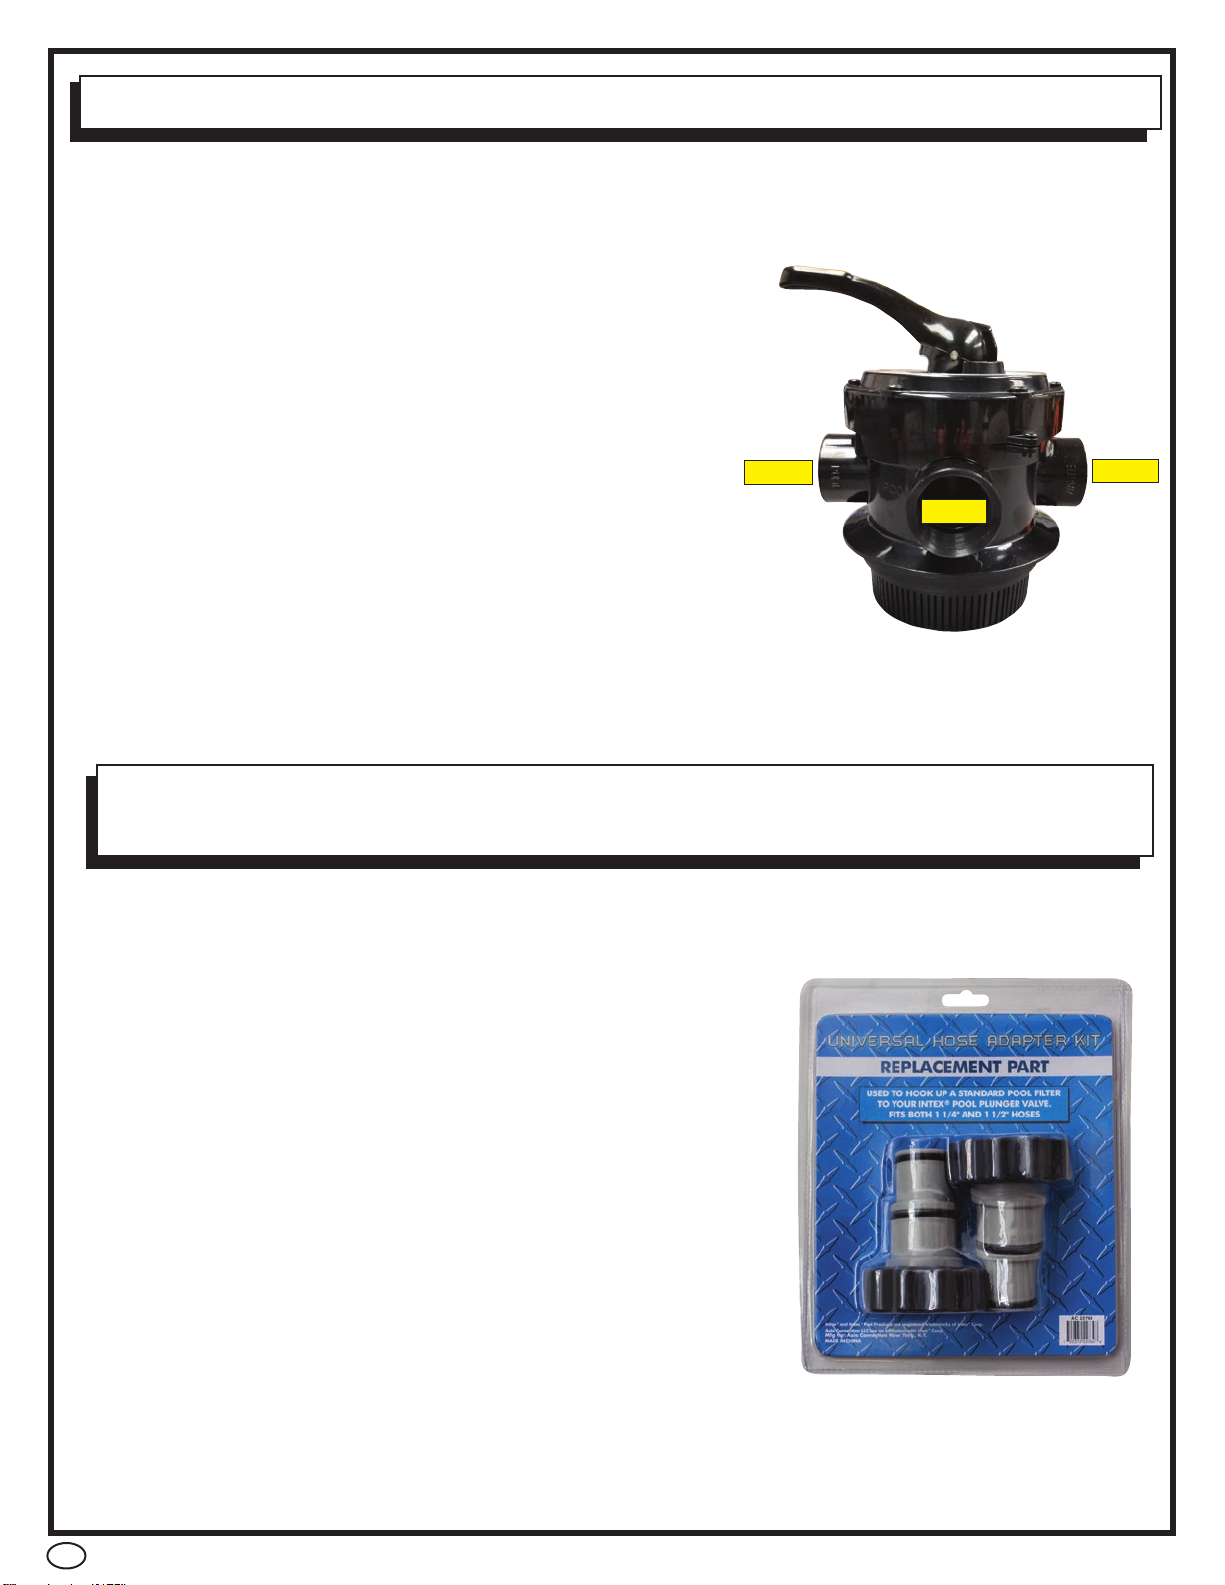
STEP 5
•The valve ports are labeled “RETURN”, “POOL” and
“WASTE” with raised letters next to or on the the openings.
•Attach one long hose to the bottom of the thru-wall skimmer
and to the front of the pump with hose clamps on each
fitting.
•Attach second long hose to the fitting on the “RETURN”
and to the pools return fitting with hose clamps on each
fitting.
•“WASTE” port will accept a standard fitting and a backwash
hose
(sold separately) which will be used during maintenance.
•Check drain plug at bottom of filter to ensure that it is
screwed on tight.
•Once valve is in place, hold clamp as shown and
position clamp around lip of filter and over edge
of valve. 2 long screws and nuts are provided
to put clamp together.
•The clamp should sit flat around the lip of the tank
and valve. If it is not sitting flat the clamp will leak.
HOSE CONNECTIONS FOR STANDARD ABOVEGROUND POOLS
HOSE CONNECTIONS FOR TEMPORARY ABOVEGROUND POOLS
AC 124EZ5G and FILTERS EQUIPPED WITH AC 22764 FITTINGS
10
1. Take the short hose. Place a clamp onto each end of the short
hose. Leave loose. Slide one end of the short hose over the
exhaust port of you pump. This is the port opening at the top
of the pump not the one in front of the pump. Once in place
tighten that clamp. Take the other end of the short hose and
slide it onto the port of the multiport valve labeled PUMP.
This port is identified by the word “PUMP” embossed on the
side of the port on the vale itself. Tighten the clamp.
2. Take one of the long hoses. Place a clamp onto each end of
the hose. Again leave them loose. Slide one end of the hose
over the intake port of the pump. This is the port at the very
front of the pump. Tighten the clamp. Take the other end of
the6’hoseandslideitovertheportofthepoolsthruwall
skimmer.Once in place tighten the clamp.
3. Take the remaining long hose. Place a clamp over each end
of the hose, again loosely. Slide one end of the hose over the
port on the multiport valve labeled “POOL”. The word “POOL
“is embossed next to the correct port on the valve. Once in
placetightenclamp.Taketheotherendofthe6’hoseand
slide it over the pools return fitting connection on the outside
of the pool wall. Once in place tighten the clamp.
1. Take the short hose. Place a clamp onto each end of the short
hose. Leave loose. Slide one end of the short hose over the
exhaust port of you pump. This is the port opening at the top of
the pump not the one in front of the pump. Once in place tighten
that clamp. Take the other end of the short hose and slide it onto
the port of the multiport valve labeled PUMP. This port is identified
by the word “PUMP” embossed on the side of the port on the vale
itself. Tighten the clamp.
2. Take one of the long hoses. Place a clamp onto each end of the
hose. Again leave them loose. Slide one end of the hose over the
intake port of the pump. This is the port at the very front of the
pump.Tightentheclamp.Taketheotherendofthe6’hoseand
slide one of the AC 22764 fittings onto the end and tighten the
clamp. Attach the fitting (now connected to the hose) to the
suction/intake port of your temporary pool. Hand tighten fitting.
3. Take the remaining long hose. Place a clamp over each end of
the hose, again loosely. Slide one end of the hose over the port
on the multiport valve labeled “POOL”. The word “POOL”
is embossed next to the correct port on the valve. Once in place
tighten clamp. Take the other end of the long hose and slide the
other AC 22764 fitting into the end and tighten the clamp. Attach
the fitting to the pools return port on the outside of the pool wall.
Hand tighten fitting.
AC 22764
PUMP
POOL WASTE
PUMP

11
OPERATING YOUR FILTER
NOTE
Your filter cannot be run if the water is not at the proper level in the
pool. Running the filter without water can cause serious damage to
your pump and filter.
NOTE
NEVER move selector handle while pump is on. Pump MUST be
switched off to change the position of the valve. Failure to comply
will cause damage to your valve and is not covered by WARRANTY.
•Prime filter prior to starting up filter system. DO NOT turn motor on until system has been primed,
you can damage your pump.
•Make sure water in pool is up to middle of skimmer(s) and that there is nothing blocking water
flow from return(s) and skimmer(s) (i.e. plug, plate).
•Push down selector handle on valve and turn to notch labeled BACKWASH. Let go of handle
and the valve is now in backwash position. Make sure backwash hose (sold separately) is
attached to the waste port so water will not spray all over you once pump is started.
•Remove lid of strainer basket on pump (if applicable) and fill with water. Skimmer and return lines
should be filled with water as well (when water level is in proper place in pool this will happen
naturally).
•Place cover back on basket and plug in/switch on pump. When pump starts up, water will come
out through the backwash hose. If the pump is properly primed, the water in the strainer basket
will fill completely and air pocket will be eliminated.
•Repeat above until all air is purged from the system then turn off the pump. If this does not get
air out of system, double check all connections to make sure they are properly tightened and try
again.
•To use filter, with pump OFF, push down selector handle on valve and turn to notch labeled FILTER.
•Connect pump to power to start filter operation.
•Note pressure gauge reading at this time.
•When pressure through return fades and pressure gauge reads 5 psi above starting pressure,
you will need to backwash the filter system to remove debris.
•Turn pump off before moving selector to BACKWASH position. Once in backwash, turn pump
back on.
•Water will come out through the waste port, so position backwash hose where you would like
water to run out.
•NEVER backwash for longer than ONE MINUTE at a time. Backwashing longer than one minute
will cause sandblasting of internal components and can lead to damage of standpipe and/or
hub and VOIDS WARRANTY.
•Turn pump off and move selector to RINSE position. Rinse will allow water to flow through to
clear out the lines and prevent a puff of sand or debris back into the pool after backwashing.
•Rinse for approximately 15 seconds and turn off pump again. Move selector back to filter and
turn pump back on. You are now filtering water.

TROUBLESHOOTING
WINTERIZING
•At the end of the season once you disconnect filter system, remove the valve from the tank. Valve
selector handle should be positioned BETWEEN any of the notches to allow for air ventilation
through the valve to protect from cracking.
•Remove drain plug from bottom of sand tank to drain water out of the filter tank. Keep this plug off
for the winter to allow any potential water build-up to escape from the tank.
•Empty ALL sand from the filter system and dispose of as it is recommended to replace sand
EACH season.
•Rinse out inside of tank and air dry. Remove standpipe from tank.
•Store tank in an area where it will be protected from the elements and keep valve and tank stored
APART to protect from condensation forming and causing cracks in the tank or valve.
•Run hose water through pump to rinse out and store in a warm, dry place for the winter.
NOTE
Failure to winterize your filter properly may result in damage to the
tank and pump which is NOT covered under any warranty.
1. Check skimmer and pump
strainer baskets for debris.
2. Check for restrictions in intake
and discharge lines.
3. Check for air leak in intake
line (indicated by bubbles
returning to pool).
4. Backwash filter.
5. Bring sand level in filter down
to 1/2 full.
LOW
WATER FLOW SHORT
FILTER CYCLES POOL WATER
WON’T CLEAR UP
1. Check for algae in pool and
superchlorinate as required.
2. Be sure chlorine and pH levels
are in proper range.
Adjust as required.
3. Check surface of filter sand for
crusting or caking. Remove
1” of sand if necessary.
4. Check hair and lint basket on
pump for possible air leak,
lubricate basket lid O-Ring as
necessary.
1. Check chlorine, pH and total
alkalinity levels and adjust as
required.
2. Be sure flow rate through filter
is sufficient.
3. Operate filter for longer
periods.
4. Be sure valve is set on
“Filter” position.
5. Be sure sand is between
1/2 and 3/4 full in tank.
12

Blue Torrent warrants its Pumps and Filters to be free of defects in
material and/or workmanship for a period of one year from the original date of
purchase and/or installation.
WARRANTY CLAIM EXCLUSIONS:
• Damage caused by improper installation as specified in owner’s manual
• Damage caused by improper handling
• Damage due to misuse, abuse and/or failure to operate item per owner’s
manual
• Damage caused by improper water chemistry
• Damage caused by improper winterization of equipment
• Damage caused by not using original Blue Torrent replacement parts
• Damage caused by improper wiring or use of extension cords
• Accidental damage, fire, acts of God or other circumstances outside of
Blue Torrent’s control
Please return any and all defective items to your local authorized
Blue Torrent dealer for inspection.
The customer is responsible for all shipping charges to and from the nearest
Factory Warranty Center. For more information. Please visit www.btwarranty.com
Should a defect in material or workmanship appear the product will be repaired
or replaced at our discretion. Neither Blue Torrent nor any authorized dealer
is responsible for any charges related to the installation of the new item or part.
Nor are they responsible for any incidental charges incurred including, but not
limited to, water, chemicals, landscaping or any other associated expenses.
NOTE:
• Customer must retain the original sales invoice as proof of purchase along
with the installers invoice (to establish date of installation)
• Commercial facilities are not covered by warranty
Blue Torrent manufactures all of its products using cutting-edge technology
with the best materials and workmanship available.
Blue Torrent’s PUMPS AND FILTERS are warranteed as follows:
Mfg. by Asia Connection LLC, NY
1 YEAR LIMITED WARRANTY
Table of contents
Popular Water Filtration System manuals by other brands


Filtreco
Filtreco Drum 100 user manual

Atlas Filtri
Atlas Filtri Micro Instructions for installation, use and maintenance manual

Spectra Watermakers
Spectra Watermakers Catalina 340 Z Installation and operating manual

GE
GE RPWFE quick start guide

aeropur
aeropur ecomax 100 operating instructions

Highland Tank
Highland Tank Ultra Clear Service manual

 RO Dia II HT operating instructions")


