bluelab PeriPod M3 Guide


English
2
1.0 Introduction & Overview:
1.1 Features 3
1.2 What’s in the box? 3
1.3 How the Bluelab®PeriPod™4
works
2.0 Safety Precautions:
2.1 General safety precautions 5
2.2 Chemical safety precautions 5
3.0 Installing the Bluelab®PeriPod™:
3.1 Mounting the Bluelab®6
PeriPod™
3.2 Setting up the inlet and 6
outlet tubes
3.3 Bluelab®PeriPod™ 8
connection panel
3.4 Connecting to a Bluelab® 8
Pro Controller
3.5 Connect power adapter 8
4.0 Set up and Operation:
4.1 Manual pump priming 9
4.2 Calibrating nutrient pumps 10
5.0 Multi-part Nutrient Dosing
with Bluelab®PeriPods™
5.1 Reservoir size 13
5.2 Starting with multi-part 14
nutrient dosing
5.2.1 Setting up the PeriPods 14
5.2.2 Setting up Connect 15
5.2.3 Calculating the on time 16
with multi-part nutrients
6.0 Maintenance, Troubleshooting
& Specications:
6.1 Maintenance 17
6.2 Firmware upgrading 17
6.3 Troubleshooting guide 17
6.4 Technical specications 19
6.5 Material specication 19
for tubing
6.6 pH adjuster compatibility 19
for tubing
7.0 Accessories, Parts & Guarantee:
20
21
Bluelab®accessories & parts
Bluelab®limited warranty
Contact details 22
page page
Contents
PLEASE FOLLOW THE MANUAL STEP BY STEP BEFORE FIRST USE

English
3
1.2 What’s in the box?
Please check and verify the box contents match the below list:
1.1 Features
Bluelab®PeriPod™M3 & M4 Bluelab®PeriPod™L3
3 or 4 120ml/min peristaltic pumps which
can be set to dose pH adjuster or nutrient
stock solutions.
3 x 1200ml/min peristaltic pumps which can be set
to dose pH adjuster or nutrient stock solutions.
Rugged wall mount design.
Individual pump calibration and pump priming.
4 metres / 13 feet of acid / alkaline resistant food grade tubing for dosing pH correction solution.
3x 4 metres / 13 feet per pump of tubing for dosing nutrient stock solution.
Replaceable peristaltic pumps and tubing.
Compatible with most modern growing systems including recirculating and drain to waste systems.
Compatible with Bluelab®Pro ControllerTM and most Bluelab®Dosetronic™models1.
1
Bluelab
®
PeriPod
™
is compatible with Bluelab
®
Dosetronic
™
s manufactured after 2010. Contact Bluelab
®
Customer Support
for more information.
Bluelab®PeriPod™L3Bluelab®PeriPod™M3
24V DC 2Amp
power supply
24V DC 2Amp
power supply
(24V DC 5A on limited stock)
Dosing
cable
Dosing cable4 metres / 13 feet
pH Tubing
4 metres / 13 feet
pH Tubing
4 metres / 13 feet
Nutrient Tubing
per pump
3x
4 metres / 13 feet
Nutrient Tubing
1.0 Introduction & Overview
Mounting
Screws
Mounting
Screws
Inlet Tube Cap - ts on
Bluelab®pH Up or Down
500ml or 1Litre Bottles
112 mm
4.4 in
M3: 220 mm / 8.7 in
M4: 285 mm / 11.3 in
154 mm
6 in
392 mm / 15.4 in
Pump 1 is set as pH by default. All pumps can be set as
pH or nutrient in Bluelab®Connect.
Pump 1 is set as pH by default. All pumps can be set
as pH or nutrient in Bluelab®Connect.

English
4
1.3 How the Bluelab®PeriPod™works & installation example
The Bluelab®PeriPod™is designed to be connected to a Bluelab®Pro Controller with inlet tubes
placed into pH adjuster and nutrient stock solutions, and the outlet tubes placed into the reservoir.
The Bluelab®PeriPod™can be integrated into a variety of growing systems including but not limited to
recirculating and drain to waste systems. Up to three M3 or M4 PeriPods™can be connected together
(max. 12 pumps) to dose multi-part nutrients. They are not designed for use as an inline doser.
PeriPod M3
Dosing
The Bluelab®PeriPod™responds to electrical dosing 'triggers'
received from the Bluelab®Pro Controller, and pumps the
pH adjuster and nutrient stock solutions into the reservoir as
needed through peristaltic pumps.
Peristaltic pumps work by compressing a exible tube between
rollers and the inside wall of the pump housing. When these
rollers are rotated, liquid is squeezed through the tube and
pushed out of the pump outlet. At the same time, as the
rollers move past a section of tube, the tube opens, creating a
suction that pulls liquid into the pump inlet for the next roller to
squeeze out of the outlet. Chemical resistant tube allows acids
and alkalis to be pumped direct from their containers, through
the pumps, and into the nutrient reservoir.
The amount of liquid that is pumped through a peristaltic pump can vary due to a number of factors
including:
• Age and condition of peristaltic tubing.
• Pump mounting height and tube length.
• Viscosity and specic gravity of the liquid being pumped.
• Environmental temperature.
To counteract these variations each EC peristaltic pump can be individually calibrated to help
ensure the desired amount of solution is dosed relative to that being dosed by the other EC
pumps in the Bluelab®PeriPod™ chain.
pH adjuster and nutrient stock solutions. Up to three M series
PeriPods™ dosing up to 12 nutrient parts can be connected
pH ECA ECB
Outlet dosing
tubes
seperate
Inlet dosing
tubes
Reservoir / tank
RECOMMENDED
To avoid precipitation of nutrients, tubes
into reservoir should be separated.
pH Nutrient A Nutrient B
(Default settings -
Can be set as pH
or nutrient pumps
in Connect)

English
5
2.0 Safety Precautions
IMPORTANT
BEFORE installation and rst use - read this section. To ensure safe setup and operation of
the Bluelab®PeriPod™follow all precautions in this manual. All the safety instructions and/or
warnings given throughout this manual relate to the specic features of the Bluelab®PeriPod™.
2.1 General safety precautions
Follow all generally accepted safety practices and procedures required when working with and
around electricity, including the following;
WARNING
•This product is designed for pumping liquids only.
•Never use in or around ammable gases. Doing so creates risk of smoke, re, or explosion.
•Never use a voltage that is different from that specied on the product.
•Do not touch the pump motor when removing it shortly after running. The motors get hot
when operating and could cause serious burns.
•Never take the product apart or modify it except as described in this manual.
•Never leave any dangerous liquids inside the tubing when replacing or disconnecting tubing or
pumps. Remaining dangerous liquids may cause serious injury. Always ush with water.
•Remove dangerous liquids from pumps and tubing when storing, or if product is not to be
used for extended periods.
•Always ush tubing with water before changing from one dosing solution to another.
CAUTION
•Peristaltic tubing can degrade in certain conditions of use. Always check for signs of
degradation and leaks, and replace tubing as required to ensure safe operation.
2.2 Chemical safety precautions
Bluelab®recommend that you DO NOT handle concentrated acids or alkalis, however if you do,
ensure that ALL generally accepted safety practices and procedures required when working with
acidic and alkaline solutions are followed.
WARNING
•Follow all Manufacturer's storage, safety instructions and precautions when handling
chemicals.
•ALWAYS neutralise acids and alkalis before cleaning up a spill or disposing of them.

English
6
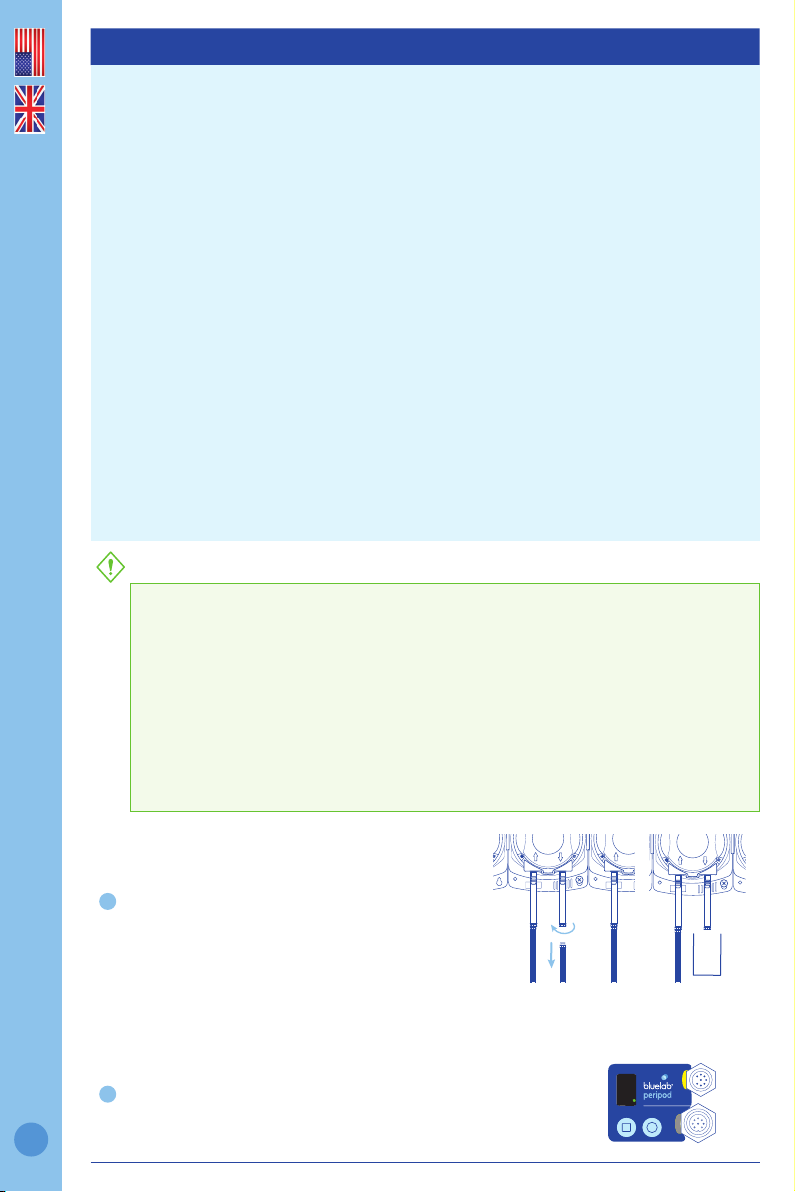
3.2 Setting up the inlet & outlet tubes
Straighten the dosing tubes before connecting. Bend tube in the opposite direction to its curve
and straighten by running through closed ngers.
Each 4 metre / 13 foot length of tube requires cutting to be used as both inlet and outlet
dosing tubes with connectors. Before cutting, ensure there is enough length for each. Cut the
tubing on a 45° angle. This is important to avoid the tube becoming blocked due to suction at
the bottom of the adjuster and nutrient solution bottles.
CAUTION
•Ensure you use the pH dosing tube with the pH adjuster solution. pH adjuster solution could
damage nutrient tubing.
Set up the pH inlet dosing tube.
M Version: Insert the pH dosing
tube connector into the LEFT pH
pump tube.
L Version: Push one end of the
pH dosing tube over the LEFT pH
pump barb.
3.0 Installing the Bluelab®PeriPod™
3.1 Mounting the Bluelab®PeriPod™
Select a suitable location that is:
• Higher than both the reservoir and the pH and nutrient
solutions. This will avoid siphoning from one to the
other in the event of peristaltic tube failure.
• NOT directly above the reservoir. This will avoid
leaked solution entering the reservoir in the event of
peristaltic tube failure.
• Less than 1.5m from an electrical mains outlet.
• Less than 400mm from the next PeriPod, if being used
in a chain.
• Less than 2m from the reservoir so that pump outlet
tubing can reach easily.
• Ideally less than 1.5m above pH adjuster and nutrient
stock solutions. This will ensure pump suction is
adequate to pump solutions. For heavy or viscous
solutions a lower mounting height may be required.
CAUTION
•Direct sunlight may result in increased damage
to tubing and plastic components of the
Bluelab®PeriPod™.
Attach to the wall by securing the screws through the
mounting holes in the top and bottom of the case. It is
recommended to place screws as indicated in the diagram.
1
2
1
Inlet ‘’
arrow on
pump cover
Inlet ‘’
arrow on
pump cover
Connector
Left pump
tube Left pump
barb
Inlet dosing
tube
Inlet dosing
tube
M Version L Version
Mounting holes at bottom
Recommended mounting conguration:
Mounting holes at top

English
7
3.2 Setting up the inlet & outlet tubes continued
Ensure the inlet dosing tube will
reach the bottom of the pH adjuster
container. Cut the inlet dosing tube
to desired length.
Set up the pH outlet dosing tube.
M Version: use the remaining
dosing tube with the connector,
and insert the connector into the
RIGHT pH pump tube.
L Version: Use the remaining dosing
tube and push it onto the RIGHT pH
pump barb.
Cut the outlet dosing tube so that
the tube sits above the maximum
solution level of the reservoir. The
pH adjuster and nutrient solutions
must drip into the nutrient reservoir.
Note: If the outlet dosing tubes are
immersed in the reservoir it could
create a siphon. This could possibly
cause the solutions to ow into the
reservoir or vice versa.
To set up nutrient tubing and pumps, repeat steps 1-4 using the darker nutrient solution
tubing. For the L Version: Insert and twist each connector of the nutrient dosing tube into each
nutrient pump tube connector.
Note: If pH adjuster or nutrient stock solution being used has solid particles suspended in
it, then a sieve lter should be placed on the end of the tube to prevent tube blockages and
potential damage to the peristaltic pumps.
A suitable sieve lter should suit tubing with 3mm or 1/8in ID for the M version, 8mm or 1/3in
ID for the L version. The lter should be made from a material that is compatible with the pH
adjuster or nutrient stock solution being used.
2
3
4
5
Dosing tube reaches
bottom of container
Cut tubing on 45° angle
pH
adjuster
Nutrient solution
reservoir / tank
Inlet dosing
tube
pH
pump
Nutrient
pumps
Outlet dosing
tube
pH
adjuster
Connector
Outlet ‘’ arrow
on pump cover
Right pump tube
Right pump barb
Outlet dosing tube
Nutrient pumps
Inlet dosing tubes
Outlet dosing tubes
M Version
M Version
L Version
L Version

English
8
3.3 Bluelab®PeriPod™ connection panel
The interface panel is located on the right hand side of the Bluelab®PeriPod™and provides the
user interface to access its features.
3.4 Connecting to a Bluelab®Pro Controller
For ease of use Bluelab®dosing cables are colour coded. Each end matchs up with colours on
the connector panel of the Bluelab®PeriPod™.
To connect the Bluelab®PeriPod™to
the Bluelab®Pro Controller™, align
pins and push the connector onto
the GREY connector.
Once pushed in turn the threaded
collar of the connector clockwise to
secure the connector in place.
Then connect the other end
(YELLOW end) to the doser
connector of the Bluelab®
Pro Controller.
Connect the next PeriPod in the
chain (if used) to the upper YELLOW
connector of the previous PeriPod. Line up connector pins, push and turn
Grey connector
(To the Pro Controller
Doser connector)
Yellow connector
(To the next PeriPod
in the chain)
LED display
screen
Select / Save button
Start / Stop button
1
2
3
Doser
connector
Grey
connector
3.5 Connect power adapter
Connect the power adaptor into the power
receptacle in the base of the Bluelab®PeriPod™.
Plug the adaptor into the mains power supply.
Switch on the power adaptor at the mains. The
Bluelab®PeriPod™will complete a display test
sequence. A GREEN dot in the lower right hand
corner of the display indicates that the Bluelab®
PeriPod™is powered ON, in stand-by mode and
ready to dose.
1
2
connect power
adaptor
stand-by
mode

English
9
4.1 Manual pump priming
It is recommended that after setup and before automatic dosing begins all pumps are manually
primed with the solutions that they will dose during normal operation. This is done for each pump
individually by following the process below.
Ensure that all dosing tubes are correctly
installed, see Section 3.2, and the
Bluelab®Pro Controller (if connected) is
in monitor mode.
Short press the Select / Save button ''
to enter pump priming mode.
The LED display will show the letter P
to indicate that priming mode has been
entered then either a 1, 2 or a 3 will
be displayed to indicate which pump is
selected.
Change the selected pump by short
pressing the Select / Save button ''.
This will change the displayed number
between 1, 2 and 3.
To begin priming the selected pump
short press the Start / Stop button ''.
The pump will begin running and the
LED display will show a DOT in the
bottom right corner (along with the pump
number) to indicate that the pump is
being primed.
Note: As a safety precaution the pump
will stop after around two minutes,
and return to standby mode. If further
priming is required, simply re-enter
priming mode, select the pump again,
and start priming as before.
Once the pump is primed short press
the Select / Save button ''to return to
standby mode.
To prime another pump repeat steps 1
to 5 above.
Note: The pump can be paused and
restarted at any time during priming by
short pressing the Start/Stop button ''.
1
2
3
4
5
6
M Version
M Version pump selection
L Version
Priming
mode
Pump to be primed
Change pump
Pump being primed
Press Select /
Save button ''
Press Select /
Save button ''
Press '' selection
button once pump
is primed
Press Start / Stop
button ''
4.0 Set up and operation
1 2 3
L Version pump selection
1 2 3
English
10
4.2 Calibrating nutrient pumps
Bluelab®recommends that pumps are calibrated on initial set up, whenever it is observed that
different quantities of solution are being dosed, when changing nutrient type, and every 30 days.
A pump set as a pH pump cannot be calibrated.
Dose rates of peristaltic pumps can vary for many reasons, including:
• Temperature of solution.
• Temperature of operating environment.
• Vertical mounting distance (height) from stock solutions.
• Age and condition of peristaltic tubes.
• Age and condition of pumps.
• Specic gravity and viscosity of stock solutions.
For these reasons the Bluelab®PeriPod™has a pump calibration feature that is designed to reduce
these effects by providing a user calibration for each pump. Pump calibration is not required,
however it does improve the dosing accuracy of each pump relative to the others, which is important
when accurate dosing of several nutrient stock solutions into the reservoir is required.
The pump calibration is a simple process where equal volumes of solution are pumped through
each nutrient pump. The time taken to deliver this volume of solution is measured by the Bluelab®
PeriPod™which will then adjust each pump’s running time during dosing in order to deliver the same
quantity of solution from each pump.
To complete calibration you will need; an empty transparent container that is able to hold
approximately 300ml / 10oz for M versions, or 3000ml / 100oz for L versions, a marker pen, and a
stop watch or similar.
CAUTION
•If calibrating pumps, ensure ALL pumps in the PeriPod™chain are calibrated.
•To ensure calibration accuracy, the solution used during the calibration of each pump MUST
be the same solution that will be dosed by that specic pump during normal operation.
•Pump calibration should be done with the Bluelab®PeriPod™and inlet tubing fully installed
and primed as it would be during normal operation.
•The maximum running time for a pump during calibration is 3 minutes. If this time is
exceeded the calibration will fail (the PeriPod will display “F” then “A”,”I,” “L”, leave calibration
mode and return to standby). It will not save calibration for that pump. If a pump takes longer
than three minutes to deliver the required amount of solution it is likely there is a problem
with the pump. See Section 5.3 Troubleshooting.
With the Bluelab®PeriPod™and dose tubing fully
installed and primed, and the Bluelab®Pro Controller
in monitor mode (if connected):
Select the rst nutrient pump to be calibrated, remove
the outlet dosing tube from the pump outlet and place
your empty transparent container underneath the
pump outlet tube so that nutrient pumped through the
pump will ow into the empty transparent container
and NOT into the reservoir.
Note: Carefully remove the outlet dosing tube from the
connector to remove for M3 version.
Power up the Bluelab®PeriPod™. The LED Display
should show a dot in the lower left hand corner of the
display indicating it is in standby mode.
1
2
Remove outlet
dosing tube
Power up in
standby mode
Put empty container
under pump outlet tube
English
11
4.2 Calibrating nutrient pumps continued
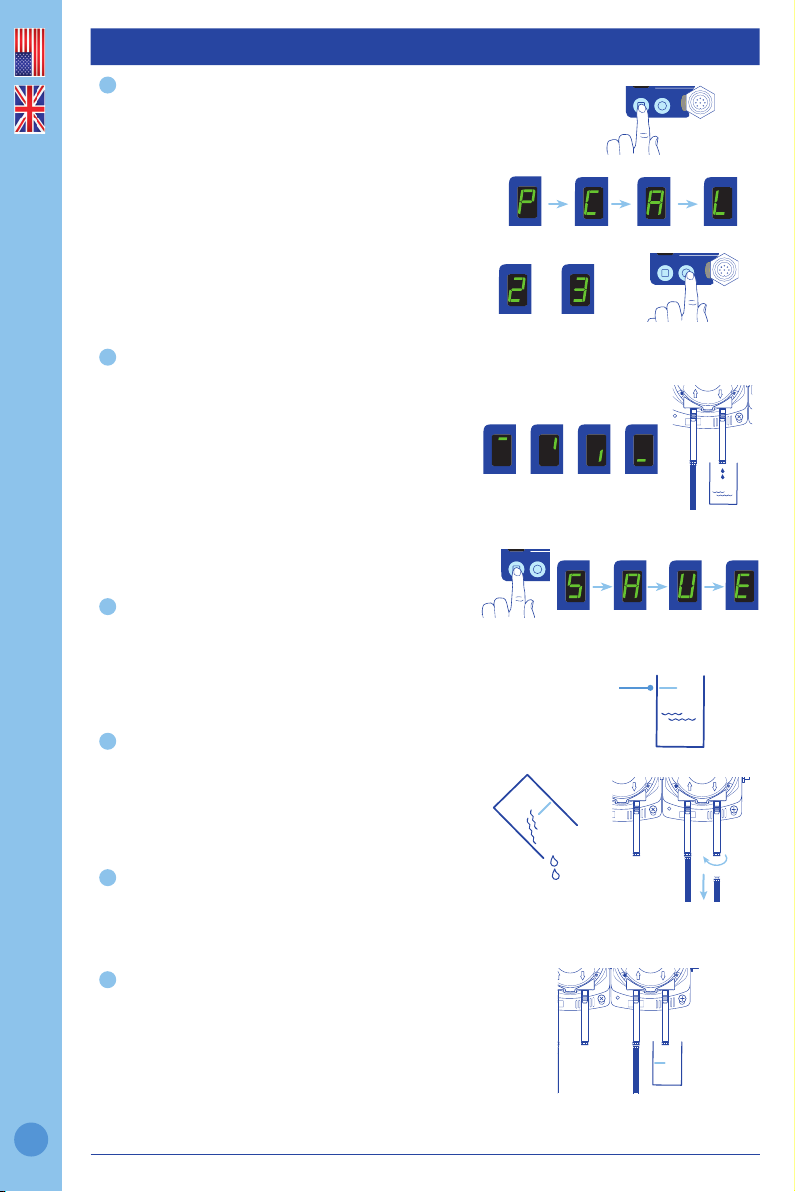
Enter pump calibration mode with a
long press of the Select / Save button ''
(long press = ~2 seconds).
The LED display will initially show the letter P, then C,
A, L, once pump calibration mode has been entered.
A 2 or 3 will be displayed to indicate which pump
will be calibrated.
Note: Press the Select / Save button '' to switch
between pumps 2 or 3 and select the pump you
will calibrate rst. Remember, pH pumps cannot be
calibrated.
To begin calibrating start the stop watch, or note the
time, and short press the Start / Stop button ''.
The pump will begin running and the LED display
will show a rotating bar to indicate that the pump
is running.
Allow the pump to run for approximately two
minutes, then short press the Start / Stop button
again to stop the pump. The LED display will show
a dash.
Press the Start / Stop button '' to save the
calibration for this pump. The LED display will show
S A V E to conrm that the calibration has been
saved.
Take the marker pen and draw a line on the
side of the transparent container to indicate the
solution level within the container. This will be the
reference quantity that all of the other pumps will
be calibrated to.
Empty the transparent container.
Select the second nutrient pump to be calibrated,
remove the outlet dosing tube from the pump
outlet and place your empty transparent container
underneath the pump outlet tube so that nutrient
pumped through the pump will ow into the empty
transparent container and NOT into the reservoir.
Note: Carefully remove the outlet dosing tube from
the connector to remove for M3 version.
4
5
6
Press '' selection button to save calibration
Mark solution
level in container
Press ''
selection button
Indicates pump
being calibrated
OR
Let pump run for 2 minutes
3
Long press ''
selection button
7
8
Remove outlet
dosing tube
Empty the container
Put empty container
under pump outlet tube
English
12
4.2 Calibrating nutrient pumps continued
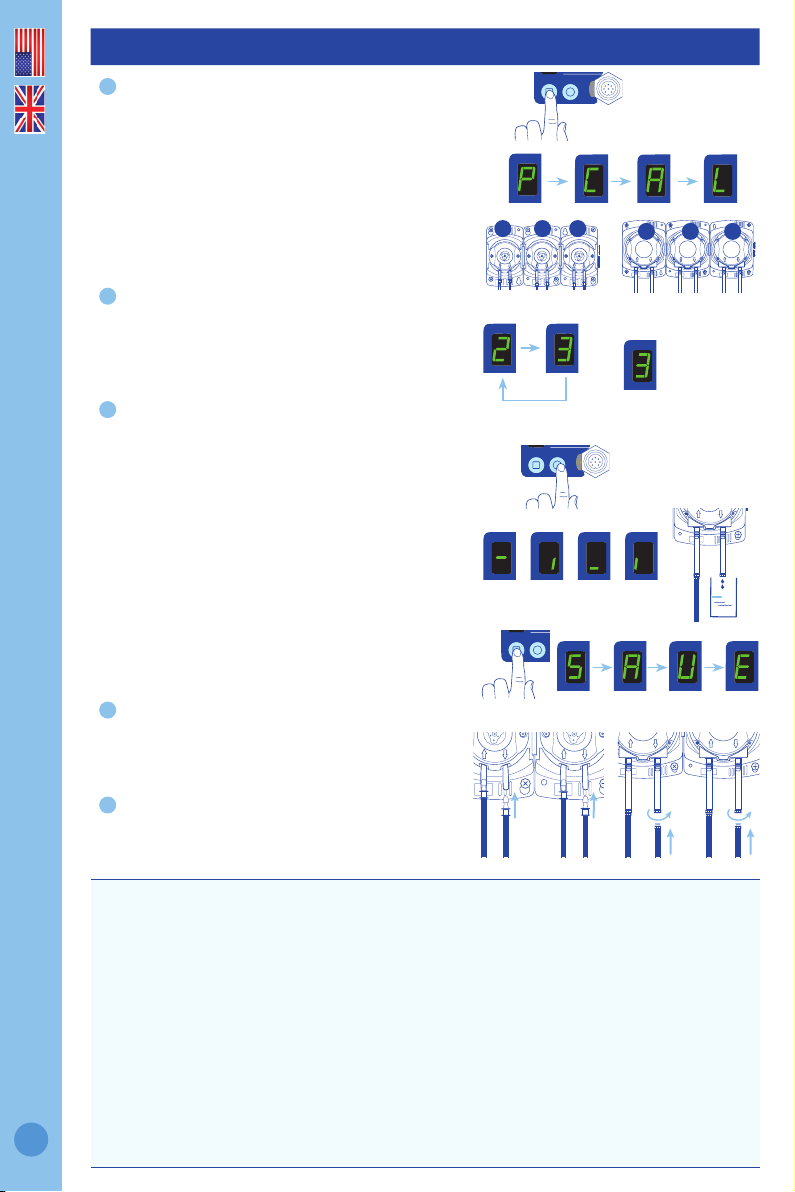
Enter pump calibration mode again with
a long press of the Select / Save button ''
(long press = ~2 seconds).
The LED display will show the letter P, then C, A, L,
once pump calibration mode has been entered.
A 2 or 3 will be displayed to indicate which pump
will be calibrated.
If required, press the Select / Save button ''
to switch to the next pump to be calibrated.
Repeated presses will cycle through all of the
nutrient pumps in that PeriPod.
To begin calibrating the pump short press the
Start / Stop button ''.
The pump will begin running and the LED display
will show a rotating bar to indicate that the pump
is running.
This time stop the pump with a short press of the
Start / Stop button ''once the solution level has
reached the mark made on the container in STEP
6 above. The LED display will show a dash.
Note: The pump can be paused at any time during
calibration by short pressing the Start / Stop
button. Push it again to restart the pump and
continue calibration.
Press the Select / Save button ''to save the
calibration for this pump. The LED display will
show S A V E to conrm that the calibration has
been saved.
When all of the nutrient pumps in the PeriPod
chain have been calibrated, calibration is
complete. Re-attach the nutrient dosing tubes to
the peristaltic pump tubes.
Note:
Pump calibration can be repeated at any time, however it is recommended that calibration is
done at least every 30 days.
Once the rst calibration has been carried out, calibration of any pump can be carried out at
any time using the marked solution container without the necessity of timing the rst pump,
however it is recommended that all all pumps in the PeriPod chain are calibrated whenever
calibration is carried out.
Once calibrated, the pumps will be turned on and off at intervals by the Bluelab®PeriPod™
while dosing in order to dose the correct amount, rather than both pumps continuously dosing.
This is normal operation.
Calibration times of greater than three minutes are not allowed, and will result in a failed calibration.
Resetting the Bluelab®PeriPod™to an un-calibrated state can be carried out by pressing and
holding both Select / Save ''and Start / Stop ''buttons while powering up. If any PeriPods™
in the pod chain are reset, it is recommended to recalibrate them all.
9
10
11
12
13
Press ''
selection button
Indicates pump
being calibrated
Press '' selection button to save calibration
Let pump run until solution reaches
the marker line
M Version L Version
M Version pump selection
Pump to be
calibrated
1 2 3
L Version pump selection
Long press ''
selection button
1 2 3

English
13
The Bluelab®PeriPods™can be used with the Bluelab® Pro Controller and Bluelab®Connect to dose
multi-part nutrients in varying proportions, according to a feed chart or feed schedule.
Overview of Multi-part nutrient dosing
Multi-part nutrient dosing allows dosing of nutrients into a reservoir according to a feed chart or
feed schedule. These are often provided by the nutrient manufacturer.
Multi-part nutrient dosing can be selected in Connect when a suitable Pro Controller/PeriPod™
combination is detected. It is enabled in the Pro Controller Nutrient Dosing screen.
Each pump in the PeriPod™or the PeriPod™chain of up to three PeriPods™can be set as a pH
pump, an EC (nutrient) pump, or it can be turned off if not currently needed.
The nutrient proportions are calculated automatically from the feed chart quantities directly
entered into Connect by the user.
When the Pro Controller initiates dosing, the PeriPods™use the calculated proportions to switch
individual pumps on and off on during dosing, so that they dose the nutrients in the correct
proportions. For example, if one pump is set to 10 ml/gal and another set to 5 ml/gal the rst
pump will dose for twice as long as the second pump.
When the nutrient proportions change (a new line or week in the feed schedule), the reservoir
should ideally be emptied, lled, and dosed up using the new ratio. This avoids unwanted nutrients
remaining in the reservoir, and smaller components taking too long to come to the correct
concentrations.
When the nutrient proportions change (a new line or week in the feed schedule), the reservoir
should ideally be emptied, lled, and dosed up using the new ratio. This avoids unwanted nutrients
remaining in the reservoir, and smaller components taking too long to come to the correct
concentrations.
5.0 Multi-part Nutrient Dosing with Bluelab®PeriPods
5.1 Reservoir size
Because 100 seconds total dosing time is required in order for the PeriPod to accurately dose, it’s
clear that there is a minimum reservoir size required. If the reservoir doses up to the required EC
before the 100 seconds dosing is up, the nutrients may not be properly balanced.
If the reservoir that will be used is less than about 25 gallons (100 litres)(for an M series PeriPod
chain), we suggest diluting all of the nutrient components by adding an equal volume of water.
This will double the dosing time, ensuring that 100 seconds dosing time is achieved. Remember
to label the containers to indicate that they are diluted.
FRODO'S FEED CHART NUTRIENTS
Week Required
pH
Required
PPM Macro A Macro B Mini
Macros
Mega
Micro 1
Mega
Micro 2
Special
Sauce
15.8 450 8 ml 8 ml 2 ml 1 ml
25.8 650 10 ml 10 ml 4 ml 2 ml
35.8 650 12 ml 12 ml 5 ml 2 ml 1 ml
45.8 1400 14 ml 14 ml 5 ml 5 ml 3 ml
55.8 1100 14 ml 14 ml 5 ml 5 ml 3 ml
65.8 1100 14 ml 14 ml 5 ml 5 ml 3 ml
75.8 800 12 ml 12 ml 5 ml 5 ml 3 ml
85.8 450 10 ml 10 ml 5 ml 5 ml
*all measures in ml/US gal and ppm 500 scale

English
14
5.2 Starting with multi-part nutrient dosing
Setting up the PeriPods and Connect
Mount the PeriPods™as described in the PeriPod™Manual.
Ensure each pump is drawing from the correct nutrient part. Labelling the pumps
with the nutrient types in the feed chart is a good idea.
Connect the PeriPods™in a daisy chain with the dosing cables. The dosing cable
and the PeriPod™connectors are colour coded to make this easier.
Ensure the Pro Controller and all of the PeriPods™are
powered up. If it is the rst time the PeriPods™have been
connected to the Pro Controller, a “Pod Change – Accept”
message will be displayed on the Pro Controller. Check
that the all of the PeriPods™are correctly set up, powered
up and connected, with all required nutrient parts and pH
adjusters in place, then press the Pro Controller brightness
button to “accept” the pod chain. This prompts the Pro
Controller to “remember” the details of all of the pods and
pumps, so it can communicate with them correctly.
Prime and carry out a calibration of the PeriPod™pumps if desired (see section 4.2 of this
manual). Note: The “Pod Change” message does not need to be accepted during priming
or calibration.
1
2
3
4
5
IMPORTANT
The PeriPod™ doses small volumes of nutrient into the reservoir so results in less
precipitating nutrients, but to further ensure this is minimised:
• Separate all nutrient tubes where they enter into the reservoir
• Always have sufcient and continuous mixing in the reservoirs (more is better)
• Some nutrient components or additives (e.g. silicon) are extremely prone to precipitation.
Dilute precipitation prone nutrients or additives to very dilute levels before dosing. Multiply
the dose value (ml/gal) by the dilution rate and enter into Connect™to retain the same ratio.
Continuous addition in dilute form results in some of the nutrient/additive always being
available, even if precipitation over time is expected.
5.2.1 Setting up the PeriPods
English
15
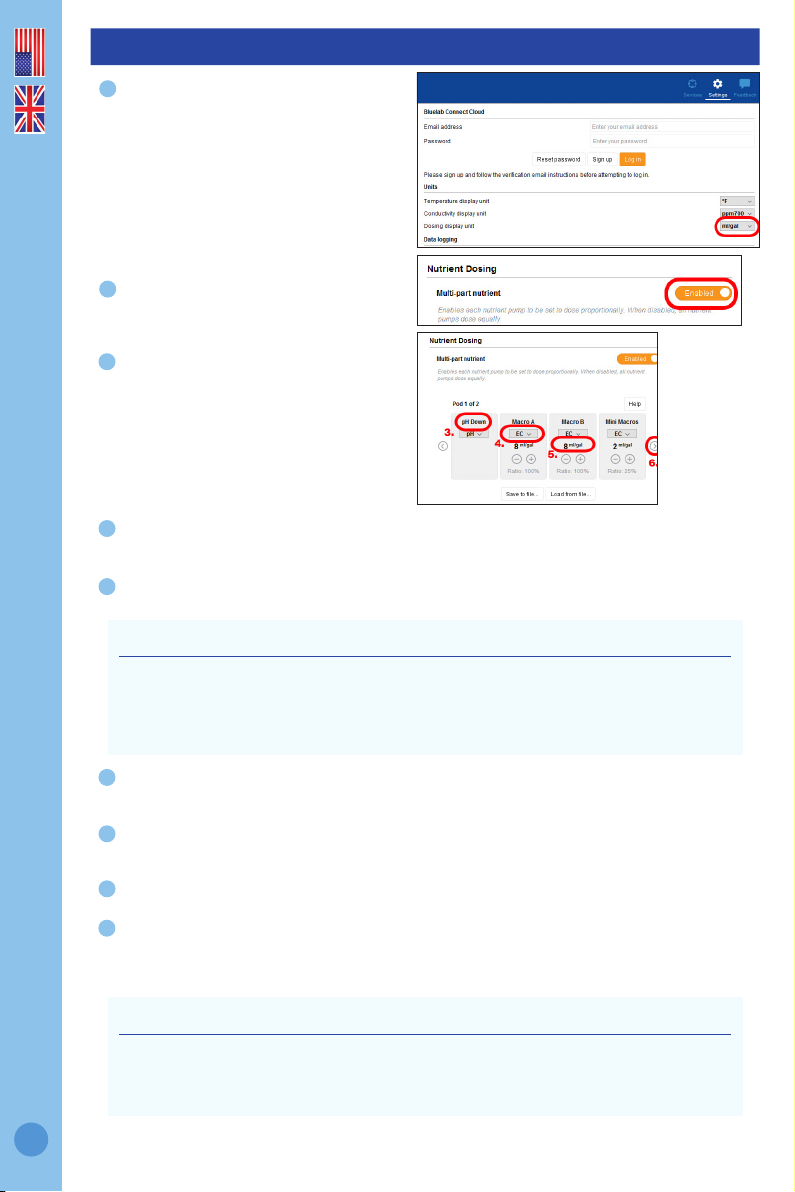
5.2.2 Setting up Connect
In the Connect global Settings screen,
select the units of the quantities that
will be entered in the multi-part nutrient
dosing screen (ml, ml/gal, ml/l are
available). This is likely to be the
units used in the nutrient feed chart
or schedule.
In the Connect™Pro Controller Nutrient
Dosing screen, enable Multi-part nutrient.
Click on the pump name of each nutrient
pump and enter the name of the nutrient
component it will be dosing (e.g., 5%
Nitric, Grow A, Grow B etc.).
Select the pump function – pH, Nutrient (EC) or Off - by using the drop-down box for each
pump. All pumps should be either set up or switched off.
Enter the nutrient quantities for each pump (probably taken from a nutrient feed schedule,
or feed chart).
Use the left and right arrows at the side of the screen to navigate between PeriPods™in order
to set up the pumps in each.
Save the setup to le, if it is likely to be used again. Click “Save to le…” and choose a location
for saved les. A saved setup can be loaded and used by clicking “Load le…”
Click “Apply” to send the information to the Pro Controller/PeriPods.
Check all equipment is correctly installed and set up, and enter Control mode to start
dosing. Nutrients will be dosed in the proportions entered from the feed chart line up to
the required EC value.
1
2
4
5
6
7
8
9
3
IMPORTANT
The Pro Controller will not use these numbers to dispense a particular quantity. Connect™uses
them to calculate nutrient proportions (these proportion are displayed as percentages, and can
be seen changing as new quantities are entered). The Pro Controller/PeriPods™will continue to
dose in these proportions until the correct EC is reached.
IMPORTANT
Remember to set or check the EC and pH required values, on/off times and alarms,
in Device Settings if loading a le, as these settings are not saved in the setup les.
See the Bluelab®Pro Controller manual for more information on setting dosing settings
English
16
5.2.3 Calculating the on time with multi-part nutrients
From the feed chart or schedule, nd the largest (by volume) nutrient component.
Example: MaxiVeg requires 18 ml/gal – all the others take less.
Then, work out how many doses are required to take a reservoir from newly lled to dosed
up. This is simply based on the required EC.
Example: 1.2 EC required = 12 (minimum) doses (We can only shift it 0.1EC with
each dose – otherwise, we’ll overshoot).
Work out how much of the nutrient component is used when fully dosing up the reservoir.
Example: Nutrient part A is added at the rate of 18 ml per gallon (from the schedule, above).
My reservoir is 100 gallons so I need: 1800mls (1.8 litres) total.
Now we can work out how big the maximum dose should be,
Example: 1800ml total divided by 12 doses (found earlier) equals 150ml per dose.
1800/12 = 150ml
Which gives us the on-time we need.
Example: My M3 pumps dose 120ml per minute, which is 2 ml per second, so
150/2 = 75 seconds.
Remember, this is the biggest we can have it, so we can reduce it a bit, to stop overshooting. So,
60 seconds would be a good starting point. It can be tweaked later, if needed.
Ensure that the nutrient / pH output tubes from the PeriPods™are separated where they enter
the reservoir to avoid precipitation problems.
1
2
3
4
5
FRODO'S FEED CHART
Week Required
pH
Required
EC Macro A Macro B MaxiVeg Mega
Micro 1
Mega
Micro 2
Special
Sauce
15.8 0.8 8 8 1 ml
25.8 0.8 10 8 8 2 ml
35.8 1.0 12 814 2 ml 1 ml
45.8 1.0 12 818 5 ml 3 ml
55.8 1.2 12 818 5 ml 3 ml
65.8 1.2 12 12 5 ml 3 ml
75.8 1.0 12 12 5 ml 3 ml
85.8 0.5 10 10 5 ml
*all measures in ml/US gal and ppm 500 scale

English
17
6.0 Maintenance, Troubleshooting & Specications
6.1 Maintenance
• Peristaltic pump tubing has a nite life and should be replaced periodically to maintain stable
performance. Refer to the Bluelab®website or the back of this manual for information on spare
parts.
• Flush pumps and tubing with water when product is going to be unused for more than one month.
• If re-installing after long periods of storage, initial setup procedures should be carried out.
• If you notice sudden or signicant changes in ow rate see the troubleshooting guide in section
5.3 and check for signs of damage or wear.
WARNING
Always ush tubing and pumps with clean water BEFORE performing any maintenance on
pumps or tubing. This ensures that all dangerous chemicals are ushed out of the tubing and
pump, reducing accidental harm or injury.
6.2 Firmware upgrading
When prompted by the Bluelab®Connect™ software that new rmware for the Bluelab®
PeriPod™is available, upgrade it to ensure optimum functionality and reliability. The computer
running Bluelab®Connect™ software must be connected to the internet to receive rmware
update information.
1
Computer & Connect
Stick with internet
Computer to
Bluelab®Pro Controller
Controller to
Bluelab®PeriPod™
Receive update
data via internet
6.3 Troubleshooting guide
PROBLEM PROBABLE CAUSE CORRECTION
Pumps not
turning.
Pro Controller currently
in an off time
Wait until next on time starts.
Required EC/pH level met. No action required.
Bluelab®Pro Controller is in
alarm - dosing is locked out.
Check Pro Controller display or Connect to identify alarm
cause, and correct it.
Bluelab®Pro Controller not
set to control.
Ensure Bluelab®Pro Controller is in control mode
(refer to Bluelab®Pro Controller Manual).
Required dosing levels not
correctly set.
Ensure Bluelab®Pro Controller is set up with correct required
levels for EC/pH (refer to Pro Controller Manual).
Power not connected. Check power supply is plugged in. If there is a green dot in
the bottom right corner of the display the Bluelab®PeriPod™
is correctly powered.
Bluelab®PeriPod™not
connected properly.
Check the connections between the Bluelab®PeriPod™and
the Bluelab®Pro Controller.
Cassette is damaged. If you can hear the motor running, but the cassette isn’t
spinning, check cassette and motor spindle. Replace if
damaged.
Motor damaged. Replace motor.

English
18
6.3 Troubleshooting guide continued
PROBLEM PROBABLE CAUSE CORRECTION
Pump(s) not
pumping but
are turning.
Nutrient stock/pH adjuster
tank is empty.
Replenish nutrient.
Tube is blocked. Remove and unblock tube, rinse with water and reattach.
Tube is twisted. Go through all the tubing (including that going into the
cassette) and straighten out any kinks.
Tube is cut at and touching
the bottom of the nutrient
tank.
Cut the bottom of the tube at a 45° angle.
Split or hole in tubing. Replace tubing.
Damaged cassette/worn
peristaltic tube.
Replace cassette.
Pumps are
not pumping
the expected
quantities /
Pump(s) ow
rate decreased /
Pump(s) failing
calibration
Calibration is out of date. Re-calibrate pumps.
Nutrient has changed. Re-calibrate pumps.
Tube is blocked. Remove and unblock tube, rinse through with water
and reattach.
Nutrient levels very low. Ensure tube is always in the nutrient even when levels
are low.
Tube is twisted. Go through all the tubing (including that going into the
cassette) and straighten out any kinks.
Tube is cut at and touching
the bottom of the nutrient tank.
Cut the bottom of the tube at a 45° angle.
Split or hole in tubing. Replace tubing.
Damaged cassette/worn
peristaltic tube.
Check pump output (approx. 120ml/min, M series;
1,200ml/min L series). If low, replace cassette.
If cassette is damaged, replace cassette.
Damaged pump. Replace pump.
EC/pH not
changing.
Inlet dosing tube not in
nutrient stock solution/pH
adjuster.
Put dosing tube back in nutrient stock solution/pH
adjuster, and re-prime pump.
Outlet dosing tube not in
reservoir.
Put dosing tube back in reservoir.
Run out of nutrient/pH
adjuster.
Replace nutrient/pH adjuster, and re-prime pump.
Tube is twisted. Go through all the tubing (including that going into the
cassette) and straighten out any kinks.
Tube is cut at and touching
the bottom of the nutrient tank.
Cut the bottom of the tube at a 45° angle.
Split or hole in tubing. Replace tubing.
Damaged cassette/worn
peristaltic tube.
Check pump output (approx. 120ml/min, M series;
1,200ml/min L series). If low, replace cassette.
If cassette damaged, replace cassette.
Damaged pump. Replace pump.
Overshooting
required values
Poor mixing in reservoir. Add mixer to reservoir.
Off time too short. Increase off time (refer to Bluelab®Pro Controller Manual).
Too many doses
needed to change
measured value.
On time too short. Increase on time (refer to Bluelab®Pro Controller Manual).
Never reaching
desired EC/pH.
On time too short/off time
too long
Set on/off times correctly (refer to Bluelab®Pro Controller
Manual).
Pumps too small for reservoir. Move to the L3 version of the Bluelab®PeriPod™if possible
or add more Bluelab®PeriPod™(in a daisy chain) for larger
reservoirs. Contact customer support for advice.
EC/pH is never
dosing.
Bluelab®Pro Controller control
direction is set incorrectly
Change Bluelab®Pro Controller control direction setting
to the correct direction, and ensure the correct solution/
adjuster is being used.
English
19
6.4 Technical specications
M3 / M4 L3
Default Function (Can be changed in
Bluelab®Connect)
Pump 1: pH, Pump 2: EC A,
Pump 3: EC B, Pump 4 (M4): EC C.
Pump 1: pH, Pump 2: EC A,
Pump 3: EC B
Pump ow rate 120 ml/min11200 ml/min1
PeriPod size selection Refer to bluelab.com for discussion on pump sizing
Peristaltic tube lifetime >750hrs pump running time
Peristaltic pump motor lifetime >1500hrs pump running time
Solution Temperature 5 - 50°C / 41 - 122°F
Environment Temperature 5 - 40°C / 41 - 104°F
Flow rate accuracy at 20°C / 68°F ±10% 1,2
Pump Calibration Yes
Firmware upgradable Yes
Power Source Input: 100-240 Vac, 50-60 Hz, 5 VA
Output: 24Vdc 2 Amp, 24Vdc 5 Amp (on limited L3 stock)
Certications CE, FCC, IC.
1
Pump ow rate and dosing accuracy is dependent on, among other things; temperature, liquid being pumped, age and condition of tubing. Therefore the actual
ow rate achieved will vary between each setup and with time.
2
With no valid pump calibration.
6.5 Material specication for tubing
Peristaltic tubing pH tubing Nutrient tubing
Food Grade YES YES NO
Standards Met
USP Class VI, ISO 10993,
FDA CFR 21, FDA 3-A, NSF
51, REACH, RoHS
USP Class VI,
FDA CFR 21 RoHS
6.6 pH adjuster compatibility for tubing3
Peristaltic tubing (PharMed BPT) pH Tubing (PTFE) Nutrient tubing (LDPE)
Nitric Acid <35% Concentrated <10%
Phosphoric Acid <85% Concentrated <40%
Sulfuric Acid <30% Concentrated <50%
Citric Acid <20% Concentrated <10%
Potassium Hydroxide Concentrated Concentrated Concentrated
Potassium Carbonate Concentrated Concentrated Concentrated
Potassium Silicate Unknown Concentrated Concentrated
3
The chemical concentrations stated in the above table are just a guide. Variations in temperature, pressure, or UV exposure may cause tubing failure which
could lead to serious injury if proper safety precautions are not followed. For this reason it is recommended that the tubing be tested by the user with the desired
chemical in the specic application to determine ultimate suitability before using them. No warranty (neither express or implied) is given that the information in
these tables is accurate or complete or that any material is suitable for any purpose.

English
20
If your pH isn’t in the right range – and that’s 5.5-6.5 for most
plant varieties – your nutrients are likely wasted.
We say that’s a problem you don’t need. At Bluelab®, we want our
customers to have optimum growth and the best plants possible. So we’ve
made it easy to raise or lower pH levels, whenever you need, and keep them
just where they should be.
Bluelab®’s pH Up and pH Down are formulated to the highest standards.
Just add what’s required to lift or reduce growing solution acidity. Your
plants will thank you for it. The main thing is, you’ll see the difference in
your harvest. Optimum inputs. Optimum results. Simple.
Bluelab®pH Up and pH Down Solutions
Optimum growth needs optimum pH. And we make optimum simple.
› Bluelab®pH Up 500ml
› Bluelab® pH Up 1 Liter
› Bluelab®pH Up 1 Gallon
› Bluelab®pH Down 500ml
› Bluelab®pH Down 1 Liter
› Bluelab®pH Down 1 Gallon
Available in:
7.0 Accessories, Parts & Guarantee
Bluelab®Peristaltic Pumps
Replacement pump motor and
cassette for Bluelab®PeriPod™.
Quick and simple to replace when required.
All you have to do is order a replacement from your supplier!
Bluelab®Cassette
Replacement cassette for Bluelab®
Peristaltic Pumps.
Quick and simple to replace when required.
All you have to do is order a replacement from your supplier!
Bluelab®Dosing Tubing
Replacement pH and nutrient tubing, 4 meters /
13 feet in length.
For use with Bluelab®PeriPod™and pH adjuster or
nutrient solution.
Dosing tube is specic to version of Bluelab®PeriPod™, so
replacement is easy. Simply order pH or nutrient tubing to suit M
or L type. Bluelab®pH Dosing Tube can be used with undiluted
Bluelab®pH Up or Bluelab®pH Down. Replacement Tubing for
Bluelab®PeriPod M
This manual suits for next models
2
Table of contents
Popular Industrial Equipment manuals by other brands


Leader Evaporator
Leader Evaporator WSE manual

PCB Piezotronics
PCB Piezotronics 394C06 Installation and operating manual

Dover
Dover Marathon V-4224 Operation, maintenance and installation manual

schmersal
schmersal AZM300B-ST-SD2P-A-T Instructions for operation

ABB
ABB EVLunic Series installation manual

RUD
RUD VVGSCH Safety instructions


