BN BNR1841 User manual

Model: BNR1841
Drywall Sander
Owners Manual

01
1
A E
D C
B
F
L G
H
M I
K
1
J K
N
O1
O4 O
O5 O2
O3
A. Air vents
B. Electronic speed control wheel
C. On/off switch
D. Lock button
E. Main handle
F. Led switch
G. Dust extraction outlet
H. Vacuum speed dial
I. Auxiliary handle
J.LED Light
K.Guard
1.Guard segment
L.Sanding pad
M.
Sanding paper (150# x2, 180# x 2,
240# x2, 400# x 2)
N.
Hex key
O.
Dust bag
1.Belt
2.Clasp
3.Adaptorassembly
4.Vacuum hose
5.Connector

02
G
O5
O4
4
M
L
3
5
O4
O
O2
2

03
7
8
1
2
6

04
TECHNICAL SPECIFICATIONS
Model Number R7241
Voltage 110-120V~60Hz/220-240V~50Hz
Power 750W
No-load Speed 1500-2700
Sanding Pad Dia. 180mm
Sanding Paper Dia. 180mm
Protection class
SAFETY
GENERAL SAFETY INSTRUCTIONS
WARNING! Read all safety warnings and all instructions. Failure to follow the
warnings and instructions may result in electric shock, fire and/or serious injury.
Save all warnings and instructions for future reference. The term “power tool” in the
warnings refers to your mainsoperated (corded) power tool or battery-operated
(cordless) power tool.
1.
WORK AREA SAFETY
> Keep work area clean and well lit. Cluttered or dark areas invite accidents.
> Do not operate power tools in explosive atmospheres, such as in the presence of
flammable liquids, gases or dust. Power tools create sparks which may ignite the
dust or fumes.
> Keep children and bystanders away while operating a power tool. Distractions can
cause you to lose control.
2.
ELECTRICAL SAFETY
> Power tool plugs must match the outlet. Never modify the plug in any way. Do not
use any adapter plugs with earthed (grounded) power tools.Unmodified plugs and
matching outlets will reduce risk of electric shock.
> Avoid body contact with earthed or grounded surfaces such as pipes, radiators,
ranges and refrigerators. There is an increased risk of electric shock if your body is
earthed or grounded.
> Do not expose power tools to rain or wet conditions.Water entering a power tool
will increase the risk of electric shock.
> Do not abuse the cord. Never use the cord for carrying, pulling or unplugging the
power tool. Keep cord away from heat, oil, sharp edges or moving parts. Damaged
or entangled cords increase the risk of electric shock.
> When operating a power tool outdoors, use an extension cord suitable for outdoor
use. Use of a cord suitable for outdoor use reduces the risk of electric shock.

05
> If operating a power tool in a damp location is unavoidable, use an earth leakage
circuit breaker. Use of an earth leakage circuit breaker reduces the risk of electric
shock.
3.
PERSONAL SAFETY
> Stay alert, watch what you are doing and use common sense when operating a
power tool. Do not use a power tool while you are tired or under the influence of
drugs, alcohol or medication. A moment of inattention while operating power
tools may result in serious personal injury.
> Use personal protective equipment. Always wear eye protection. Protective
equipment such as dust mask, non-skid safety shoes, hard hat, or hearing
protection used for appropriate conditions will reduce personal injuries.
> Prevent unintentional starting. Ensure the switch is in the off-position before
connecting to power source and/or battery pack, picking up or carrying the tool.
Carrying power tools with your finger on the switch or energising power tools that
have the switch on invites accidents.
> Remove any adjusting key or wrench before turning the power tool on. A wrench
or a key left attached to a rotating part of the power tool may result in personal
injury.
> Do not overreach. Keep proper footing and balance at all times. This enables
better control of the power tool in unexpected situations.
> Dress properly. Do not wear loose clothing or jewelry. Keep your hair, clothing
and gloves away from moving parts. Loose clothes, jewelry or long hair can be
caught in moving parts.
> If devices are provided for the connection of dust extraction and collection
facilities, ensure these are connected and properly used. Use of dust collection
can reduce dust-related hazards.
4.
POWER TOOL USE AND CARE
> Do not force the power tool. Use the correct power tool for your application. The
correct power tool will do the job better and safer at the rate for which it was
designed.
> Do not use the power tool if the switch does not turn it on and off. Any power tool
that cannot be controlled with the switch is dangerous and must be repaired.
> Disconnect the plug from the power source and/or the battery pack from the power
tool before making any adjustments, changing accessories, or storing power tools.
Such preventive safety measures reduce the risk of starting the power tool
accidentally.
> Store idle power tools out of the reach of children and do not allow persons
unfamiliar with the power tool or these instructions to operate the power tool.
Power tools are dangerous in the hands of untrained users.

06
> Maintain power tools. Check for misalignment or binding of moving parts,
breakage of parts and any other condition that may affect the power tool's
operation. If damaged, have the power tool repaired before use. Many accidents
are caused by poorly maintained power tools.
> Keep cutting tools sharp and clean. Properly maintained cutting tools with sharp
cutting edges are less likely to bind and are easier to control.
> Use the power tool, accessories and tool bits etc., in accordance with these
instructions, taking into account the working conditions and the work to be
performed. Use of the power tool for operations different from those intended
could result in a hazardous situation.
5.
SERVICE
> Have your power tool serviced by a qualified repair person using only identical
replacement parts. This will ensure that the safety of the power tool is maintained.
SAFETY INSTRUCTIONS FOR POLISHERS
1)
SAFETY INSTRUCTIONS FOR ALL OPERATIONS
a)
This power tool is intended to function as a polisher. Read all safety warnings,
instructions,illustrations and specifications provided with this power tool. Failure to
follow all instructions listed below may result in electric shock, fire and/or serious injury.
b)
This power tool is not recommended for grinding,sanding, wire brushing or cutting
off operations.Operations for which the power tool was not designed may create a
hazard and cause personal injury.
c)
Do not use accessories which are not specifically designed and recommended by
the tool manufacturer. Just because the accessory can be attached to your power
tool, it does not assure safe operation.
d)
The rated speed of the accessory must be at least equal to the maximum speed
marked on the power tool. Accessories running faster than their rated speed can
fly apart.
e)
The outside diameter and the thickness of your accessory must be within the
capacity rating of your power tool. Incorrectly sized accessories cannot be
adequately guarded or controlled.
f)
The arbour size of wheels, flanges, backing pads or any other accessory must
properly fit the spindle of the power tool. Accessories with arbour holes that do not
match the mounting hardware of the power tool will run out of balance, vibrate
excessively and may cause loss of control.
g)
Do not use a damaged accessory. Before each use inspect the accessory such as
abrasive wheels for chips and cracks, backing pads for cracks, tear or excess wear,
wire brushes for loose or cracked wires. If the power tool or accessory is dropped,
inspect for damage or install an undamaged accessory. After inspecting and
installing an accessory, position yourself and bystanders away from the plane of the
rotating accessory and run the power tool at maximum no load speed for one minute.
Damaged accessories will normally break apart during this test time.

07
h)
Wear personal protective equipment 4.Depending on application, use face shield,
safety goggles or safety glasses. As appropriate, wear dust mask, hearing
protectors, gloves and shop apron capable of stopping small abrasive or
workpiece fragments. The eye protection must be capable of stopping flying
debris generated by various operations. The dust mask or respirator must be
capable of filtrating particles generated by your operation. Prolonged exposure to
high intensity noise may cause hearing loss.
i)
Keep bystanders a safe distance away from work area. Anyone entering the work
area must wear personal protective equipment. Fragments of the workpiece or of
a broken accessory may fly away and cause injury beyond the immediate area of
operation.
j)
Hold power tool by insulated gripping surfaces only, when performing an operation
where the cutting accessory may contact hidden wiring or its own cord. A cutting
accessory contacting a "live" wire may make exposed metal parts of the power
tool "live" and could give the operator an electric shock.
k)
Position the cord clear of the spinning accessory. If you lose control, the cord may
be cut or snagged and your hand or arm may be pulled into the spinning accessory.
l ) Never lay the power tool down until the accessory has come to a complete stop.
The spinning accessory may grab the surface and pull the power tool out of your
control.
m)
Do not run the power tool while carrying it at your side. Accidental contact with
the spinning accessory could snag your clothing, pulling the accessory into your
body.
n)
Regularly clean the power tool’s air vents. The motor’s fan will draw the dust
inside the housing and excessive accumulation of powdered metal may cause
electrical hazards.
o)
Do not operate the power tool near flammable materials. Sparks could ignite
these materials.
p)
Do not use accessories that require liquid coolants. Using water or other liquid
coolants may result in electrocution or shock.
2)
KICKBACK AND RELATED WARNINGS
•
Kickback is a sudden reaction to a pinched or snagged rotating wheel, backing pad,
brush or any other accessory.Pinching or snagging causes rapid stalling of the
rotating accessory which in turn causes the uncontrolled power tool to be forced in
the direction opposite of the accessory’s rotation at the point of the binding.

08
•
For example, if an abrasive wheel is snagged or pinched by the workpiece, the
edge of the wheel that is entering into the pinch point can dig into the surface of the
material causing the wheel to climb out or kick out. The wheel may either jump
toward or away from the operator, depending on the direction of the wheel’s
movement at the point of pinching. Abrasive wheels may also break under these
conditions.
•
Kickback is the result of power tool misuse and/or incorrect operating procedures
or conditions and can be avoided by taking proper precautions as given below.
a)
Maintain a firm grip on the power tool and position your body and arm to allow you
to resist kickback forces. Always use auxiliary handle, if provided, for maximum
control over kickback or torque reaction during start-up. The operator can control
torque reactions or kickback forces, if proper precautions are taken.
b)
Never place your hand near the rotating accessory. The accessory may kickback
over your hand.
c)
Do not position your body in the area where power tool will move if kickback
occurs. Kickback will propel the tool in the direction opposite to the wheel’s
movement at the point of snagging.
d)
Use special care when working corners, sharp edges etc. Avoid bouncing and
snagging the accessory. Corners, sharp edges or bouncing have a tendency to
snag the rotating accessory and cause loss of control or kickback.
e)
Do not attach a saw chain woodcarving blade or toothed saw blade. Such blades
create frequent kickback and loss of control.
GENERAL
•
This tool should not be used by people under the age of 16 years
•
This tool is not intended for use by persons (including children) with reduced
physical, sensory or mental capabilities, or lack of experience and knowledge,
unless they have been given supervision or instruction concerning use of the tool
by a person responsible for their safety
•
Ensure that children do not play with the tool
•
This tool is not suitable for wet sanding
•
Always disconnect plug from power source before making any adjustment
or changing any accessory
OUTDOOR USE
•
Connect the tool via a fault current circuit breaker with a triggering current of
30 mA maximum

09
BEFORE USE
•
Before using the tool for the first time, it is recommended to receive practical
information
•
Always check that the supply voltage is the same as the voltage indicated on the
nameplate of the tool (tools with a rating of 230V or 240V can also be connected to
a 220V supply)
•
Use suitable detectors to find hidden utility lines or call the local utility
company for assistance(contact with electric lines can lead to fire or electrical
shock; damaging a gas line can result in an explosion; penetrating a water pipe
will cause property damage or an electrical shock)
•
Do not work materials containing asbestos (asbestos is considered
carcinogenic)
•
Dust from material such as paint containing lead, some wood species, minerals
and metal may be harmful (contact with or inhalation of the dust may cause allergic
reactions and/or respiratory diseases to the operator or bystanders); wear a dust
mask and work with a dust extraction device when connectable
•
Certain kinds of dust are classified as carcinogenic (such as oak and beech dust)
especially in conjunction with additives for wood conditioning; wear a dust mask
and work with a dust extraction device when connectable
•
Follow the dust-related national requirements for the materials you want to work with
•
Do not clamp the tool in a vice
•
Use completely unrolled and safe extension cords with a capacity of 16 Amps
(U.K. 13 Amps)
AFTER USE
•
After switching off the tool, never stop the rotation of the accessory by a lateral
force applied against it
USE
Attaching auxiliary handle②
For reasons of safety the auxiliary handle must be assembled when using the
product.
-Screw the auxiliary handle clockwise in one of the mounting threads
-Make sure the auxiliary handle (I) is securely fastened.
Attaching and changing sanding disc③
-
Place the sanding disc (M) in the center of the sanding pad (L) and press on. The
holes in the sanding disc must be in alignment with the extraction holes in the
sanding Pad.

10
Attaching and removing Dust bag④
-
Align and attach the vacuum hose connector (O5) onto the dust extraction outlet (G)
all the way to stop
-
After operation, hold and pull the vacuum hose connector (O5) off the dust extraction
outlet (G) to remove the vacuum hose (O4) / dust bag (O) from the product.
Emptying Dust bag⑤
-
Remove the vacuum hose (O4) with dust bag (O) from the product, if necessary.
-
Hold the dust bag (O) over a suitable rubbish bag.
-
Pull the clasp (O2) off the dust bag (O) and empty it into the rubbish bag (Fig. 5).
-
Slide the clasp (O2) onto the rails on the dust bag (O) and re-attach the vacuum
hose (O4) and dust bag (O) to the product.
Switching the machine on and off
-
Turn on/off the drywall sander by switch(C)
-
Adjust the speed by turning the speed wheel(B), user can choose different speed
for different sanding surface.
A higher setting is suitable for sanding with fine-grained sanding papers to achieve a
fine finishing.
A lower setting is suitable for sanding with coarse-grained sanding papers to clean
plaster and water stain from work surface.
-
Use the Lock button (D) to keep the machine running at the same speed as selected.
Do not overload by excessive pressure.
S
a
ndGlowTM S
ystem
⑥
Push the LED switch (F) to position 1 to turn on the LED and position O to turn off
the LED.
Sanding can be difficult and time consuming due to surface clarity that leads to repeat
sanding when you miss a spot.
Newl
y
de
s
ign
S
and
G
low
TM syst
em enable
s y
ou
t
o
work be
tt
er and
m
ore
e
ffic
ien
t while
sanding. The system is designed and built with super-bright LEDs that are positioned
at the ultimate angle to provide you visibility during inefficient lighting conditions. With
this new function, you will never miss an uneven spot and would
a
ss
i
st y
ou
t
o
fi
ni
s
h
y
our work qui
ck
er
. E
njo
y y
our Drywall
S
ander wi
t
h
t
he
S
and
G
low
TM System today.

11
Adjusting suction power⑦
Adjust the suction power according to the intended operation
-Turn the vacuum speed dial (H) clockwise to increase the suction power.
-Turn the vacuum speed dial (H) anticlockwise to decrease the suction power
Guard segment⑧
The detachable guard segment allows to reduce the distance between the wall /
ceiling and the side of the sanding paper / sanding pad. Remove the guard segment
when the work surface is close to the other objects (e. g. wall, ceiling).
Detachable guard segment and rotated by 360°⑧
The detachable guard segment allows to reduce the distance between the wall /
ceiling and the side of the sanding paper / sanding pad. Remove the guard segment
when the work surface is close to the other objects (e. g. wall, ceiling).And sanding
pad can be rotated by 360°, applying for different edges.
WARNING! Use the product without guard segment only for sanding
operation on work surface close to other objects!
-Remove the guard segment(K1) from the guard (K).
-After operation, refit the segment (K1) onto the guard (K ). Ensure the three points
of segment (K1) press into the right position .
MAINTENANCE / SERVICE
Store the tool in its protective case in a dry and lockedup place, out of reach of
children
Always keep tool and cord clean (especially ventilation slots )
do not attempt to clean ventilation slots by inserting pointed objects
through openings
disconnect the plug before cleaning
ENVIRONMENT
Do not dispose of electric tools, accessories and packaging together with
household waste material (only for EU countries)
- in observance of European Directive on waste of electric and electronic
equipment and its implementation in accordance with national law, electric tools
that have reached the end of their life must be collected separately and returned to
an environmentally compatible recycling facility
12
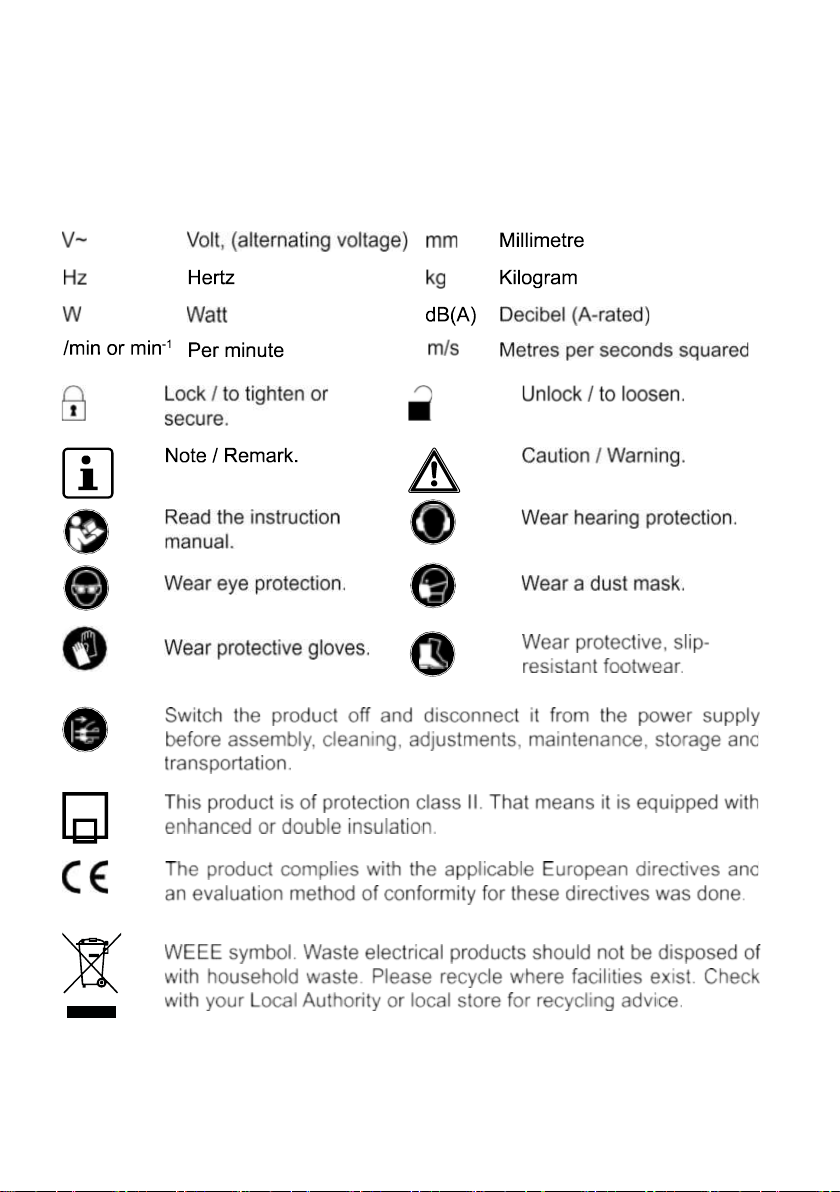
Symbols
On the product, the rating label and within these instructions you will find among
others the following symbols and abbreviations. Familiarize yourself with them to
reduce hazards like personal injuries and damage to property.
2

13
Table of contents
Other BN Sander manuals


