Bobike One mini User manual
EN. PLEASE READ THIS MANUAL.THE INFORMATION PROVIDED IS FUNDAMENTALTOYOUR SAFETY AND THE SAFETY OF YOUR CHILD.
IT IS RECOMMENDED A PROFESSIONAL BICYCLE SHOP TO ASSEMBLE AND INSTALLYOUR CARRIER TO THE BICYCLE.
ES. LEA ATENTAMENTE ESTE MANUAL. ESTA INFORMACIÓN ES FUNDAMENTAL PARA SU SEGURIDAD Y LA SEGURIDAD DEL NIÑO.
LE RECOMENDAMOS QUE ENCARGUE EL MONTAJE Y LA INSTALACIÓN DE LA SILLA A UN ESTABLECIMIENTO ESPECIALIZADO EN
BICICLETAS.
FR. VEUILLEZ LIRE CE MODE D’EMPLOI. CES INFORMATIONS SONT IMPORTANTES POUR VOTRE SÉCURITÉ ET CELLE DE VOTRE ENFANT
IL EST CONSEILLÉ DE DEMANDER À UN MAGASIN SPÉCIALISÉ EN VÉLOS DE FAIRE LE MONTAGE ET D’INSTALLER LE SIÈGE SUR VOTRE
VÉLO.
one mini
front head tube mounting system
EN. FRONT BABY CARRIER FOR BICYCLE
Front head tube mounting system
ES. SILLA DELANTERA PARA BICICLETA
Fijación al tubo de direccion
FR. SIÈGE AVANT POUR VÉLO
Fixation avant sur tube de direction
maximum child
weight 33 lbs
(15 kg)
9 months
to 3 years
3-point
seatbelt
26”- 29” e-bike fitting required tools
included
EN.COMPLIES WITH EN14344 | CPSIA 2008 | MAXIMUM CHILD WEIGHT 33lbs-15kg
ES. EN CUMPLIMIENTO DE EN14344 | CPSIA 2008 | PESO MÁXIMO DEL NIÑO 33lbs-15kg
FR. CONFORME AUX NORMES EN14344 | CPSIA 2008 | POIDS MAXIMAL DE L’ENFANT 33 lb -15 kg
http://bit.ly/bobike-usa
1,38"
35 mm
for round and oval tubes
Ø 0,87 to 1,10 in | Ø 22 to 28mm
2
01. LIST OF COMPONENTS 3
02. TECHNICAL FEATURES – SPECIFICATIONS TO ASSEMBLE YOUR CARRIER 4
03. ASSEMBLY INSTRUCTIONS – FITTING THE CARRIER ON THE BICYCLE 5
04. ASSEMBLY INSTRUCTIONS – SEATING THE CHILD ON THE CARRIER 9
05. ASSEMBLY INSTRUCTIONS – HOW TO REMOVE YOUR CARRIER 11
06. CAUTION NOTES 12
07. INSTRUCTIONS FOR USE 12
08. CARE AND MAINTAINANCE 13
09. WARRANTY 14
TABLE OF CONTENTS
01. LISTA DE COMPONENTES 15
02.
CARACTERÍSTICAS TÉCNICAS
–
ESPECIFICACIONES PARA EL MONTAJE DE LA SILLA
16
03. INSTRUCCIONES DE MONTAJE – CÓMO MONTAR LA SILLA EN LA BICICLETA 17
04. INSTRUCCIONES DE MONTAJE – CÓMO SENTAR AL NIÑO EN LA SILLA 21
05. INSTRUCCIONES DE MONTAJE – CÓMO RETIRAR LA SILLA DE LA BICICLETA 23
06. ADVERTENCIAS 24
07. INSTRUCCIONES DE USO 24
08. CUIDADO Y MANTENIMIENTO 25
09. GARANTÍA 26
ÍNDICE
01. LISTE DES ÉLÉMENTS 27
02. CARACTÉRISTIQUES TECHNIQUES – SPÉCIFICATIONS D’ASSEMBLAGE DU SIÈGE 28
03. CONSIGNES DE MONTAGE – AJUSTEMENT DU SIÈGE SUR LE VÉLO 29
04. CONSIGNES DE MONTAGE – ASSEOIR L’ENFANT SUR LE SIÈGE 33
05. CONSIGNES DE MONTAGE – COMMENT ENLEVER LE SIÈGE 35
06. AVERTISSEMENTS 36
07. CONSIGNES D’UTILISATION 36
08. SOIN ET ENTRETIEN 37
09. GARANTIE 38
TABLE DES MATIÈRES
FR
ES
EN
3
STANDARD
Ø 0,87 - 1,10 in
Ø22 - Ø28 mm
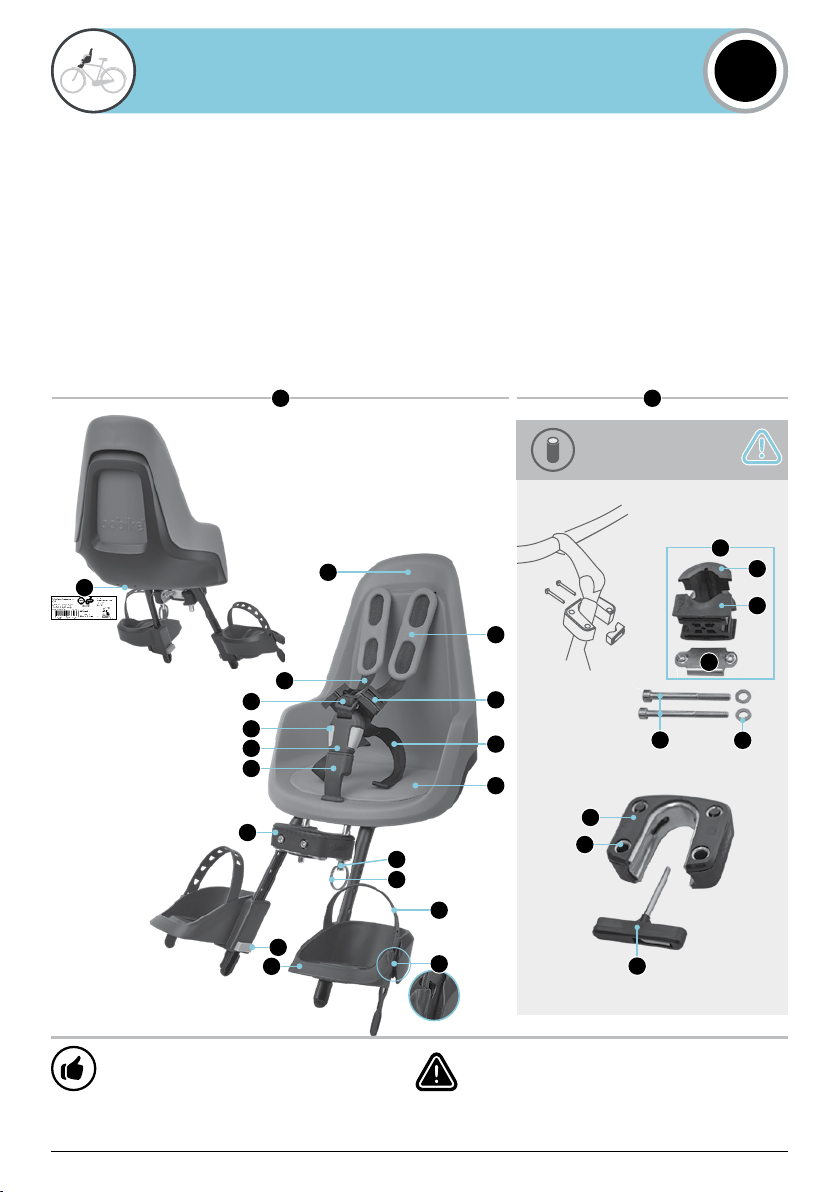
A. CHILD CARRIER
A1. STEEL FIXING ROD ENDS
B. RETENTION SYSTEM HARNESS
B1. SHOULDER PAD
B2. UPPER STRAP ADJUSTMENT BUTTON
B3. BELT STRAP
B4. LOWER STRAP ADJUSTER
C. SAFETY BUCKLE
C1. SAFETY BUCKLE RELEASE BUTTON
C2. SAFETY BUCKLE SOCKET
D. FOOTREST
D1. FOOTREST STRAP
D2. FOOTREST ADJUSTMENT BUTTON
D3. FOOTREST STRAP FIXING PEG
E. FRAME HOLDER
E1. ALLEN KEY NRº 5
E2. 2 x WASHERS
E3. SPLIT RING
E4. 2 x M6x65 BOLTS
E5. MOUNTING BLOCK BODY
E5.1. HOLES TO INSERT THE A1 RODS
E6. KIT STANDARD FOR Ø 22-28 MM HANDLEBARS
E6.1. FRONT SPACER
E6.2. REAR FASTENING PART
E6.3. STEEL FASTENING PLATE
F. TRACEABILITY INFORMATION
01. LIST OF COMPONENTS
WARNING! Failure to comply with the
manufacturer’s instructions can lead to serious
injury or death of the passenger/rider!
OK! CORRECT ASSEMBLY
EN
Ø 0,87 - 1,10 in
Ø22 - Ø28mm
F
B2
B1
B3
D1
E3
A1
D3
B4
C1
C2
A
G
B
E
D
D2
E6
E6.1
E6.2
E6.3
E5.1
E2
E4
E5
E1
EA
C

4
02. TECHNICAL FEATURES
SPECIFICATIONS TO ASSEMBLE YOUR CARRIER
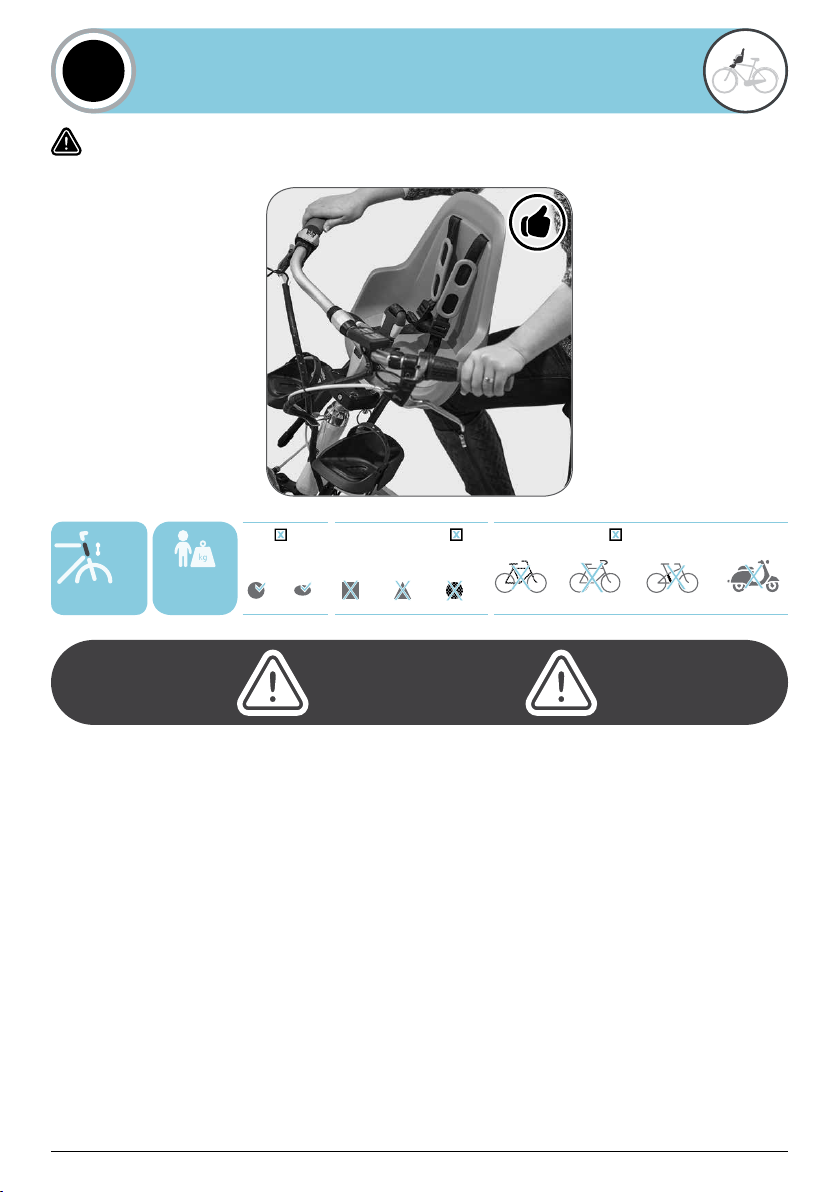
WARNING
• This baby carrier must not be mounted to bicycles fitted with
rear shock absorbers.
• This baby carrier must not be mounted to a racing bicycle
with drop handlebar.
• This baby carrier must not be mounted to MotorizedVehicles
such as Mopeds and Scooters.
• This baby carrier must not be mounted in bicycles with trian-
gular, square or carbon fiber frames.
• This front baby carrier must be assembled on bicycles with
round and oval frame head tube with diameters ranging
from Ø 0,87 to 1,10 in (Ø22 to Ø28 mm).
• The baby carrier must be assembled on bicycles with wheels
with diameters of 26”- 29”.
• This baby carrier is only suitable for carrying children with a
maximum weight of 33 lbs - 15 Kg (and children with recom-
mended ages ranging from 9 months to 3 years of age - with
the weight as the decisive variable).
• The total weight of the cyclist and the child transported must
not exceed the maximum permitted load permitted for the
bicycle. Information on the maximum load can be found in
How and where the carrier is to be attached to the bicycle.
the operating instructions of the bicycle.You can also contact
the manufacturer for this question.
• The carrier may only be mounted on a bicycle suitable for the
attachment of such additional loads.
• The position of the baby carrier must be adjusted so that the
bicycle rider does not touch the baby carrier with the feet
when in motion.
• It’s very important to adjust correctly the carrier and its com-
ponent parts for optimum comfort and safety of the child. It’s
also important that the carrier does not slope forward so that
the child does not tend to slide out of it. It’s also important
that the backrest slope backward slightly.
• Check if all parts of the bicycle function correctly with the
baby carrier mounted.
• WARNING: Front seats reduce the maneuverability of the bi-
cycle
• Check the instructions of the bicycle, and If you have
any doubts on fitting the baby carrier to your bicycle,
please contact your bicycle supplier for further infor-
mation.
CAUTION
OK
COMPATIBLE
FRAMES
NOT OK
NOT COMPATIBLE
FRAMES
MAXIMUM
CHILD WEIGHT
33 lbs (15 kg)
NOT OK
NOT COMPATIBLE BICYCLES
CARBON
FIBER REAR SUSPENSION
SHOCK ABSORBER MOTOR (MOPEDS
AND SCOOTERS)
EN
1,38 in
(35 mm)
Ø 0,87 to 1,10 in
Ø 22 to 28 mm
ROUND OVAL SQUARE TRIANGULAR CARBON FIBER DROP HANDLEBAR

5
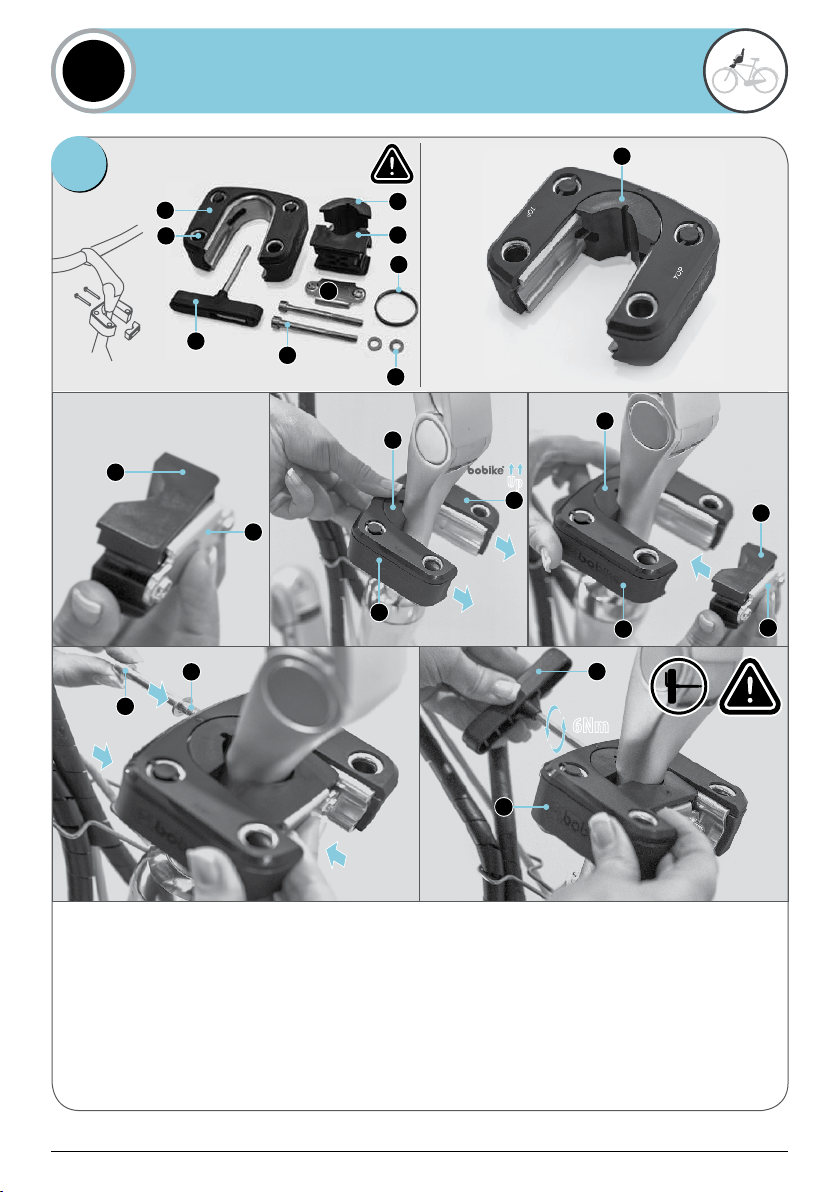
03. ASSEMBLY INSTRUCTIONS
FITTING THE CARRIER ON THE BICYCLE
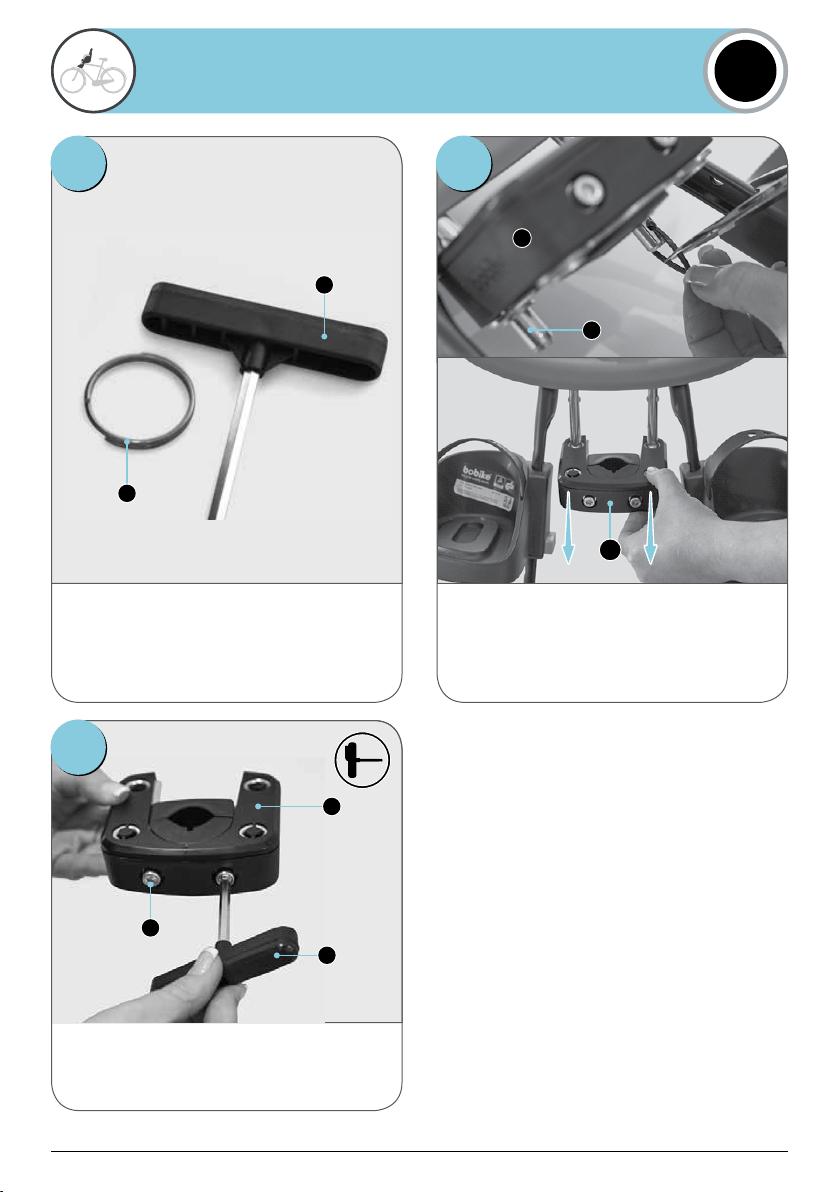
Take off all components from the bag (2 parts). Cut the security device to remove the frame holder (E)
from the steel rod (A1). Then, pull the frame holder (E)
down to release it.
1 2
EN
E
E
Remove the 2 bolts (E4) and washers (E2) from the frame
holder (E). Use the Allen key (E1).
3
E4
E1
A1
E1
E
E3
6
03. ASSEMBLY INSTRUCTIONS
FITTING THE CARRIER ON THE BICYCLE
Place the steel fastening plate (E6.3) to the rear fastening part of the KIT (E6.2) as shown in the picture.
On this step, make sure that the frame holder body (E5) faces up - the word“TOP”must face up. Then make sure that the front
spacer of the KIT (E6.1) is correctly applied to the body of the frame holder body (E5) as shown. Then, place the set to the
steering tube.
Next place the rear part (E6.2 + E6.3) so that the frame holder surrounds the steering tube. Then insert the 2 bolts (E4) and
washers (E2) into the frame holder (E).
Finally tighten the bolts using the Allen key (E1). Make sure that the frame holder (E) is tightly fixed and does not move (we
recommend a torque of 6 N.m) - correct tightening is extremely important for the child’s safety.
4
EN
Ø22MM - Ø28MM
E1
E3
E2
E4
E5.1
E6.1
E6.1
E6.2
E6.3
E
E5
6Nm
E6.1
E6.2
E6.3
E6.1
E
E
E
E2 E1
E4
Up
E6.2
E6.3

7
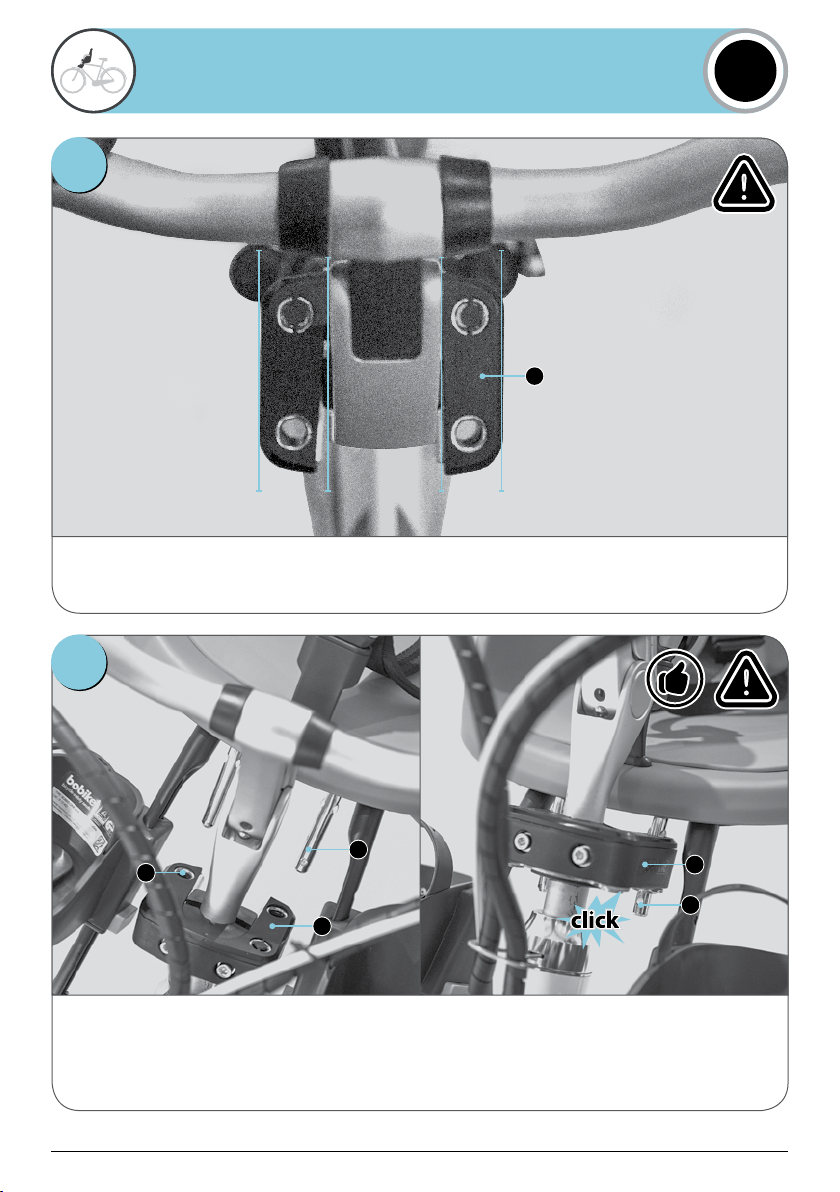
03. ASSEMBLY INSTRUCTIONS
FITTING THE CARRIER ON THE BICYCLE EN
To assemble the Baby Carrier insert the two ends of the steel rod (A1) of the Carrier into the corresponding holes (E5.1) of the
Frame Holder Body (E5).
You will hear a slight click when the operation is complete, and you will see that the ends of the steed rod (A1) appear
beneath the Frame Holder (E).
Make sure the child seat is upright.
6
A1
E5
E5
A1
E5.1
Having concluded the previous steps make sure that the frame holder (E) is secure and properly aligned with the handlebar
and the wheel. The frame holder (E) must be fitted as low as the steering tube allows.
5
E

8
03. ASSEMBLY INSTRUCTIONS
FITTING THE CARRIER ON THE BICYCLE
EN
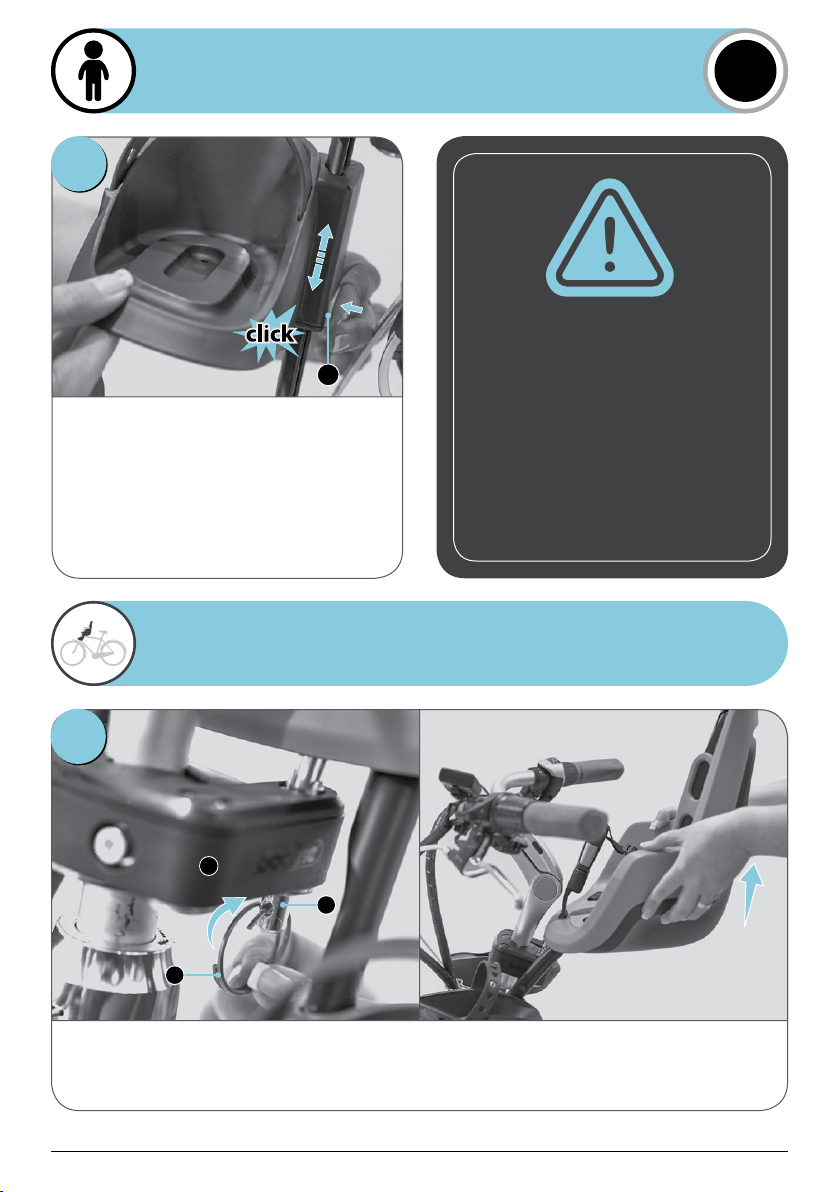
Having fitted the Carrier (A) to the frame holder (E), conclude this stage by inserting the safety ring (E3) in the hole at the end
of the steel rod (A1). This step is extremely important for the child’s safety.
7
Then sit on the bike and make sure that steering and
braking are not affected by any component of the Carrier.
Also make sure that there is enough space for the child
between the seat and the handlebars.
8
Make sure you have followed all the prior instructions. If
you have followed them correctly the carrier should look
like the pictures above.When done so, the carrier is ready
for use. IT IS MANDATORY TO READ the chapter on
Caution (06) and Instructions for Use (07) about using
your carrier before using it.
9
E
A1
E3
E3
9
04. ASSEMBLY INSTRUCTIONS
SEATING THE CHILD ON THE CARRIER
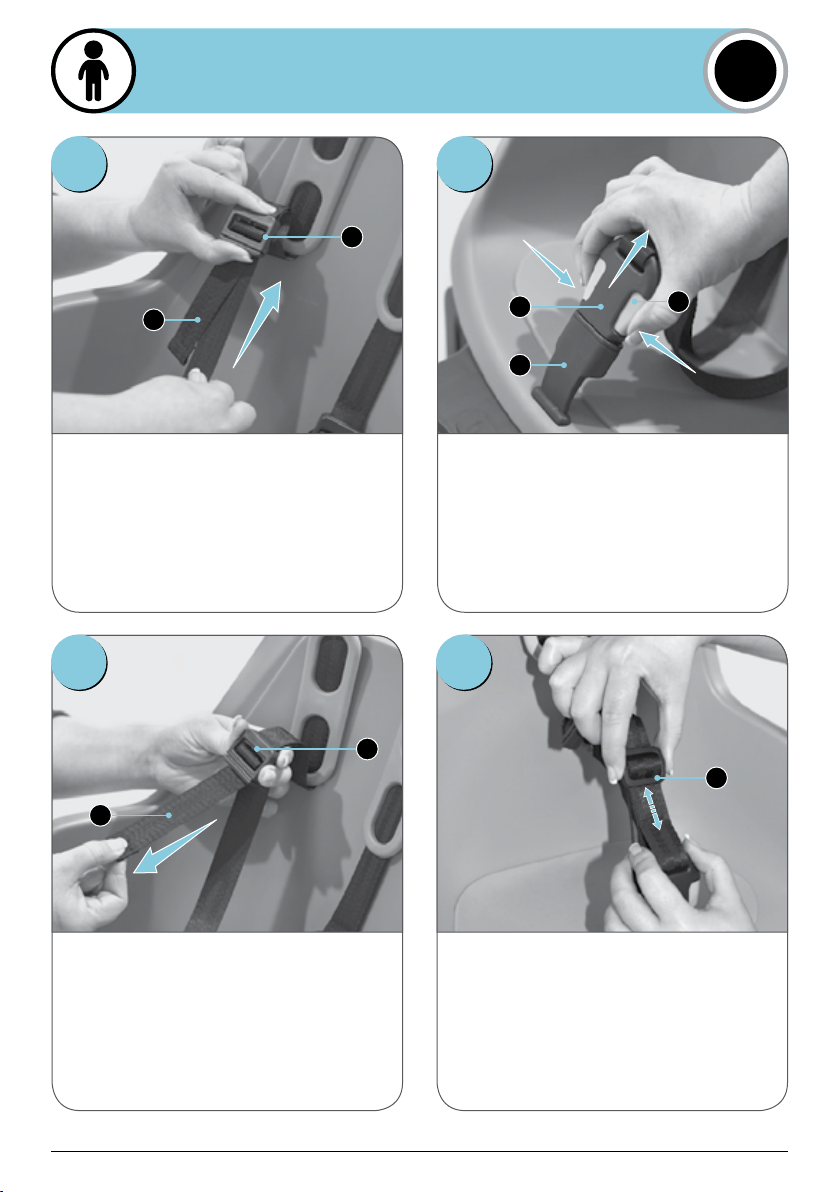
To put the child into the carrier you must first loosen the
retention system harness. First, extend the belt straps (B3)
to the maximum by pressing the upper strap adjustment
button (B2), then pull it up. This will simplify the
placement of the retention system harness (B) when the
child is in the child carrier. We recommend that the child's
helmet must be placed on after the retention system
harness is adjusted.
Next adjust the retention system harness (B) to the size of
the child to ensure that the child is firmly secured. First
adjust the height of the retention system harness (B). To
do this, pull the belt straps (B3) according to the size of
the child. Before starting the journey, always check that
the child is secured and that the retention system harness
is snug but not so tight that it hurts the child.
To complete this step and ensure that the child is safe,
adjust the lower lap belt adjuster (B4) according to the
size of the child, sliding it up or down.
To place the child in the child carrier, first undo the
retention system harness. Start by pressing the releases
on the sides of the safety buckle (C1) and pull the safety
buckle (C) upwards, so that it slides out of the socket (C2).
Place the child in the child carrier. lnsert the safety buckle
(C) in its socket again (C2). Make sure that the buckle
socket (C2) is correctly positioned and does not hurt the
child.
1
3 4
2
C1
B2
C2
B3
B2
B4
B3
EN
C

10
04. ASSEMBLY INSTRUCTIONS
SEATING THE CHILD ON THE CARRIER
After the final adjustment of the belt, check that the shoulder straps (B1) are not too close to the child’s neck to avoid hurting
them. The straps should be positioned slightly above the shoulders, as shown in the picture above.
5
To remove the footrest strap, lift it slightly to release it from the footrest peg (D3) and slide it upwards to disengage it from
the footrest slot (D). Put the child’s foot in place.To fix the strap (D1), place its narrower part of the footrest slot. Then pull the
strap down to fasten the appropriate hole to the footrest pin (D3). On conclusion of these steps the footrest strap (D1) is
securely fastened to the peg (D3).
6
B1
D1
D1
D3
DD
EN
11
To remove your child seat remove the split ring (E3) and pull the Carrier upwards and backwards to release it from the frame
holder (E).
6
04. ASSEMBLY INSTRUCTIONS
SEATING THE CHILD ON THE CARRIER
Next, adjust the height of the footrest to the child’s size.
For the purpose, press the footrest button (D2) and slide
the footrest (D) up or down as appropriate. Release the
button to fix the footrest (D) in the desired position. You
will hear a slight click when the operation is complete
and the button (D2) will jump to its normal position.
Note - The chosen position should cause the child’s knee
to be slightly straighter rather than bent, a more
comfortable position.
7
05. ASSEMBLY INSTRUCTIONS
HOW TO REMOVE YOUR CARRIER
WARNING!
Failure to comply with these
operating instructions can
lead to serious injury or
death of the bicycle operator
and/or child.
EN
D2
E
A1
E3

12
06. CAUTION NOTES
07. INSTRUCTIONS FOR USE
• The bicycle to which the carrier is attached must be in good
working order, of a type appropriate for the additional load,
and of proper size and adjustment for the rider. Check the
bicycle user manual or the bicycle manufacturer to obtain
information and to make sure the bicycle model is appropri-
ate to carry a bicycle carrier according to these characteris-
tics.
• Tighten fasteners securely, and check them frequently.
• Do not carry a child who is too young to sit comfortably and
independently in the carrier. (A pediatrician should be con-
sulted before any child younger than one year is carried, or if
the child has any disabilities.)
• Ensure initially, and check from time to time, that the child’s
weight does not exceed the load limit of the carrier.
• Additional luggage or accessories should not be attached to
the carrier, as they may exceed the load limit, and may lessen
stability. Total load limit for the carrier is 33 lbs (15 kg).
• Make no modifications to the carrier other than as set forth in
this manual.
• Do not allow any of the child’s body, clothing, shoelaces, or
toys to come in contact with moving parts of the bicycle.
• Always attach the retention system snugly around the child.
• When no child is being carried, fasten the retention system
buckles so the straps do not hang loosely.
• Ensure the rider and child are wearing approved bicycle hel-
mets (CPSC, ASTM F1447 or Snell) .
• Never ride in inclement or hazardous conditions.
• Check your local city, country or state laws relating to the
carrying of children in carriers attached to bicycles.
• The rider must be at least 16 years of age; Check your local
city, country or state laws pertaining to this issue.
• Make sure that the weight of the child and items in the stor-
age area does not exceed the maximum capacity of the child
seat or the rack, and check this at regular intervals. Check the
weight of the child before using the CARRIER. Under no cir-
cumstances should you use the carrier to transport a child
whose weight is above the permissible limit. Do not use the
child carrier to carry any pets or objects other than a properly
sized child.
• A load of a carrier may lessen the stability and alter the riding
characteristics of the bicycle, particularly regarding steering
and braking.
• Never leave the child unattended in the carrier.
• Never leave the child in a carrier with the bicycle supported
only by a kickstand.
• Before each ride, ensure the mounted carrier does not inter-
fere with braking, pedaling, or steering of the bicycle.
• Never ride the bicycle at night without adequate lighting.
• Always remove the carrier from the bicycle when the bicycle
is being transported on a motor vehicle. This is necessary be-
cause the force of the high wind on the carrier may degrade
or damage the carrier to the point that it will not perform
reliably.
• Presence of a carrier on a bicycle may require alteration of the
method used by the rider to mount or dismount the bicycle.
Care must be taken whenever the rider gets on or off the bi-
cycle.
• Do not allow the child to hold or carry anything while in the
carrier as if dropped it could interfere with the movement of
the bicycle or injure your child or both.
• Secure the child into carrier ensuring that all the retention
belts and straps applied firmly but not so tight as to cause
discomfort to the child. Please check the tightness of the
fasteners during the ride and each time the child in put in or
taken out of the carrier during the ride.
• The carrier must never be used before adjusting the retention
belts.
EN

13
07. INSTRUCTIONS FOR USE
• Insure that carrying the child will not interfere with the rear
brakes. These safety issues should be revised as your child
grows.
• Dress the child in proper clothes according to weather condi-
tions. Carried children need to be more warmly dressed than
riders of cycles and should be protected from rain, and from
temperatures below freezing that could cause the child to suf-
fer frostbite. Always insure that none of your child’s clothing or
shoes can become entangle with any part of the bicycle.
• You must cover any sharp or pointy objects,“pinch points” or
body part entrapment areas on the bicycle that could be
reached by the child.
• The carrier and cushion can get hot if under the sun for a long
time. Make sure that they are not too hot before carrying the
child.
• Check if all parts of the bicycle function correctly with the
carrier mounted.
• The bicycle to which the carrier is attached must be in good
working order, of a type appropriate for the additional load,
and of proper size and adjustment for the rider. Check the bicy-
cle user manual or the bicycle manufacturer to obtain informa-
tion and to make sure the bicycle model is appropriate to carry
a bicycle carrier according to these characteristics.
• Do not use the carrier if any part is broken or damaged. Check
all components regularly and replace any when required.
Check the maintenance chapter.
• The rider and the child should wear helmets that have been
approved to nationally recognized standards.
08. CARE AND MAINTAINANCE
To keep the carrier in good working condition and to prevent accidents we recommend the following:
• Check regularly the mounting system of the carrier to the bicycle in order to make sure it is in perfect condition.
• Before any ride, check all the components to see if they work properly. Do not use the carrier if any of the components are
damaged. Damaged components must be replaced. In order to replace them, you need to contact your local dealer in order to
get the correct components for replacement. You can find all the contacts on the website: http://bit.ly/bobike-usa
• If you have suffered an accident with your bicycle and carrier, we advise you to get a new carrier. Even if there is no visible
damage to the carrier.
• Clean the carrier with soap and water (do not use abrasive, corrosive or toxic products). Leave it to dry at room temperature.
• Failure to comply with these operating instructions can lead
to serious injury or death of the bicycle operator and/or child.
Polisport is not liable for any damage to the product or per-
sons resulting from improper installation, storage, or assem-
bly (non-compliance with assembly instructions), improper
maintenance, misuse or use not in compliance with the tech-
nical or use specifications (non-compliance with mainte-
nance and care instructions), modifications or repairs made
by you or a third party.
• When the steering angle to each side is reduced to less than
45º, change the type of handlebar.
WARNING: Additional security devices shall always be fas-
tened.
WARNING: Do not place any additional luggage on the seat,
because the weight cannot exceed 15 kg (33 lb). If you carry
extra luggage, the bicycle’s carrying capacity must not be ex-
ceeded, and we recommend that it be placed at the rear of the
bike.
WARNING: The turning circle will be restricted when using a
front child seat. Pay attention to this fact before setting off.
WARNING: Remove the seat when transporting the bicycle by
car (outside the car). Air turbulence might damage the seat or
loosen its fastenings or other suspended elements, which
could lead to an accident.
EN

14
09. WARRANTY
POLISPORT LIMITED WARRANTY
Polisport warrants to the original retail purchaser (“you”) that the Polisport product for which you received this warranty is free
from defects in material and workmanship for (3) three years from the date of original retail purchase. Please see the current full
warranty policy at http://bit.ly/bobike-usa for details.
WARRANTY EXCLUSIONS
This warranty does not cover the following:
Products that have been modified, neglected or poorly maintained, used for commercial purposes, misused or abused
or involved in accidents. It is your responsibility to regularly examine the product to determine the need for normal service or
replacement.
Damage occurring during shipment of the products (such claims must be presented directly to the shipper).
Products whose serial number or other identifying marks or labels have been altered, defaced or removed.
Products whose original product decals or surface finish/paint have been removed or modified.
Products that are purchased used, or in not-new condition without original packaging.
Products that are returned in an incomplete condition (i.e. parts missing)
Damage to products resulting from improper assembly or repair (or the techniques used), the use or installation of parts or
accessories not compatible with the original intended use of the product, or the failure to follow the product warnings,
installation and usage instructions.
Products purchased at, installed, adjusted and or assembled by non-authorized retailers.
Products purchased through unauthorized distribution channels (i.e. via an unauthorized internet seller, swap meet or private
party) or products originally intended to be sold in a country other than the one you purchased them in or from (i.e. grey market
goods)
Damage or deterioration to the surface finish, paint, aesthetics or appearance of the product.
The labor costs required to remove and/or re-fit and re-adjust the item covered by this warranty or any product that it is attached to.
Any costs associated with returning or shipping warranted or non-warranted products.
Normal wear to the product. Components may have symptoms of wear in less than their warranted time frame depending on
amount of use, type of use and other conditions.This includes products that have reached the end of their normal life expectancy
before the warranted time frame expires.
Commercial claims made by any merchant, retailer, commercial seller or reseller (not on behalf of an individual consumer).
Any products for which the consumer does not follow the warranty procedures outlined above.
WARRANTY CLAIMS
To obtain warranty service, you must have your original sales receipt. Items returned without a sales receipt will assume that the
warranty begins on the date of manufacture. All warranties will be void if the product is damaged due to user crash, abuse,
system modification, or used in any way not intended as described in this operating manual.
In order to make sure you have all the required information to activate the warranty, you need to keep the information that you
have in your traceability information (F).You can also record here the info.
O.F ___________________ Date ___________________ .
NOTE:The specifications and design are subject to change without notice.
Please contact Polisport for any questions.
EN

15
STANDARD
Ø 0,87 - 1,10 in
Ø22 - Ø28 mm
A. SILLA
A1. EXTREMOS DE LAS VARILLAS DE ANCLAJE DE ACERO
B. CORREAS DEL SISTEMA DE RETENCIÓN
B1. ALMOHADILLA PARA EL HOMBRO
B2. BOTÓN DE AJUSTE DE LA CORREA SUPERIOR
B3. CORREA
B4. AJUSTE DE LA CORREA INFERIOR
C. HEBILLA DE SEGURIDAD
C1. BOTÓN DE LIBERACIÓN DE LA HEBILLA DE SEGURIDAD
C2. ANCLAJE DE LA HEBILLA DE SEGURIDAD
D. REPOSAPIÉS
D1. CINTA PARA REPOSAPIÉS
D2. BOTÓN DE AJUSTE DEL REPOSAPIÉS
D3. CLAVIJA DE SUJECIÓN DE LA CINTA DEL REPOSAPIÉS
E. ANCLAJE DEL CUADRO
E1. LLAVE ALLEN DEL 5
E2. 2 ARANDELAS
E3. ARGOLLA
E4. 2 TORNILLOS M6x65
E5. BLOQUE DE MONTAJE
E5.1. AGUJEROS PARA INTRODUCIR LAS VARILLAS A1
E6. KIT ESTÁNDAR PARA MANILLARES DE 22-28 MM DE
DIÁMETRO
E6.1. PIEZA FRONTAL
E6.2. SUJECIÓN POSTERIOR
E6.3. PLACA DE SUJECIÓN DE ACERO
F. N.º DE SERIE DE LOTE
01. LISTA DE COMPONENTES
¡ATENCIÓN! El incumplimiento de las instrucciones
del fabricante puede provocar graves lesiones e incluso la
muerte del conductor de la bicicleta y/o del niño!
OK! MONTAJE CORRECTO
ES
Ø 0,87 - 1,10 in
Ø22 - Ø28mm
F
B2
B1
B3
D1
E3
A1
D3
B4
C1
C2
A
G
B
E
D
D2
E6
E6.1
E6.2
E6.3
E5.1
E2
E4
E5
E1
EA
C
16
02. CARACTERÍSTICAS TÉCNICAS
ESPECIFICACIONES PARA EL MONTAJE DE LA SILLA
ADVERTENCIA
• Esta silla no se puede montar en bicicletas que tengan amor-
tiguadores traseros.
• El portabebé delantero no se puede instalar en bicicletas de
carreras con manillares de carretera.
• Esta silla no se puede montar en vehículos motorizados,
como ciclomotores y escúteres.
• Esta silla no debe montarse en bicicletas con cuadros trian-
gulares, cuadrados o de fibra de carbono o titanio.
• Esta silla se puede instalar en bicicletas con cuadros redon-
dos u ovalados de diámetros comprendidos entre los 22 y los
28 milímetros (Ø 0,87 to 1,10 in).
• La silla se tiene que montar en bicicletas cuyas ruedas tengan
diámetros de 26”- 29”.
• Esta silla solo es apta para transportar niños con un peso
máximo de 33 lbs - 15 Kg (y niños con edades recomendadas
entre 9 meses y 3 años, siendo el peso una variable decisiva).
• La suma del peso del conductor y del niño transportado no
puede ser superior a la carga máxima permitida de la bicicle-
ta. La información sobre la carga máxima se encuentra en las
Cómo y dónde fijar la silla a la bicicleta.
instrucciones de uso de la bicicleta. En caso de dudas, pón-
gase en contacto con el fabricante.
• La silla únicamente se puede montar en bicicletas aptas para
añadir cargas adicionales.
• La posición de la silla se tiene que adaptar de modo que los
pies del conductor de la bicicleta no entren en contacto con
la silla mientras esté en marcha.
• Es muy importante ajustar correctamente la silla y sus compo-
nentes para conseguir el máximo confort y seguridad para el
niño. Asimismo, es importante que la silla no se incline hacia
adelante, para que el niño no se escurra. También es impor-
tante que el respaldo esté ligeramente inclinado hacia atrás.
• Compruebe que todos los componentes de la bicicleta fun-
cionan correctamente cuando monte la silla.
• ADVERTENCIA: Los portabebés delanteros reducen la capaci-
dad de maniobra de la bicicleta.
• Consulte las instrucciones de la bicicleta y si tiene du-
das sobre cómo montar el portabebé delantero, pón-
gase en contacto con el fabricante de su bicicleta.
PRECAUCIÓN
OK
CUADROS
COMPATIBLES
INCORRECTO
QUADROS
INCOMPATIBLES
PESO MÁXIMO
DEL NIÑO
33 lbs (15 kg)
INCORRECTO
INCOMPATIBLE CON
FIBRA DE
CARBONO AMORTIGUADORES
TRASEROS MOTOS (CICLOMOTORES
Y ESCÚTERES)
ES
1,38 in
(35 mm)
Ø 0,87 to 1,10 in
Ø 22 to 28 mm
REDONDO OVALADO CUADRADO TRIANGULAR FIBRA DE CARBONO CARRERAS CON
MANILLARES DE CARRETERA
17
03. INSTRUCCIONES DE MONTAJE
CÓMO MONTAR LA SILLA EN LA BICICLETA
Retire todos los componentes de la bolsa (2 piezas). Corte el dispositivo de seguridad para extraer el anclaje
del cuadro (E) de la varilla de acero (A1). A continuación,
tire del anclaje del cuadro (E) hacia abajo para soltarlo.
1 2
ES
E
E
Extraiga los 2 pernos (E4) y las arandelas (E2) del anclaje
del cuadro (E). Utilice la llave Allen (E1).
3
E4
E1
A1
E1
E
E3

18
03. INSTRUCCIONES DE MONTAJE
CÓMO MONTAR LA SILLA EN LA BICICLETA
Coloque la placa de sujeción de acero (E6.3) en la sujeción posterior del kit (E6.2), tal como se muestra en la imagen.
En este paso, compruebe que el anclaje del cuadro (E5) está orientado hacia arriba (la palabra «TOP» debe quedar arriba). A
continuación, compruebe que la pieza frontal del kit (E6.1) encaja correctamente con el anclaje del cuadro (E5), tal como se
muestra. Coloque el conjunto en el tubo del manillar.
A continuación, coloque la parte posterior (E6.2 + E6.3) de modo que el anclaje del cuadro rodee el tubo del manillar.
Introduzca los 2 pernos (E4) y las arandelas (E2) del anclaje del cuadro (E).
Apriete los pernos con la llave Allen (E1). Asegúrese de que el anclaje del cuadro (E) queda bien sujeto y no se mueve
(recomendamos un par de apriete de 6 N.m). Para garantizar la seguridad del niño, es muy importante que quede
correctamente apretado.
4
ES
Ø22MM - Ø28MM
E1
E3
E2
E4
E5.1
E6.1
E6.1
E6.2
E6.3
E
E5
6Nm
E6.1
E6.2
E6.3
E6.1
E
E
E
E2 E1
E4
Up
E6.2
E6.3
19
03. INSTRUCCIONES DE MONTAJE
CÓMO MONTAR LA SILLA EN LA BICICLETA ES
Asegúrese de que el anclaje del cuadro (E) está bien sujeto y debidamente alineado con el manillar y la rueda.
El anclaje del cuadro (E) debe estar instalado lo más abajo posible que permita el tubo de dirección.
5
Para colocar la silla de bebé, introduzca los pernos de la varilla metálica (A1) de la silla de bebé en los orificios (E5.1)
correspondientes del cuerpo del anclaje del cuadro (E5).
Oirá un pequeño clic cuando finalice la operación y verá que las extremidades de los pernos de la varilla metálica (A1) pasan
hacia abajo del anclaje del cuadro (E).
Asegúrese de que la silla de bebé ha quedado colocada en la vertical.
6
A1
E5
E5
A1
E5.1
E

20
03. INSTRUCCIONES DE MONTAJE
CÓMO MONTAR LA SILLA EN LA BICICLETA
ES
Uma vez encajada la silla de bebé ( A) en el anclaje del cuadro (E), deberá concluir la operación introduciendo la arandela de
seguridad (E3) en la abertura de la extemidad del perno de la varilla metálica (A1). Este paso es muy importante para la
seguridad del niño.
7
A continuación, siéntese en la bicicleta y compruebe que
la capacidad de conducción y frenado no ha quedado
afectada por ningún componente de la silla de bebé.
Asegúerese, asimismo, que existe espacio suficiente para
el niño entre la silla y el manillar.
8
Asegúrese de que ha seguido las instrucciones anteriores.
Si las ha seguido correctamente, la silla debería tener el
mismo aspecto que en las imágenes que aparecen
anteriormente. Si es así, ya puede empezar a utilizar la
silla. ES OBLIGATORIO LEER el Advertencias (06) y
Instrucciones de Uso (07) sobre cómo preparar la silla
antes de usarla.
9
E
A1
E3
E3
Table of contents
Languages:


