Balance Carrier User manual

BalanceTM Carrier
Owners Manual
Instructions
This box contains:
1-sash 1-detachable hood 1-reversible front panel 1-mesh washing bag
Read all instructions before assembling and using your carrier. Failure to follow
each instruction can result in serious injury or death to your baby.
IMPORTANT!
KEEP INSTRUCTIONS FOR FUTURE USE
.
8lbs - 35lbs (3.6kgs 15.9kgs)
English
Visit us
online to view our
instructional videos
and learn more about
our products at
www.infantino.com

1.
WARNING: FALL HAZARD
Small babies can fall through a leg opening. Follow instructions for use. Only
use this carrier for babies between 8 lbs (3.6 kgs) and 35 lbs (15.9 kgs). Adjust
the leg openings to t the baby’s legs snugly. When using this carrier in the
front position, ALWAYS keep one hand on the baby until the shoulder straps
are properly positioned. DO NOT attempt to use the carrier in the backpack
position without the assistance of a partner. The baby MUST be able to sit up
on his/her own before being worn in the backpack position to avoid possible
neck or back injury.
Complies with safety requirements of ASTM F2236 and BS EN 13209-2:2005
WARNING: SUFFOCATION HAZARD
NEVER lean against baby. ALWAYS make sure there is enough room around
your baby’s face to provide a clear source of air.
WARNING:
• KEEP AWAY from re and heat sources.
• Your balance may be adversely affected by your movement and that of
your baby.
• DO NOT lean forward with the baby in the carrier. DO NOT bend at the waist
– only bend at the knees to make sure the baby stays securely in the carrier.
• This carrier is not suitable for use during sporting activities.
• IMPORTANT! The baby must face towards you until he/she can hold head
upright.
• ALWAYS Check to assure all buckles, snaps, straps, and adjustments are
secure before each use.
• STOP! First time users should be assisted by a partner.
• DO NOT USE PRODUCT IF DETERIORATION OR PROBLEMS ARE DETECTED.
• DO NOT use this carrier as a child restraint in a motor vehicle. This product will
not properly restrain your baby in the event of a crash.
Warnings:

Helpful Hints:
The BalanceTM Carrier is designed for greater comfort for both you
and your child, and more physical contact with your baby. Its design
allows the child’s weight to be focused on the hips (where mothers
have been carrying children for at least several thousand years). And
because you can tolerate additional weight in this position, you can
continue to carry your child even as they get older.
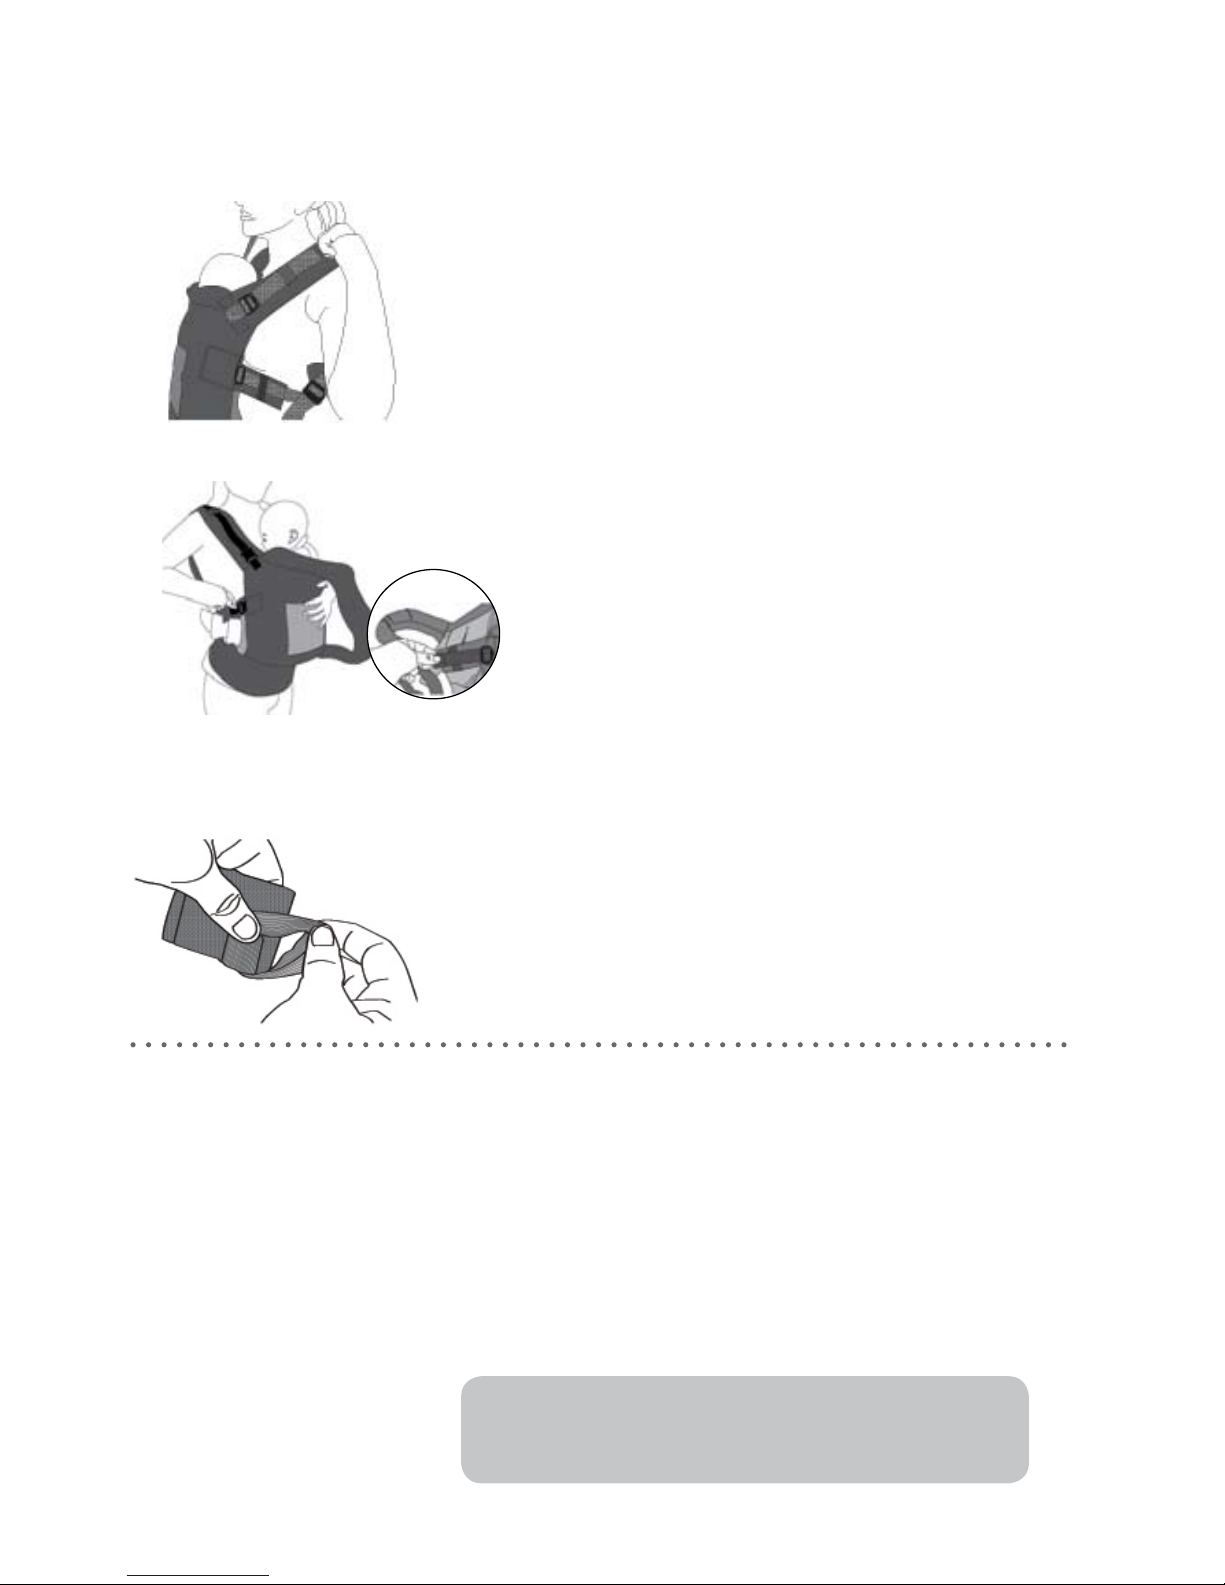
Facing-in position - Child Facing Toward You - Until your child is able
to sit upright, this is the ideal position. Since there is no material be-
tween you and your infant, it affords your baby lots of close physical
contact and attention, while leaving your hands free. In this position.
you can entertain or bond with your newborn by talking, touching,
playing or just making eye-contact.
How do you know if your baby is at the right height when worn in the
front? - You should be able to tilt forward slightly and kiss the top of
your child’s head.
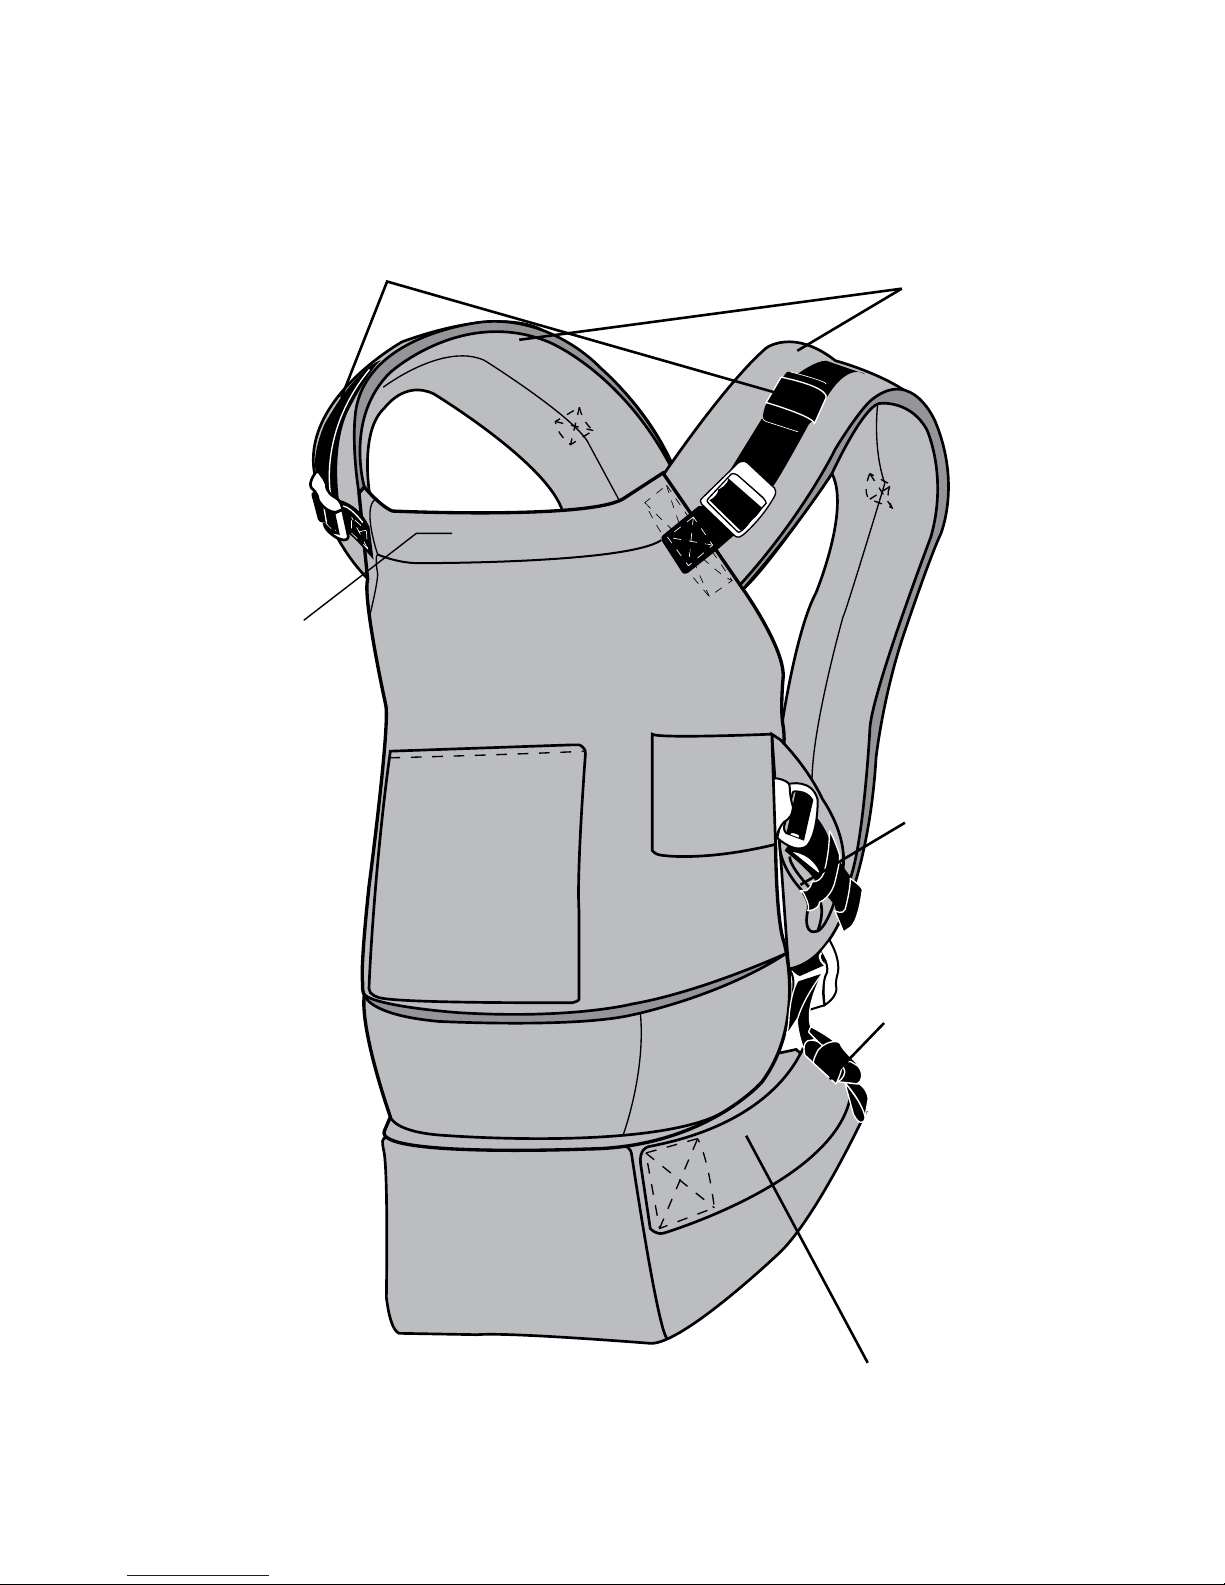
When placing or removing your baby into or out of the carrier,
sitting down will make the procedure easier. Until you are completely
comfortable with the loading and unloading procedures, it is also
safer to do so over a soft surface.
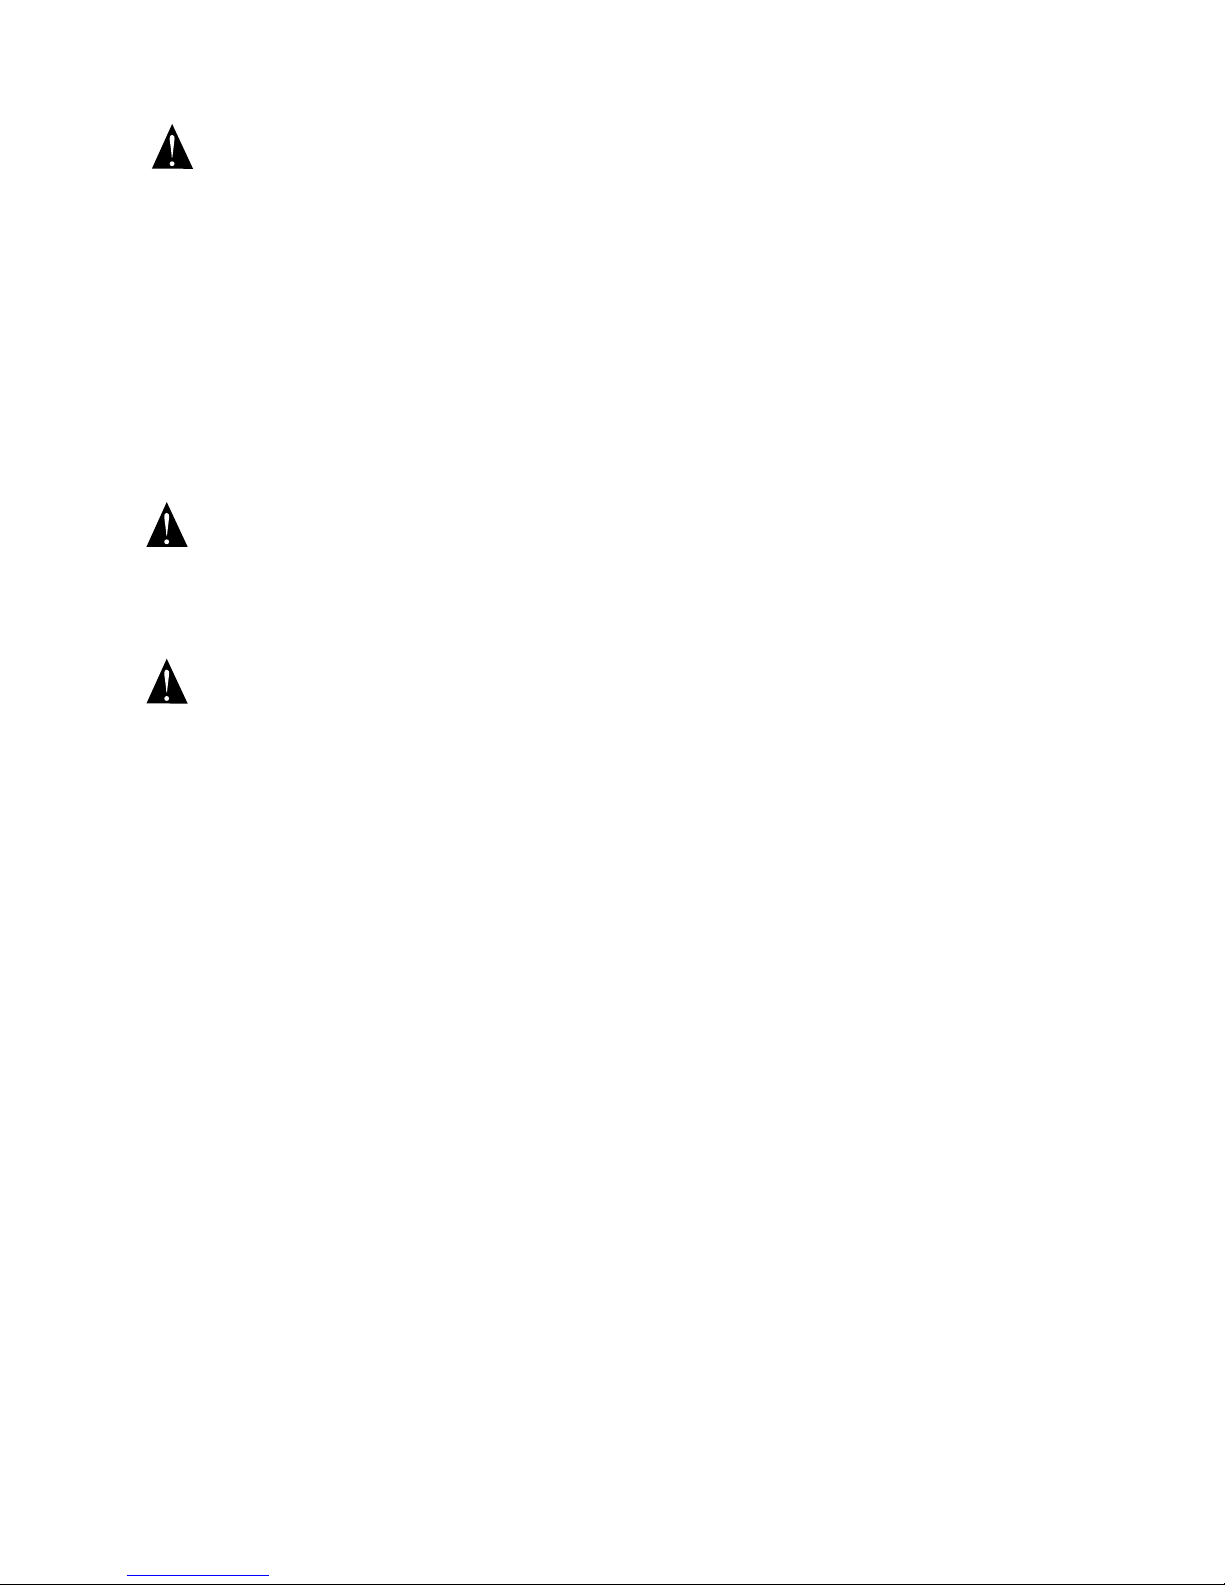
The BalanceTM Carrier also contains a handy accessory pocket for
keeping “essentials” close at hand (such as a phone, pacier, keys,
etc.)
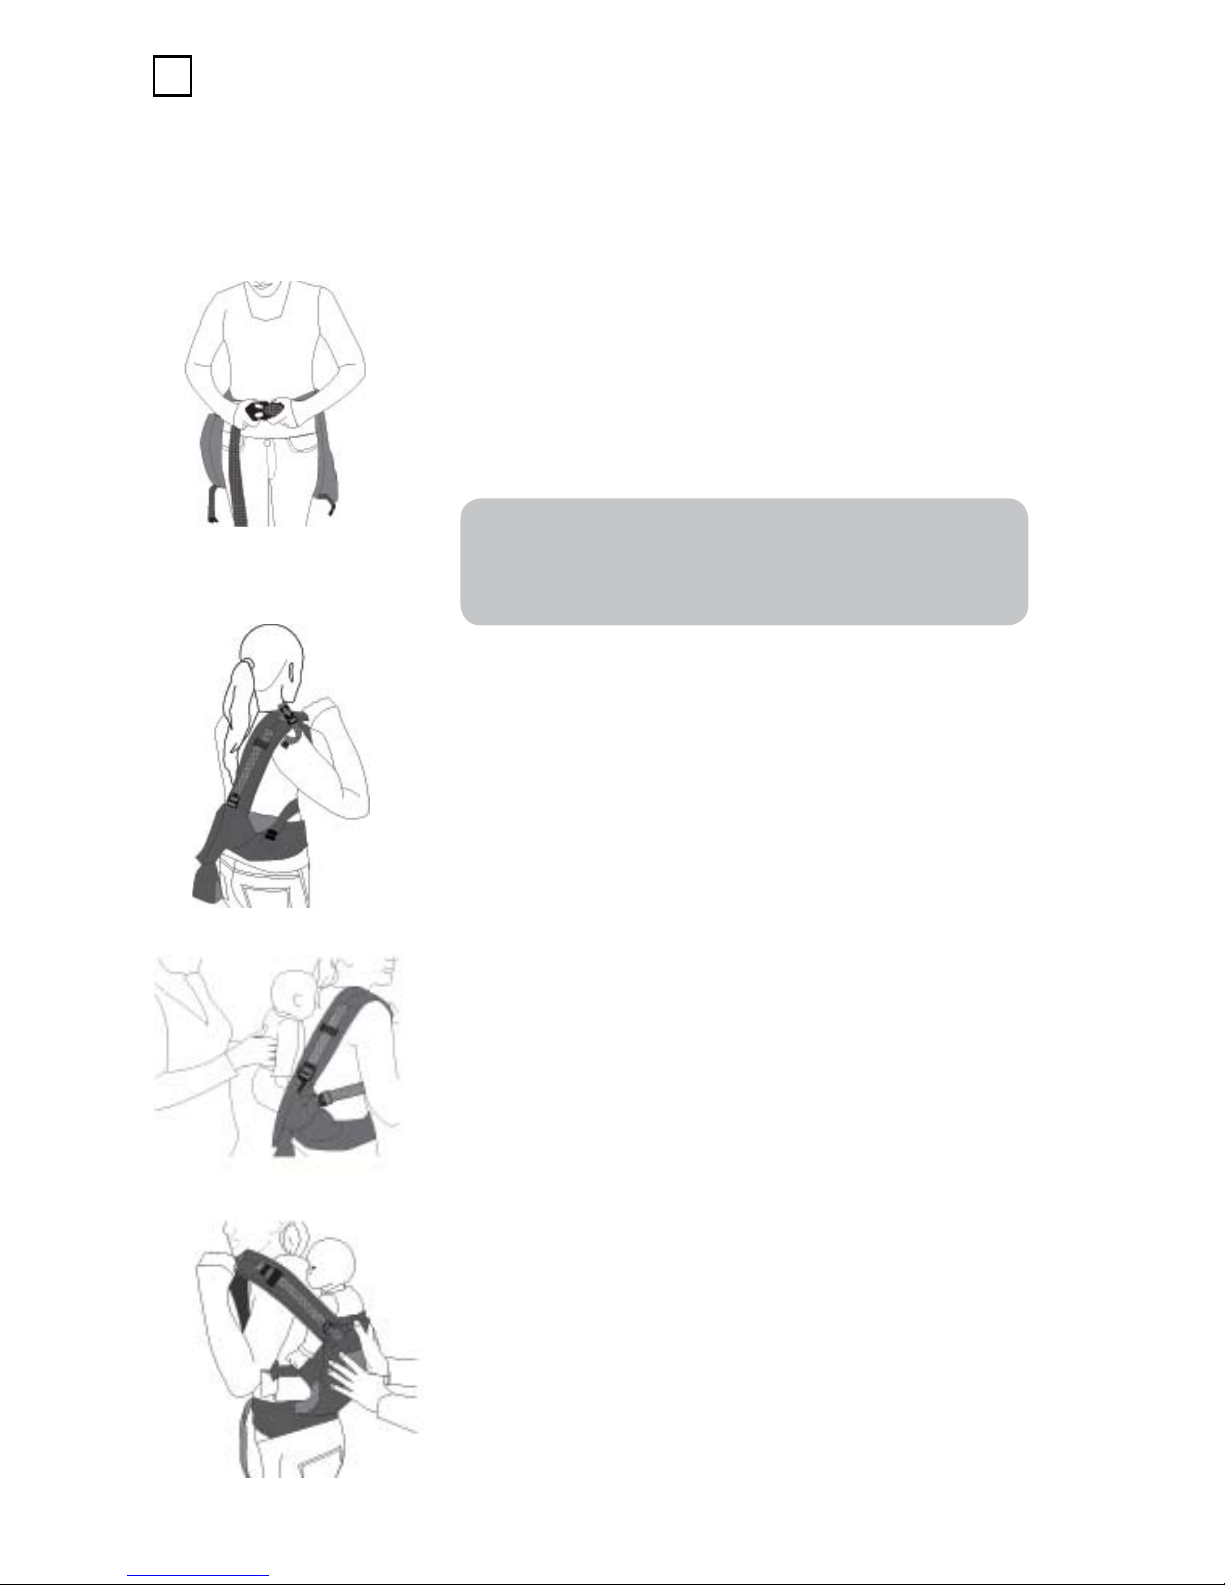
Backpack Position - Child Facing Forward - ”It’s like a piggyback ride,
but your hands are free.” When your little one can fully sit up on his
or her own, putting them on your back allows you to carry the child
comfortably for longer periods of time. In this position your baby is free
to check out what is going on around them and still know that you are
right there.
Wearing the carrier closer to your body and higher up on your back
(or chest when worn in the front position) will minimize stress to your
back and shoulders from prolonged use.
Care Instructions
Machine wash cold, separately, on gentle cycle. NO chlorine bleach or
fabric softeners. Drip dry only, do not use dryer. Do not iron.
2.
English
*
*
*
*
*
*
*

3.
Top Shoulder
Strap Tightener Shoulder Strap
Tidy Loop
Head Support
Lumbar Support Belt
Carrier Body Front:
Leg Strap

Carrier Body Back:
4.
Chest/Back Strap
Leg Strap
Top Shoulder
Strap Tightener
Head Support
Lumbar Support Belt
Pattern Area

* IMPORTANT! Keep one hand on the baby until the shoulder straps are properly
positioned.
* IMPORTANT! Your baby must face toward you until he/she is able to hold head
upright.
First, unfasten the buckle on the “lumbar support
belt.” Pick up your carrier by the “lumbar support
belt” with the inside “pattern area” of the carrier
facing towards the front of your body. Place the
“lumbar support belt” around you at your natural
waist, and attach the belt buckle in the back.
Tighten the “lumbar support belt” by pulling
forward on its webbing strap.
For accessibility, move the “chest/back strap”
(that attaches the “shoulder straps”) to as close
to the top of the carrier as possible. Unfasten the
buckle.
Instructions:
1.
2.
3.
5.
1 Placing baby in your carrier:
Facing-in position
* Until your baby is able to hold his/her head upright, this is the ideal position.
Since there is no material between you and your infant, if affords him or her lots
of close physical contact and attention, while leaving your hands free. In this
position, you can entertain or bond with your baby by talking, touching, playing
or just making eye-contact.
* Note: Persons with longer torsos may nd a higher
belt position more comfortable (closer to the
navel); shorter people may wish to wear the belt
more on the hips.
Pattern Area

6.
* IMPORTANT! Before releasing your hold on the
baby, ensure that the “shoulder straps” are
securely in place.
Lift your baby facing towards your body to your
natural waist. Make sure the baby’s legs wrap
comfortably around your waist and are slipped
through each leg hole. The “leg straps” should
be above the baby’s legs.
5
4.
While holding the baby securely with the left
hand, slip the “shoulder strap” onto your right
shoulder. Switch hands and repeat with the other
“shoulder strap.”
6
5.
Once the straps are secure on your shoulders,
reach over your shoulders and attach the
“chest/back strap” to connect the two “shoulder
straps” together. If you have difculty reaching
the buckle ask another person for assistance.
7
6.
English

7.
* IMPORTANT! The “removable bib” should only be
used for the front, facing In position and NOT for
the backpack position.
To bring the baby close against your body
(or for a more comfortable t), tighten the
“shoulder straps” by pulling on the “top
shoulder strap tighteners.
5
7.
Fit the baby’s legs snugly in the leg holes by
adjusting the webbing on the” leg strap.”
6
8.
Adjust the “head support” to properly support
the child’s head.
9.
Direct contact between the baby and the
parent is one of the best features of this carrier.
However, when carrying the child in the front
position, the “removable bib” may be used to
protect the wearer’s clothing. Attach the bib
directly onto each “shoulder strap” and center
it on your chest between you and the baby.
7
11.
Roll any excess webbing and secure with an
elastic “tidy loop.” Repeat with each strap to
keep the carrier neat and any excess strap out
of the way.
7
10.
Using removable bib: Facing-in position

Unbuckle the “lumbar support belt” and remove
the carrier.
7
5.
Removing the child from the carrier: Facing-in position
8.
* IMPORTANT! Once the “chest/back strap” is
unbuckled, keep at least one hand on the baby
at all times.
First of all, reach over your shoulders and
unbuckle the “chest/back strap.”
5
1.
To facilitate extracting the baby’s legs, loosen the
leg hole openings by adjusting the webbing on
the “leg strap.”
6
2.
While holding the baby securely with the left
hand, remove the right “shoulder strap.” Switch
hands and repeat for the other side.
7
3.
English
Holding the baby with both hands, slide the child
out of the front of carrier. Gently place the baby
in a safe location before removing the carrier
from your body.
7
4.

While the other person is still holding the baby
securely on your back, put your other arm
through the “shoulder strap.”
4.
* IMPORTANT! For the backpack position, users must be assisted by a partner.
* IMPORTANT! The baby MUST be able to sit up on his/her own before being worn
in the backpack position to avoid possible neck or back injury.
* IMPORTANT! The “removable bib” should NOT be used in the backpack position.
9.
First, unfasten the buckle on the “lumbar support
belt.” Pick up your carrier by the “lumbar support
belt” and place it around you at your natural
waist with the inside “pattern area” of the carrier
facing toward your back. Attach the belt buckle
in the front.
1.
Put one “shoulder strap” over your shoulder.
2.
Have a second person carefully place the baby
into the carrier, making sure that the baby’s legs
go through the leg holes and wrap around your
waist naturally. The “leg straps” should be above
the baby’s legs.
3.
2 Placing older baby in your carrier:
Backpack position
* Note: Persons with longer torsos may nd a higher
belt position more comfortable (closer to the
navel); shorter people may wish to wear the belt
more on the hips.

With the second person still supporting your
baby securely, buckle the “chest/back
strap” and adjust it to a comfortable
position.
5
5.
Tighten the webbing at the base of each
“shoulder strap” to adjust them for a more
comfortable t.
6
6.
Tighten the “top shoulder strap tighteners” to
pull your baby closer to your body into the most
comfortable position.
7
7.
When the baby is secure in the backpack
position, the assistant can release their support
of the child.
7
8.
Adjust the webbing on the” leg straps” to t the
baby’s legs snugly in the leg holes.
7
9.
Roll any excess webbing and secure with an
elastic “tidy loop.” Repeat with each strap to
keep the carrier neat and any excess strap out of
the way.
7
10.
English
10.

Carefully slide the baby out of the carrier.
7
6.
Removing older baby from the carrier:
Backpack position
11.
* IMPORTANT! NEVER lean against the baby. ALWAYS
make sure there is enough room around your
baby’s face to provide a clear source of air.
For removal with assistance, have the second
person support the child while you unfasten
the buckles on the “chest/back strap” and the
“lumbar support belt.” As the second person
lifts the child in the carrier, remove both shoulder
straps. Loosen both “leg straps” and lift the child
out of the carrier.
5
1.
For removal by yourself, sit down slowly and
carefully in a secure corner before removing
the carrier.
6
2.
Unbuckle the “chest/back strap” and the
“lumbar support belt”.
7
3.
Remove the “shoulder straps” and slowly lower
the baby off your back into the secure corner.
7
4.
Loosen both “leg straps” to facilitate extracting
the child’s legs.
7
5.
* Note: For unloading your child from the backpack position, you may either use
the assistance of a second person or perform the procedure alone using a secure
corner (such as a couch).

Manual del propietario de
BalanceTM Carrier
Esta caja contiene:
1 transportador 1 babero desprendible
Lea todas las instrucciones antes de armar y usar su transportador. No seguir
todas estas instrucciones puede dar como resultado lesiones graves o la
muerte de su bebé.
¡
IMPORTANTE!
CONSERVE ESTAS INSTRUCCIONES PARA
UTILIZARLAS MÁS ADELANTE.
8lbs - 35lbs (3.6kgs 15.9kgs)
Español

ADVERTENCIA: PELIGRO DE CAÍDAS
Los niños pequeños pueden caer por una de las aberturas para las piernas.
Siga las instrucciones de uso. Sólo use este transportador con niños de entre
8 lb (3.6 kg) y 35 lb (15.9 kg). Ajuste las aberturas para las piernas de modo
que se adapten bien a las piernas de su bebé. Al usar este transportador en
posición frontal, SIEMPRE mantenga una mano en el bebé hasta que las
correas de los hombros estén en la posición correcta. NO intente usar el
transportador en posición de mochila sin la ayuda de otra persona. El bebé
DEBE poder sentarse por sí mismo antes de llevarse en posición de mochila,
para evitar posibles lesiones en el cuello o la espalda.
Cumple o supera las normas ASTM F2236 y BS EN 13209-2:2005.
ADVERTENCIA: RIESGO DE ASFIXIA
NUNCA se incline contra el bebé ni lo oprima. SIEMPRE asegúrese de que haya
suciente espacio alrededor del rostro de su bebé para proporcionar una fuente
de aire libre.
ADVERTENCIA:
• CONSÉRVELO LEJOS del fuego y fuentes de calor.
• Su equilibrio se puede ver afectado negativamente por su movimiento y el
de su hijo.
• No se incline hacia delante cuando tenga al bebé en el transportador. No
se doble por la cintura al inclinarse; sólo doble las rodillas para asegurarse de
que el bebé se mantenga jo en el transportador.
• Este transportador no es adecuado para ser usado durante actividades
deportivas.
• ¡IMPORTANTE! El niño debe mirar hacia usted hasta que pueda mantener
erguida la cabeza.
• SIEMPRE revise para asegurarse de que todas las hebillas, broches, correas y
ajustes estén rmes antes de cada uso.
• ¡ALTO! Quienes lo usan por primera vez deben contar con la ayuda de otra
persona.
• NO USE EL PRODUCTO SI SE DETECTAN DETERIOROS O PROBLEMAS.
• NO use este transportador como jación para el niño en un vehículo de
motor. Este producto no retendrá debidamente a su hijo en caso de un
choque.
Advertencias:
13.

Sugerencias Útiles:
El Transportador BalanceTM está diseñado para una mayor comodidad
tanto de usted como de su hijo, y para un mayor contacto físico con
su bebé. Su diseño permite que el peso del niño se concentre en las
caderas (donde las madres han estado cargando a sus hijos durante
al menos varios miles de años). Y dado que usted puede tolerar peso
adicional en esta posición, puede seguir cargando a su hijo incluso
cuando sea mayor.
Posición frontal - Niño mirando hacia usted - Hasta que el niño
pueda sentarse erguido, ésta es la posición ideal. Dado que no hay
materiales entre usted y su bebé, le da a éste mucho contacto físico
cercano y atención, al tiempo que le deja libres las manos. En esta
posición, puede divertir a su bebé y establecer lazos con él hablando,
tocándose, jugando o simplemente mirándose a los ojos.
Cómo sabe si el bebé está a la altura correcta cuando lo lleva al
frente? - Usted debe poder inclinarse ligeramente y besar la parte
superior de la cabeza de su bebé.
Al cargar o descargar a su bebé en el transportador, sentarse hará
más seguro el procedimiento. Hasta que esté totalmente cómoda
con los procedimiento de carga y descarga, también es más seguro
hacerlo en una supercie suave.
El Transportador BalanceTM también contiene una útil bolsa para
accesorios que le permite mantener a mano artículos “esenciales”
(como el teléfono, el chupón, las llaves, etc.)
Posición de mochila - Niño mirando hacia delante - “Es como un
paseo a caballito, pero sus manos están libres”. Cuando su pequeño
se pueda sentar erguido totalmente por sí mismo, llevarlo en la
espalda le permite transportarlo cómodamente durante períodos
de tiempo más prolongados. En esta posición, su bebé tiene libertad
de revisar lo que está pasando a su alrededor y seguir sabiendo que
usted está allí.
Llevar el transportador más cerca de su cuerpo y más alto en la
espalda (o en el pecho cuando lo lleve en posición frontal) reducirá
al mínimo la tensión en su espalda y hombros por el uso prolongado.
Instrucciones Para el Cuidado:
Lave a máquina con agua fría, por separado, en ciclo para prendas
delicadas. NO use blanqueador de cloro ni suavizantes de telas. Séquelo
colgándolo únicamente; no use la secadora de ropa. No lo planche.
14.
*
*
*
*
*
*
*
Español

Transportador de Frente:
Tensor superior de
la correa para el
hombro
Correa para
la pierna
Correa para el hombro
Lazo
organizador
Soporte de la
cabeza
Cinturón de soporte lumbar
15.

Transportador de Atras:
16.
Español
Área con
dibujo
Correa del pecho
y la espalda
Tensor superior de
la correa para el
hombro
Correa para
la pierna
Soporte de
la cabeza
Cinturón de soporte lumbar

* ¡IMPORTANTE! SIEMPRE mantenga una mano en el bebé hasta que todas las
hebillas y correas estén debidamente cerradas.
* ¡IMPORTANTE! En este transportador, su hijo ÚNICAMENTE debe llevarse en la
posición de “mirando hacia dentro”.
Para empezar, suelte las hebillas del “cinturón de
soporte lumbar”. Recoja el transportador por el
“cinturón de soporte lumbar” con el “área con
dibujo” interior del transportador mirando hacia
el frente de su cuerpo. Coloque el “cinturón
de soporte lumbar” alrededor de usted en su
cintura natural y cierre la hebilla del cinturón en
la espalda.
Apriete el “cinturón de soporte lumbar” tirando
hacia delante de su correa trenzada.
Par efectos de accesibilidad, lleve la “correa
del pecho y la espalda” (que se conecta con
las “correas del hombro”) tan cerca de la parte
superior del transportador como sea posible.
Suelte la hebilla.
Instructions:
1.
2.
3.
17.
1 Para colocar al bebé en el transportador:
Posición frontal
* El bebé debe poder sentarse por sí mismo antes de poderse usar en posición
de mochila. Dado que no hay material entre usted y su bebé, te da mucho
contacto físico cercano y la atención, dejando las manos libres. En esta
posición, puede entretener o vínculo con su bebé por hablar, tocar, jugar o
simplemente hacer contacto visual.
* Nota: Las personas con torsos más largos pueden
hallar más cómodo el cinturón en una posición
más alta (más cerca del ombligo), y las personas
más bajas quizá quieran usar el cinturón más en
las caderas.
Área con
dibujo

18.
* ¡IMPORTANTE! Antes de soltar al bebé, asegúrese
de que las “correas para los hombros” estén rme
mente en su sitio.
Levante al bebé mirando hacia usted hasta su
cintura natural. Asegúrese de que las piernas
del bebé le rodeen cómodamente la cintura y
pasen por cada agujero para las piernas. Las
“correas para las piernas” deben estar encima
de las piernas del bebé.
5
4.
Sosteniendo al bebé rmemente con la mano
izquierda, pase la “correa para el hombro”
sobre su hombro derecho. Cambie de manos
y repita la acción con la otra “correa para el
hombro.”
6
5.
Una vez que las correas estén seguras sobre
sus hombros, lleve la mano por encima de los
hombros y cierre la “correa del pecho y la
espalda” para conectar las dos “correas para
el hombro” entre sí. Si tiene dicultades para
alcanzar la hebilla, pídale ayuda a otra persona.
7
6.
Español

19.
* ¡IMPORTANTE! El “babero extraíble” sólo debe
utilizarse para el frente, mirando en la posición y no
por la posición de la mochila.
Para acercar al bebé estrechamente contra su
cuerpo (o para un ajuste más cómodo) apriete
las “correas para el hombro” tirando de los
“tensores superiores de la correa para el
hombro.”
5
7.
Ajuste bien las piernas del bebé en los agujeros
para las piernas ajustando la banda trenzada
de la “correa para la pierna.”
6
8.
Ajuste el “soporte del “soporte para la cabeza”
para sostener correctamente la cabeza del niño.
9.
El contacto directo entre el bebé y sus padres
es una de las mejores características de este
transportador. No obstante, al llevar el niño en
posición frontal, se puede usar el “babero
desprendible” para proteger la ropa del usuario.
Fije el babero en cada una de las “correas para
el hombro” y céntrelo en el pecho entre usted y
el bebé.
7
11.
Enrolle cualquier cincha excedente y fíjela
con un “lazo organizador” elástico.Repita la
acción con todas las correas para mantener el
transportador ordenado y sin que estorben las
correas sobrantes.
7
10.
Usando un babero extraíble: Posición frontal
Table of contents
Languages: