BODYMAX Walking Pad WP60 User manual

max. 100 kg
~ 10 Min.
CM
28 kg
CVTM2611.01.06
BodyMax Walking Pad WP60
SKU: CVTM2611
Assembly and Operating Instructions
L 143 | W 55 | H 13

2WP60

3
Content
1 GENERAL INFORMATION 7
1.1 Technical Data 7
1.2 Personal Safety 8
1.3 Electrical Safety 9
1.4 Set-Up Place 10
2 ASSEMBLY 11
2.1 General Instructions 11
2.2 Scope of Delivery 12
2.3 Assembly 13
2.4 Handrail (optional) 14
2.4.1 Scope of Delivery 14
2.4.2 Assembly 14
2.4.3 Instructions for Using the Handrail 15
3 OPERATING INSTRUCTIONS 16
3.1 Console Display 16
3.2 Button Functions 16
3.3 Training Modes 17
3.3.1 Manual Mode 17
3.3.2 Automatic Mode 17
3.4 Battery Replacement 18
4 STORAGE AND TRANSPORT 19
4.1 General Instructions 19
4.2 Transportation Wheels 19
4.3 Folding Mechanism 20
4.3.1 Folding up the Walking Pad 20
4.3.2 Unfolding the Walking Pad 20
5 TROUBLESHOOTING, CARE AND MAINTENANCE 21
5.1 General Instructions 21
5.2 Faults and Fault Diagnosis 21
5.3 Error Codes and troubleshooting 22
5.4 Care and Maintenance 23
5.4.1 Adjusting the Running Mat 23
5.4.2 Re-tensioning the Running Mat 24
5.4.3 Lubricating the Running Mat 24
5.5 Maintenance and Inspection Calendar 25

4WP60
6 DISPOSAL 25
7 RECOMMENDED ACCESSORIES 26
8 ORDERING SPARE PARTS 27
8.1 Serial Number and Model Name 27
8.2 Parts List 28
8.3 Exploded Drawing 32
9 WARRANTY 33
10 CONTACT 35

5
Dear customer,
Thank you for choosing training equipment from BodyMax.BodyMax is your reliable partner for
home and commercial gym equipment. We are specialized in cardio and strength training machines
for home and commercial use. Our products are not only strong, durable, and aordable but also
designed to t your personal needs.
The BodyMax headquarter is based in Rutherglen, Glasgow. Our brand was created with the intention
of providing innovative exercise equipment at aordable prices for users of all training levels.
Further information can be found at www.bodymax-tness.com.
Disclaimer
©2016 BodyMax® is a registered brand of the company Sport-Tiedje GmbH. All
rights reserved. Any use of this trademark without the explicit written permission
of Sport-Tiedje is prohibited.
Product and manual are subject to change. Technical data can be changed without
advance notice.
Intended Use
The equipment may only be used for its intended purpose.
The equipment is suitable for home use and semi-professional use (e.g. hospitals, clubs, hotels,
schools, etc.). The equipment is not suitable for commercial or professional use (e.g. tness
studio).
Please note that all safety and maintenance instructions in this manual apply to both the Walking
Pad and the optional handrail.

6WP60
ABOUT THIS MANUAL
Please carefully read the entire manual before installation and rst use. The manual will help you to
quickly set up the system and explains how to safely use it. Make sure that all persons exercising with
the equipment (especially children and persons with physical, sensory, mental or motor disabilities)
are informed about this manual and its contents in advance. In case of doubt, responsible persons
must supervise the use of the equipment.
This equipment has been manufactured according to the latest safety knowledge.
As far as possible, potential safety hazards which could cause injury have been
eliminated. Make sure to carefully follow the instructions and that all parts are
securely in place. If required, read through the instructions again to correct any
mistakes.
Please pay close attention to the safety and maintenance instructions given
here. The contract partner cannot be held liable for damage to health, accidents or damage to the
equipment when it is not used in accordance with these instructions.
The following safety instructions may appear in this manual:
࣑ATTENTION
This notice indicates potentially hazardous situations which, if not avoided, may result in
property damage.
⚠CAUTION
This notice indicates potentially hazardous situations which, if not avoided, may result in slight
or minor injuries!
⚠WARNING
This notice indicates potentially hazardous situations which, if not avoided, may result in death
or serious injuries!
⚠DANGER
This notice indicates potentially hazardous situations which, if not avoided, will result in death
or serious injuries!
LNOTICE
This notice indicates further useful information.
Retain these instructions in a safe place for future reference, maintenance or when ordering
replacement parts.

7
1 GENERAL INFORMATION
1.1 Technical Data
Walking Pad
LCD Display:
+ Time
+ Speed
+ Distance
+ Steps
Motor type: DC Motor (1.0 HP)
Speed range: 0.5 - 6km/h (adjustable in 0.5km/h increments)
Programmes in total: 2
Manual programme: 1
Automatic programme: 1
Weight and dimensions:
Walking area (L x W): 120 cm x 41.5 cm
Walking mat density: 1.4 mm
Article weight (gross, incl. packaging): 31 kg
Article weight (net, without packaging): 28 kg
Packaging dimensions (L x W x H): 90 cm x 64 cm x 19.5 cm
Set-up dimensions (L x W x H): 143 cm x 55 cm x 13 cm
Folded dimensions (L x W x H): 82 cm x 55 cm x 13 cm
Maximum user weight: 100 kg
Handrail (optional)
Article weight (gross, incl. packaging): 9.4 kg
Article weight (net, without packaging): 7.1 kg
Packaging dimensions (L x W x H): 86 cm x 76 cm x 14 cm
Maximum load: 100 kg

8WP60
1.2 Personal Safety
⚠DANGER
+ Before you start using the equipment, you should consult your physician that this type of
exercise is suitable for you from a health perspective. Particularly aected are persons who:
have a hereditary disposition to high blood pressure or heart disease, are over the age of 45,
smoke, have high cholesterol values, are overweight and/or have not exercised regularly in
the past year. If you are under medical treatment that aects your heart rate, medical advice
is absolutely essential.
+ Note that excessive training can seriously endanger your health. Please also note that
heart rate monitoring systems can be inaccurate. If you notice any signs of weakness,
nausea, dizziness, pain, shortness of breath, or other abnormal symptoms, stop exercising
immediately and seek advice from your doctor if necessary.
⚠WARNING
+ This equipment may not be used by children under the age of 14.
+ Children should not be allowed unsupervised access to the equipment.
+ Persons with disabilities must have a medical license and must be under strict observation
when using the equipment.
+ The equipment is strictly for use by one person at a time.
+ If your equipment provides a safety key, the clip of the safety key must be attached to your
clothing before starting your training. In the event of a fall, the EMERGENCY STOP of the
equipment can be initiated.
+ Keep your hands, feet and other body parts, hair, clothing, jewellery and other objects well
clear of moving parts.
+ During use, wear suitable sports clothing rather than loose or baggy clothing.When wearing
sports shoes, make sure they have suitable soles, preferably made of rubber or other non-
slip materials. Shoes with heels, leather soles, studs or spikes are unsuitable. Never exercise
barefoot.
⚠CAUTION
+ If your equipment needs to be connected to the power supply with a mains cable, make
sure that the cable is not a potential tripping hazard.
+ Make sure that nobody is within the range of motion of the equipment during training so as
not to endanger you or other persons.
࣑ATTENTION
+ Do not insert any objects of any kind into the openings of the device.

9
1.3 Electrical Safety
⚠DANGER
+ In order to reduce the risk of an electric shock, always unplug the equipment from the
mains socket immediately after your workout, before assembly or dismantling, and before
maintenance or cleaning. Do not pull on the cable.
⚠WARNING
+ Do not leave the equipment unattended while the mains cable is plugged into the mains
socket. During your absence, the mains cable must be removed from the mains socket to
prevent improper use by third parties or children.
+ If the mains cable or plug is damaged or defective, contact your contract partner. Until
repair, the equipment must not be used.
࣑ATTENTION
+ The equipment requires a mains connection of 220-230V with 50Hz mains voltage.
+ The equipment may only be connected directly to an earthed socket using the supplied
mains cable. Extension cables must conform to VDE guidelines. Always completely unwind
the mains cable.
+ The socket must be protected by a fuse with a minimum fuse rating of "16A, slow blow".
+ Do not make any changes to the mains cable or the mains plug.
+ Keep the mains cable away from water, heat, oil and sharp edges. Do not route the mains
cable underneath the equipment or under a carpet or rug, and do not place any objects on
top of it.

10 WP60
1.4 Set-Up Place
⚠WARNING
+ Do not place the equipment in main corridors or escape routes.
⚠CAUTION
+ Make sure that there is a safety area behind the treadmill with a length of at least 2 m and a
width at least equal to the width of the treadmill.
+ The training room should be well ventilated during training and not be exposed to any
draughts.
+ Choose the place in which to set up the equipment such that there is enough free space/
clearance to the front, the rear and to the sides of the equipment.
+ The set-up and mounting surface of the equipment should be at, loadable and solid.
࣑ATTENTION
+ The device may only be used in one building, in suciently tempered and dry rooms
(ambient temperatures between 10°C and 35°C). The equipment should not be used
outdoors or in rooms with high humidity (over 70%) like swimming pools.
+ A oor protective mat/equipment underlay can help to protect high-quality oor coverings
(parquet, laminate, cork, carpets) from dents and sweat and can help to level out slight
unevenness.

11
2 ASSEMBLY
2.1 General Instructions
⚠DANGER
+ Do not leave any tools, packaging materials such as foils or small parts lying around,
as otherwise there is a danger of suocation for children. Keep children away from the
equipment during assembly.
⚠WARNING
+ Pay attention to the instructions attached to the equipment in order to reduce the risk of
injuries.
⚠CAUTION
+ Do not open the packaging when it is lying on its side.
+ Ensure to have sucient room for movement in each direction during assembly.
+ The assembly of the equipment must be carried out by at least two adults. If in doubt, seek
the help of a third technically skilled person.
࣑ATTENTION
+ To prevent damage to the equipment and the oor, assemble the equipment on a mat or
packaging board.
LNOTICE
+ In order to make the assembly as simple as possible, some screws and nuts to be used can
already be pre-assembled.
+ Ideally, assemble the equipment at its later set-up place.

12 WP60
2.2 Scope of Delivery
The scope of delivery consist of the following parts. At the beginning, check whether all parts
and tools belonging to the device are included in the scope of delivery and whether damage has
occurred. In the event of complaints, the contractual partner must be contacted directly.
⚠CAUTION
If parts of the scope of delivery are missing or damaged, the assembly must not be carried out.
Power cord Remote control Wrist band Allen key Silicon oil
Contents and accessories
User manual
Walking mat
Folding hinge Mode &
change switch
Transportation
wheels
Transportation
wheels
Mode display
Display
Power switch
Power cable
port

13
2.3 Assembly
Before assembly, take a close look at the individual assembly steps shown and carry out the assembly
in the order given.
Step 1: Setting up the treadmill
1. Place the treadmill in a location as described in chapter 1.4.
2. Slowly fold out the treadmill. For more information on folding out and up the Walking Pad,
please read the instructions in chapter 4.3.
Step 2: Aligning the walking mat and connecting the pad to the mains supply.
1. Check if the walking mat is centered and adjust if needed. To adjust the mat please use the
instructions and advisements in chapter 5.4.1.
࣑WARNING
The Walking Pad should not be plugged into a power board, as it cannot be guaranteed that
the pad will be supplied with sucient power. This could also lead to technical errors occurring.
2. Connect the power cord into a wall socket, making sure the electrical prerequisites covered in
the chapter about electrical safety are met.
Step 3: Conguring the Walking Pad
LNOTICE
Use the following instructions to remove the speed restriction and increase the maximum
speed from 3km/h to 6km/h.
Walk for approximately 1km on the Walking Pad and restart it to unlock various functions of the
Walking Pad.
14 WP60
2.4 Handrail (optional)
2.4.1 Scope of Delivery
The scope of delivery consist of the following parts. At the beginning, check whether all parts
and tools belonging to the device are included in the scope of delivery and whether damage has
occurred. In the event of complaints, the contractual partner must be contacted directly.
⚠CAUTION
If parts of the scope of delivery are missing or damaged, the assembly must not be carried out.
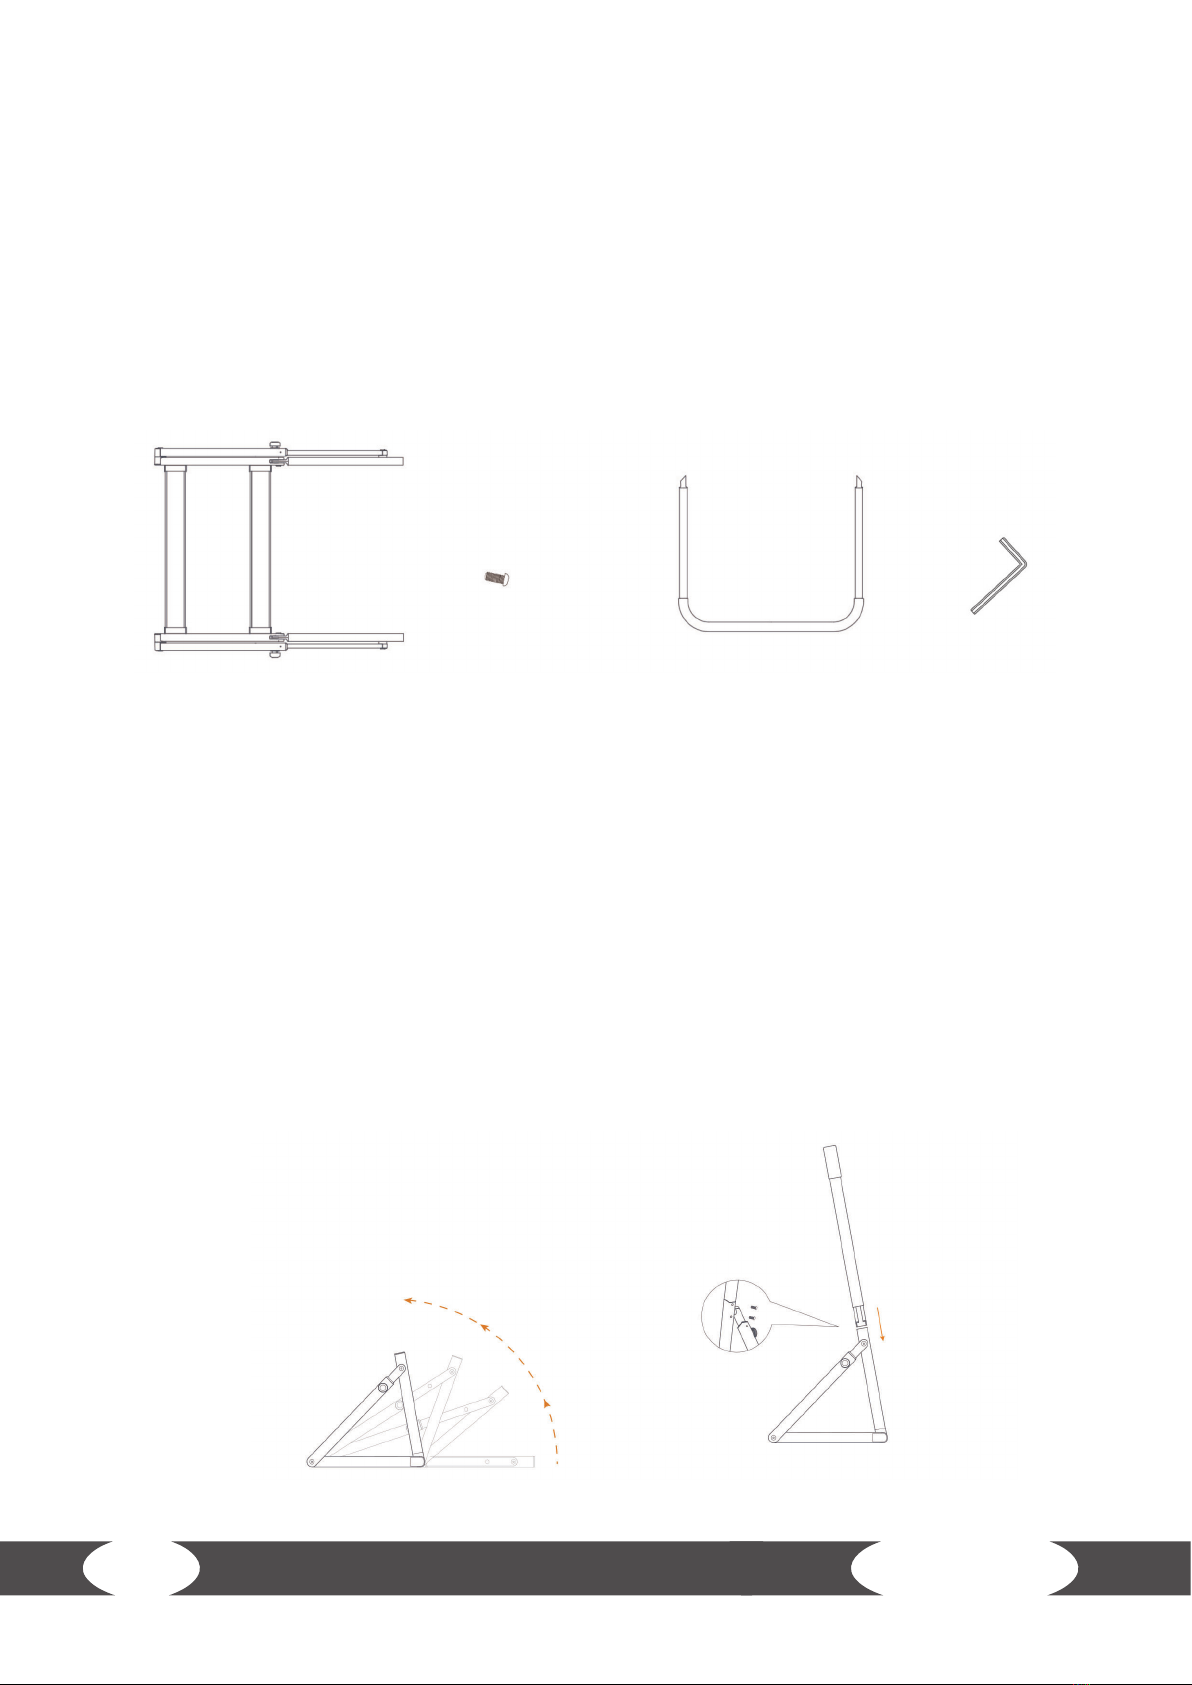
2.4.2 Assembly
Before assembly, take a close look at the individual assembly steps shown and carry out the assembly
in the order given.
Step 1 : Assembly of the handrail
1. Open the lower part of the handrail.
2. Insert the upper handrail part into the lower handrail part.
3. Secure the two parts with the supplied screws. Use the supplied Allen wrench to do this.
Handrail
(lower part) Screws 4x Allen Key
Handrail
(upper part)

15
Step 2: Adjust the angle of the handrail
1. Loosen the adjusting knobs on the lower part of the handrails
and adjust the angle of the handrail according to your
requirements.
2. After you have made the adjustment, tighten the control
knobs rmly again.
Step 3: Using with the Walking Pad
࣑ATTENTION
For the following steps, the Walking Pad needs to be folded and/or unfolded. Please follow the
instructions given in section 4.3.
1. When folded, slide the Walking Pad between the handrail.
2. Unfold the Walking Pad.
2.4.3 Instructions for Using the Handrail
⚠CAUTION
+ When using the handrails, the Walking Pad must not be used in automatic mode.
+ Please note that the handrail must not be loaded with a vertical force of more than 100 kg.

16 WP60
3 OPERATING INSTRUCTIONS
LNOTICE
Familiarise yourself with all the functions and setting options of the device before starting
training. Have the proper use of this product explained to you by a specialist.
3.1 Console Display
TIME + Display of the elapsed training time
SPD
+ Display of the current speed
⚠CAUTION
The default setting for speed is 2.0 km/h.
DIST + Display of the distance
STEP + Display of the amount of steps taken
M+ Manual mode
A+ Automatic mode
+ Standby mode
+ An error has occurred
3.2 Button Functions
+ / - + In manual mode these buttons increase or decrease the speed (in 0.5km/h
increments).
+ Press this button to start or stop the WalkingPad.
LNOTICE:
Alternatively you can just step on the front part of the walking area to automatically
start the WalkingPad.
+ Press this button to switch between the dierent modes.
+ Press and hold the button to switch the pad into standby mode.
LNOTICE:
On the left side of the WalkingPad is an identicle button in which the mode and
also be changed.

A
B
17
࣑ATTENTION
The Walking Pad must not be used for more than 6 hours a day. After an operating time of one
hour, the device must not be used for 30 minutes to avoid overloading.
3.3 Training Modes
There are a total of two training modes to choose from, which are expanded upon in this chapter.
3.3.1 Manual Mode
In this mode, the speed of the Walking Pad can be adjusted via the remote control.
3.3.2 Automatic Mode
In this mode, the speed of Walking Pad is automatically adjusted. Depending on your position on the
walking area, the Walking Pad will increase or decrease the speed.
A: If you are walking in this
area, the Walking Pad will start
the program and/or increase
the speed.
B: If you are walking in this area,
the Walking Pad will decrease
the speed.

18 WP60
3.4 Battery Replacement
The supplied remote control is powered by a CR2032 lithium button cell battery. If the remote control
does not work properly, the button cell battery might be running low. Follow the instructions to
replace the battery.
1. Open the battery compartment by turning the battery cover to the left.
2. Remove the battery.
3. Insert a new CR2032 lithium button cell battery. Make sure the battery is inserted with the +
facing upwards.
4. Close the battery compartment again by turing the battery cover to the right.

19
4 STORAGE AND TRANSPORT
4.1 General Instructions
⚠WARNING
+ The storage location should be chosen so that improper use by third parties or children can
be prevented.
+ If your equipment does not have transportation wheels, the equipment must be
disassembled before transportation.
࣑ATTENTION
+ Make sure that the equipment is protected from moisture, dust and dirt in the selected
storage location.The storage location should be dry and well ventilated and have a constant
ambient temperature between 5°C and 45°C.
4.2 Transportation Wheels
࣑ATTENTION
+ If you want to transport your equipment over particularly sensitive and soft oor coverings,
such as parquet, planks or laminate, lay out the transport route with cardboard or similar to
avoid possible oor damage.
+ The WalkingPad should only be transported while folded together. To correctly fold the
WalkingPad, please follow the instructions in chapter 4.3.1.
1. Standbehind theequipmentand lift ituntil theweightistransferredtothe transportationwheels.
After that, you easily can move the equipment to a new position. For long transport distances
the equipment should be disassembled and safely packed.
2. Select the new location by following the instructions in the section 1.4 of this manual.

20 WP60
4.3 Folding Mechanism
⚠WARNING
+ Do not lift the Walking Pad by the walking band or by the rear transport wheels. These parts
do not lock and are dicult to hold on to.
LNOTICE
+ The treadmill is foldable and therefore saves space while stored. It also makes it easier to
transport.
4.3.1 Folding up the Walking Pad
⚠WARNING
+ Do not connect the equipment to the power supply while it is folded up. Try not to operate
the equipment when it is folded up.
+ The running surface must have come to a complete stop before folding.
⚠CAUTION
+ Do not lean on the equipment while it is folded and do not place anything on top of it that
may make the equipment unstable or fall down.
࣑WARNING
+ Make sure that nothing is standing next to or on top of the pad that can be spilled or thrown
or prevents folding up the pad.
1. Turn o the on/o switch and remove the plug from the outlet.
2. Hold on to the rear part of the pad.
3. Lift the pad and fold it slowly together.
4.3.2 Unfolding the Walking Pad
࣑WARNING
+ Make sure that nothing is standing next to or on top of the pad that can be spilled or thrown
or prevents folding out the pad.
Lift the rear end of the pad and fold it slowly out. Please make sure that the folding mechanism locks
into place.
This manual suits for next models
1
Table of contents


