Bogner BDECM02 User manual

BDECM02
Cafetera 2 en 1: Espresso + goteo
+ Placa calentadora de tazas
+ Tanque de agua de 1.5 L
MANUAL DE USUARIO
Cafetera 2 en 1:
Espresso + goteo
+ 20 Bar de presión en Café Espresso
+ Tanque de agua de 1.5L
+ Cuerpo en acero inoxidable
+ 850W en Espresso / 1000W en goteo
+ Capacidad 12 tazas
+ Sistema de seguridad para liberar presión
+ Función auto apagado
+ Placa calentadora de tazas
+ Función antigoteo
+ Panel LED para programas
de tiempo y temperatura
127V~ 60Hz 1000W
+
Importado por:
GRUPO IMPORTADOR TEXJAN S.A. DE C.V.
GIT210816142
CALLE ARMANDO MELÉNDEZ 211 DEPTO. C
LAS MARGARITAS, TORREÓN COAHUILA
ZIP 27130 MÉXICO
HECHO EN CHINA bogner.mx

Medidas de seguridad importantesMedidas de seguridad importantes
-
43
ANTES DE USAR ESTE APARATO DEBE CONOCER Y SEGUIR LAS
SIGUIENTES PRECAUCIONES:
1. Este aparato no debe ser usado por personas con capacidades físicas,
sensoriales o mentales reducidas (incluyendo niños) a no ser que reciba
capacitación y supervisión por parte de alguien responsable de su
seguridad.
2. Antes de usar asegúrese de que el voltaje del contacto corresponde al
voltaje marcado en la etiqueta de características técnicas de la cafetera.
3. Esta cafetera tiene un enchufe eléctrico con conexión a tierra. Asegúrese
de que lo conectará a una toma de corriente eléctrica con conexión a
tierra adecuada.
4. Para disminuir el riesgo de incendio, descarga eléctrica y/o lesión no
sumerja el cable o el enchufe en agua u otros líquidos.
5. Desconecte de la toma de corriente eléctrica antes de limpiar y cuando
no esté en uso. Permita que la cafetera se enfríe por completo antes de
levantarla, instalar o remover partes o limpiarla.
6. No opere la cafetera con el cable o enchufe dañado. En caso de que la
cafetera se haya averiado o dañado de cualquier forma, llévela al centro
de servicio autorizado más cercano para su revisión, reparación o
ajuste.
7. El uso de accesorios no recomendados por el fabricante puede resultar
en riesgo de incendio, descarga eléctrica o lesiones.
8. Coloque la cafetera sobre una superficie plana y nivelada. No deje colgar
el cable por un lado.
9. No coloque la cafetera cerca o sobre ninguna superficie caliente u otro
aparato electrodoméstico (como, por ejemplo, sobre el refrigerador).
10. Nunca coloque otros objetos sobre la cafetera.
11. Para desconectar, siempre tome el enchufe y desconecte del contacto.
Nunca jale el cable.
12. No use el electrodoméstico para otros fines que no sean los
especificados. Colóquelo en un lugar seco.
13. No deje operando la cafetera sin supervisión ni la deje en la posición
de PAUSA por un tiempo largo.
14. Tenga cuidado de no quemarse con el vapor que sale de la cafetera.
15. Algunas partes de la cafetera estarán calientes durante la operación
(como la tapa, la bandeja, el vaporizador, etc.) así que no los toque con
la mano directamente. Use las perillas y manijas.
16. Limpie y de mantenimiento a su cafetera regularmente de acuerdo a la
sección “Limpieza y mantenimiento” para asegurar la calidad del café y
una larga vida útil de su cafetera.
17. Si no va a usar la cafetera por un periodo largo, limpie todas las partes
y guárdela.
18. Nunca abra la tapa ni remueva componentes durante su operación.
Hágalo hasta que se encuentre apagada y desconectada.
19. No opere la cafetera si presenta algún problema. No coloque objetos
dentro de la jarra ni el tanque.
20. Nunca use detergente ni agua caliente para limpiar el depósito de
agua. No la lave en lavavajillas.
21. No opere la cafetera sin agua.
22. No deje la cafetera a la intemperie.
23. No use en ambientes de temperaturas elevadas, húmedos o con
campos magnéticos.
24. Desconecte de la luz durante tormentas.
25. No conecte con extensiones o enchufes múltiples.
26.La jarra de café esta diseñada para usarse con esta cafetera
solamente.
USO DOMÉSTICO SOLAMENTE
Lea cuidadosamente y guarde para futura referencia.

Conoce tu Cafetera
-
65
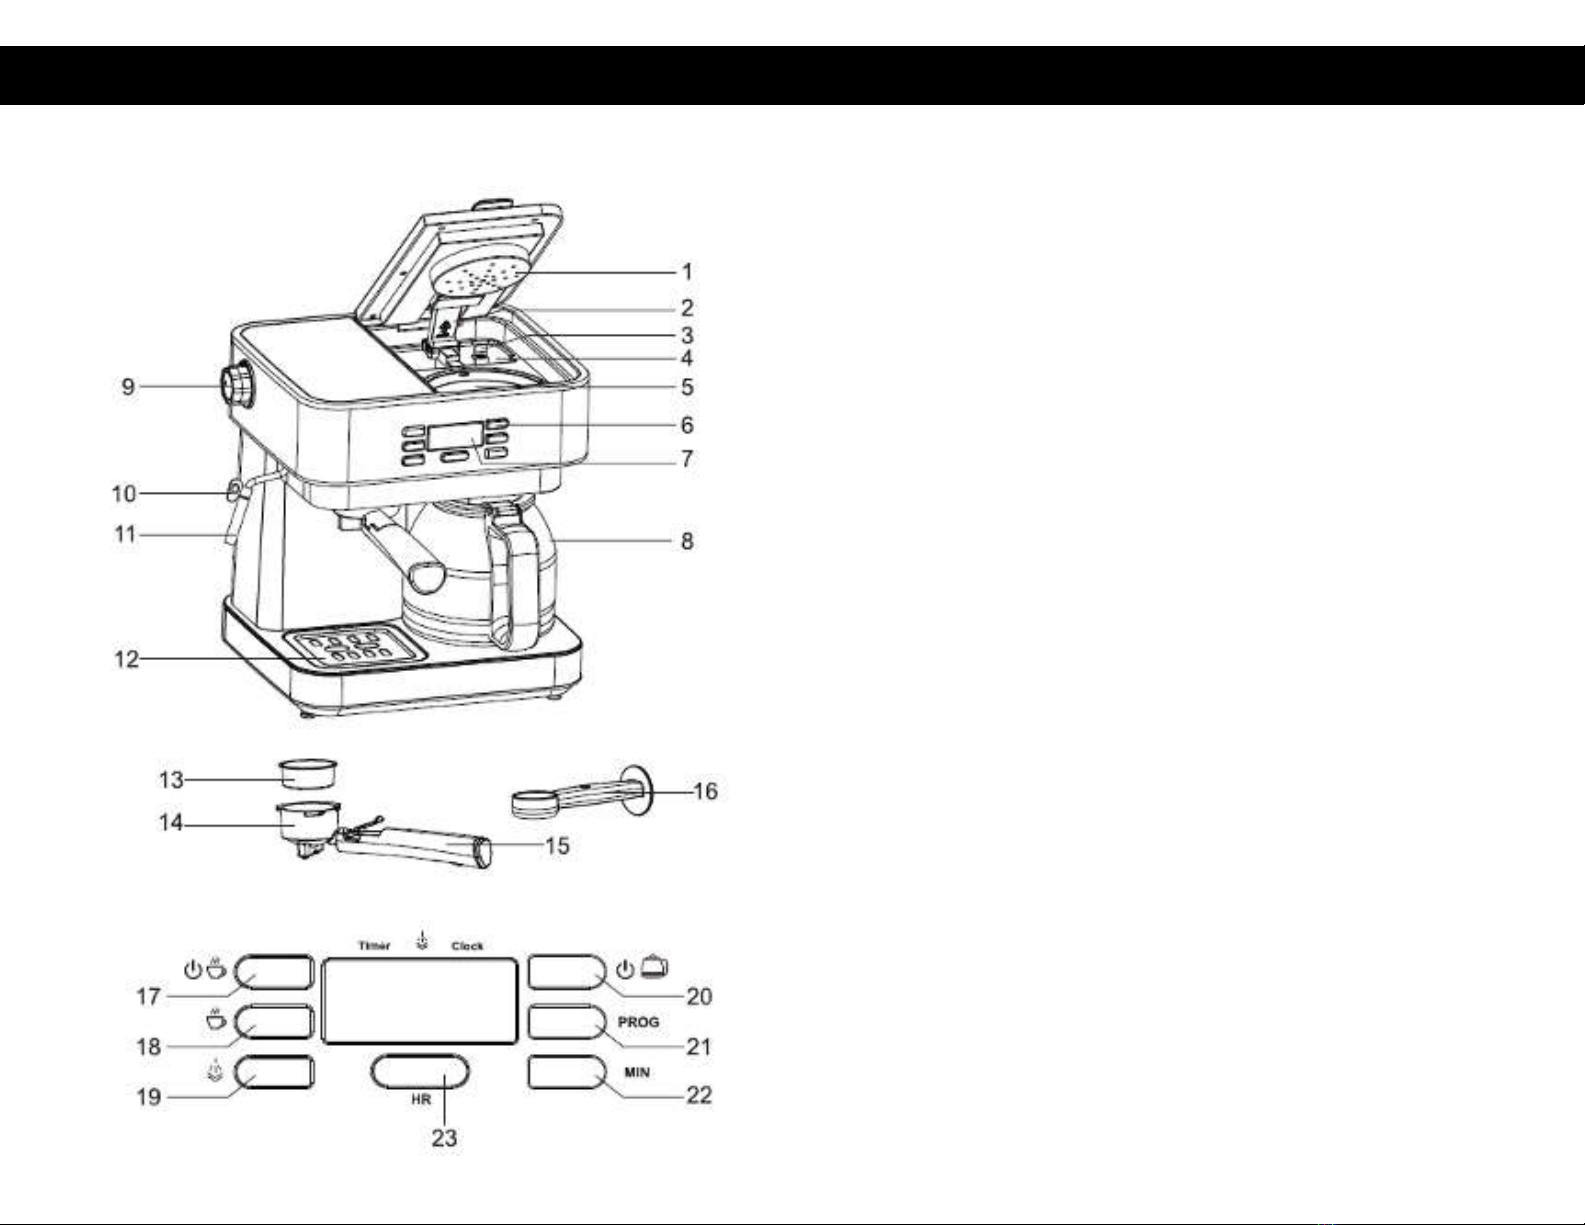
1. Tapa del depósito de agua
2. Boquilla
3. Válvula de agua
4. Depósito de agua
5. Filtro
6. Botones
7. Pantalla digital
8. Jarra de vidrio
9. Perilla de vapor
10. Agarradera de vapor
11. Conducto de vapor
12. Bandeja
13. Filtro para espresso
14. Portafiltro
15. Asa del portafiltro
16. Cuchara medidora
17. Botón On/Off de café espresso
18. Botón de café espresso
19. Botón de Vapor
20.Botón ON/Off Goteo de café
21. Botón de ajustes
22. Botón de ajuste de MINUTOS
23. Botón de ajuste de HORA
Conoce tu Cafetera

4.Presione el botón de y la luz indicadora en la pantalla comenzará
a parpadear (como se muestra en la imagen). Deje correr agua para
limpiar el filtro. Después de limpiarlo, presione el botón una vez más
para detener el flujo del agua.
5. Durante el precalentamiento, coloque café en polvo (que no esté
demasiado grueso ni demasiado fino) en el filtro de metal usando la
cuchara medidora para comprimir y aplanar el café. Limpie el exceso de
café que se haya salido por un lado del filtro con la mano o una brocha.
6.Inserte el portafiltro y asegúrelo (siguiendo la marca). Coloque la taza
debajo del portafiltro.
7. Una vez que la luz indicadora permanezca prendida (como se indica en
la imagen), presione el botón de “ ” y el café comenzará a salir. Al
mismo tiempo, ajuste la taza de café para que el café caiga en la pared
de la taza. Una vez que tenga la cantidad deseada de café, presione
nuevamente el botón de “ ” para detener el flujo de café.
Uso
7 8
Uso
Antes de usar:
1. Llene de agua el tanque. El nivel del agua no debe exceder la marca de
“Max”. Esta máquina fue diseñada para usarse exclusivamente con
agua fría o al tiempo.
2. Conecte el cable al enchufe de la luz, luego presione el botón de
“ ”. La luz indicadora comenzara a parpadear en la pantalla (como
se muestra en la imagen). Gire la perilla de vapor y deje salir agua. Gire
otra vez la perilla de vapor para que deje de salir agua.
Nota:
a. Si la luz indicadora de ON/OFF no se prende, entonces gire la perilla de
vapor en sentido de las manecillas del reloj.
b. Al salir agua de la cafetera, es normal que se escuche un sonido de
vibración mientras funciona.
3.La cafetera comenzó a precalentarse y la luz indicadora parpadea (como
se muestra en la imagen). Una vez que la luz deja de parpadear, y se
mantiene encendida, ha terminado de precalentarse. Este proceso toma
alrededor de 2 minutos.

Función para espumar leche
9 10
Función para espumar leche
Método:
1. Prepare su café espresso siguiendo las instrucciones.
2. Presione el botón de “ ” y después el botón de vapor “ ”, ahora
la luz indicadora de vapor se iluminará en la pantalla y parpadeará hasta
que el proceso de precalentamiento haya finalizado.
3. Llene una taza (a 1/3 de lleno) con la cantidad de leche deseada para su
café. Recomendamos usar leche entera fría (¡NO caliente!).
Note: A la hora de escoger la taza que usará, le recomendamos que el
diámetro sea menor de 70±5mm. Tenga en cuenta que la leche aumenta
dos veces su volumen una vez espumada, así que use una taza
suficientemente alta.
4. Inserte el espumador en la taza de leche aproximadamente dos
centímetros. Gire la perilla de vapor lentamente en sentido contrario de las
manecillas del reloj, hasta que comience a salir vapor.
Mueva arriba y abajo la taza para espumar la leche.
Nota: Tenga cuidado, el calor del vapor puede quemar.
Atención:
La cantidad de vapor es ajustable.
Siempre recuerde dejar salir un poco de
vapor antes de comenzar a espumar la
leche.
Una vez que la leche haya aumentado su volumen al doble, gire la perilla de
vapor y apague el botón de vapor al mismo tiempo (la dirección para apagar es
en el sentido de las manecillas del reloj).
Nota: Limpie inmediatamente la salida del
espumador con una esponja húmeda al
terminar de generar el vapor. ¡Cuidado de no
quemarse!
5. Sirva la leche espumada sobre su café espresso.
Nota: Le recomendamos que espere a que el aparato se enfríe por
completo antes de volver a preparar café nuevamente. Esto evitará un
posible olor a quemado en su café.
Nota:
1.Puede espolvorear cocoa en polvo o jarabe sabor chocolate al gusto
para preparar un café moka.
2.Si la luz indicadora de vapor parpadea rápidamente, esto indicará
que se ha llegado a una temperatura muy alta. Puede usar la función de
agua caliente para enfriar un poco.
FUNCION DE AGUA CALIENTE
1. Presione el botón de “ ”. La máquina comenzará a calentarse y la
luz indicadora comenzará a parpadear. (como se muestra en la imagen)

2. Después de precalentar, la luz indicadora estará prendida. Presione el
botón de café y gire la perilla de vapor en sentido contrario de las
manecillas del reloj. Comenzará a salir agua caliente por el tubo de vapor
y usted podrá usar esta agua para beber, limpiar o calentar su taza.
Una vez terminados los pasos anteriores,
presione el botón de café otra vez. La
máquina dejara de funcionar. Gire la perilla
de vapor al mismo tiempo. Finalmente
presione el botón de “ ” para apagar
por completo la máquina.
FUNCION DE CAFÉ POR GOTEO:
1. Asegúrese de que el tanque tiene suficiente agua.
2. Coloque máximo 2 cucharadas de café molido en el filtro (el grano de
café no debe estar molido muy grueso ni muy fino). Coloque ahora el
portafiltro en su lugar.
3. Presione el botón de “ ” y la luz indicadora se prenderá. La
máquina empezará a hacer café.
4. Quite la jarra una vez que termine de salir café y presione el botón de
“ ”para apagar la máquina.
1. PROGRAMAR LA HORA: Presione el botón de programar hasta que el
indicador de “TIMER” se encienda. Presione los botones de “HR” y “MIN” para
elegir la hora actual.
2. FUNCIÓN PARA PROGRAMAR EL CAFÉ A UNA HORA EN ESPECÍFICO: presione
el botón de programar para que la luz indicadora del reloj se prenda. Presione
los botones de “HR” y “MIN” y seleccione la hora deseada. Presione el botón de
“PROG” hasta que la luz se encienda. Cuando llegue la hora seleccionada, la
función de preparar café por goteo comenzará automáticamente.
1. Desenchufe y permita que se enfríe por completo antes de limpiar la
cafetera.
2. Limpie su cafetera por fuera con una esponja o trapo húmedo.
Nota: No use alcohol o solventes para limpiar su cafetera. Nunca sumerja el
aparato en agua.
3. Quite el embudo girando en el sentido de las manecillas del reloj, tire el café
que quedo de residuo y después puede enjuagar con agua corriente.
4. Puede lavar los componentes desmontables y asegurarse de secarlos bien
antes de volver a armar su cafetera.
Funciones adicionales
Limpieza y mantenimiento
Función de agua caliente
11 12
ELIMINACIÓN ECOLÓGICA
¡Usted puede ayudar a cuidar el medio ambiente!
Recuerde respetar las regulaciones locales: lleve los
electrodomésticos que ya no funcionen a un depósito de
basura apropiado.

Sello del establecimiento y
Fecha de compra o instalación
POLIZA DE GARANTÍA
Garantía VÁLIDA SOLO en MÉXICO, únicamente para producto comprado en MÉXICO. Esta garantía
sustituye a cualquier otra especificada o contenida en el empaque.
COMERCIALIZADORA ALPESA S.A. de C.V., garantiza éste producto por el término de 2 años todas sus
partes y mano de obra contra cualquier defecto de fabricación y funcionamiento a partir de la fecha de la compra
o instalación. Durante este periodo COMERCIALIZADORA ALPESA S.A. de C.V. reparará o reemplazará, sin
cargo alguno para el consumidor, cualquier pieza o componente defectuoso del producto, incluyendo la mano
de obra y los gastos de transportación del producto que deriven de su cumplimiento, dentro de nuestra red de
servicio, cuando se trate de defectos cubiertos y reclamados en términos de la presente garantía.
Limitación: Esta garantía NO ampara el reemplazo de la pieza por uso o desgaste normal.
Nombre del consumidor: ___________________________________________________________________
Dirección (calle y número):_________________________________________________________________
Colonia o poblado: ________________________________________________________________________
Delegación o municipio: __________________________________________________ __________________
Ciudad, estado y código postal: ______________________________________________________________
En caso de requerir partes, componentes, consumibles y accesorios; se deberá dirigir a nuestro Centro de
Servicio ubicado en Centro de Servicio ubicado en Montecito 38, piso 7 oficina 36 Col. Nápoles, Del. Benito
Juárez, CP 03810 CDMX o llamando a los teléfonos de servicio:(55) 78240069 / (55) 78240070
Datos del producto: ________________________________________________________________________
Marca: __________________________________________________________________________________
Modelo _________________________________________________________________________________
Número de serie: __________________________________________________________________________
Para hacer efectiva la garantía no deben exigirse mayores requisitos que la presentación del producto,
acompañado de la póliza correspondiente, debidamente sellada por el establecimiento que lo vendió, o la factura,
o recibo o comprobante, en el que consten los datos específicos del producto objeto de la compraventa.
La Garantía podrá hacerse efectiva directamente en el lugar de compra, en nuestro Centro de Servicio ubicado
en Montecito 38, piso 7 oficina 36 Col. Nápoles, Del. Benito Juárez, CP 03810 CDMX o llamando a los teléfonos
de servicio:(55) 78240069 / (55) 78240070 atencionaclientes@bogner.mx de Lu a Vie de 09:00 a 17:00 horas.
Excepciones:
No se cosidera que la garantía puede aplicar cuando se ha usado incorrectamente el artículo, en sartenes con
golpes, con deformidades, con manchas o decoloración de revestimientos internos y externos, con arañazos
internos y externos con mangos quemados y/o sobrecalentados.
Importado por:
GRUPO IMPORTADOR TEXJAN S.A. DE C.V.
GIT210816142
CALLE ARMANDO MELÉNDEZ 211 DEPTO. C, LAS MARGARITAS, TORREÓN COAHUILA
ZIP 27130 MÉXICO
14
Solución de problemas
PROBLEMA
No sale café
No sale vapor
La cafetera no
funciona. Las
luces de agua
caliente y vapor
están encendidas
y las demás luces
apagadas.
La leche no
espuma .
Escurre café del
filtro.
CAUSA
1.No hay agua en el
depósito de agua.
2.No ha salido el agua.
3.La cafetera no se
precalentó.
El orificio de la manguera
de vapor está bloqueado.
La función de vapor no
está apagada.
1.Usó leche descremada.
2.No precalentó la
máquina.
El café esta molido
demasiado fino o se uso
demasiado café.
SOLUCIÓN
1.Llene con agua el depósito y
encienda después la máquina.
2.Presione el botón de café y
gire la perilla de vapor. Una vez
que salga agua, siga las
instrucciones para hacer café.
3.La cafetera necesita
precalentarse para estar lista
para hacer café. Esto es
cuando la luz indicadora deja
de parpadear y se mantiene
encendida.
1.Use un alambre delgado e
insértelo en el orificio para
destaparlo.
2.Después de espumar leche,
limpie con agua caliente para
evitar que se tape.
Apague la función de vapor.
1.Use leche entera.
2.El vapor solamente saldrá
una vez que el indicador de
vapor deje de parpadear y
permanezca encendido.
Use el molido indicado. Nunca
use más de 3 cucharadas de
café.
13
Póliza de Garantía
No desarme el electrodoméstico usted mismo. Póngase en contacto con el centro de
servicio autorizado más cercano.

BDECM02
2 in 1 Coffee maker: Espresso + drip coffee
+ Preheating base for cup
+ 0.3 gallon water tank
INSTRUCTION MANUAL
2 in 1 Coffee maker:
Espresso + drip coffee
+ 20 Bar in pressure for Espresso coffee
+ 50 ounce / 0.3 gallon water tank
+ Stainless steel body
+ 850W for Espresso / 1000W for drip coffee
+ 12 cup capacity
+ Pressure releasing security system
+ Auto shut-off function
+ Preheating base for cup
+ Antidrip function
+ LED digital display
to program time and temperature
127V~ 60Hz 1000W
Imported by:
GRUPO IMPORTADOR TEXJAN S.A. DE C.V.
GIT210816142
CALLE ARMANDO MELÉNDEZ 211 DEPTO. C
LAS MARGARITAS, TORREÓN COAHUILA
ZIP 27130 MÉXICO
MADE IN CHINA bogner.mx

Important safeguardsImportant safeguards
-
43
When using electrical appliances, basic safety precautions should always
be followed to reduce the risk of fire, electric shock and/or injury to
persons, including the following:
READ ALL INSTRUCTIONS BEFORE USING.
1. The appliance is not intended for use by persons (including children) with
reduced physical, sensory or mental capabilities, or lack of experience
and knowledge, unless they have been given supervision or instructions
concerning use of the appliance by a person responsible for their safety.
2. Make sure the appliance’s voltage is in accordance with your domestic
supply. (See: Specifications)
3. This appliance has been incorporated with a grounded plug. Please
ensure you connect it to an earthed wall socket.
4. To protect against fire, electric shock and injury to persons do not
immerse cord, plug, or machine in water or other liquids.
5. Turn OFF and unplug from outlet before cleaning and when not in use.
Allow appliance to cool down completely before putting on or taking off
parts or before cleaning.
6. Do not operate any appliance with a damaged cord or plug or after the
appliance malfunctions or has been damaged in any manner. Return this
appliance only to the nearest Authorized Service Center for examination,
repair or adjustment.
7. Do not use any parts or attachments other than the ones supplied by or
specified by the manufacturer. The use of accessory attachments not
recommended by the manufacturer may result in fire, electric shock or
injury to persons.
8. Scalding may occur if the reservoir cover is opened during the brewing
cycle. Be careful with the steam that comes out.
9. Always operate the appliance on a dry, flat surface to avoid interruption
of air flow underneath the appliance.
10. Do not use equipment in high temperature, high magnetic field, wet
environment.
11.To reduce the risk of injury do not drape cord over the countertop where
it can be pulled on by children or tripped over unintentionally.
12. Do not operate any appliance with a damaged cord or plug or after the
appliance malfunctions or has been dropped or damaged in any manner.
If the supply cord is damaged, it must be replaced by the manufacturer
or service agent.
13. Turn the appliance OFF, then unplug from outlet. Unplug from outlet
when not in use, before putting on or taking off parts, and before
cleaning. Allow to cool down before putting on or taking off parts, before
cleaning the appliance, and before storing.
14. Always unplug from outlet during lightning and thunderstorm.
15. Always hold the plug while plugging or unplugging from power. Never
pull from the cord. Instead grasp the plug and pull to disconnect.
16. Do not connect to an extension cord or multiple socket adaptor.
17. Do not place on or near a hot gas or electric burner or in a heated oven.
18. The glass jar is designed to be used with this appliance only.
19. Do not clean with abrasive cleansers, steel wool pads, or other abrasive
materials.
20. Close supervision is necessary when your appliance is operating. Do not
leave the appliance in standby for a long time.
21. Some parts of the appliance are hot when in operation (such as drip
tray, top cover, steam tube and froth nozzle), so do not touch directly with
your hand. Use only the handle or knob.
22. Do not let the coffee maker operate without water. Do not open while in
use.
23. Do not move or turn off the power when the coffee machine is working
24. Do not use outdoors.
25. Clean your coffee maker regularly to ensure the best quality of your
coffee.
Before using it for the first time, please run the coffee maker only with
water (no coffee) twice to remove any odor.
HOUSEHOLD USE ONLY
Read carefully and save for future reference
Know your coffee maker
-
65
1. Water tank cover
2. Water nozzle
3. Water gauge
4. Water tank
5. Filter
6. Button
7. LED display
8. Glass jar
9. Steam knob
10. Steam sheath handle
11. Steam sheath
12. Cup mat
13. Two cup filter
14. Funnel
15. Aluminum alloy filter holder
16. Measuring spoon
17. On/off coffee button
18. Coffee button
19. Steam button
20. On/off drip coffee button
21. Setting button
22. Minute adjustment button
23. Hour adjustment button
Know your coffee maker

4.Press the “ ” button and the corresponding indicator light on the
screen will start flashing (as shown by the arrow on the picture below).
Let hot water come out to clean the filter or coffee cup. After cleaning,
press the button again to stop the water flow.
5. During preheating, put the ground coffee powder (it should not be too
thick or too fine) into the metal filter, then use the measuring spoon to
compress and flatten it. Clean the extra coffee powder from the edge of
the filter with your hand or brushes.
6.Insert the funnel and lock it (follow the mark) and put the coffee cup
under the funnel.
7.When the indicator light remains light up (as shown by the arrow on the
picture below), press the “ ” button and coffee will begin to flow. At
the same time, adjust the position of the coffee cup to let the coffee flow
into the cup along the cup’s wall. When the desired amount is reached,
press the “ ” button again to stop the flow of coffee.
Operation
7 8
Operation
Before use:
1. Pour the water into the tank. The water level should not exceed the “Max”
mark in the tank. Your appliance was designed to operate only with cold
or room temperature water.
2. Connect the power cord, then press the “ ” button. The indicator
light on the screen is flashing (as shown by the arrow on the picture
below) and the other indicator lights are off. Turn on the “steam knob”
and water will come out. Turn off the “steam knob”.
Note:
a. If the ON/OFF indicator light does not light up, then turn the steam knob
clockwise.
b. When water comes out of the coffee machine, the internal pump will make
a working vibration sound.
3.The machine starts to preheat and the indicator light on the screen is
flashing (as shown by the arrow on the picture below). When the indicator
light stops flashing and lights up, the preheating is finished. This process
takes about 2 minutes.

Hot water function
9 10
Milk frothing function
Milk frothing Method:
1. Press the “ ” button and then press the “ ” button, the indicator
of “ ” on the screen will flash until the steam preheating is completed.
2. Pour cold whole milk into the jug (1/3 full) and put the steam nozzle into
the milk (1cm deep), then turn the “steam knob” slowly in anti-clockwise
motion until steam starts to spray out.
Attention:
The amount of steam is adjustable
according to personal proficiency. Always
remember to release a little water from
the steam pipe before milk frothing.
3. When the volume of milk has approximately doubled, turn off the “steam
knob” and the “steam button” at the same time (clockwise direction is off).
After milk frothing, use a wet towel to clean
the milk on the surface of the steam nozzle
in time and spray steam again by turning
on the steam function to avoid dry milk
from blocking the air outlet.
4. You can now pour the milk into the coffee cup.
Note:
1.You can sprinkle with cocoa powder/chocolate sauce as desired and
make a cup of Mocha coffee.
2.If the coffee indicator light flashes quickly, this means that the
temperature is too high. You can use the hot water function to cool down.
HOT WATER FUNCTION
1. Press the “ ” button. The machine will start to warm up and
corresponding light of the coffee button flashes (as shown here by the
arrow).
After preheating, the coffee indicator light
remains light up. You may then press the
“coffee button” and anticlockwise rotate the
steam knob, then hot water comes out
through the steam tube and you can use
hot water to drink, wash or heat the cup.
When you have finished doing the steps above, press the “coffee button”
again. The machine will stop working and you can clockwise rotate the
steam tube to OFF at the same time.
2. Finally press “ ” button to turn off the machine.

1. Make sure that the water tank has enough water.
2. Put at most 2 spoons coffee powder into the filter (coffee powder cannot
be too fine and it cannot be filled too much) and insert funnel to its
corresponding place.
3. Press the “ ” button and the corresponding indicator light will
light up. The machine will start to make coffee.
4. Remove the glass jar after the coffee finishes dripping and press the
“ ” button to turn off the machine.
ADDITIONAL FUNCTION:
1. SET THE CURRENT TIME: Press the “PROG” button so the “TIMER”
indicator light lights up. You can press the “HR” button and “MIN” button
to set the current time.
2. TIMER FUNCTION: press the “PROG” button so the “CLOCK” indicator light
lights on. You can press the ”HR” button and “MIN” button to set the timer.
Then press the “PROG” button again and a blue indicator light will light up.
When the time you have set comes, drip coffee function will start brewing
automatically.
1. Turn off, unplug, and allow to cool down completely.
2. Use a damp cloth or sponge to wipe outside of coffee machine and part of
the accessories.
Note: Do not clean with alcohol or solvent cleaner, and do not immerse the
machine in water.
3. Unscrew the coffee funnel and clean the coffee inside the filter.
Cleaning and maintenanceDrip coffee function
11 12
ENVIRONMENT FRIENDLY DISPOSAL
You can help protect the environment!
Please remember to respect the local regulations: hand in
the non-working electrical equipment to an appropriate
waste disposal centre.

14
Troubleshooting
PROBLEM
No water comes
out when making
coffee.
No steam comes
out.
The machine
does not work.
The hot water and
steam button
lights are on and
the other two
lights are not on.
The milk does not
foam well.
There is coffee
dripping out of
funnel or filter.
CAUSE
1.There is no water in the
water tank.
2.The water hasn't been
pumped out yet.
3.The machine is not
preheated.
The steam outlet hole is
blocked.
The steam switch is not off.
1.You used skimmed
milk.
2.The machine was not
preheated.
Coffee powder was either
too fine or you added too
much powder.
SOLUTION
1.Fill the tank with water and
turn on the power switch and
the coffee switch.
2.Pump the water: press the
coffee button and turn on the
steam knob. When there is
water coming out, then follow
the instructions to make coffee.
3.The machine needs to be
preheated before coffee can be
made. This is when the
indicator light stops flashing
and remains light up.
1.Use a small wire through
the steam hole.
2.Clean the steam pipe with
hot water after foaming.
Turn the steam switch to OFF.
1.Use whole milk.
2.Steam can only be started
after the steam indicator light
changes from flashing to
constant light.
Use the correct type of ground
powder. Do not use more than
3 tablespoons of coffee.
13
Notes
If the problem persists, do not try to repair the appliance by yourself. Please contact a
certified service centre.
Table of contents
Languages:
Other Bogner Coffee Maker manuals


