Bohemian Travel Gear WMT-13972 User manual

STITCH LINE
Before you begin
Read all instructions thoroughly before beginning set up.
• Select a level site clear of rocks, branches, and other hard or sharp objects, to set up your tent.
WARNING: Keep clear of overhead power lines.
• Do not set up your tent under trees because of potential lightning strikes or falling tree limbs
in inclement weather.
• For best results in windy conditions, position narrow end of tent into the wind.
• Secure with all stakes and guylines provided to prevent property damage or personal injury.
• Two people can easily setup this tent in 60 seconds or less. Scan QR code to view our
setup video.
1
Setup Instructions:
2
NOTE: 2 people will be needed to erect the tent.
• Lift up on ARM JOINT of an UPPER
EAVE POLE. The tent will partially
raise when ARM JOINTS are
extended. (Detail 1)
• Extend UPPER EAVE POLES
until the orange LOCKING
BUTTON “clicks” into
locked position. (Detail 2)
NOTE: The 2 SHORT EAVE
POLES located above the
front door and back of the tent
do not extend out.
3
• Extend TELESCOPING LEG POLES until the orange LOCKING BUTTONS
“click” into locked position. (Detail 3)
8 PERSON INSTANT CABIN TENT -13 x 9
4
• Unfold LEG POLES and spread out tent.
“Click”
• Drape RAINFLY over tent as shown.
• Clip HOOK attached to SHOCKCORD of Rainfly onto FABRIC LOOP on tent. (Detail 4)
• Secure RAINFLY to both LEG POLES with HOOK & LOOP FASTENERS
(located on underside of Rainfly). (Detail 5)
(continued on other side)
Parts List:
A (1) Integrated Frame with Tent Body
B (1) Rainfly w/4 S-Hooks
Item No. WMT-13972
Model No. 30168
NOTE: You can now
easily move your tent
to its final position
before installing
the Rainfly and
securing with stakes
and guylines.
3
1
“Click”
2
DOOR
To Secure Tent:
Stake Tent
• Locate WEBBING LOOPS sewn into the corners at the base of
your tent.
• Slide STAKE through WEBBING LOOP at each location; then extend
out before securing.
NOTE: Floor of tent should be taut when staked properly.
Secure Tent Guylines
• Locate GUYLINES attached to the Rainfly.
• Slide STAKE through loop at each location, extend out and drive in to secure.
NOTE: GUYLINES should extend out at a 45º angle from tent .
• Tighten GUYLINES as needed by adjusting the SLIDER up the cord.
WEB
LOOP
SLIDER
5
4
E (1) Welcome Mat
C (1) Divider
F (1)
Stake Bag
H (1) Carry Bag
G (11) Stakes
D (1) Storage Pocket
• Attach Room Divider by inserting black toggles through the top and bottom fabric loops,
located at the center portion of the sides of your tent, as needed. (Fig. 1)
• Insert electrical cord through access panel in midway up on left side of tent.
(Fig. 2)
NOTE: Use only UL approved cords rated for outdoor usage.
• Attach Welcome Mat by inserting the plastic toggles through the fabric loops
located below the doorway along the base of the tent.
(Fig. 3)
• Attach Storage Pocket by clipping plastic hooks on elastic straps
to the fabric loops located on inside lower portion of tent.
IMPORTANT:
THE ORIGINAL FIRE RETARDENT AND WATER REPELLENT PROTEC-
TIVE COATINGS MAY BE COMPROMISED IF SPRAYS OR OTHER
CHEMICAL TREATMENTS ARE USED ON THE TENT. FABRIC HAS BEEN
FACTORY‐TREATED. IT IS HIGHLY WATER-REPELLANT; HOWEVER, IT
IS NOT WATERPROOF. ALL TENTS CAN EXPERIENCE SEAM LEAK-
AGE DURING WET WEATHER. IF YOU WANT ADDITIONAL MOISTURE
PROTECTION, TRY A SEAM SEALING COMPOUND ONLY; STRICTLY
FOLLOW THE MANUFACTURER’S DIRECTIONS. IT IS RECOMMENDED
THAT YOU SEAL THE TENT DURING THE INITIAL SETUP AS WELL AS
PRIOR TO EACH CAMPING SEASON. SEAM SEALER COMPOUNDS
CAN BE PURCHASED AT YOUR LOCAL CAMPING PRODUCTS OUTLET.
FOR MISSING PARTS CALL 1-888-774-5840.
PLEASE DO NOT RETURN THIS PRODUCT TO THE RETAIL STORE.
WARNING: KEEP ALL FLAME AND HEAT SOURCES AWAY FROM THIS
TENT FABRIC
This tent is made of flame-resistant fabric which meets CPAI-84 specifications. IT IS NOT FIRE-PROOF.
The fabric will burn if left in continuous contact with any flame source. The application of any foreign substance
to the product fabric may render the flame-resistant properties ineffective.
DO NOT use fuel burning devices inside or near tent materials.
DO NOT permit children to light matches, operate burning appliances, or handle any flame sources in or near
the tent.
• Do not smoke, use matches, candles or open flames of any kind in or near the tent.
• Do not refuel lanterns, stoves or heaters inside tent.
• Do not cook inside tent.
• Do not store flammable liquids inside tent.
Bohemian Travel Gear Limited
Plot # 30-32, Sector 3, Karnaphuli EPZ, Chittagong 4204, Bangladesh
Made in Bangladesh • Printed in Bangladesh
6 Month Limited Warranty
Bohemian Travel Gear Limited warrants for a period of 6
months from the original date of purchase, this product against
any defects in materials or workmanship. At its discretion,
Bohemian Travel Gear may provide replacement parts to original
purchaser. Original receipt or proof of purchase as well as proof
of defect is required. Bohemian Travel Gear will not be respon-
sible for shipping costs incurred outside the continental USA.
Warranty is valid for the original purchaser six months from the
date of purchase and is not transferable. This Warranty does not
cover any product purchased through non‐authorized dealers
and/or online auction websites.
This Warranty Does Not Cover This
This 6 Month Limited Warranty does NOT cover normal wear
and tear, abuse or misuse of this product including damage
from inclement weather conditions, such as wind, rain, or hail.
In case of inclement weather remove all valuables and persons
and seek appropriate shelter. Under no circumstances will
Bohemian Travel Gear Limited be liable or responsible for any
incidental or consequential damages.
This product is designed and intended for Recreational use
only. Prolonged exposure to UV rays will cause any fabric to
fade and deteriorate and is NOT covered by this 6 Month
Limited Warranty.
All replacement products or parts will assume the remain-
ing warranty of the original product. This warranty gives you
specific legal rights. You may also have other rights which vary
from state to state.
To Obtain Warranty Service
Call Toll Free 1-888-774-5840 for warranty service, repair
parts, or product questions. Mon‐Fri, 8:00 a.m. – 5:00 p.m.
Central Time.
NOTICE: DO NOT RETURN PRODUCT TO RETAIL STORE.
Fig. 1
FABRIC
LOOP
BLACK
TOGGLE
DOOR
WELCOME MAT
Fig. 3
Part
Number Description
90004 Corner Joint
90007 Foot Connector
90021 Base of Pole Connector
90082 Guyline
90204 Welcome Mat
90208 Center Hub
90247 Darker Orange Patch
90248 Bright Orange Patch
90266 Gray Patch
90364 Storage Organizer
REPAIR PARTS LIST
Part
Number Description
90365 Telescoping Roof
Pole
90366 Telescoping Leg
Pole
90367 Room Divider
90368 Rainfly
Things You Should Know
• Under certain conditions (cold weather, high humidity, etc.) condensation will form on the inside of your tent.
Condensation is caused by water vapor from your breath, perspiration, or any wet clothing inside the tent. It is
NOT LEAKAGE through the tent fabric. It can be minimized by removing wet clothing from your tent and by provid-
ing good ventilation through the tent.
• Never store tent, even for a short period of time, without drying it thoroughly and brushing off caked dirt. Do not
pack stakes inside your tent. Use a separate storage bag.
• STAKES SHOULD BE REMOVED BY PULLING ON THE STAKE ITSELF. NEVER PULL ON THE TENT TO
REMOVE STAKE.
• Do not leave your tent set-up for weeks at a time. Be aware that exposure to ultraviolet rays from the sun can
seriously damage material and/or cause it to become discolored.
WARNING: Keep all flame and heat sources away from this tent fabric.
This tent meets the flammability requirements of CPAI-84. The fabric may burn if left in continuous contact with any
flame source. The application of any foreign substance to the tent fabric may render the flame-resistant properties
ineffective.
Storing the Tent
• Remove guylines and stakes and place in their storage bag.
• All stakes must be placed in their own storage bag before placing in tent carrying case to prevent damage to the
tent fabric.
• Store in a clean, dry area.
STITCH LINE
Fig. 2
ACCESS
PANEL
POWER
CORD
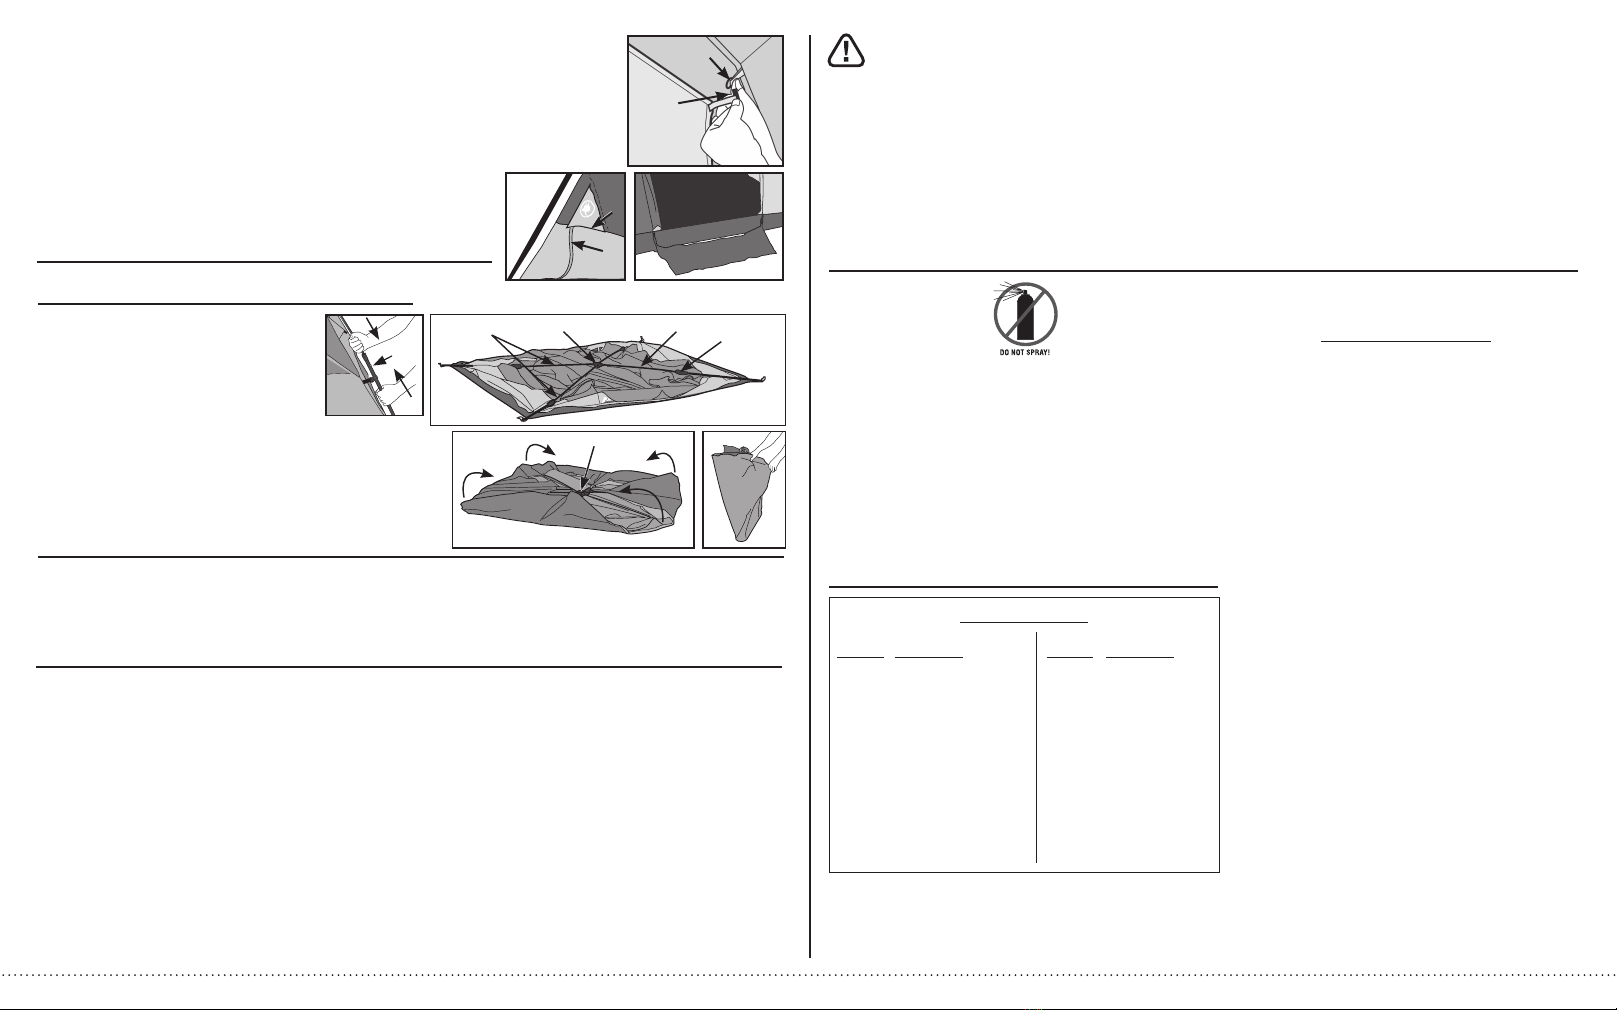
Take Down & Storage Instructions:
To Take Down Tent
• Remember to push the orange LOCKING
BUTTON and telescope in the 4 STEEL
POLES to closed position. (Fig. 4 & 5)
• Push down on the ARM JOINTS then
fold over STEEL LEG POLES. (Fig. 5)
• Rotate the 4 corners of tent up from the
HUB ASSEMBLY. (Fig. 6 & 7)
• Lay the tent down on its side and roll out the excess air
and put back into the bag.
Fig. 5
LOCKING
BUTTON
Fig. 4
Fig. 6
HUB ASSEMBLY
Fig. 7
HUB ASSEMBLY STEEL POLES
STEEL POLES
ARM JOINTS
This manual suits for next models
1
Other Bohemian Travel Gear Tent manuals

Bohemian Travel Gear
Bohemian Travel Gear WMT-130976 Parts list manual

Bohemian Travel Gear
Bohemian Travel Gear 30167 User manual

Bohemian Travel Gear
Bohemian Travel Gear 30088 User manual

Bohemian Travel Gear
Bohemian Travel Gear Shield Series User manual

Bohemian Travel Gear
Bohemian Travel Gear 30170 Manual

Bohemian Travel Gear
Bohemian Travel Gear WMT-141078 User manual

Bohemian Travel Gear
Bohemian Travel Gear 30166 User manual


