Bohle DIAMANTOR TG H200 User manual

DIAMANTOR TG H200


DE
3
Bedienungsanleitung
Seite 04 - 09
Operating Instructions
Pages 10 - 15
Instructions de commande
Pages 16 - 21
Instrucciones de uso
Páginas 22 - 27
Istruzioni d’ uso
Pagine 28 - 33
Bruksanvisning
Pagina’s 34 -39
GB
FR
ES
IT
NL

4
Inhalt
01 Vorbereitung der Schleifmaschine
02 Vorbereitung des DIAMANTOR Bandsägeaufsatzes
03 Wechseln und Justieren des Sägebandes
04 Bearbeiten von Glas
05 Bearbeiten von anderen Werkstoffen
06 Wartung, Reinigung und Pflege
07 Sicherheitshinweise
08 Ersatzteile
DE
5
Mit dem Bohle DIAMANTOR Bandsägeaufsatz kön-
nen Sie verschiedene Tisch-Glasschleifmaschinen
mit wenigen Handgriffen zu einer Bandsäge umrü-
sten.
Das allseitig beschichtete DIAMANTOR Sägeband
ermöglicht auch engste Radien und komplizierteste
Formen. Der selbstzentrierende Lauf macht Führun-
gen für das Sägeband überflüssig. Es wird keine
weitere Kühlmittelversorgung und Stromversorgung
benötigt.
01 Vorbereitung der
Schleifmaschine
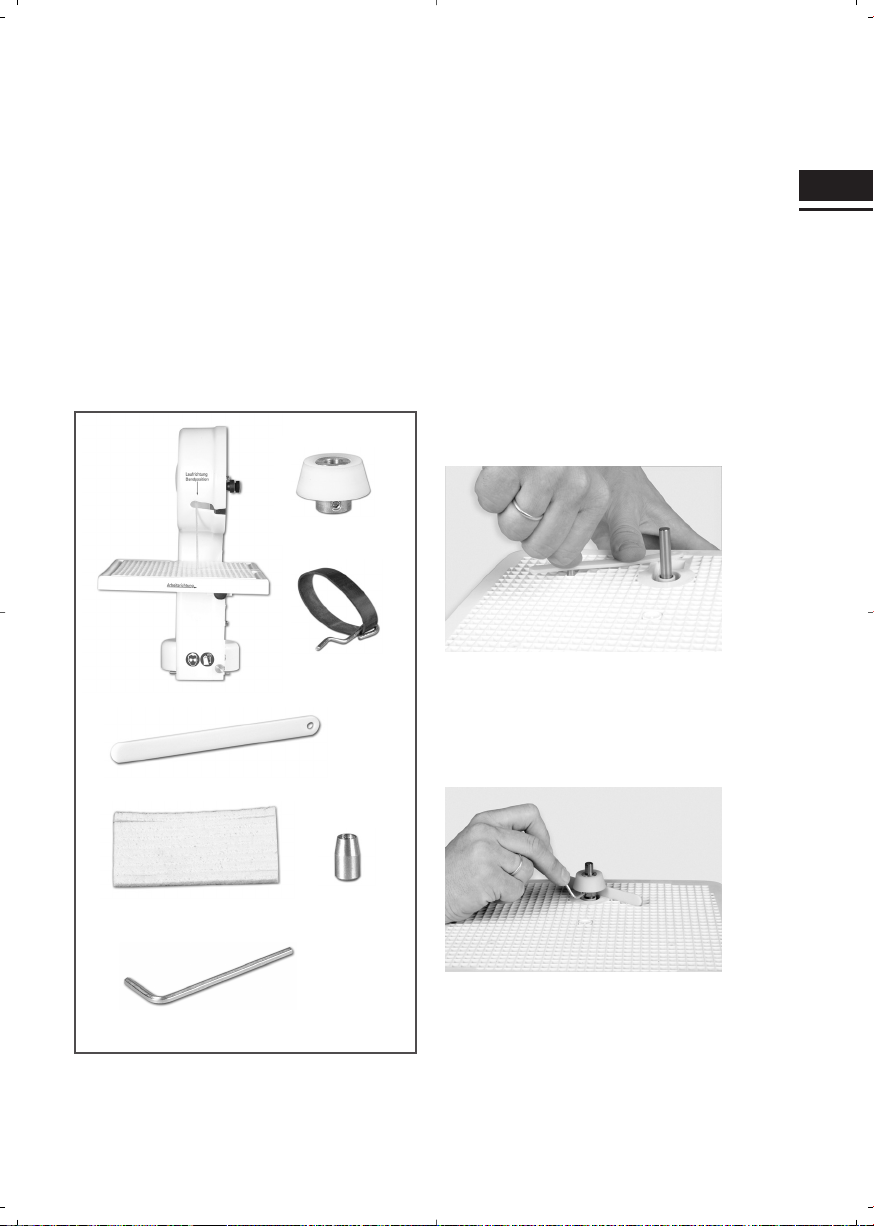
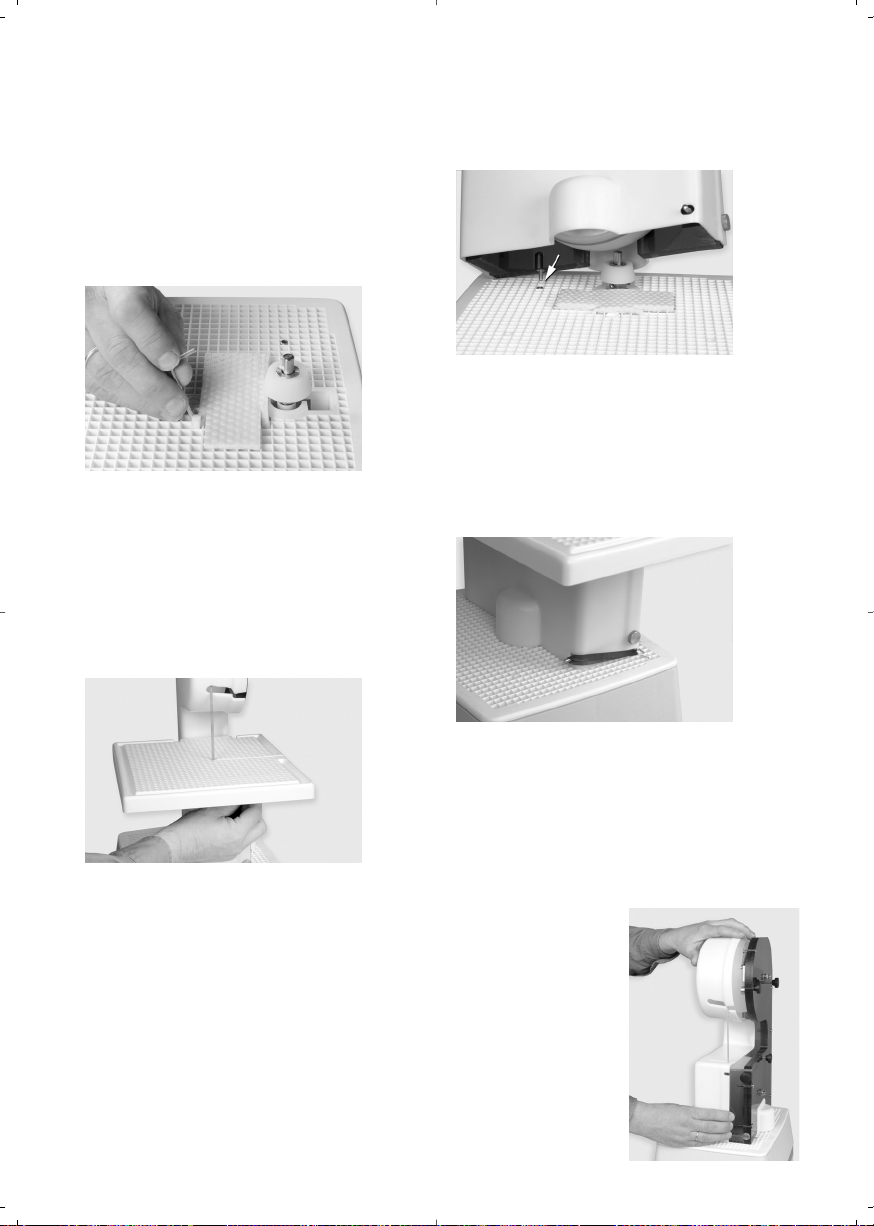
1) Pressen Sie die mitgelieferte Hülse in die Gitter-
platte ein. Die genaue Position für Ihre Schleifma-
schine entnehmen Sie bitte den Zeichnungen im
Anhang.
Schleifmaschinen der Firma GLASTAR benötigen die
Hülse nicht. Hierbei ist von Vorteil, wenn Sie die
zugehörende Gitteröffnung mit einem wasserfesten
Filzstift dauerhaft markieren.
2) Ersetzen Sie den Schleifkopf durch den mitgelie-
ferten Antriebskegel. Die richtige Position erhalten
Sie durch unterstellen der beigefügten Einstelllehre
(Höhe von Gitterplatte bis zur Unterkante Antriebs-
kegel 11mm).
Bandsägeaufsatz
mit Sägetisch
und Sägeband
Antriebskegel
Befestigungsband
Einstelllehre
Kühlwasserschwamm Hülse
Sechskantschlüssel
6
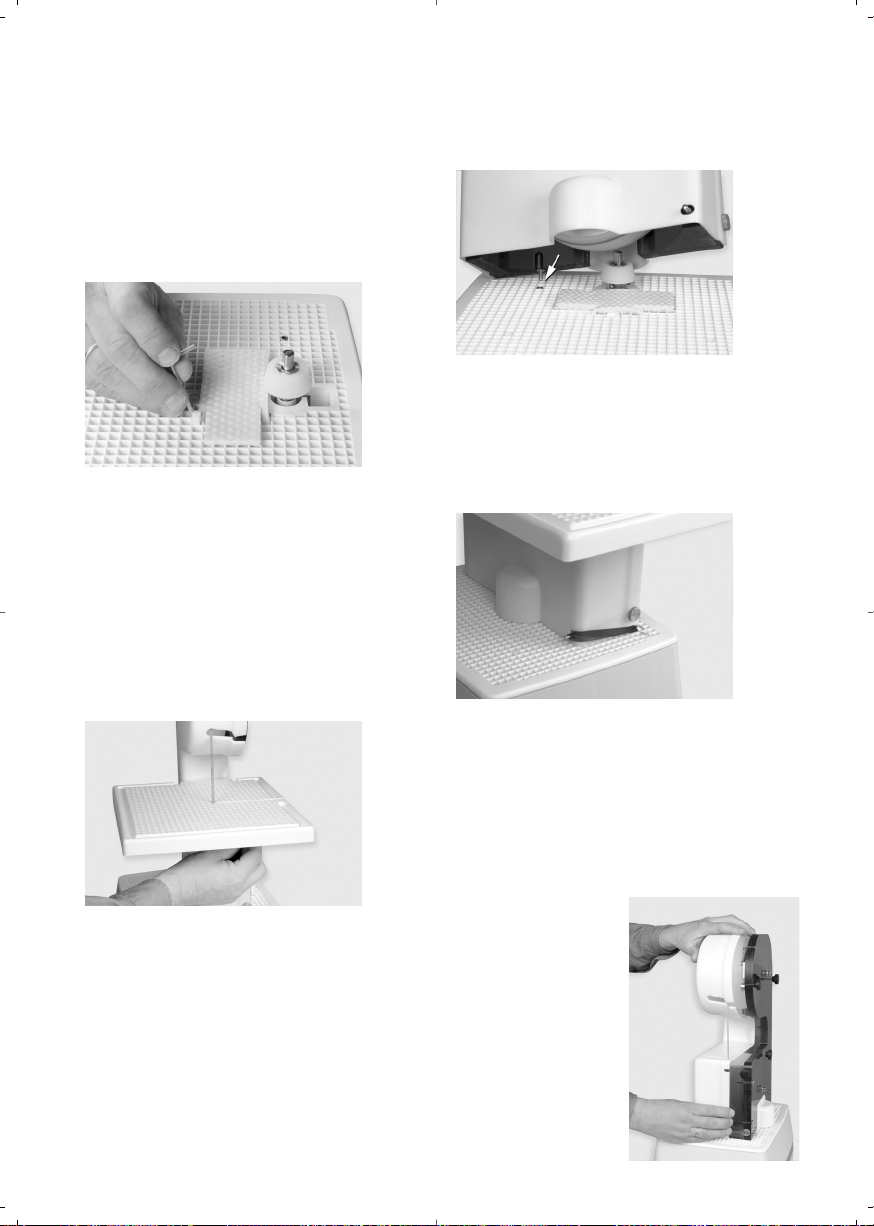
3) Drücken Sie den Wasserschwamm in die Gitter-
platte ein. Füllen Sie dann Wasser in die Wasser-
wanne Ihrer Schleifmaschine. Dadurch wird das
Sägeband permanent feucht gehalten. Ein evtl. vor-
handener Spritzschutz muss entfernt werden.
02 Vorbereitung des
DIAMANTOR Band-
sägeaufsatzes
4) Setzen Sie den Sägetisch auf und befestigen Sie
diesen mit den 2 Rändelschrauben.
5) An der Unterseite des Sägeaufsatzes befindet sich
ein 10 mm langer Stift. Die Bandsäge wird nun so auf
die Schleifmaschine aufgesetzt, dass der Stift in der
Hülse steckt.
Bei Schleifmaschinen des Typs “KRISTALL” ist der
Antriebskegel auf der Seite der blautransparenten
Seitenplatte.
Bei den Schleifmaschinen vom Typ “GLASTAR, GRY-
PHON und INLAND” befindet sich der Antrieb auf der
gegenüberliegenden Seite.
6) Schwenken Sie den Aufsatz jetzt an den Antriebs-
kegel, um ihn dann mit dem Gummiband am seitlichen
Stift und der Gitterplatte zu befestigen. Dadurch stellt
sich ein konstanter Andruck am Antriebskegel ein.
Nehmen Sie die Bandsäge durch Einschalten des
Netzschalters der Schleifmaschine in Betrieb.
03 Wechseln und
Justieren des
Sägebandes
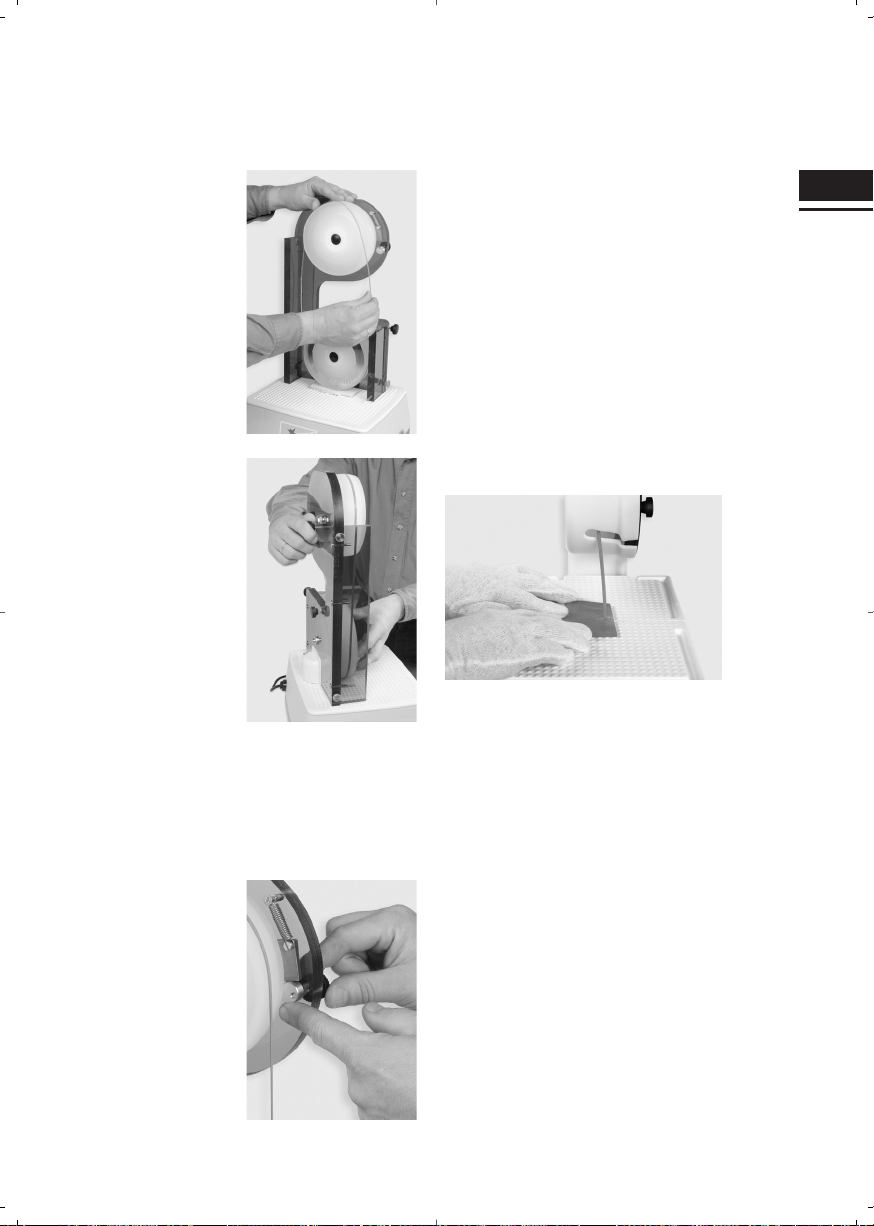
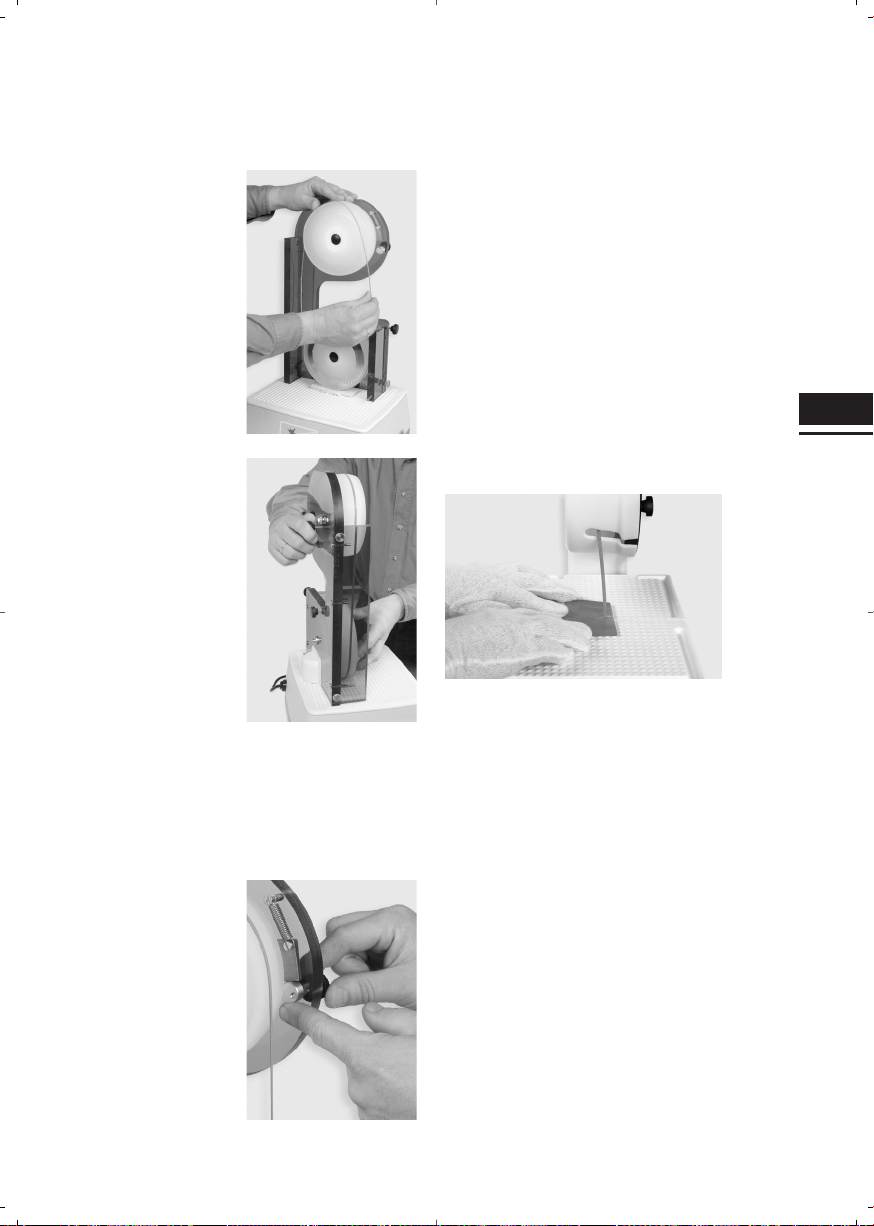
7) Lösen Sie zuerst die
zwei Rändelschrauben
unterhalb des Sägeti-
sches, um diesen dann
abzunehmen. Anschlie-
ßend lösen Sie die Rän-
delschrauben der Haube
und nehmen auch diese
ab. Drücken Sie jetzt die
obere Bandlaufrolle nach
unten, um dann das Säge-
band zu entfernen.
DE
7
8) Legen Sie das neue
Sägeband auf die untere
Bandlaufrolle mittig auf.
Drücken Sie dann die
obere Bandlaufrolle run-
ter und legen Sie auch
dort das Sägeband auf.
9) Drehen Sie nun per
Hand die untere Band-
laufrolle ca. 2-3 Umdre-
hungen in Laufrichtung.
Dadurch wird das Säge-
band automatisch zen-
triert. Durch die Zugfeder
wird es auf Spannung
gehalten. Schalten Sie
die Maschine ein um den
Lauf zu überprüfen. Das
Sägeband sollte ca. 5-10
mm vom Rand der unte-
ren Rolle entfernt laufen. Das Band kann nun durch
vorsichtiges Verdrehen der Rändelmutter auf der
Rückseite der Säge in die richtige Position gebracht
werden. Bitte führen Sie ein paar Tests durch, um
die gewünschte Position einzustellen. Schalten Sie
die Maschine anschließend wieder aus.
10) Stellen Sie den
Excenter ohne Druck
unterhalb der Wippe fest.
Abschließend setzen Sie
wieder die Haube und
den Sägetisch auf und
ziehen die Befestigungs-
schrauben an.
04 Bearbeiten von Glas
11) Das zu trennende Glasstück wird auf den Säge-
tisch gelegt und mit geringem Druck zur blauen
Seitenplatte hin an das Sägeband geführt. Bei Kur-
venschnitten das Glasstück nicht ruckartig drehen!
Bitte das Glasstück nur so fest gegen das Sägeband
drücken, dass es nicht von den Bandlaufrollen
geschoben wird. Machen sie sich mit dem richtigen
Sägeandruck vertraut, indem Sie zunächst
Probestücke verwenden. Nehmen sie am Ende des
Sägeschnittes den Druck gegen das Sägeband
zurück, damit das Glas nicht aussplittert.
05 Bearbeiten von
anderen Werkstoffen
Für andere Werkstoffe gilt das Gleiche wie bei Glas-
werkstoffen. Der Sägeandruck kann aber anders
sein.
Achten Sie darauf das der zu bearbeitende Gegen-
stand immer fest auf dem Sägetisch liegt.

8
06 Wartung, Reinigung
und Pflege
Spülen sie die Säge nach Gebrauch mit klarem
Wasser ab.
07 Sicherheitshinweise
Tragen Sie bei allen Arbeiten mit der Bandsäge eine
Schutzbrille und Schutzhandschuhe!
08 Ersatzteile
Der Bohle DIAMANTOR Bandsägeaufsatz ist sehr
verschleißarm. Die folgenden Artikel halten wir
jedoch für Ihren Bedarf immer auf Lager:
Sägeband 3,4 mm breit TG H201
Kühlwasserschwamm TG H214
Antriebskegel TG H216.01
Befestigungsband mit Haken TG H218.01
Antriebsrolle TG H213.01

DE
9

10
Contents
01 Preparation of the Grinder
02 Preparation of the DIAMANTOR Band Saw Attachment
03 Changing and Adjusting the Saw Blade
04 Sawing Glass
05 Sawing other Materials
06 Cleaning and Maintenance
07 Safety Information
08 Spare Parts

GB
11
With the Bohle DIAMANTOR band saw attachment
you can transform almost any glass grinder into a
fully functioning glass band saw in just a few steps.
The DIAMANTOR saw blade is diamond coated all
around, allowing even complicated shapes or extre-
mely small inner radii to be sawn. The self-cente-
ring run makes guides for the saw blade unnecessa-
ry. No separate electrical or coolant supply is requi-
red.
01 Preparation of the
Grinder
1) Press the provided sleeve into the grid plate of
the grinder. For the exact position for your particu-
lar grinder please refer to the attached drawings.
GLASTAR grinders do not require the sleeve. It is a
good idea to permanently mark the corresponding
grid opening with a waterproof marker.
2) Replace the diamond grinding head with the pro-
vided drive cone. By using the provided adjustment
gauge, you will get the correct height (height from
grid plate to lower edge of drive cone 11 mm).
Band saw
attachment with
worktable and
saw blade
Drive cone
Fastening band
Adjustment gauge
Coolant sponge Sleeve
Hexagon key
12
3) Press the water sponge into the grid plate. Then
fill the water tray of the grinder with water. This
will keep the saw blade constantly moistened. Any
splashguards must be removed.
02 Preparation of the
DIAMANTOR Band
Saw Attachment
4) Set the worktable in place and fasten it with the 2
knurled screws.
5) On the underside of the saw attachment is a pin, 10
mm long. When mounting the band saw onto the
grinder, make sure that the pin is inserted into the
sleeve.
With“KRISTALL” grinders the drive cone will be on the
transparent blue side of the band saw.
With “GLASTAR”, “GRYPHON” and “INLAND” grin-
ders, the drive cone will be on the opposite (white)
side.
6) Swivel the band saw attachment so that the drive
roller touches the drive cone. Fasten the elastic band
so that it stretches from the lateral pin to the grid
plate. This will create a constant pressure onto the
drive cone.
The on/off switch of the grinder is used to turn on the
band saw.
03 Changing and Adju-
sting the Saw Blade
7) First loosen the two
knurled screws beneath
the worktable and remove
the worktable. Next, loo-
sen the knurled screws of
the white hood and remo-
ve the hood. Now press
the upper band roller
downward to remove the
saw blade.

GB
13
8) Place the new saw
blade onto the middle of
the lower band roller.
Push down the upper
band roller and put the
saw blade onto it as well.
9) Manually turn the
lower roller approx. 2-3
rotations in the running
direction. This will auto-
matically centre the saw
blade. The tension spring
keeps the saw blade
under tension. Turn on
the machine to check the
running position of the
saw blade. The saw
blade should run approx.
5-10 mm from the edge
of the lower roller. The position of the saw blade
can only be corrected by carefully turning the knur-
led nut on the back side of the saw. Please run a
few tests to set the desired position. Then turn the
machine off again.
10) Without pressure,
tighten the eccentric
below the rocker bar.
Finally, put the hood and
the worktable back in
place and tighten the
fastening screws.
04 Sawing Glass
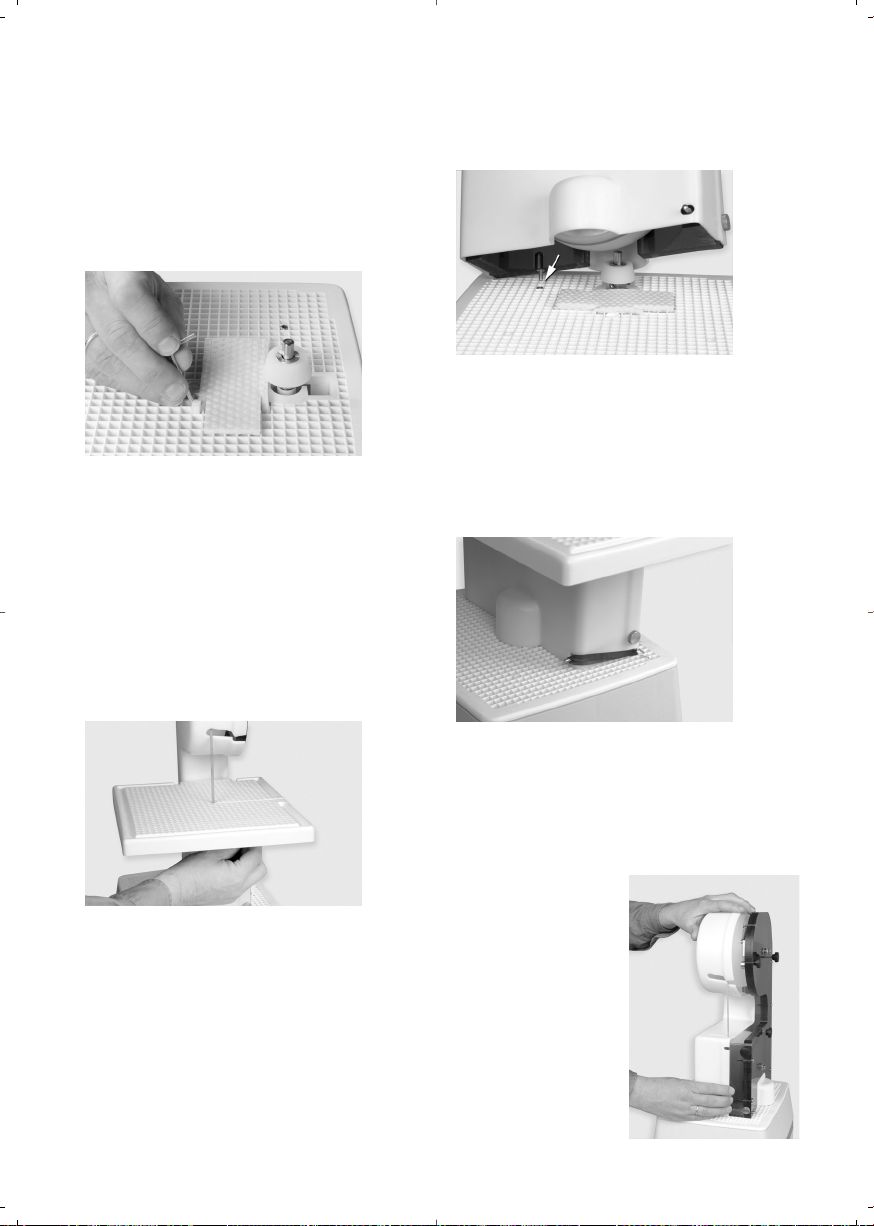
11) Set your glass on the worktable. Guide the glass
along the saw blade using gentle pressure, always
sawing toward the transparent blue side. When
sawing curves, turn the glass smoothly without jer-
king! The glass should be pressed against the saw
blade only enough that the saw blade does not get
pushed from the roller. Familiarize yourself with the
correct sawing pressure by first sawing some trial
pieces. At the end of a cut, stop pressing against
the saw blade so that the glass does not splinter.
05 Sawing other
Materials
For other materials the same applies as for glass.
However, the sawing pressure may be different. Be
sure that you always keep the object you are
sawing firmly on the worktable.

14
06 Cleaning and
Maintenance
After you have finished using the saw, rinse it off
with clean water.
07 Safety Information
Always wear safety glasses and safety gloves when
working with the band saw!
08 Spare Parts
The Bohle DIAMANTOR band saw attachment is
very wear-resistant. However, should you need
spare parts, we always have the following articles
in stock:
Saw blade 3.4 mm wide TG H201
Coolant sponge TG H214
Drive cone TG H216.01
Fastening band with hook TG H218.01
Drive roller TG H213.01

GB
15

16
Sommaire
01 Préparation de la meuleuse
02 Préparation de la scie DIAMANTOR
03 Remplacement et ajustage du ruban de scie
04 Le travail du verre
05 Le travail d’autres matériaux
06 Maintenance, nettoyage et entretien
07 Instructions de sécurité
08 Pièces de rechange

FR
17
La scie DIAMANTOR de Bohle vous permet, avec
peu de gestes, de transformer différentes meuleu-
ses portables en une scie à ruban. Le ruban DIA-
MANTOR, revêtu sur toutes les faces, vous permet
de réaliser des arrondis très étroits et des formes
très complexes. Grâce à son roulement à centrage
automatique, le ruban n’a pas besoin de guidage
spécial. L’alimentation en liquide de refroidissement
et en électricité est assurée par la meuleuse.
01 Préparation de la
meuleuse
1) Enfoncez la douille fournie dans le plan de travail
de la meuleuse. Vous trouverez la position exacte
dans les plans en annexe. Les meuleuses de la mar-
que GLASTAR n’ont pas besoin de cette douille,
marquez simplement le trou correspondant du plan
de travail à l’aide d’un feutre résistant à l’eau.
2) Remplacez la tête de meulage par le cône d’en-
traînement fourni. Pour trouver la bonne position,
utilisez le calibre de réglage livré en le positionnant
sur le grillage (distance entre la grille et le côté
inférieur du cône d’entraînement = 11 mm)
Scie avec table
detravail et ruban
Cône d’entraînement
Caoutchouc de fixation
Calibre de réglage
Eponge pour le liquide
de refroidissement
Douille
Clé à six pans
18
3) Enfoncez les parties coupées de l’éponge dans le
plan de travail. Mettez de l’eau dans le bac à eau de
votre meuleuse. Ainsi le ruban sera constamment
humidifié. Si il y a une protection anti-éclaboussu-
res, celle-ci doit être enlevée.
02 Préparation de la
scie DIAMANTOR
4) Positionnez la table de travail de la scie et fixez-la à
l’aide des deux vis moletées.
5) Du côté inférieur de la scie se trouve une tige d’
environ 10 mm de long. Positionnez la scie de manière
que cette tige se trouve dans la douille.
Pour les meuleuses du type KRISTAL, le cône
d’entraînement se trouve du côté de la plaque bleu
transparente de la scie.
Pour les meuleuses du type GLASTAR, GRYPHON et
INLAND, le cône d’entraînement se trouve du côté
opposé.
6) Maintenant pivotez la scie contre le cône d’entraî-
nement afin de la fixer avec le caoutchouc au niveau
de la tige latérale et de la table de travail. Ainsi, il y
aura une pression constante contre le cône d’entraî-
nement.
Mettez la scie en route en enclenchant l’interrupteur
de la meuleuse.
03 Remplacement et
ajustage du ruban
de scie
7) Dévissez d’abord les
deux vis moletées se
trouvant en-dessous de la
table de travail, afin de
pouvoir enlever celle-ci.
Ensuite, vous desserrez
les vis du cache et l’enle-
vez également. Poussez le
rouleau d’entraînement
supérieur vers le bas et
retirez le ruban.
FR
19
8) Centrer le nouveau
ruban sur le rouleau
d’entraînement inférieur.
Poussez ensuite le rou-
leau supérieur vers le bas
et positionnez également
le ruban.
9) Faites faire, manuelle-
ment, 2 – 3 tours au
rouleau inférieur, dans la
direction de marche.
Ainsi le ruban sera centré
automatiquement. Grâce
au ressort, la tension
exercée sur le ruban sera
maintenue. Mettez la
scie en route afin de con-
trôler le roulement. Le
ruban devra tourner à
environ 5-10 mm du bord
du rouleau inférieur. Vous pourrez rectifier la positi-
on du ruban uniquement en tournant avec précauti-
on l’écrou moleté se trouvant sur le côté arrière de
la scie. Veuillez exercer quelques tests pour régler
la bonne position. Eteignez la scie.
10) Fixez l’excentrique
en-dessous de la bascule,
sans exercer de pression.
Remettez ensuite le
cache ainsi que la table
de travail et resserrez les
vis.
04 Le travail du verre
11) Le verre à scier est posé sur la table de travail et
glissé vers le ruban, dirigé vers la plaque bleu trans-
parente, en n’exerçant qu’une faible pression. Pour
découper des courbes, ne jamais tourner le verre
brusquement ! N’exercez que de pression trop forte
sur le ruban afin que celui -ci ne saute pas des rou-
leaux d’entraînement. Pour vous familiariser avec la
pression à exercer, faites d’abord des essais. Arriver
à la fin de la coupe, diminuez progressivement la
pression contre le ruban afin d’éviter que le verre
éclate.
05 Le travail d’autres
matériaux
Le procédé de travail est identique au travail du
verre. Mais la pression à exercer peut varier. Veillez
à ce que la pièce de travail repose toujours sur le
plan de travail.

20
06 Maintenance, net-
toyage et entretien
Après utilisation, rincer la scie à l’eau claire.
07 Instructions de
sécurité
Portez des lunettes et des gants de protection pen-
dant les travaux avec la scie!
08 Pièces de rechange
La scie DIAMANTOR de Bohle est très résistante à
l’usure. Nous avons néanmoins les pièces suivantes
en stock
Ruban de scie, largeur 3,4 mm TG H201
Eponge TG H214
Cône d’entraînement TG H216.01
Caoutchouc de fixation
avec crochet TG H218.01
Rouleau d’entraînement TG H213.01
Table of contents
Languages:


