Skyfood SI-282HDE-1 User manual

Data de Correção: 01/02/2016
UG0169 / 507806 - INGLÊS
- BESIDES THIS EQUIPMENT, A COMPLETE RANGE OF OTHER PRODUCTS ARE MANUFACTURED, CONSULT OUR DEALERS
- DUE TO THE CONSTANT IMPROVEMENTS INTRODUCED TO OUR EQUIPMENTS, THE INFORMATION CONTAINED IN THE PRESENT
INSTRUCTION MANUAL MAY BE MODIFIED WITHOUT PREVIOUS NOTICE.
Skyfood Equipament LLC
OFFICE
11900 Biscayne Blvd. Suite 616 - North Miami, FL 33181 - USA
1-800-503-7534 | 305-868-1603
www.skyfood.us
MEAT AND BONE SAW – 111” BLADE - 2HP
SIERRA PARA HUESOS - HOJA 111” - 2 HP
SCIE POUR OS - LAME 111” - 2 HP
SI-282HDE-1
INSTRUCTION MANUAL
MANUAL DE INSTRUCCIONES
MANUEL D’ INSTRUCTIONS

2
ENGLISH ................................................................................................3
ESPAÑOL............................................................................................. 23
FRANÇAIS............................................................................................ 43
INDEX
67

66
SKYFOOD se reserva el derecho de cambiar los términos de la Garana Limitada a
cualquier momento sin previo aviso. También se reserva el derecho de cambiar el
proyecto y las especificaciones de sus equipos ó cualquier otra documentación a
cualquier momento. El usuario final no tendrá derecho a compensaciones
resultantes de éstos cambios.
Actualización :
Estes Terminos y Condiciones fueran por ulmo actualizadas en 1 de Marzo 2015.
3
1. INTRODUCTION .................................................................................4
1.1 Safety .................................................................................................................... 4
1.2 Main Components ................................................................................................ 6
1.3 Technical Characteriscs ........................................................................................ 7
2. INSTALLATION.................................................................................... 7
2.1 Receiving and Unpacking ....................................................................................... 7
2.2 Installaon ............................................................................................................ 7
3. OPERATION........................................................................................9
3.1 Pre-Operaon ....................................................................................................... 9
3.2 Operang process.................................................................................................. 9
3.3 Cleaning and Sanizaon......................................................................................10
4. GENERAL SAFETY PRACTICES............................................................ 15
4.1 Basic Operaon Pracces......................................................................................15
4.2 Safety Procedures and Notes before Switching the Machine ON ...........................16
4.3 Roune Inspecon................................................................................................16
4.4 Operaon .............................................................................................................17
4.5 Aer Finishing The Work.......................................................................................17
4.6 Maintenance ........................................................................................................17
4.7 Warning................................................................................................................18
5. PROBLEMS ANALYSIS and SOLUTIONS.............................................. 19
5.1 Problems, Causes and Soluons............................................................................19
6. ELECTRIC DIAGRAM ......................................................................... 21
SUMMARY

4
1. INTRODUCTION
1.1 Safety
If and when the Band Saw Model SI-282HDE-1 is not correctly used it is a potenally
DANGEROUS machine. Cleaning, maintenance and any other service in the machine shall
be carried out by duly trained people and with the plug offits socket. The instrucons
below must be always followed to avoid ACCIDENTS:
1.1.1 Take the electric plug offits socket, before to withdraw any moving part, before
cleaning, maintenance or any other kind of service.
1.1.2 Never use any kind of tools not belonging to the Saw to help during operaon.
1.1.3 Never touch the blade # 08 (Pic.01) when the saw is in operaon
1.1.4 Never wear loose clothes with wide sleeves mainly around the wrists during
operaon.
1.1.5 Never adjust the Thickness Guide # 13 (Pic.01) with the saw blade in movement.
1.1.6 Keep hands away from moving parts.
1.1.7 Never switch on the Saw with wet clothes or wet feet.
1.1.8 Ground machine properly during installaon.
1.1.9 The saw has a Thermal Protector for the motor protecon. Motor and the operator
are protected in case of over heang.
Therefore if the equipment suddenly STOPS, wait some minutes, and aer reset the
Thermal Protector pressing the Buon # 01 (Pic. 02)
65
por cualquier perdida, daño, daño oculto, despensa ó atraso de mercaderías, por cualquier
movo cuando dichas mercaderías estuvieren en custodia, posesión ó control de terceras
partes seleccionadas por SKYFOOD para despachar, tramitar, libertar, transportar ó otros
servicios relavos a estas mercaderías. El único remedio por la quiebra de cualquier
garana se limita a lo que es expuesto arriba.
Todos los productos que se encuentren en instalaciones ó domicilios que no sean
comerciales, deben ser llevados o despachados, con flete prepago, sea para las
instalaciones de SKYFOOD, sea para una compañía de servicio (“Compañía de Servicio”)
indicada por SKYFOOD. Productos que se encuentren en instalaciones comerciales y con
peso menor que setenta (70) libras deben ser traídos o despachados, flete prepago, sea
para las instalaciones de SKYFOOD sea para la Compañía de Servicio. Distancia o empo de
viaje NO serán pagados. SKYFOOD ofrece una garana limitada en sito para productos que
estén solamente en instalaciones comerciales con peso neto superior a setenta (70) libras,
siempre que estén instalados en una dirección dentro de un rayo de treinta (30) millas de
una Compañía de Servicio. Usuarios finales son responsables por todos los costos extra
de viaje y costo por milla. En este caso servicios de garana serán provenidos durante las
horas de trabajo comerciales.
Este producto sera sustuido o reparado bajo la garana, por un periodo de un (1) año
desde la fecha de compra por el comprador original/usuario (“Usuario Final”), ó diez
ocho (18) meses a parr de la fecha de envío desde el almacén de SKYFOOD cual sea la
fecha que expire primero.
Accesorios serán remplazados ó reparados bajo la garana por un periodo de (30) días a
parr de la fecha de compra por el comprador/usuario (“Usuario Final”), ó diez ocho (18)
meses a parr de la fecha de envío desde el almacén de SKYFOOD cual sea la fecha que
expire primero.
La garana no será aplicable hasta que un formulario de REGISTRO DE GARANTÍA sea
recibido por SKYFOOD EQUIPMENT, LLC, dentro de treinta (30) días de la feche de la compra.
El REGISTRO DE GARANTÍA sea en el Manual de Instrucción de cada producto ó en el sito
de SKYFOOD: www.skyfood.us. El Usuario Final debe llenar el formulario de REGISTRO DE
GARANTÍA y mandarlo para SKYFOOD de acuerdo con las instrucciones indicadas en el
referido sito. Sin el cumplimiento de esta condición la garana NO será valida.
La garana no se exende para productos de terceros. No existen otras garanas ó
condiciones expresas otras que aquellas ofrecidas por cada fabricante de productos
vendidos por SKYFOOD que no sean bajo la marca SKYFOOD.
Para preguntas ó asistencia, no devuelva el producto ó accesorios para la enda, por favor
llame a Toll Free 1-800-503-7534, ó visite la sección Servicio al Cliente en www.skyfood.us.
Para un servicio mas rápido tenga disponible el nombre del modelo, el numero de serie y
la prueba de compra para que el operador le asista.

64
SKYFOOD EQUIPMENT LLC - SERVICIO
Para preguntas o asistencia, llame SKYFOOD EQUIPMENT Toll Free: 1-800-503-7534, o
visite la sección de Servicio al Cliente en www.skyfood.us.
GARANTIA LIMITADA DE SKYFOOD
Salvo especificado diferentemente nuevos productos SKYFOOD accesorios excluidos,
vendidos por SKYFOOD EQUIPMENTS, LLC (“SKYFOOD”), para uso solamente en los Estados
Unidos ( colecvamente “Productos” ó singularmente “Producto”) son garanzados de
estar libres de defectos en los materiales y la mano de obra por un periodo de un (1) año
desde la fecha de compra por el comprador original/usuario (“Usuario Final”), ó diez ocho
(18) meses a parr de la fecha de envío desde el almacén de SKYFOOD cual sea la fecha
que expire primero. Varios productos nuevos y accesorios pueden ser garanzados por
un periodo diferente de un (1) año, mientras otros podrían estar sujetos a limitaciones
de transporte, como especificado en Manual de Instrucción del producto. Es necesario
presentar la Prueba de Compra, caso contrario la garana NO SERÁ APLICABLE. Ninguna
garana es dada ó implícita para usuarios secundarios o para terceras partes. Es condición
fundamental de la Garana que SKYFOOD sea noficada de cualquier defecto en materiales
ó mano de obra en el plazo de cinco (5) días del ocurrido, dentro del plazo de la garana. Si
el aviso del reclamo, bajo esta garana, es hecho en empo por el usuario final, SKYFOOD ó
una compañía de servicio (“Compañía de Servicio”) indicada, hará el reparo o la sustución
del Producto, a criterio de SKYFOOD, bajo las condiciones adicionales escritas abajo.
Esta garana no se aplica si el daño ocurre de una instalación impropia ó mantenimiento
hecho por una compañía de servicio (“Compañía de Servicio”) no autorizada, tensión
eléctrica errada, ni si los productos ó partes hubieren sido usados fuera de conformidad
con las instrucciones de operación y mantenimiento, sujetos a mal uso ó abuso, ó
damnificados por accidentes, causas de fuerza mayor, uso anormal, tensión ó cualquier
otra causa que no sea de responsabilidad de SKYFOOD o afuera de su razonable control.
Esta garana NO cubre mano de obra de servicio y despensas de viaje para proceder
ajustes en los productos o /y accesorios. Además del desgaste y rasgue de algunos
ítems, como pero no limitado a; partes de vidrio, hojas de corte, piedras, cuchillas, platos,
cuchillas de corte, discos de corte, vedamientos, cambios de óleo, cinta para vedamiento,
cintas de aislamiento, gusanos, rodamientos auto-lubricados, carbones para motores
eléctricos, y otras partes desgastables por su naturaleza y que necesiten ser repuestas
con frecuencia. Componentes eléctricos están sujetos a desgaste y rasgue natural y
no están cubiertos por esta garana. ESTA GARANTÍA ESCLUDE TODAS GARANTÍAS
VERBALES, ESTRUCTURALES, EXPRESA, Ó IMPLICITA QUE PUDIERA SER APLICABLE
A SKYFOOD, INCLUSO, PERO NO LIMITADO A, CUALQUIER GARANTIA IMPLICITADE
COMERCIALIZACIÓN Y ADAPTABILIDAD PARA FINALIDADES PARTICULARES. Bajo ninguna
circunstancia SKYFOOD será responsable por perdida de uso, renta o lucros cesantes o
por daños incidentes ó consecuentes. SKYFOOD en ninguna circunstancia será responsable
5
IMPORTANT
In order to improve user safety the Band Saw model SI-282HDE-1 is equipped
with a safety system, which refrain itself from being acvated if the upper door #
04 (Pic.01), the lower door #15 (Pic.01) and the blade guard #17 (Pic.01) are not
properly in place.
IMPORTANT
This equipment must not be used by children or any persons with reduced
physical or mental aptness, lack of experience or knowledge, unless they are
under supervision or have received from the person responsible for safety, proper
instrucons on how to use the equipment.
IMPORTANT
The cord shall be in perfect condions for the use, check it carefully, and change
a damaged cord using a new one designed in accordance with the surety and
technical specificaons. The changing shall be made by qualified professionals and
shall respect local safety rules.
IMPORTANT
In case of emergency use emergency switch # 03 (Pic.01). To switch the machine
back ON push green buon of ON/OFF Switch # 02 (Pic.01).
6
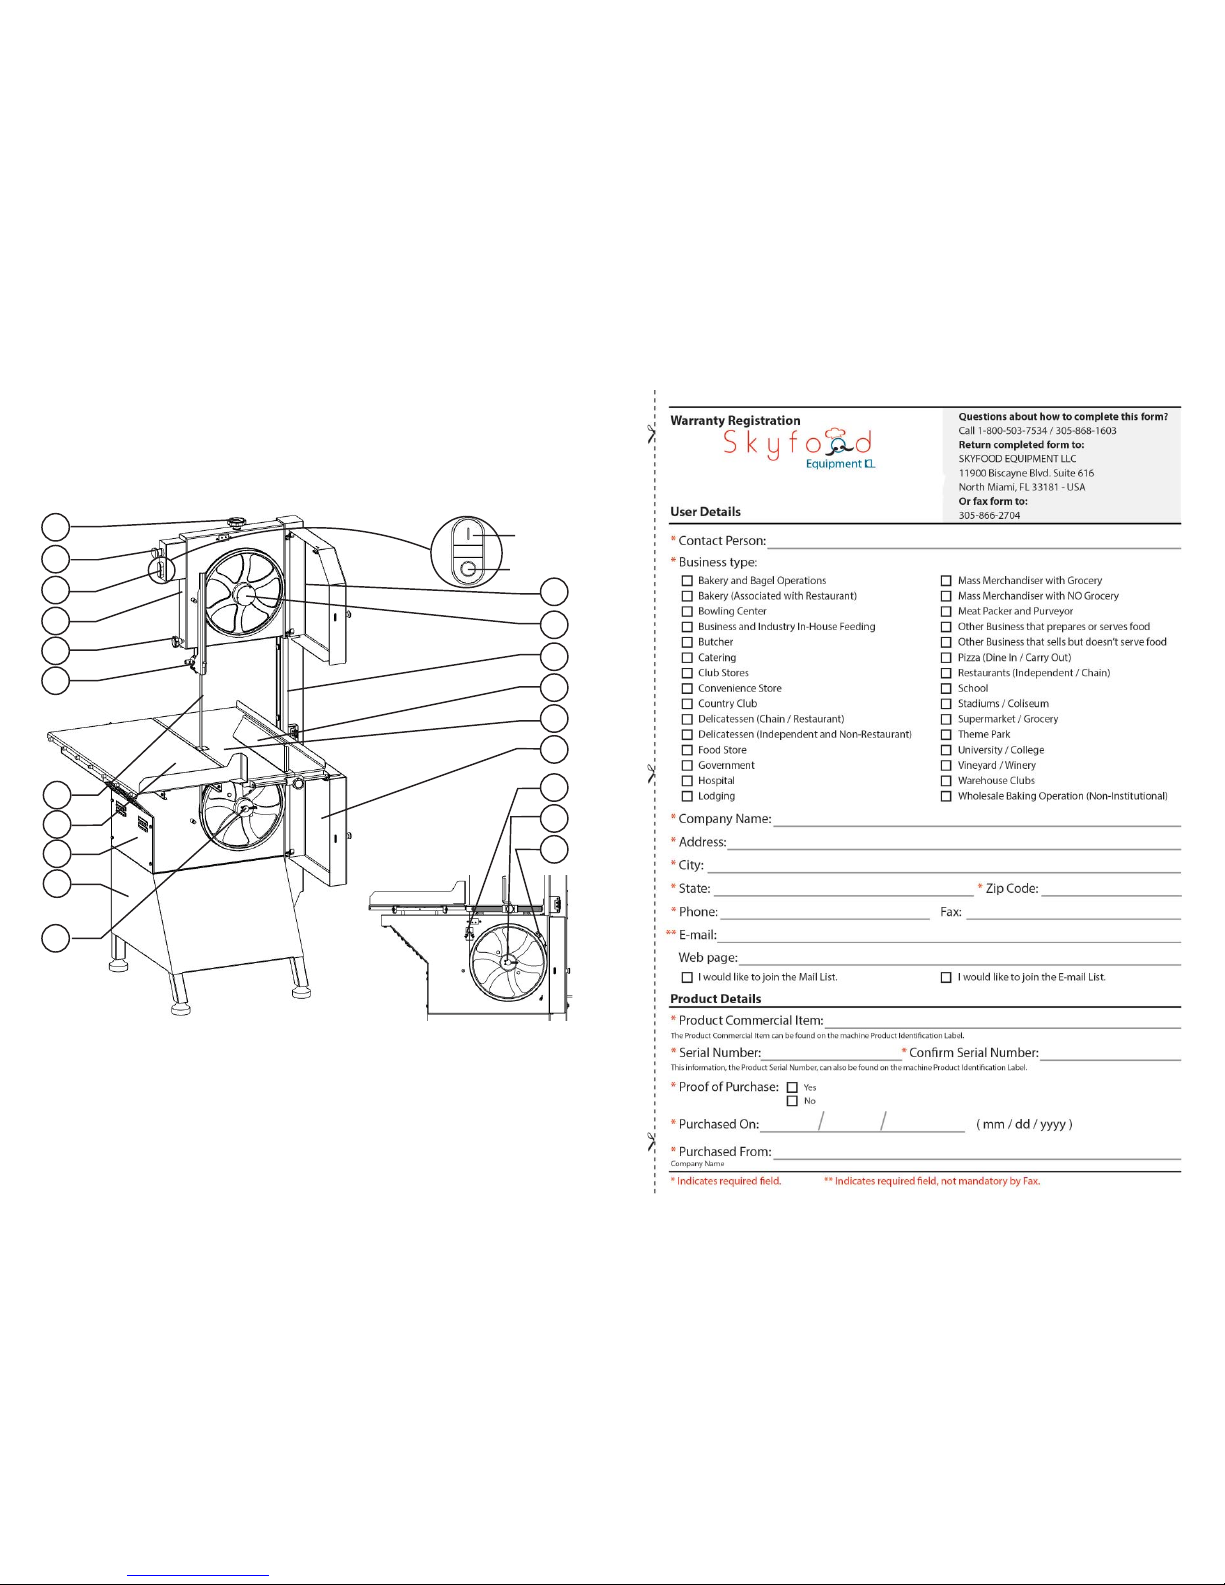
1.2 Main Components
All components are manufactured with carefully chosen raw materials in accordance with
Siemsen experience and tesng standards.
PICTURE 01
05
14
13
19
10
15
04
07
08
01
09
20
03
11
17
02
18
12
06
16
ON
OFF
01 - Blade Tension Regulator Handle
02 - ON/OFF Switch
03 - Emergency Buon Switch
04 - Upper Door
05 - Upper Wheel
06 - Handle
07 - Blade Guide
08 - Blade (width 3/4”)
09 - Movable table
10 - Wheel Staple
11 - Rack
12 - Frame
13 - Thickness Guide
14 - Fixed table
15 - Lower Door
16 - Lower wheel
17 - Blade guard
18 - Wheel Scraper
19 - Blade Scraper
20 - Motor Housing
63

62
remedy for breach of any warranty is limited to the remedies provided in the paragraph
above.
All products held at non-commercial facilies or domiciles, must be taken or shipped,
shipping charges prepaid, either to SKYFOOD’s facility or a SKYFOOD’s designated service
company (“Service Company”). Products held at commercial facilies and weighing
less than seventy (70) lbs. must be taken or shipped, shipping charges are prepaid, either
to SKYFOOD’s facility or to a Service Company. Mileage or travel me will NOT be paid.
SKYFOOD offers a limited on-site warranty for products ONLY held at commercial facilies,
whose net weight exceeds seventy (70) lbs., provided they are installed in a locaon that
is within a thirty (30) mile radius of a Service Company. End Users are responsible for
all extra travel and mileage rates. In this case, warranty services will be provided during
regular business hours.
This product will be replaced or repaired under warranty, for a period of (1) year,
beginning from the date of purchase by the original purchaser/user (“End User”), or
eighteen (18) months from the date of shipment from SKYFOOD’s warehouse, whichever
expires first.
Accessories will be replaced or repaired under warranty, for a period of (30) days, beginning
from the date of purchase by the original purchaser/user (“End User”), or eighteen (18)
months from the date of shipment from SKYFOOD’s warehouse, whichever expires first.
This warranty shall not take effect unl a properly completed and executed WARRANTY
REGISTRATION form has been received by SKYFOOD EQUIPMENT, LLC, within thirty (30)
days from the date of purchase. The WARRANTY REGISTRATION is available either in the
Instrucon Manual of every Product or at SKYFOOD’s website www.skyfood.us. The End
User must fill out the WARRANTY REGISTRATION form and send it to SKYFOOD according
to the instrucons posted on the referred website. Failure to do so will VOID the warranty.
No extended warranes for third party products. There are no other express warranes
or condions other than the one offered by each manufacturer for products sold by
SKYFOOD, not under the SKYFOOD brand.
For quesons or assistance, do not return the product or accessories to the store, please
call Toll Free 1-800-503-7534, or visit the Customer Service secon at www.skyfood.us. For
faster service please have the items name, serial number, and proof of purchase for the
operator to assist you.
SKYFOOD reserves the right to change the terms of its limited warranty at any me
without any prior noce. It also reserves the right to change the design and specificaons
of its equipment or any related documentaon at any me. The end user is not entled
to upgrades or refunds resulng from these changes.
Updates
These Terms and Condions were last updated on March 1st, 2015.
7
TABLE 01
CHARACTERISTICS UNIT SI-282HDE-1
Voltage V 230
Electric Current A 9,5
Frequency Hz 60
Power Rang HP 2
Consumpon kW.h 1.47
Height in 37 1/2
Width in 37 3/4
Depth in 37 1/2
Net Weight lb 265
Shipping Weight lb 408
Maximum Cung Height in 12 3/4
Maximum Cung Width in 10
1.3 Technical Characteriscs
2. INSTALLATION
2.1 Receiving and Unpacking
As soon as the equipment is received check the packaging integrity. If packaging is
damaged, check if there has been some damage to the equipment during transportaon.
If damage has been found, keep the packaging and contact immediately the transporter.
2.2 Installaon
2.2.1 Placing the saw
The Saws must be installed over a firm working surface. See below drawing the
recommended area.
2.2.2 Electric Installaon
The equipment has been designed to operate 230 Volts. When you receive the equipment
check the voltage indicated on the cord label.
The power plug has 3 pins the middle pin is the ground. All the 3 pins must be properly
connected.
FRONT SIDE
1350 mm
1350 mm
8
2.2.3 Blade
The Blade shall be installed with the teeth turned toward the saw front side, and downward.
To stretch the blade #. 08 (Pic.01) turn clockwise the Blade Tension Regulator Handle #.01
(Pic.01) unl it stops.
2.2.4 Blade Guide
With the saw switched OFF turn the Handle #.06 (Pic.01) counter clockwise to loose the
Blade Guide #. 07 (Pic. 01).
Adjust the Blade Guide height to meet the meat piece thickness, and not more.
Then ght the handle # 06 (Pic 01)
2.2.5 Tray
The Saw model SI-282HDE-1 has a Tray #.16 (Pic.01) placed under the saw, to collect
residues
To remove the tray pull it sideway unl it is completely out.
To replace it follow the inverse procedure and push unl it is completely in
2.2.6 Scrapers
The saw model SI-282HDE-1 has two scrapers, the wheel scraper # 18 (Pic 01) and the
blade scraper # 19 (Pic.01)
The Wheel Scraper
This scraper cleans the bone dust or the residues from the Lower Wheel during operaon.
The scraper may be removed for cleaning (see item 3.3 Cleaning).
IMPORTANT
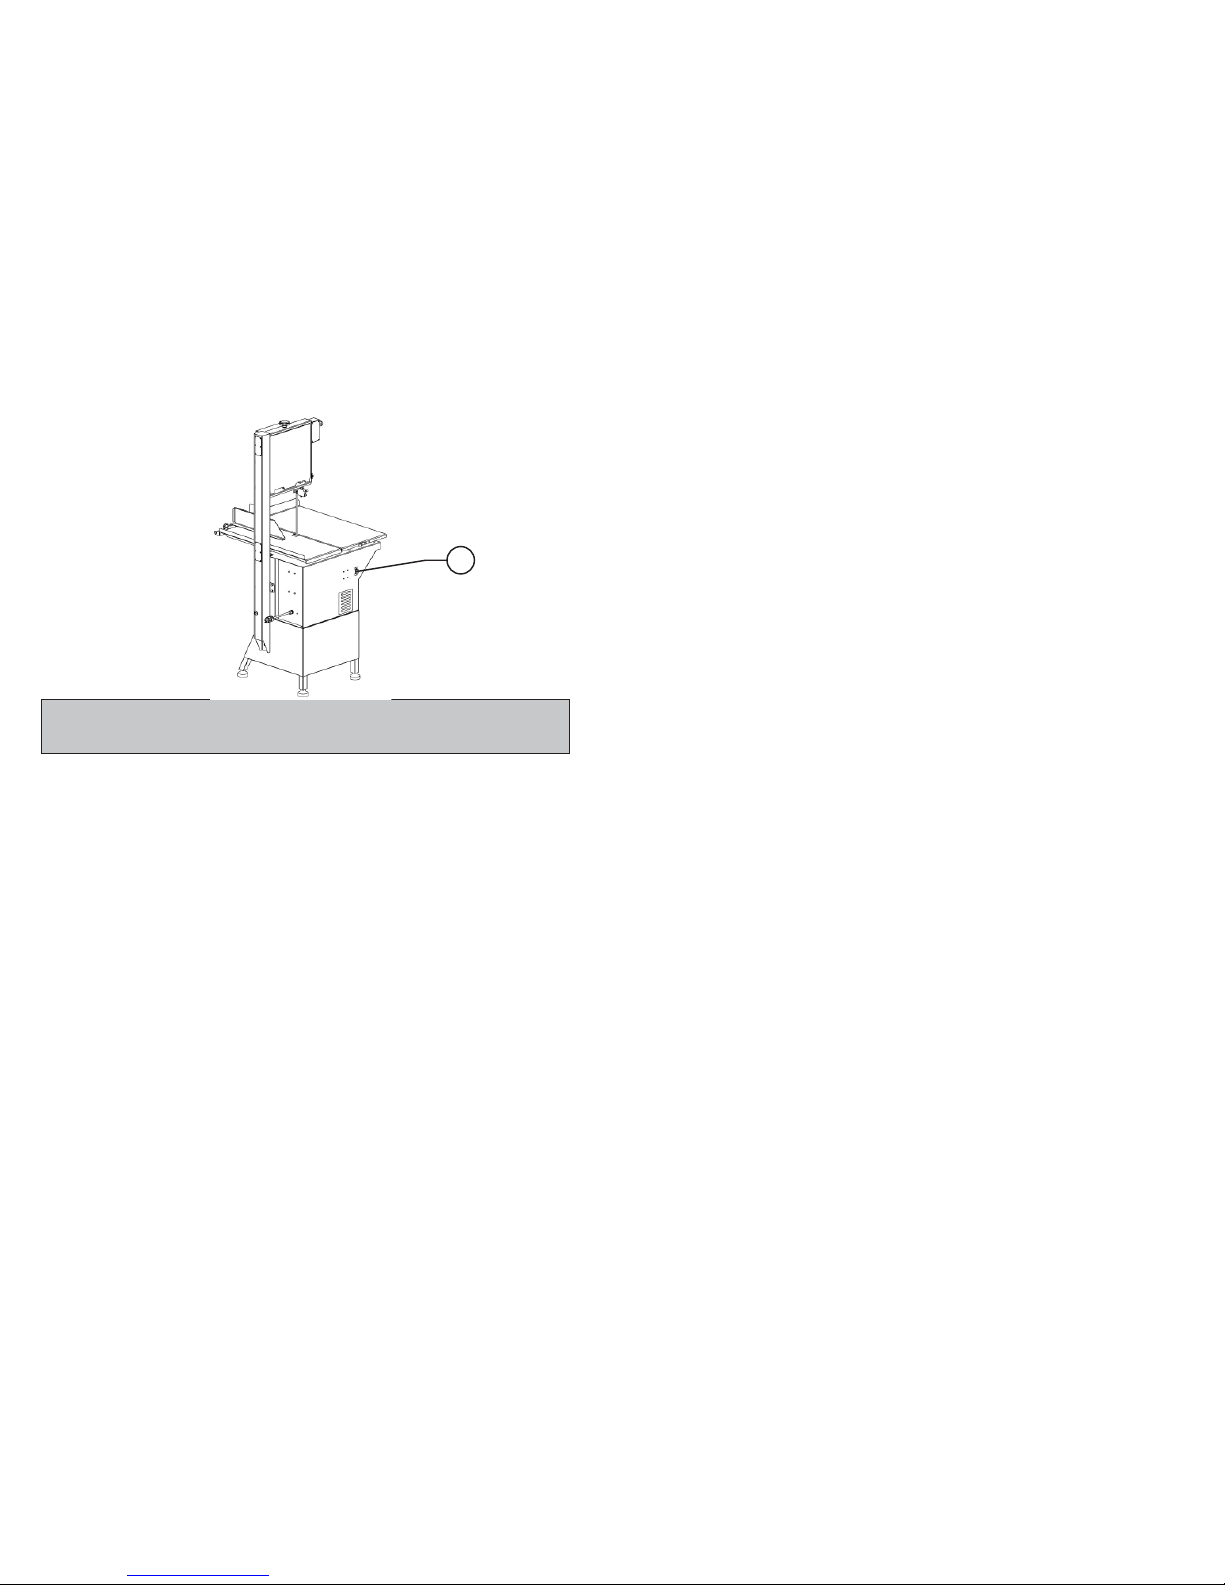
Make sure the network voltage is the same as indicated on the cord label.
PICTURE 02
01
61
SKYFOOD EQUIPMENT LLC - SERVICE
For quesons or assistance, call SKYFOOD EQUIPMENT Toll Free: 1-800-503-7534, or visit
the Customer Service secon at www.skyfood.us.
SKYFOOD’S LIMITED WARRANTY
Unless otherwise specified, new SKYFOOD products, excluding accessories, sold by
SKYFOOD EQUIPMENT, LLC. (“SKYFOOD”), for use only in the connental United States
(collecvely, “Products” or singularly, “Product”), are warranted to be free from defects in
materials and workmanship for a period of one (1) year from the date of purchase by the
original purchaser/user (“End User”), or eighteen (18) months from the date of shipment
from SKYFOOD’s warehouse, whichever expires first. Several new products and accessories
may be warranted for a period other than one (1) year while others may be subject to
travel limitaons, as specified on the products Instrucon Manual. Proof of purchase must
be presented; if not this warranty will be VOID. No warranty is given or implied to a
subsequent transferee or any other third party. This warranty is expressly condional upon
SKYFOOD being nofied of any defects in materials or workmanship within five (5) days of
its occurrence, within the warranted me period. If a noce of a claim under this warranty
is mely made by the End User, SKYFOOD or a SKYFOOD’s designated service company
(“Service Company”), will repair or replace the Product, at SKYFOOD’s discreon, subject
to the addional condions hereinaer described.
This warranty shall not apply if damage occurs from improper installaon or maintenance
performed by an unauthorized service company (“Service Company”), wrong voltage,
nor to the extent that Products or parts have been used other than in conformance with
operang and maintenance instrucons, subjected to misuse or abuse or damaged by
accident, acts of God, abnormal use, stress or any other maer unrelated to SKYFOOD,
and beyond its reasonable control. This warranty does NOT cover service labor and travel
to perform adjustments on products and/or accessories. In addion to wear and tear
of certain items, such as, but not limited to; glass parts, blades, stones, chopper cung
knives, plates, slicing knives, cung disc, gaskets, oil changes, sealing tape, heat seal wires,
worm gears, self-lubricang bushings, carbon brushes for electric motors, and other parts
expendable by nature and that need to be replaced frequently. Electrical components are
subject to natural wear and tear, and are NOT covered by this warranty. THIS WARRANTY
EXCLUDES ALL ORAL, STATUTORY, EXPRESS OR IMPLIED WARRANTIES WHICH MAY BE
APPLICABLE TO SKYFOOD, INCLUDING, BUT NOT LIMITED TO, ANY IMPLIED WARRANTY
OF MERCHANTABILITY AND FITNESS FOR PARTICULAR PURPOSE. Under no circumstances
shall SKYFOOD be liable for loss of use, revenue or profit or for incidental or consequenal
damages. SKYFOOD shall under no circumstances be liable for any loss, damage, concealed
damage, expense or delay of goods for any reason when said goods are in the custody,
possession or control of third pares selected by SKYFOOD to forward, enter, clear,
transport, or render other services with respect to such goods. The sole and exclusive
60
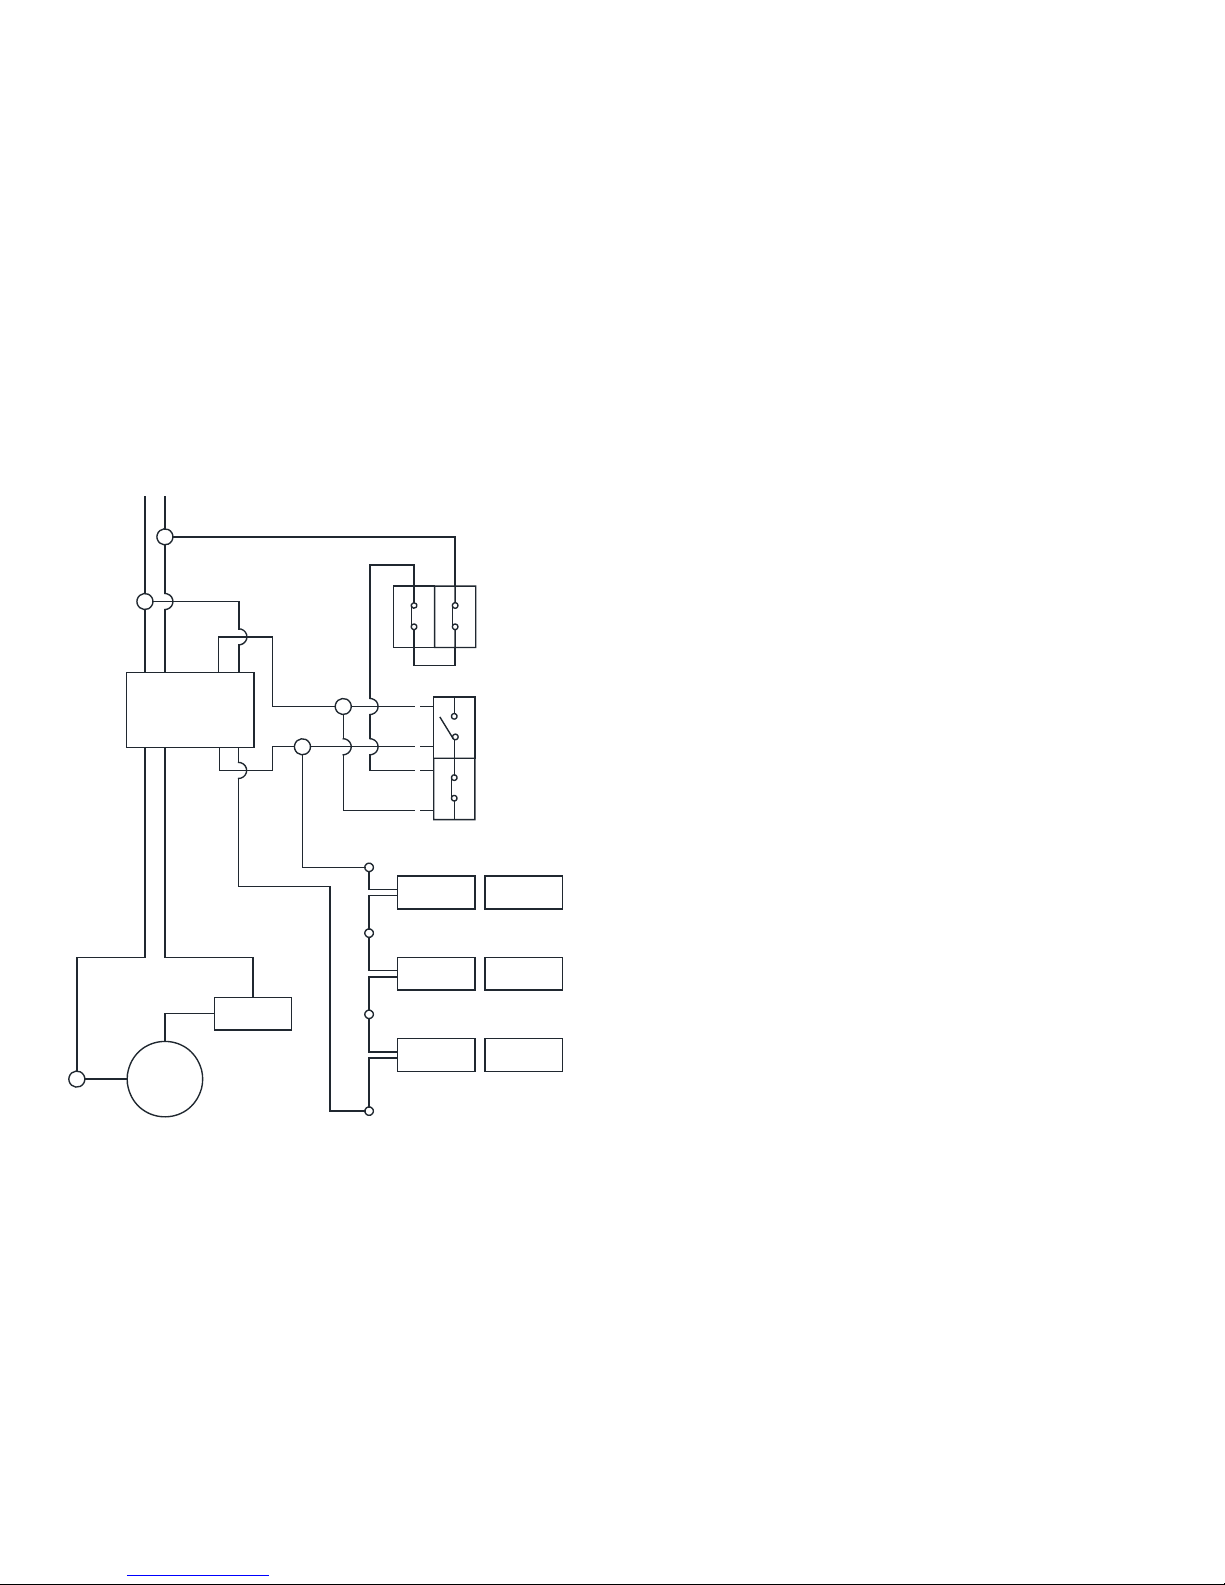
6 DIAGRAMME ÉLECTRIQUE
FN
ÉMERGENCE
1
2
NF
NC
1
2
NF
NC
ATTACHÉ
3
4
NA
NO
1
2
NF
NC
3
4
1
2
DÉTACHE
RESEAU ÉLECTRIQUE
230V/60Hz
SENSEUR SENSEUR
M1~
PROTECTEUR
THÉRMIQUE
T1
T4
T4
SENSEUR
SENSEUR
1L1 3L2 5L3 13 A1+
2T1 4T2 6T3 14 A2-
CONTACTEUR
SENSEUR
SENSEUR
9
The Blade Scraper
This scraper cleans the bone dust or the residues from the blade during the operaon. The
scraper may be removed for cleaning (see item 3.3 cleaning).
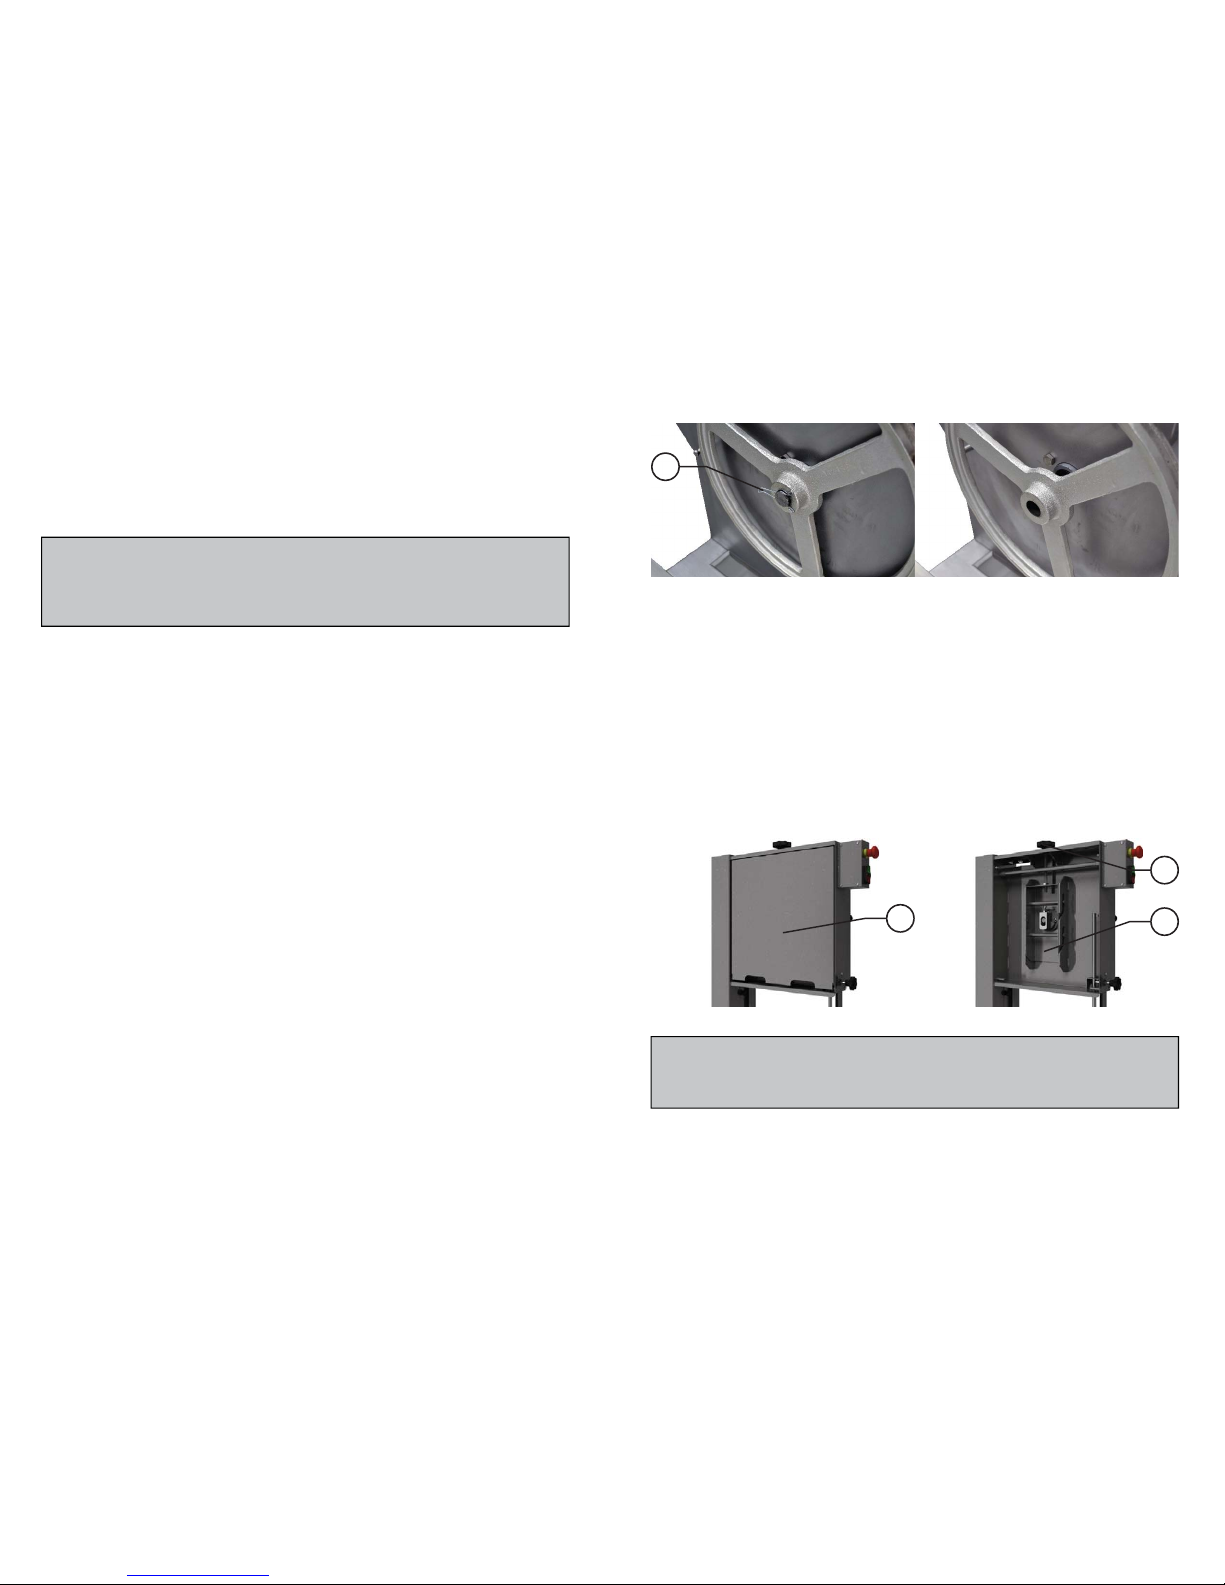
2.2.7 Lower Wheel
The Lower Wheel #. 16 (Pic.01) is assembled on the lower bearing shaand fixed by the
staple #. 10 (Pic.01). The staple shall always be placed in the shaslit.
The lower wheel may be removed for cleaning aer removing the blade.(see item 3.3
Cleaning).
2.2.8 Upper Wheel.
The Upper Wheel #.05 (Pic.01) frame has its own shaand bearings.
Therefore the Upper Wheel has to be removed with the shaand bearing for cleaning (see
item 3.3 Cleaning), only aer the Blade has been taken off.
3. OPERATION
3.1 Pre-Operaon
3.1.1 Check if the saw is standing firm in its posion
3.1.2 Adjust the Blade Guide # 07 (Pic.01) height to meet the meat piece thickness.
3.1.3 Doors and Blade Guard
The upper door #.04 (Pic.01), the Lower Door #. 15 (Pic.01) and the Blade Guard #17
(Pic.01) shall be closed and in their right posion while the saw is operang...
3.1.4 Thickness Guide
To obtain several slices with the same thickness, adjust the Thickness Guide #.13 (Pic.01) as
desired. Turn the Thickness Guide Handle counter clockwise loosing the Thickness Guide,
and drive it to the desired thickness. Then ght back the handle.
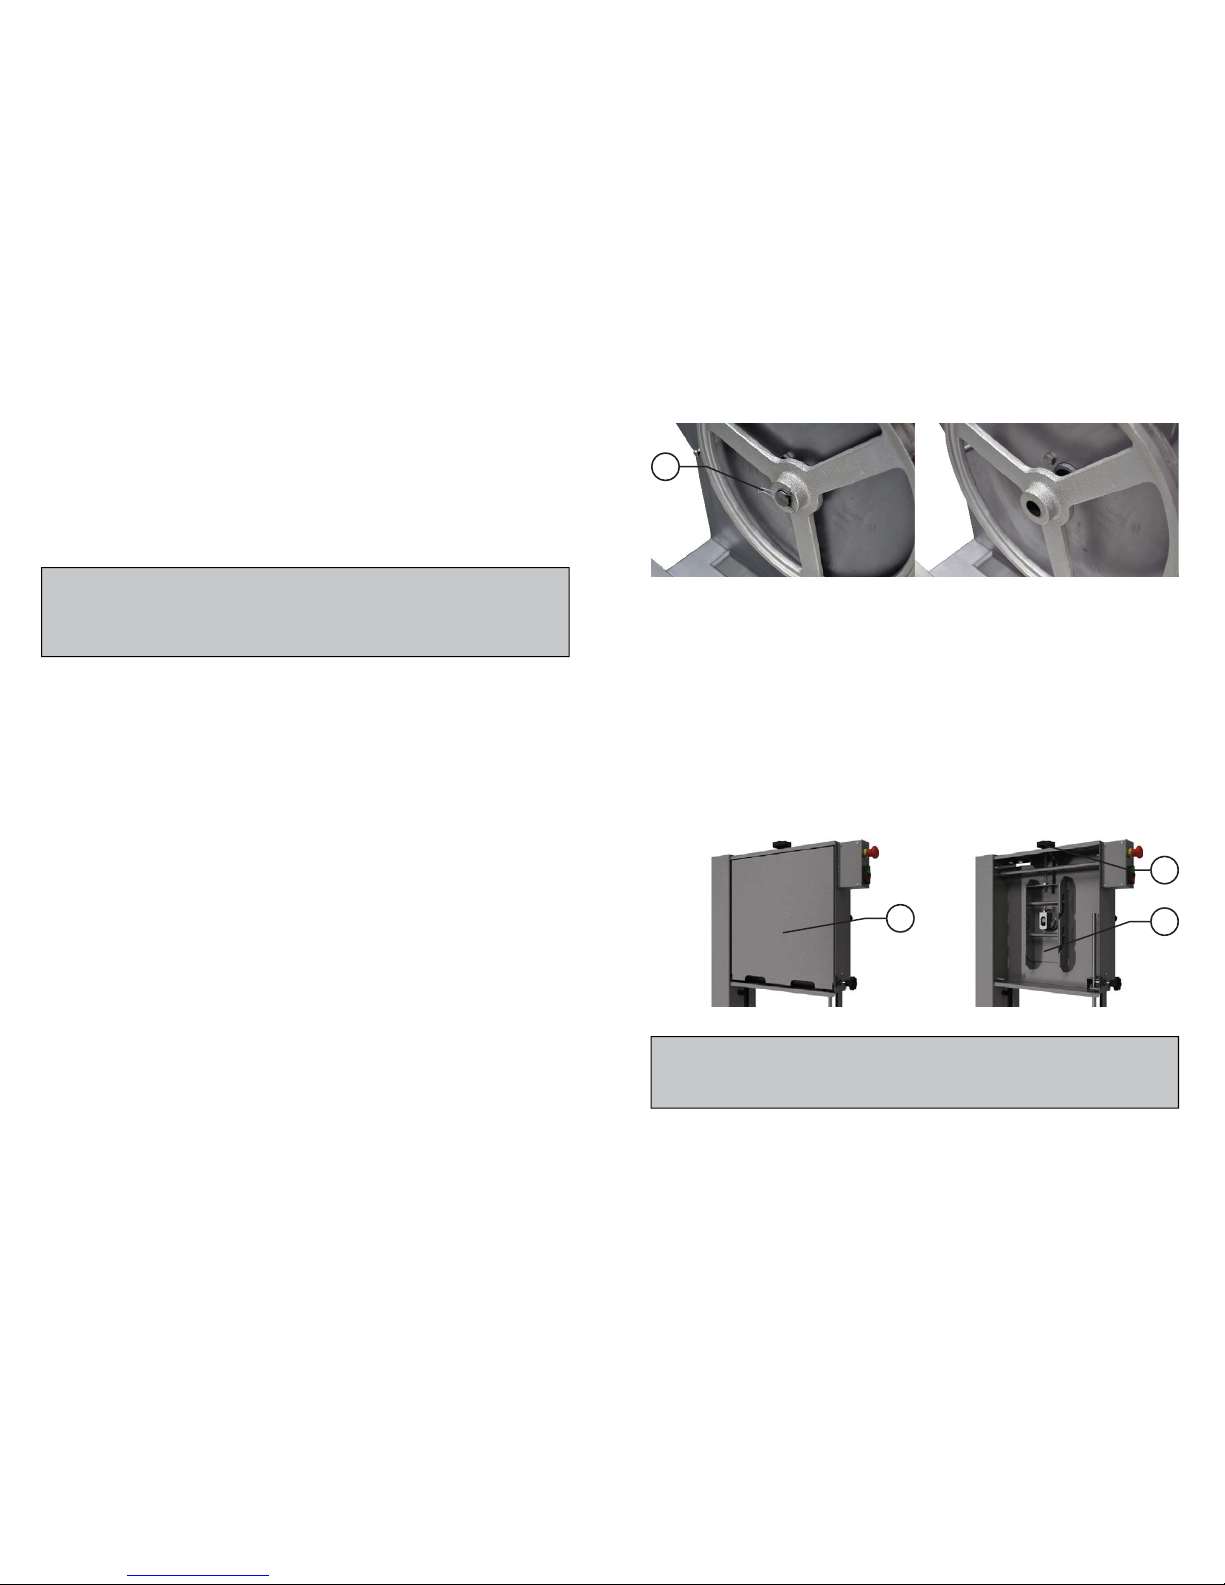
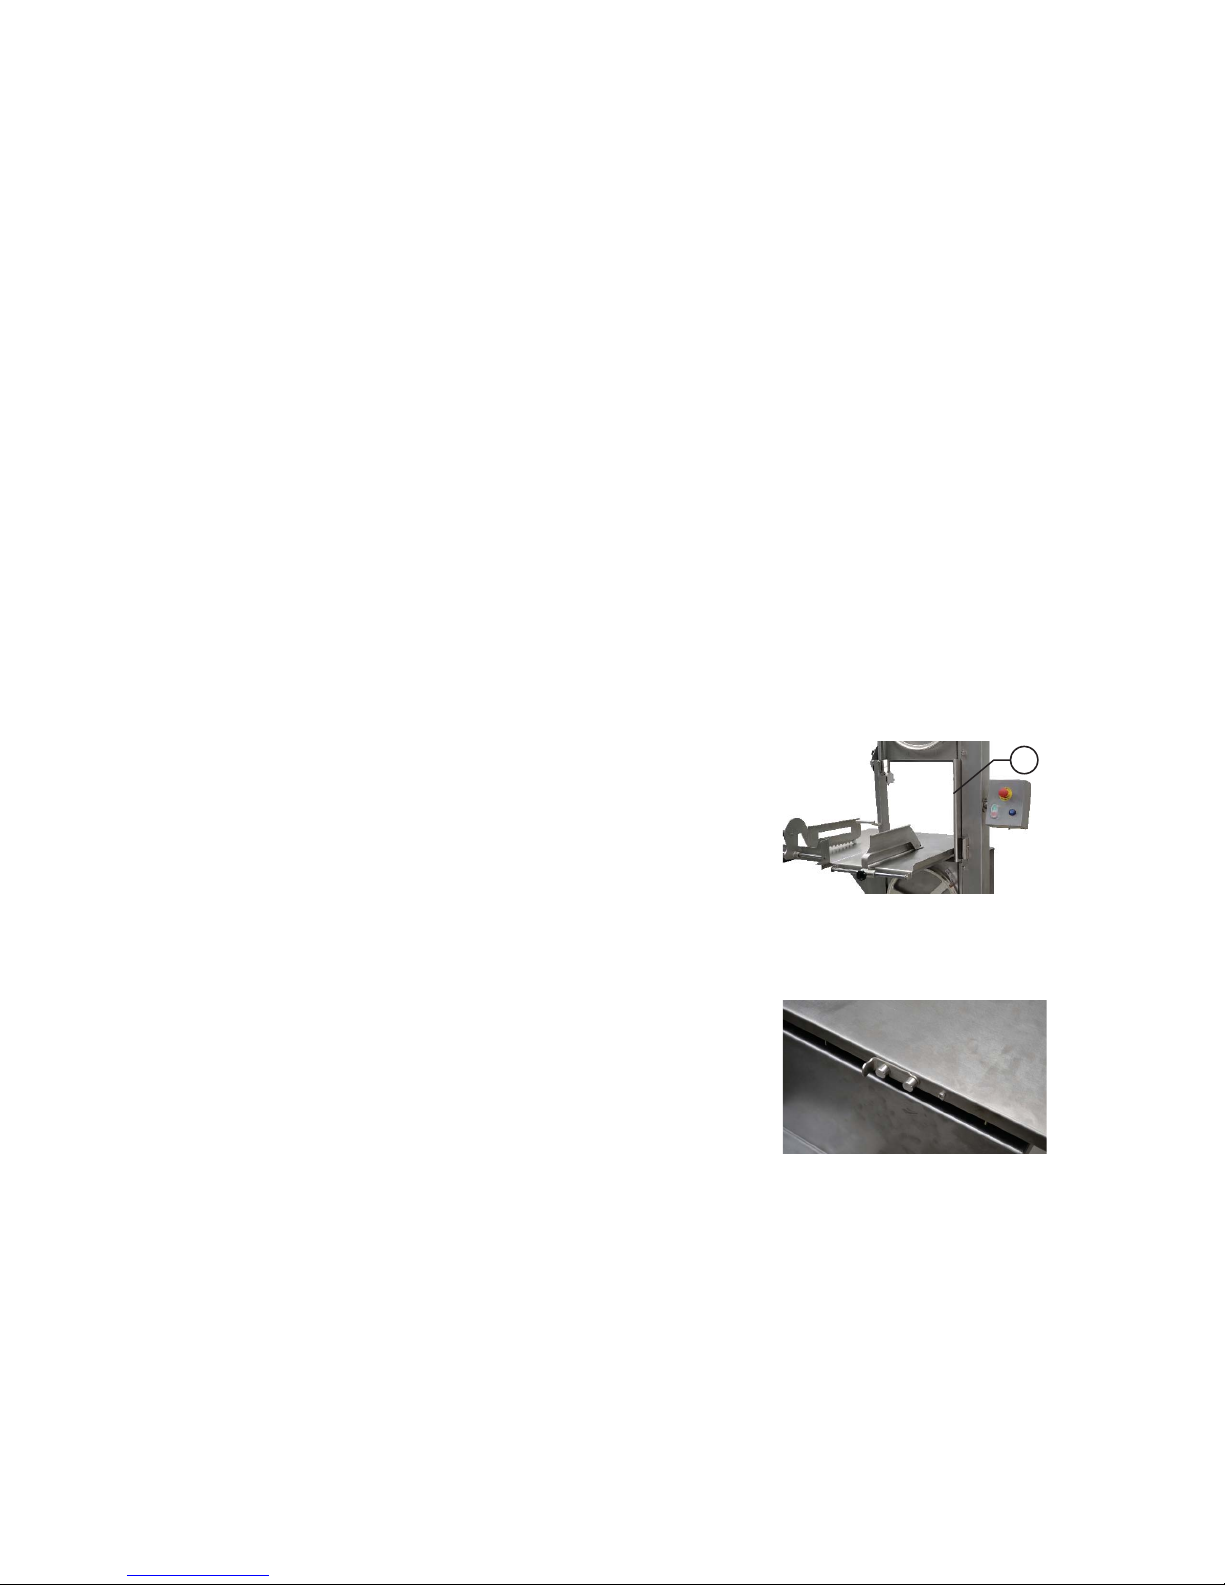
3.1.5 Control Board.
The ON/OFF Switch # 02 (Pic.01) and the Emergency Buon Switch #.03 (Pic,01) are placed
on a control board, on the motor housing upper front side.
To turn ON the saw press the ON/OFF Switch (green) buon to posion “I”..
To stop the saw operaon press the ON/OFF Switch (red) buon to posion ”O”.
If an emergency case arises, press the EMERGENCY buon, immediately stopping the saw
operaon.
3.2 Operang process
Before to start the Saw
- Pull totally the Movable Table # 09 (Pic.01) toward the saw front side..

10
- Place and store the slices on the Fixed Table #.14 (Pic. 01)
- Bring back the Movable Table toward the front side of the machine and repeat the above
menoned steps unl the whole meat has been sliced.
- Aer to have finished the last slice switch OFF the saw pressing the red buon “0”.
3.3 Cleaning and Sanizaon
IMPORTANT
Do never remove the slices by the blade front side.
- Place the meat on the Movable Table.
- Choose the slice thickness and adjust the Thickness Guide #. 13 (Pic.01) (see item 3.1.4)
- Adjust the Blade Guide # 07 (Pic.01) height to meet the meat piece thickness (see item
2.2.4)
- Take place in front of the saw, to have a frontal view of the blade.
Starng the Saw
- To start the saw press the ON/OFF Switch green buon.
- Push the meat toward the Thickness Guide, touching it.
- Place the lehand on the table protecon guard and slide the Movable Table against the
Blade, slicing the meat at a constant and uniform speed.
- Aer cung the slice remove it using the right hand. The slice must always be removed
behind the blade to avoid the hand to touch the blade cung side.
IMPORTANT
Unplug the saw before to start Cleaning.
When the saw must go through a complete cleaning and sanizaon process :
- before to be used first me.
- Aer every day end of operaons
- When the saw is not going to be used for a long period of me.
- Before to start operaon aer a long period it has not been used.
Many model SI-282HDE-1 parts may be removed for cleaning:
- Upper Door
- Lower Door
- Blade Guard
- Movable Table
- Fixed Table Block
- Fixed Table
- Blade
59
TABLE 02
PROBLÈME CAUSES SOLUTIONS
La machine ne démarre pas
La machine est détachée de l’
éléctricité
Manque d’ énergie éléctrique
Problème avec les circuits
éléctriques internes ou externes
de la machine
Le Protecteur Thermique est
ouvert
Branchez la machine au
réseau éléctrique
Vérifier s’ il manque
l´éléctricité
Appeler l’ Assistance
Téchnique
Aendez quelques minutes et
rebranchez le protecteur
Odeur de brulé ou fumée
Problème avec les circuits
électriques internes ou externes
de la machine
Appeler l’ Assistance
Téchnique
La machine démarre, mais
quand le produit touche la
lame No 08 (Fig.01), celle-ci
s’ arrête où tourne à basse
rotaon
La courroie glisse
Problème avec le condensateur
de pare du moteur
Appeler l’ Assistance
Téchnique
Appeler l’ Assistance
Téchnique
Bruits anormaux
La lame glisse sur le volant
La Lame est mal soudée
Tournez le Manipule No
01(Fig.01), pour augmenter la
pression entre la Lame et le
volant.
Changer la Lame.
La lame casse avec fréquence
Lame sâle ou volants sâles
Volant avec un défaut
Faire le neoyage, voir item
3.3
Changer les volants
Le produit se coupe
difficilment
Lame sâle ou volants sâles
Lame avec mauvaise tension
La lame est décentralisé par
rapport aux volants
La Lame est mal aiguisée
Faire le neoyage, voir item
3.3
Ajuster la lame
Appeler l’ Assistence
Téchnique
Changer la Lame

58
5. Analyse et Soluon de Problèmes
5.1 Problèmes Causes et Soluons
Les Scies ont été projetés pour que le minimum d’ entreent soit nécéssaire, toutes fois,
quelques irrégularités dans leurs fonconnement peuvent se produire, suite à l’ usage
connu de l’equipement.
En cas de problème vérifier la Table No. 02, où nous décrivons quelques soluons
recommandés.
11
- Upper Wheel
- Lower Wheel
- Blade Scraper
- Wheel Scraper
- Blade Tension Regulator
Follow the below instrucons to remove the above menoned parts:
- Upper Door
Open the door #.04 (Pic.01), and liit.
- Lower Door
Open the door # 15 (Pic.01), and liit.
- Blade Guard
Turn counter clockwise the two handles, just enough to loose the Blade Guard # 01 (Pic
03), then remove the Blade Guard pulling it towards the saw front side.
PICTURE 03
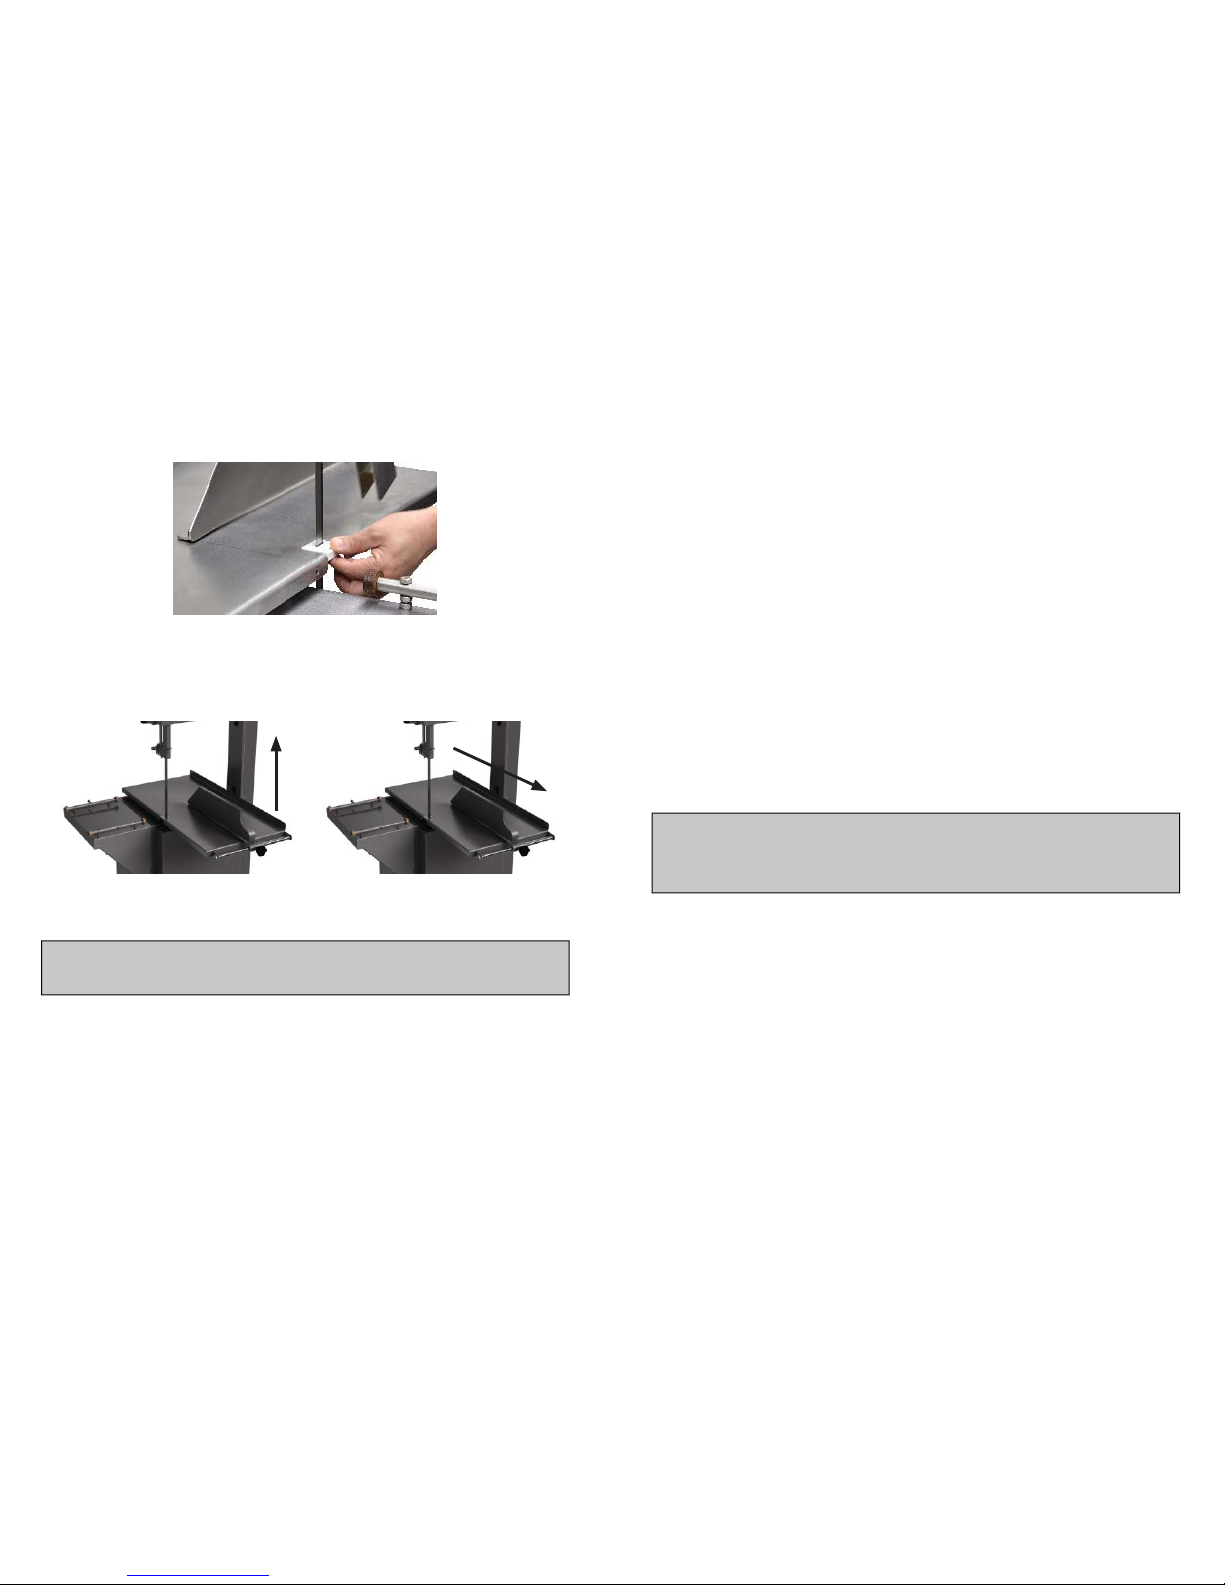
- Movable Table
Pull totally the Movable Table #.09 (Pic.01) towards the saw front side.
Displace the end plate, see picture 04, and slide the Movable Table completely out of the
rollers.
PICTURE 04
01
12
- Fixed Table Block
Remove the Fixed Table Block liing the block above the Fixed Table, see picture 05.
PICTURE 05
- Fixed Table
Livercally the Fixed Table front side, picture 06 (see the arrow) unl to loose the lower
trigger.Then pull the Fixed Table towards the front, picture 07, (see the arrow) unl the
table is completely removed.
PICTURE 06
- Blade
Turn the Blade Tension Regulator Handle # 01 (Pic.01) counter clockwise, unl the blade
gets loose, for removing.
PICTURE 07
IMPORTANT
Use steel gloves to hold the blade
- Upper wheel
Remove the blade, aer, hold strongly the Upper Wheel #.05 (Pic.01), push it vercally up
and then pull it towards the saw front side.
- Lower Wheel
Remove the Staple #.01 (Pic.08) hold strongly the Lower Wheel and pull it towards the saw
front side, picture 09.
57
IMPORTANT
Dans n’importe quel occurence imprévue, enlevez toujours la fléche de sa prise de
courant.
4.4 Opéraon
4.4.1 Averssements
Évitez travailler avec des cheveux longs, qui puissent toucher n’ importe quelle pare de la
machine, puisqu’ ils pourront causer de sérieux accidents. Liez-les derriére vôtre tête, ou
couvrez-les avec un mouchoir.
Seulement des opérateurs entrainés et qualifiés, peuvent opérer la machine.
Ne jamais opérer la machine sans tous ses accessoires de sureté.
4.5 Aprés la Fin du Travail
4.5.1 Précauons
Neoyez toujours la machine, pour cela ENLEVEZ LA FLÉCHE DE SA PRISE DE COURANT.
Ne jamais neoyer la machine avant son complet arrêt.
Replacez tous les composant de la machine à leur place avant de la démarrer à nouveau.
Verifier tous les fluides.
Verifier la tension de courroies et des chaines, NE PAS placer les doigts entre les courroies
et les poulies, ni entre les chaines et les engrenages.
4.6 Entreent
4.6.1 Dangers
Avec la machine embranché toutes operaons d’ entreent sont dangereuses.
ENLEVEZ LA FLÉCHE DE SA PRISE DE COURANT, PENDANT TOUT LE TEMPS DE L’ ENTRETIENT
4.7 Averssements
L’ entreent électrique ou mécanique doit ête fait par des personnes dument qualifiés
pour ce genre de travail.
La personne chargé de l’ entreent doit s’ assurer que la machine travaille dans sa
condions de TOTALE SÉCURITÉ.
56
NE PAS ALTÉRER les caractérisques originales de la machine.
NE PAS SALIR, DECHIRER OU RETIRER LES ÉTIQUETTES DE SURTÉ OU D’IDENTIFICATION.
Si une équee est salie ou perdue, demandez une neuve à votre Assistant Téchnique le
plus proche.
4.2 Précauons et Observaons Avant de Démarrer la Machine
IMPORTANT
Lire totalment et avec aenon ces INSTRUCTIONS avant dembrancher la
machine. Soyez sur que toutes les informaons ont été correctement comprises.
En cas de doute consultez votre superieur ou le Revendeur.
4.2.1 Danger
Un cordon d’ alimentaon électrique ou un fil électrique avec l’ isolement endomagé, peut
causer des fuites de courant et provoquer de choques électriques. Avant l’ usage vérifier
ses condions.
4.2.2 Averssements
Soyez sur que les INSTRUCTIONS de ce manuel aient été parfaitement comprises. Chaque
foncon ou procedé d’ opéraon et d’ entreent doit être parfaitemente claire.
Un commandement manuel ( bouton, clavier, interrupteur, etc ) ne doit être operé que si
on est sur que le commandement est correct.
4.2.3 Précauons
Le cordon d’ alimentaon électrique doit avoir une secon suffisante pour suporter la
puissance consomé.
Les cables électrique sur le sol, auprès de la machine doivent ête protégés pour éviter des
court circuits.
4.3 Inspecon de Roune
4.3.1 Averssement
Quand il soit necessaire de vérifier la tension de courroies ou de chaines, NE PAS METTRE
les doigts entre les courroies et les poulies ou les chaines et ses engrenages.
4.3.2 Précauons
En cas de bruits anormaux, controler les moteurs, courroies, engrenages, et les pares
tournantes de la machine.
Vérifier la tension des courroies et des chaines, changez l’ assemblage complet si quelque
courroies, chaine ou engrenage est usé.
Vérifiez les protecons et les disposifs de sureté pour qu’ils soient toujours en parfait état
de fonconment.
13
PICTURE 08 PICTURE 09
- Blade Scraper
Slide the Blade Scraper sideway unl it gets out
- Wheel Scraper
Remove the Lower Wheel, then pull the Scraper towards the saw front side unl it gets
out.
Blade Tension Regulator
Stand behind the saw and remove the Upper Back Cover #.01 (Pic.10). Turn the Blade
Tension Regulator Handle # 02 (Pic.11) counter clockwise unl the Blade Tension Regulator
# 01 (Pic.11) gets free to be removed.
Also remove the Blade Tension Regulator Handle # 02 (Pic.11).
PICTURE 10 PICTURE 11
- Wash all the parts with water and neutral ph detergent.
IMPORTANT
Do not spray water directly on the Lower Bearing, the Controll Board and the
Motor Housing # 20 (Pic. 01), principally at the venlaon points.
Use clean clothes or sobrushes to remove residues.
Washing and sanizaon shall be regularly performed and then all parts shall be carefully dried.
To assemble the several parts removed proceed inversely as above instructed, make sure
all parts to be properly assembled.
01
03
02
01

14
3.3.1 Cauons with Stainless Steel:
The Stainless Steel may present rust signs, which ARE ALWAYS CAUSED BY EXTERNAL
AGENTS, especially when the cleaning or sanizaon is not constant and appropriate.
The Stainless Steel resistance towards corrosion is mainly due to the presence of chrome,
which in contact with oxygen allows the formaon of a very thin protecve coat. This
protecve coat is formed through the whole surface of the steel, blocking the acon of
external corrosive agents.
When the protecve coat is broken, the corrosion process begins, being possible to avoid
it by means of constant and adequate cleaning.
Cleaning must always be done immediately aer using the equipment. For such end, use
water, neutral soap or detergent, and clean the equipment with a socloth or a nylon
sponge. Then rinse it with plain running water, and dry immediately with a socloth, this
way avoiding humidity on surfaces and especially on gaps.
The rinsing and drying processes are extremely important to prevent stains and corrosion
from arising.
IMPORTANT
Acid soluons, salty soluons, disinfectants and some sterilizing soluons
(hypochlorites, tetravalent ammonia salts, iodine compounds, nitric acid and
others), must be AVOIDED, once it cannot remain for long in contact with the
stainless steel.
These substances aack the stainless steel due to the CHLORINE on its composion,
causing corrosion spots (ping).
Even detergents used in domesc cleaning must not remain in contact with the stainless
steel longer than the necessary, being mandatory to remove it with plain water and then
dry the surface completely.
Use of abrasives:
Sponges or steel wool and carbon steel brushes, besides scratching the surface
and compromising the stainless steel protecon, leave parcles that rust and react
contaminang the stainless steel. That is why such products must not be used for cleaning
and sanizaon. Scrapings made with sharp instruments or similar must also be avoided.
Main substances that cause stainless steel corrosion:
Dust, grease, acid soluons such as vinegar, fruit juices, etc., saltern soluons (brine),
blood, detergents (except for the neutral ones), common steel parcles, residue of sponges
or common steel wool, and also other abrasives. 55
Les noons de sécurité ont été préparés pour orienter et instruir convenablement les
opérateurs des machines, ainsi que ceux qui seront responsables pour leur entreent.
La machine ne doit être remise à son operateur que dans des bonnes condions de
fonconement, l’ operateur doit être instruit sur l’ emploi et la sécurité par le Revendeur.
L’ operateur devra employer la machine seulement après avoir pris connaissance de toutes
les précauons applicables , et avoir lu ATTENTIVEMENT LA TOTALITÉ DE CETTE NOTICE
EXPLICATIVE.
4.1 Praques Fondamentales pour l’ Opéraon
4.1.1 Dangers
Certaines pares des commandements éléctriques, ont des points avec des hautes
tensions. Si ces points sont touchés, ils peuvent causer des choques électriques graves,
même MORTELS.
Ne jamais toucher un commandement manuel ( bouton, clavier, interrupteur.etc) avec des
mains, des chaussures ou des vetments mouillés. Ne pas observer cee recommendaon,
poura aussi provoquer de choques électriques, même MORTELS
4.1.2 Précauons
L’ enplacement de Interrupteur doit être bien connu, pour permere son usage à n’
importe quel moment sans devoir le chercher.
Avant n’ importe quelle operaon d’ entreent, detachez la fléche de sa prise de courant.
Aménager un espace suffisant pour éviter de chutes dangereuses.
De l’eau ou de l’ huile pouront rendre le sol glissant et dangereux. Pour éviter des accidents,
le sol doit être propre et sec.
Ne jamais toucher un commandement manuel ( bouton, clavier, interrupteurs, etc ) au
hazard.
Si un travail doit être fait par deux ou plusieurs personnes, des signaux de coordinaon
doivent être donnés à chaque étape du travail. L’ étape suivante ne doit pas être commencé
sans que le signal soit donné et répondu.
4.1.3 Averssements
En cas de coupure d’ énérgie électrique ouvrez immédiatement l’ Interrupteur.
Employez des huiles lubrifiants ou des graisses recommandés ou similaires.
Évitezdes choquesmécaniques, carils pourraientcauserdes domages,ou un fonconement
défectueux.
Évitez que de l’eau, de la saleté ou de la poussiére entre dans les composants mécaniques
ou électriques.
IMPORTANT
Dans le cas oú quelques recommendaon ne soient pas applicables ne les
considèrez pas.
4. NOTIONS GENERALES DE SECURITE

54
3.3.1 Précauons avec les aciers inoxidables
Les aciers inoxidables peuvent présenter de points de « corrosion « qui SONT TOUJOURS
PROVOQUÉS PAR DES AGENTS EXTERNES, principalment quand les soins avec la propreté
et l’ higyénizaon ne sont pas constants et adéquats.
La résistance à la corrosion de l’ acier inoxidable est principalment due à la présence
du chrome qui, en contact avec l’oxygène, permet la formaon d’ une très fine couche
protectrice. Cee couche de protecon se forme sur toute la surface de l’ acier, bloquant
l’ acon des agents externes qui provoquent la corrosion .
Quand la couche protectrice se romp, la corrosion commence, et ne peut être évitée que
par un netoyage constant et adéquat.
Immédiatement après avoir ulizé un équipement, il sera donc necéssaire pourvoir au
netoyage, enployant de l’ eau, du savon ou des détergents neutres, appliqués avec un
torchon suave ou une éponge de nylon. Ensuite, rincer avec de l’ eau courrante, essuyer
et sécher avec un torchon suave, évitant l’ humidité sur les surfaces et principalment dans
les replis.
Le rinçage et l’ essuyment sont extrèmement importants pour éviter des traces et des
corrosions
IMPORTANT
Les soluons acides, soluons salines, désinfectants et certes soluon pour
stérilizer
( hypoclorites, sels d’ amoniac tetravalant, composés de iode, acide nitric entre
autres),
Doivent être évités car elle ne peuvent pas rester trop longtemps en contact avec l’
acier inoxidable.
Puisque généralment elles ont du CHLORE dans leurs composion, ces substances
aaquent l’ acier inoxidable, causants des points de corrosion.
Même les détergents enplyés dans le netoyage domesque, ne doivent pas rester en
contact avec l’ acier inoxidable plus que le nécessaire, ils doivent être enlevés avec de l’
eau et la surface devra être complètement séchée.
Emploi d’ abrasifs :
Éponges,laines d’acier,ou brosses d’ acier en général, outre à grater la surface et
comprometre la protecon de l’ acier inoxidable, laissent des parcules qui s’ oxydent et
réaconnent contaminant l’ acier inoxidable.
Pour cela ces produits ne doivent pas être usés pour le netoyage et l’ hygiénizaon
Des gratages avec des objets pointus ou pareils doivent aussi être évités.
Principales substances qui causent corrsion des aciers inoxidables :
Poudres, graisses, huiles, soluons acides tel que le vinaigre, jus de fruits, ou autres acides,
soluons salines ( saumure ), sang,détérgents ( exceptés les neutres ), parcules d’ acier,
restes d’éponges, ou de laines d’acier, et aussi d’ autres types d’ abrasifs.
15
The following safety instrucons are addressed to both the operator of the machine as
well as the person in charge of maintenance.
The machine has to be delivered only in perfect condions of use by the Distributor to the
user. The user shall operate the machine only aer being well acquainted with the safety
procedures described in the present manual. READ THIS MANUAL WITH ATTENTION.
4.1 Basic Operaon Pracces
4.1.1 Dangers
Some areas of the electric device have parts that are connected or have parts connected
to high voltage. These parts when touched may cause severe electrical shocks or even be
lethal.
Never touch manual commands such as switches, buons, turning keys and knobs with
your hands wearing wet clothes and/or wet shoes. By not following these instrucons
operator could be exposed to severe electrical shocks or even to a lethal situaon.
4.1.2 Warnings
* The operator has to be well familiar with the posion of ON/OFF Switch to make sure the
Switch is easy to be reached when necessary.
* Before any kind of maintenance, physically remove plug from the socket.
* Provide space for a comfortable operaon thus avoiding accidents.
* Water or oil spilled on the floor will turn it slippery and dangerous. Make sure the floor
is clean and dry.
* Before using any commands (switch, buons, lever), be sure it is the correct one. In case
of doubt, consult this manual.
* Never touch any manual commands (switch, buons, lever) unadvisedly.
* If any work is to be made by two or more persons, coordinaon signs will have to be
given for each operaon step. Every step of the operaon shall be taken only if a sign has
been made and responded.
4.1.3 Advices
* In case of power shortage, immediately switch the machine off.
* Use recommended or equivalent lubricants, oils or greases.
IMPORTANT
If any recommendaon is not applicable to your equipment, please ignore it.
4. GENERAL SAFETY PRACTICES
16
* Avoid mechanical shocks, once they may cause damages or bad funconing.
* Avoid water, dirt or dust contact to the mechanical and electrical components of the
machine.
* DO NOT change the standard characteriscs of the machine.
* DO NOT remove, tear offor maculate any safety or idenficaon labels stuck on the
machine. If any labels have been removed or are no longer legible, contact your nearest
dealer for replacement.
4.2 Safety Procedures and Notes before Switching the Machine ON
IMPORTANT
Carefully read ALL INSTRUCTIONS of this manual before turning the machine ON.
Be sure to well understand all the informaon contained in this manual. If you
have any queson contact your supervisor or your nearest Dealer.
4.2.1 Danger
An electric cable or electric wire with damaged jacket or bad insulaon might cause
electrical shocks as well as electrical leak. Before use, check the condions of all wires and
cables.
4.2.2 Advices
Be sure to well understand all the informaon contained in this manual. Every operaon
funcon or procedure has to be thoroughly clear.
Before using any commands (switch, buons, lever), be sure it is the correct one. In case
of doubt, consult this manual.
4.2.3 Precauons
The electric cable has to be compable with the power required by the machine.
Cables touching the floor or close to the machine need to be protected against short
circuits.
The oil reservoirs have to be filled unl the indicated level. Check and refill if necessary.
4.3 Roune Inspecon
4.3.1 Advice
When checking the tension of the belts or chains, DO NOT insert your fingers between the
belts and the pulleys and nor between the chain and the gears.
4.3.2 Precauons
Check the motor and sliding or turning parts of the machine in case of abnormal noises.
Check the tension of the belts and chains and replace the set when belts or chains show
53
FIGURE 08 FIGURE 09
Racleur de la Lame
Glissez le Racleur de la Lame lateralment pour le sorr.
Racleur du Volant
Enlevez le Volant Inférieur et il suffira rer le Racleur du Volant vers le devant de la scie le
sortant de son guide.
Calibreur de la Lame
Placez vous derrière la scie et rerez le Couvercle Arrière Supérieur No.01 (Fig.10). Tournez
le Manipule du Calibreur de la Lame No 02 (Fig.11) dans le sense an-horaire pour que le
Calibreur de la Lame No. 01 (Fig.11) soit libre et puisse être reré.
Rerer aussi le Manipule du Calibreur No 02 ( Fig.11 )
FIGURE 10 FIGURE 11
Laver toutes les pares avec eau et détergent à Ph neutre.
IMPORTANT
Ne pas employer de jets d’eau directement sur le Coussinet Inférieur, la Tableau de
Commande et le Cabinet principalment au points de venlaon.
Employer un chifon propre et una brosse douce pour enlever les residus.
Laver et hygienizer régulièrement toutes les pares, pour ensuite les sécher.
Monter toutes les pares ayant été rerés par le procédé inverse à celui instruit ci dessus,
prenent soin pour qu’ elles soient montés correctement.
01
03
02
01

52
Cheville de la Table Fixe
FIGURE 05
Rerer la Cheville la levant vercalment vers le haut de la Table Fixe, voir figure 05.
Table Fixe
Lever la pare frontale de la Table Fixe, voir figure 06, vercalment (voir la flèche) pour
relâcher l’ entrave inférieure. Après, rer la Table Fixe en avant ( voir la flèche) pour sorr
complètement la Table, voir figure 07.
FIGURE 06
Lame
Tourner le Manipule du Calibreur de la Lame No 01 (Fig.01) dans le sense an-horaire
jusque la lame soit libre pour être rerée.
FIGURE 07
IMPORTANT
Employer des gants en maille d’ acier pour prendre la Lame
Volant Supérieur
Après avoir reré la Lame prendre fermement le Volant Supérieur No.05 (Fig.01) le
poussant vers le haut, ensuite poussez-le vers le devant de la scie.
Volant Inférieur
Rerez l’ aache No.01 (Fig.08) prenez fermement le Volant Inférieur et poussez-le en
avant, voir figure 09. 17
IMPORTANT
Always remove the plug from the socket in any emergency situaon.
signs of wearing.
When checking the tension of belts or chains DO NOT insert your fingers between belts
and pulleys, nor between the chains and gears.
Check protecons and safety devices to make sure they are working properly.
4.4 Operaon
4.4.1 Warnings
Do not use the machine with long hair that could touch any part of the machine. This might
lead to a serious accident. Tie your hair up well and/or cover it with a scarf.
Only trained or skilled personnel shall operate this machine.
Never touch turning parts with your hands or any other way ,
NEVER operate the machine without any original safety devices under perfect condions.
4.5 Aer Finishing The Work
4.5.1 Precauons
Always TURN THE MACHINE OFF before cleaning by removing the plug from the socket.
Never clean the machine unless it has come to a complete stop.
Put all the components back to their funconal posions before turning the machine ON
again.
Check the level of oil.
Do NOT insert your fingers in between belts and pulleys nor chains and gears.
4.6 Maintenance
4.6.1 Danger
Any maintenance with the machine in working situaon is dangerous. TURN IT OFF BY
PULLING THE PLUG OFF THE SOCKET DURING MAINTENANCE.
18
4.7 Warning
Electrical or mechanical maintenance has to be undertaken by qualified personnel. The
person in charge of maintenance has to be sure that the machine is under TOTAL SAFETY
condions when working.
51
- Volant Supèrieur
- Volant Inférieur
- Racleur de la Lame
- Racleur du Volant
- Calibreur de Tension
Ci dessous vous trouverez les instrucons pour rerer les pares menonnés :
Porte Supérieure
Ouvrez la Porte Supérieure No. 04 (Fig.01) et sortez-la par en haut.
Porte Inférieure
Ouvrez la Porte Inférieure No.15 (Fig.01), et sortez-la par en haut
Protecteur de la Lame
Tournez les deux manipules dans le sense an-horaire sufisament pour relâcher le
Protecteur de la Lame No 01 (Fig.03). Rerer alors le Protecteur de la Lame le rant vers l’
avant de la scie.
FIGURE 03
Table Mobile
Tirer la Table Mobile No.09 (Fig. 01) totalmente vers le devant de la scie.
Déplacer la plaque baante, voir figure 04, et glisser la Table Mobile totalment hors des
rouleaux
FIGURE 04
01

50
Meez les tranches sur la Table Fixe No 14 (Fig.01).
Tirez la Table Mobile vers l’ avant de la scie et répétez le procedé jusqu’à avoir coupé tout
le produit.
À la fin de la dernière tranche détachez la scie en apuyant le bouton rouge « O » de l’
Interrupteur Aaché/Détaché.
3.3 Neoyage et Hygienizaon
IMPORTANT
Ne rerez jamais les tranches devant la Lame.
Placez le produit à couper sur la Table Mobile.
Choisissez l’ épaisseur de la tranche qui doit être coupé et ajustez le Régulateur de Coupe
No 13 (Fig.01), voir item 3.1.4.
Ajustez la Guide de la Lame No.07 (Fig.01) pour convenir à la hauteur de la pièce qui sera
coupée, voir item 2.2.4
Placez- vous devant la scie pour avoir une vision frontale de la Lame
Démarrez la Scie.
Pour aacher la scie pressez le bouton vert « I » de l’Interrupteur Aaché/Détaché
Poussez le produit a couper vers le Régulateur de Coupe jusqu’à le toucher.
Placez la main gauche sur le bord de protecon de la Table Mobile et glissez la Table Mobile
contre la Lame coupant le produit avec une vélocité constante et uniforme.
Après avoir coupé toute la tranche, avec la main droite rerez-la. La tranche devra
TOUJOURS être rerée derrière la Lame pour éviter le contact de la main avec la lame.
IMPORTANT
Enlevez la Flèche de la Prise avant de commencer le Neoyage
La scie doit être totalmente neoyée et hygienizée :
- Avant du premier emploi.
- Après chaque journé de travail
- Avant de la mere hors d’usage pour une longue période
- Avant de recommencer l’ opéraon aprés une longue période arrêtée.
Plusieurs pares de la scie peuvent être rerées pour les neoyer.
. Porte Supérieure
. Porte Inférieure
- Protecteur de la Lame
- Table Mobile
- Cheville de la Table Fixe
- Table Fixe
- Lame
19
5. PROBLEMS ANALYSIS and SOLUTIONS
5.1 Problems, Causes and Soluons
The Saws have been designed to need minimum maintenance, however, some performance
failures may happen due mainly to natural worn out, caused by the use of the Saw.
If some problems arise with your Band Saw check Table - 02 below where there are detailed
some possible soluons.

20
TABLE 02
PROBLEM CAUSES SOLUTIONS
The saw does not switch on.
- The saw is unplugged;
- Thermal Protector is acvated;
- Lack of power;
- Problem with the internal or
external circuits of the Saw.
- Plug it;
- Wait a few minutes and reset
the Thermal Protector;
- Check if there is electric
power;
- Call Technical Assistance.
Smoke or burn smell.
Problem with the internal or
external electric circuits of the
Saw.
Call Technical Assistance.
Machine switch on but when
product touches blade # 08
(Pic. 01) it stops or runs slowly.
- Belt slipping on pulleys;
- Damaged capacitor.
- Call Technical Assistance;
- Call Technical Assistance.
Unusual noises.
- Blade slipping on wheels;
- The blade incorrectly welded.
- Turn the blade tension
regulator handle # 01 (Pic. 01)
to increase pressure between
blade and wheels;
- Change the blade.
The blade frequently tears.
- Blade or wheels dirty;
- Faulty wheels.
- Clean the saw. (See item 3.3);
- Change the wheels.
Difficulty to cut the product.
- Blade or wheels dirty;
- Wrong tension on the blade;
- Blade is offthe wheels center;
- Blade blunt.
- Clean the saw. (See item 3.3);
- Regulate blade tension, (See
item 2.2.3);
- Call Technical Assistance;
- Change the blade.
49
Racleur de la Lame
Ce Racleur rere la poussière des os ou les résidus de la Lame. Le Racleur de la Lame peut
être démonté pour le neoyage (voir item 3.3 neoyage).
2.2.7 Volant Inférieur
Le Volant Inférieur No.16 (Fig.01) est montée sur l’ essieu du coussinet inférieur et fixé par
l’aache No. 10 (Fig.01) qui devrá toujours être placé dans la rainure de l’ essieu
Le Volant Inférieur peut être reré pour le neoyage après avoir enlevé la Lame ( voir item
3.3 neoyage).
2.2.8 Volant Supérieur
Le Volant Supérieur No 05 (Fig.01) possède incorporé dans sa structure l’ essieu et les
roulements.
Le Volant Supérieur peut être reré pour le neoyage après avoir enlevé la Lame ( voit
item 3.3 neoyage).
3 OPÉRATION
3.1 Pré Opéraon
3.1.1 Assurez-vous que la scie soit ferme sur son emplacement.
3.1.2 Ajustez la Guide de la Lame No 07 (Fig.01) pour que son hauteur soit celle de la pièce
a être coupé.
3.1.3 Les Portes et le Protecteur de la Lame – La Porte Supérieure No 04 (Fig.01), la Porte
Inférieure No. 15 (Fig.01), et le Protecteur de la Lame NO 17 (Fig. 01) – doivent ètre dans
la posion d opéraon, dûment fermés tant que la scie soit en usage.
3.1.4 Régulateur de Coupe
Pour faire plusieures tranches de la même épaisseur faites l’ ajustage du Régulateur de
Coupe No 13 (Fig.01) selon votre nécessité.
Pour faire cet ajustage tournez le Manipule du Régulateur dans le sense an-horaire pour
le libérer.
Alors poussez le Régulateur à l’ épaisseur désirée.
Finalmente serrez fortement le Manipule du Régulateur.
3.1.5 Tableau de Commande
Le Tableau de Commande se trouve à la droite de la scie, et possède un Bouton d’
Émergence No.03 (Fig.01) et un Interrupreur Aaché/Détaché No 02 (Fig 01).
Pour aacher la scie pressez le bouton vert « I » ( aaché) de l’ Interrupteur.
Pour détacher la scie pressez le bouton rouge « O » de l’ interupteur.
Dans le cas d’ ÉMERGENCE pressez le bouton émergence qui détachera la scie
imediatement.
3.2 Procédé pour l’ Opéraon
Avant de démarrer la scie:
Tirez la Table Mobile No. 09 (Fig.01) totalment vers le avant de la scie.
Table of contents
Other Skyfood Saw manuals

Popular Saw manuals by other brands


KAKA Industrial
KAKA Industrial CS-12 Operation manual

Atlas Copco
Atlas Copco LS 14 Safety & Operating Instructions

skilsaw
skilsaw SPT99 Operating/safety instructions

Hitachi
Hitachi C 10FCH2 Handling instructions

Original Saw Company
Original Saw Company 3512-01 Operation & maintenance manual

Axminster
Axminster WORKSHOP AW216TS Original instructions