Bolt VS-260SMI User manual

VS-260SMI
TTL AUTOFOCUS FLASH
User’s Manual
Inspiration strikes.
Inspiration strikes.

2 |Introduction
Copyright © 2015 Gradus Group.
Bolt and other names of Bolt products are trademarks of Gradus Group. Other product and corporate names mentioned herein are trademarks of their respective holders.
Introduction |3
Introduction
Thank you for choosing the Bolt
VS-260SMI
TTL Autofocus Flash. This ash unit
combines a compact design with versatile
features to give you both automatic
ease of use and creative lighting control.
Among the benets you’ll enjoy:
• Full compatibility with Sony’s TTL
metering system
• Adjustable ve-position ash head
• Autofocus-assist for low-light
photography
• Rear-curtain sync
• Automatic power-saving function

4 |Contents

Contents |5
Contents
Overview ..................................................................................................................................................... 6–7
Warnings ................................................................................................................................................... 8–10
Installing Batteries ................................................................................................................................... 10–11
Mounting the Flash .................................................................................................................................. 12–13
Turning on the Flash and Firing a Test............................................................................................................ 14
Taking Photos ................................................................................................................................................ 15
Using Red-Eye Reduction............................................................................................................................... 16
Using Flash Exposure Compensation........................................................................................................ 16–17
Using the Autofocus-Assist Light.................................................................................................................... 17
Bouncing Your Flash................................................................................................................................. 18–19
Using Rear- or Second-Curtain Synchronization ............................................................................................. 20
Troubleshooting ............................................................................................................................................. 21
Specications ................................................................................................................................................ 22
Warranty........................................................................................................................................................ 23

6 |Overview
VS-260SMI
OFF ON
TEST/
READY
TTL OK
2
1
6
5
8
7
4

Overview |7
Overview
1. Flash head
2. Battery compartment
cover
3. Autofocus-assist light
4. Mounting foot
5. Mounting foot lock
6. Test button / Ready light
7. Power switch
8. Automatic exposure
conrmation light
3

8 |Warnings
Warnings
Before using your VS-260SMI, please read the following safety notices carefully and thoroughly to ensure safe
use, and to help prevent damage to your ash or injury to yourself or others.
• Do not re the ash at close range directly into the eyes of people or animals. This can cause damage to
the retina and may even lead to blindness.
• To avoid overheating and damaging your ash unit, please wait for at least 10 minutes after 20 continuous
ashes at full power.
• Do not disassemble or attempt to repair this product yourself. There are high-voltage components inside
that can produce a hazardous electric shock.
• Keep this product and its batteries out of reach of children.
• Use only the power sources specied in this manual.
• Always switch the ash off before changing the batteries.
• Always install AA batteries of the same type, brand, and age. Do not combine different types or brands, or
old and new batteries. This could cause batteries to leak, overheat, or explode.

Warnings |9
• Install batteries in the proper orientation, according to the indicator in the battery chamber. Installing
batteries in the reverse orientation could cause them to leak, overheat, or explode.
• Do not use or store the VS-260SMI in ammable conditions (such as environments containing ammable
gases or liquid chemicals). This could damage the ash, start a re, or cause an electric shock.
• Do not clean the VS-260SMI with agents containing corrosive or ammable substances such as paint
thinner, benzene, or nail polish remover.
• This product is not water resistant. Keep it away from rain, snow, humidity, and general moisture.
• Should the VS-260SMI get damaged, do not touch any exposed interior metal parts. If touched, they may
generate an electric shock or cause a malfunction. Promptly remove the batteries, and take the product to
an authorized service center for repair.
• If you detect excessive heat, smoke, or a burning smell coming from the ash, immediately stop operation
and remove the batteries to prevent the product from igniting or melting. Take the product to an authorized
service center for repair.
• Do not drop or otherwise cause a strong physical impact to the VS-260SMI, as this could cause a
malfunction that may cause it to explode or ignite.
• Remove all batteries from the VS-260SMI before long-term storage in order to prevent the product from
igniting or leaking corrosive liquids.
• Do not store or use this product at temperatures above 40°C / 104°F.

10 |Installing Batteries
• Keep the metal contacts in the battery compartment clean and free of corrosion and dirt. Do not touch
them with your ngers. Corrosive elements on the contacts can damage the VS-260SMI and prevent it from
functioning properly. Contacts may be cleaned with isopropyl alcohol on a cotton swab.
• Dispose of used batteries properly. Never heat them or throw them into a re, as this could cause the
batteries to leak, overheat, or explode.
Installing Batteries
The VS-260SMI can be powered by two AA batteries of several types:
• Lithium (1.5V)
• Nickel-metal hydride (Ni-MH) (1.2V)
• Alkaline (1.5V)
Note: For the fastest recycle times and longest battery life, lithium and Ni-MH batteries are recommended.
Installing Batteries |11
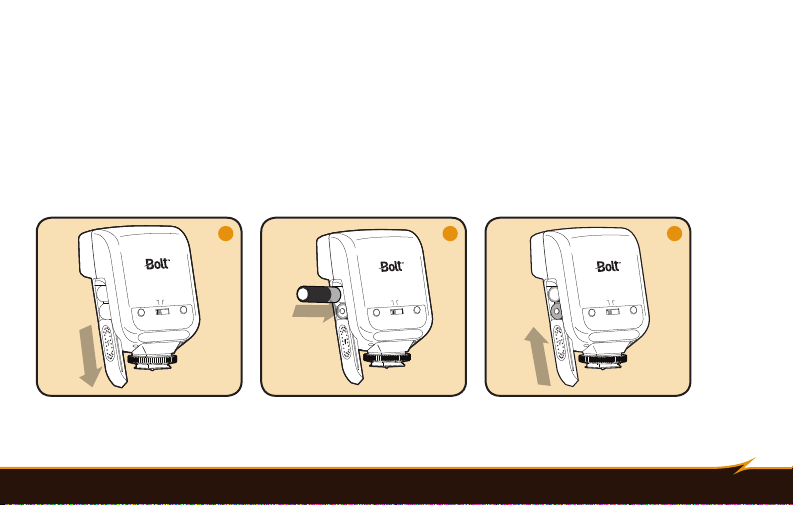
To install batteries, make sure the VS-260SMI is turned off and follow these steps:
1. Press on the battery compartment cover and slide it in the direction of the arrow.
2. Insert batteries in the orientations indicated inside the compartment.
3. Replace the battery compartment cover by pressing and sliding it into place, in the opposite direction of
the arrow on the cover.
OFF ON
TEST/
READY
TTL OK
VS-260SMI
OFF ON
TEST/
READY
TTL OK
VS-260SMI
OFF ON
TEST/
READY
TTL OK
VS-260SMI
1 2 3

12 |Mounting the Flash
Important!
Replace all four batteries at the same time. Do not mix battery types or brands, or use old and new batteries
together.
Mounting the Flash
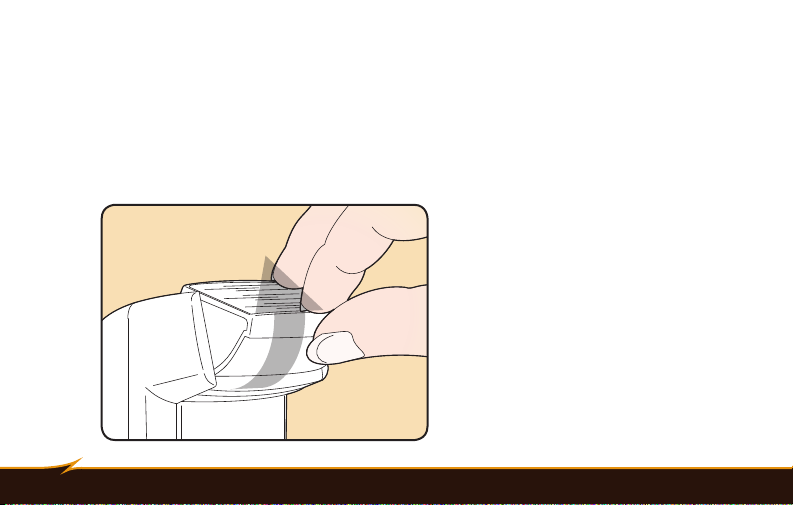
To mount the ash on your camera,
make sure the VS-260SMI is turned off
and follow these steps:
1. Turn the mounting foot lock counter-clockwise to loosen it.
VS-260SMI
OFF ON
TEST/
READY
TTL OK
1

Mounting the Flash |13
2. Slide the mounting
foot all the way into
your camera’s hot
shoe.
3. Turn the mounting
foot lock clockwise
until snug. Do not
overtighten.
To dismount the ash from your camera, make sure the
VS-260SMI is turned off and follow these steps:
1. Turn the mounting foot lock counter-clockwise to loosen it.
2. Slide the mounting foot out of your camera’s hot shoe.
VS-260SMI
OFF ON
TEST/
READY
TTL OK
LOCK
VS-260SMI
OFF ON
TEST/
READY
TTL OK
LOCK
VS-260SMI
OFF ON
TEST/
READY
TTL OK
2 3

14 |Turning on the Flash and Firing a Test
Turning on the Flash and Firing a Test
To turn the ash on, simply slide the power switch to the On position.
When the ash is ready to re, the Ready light will glow red. If the ash is mounted on your camera, a ash
icon will also appear in the camera’s viewnder when you press the shutter-release button halfway.
To re a test ash, press the Ready light / Test button.
Automatic power-saving function: After 3 minutes of inactivity, the ash will automatically enter power-
saving mode to conserve battery life. The Ready light will turn off. To reactivate the VS-260SMI, simply press
the Ready light / Test button or your camera’s shutter-release button. During long periods of inactivity, it is
recommended that you use the power switch to turn the ash off completely.

Taking Photos |15
Taking Photos
When the VS-260SMI is mounted on a compatible camera, it will set the appropriate ash level automatically,
in conjunction with the camera’s through-the-lens (TTL) metering system.
For information about your camera’s ash sync speed range (the shutter speed range your camera will allow
you to use when taking ash photos), consult your camera manual.
To take photographs with the ash, turn the ash and camera on and follow these steps:
1. Press the shutter-release button on your camera halfway to ensure that the camera is communicating
with the ash. A ash icon will appear in the camera’s viewnder.
2. Press your camera’s shutter-release button to take the picture. The OK light will glow green momentarily
to indicate that the proper exposure was attained.

16 |Using Red Eye Reduction
Using Red-Eye Reduction
The VS-260SMI supports red-eye reduction mode, which is set automatically by your camera. Consult your
camera’s manual for more information about this feature.
Using Flash Exposure Compensation
You can use ash exposure compensation to adjust the VS-260SMI’s ash output incrementally, just as you
would adjust exposure with the exposure compensation function on your camera.
To apply ash exposure compensation, press the ash exposure compensation button on your camera and
adjust the ash exposure level up or down with your camera’s controls.

Using the Autofocus-Assist Light |17
The ash exposure compensation range and controls vary between different camera models. Consult your
camera’s manual for more information about this feature.
Using the Autofocus-Assist Light
Camera autofocus systems can have difculty locking on a subject in dim light. When the ambient light level
is low, the VS-260SMI will emit a red autofocus-assist beam when you press your camera’s shutter-release
button halfway to autofocus. The camera will then be able to autofocus by locking on the projected light.
18 |Bouncing Your Flash
Bouncing Your Flash
Using ash to directly illuminate a subject often creates harsh, unnatural, and unattractive shadows. To
avoid this, the ash can be tilted up, allowing you to aim it at a large white or neutral-colored surface, such
as a ceiling, a wall, or a reector. The light will bounce off of the larger surface before striking your subject,
providing softer, more natural illumination.

Bouncing Your Flash |19
The VS-260SMI ash head can be tilted up at 45-, 60-, 75-, and 90-degree angles to the lens.
When bouncing your ash, you may need to adjust your exposure settings, since the level of light falling on
your subject will be reduced. The farther away the bounce surface and your subject are, the more illumination
will be reduced.
Tip: Bouncing your ash off of colored surfaces can create a color cast in your images. Bouncing off of
a white or neutral-colored surface will not alter the color of the light, while bouncing off of a gold-toned
surface can give portraits a warmer look. Other colors, while usually not desirable, can be used for creative
effects.

20 |Using Rear- or Second-Curtain Synchronization
Using Rear- or Second-Curtain Synchronization
When you photograph a moving subject with a slow (1/30 second or longer) shutter speed and a ash, the
ash will freeze the moving subject and the long exposure will cause motion blur and light trails to appear in
the image, especially in low light. This “slow-sync” ash technique, also referred to as “dragging the shutter,”
can be applied in two different ways: The ash can be synchronized with the camera’s shutter release so that
it res at the beginning of the period when the shutter opens, or it can re near the end of that period. The
former is called “front-curtain” or “rst-curtain” ash sync, and the latter is called “rear-curtain” or “second-
curtain” sync. Front-curtain sync causes motion blur and light trails to appear in front of moving subjects,
while rear-curtain sync makes them appear behind moving subjects. That means rear-curtain sync creates a
more realistic impression of movement.
The VS-260SMI supports rear-curtain sync modes on cameras that offer the setting. Consult your camera’s
manual to nd out how to activate it. Use your camera’s manual or shutter-priority mode to control the amount
of blurring and light trails you capture by varying the shutter speed.
Table of contents
Other Bolt Camera Flash manuals


