BOLTUNE BT-BH001 User manual

営唺䯤86+:1nn
䖧䖂㾘
棞㠮䯤啌䉳239陸㿫穼鄘䯖廟䎇91h霎鄘

Model: BT-BH001 Pro
Boltune Wireless Stereo Earphones
User Guide
MADE IN CHINA
www.boltune.net
02-20-2020
BT-BH001 Pro_V1.2
ASIA PACIFIC
E-mail: [email protected]
JP Importer:株式会社SUNVALLEY JAPAN
Address: 〒104-0032 東京都中央区八丁堀3丁目18-6PMO京橋東9F
EUROPE
E-mail: [email protected]
EU Importer: ZBT International Trading GmbH
Address: Halstenbeker Weg 98C, 25462 Rellingen, Deutschland
NORTH AMERICA
E-mail: [email protected]
MANUFACTURER
Shenzhen NearbyExpress Technology Development Co.,Ltd.
Address: 333 Bulong Road, Shenzhen, China, 518129

English
Deutsch
Français
Español
Italiano
日本語
CONTENTS
01-03
04-06
07-09
10-12
13-15
16-18
Lieferumfang
•
1 × Boltune BT-BH001 Pro Kabellose Stereo Kopfhörer
•
1 × USB-Ladekabel
•
6
×
Ohrstöpsel (ein Paar kommt bereits an den Kopfhörern)
•
6
×
Ohrbügel (ein Paar kommt bereits an den Kopfhörern)
•
1
×
Reiseetui
•
1
×
Bedienungsanleitung
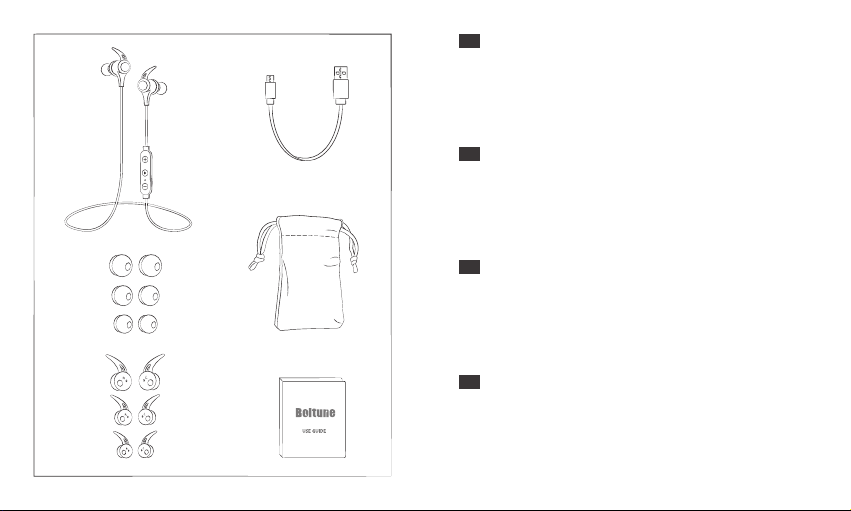
Package Content
• 1 × Boltune BT-BH001 Pro Wireless Stereo Earphones
• 1 × USB Charging Cable
• 6 × Ear Buds (two are equipped on the earphones)
• 6 × Ear Hooks (two are equipped on the earphones)
• 1 × Travel Pouch
• 1 × User Guide
EN
DE
Contenu du Package
• 1 × Écouteurs Stéréo Sans Fil Boltune BT-BH001 Pro
• 1 × Câble de Charge USB
• 6 × Oreillettes (deux sont déjà installées sur les écouteurs)
• 6 × Crochets d’Oreille (deux sont déjà installés sur les écouteurs)
• 1 × Pochette de Transport
• 1 × Guide d’Utilisation
Contenido del paquete
• 1 × Auriculares estéreo inalámbricos Boltune BT-BH001 Pro
• 1 × Cable de carga USB
• 6 × Tapones (dos están equipados en los auriculares)
• 6 × Ganchos de oído (dos están equipados en los auriculares)
• 1 × Bolsa de viaje
• 1 × Manual del usuario
FR
ES
Contenuto della Confezione
• 1 × Boltune BT-BH001 Pro Auricolari Stereo Bluetooth
• 1 × Cavo di Ricarica USB
• 6 × Gommini Auricolari (2 presenti sugli auricolari)
• 6 × Ganci Auricolari (2 presenti sugli auricolari)
• 1 × Custodia
• 1 × Guida Utente
同梱物
• 1 × BoltuneBT-BH001Proワイヤレスイヤホン
• 1 × USB 充電ケーブル
• 6 × イヤーピース(2つはイヤホンに装着済み)
• 6 × イヤーフック(2つはヘッドホンに装着済み)
• 1 × 収納ポーチ
• 1 × 取扱説明書
IT
JP
1
2
3
4
5
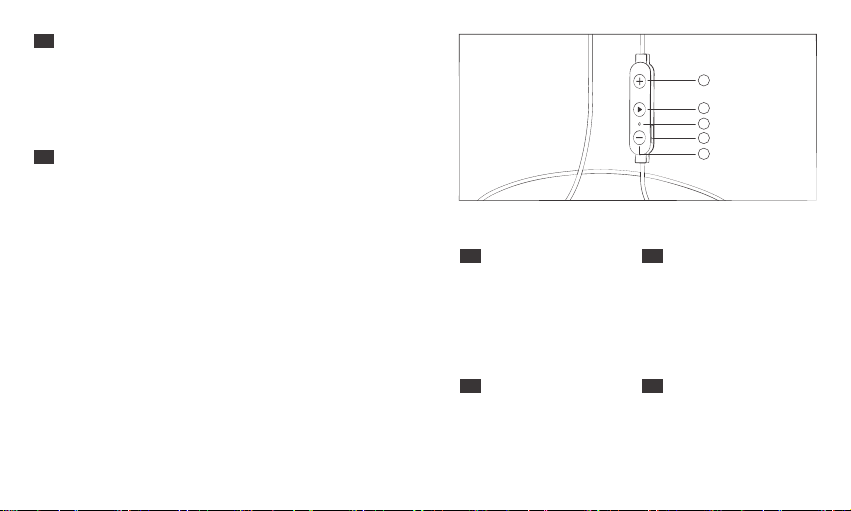
Product Diagram
①
②
③
④
⑤
①
②
③
④
⑤
Produktdiagramm
Description du Produit
①
②
③
④
⑤
Lautstärke + / Nächstes Lied
Multifunktionsknopf
LED-Anzeige / Mikrofon
Mikro USB-Ladeanschluss
Lautstärke - / Vorheriges Lied
Volume + / Piste Suivante
Bouton Multifonction
Voyant à LED / Micro
Port de Charge Micro-USB
Volume - / Piste Précédente
①
②
③
④
⑤
Diagrama del producto
Volumen + / Pista siguiente
Botón multifunción
Indicador LED / Micrófono
Puerto de carga micro USB
Volumen - / Pista anterior
Volume + / Next
Multifunction Button
LED Indicator / Microphone
Micro USB Charging Port
Volume - / Previous
EN
FR ES
DE
02
04 06 08
10 12 14
16 18
①
②
③
④
⑤
Schema del Prodotto
Volume + / Traccia Successiva
Tasto Multifunzione
Indicatore LED / Microfono
Porta di Ricarica Micro-USB
Volume - / Traccia Precedente
①
②
③
④
⑤
製品図
音量+/次の曲
多機能ボタン
LEDインジケーター/マイク
USB充電ポート
音量-/前の曲
IT JP
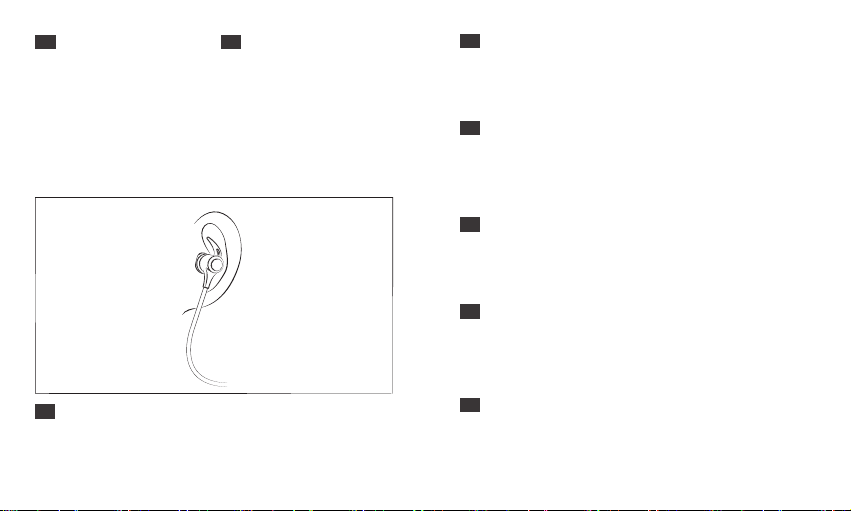
How to Wear
Please wear the headphones as shown in the diagram:
1) Attach the ear hooks onto the earphones.
2) Wear the earphones and the hooks on your ears and adjust for the best fit.
Wie zu Tragen
Tragen Sie die Kopfhörer, wie abgebildet:
1) Bringen Sie die Ohrenbügel an den Kopfhörern an.
2) Tragen Sie die Kopfhörer so, dass die Ohrbügel bequem in Ihr Ohr passen.
Comment les Porter
Veuillez porter les écouteurs comme indiqué sur le dessin :
1) Attachez les crochets d’oreille sur les écouteurs.
2) Portez les écouteurs et les crochets sur vos oreilles et réglez-les pour vous
convenir le mieux.
Como ponérselos
Por favor use los auriculares como se muestra en el diagrama:
1) Coloque los ganchos de oreja en los auriculares.
2) Use los auriculares y los ganchos en sus oídos y regúlelos para un mejor ajuste.
Come Indossare gli Auricolari
Fare riferimento allo schema sottostante per indossare gli auricolari:
1) Fissare gli appositi ganci sugli auricolari
2) Inserire auricolari e ganci nelle orecchie fino a che questi non siano
confortabili.
装着方法
図のようにヘッドホンを着用してください:
1)耳掛けをイヤホンに取り付けます。
2)イヤホンとフックを耳に付けて、最適なフィット感に調整します。
EN
DE
FR
ES
IT
JP
02
04 06 08
10 12 14
16 18

Thank you for choosing the Boltune BT-BH001 Pro Wireless Stereo Earphones.
If you have any questions or issues, please contact our customer support team
EN
ENEN
Note:
• Charge the earphones at least once every 6 months when not
using for a long time.
• Make sure the battery is fully charged before putting the
earphones away for storage.
2. Pairing
1) Make sure the earphones and your Bluetooth®device are next to each other
(within 3 feet / 1 meter).
2) The first time you use the earphones, press and hold the Multifunction Button
until the LED indicator flashes red and blue alternately. Now the earphones
are in pairing mode.
3) Activate Bluetooth®function on your phone and search for the nearby Bluetooth®
connection: Find “Boltune BT-BH001 Pro” in the search results. Tap on the
name to connect. Once connected, the Blue LED will flash.
How to Use
1. Charging
1) Connect the charging port with any USB charging adapter or active computer
USB port.
2) Charging will start automatically with the LED indicator turning red.
3) The earphones are fully charged when the LED indicator turns blue.
3. EQ Mode
Press the Multifunction and Volume + Buttons at the same time to adjust the
built-in EQ modes (3 models in total).
4. Clear Pairing History
1) If the earphones fail to pair with your Bluetooth® device, clear the pairing
history by pressing and holding the Volume + and Volume - Buttons
simultaneously when the earphones are on until the LED indicator flashes
purple twice indicating clearing successfully. Then re-pair your Bluetooth®
device as instructed in Pairing.
2) If you want to pair the earphones with another device when already paired,
deactivate the Bluetooth® feature on the paired device or remove “Boltune
BT-BH001 Pro” from the Bluetooth list.
Note: Automatic Re-pairing: The Bluetooth® earphones can
remember the devices paired previously, and will attempt to pair
with the last connected device (with Bluetooth® feature activated)
automatically without going into pairing mode.
0201
04 06 08
10 12 14
16 18

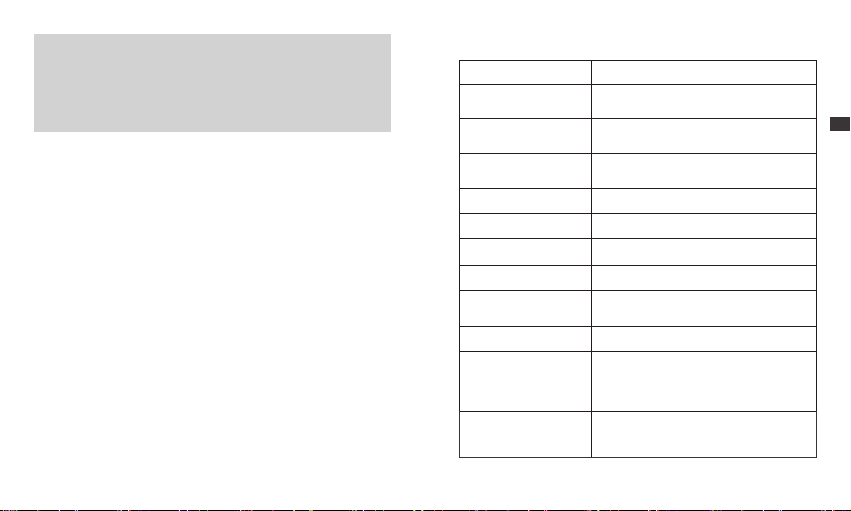
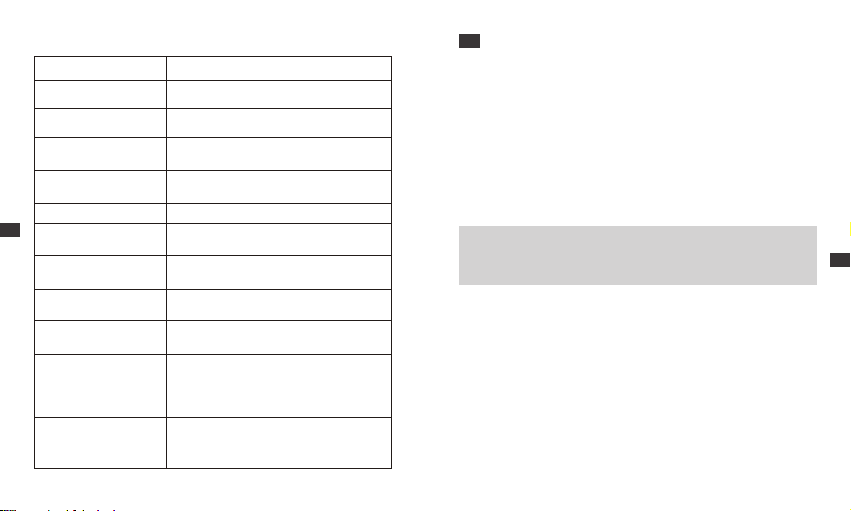
Operation and Functions
Function
Power On
Power Off
Enter Pairing Mode
Play / Pause
Volume + / -
Next Track / Previous Track
Answer / Hang up Phone Call
Decline an Incoming Call
Re-dial Last Call
Restore to Factory Settings
Operation
Press and hold the Multifunction Button for 1
second
Press and hold the Multifunction Button for 3
seconds
Press and hold the Multifunction Button for 5
seconds
Press the Multifunction Button once
Press the Volume + / - Button
Press and hold the Volume + / - Button
Press the Multifunction Button once
Press and hold the Multifunction Button for 1
second
Press the Multifunction Button twice
When the earphones are on, press and hold
the Volume + and Volume - Buttons simultaneously
until the LED indicator flashes purple twice
Vielen Dank, dass Sie sich für die Boltune Kabellosen Stereo Kopfhörer
entschieden haben. Bei Fragen oder Bedenken, wenden Sie sich an unseren
DE
DE
Bedienungsanleitung
1. Aufladen
1) Verbinden Sie den Ladeanschluss mit irgendeinem USB-Ladeadapter oder
aktiven Computer via USB-Anschluss.
2) Der Ladeprozess wird automatisch gestartet und die LED-Anzeige wird rot
leuchten.
3) Die Kopfhörer sind vollständig aufgeladen, wenn die LED-Anzeige blau
leuchtet.
Hinweis:
• Laden Sie die Kopfhörer mindestens alle sechs Monate auf,
wenn Sie sie für eine längere Zeit nicht benutzen.
• Stellen Sie sicher, dass der Akku vollständig geladen ist, bevor
Sie die Kopfhörer zum Lagern verstauen.
2. Kopplung
1) Stellen Sie sicher, dass die Kopfhörer und Ihr Bluetooth®-Gerät sich nah
beieinander befinden (innerhalb 1 Meter).
2) Wenn Sie die Kopfhörer das erste Mal benutzen, halten Sie den
Multifunktionsknopf gedrückt, bis die LED-Anzeige abwechselnd rot und
blau leuchtet. Die Kopfhörer befinden sich jetzt im Kopplungsmodus.
3) Aktivieren Sie die Bluetooth®-Funktion auf Ihrem Telefon und suchen Sie
nach Bluetooth®-Verbindungen in der Nähe: Wählen Sie “ Boltune
BT-BH001 Pro” aus der Liste aus. Sobald die Verbindung besteht, blinkt die
LED nur blau.
EN
EQ Mode
Press the Multifunction and Volume + Buttons at
the same time to adjust the built-in EQ modes
(3 models in total).
02
04 06 08
10 12 14
16 18
03 05 07
09 11 13
15 17 19
DE
Hinweis: Automatisches Verbinden: Die Bluetooth®-Kopfhörer
merken sich zuvor bereits gekoppelte Geräte. Sie können die
Kopfhörer und das Gerät (mit aktiviertem Bluetooth®) einfach
einschalten und schon verbinden sich die Kopfhörer automatisch
mit dem zuletzt verbundenen Gerät, ohne in den Kopplungsmodus
zu wechseln.
3. EQ Modi
Drücken Sie den Multifunktions- und den Volume + -Knopf gleichzeitig, um
zwischen den 3 EQ Modi zu wechseln.
4. Kopplungsverlauf löschen
1) Sollten sich die Kopfhörer nicht mit Ihrem Bluetooth®-Gerät koppeln lassen,
bereinigen Sie den Kopplungsverlauf, indem Sie die "Lautstärke +" und
"Lautstärke -"-Tasten gleichzeitig gedrückt halten, während die Kopfhörer
eingeschaltet sind, bis die LED-Anzeige zweimal lila blinkt und so das
erfolgreiche Löschen bestätigen. Koppeln Sie Ihr Bluetooth®-Geräte dann
wie im Abschnitt "Koppeln" beschrieben erneut.
2) Wenn Sie Ihre Kopfhörer bei bestehender Verbindung mit einem anderen
Gerät koppeln wollen, deaktivieren Sie die Bluetooth®-Funktion des
gekoppelten Geräts oder entfernen Sie "Boltune BT-BH001 Pro" aus der
Bluetooth-Liste.
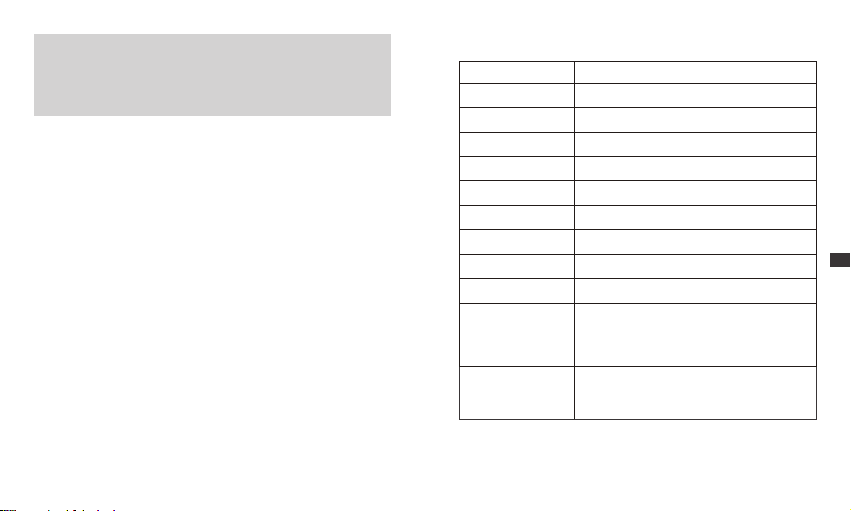
Bedienung und Funktionen
Funktion
Einschalten
Ausschalten
Kopplungsmodus aktivieren
Wiedergabe / Pause
Lautstärke + / -
Nächstes Lied / Vorheriges Lied
Anruf annehmen / auflegen
Eingehenden Anruf abweisen
Wahlwiederholung
Auf Werkseinstellungen
zurücksetzen
Bedienung
Halten Sie die Multifunktionstaste 1 Sekunde
lang gedrückt
Halten Sie die Multifunktionstaste 3 Sekunden
lang gedrückt
Halten Sie die Multifunktionstaste 5 Sekunden
lang gedrückt
Drücken Sie die Multifunktionstaste ein Mal
Drücken Sie die Tasten Lautstärke + / -
Halten Sie die Knöpfe Lautstärke + / - gedrückt
Drücken Sie die Multifunktionstaste ein Mal
Halten Sie die Multifunktionstaste 1 Sekunde
lang gedrückt
Drücken Sie die Multifunktionstaste zwei Mal
Halten Sie die "Lautstärke +" und "Lautstärke -"
-Tasten gleichzeitig gedrückt, wenn die Kopfhörer
eingeschaltet sind, bis die LED-Anzeige zwei Mal
lila blinkt
EQ Modi
Drücken Sie den Multifunktions- und den
Volume + -Knopf gleichzeitig, um zwischen
den 3 EQ Modi zu wechseln.
02
04 06 08
10 12 14
16 18
03 05 07
09 11 13
15 17 19

Merci d'avoir choisi les Écouteurs Stéréo Sans Fil Boltune BT-BH001 Pro. Si vous
avez des questions ou des problèmes, veuillez contacter notre équipe de
FR
FRFR Mode d’Emploi
1. Chargement
1) Connectez le port de charge à un adaptateur USB ou un port USB
d’ordinateur actif.
2) Le chargement va démarrer automatiquement et le voyant à LED deviendra
rouge.
3) Les écouteurs seront entièrement chargés quand le voyant à LED devient
bleu.
Remarque:
• Chargez les écouteurs au minimum une fois tous les 6 mois si
vous ne les utilisez pas dans une longue période.
• Assurez-vous que la batterie est complètement chargée avant
de ranger les écouteurs pour la préservation.
2. Couplage
1) Assurez-vous que les écouteurs et votre appareil Bluetooth®soient à
proximité l’un de l’autre (à moins d’un mètre).
2) La première fois que vous utilisez les écouteurs, appuyez et maintenez le
Bouton Multifonction jusqu’à ce que le voyant à LED clignote rouge et bleu
alternativement. Les écouteurs sont maintenant en mode de couplage.
3) Activez la fonction Bluetooth®sur votre téléphone et cherchez les
connexions Bluetooth®à proximité : localisez “Boltune BT-BH001 Pro” dans
les résultats de la recherche. Cliquez dessus pour établir la connexion. Une
fois connecté, le voyant à LED clignotera lentement en bleu.
Remarque: Ré-appairage automatique: Le casque Bluetooth®
peut se rappeler des appareils précédemment appairés. Vous
pouvez simplement allumer le casque et l’appareil (avec le
Bluetooth® activé), et ils se reconnecteront automatiquement
sans repasser en mode appairage.
3. Mode EQ
Appuyez simultanément sur le bouton multifonction et Volume + pour régler le
mode EQ intégré (3 modèles au total).
4. Vider l’historique d’appairage
1) Si le casque n’arrive pas à s’appairer à l’appareil Bluetooth®, videz l’historique
d’appairage en appuyant et maintenant le Bouton Volume + et Volume –
simultanément lorsque le casque est allumé jusqu’à ce que l’indicateur LED
clignote violet deux fois indiquant que le nettoyage de l’historique est réussi.
Puis ré-appairez votre appareil Bluetooth® tel qu’instruit dans la section
Appairage.
2) Si vous souhaitez appairer le casque avec un autre appareil lorsqu’il est déjà
appairé, désactivez la fonction Bluetooth® sur l’appareil appairé ou retirez
“Boltune BT-BH001 Pro” de la liste Bluetooth.
02
04 06 08
10 12 14
16 18
03 05 07
09 11 13
15 17 19

Fonctionnement
Fonction
Allumer
Extinction
Entrer en Mode Couplage
Lecture / Pause
Volume + / -
Piste Suivante / Piste
Précédente
Répondre / Raccrocher un
Appel Téléphonique
Rejeter un Appel Entrant
Recomposer le Dernier
Numéro
Restauration des
Paramètres d'Usine
Opération
Maintenez appuyé le Bouton Multifonction
pendant 1 seconde
Maintenez appuyé le Bouton Multifonction
pendant 3 secondes
Maintenez appuyé le Bouton Multifonction
pendant 5 secondes
Appuyez une fois sur le Bouton Multifonction
Appuyez sur le Bouton Volume + / -
Maintenez appuyé le Bouton Volume + / -
Appuyez une fois sur le Bouton Multifonction
Maintenez appuyé le Bouton Multifonction
pendant 1 seconde
Appuyez deux fois sur le Bouton Multifonction
Les écouteurs sont allumés, appuyez et maintenez
le Bouton Volume + et Volume – simultanément,
jusqu'à ce que le voyant à LED clignote deux fois
en violet
ES
ES
Gracias por elegir los auriculares estéreos inalámbricos BT-BH001 Pro Boltune.
Si tiene alguna pregunta o problema, comuníquese con nuestro equipo de
Cómo utilizarlos
1. Carga
1) Conecte el puerto de carga con cualquier adaptador de carga USB o a un
puerto USB de un ordenador encendido.
2) La carga comenzará automáticamente el indicador del LED se pondrá en rojo.
3) Los auriculares están completamente cargados cuando el indicador LED se
vuelve azul.
Nota:
• Cargue los auriculares al menos una vez cada 6 meses cuando no
lo utilice durante mucho tiempo.
• Asegúrese de que la batería está completamente cargada antes
de guardarlos.
2. Emparejamiento
1) Asegúrese de que los auriculares y el dispositivo Bluetooth®estén uno al
lado del otro (a menos de 3 pies / 1 metro).
2) La primera vez que utilice los auriculares, mantenga pulsado el botón
multifunción hasta que el indicador LED parpadee en rojo y azul
alternativamente. Ahora los auriculares están en modo de emparejamiento.
3) Active la función Bluetooth®en su teléfono y busque la conexión Bluetooth®
cercana: Encuentre "Boltune BT-BH001 Pro" en los resultados de búsqueda.
Toque en el nombre para conectarse. Una vez conectado, el LED azul parpadeará.
FR
Mode EQ
Appuyez simultanément sur le bouton
multifonction et Volume + pour régler le mode
EQ intégré (3 modèles au total).
02
04 06 08
10 12 14
16 18
03 05 07
09 11 13
15 17 19

ES ES
Nota: Emparejamiento Automático: Los Articulares Bluetooth®
pueden recordar dispositivos emparejados previamente.
Simplemente encienda los auriculares y el dispositivo (con
Bluetooth® activado), y se conectarán al último dispositivo
conectado automáticamente sin entrar en modo de emparejamiento.
3. Modo EQ
Presione los botones de Multifunción y Volumen + al mismo tiempo para ajustar
los modos de EQ incorporados (3 modelos en total).
4. Borrar Historial De Emparejamiento
1) Silos auriculares no pueden emparejarse con su dispositivo Bluetooth®, borre
el historial de emparejamiento dejando presionado los Botones de Volumen +
y Volumen – al mismo tiempo, el indicador LED parpadeara indicado que el
historial se ha borrado exitosamente. Vuelva a emparejar sudispositivo
Bluetooth®como se indica en la sección anterior.
2) Si quiere emparejar los auriculares ya emparejados con otro dispositivo,
desactive la función Bluetooth® del dispositivo emparejado o elimine "Boltune
BT-BH001 Pro" de la lista de conexiones Bluetooth.
Operación y Funciones
Funciónes
Encender
Apagar
Iniciar Modo de
Emparejamiento
Reproducir / Pausar
Volumen + / -
Siguiente Pista / PistaAnterior
Responder / Colgar
Llamada Telefónica
Rechazar Llamada
Volver a Marcar
Restaurar a la Configuración
de Fábrica
Operación
Mantenga presionado el Botón Multifunción
por un segundo
Mantenga presionado el Botón Multifunción
por 3 segundos
Mantenga presionado el Botón Multifunción
por 5 segundos
Presione el Botón Multifunción
Presione el Botón de Volumen + /-
Mantenga presionado el Botón de Volumen + / -
Presione el Botón Multifunción
Mantenga presionado el Botón Multifunción
por un segundo
Presione el Botón Multifunción dos veces
Cuando los audifonos esten encendidos, mantenga
presionado el Botón Volumen + y Volumen – al
mismo tiempo hasta que el indicador LED
parpadee en color purpura dos veces
Modo EQ
Presione los botones de Multifunción y Volumen +
al mismo tiempo para ajustar los modos de EQ
incorporados (3 modelos en total).
02
04 06 08
10 12 14
16 18
03 05 07
09 11 13
15 17 19

IT
ITIT
Grazie per aver scelto gli Auricolari Stereo Bluetooth BT-BH001 Pro di Boltune.
Nel caso ci fosse bisogno di ulteriore assistenza, si prega di contattare il nostro
Funzionamento
1. Come Ricaricare
1) Connettere la porta micro-USB degli auricolari con un adattatore USB o alla
porta USB del computer.
2) La ricarica inizierà automaticamente e l’indicatore LED diverrà rosso.
3) L’indicatore diverrà blu quando gli auricolari sono carichi.
Nota:
• Ricaricare gli auricolari almeno una volta ogni 6 mesi per periodi
di inutilizzo prolungato.
• Assicurarsi che la batteria sia completamente carica prima della
perservazione delle cuffie.
2. Come Connettere
1) Assicurarsi che gli auricolari ed il dispositivo Bluetooth®siano entro 1
metro/3 piedi di distanza.
2) Tenere premuto il Tasto Multifunzione fino a che l’indicatore LED non
lampeggi rosso e blu la prima volta che si utilizzano gli auricolari perché
questi entrino in modalità d’associazione.
3) Attivare la funzione Bluetooth®del proprio dispositivo e cercare i dispositivi
Bluetooth®disponibili nelle vicinanze: selezionare “Boltune BT-BH001 Pro”
tra la lista dei risultati. Una volta connessi, la luce blu del LED di notifica
lampeggerà.
Nota: Ri-accoppiamento Automatico: Le cuffie Bluetooth® sono in
grado di ricordare i dispositivi accoppiati in precedenza. Basterà
riaccendere le cuffie e il dispositivo (con la funzione Bluetooth®
attivata), e le cuffie si ricollegheranno all’ultimo dispositivo a cui erano
state collegate senza dover passare per la modalità accoppiamento.
3. Modalità EQ
Premere contemporaneamente i pulsanti multifunzione e volume + per
regolare le modalità EQ incorporate (3 modelli in totale).
4. Cancellare lo Storico degli Accoppiamenti
1) Se le cuffie non riescono a collegarsi ad un dispositivo Bluetooth®, cancellare
lo storico degli accoppiamenti premendo e tenendo premuti i Pulsanti
Volume + e Volume - contemporaneamente quando le cuffie sono accese,
finché l’indicatore LED lampeggerà due volte di viola ad indicare che la
pulizia è avvenuta con successo. A questo punto, accoppiare nuovamente il
dispositivo Bluetooth® come spiegato nella sezione Accoppiamento.
2) Se si vuole accoppiare la cuffie con un altro dispositivo quando queste sono
già accoppiate, disattivare la funzione Bluetooth® sul dispositivo accoppiato
o rimuovere “Boltune BT-BH001 Pro” dalla lista dei dispositivi Bluetooth.
02
04 06 08
10 12 14
16 18
03 05 07
09 11 13
15 17 19
Operazioni e Funzioni
Funzione
Accensione
Spegnimento
Entrare in Modalità
Accoppiamento
Riproduzione / Pausa
Volume + / -
Traccia Successiva / Traccia
Precedente
Rispondere / Riattaccare una
Chiamata
Rifiutare una Chiamata in
Arrivo
Ricomporre l’Ultimo Numero
Chiamato
Ripristinare alle Impostazioni
di Fabbrica
Operazione
Premere e tenere premuto il Pulsante
Multifunzione per 1 secondo
Premere e tenere premuto il Pulsante
Multifunzione per 3 secondi
Premere e tenere premuto il Pulsante
Multifunzione per 5 secondi
Premere e tenere premuto il Pulsante
Multifunzione una volta
Premere il Pulsante Volume + / -
Premere e tenere premuto il Pulsante
Volume + / -
Premere il Pulsante Multifunzione una volta
Premere e tenere premuto il Pulsante
Multifunzione per 1 secondo
Premere il Pulsante Multifunzione due volte
Quando le cuffie sono accese, premere e tenere
premuto il Pulsante Volume + e Volume -
contemporaneamente finché l’indicatore LED
lampeggia di viola due volte
JP
JP
BT-BH001 Pro Boltune ワイヤレスイヤホンをお買い上げいただきあり がとうご ざ い ま す。
ご質問やご不明な点がございましたらE-mail: [email protected]までメールで
お問い合わせください。
使い方
1.充電
1)USB充電アダプタまたはコンピュータのUSBポートを充電ポートに接続します。
2)LEDインジケータが赤色になると自動的に充電が開始されます。
3)イヤホンはLEDインジケータが青色になると完全に充電されます。
注意:
•長時間ご使用にならない場合は、6ヶ月に1回はイヤホンを充電してください。
•長時間使用しない場合は、一度フル充電した後で保管してください。
2.ペアリング
1)イヤホンとBluetooth®デバイスが隣り合っていることを確認します(3フィート
/1メートル以内)。
2)初めてイヤホンを使用するときは、LEDインジケーターが交互に赤と青で点滅す
るまで多機能ボタンを押し続け、ペアリングモードにします。
3)お使いの携帯電話でBluetooth®機能を有効にし、近くにあるBluetooth®機器を
検索します。検索結果で「Boltune BT-BH001 Pro」の名前をタップすると接続します。
接続すると、LEDインジケーターが青に点滅する。
IT
Modalità EQ
Premere contemporaneamente i pulsanti
multifunzione e volume + per regolare le modalità
EQ incorporate (3 modelli in totale).
02
04 06 08
10 12 14
16 18
03 05 07
09 11 13
15 17 19
JP
注意:自動再ペアリング:Bluetooth®ヘッドフォンは、前回接続した機器
を記憶します。そのため、ペアリングモードにしなくても、ヘッドフォンの
電源を入れるだけで、前回接続した機器(Bluetooth®機能が有効になっ
ている必要があります)に自動的に接続を行います。
3.EQモード
多機能ボタンと音量+ボタンを同時に押すことでEQモードを調整することができます。
( 三 つ モ ードあり)
4.ペアリング履歴の消去
1)お使いのBluetooth®機器とのペアリングに失敗した場合、ペアリング履歴を消去
する必要があります。消去するには、ヘッドフォンがオンの状態で、LEDインジケー
ターが紫色に2度点滅するまで、音声+ボタンと音声-ボタンを同時に押します。
その後、ペアリングの手順に従い、再度Bluetooth®機器とのペアリングを行ってく
ださい。
2)ヘッドフォンを他の機器とペアリングしたい場合、すでにペアリングを行った機器
のBluetooth®機能を無効に設定するか、Bluetoothのリストから“BoltuneBT-
BH001Pro”を削除してください。
機能と操 作
機能
電源オン
電源オフ
ペアリング モード
再生/一時停止
音量+/-
次へ進む/前に戻る
応答/通話終了
着信拒否
リダイヤル
初期化「リセット」
多機能ボタンを1秒間長押し
多機能ボタンを3秒間長押し
多機能ボタンを5秒間長押し
多機能ボタンを1回押す
音量+/-ボタンを押す
音量+/-ボタンを長押し
多機能ボタンを1回押す
多機能ボタンを1秒間長押し
多機能ボタンを2回押す
ヘッドフォンがオンの状態で、LEDインジケーターが
紫色に2度点滅するまで、音声+ボタンと音声-ボタ
ンを同時に押します
操作
E Q モ ード 多機能ボタンと音量+ボタンを同時に押すことでEQ
モードを調整することができます。(三つモードあり)
02
04 06 08
10 12 14
16 18
03 05 07
09 11 13
15 17 19

EN The Bluetooth®word mark and logos are registered
trademarks owned by the Bluetooth SIG, Inc. and any use
of such marks by Sunvalleytek International Inc. is under
license. Other trademarks and trade names are those of their respective owners.
DE Die Marke Bluetooth®und das Bluetooth Logo sind eingetragene
Markenzeichen der Bluetooth SIG, Inc. und jegliche Verwendung dieser
Marke durch Sunvalleytek International Inc. ist lizensiert. Die Rechte an
anderen Markenzeichen liegen beim jeweiligen Eigentümer.
FR Le terme et les logos Bluetooth®sont la propriété de Bluetooth SIG, Inc.
et toute utilisation de ces marques par Sunvalleytek International Inc. se fait
sous licence. Les autres désignations commerciales et marques mentionnées
sont détenues par leur propriétaire respectif.
ES La marca Bluetooth®y los logotipos son de propiedad de Bluetooth SIG,
Inc. y se encuentra autorizado cualquier uso de estas marcas por parte de
Sunvalleytek International Inc. Otras marcas y nombres comerciales son
aquellas de sus respectivos propietarios.
IT La parola e i loghi Bluetooth®sono marchi di fabbrica registrati di
proprietà di Bluetooth SIG, Inc. e qualsiasi utilizzo di questi marchi da parte
di Sunvalleytek International Inc. avviene su licenza. Gli altri marchi di
fabbrica e nomi commerciali appartengono ai rispettivi proprietari.
JP Bluetooth®のワードマークおよびロゴはBluetooth SIG, Inc.が所有する登録商
標であり 、Sunvalleytek International Inc. はこれらのマークおよびロゴをライセ
ンスに基づ いて使用しています。その他の 商標およびトレードネームは、それぞれ
の所有者に帰属します。
NOTE: This equipment has been tested and found to comply with the limits for
a Class B digital device, pursuant to part 15 of the FCC Rules. These limits are
designed to provide reasonable protection against harmful interference in a
residential installation. This equipment generates uses and can radiate radio
frequency energy and, if not installed and used in accordance with the
instructions, may cause harmful interference to radio communications.
However, there is no guarantee that interference will not occur in a particular
installation. If this equipment does cause harmful interference to radio or
television reception, which can be determined by turning the equipment off
and on, the user is encouraged to try to correct the interference by one or
more of the following measures:
- Reorient or relocate the receiving antenna.
- Increase the separation between the equipment and receiver.
- Connect the equipment into an outlet on a circuit different from that to which
the receiver is connected.
- Consult the dealer or an experienced radio/TV technician for help
Changes or modifications not expressly approved by the party responsible for
compliance could void the user's authority to operate the equipment. This
device complies with Part 15 of the FCC Rules. Operation is subject to the
following two conditions:
(1) this device may not cause harmful interference, and
(2) this device must accept any interference received, including interference
that may cause undesired operation.
02
04 06 08
10 12 14
16 18
03 05 07
09 11 13
15 17 19

WEEE Compliance
Correct Disposal of This Product (Waste Electrical & Electronic Equipment)
(Applicable in countries with separate collection systems)
This marking on the product, accessories or literature indicates that the product
and its electronic accessories should not be disposed of with other household
waste at the end of their working life. To prevent possible harm to the environment
or human health from uncontrolled waste disposal, please separate these items
from other types of waste and recycle them responsibly to promote the sustainable
reuse of material resources. Household users should contact either the retailer
where they purchased this product, or their local government office, for details
of where and how they can take these items for environmentally safe recycling.
Business users should contact their supplier and check the terms and conditions
of the purchase contract. This product and its electronic accessories should not
be mixed with other commercial wastes for disposal.
Other manuals for BT-BH001
1
Table of contents
Other BOLTUNE Headphones manuals

BOLTUNE
BOLTUNE BT-BH020 User manual

BOLTUNE
BOLTUNE BH024 User manual

BOLTUNE
BOLTUNE BT-BH023 User manual

BOLTUNE
BOLTUNE BT-BH020 User manual

BOLTUNE
BOLTUNE BT-BH021 User manual

BOLTUNE
BOLTUNE BT-BH023 User manual

BOLTUNE
BOLTUNE BT-BH020 User manual

BOLTUNE
BOLTUNE BT-BH020 User manual

BOLTUNE
BOLTUNE BT-BH021 User manual

BOLTUNE
BOLTUNE BT-BH024 User manual


