Bonne O Carbonated & Mixed Drink Appliance User manual

Cvr
Bonne O International Inc.
Instruction Manual
Carbonated &
Mixed Drink Appliance

E1
1
Important Safeguards
Carefully read these operating instructions before using the appliance. Save these instructions.
When using electrical appliances, basic safety precautions should always be followed including the following:
READ ALL INSTRUCTIONS BEFORE USING.
• This appliance must be properly installed and located in
accordance with these instructions before it is used.
• Close supervision is necessary when appliance is used near
children. Keep the machine out of the reach of children.
• Do not operate unattended.
• Do not use the appliance for purposes other than its
intended use.
• Before use, plug in the appliance correctly according to the
instruction manual.
• Use the appliance only in upright position and do not move
appliance during use.
• Unplug from outlet when appliance is not in use and before
cleaning.
• Allow to cool before adding or removing parts, and before
cleaning machine.
• Do not operate a damaged appliance or using a damaged
bottle. Do not operate an appliance with a damaged cord or
plug or after the appliance malfunctions or has been
dropped or damaged in any manner. Contact BONNE O
customer service to report any malfunction of or damage to
the appliance.
• Do not let the cord hang over the edge of the table or
counter or touch hot surfaces.
• To protect against fire, electric shock and injury to persons,
do not immerse cord, plug, or body of the appliance in
water or any other liquid.
• Do not place on or near a hot gas or electric burner or in a
heated oven.
• The use of accessories or attachments is not recommended
by the BONNE O appliance manufacturer and may result in
fire, electric shock or injury to persons.
• Do not use outdoors or when standing in damp area.
• Do not expose the carbonating bottle to temperatures above
175F (80C) or below 34F (1C), do not freeze carbonating
bottles or place in freezer or microwave.
• Do not use carbonating bottles that have changed shape, as
this indicates the bottle is damaged. Do not use bottles that
are scratched, worn, discolored or damaged in any way.
• Bonne O carbonating bottles are clearly marked with an
expiry date near the base of the bottle. Do not use the
bottle after this expiry date. Replace and recycle expired
bottles according to local recycling laws.
• Do not attempt to carbonate an empty bottle or with an
empty flavor chamber.
Short cord instructions:
• A short power supply cord is provided to reduce the risk of
becoming entangled in or tripping over a longer cord.
• Longer detachable power-supply cords or extension cords
are available and may be used if care is exercised in their
use
• If a longer detachable power-supply cord or extension cord
is used,
❍The marked electrical rating of the detachable
power-supply cord or extension cord must be as great
as the electrical rating of the appliance,
❍If the appliance is of the grounded type, the extension
cord should be a grounding type 3-wire cord, and
❍The longer cord should be arranged so that it will not
drape over the countertop or table top where it can be
pulled on by children or tripped over.
• This appliance has a polarized plug (one blade is wider than
the other). To reduce the risk of electric shock, this plug will
fit in a polarized outlet only one way. If the plug does not fit
fully in the outlet, reverse the plug. If it still does not fit,
contact a qualified electrician. Do not attempt to defeat this
safety feature.

E2
2
• This appliance is for HOUSEHOLD
USE ONLY. Any servicing other than
cleaning and user maintenance
should be performed by an
authorized service agent. Do not
remove the bottom panel, there are
no user serviceable parts inside.
❍Do not immerse in water or try
to disassemble appliance.
❍Do not attempt to open the
bottom cap of the appliance
during operation.
❍Never use warm or hot water
to fill the bottle. Use cold water
only.
❍Never clean with scouring
powders or hard implements.
❍Connect the appliance only to
a grounded electrical socket.
The voltage on the appliance
rating plate must correspond
with that of your electrical
supply.
General Specifications
Voltage: AC 120V
Frequency: 60Hz
Wattage: 900W
Maximum working pressure: 80 PSI (5.5 bars)
Bottle capacity: 0.75L (25.4 FL. OZ.)
❍Do not use the appliance if
either the power cord, the
bottle or the appliance is
damaged.
❍Use indoors at room
temperature only.
❍Do not use if the water does not
flow smoothly or the system is
plugged or jammed for any
reason.
❍Do not let children or persons
with reduced mental or sensory
abilities or limited knowledge
and experience use the
appliance, unless they are
supervised or have been
instructed in the use of the
appliance by a person who is
responsible for their safety.
❍Supervise children to ensure
that they do not play with the
appliance.
CAUTION!
❍In the event of malfunction,
unplug the appliance
immediately.
❍To avoid potential hazards,
repairs such as replacing a
damaged cord should only be
performed by our service
personnel.
❍Never immerse the appliance or
the power cord in water.

E3
E3
6
7
8a
8
8b
1
5b
5a
5
2
4
3
3b
3a
2
3
Description of main parts
1. Start Button
2. Appliance Bottom Cap
3. Removable Cup
3a) Carbonation Chamber
3b) Flavor Chamber
4. Appliance Top Cap
5. Bottle Holder
5a) Top Spigot
5b) Bottom Spigot
6. Housing
7. Power Cord
8. Bottle
8a) Bottle Top Cap
8b) Bottle Bottom Cap

E4
E4
4
1
5
7 8 9
20s
6
4
3
2
First Use: Rinse Your Appliance and Bottle
Follow these steps to rinse your Appliance and Bottle and to prepare them for first use
1. Plug the Power Cord into the electrical socket
2. Open the Appliance Bottom Cap by turning it
counter-clockwise one full rotation.
3. Remove the Removable Cup by grabbing the middle wall
between the Chambers and pulling up. Rinse the
Removable Cup with tap water at your sink and fill the
Flavor Chamber with cold water.
NOTE: Do not place a carbonator in the Carbonation
Chamber during a rinse cycle, it is not required.
4. Re-insert the Removable Cup in the appliance by pushing
down on the wall between the Chambers. Close the
Appliance Bottom Cap by turning the Appliance Bottom
Cap clockwise one full rotation.
5. Rinse and completely fill the Bottle with cold water and
close the Bottle with the Bottle Caps.
6. Turn the Appliance Top Cap counterclockwise one-quarter
turn to lift the Top Spigot and allow the Bottle to be
inserted. Place the bottle in the Bottle Holder on the
Appliance. Turn the Appliance Top Cap clockwise
one-quarter turn to attach the full Bottle to the Appliance.
This will light up the Start Button.
7. Push the lit Start Button
8. Allow the cycle run for at least 20 seconds to rinse the
entire system. After 20 seconds, turn the Top Cap
clockwise one quarter turn to stop the Appliance.
9. Remove the Bottle and Removable Cup and rinse them in
your sink.

E5
E5
5
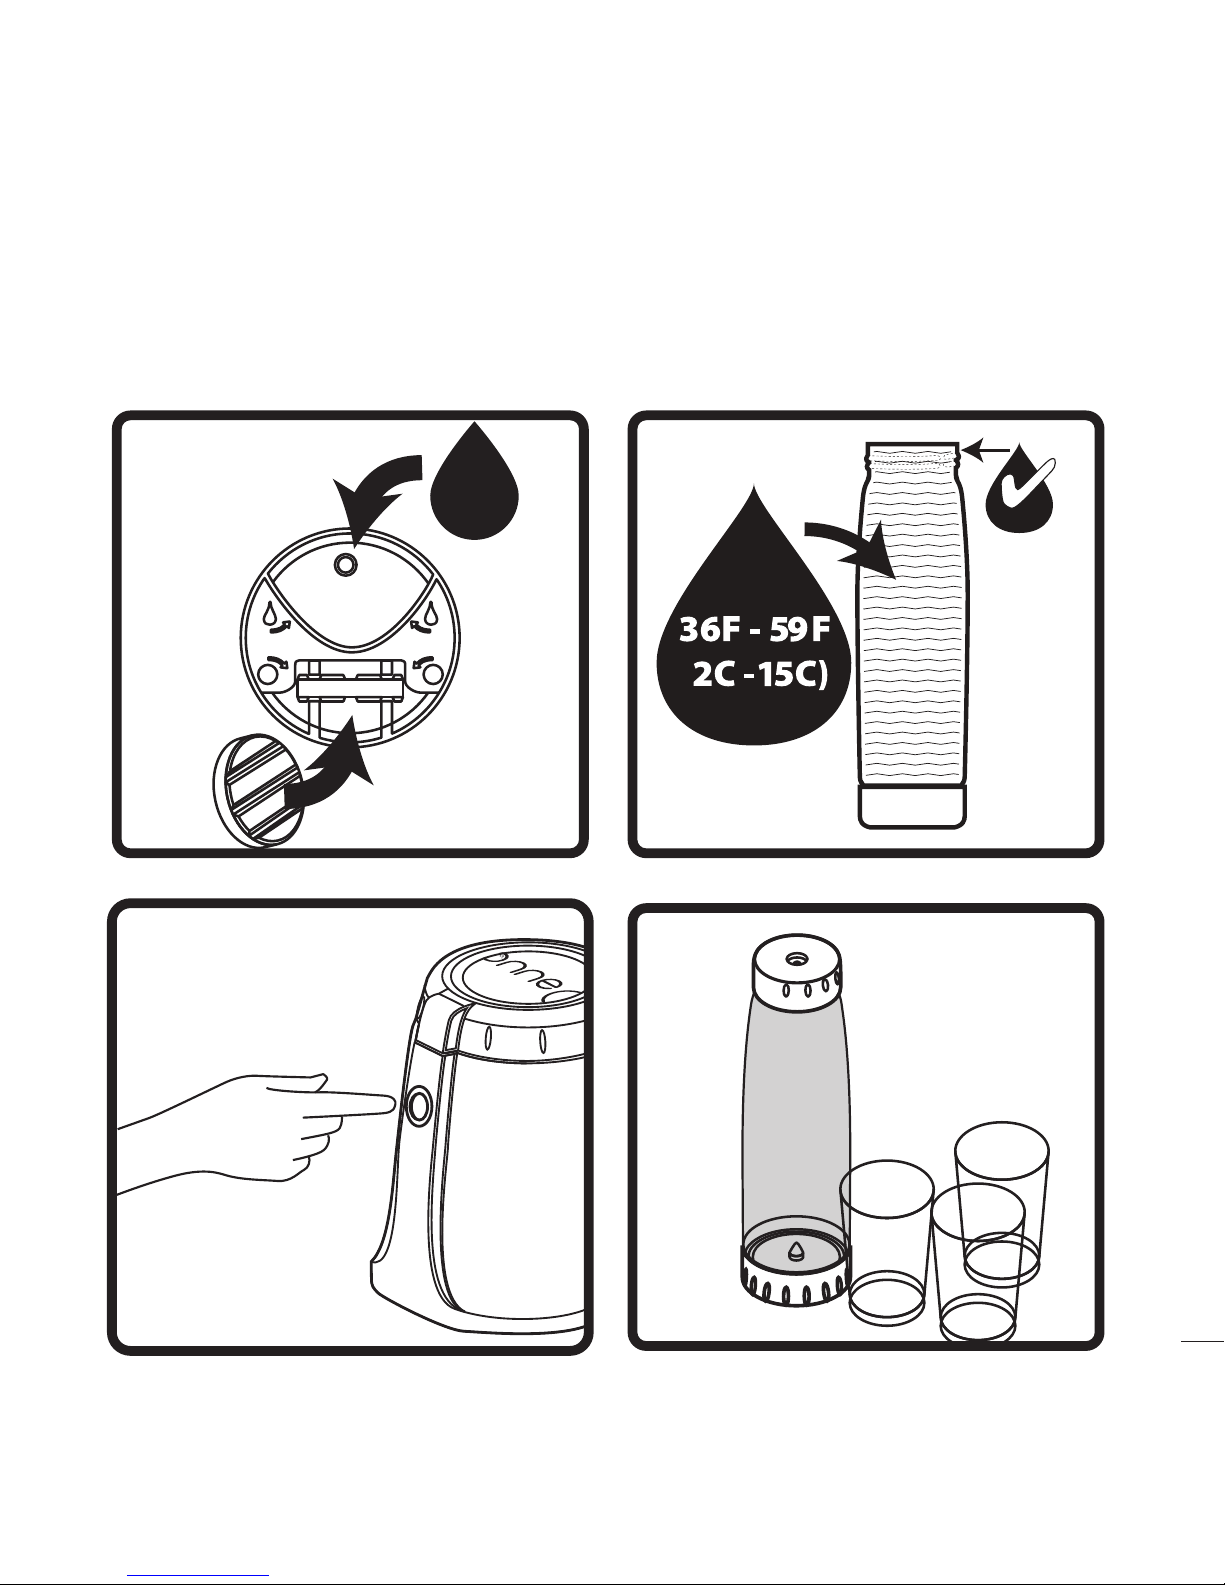
How to Use – Making Sparkling Drinks
1. Prepare the Flavor Chamber and Carbonation
Chamber for drink making.
a) Open the Appliance Bottom Cap by turning it
counter-clockwise one full rotation
b) Fill the Flavor Chamber with cold water or a flavored syrup
TIP: The Flavor Chamber must be filled with water or flavor
every time you make a drink.
WARNING: Only liquids may be placed in the Flavor Chamber,
powders and solids in the flavor chamber may block the
inner tubing and render your Appliance unusable
WARNING: Thick or viscous syrups (e.g., a molasses-like
consistency) should not be used in the appliance as they
will not flow though the Appliance. Thick syrups can be
warmed to room temperature (no warmer than room
temperature) or diluted with water to make less thick.
d) Place a maximum of ONE carbonator in the Carbonation
Chamber
e) Close the Bottom Cap by turning the Bottom Cap clockwise
one full rotation
2. Prepare the Bottle for drink making.
a) Completely fill the Bottle with chilled, very cold water and
ensure both Bottle Caps are closed.
TIP: Using cold water between 36F-41F (2C-5C) is
recommended. Using water that is warmer than 50F (10C)
may result in poor carbonation. Using water that is greater
than 59F (15C) will result in the machine sensor ceasing
operations and issuing a warning tone. To rapidly drop the
water temperature, add a few ice cubes to the bottle prior
to carbonation.
WARNING: Your Appliance has been optimized to work with
cold water either directly from the tap or filtered water from
a water-filter pitcher kept in the fridge. Do not carbonate
already carbonated water or mineral water. Carbonating
already carbonated water will not increase the overall
carbonation level and some minerals may interfere with the
carbonation process.
b) Optionally add a few pieces of fruit, herbs or spices into the
Bottle as well.
c) Turn the Appliance Top Cap counterclockwise one-quarter
turn to lift the Top Spigot and allow the Bottle to be inserted
and place the Bottle in the Bottle Holder on the Appliance
d) Turn the Appliance Top Cap clockwise one-quarter turn to
attach, tap and seal the full Bottle to the Appliance and to
light up the Start Button
3. Push the lit Start Button
a) Watch as your beverage is created over a three minute
cycle until two chimes are heard
4. Enjoy and share your carbonated beverage!
a) After the two chimes are heard, turn the Appliance Top Cap
clockwise one quarter turn to release the sealed Bottle and
to automatically begin releasing the residual system
pressure
b) If the bottle is difficult to open, press the vent in the center
of the Top Bottle Cap before opening.
c) Allow the Appliance to automatically release the residual
system pressure in a slow, controlled manner.
d) Once the residual pressure has been released open the
Appliance Bottom Cap, remove the Removable Cup and
fully rinse the Removable Cup in the sink before making
your next beverage
NOTE: It will take about 30 seconds after the Bottle is released
to release the residual system pressure, you will be able to
hear a gentle hissing sound at the top of the Appliance
during this time.
WARNING: There is a safety lock that locks the Appliance
Bottom Cap closed until the residual system pressure is
released. Do not try to open the Appliance Bottom Cap
until the residual system pressure is released. Forcing the
Appliance Bottom Cap open prior to residual system
pressure being released will likely damage your appliance.
E6
E6
1 2
3 4
6

E7
E7
7
Care and Maintenance: Appliance and Bottle
• Periodic Rinse Cycles
❍The rinsing steps outlined previously should be done
every week or two - to rinse your Appliance and Bottle
to keep beverages flavors fresh and clean.
❍A rinse cycle is recommended if you want to make a
lighter flavor beverage such as sparkling water after
making a heavier flavored beverage such as a cola.
❍Rinse your Appliance and Bottle using clean water in
the Flavor Chamber. Alternatively, a naturally acidic
cleaning solution is 1 part unsweetened lemon juice
to 5 parts water can be used in the Flavor Chamber.
• Storing Your Appliance Between Uses
❍When you store your Appliance between uses make
sure the Removable Cup and the area under the
Removable Cup in the Appliance are completely dry
before reinserting
NOTE: Storing a wet Removable Cup or with wetness in
the area under the Removable Cup in the Appliance
with a closed Appliance Bottom Cap may result in a
stale smell in the Flavor and Carbonation Chambers
and will necessitate rinsing the Appliance with
naturally acidic cleaning solution before use, as
outlined above
• Handwash Your Appliance
❍The Removable Cup and Appliance Bottom Cap should
be hand washed in warm, soapy water. Rinse well to
avoid any soap flavors or soap bubbles.
WARNING: The Appliance Bottom Cap and Removable
Cup are not dishwasher safe. Washing these parts in
the dishwasher will reduce their useful life and
invalidate your Bonne O warranty.
❍Always unplug the Appliance before cleaning. Never
immerse the appliance in water or other liquids. Do
not use a steam cleaner. Never use abrasive cleaners
or sharp tools to clean.
❍Wipe the exterior of the appliance with a soft damp
cloth. Wipe spills in the bottle holder to keep the bottle
holder clean and dry.
• Dishwasher Safe Bottle
❍Your Bonne O Bottle and its Caps are dishwasher safe
or may be washed by hand.
❍To wash, remove the Bottle Top Cap and the Bottle
Bottom Cap from the Bottle and place all three (3)
parts in the dishwasher on the top rack away from the
dishwasher heat sources which are often located in
the bottom of the dishwasher.
WARNING: Placing the Bottle or Bottle Caps close to a
high heat source in your dishwasher can lead to them
being damaged by heat and reduce their useable life.

E8
E8
8
Trouble Shooting
Problem Possible Cause Solution
Appliance is not
working, Start Button
not lit.
There is no power
supply
Check that Appliance is properly plugged into the power supply
If water greater than 59F (15C) is sensed, it will be rejected by the system as too warm.
Using water between 36F-41F (2C-5C) is recommended. Using water that is warmer
than 50F (10C) may result in poor carbonation. Use refrigerator chilled water or add a
few ice cubes to the bottle prior to carbonation to rapidly drop the water temperature.
The Bottle must be completely filled to the rim for the system to run.
Bottle is not attached
to appliance.
The Bottle must be attached to the system to light up the Start Button. To attach the
Bottle, place the Bottle in the Bottle Holder and turn the Appliance Top Cap one-quarter
turn clockwise.
After pushing the Start
Button a single long
chime is heard, the
start button flashed
and the Appliance
stops.
Water is too warm
Bottle is not filled
No water or flavor in
Flavor Chamber
The Flavor Chamber must be filled with flavor or water for the system to run. If you are
creating sparkling water or a fruit infusion, fill the Flavor Chamber with water. If
creating a flavored beverage, fill the Flavor Chamber with liquid flavor such as a syrup.
Using water between 36F-41F (2C-5C) is recommended, using water that is warmer
than 50F (10C) may result in poor carbonation. Add a few ice cubes to the bottle prior
to carbonation to rapidly drop the water temperature. Use refrigerator chilled water or
add a few ice cubes to the Bottle prior to carbonation to rapidly drop the water
temperature. The Appliance will operate with a few ice cubes in the Bottle.
Carbonation is lighter
than expected
Water is too warm
Tighten the Top Bottle Cap and Bottom Bottle Cap sufficiently to seal the Bottle.Water is exiting the
bottle.
Bottle Caps are not
tightened
Pressure was not
maintained –
Appliance Bottom Cap
unsealed
The system must be completely sealed in order to maintain system pressure and fully
carbonate your beverage. When the system operates you will hear a hissing sound
from the Appliance Bottom Cap if it is not fully sealed. Ensure that the Appliance
Bottom Cap is completely closed by lining up Appliance Bottom Cap nose with the
matching appliance nose. Wipe the sealing area to clean any grains of dirt or solid
material that is impeding a completely sealed Appliance Bottom Cap.
Pressure was not
maintained – Bottle
unsealed
The system must be completely sealed in order to maintain system pressure and fully
carbonate your beverage. When the system operates you will hear a hissing sound
from the Top Bottle Cap or leaking from the Bottom Bottle Cap if it is not fully sealed.
Tighten the Top Bottle Cap and Bottom Bottle Cap sufficiently to seal the bottle. Clean
any wet areas prior to operating the system again.
Bottle is damaged
Do not use carbonating Bottles that have changed shape, as this indicates the bottle is
damaged. DO NOT use a Bottle that is scratched, worn, discolored or damaged in any way.

E9
E9
9
Trouble Shooting
Problem Possible Cause Solution
Appliance Bottom Cap
will not close
Closure threads are
not lined up
The Appliance Bottom Cap is a screw cap, like found on most common bottles, but it is
very wide. The closure threads must be aligned to turn and close.
Sometimes you will need to wait for the bubbles to settle down or to open the drink
slowly over the sink. Next time consider using less fruit, herbs or spice. Remove the
peel from oranges to reduce the bubbles
Carbonator has been
placed in Flavor
Chamber
The Flavor Chamber is designed to not allow the carbonator to fit in it, thereby
impeding the Appliance Bottom Cap when closing. Do not place the carbonator in the
Flavor Chamber. Move the carbonator to the Carbonation Chamber.
When Bottle is
opened, bubbles and
beverage foams over
Fruit, herb and spice
infusions create many
bubbles
Carbonation cycle is
complete and the
Appliance Bottom Cap
will not Open.
After the carbonation cycle, you must turn the Appliance Top Cap one quarter turn
counter-clockwise to release the Bottle and to release the residual system pressure.
Releasing the residual system pressure takes about 30 seconds and a hissing sound
will be heard near the Appliance Top Cap. When the residual system pressure is
released, the Appliance Bottom Cap should be turned one full turn counter-clockwise
to open.
If the residual system pressure is not released when the Appliance Top Cap has been
turned one-quarter counter-clockwise turn, the residual system relief valve may be
defective. The system pressure may be manually released by pressing the Appliance
Bottom Spigot after the Bottle has been removed; however this issue may recur. If it
recurs please contact Bonne O Customer Service to address the problem. Visit
www.bonneo.com/warranty for instructions.
Appliance Bottom Cap
will not Open
Carbonation cycle is
complete, the Bottle is
released and the
Appliance Bottom Cap
will not Open.
Appliance was closed
with water and/or
syrup residue when
the Appliance Bottom
Cap was closed.
Rinse your Appliance and Bottle using a naturally acidic cleaning solution. One
suggestion is to use 1 part unsweetened lemon juice to 5 parts water in the Flavor
Chamber. Follow the directions in “First Use: Rinse Your Appliance and Bottle” from
these instructions and in the Quick Start Guide. Also wipe the area under the
Removable Cup and the Removable Cup with this solution.
Press the valve in the center of the Bottle Top Cap. This will release some pressure.
The Top Bottle Cap should now open more easily.
Removable Cup
smells stale when
Appliance Bottom Cap
is opened
Pressure is making
the top cap difficult to
turn.
Bottle will not open

E10
10
Bonne O International Inc. (Bonne O) warrants that your Appliance will be free from defects in materials or workmanship under
normal home use for one year from the date of purchase. It is recommended that you go to www.bonneo.com/warranty and
register for this warranty so that your purchase information will be recorded in our system. Bonne O will, at its option, repair
or replace the Appliance without charge upon its receipt of proof of date of purchase. If a replacement Appliance is necessary
to service this warranty, the replacement Appliance may be new or reconditioned. If a replacement Appliance is sent, a new
limited one year warranty will be applied to the new Appliance.
This warranty only applies to Appliances operated in the United States and Canada. This warranty gives you specific legal
rights, and you may also have other rights that vary from state to state and, in the case of Canada, from province to province.
What is not covered by the Limited Warranty?
THIS WARRANTY DOES NOT COVER GENERAL LIABILITY, OR DIRECT, SPECIAL, CONSEQUENTIAL OR INCIDENTAL DAMAGES
TO PROPERTY OR TO PERSONS RESULTING FROM THE USE OF OR INABILITY TO USE THE APPLIANCE, AND DOES NOT
COVER INCIDENTAL COSTS RESULTING FROM ANY BREACH OF THIS WARRANTY, EVEN IF FORESEEABLE. Some states or
provinces do not allow the exclusion or limitations of incidental or consequential damages, so the above limitation or exclusion
may not apply to you depending upon the state or province of purchase.
Nor does this warranty cover damages caused by services performed by anyone other than Bonne O or its authorized service
providers, use of parts other than genuine Bonne O parts, or external causes such as abuse, misuse, inappropriate power
supply or acts of God.
Other Limitations
THIS WARRANTY IS EXCLUSIVE AND IN LIEU OF ANY OTHER EXPRESS WARRANTY, WHETHER WRITTEN OR ORAL. IN
ADDITION, BONNE O HEREBY SPECIFICALLY DISCLAIMS ALL OTHER WARRANTIES WITH RESPECT TO YOUR CARBONATED
AND MIXED DRINK APPLIANCE, INCLUDING ANY IMPLIED WARRANTY OF MERCHANTABILITY OR FITNESS FOR ANY OTHER
PARTICULAR PURPOSE. Some states or provinces do not allow disclaimers of such implied warranties or limitations on how
long an implied warranty lasts, so the above limitation may not apply to you depending upon the state or province of purchase.
How do you obtain warranty service?
Bonne O Appliances are high quality appliances and, with proper care, are intended to provide years of satisfying performance.
However, should the need arise for warranty servicing, contact Bonne O through www.bonneo.com/warranty.
Do not return your Appliance for servicing without first communicating with Bonne O Customer service to obtain an
Authorization to Return (ATR) number. Bonne O Appliances returned without an ATR number will be returned to the sender
without servicing and at the sender’s sole cost and expense.
Bonne O International, 12 Upjohn Road, Unit 6, Toronto, ON, Canada M3B 2V9
www.bonneo.com/warranty
Limited One Year Warranty
Thank you for choosing Bonne O.
The power of customization and creativity is in your hands.
“I hope your family shares and enjoys your Bonne O
creations as much as we do. My wife and I create
healthy sparkling beverages for ourselves, make soda
alternatives for our daughters and put on a show with
party cocktails when entertaining. We look forward to
hearing what you create!”
- Darren Hatherell, Inventor
Table of contents
Popular Kitchen Appliance manuals by other brands


emerio
emerio KM-122340.1 instruction manual

Royal Catering
Royal Catering RCWC-01 user manual

Marta
Marta MT-1952 user manual

Holstein Housewares
Holstein Housewares HU-09018 manual

Summit Classic Collection
Summit Classic Collection CL24WC2 owner's manual

Linea 2000
Linea 2000 Domo My Vegetable DO9165SP Instruction booklet