Bonnet B1A9S+50EBE User manual

ADVANCIA
BRATT PANS
GAS & ELECTRIC
MANUFACTURERS INSTRUCTIONS
Part A: Technical characteristic
Part B: Installation manual
- WARNING -
•
The installation and any subsequent work should be undertaken by approved
personnel and in compliance with current standards and regulations.
•
Anyone modifying this equipment assumes complete responsibility for it.
•
These units should only be used in a well ventilated environment
•
Read these instructions carefully before installation.
•
It is vital that these units remain on their pallets whilst being moved and until they
are in their final location.
3BE390845NI

Page 2 3BE390845NI – 01/12
BONNET GRANDE CUISINE
Registered office:
Rue des Frères Lumière - Z.I Mitry Compans
F-77292 MITRY MORY Cedex
CONTENTS
BRATT PANS
GAS & ELECTRIC
A) TECHNICAL CHARACTERISTICS……..........................................................
2
B) TECHNICAL DATA SHEETS FOR THE INSTALLATION ENGINEER
1 DATA PLATES........................................................................................................................................4
1.1
GAS BRATT PAN .................................................................................................................................................4
1.2
SAUTEUSE ELECTRIQUE...................................................................................................................................5
2 INSTALLATION: GENERAL ...................................................................................................................6
2.1
GENERAL REQUIREMENTS...............................................................................................................................6
2.2
HANDLING............................................................................................................................................................6
2.3
UNPACKING.........................................................................................................................................................6
2.4
LEVELLING...........................................................................................................................................................6
3 INSTALLATION: LOCATING.................................................................................................................. 7
3.1
ASSEMBLING UNITS CANTILEVERED OFF A WALL .......................................................................................7
3.1.1
FREE STANDING UNITS.............................................................................................................................7
3.1.2
CANTILEVERED...........................................................................................................................................9
3.2
ASSEMBLING UNITS ON INDIVIDUAL LEGS ..................................................................................................11
3.3
ASSEMBLING UNITS ON A CONCRETE PLINTH............................................................................................12
4 INSTALLATION: CONNECTIONS ........................................................................................................ 14
4.1
ELECTRICAL CONNECTION.............................................................................................................................14
4.1.1
GAS BRATT PANS.....................................................................................................................................14
4.1.2
ELECTRIC BRATT PANS...........................................................................................................................15
4.2
GAS CONNECTION ...........................................................................................................................................16
4.3
WATER CONNECTION......................................................................................................................................17
5 CHANGING FROM ONE TYPE OF GAS TO ANOTHER ...................................................................... 18
5.1
LIST OF AUTHORISED GASES / PRESSURES PER CATEGORIES & COUNTRIES......................................18
5.2
CHANGING FROM ONE GAS TO ANOTHER...................................................................................................19
5.3
GAS FLOW RATES AND POWER.....................................................................................................................20
5.4
TABLE OF JETS and air adjustments................................................................................................................20
5.4.1
ADVANCIA BRATT PANS (45, 50 & 65 dm
2
).............................................................................................21
5.4.2
ADVANCIA PLUS BRATT PANS(50 & 75 dm
2
) .........................................................................................23

Page 3 3BE390845NI – 01/12
BONNET GRANDE CUISINE
Registered office:
Rue des Frères Lumière - Z.I Mitry Compans
F-77292 MITRY MORY Cedex
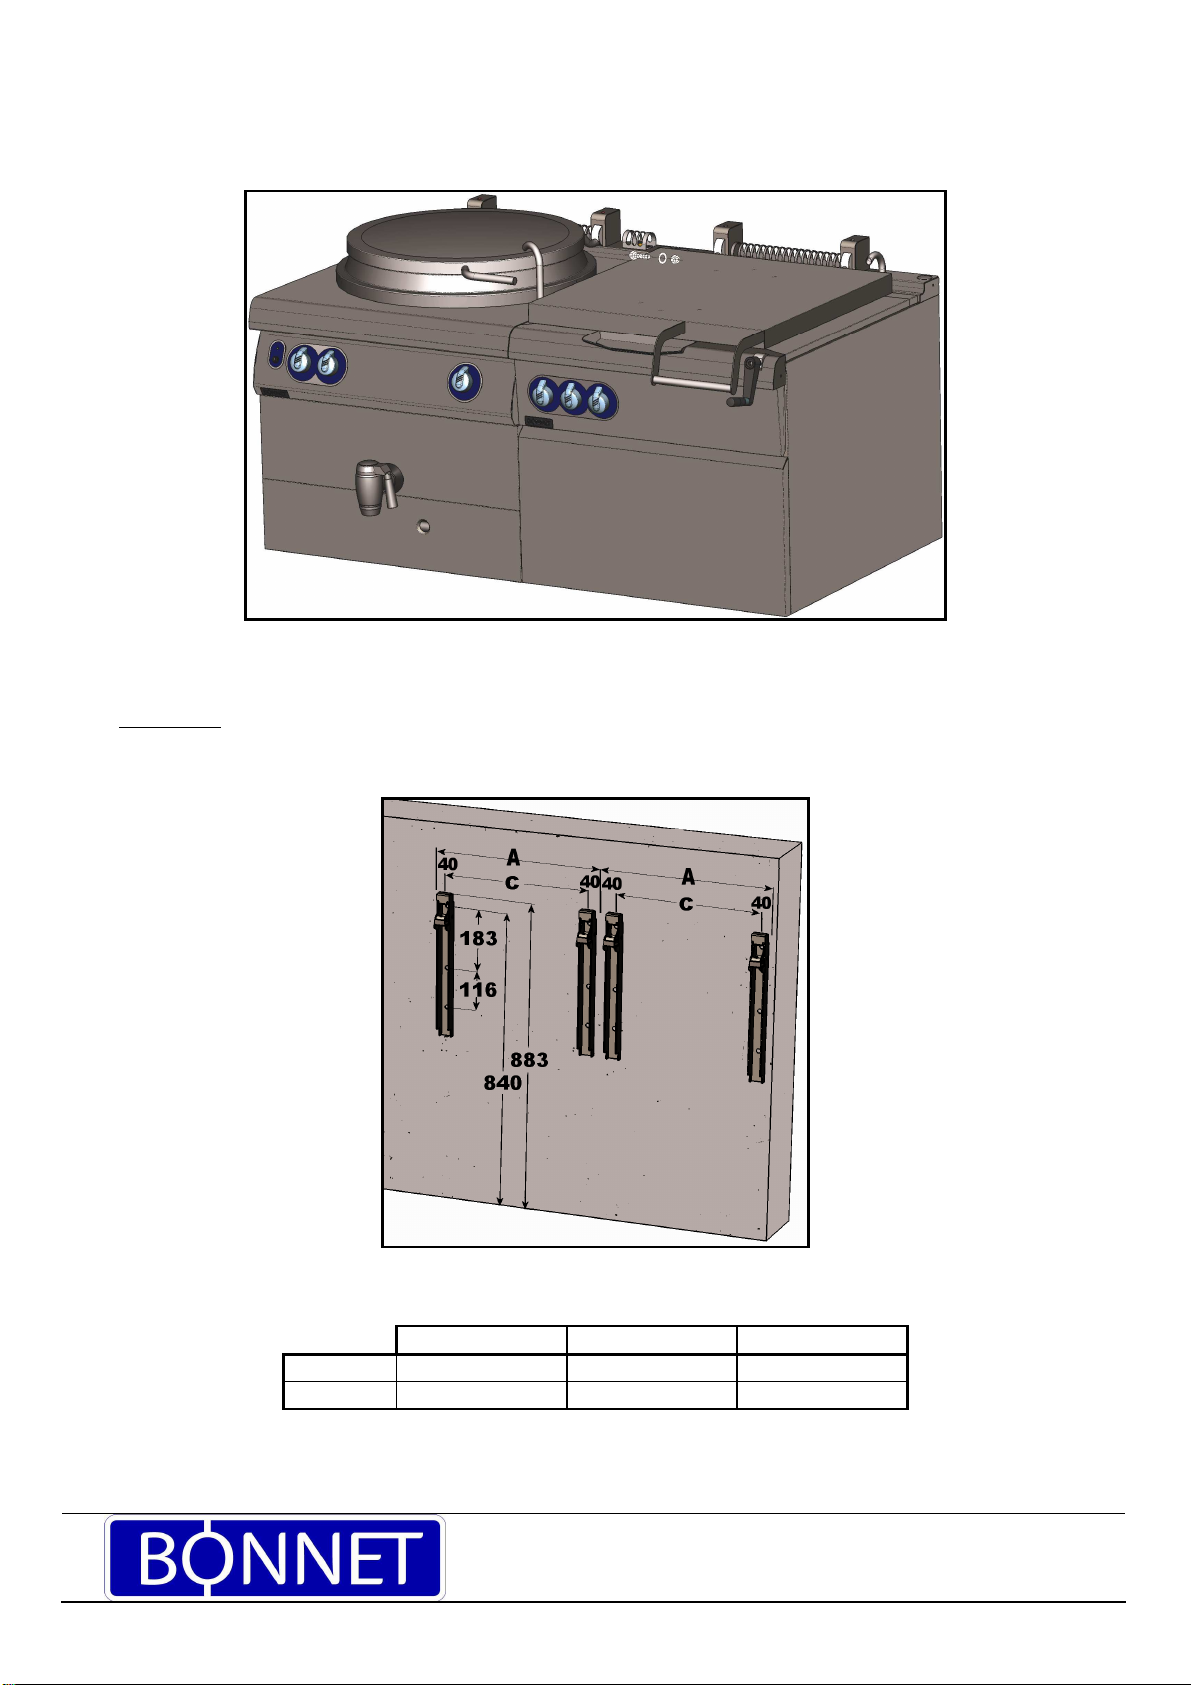
A: TECHNICAL CHARACTERISTICS
Gas flow
Dimension
CODE Designation U Lib KwE
kW Imax
AKwG
kW G31 37/50
Kg/h G30 28/50
Kg/h G30 28/30
Kg/h G30 50
Kg/h G20 20
m3/h G25 20
m3/h G25 25
m3/h
Profondeur /
Depth
mm
Largeur /
Width
mm
Hauteur /
Height
mm
B1A9S+50EBE 900: Bratt Pan Plus 50dm² Elec.Tilt (Elec) 230 3a.c. 13,50 33,90 0,00 0 0 0 0 0 0 0 1017 1200 1015
B1A9S+50EBE
900: Bratt Pan Plus 50dm² Elec.Tilt (Elec)
400
3Na.c.
13,50
19,60
0,00
0 0 0 0 0 0 0 1017 1200 1015
B1A9S+50EBG 900: Bratt Pan Plus 50dm² Elec.Tilt (Gas) 230 a.c. 0,30 1,30 25,00 1,94 0 0 1,97 2,65 3,01 3,01 1017 1200 1015
B1A9S+50EDE 900: Bratt Pan Plus 50dm² Elec.Tilt Top (Elec) 230 3a.c. 13,50 33,90 0,00 0 0 0 0 0 0 0 1017 1200 680
B1A9S+50EDE
900: Bratt Pan Plus 50dm² Elec.Tilt Top (Elec)
400
3Na.c.
13,50
19,60
0,00
0 0 0 0 0 0 0 1017 1200 680
B1A9S+50EDG
900: Bratt Pan Plus 50dm² Elec.Tilt Top (Gas)
230
a.c.
0,30
1,30
25,00
1,94 0 0 1,97 2,65 3,01 3,01 1017 1200 680
B1A9S+75EBE 900: Bratt Pan Plus 75dm² Elec.Tilt (Elec) 400 3Na.c. 20,25 29,30 0,00 0 0 0 0 0 0 0 1017 1600 1015
B1A9S+75EBG
900: Bratt Pan Plus 75dm² Elec.Tilt (Gas)
230
a.c.
0,30
1,30
34,00
2,64 2,68 0 0 3,6 4,09 4,09 1017 1600 1015
B1A9S+75EDE
900: Bratt Pan Plus 75dm² Elec.Tilt Top (Elec)
400
3Na.c.
20,25
29,30
0,00
0 0 0 0 0 0 0 1017 1600 680
B1A9S+75EDG 900: Bratt Pan Plus 75dm² Elec.Tilt Top (Gas) 230 a.c. 0,30 1,30 34,00 2,64 2,68 0 0 3,6 4,09 4,09 1017 1600 680
B1A9SA45EBG 900: Bratt Pan 45dm² Elec.Tilt (Gas) 230 a.c. 0,30 1,30 16,70 1,59 0 0 1,62 2,17 2,46 2,46 1017 800 1014
B1A9SA45EBG
900: Bratt Pan 45dm² Elec.Tilt (Gas)
230
a.c.
0,30
1,30
20,50
1,59 0 0 1,62 2,17 2,46 2,46 1017 800 1014
B1A9SA45MBE 900: Bratt Pan 45dm² Manual Tilt (Elec) 230 3a.c. 13,50 33,90 0,00 0 0 0 0 0 0 0 1017 800 1014
B1A9SA45MBE 900: Bratt Pan 45dm² Manual Tilt (Elec) 400 3Na.c. 13,50 19,60 0,00 0 0 0 0 0 0 0 1017 800 1014
B1A9SA45MBG
900: Bratt Pan 45dm² Manual Tilt (Gas)
230
a.c.
0,10
0,40
16,70
1,59 0 0 1,62 2,17 2,46 2,46 1017 800 1014
B1A9SA45MBG
900: Bratt Pan 45dm² Manual Tilt (Gas)
230
a.c.
0,10
0,40
20,50
1,59 0 0 1,62 2,17 2,46 2,46 1017 800 1014
B1A9SA50EBE 900: Bratt Pan 50dm² Elec.Tilt (Elec) 230 3a.c. 13,50 33,90 0,00 0 0 0 0 0 0 0 1017 1000 1014
B1A9SA50EBE
900: Bratt Pan 50dm² Elec.Tilt (Elec)
400
3Na.c.
13,50
19,60
0,00
0 0 0 0 0 0 0 1017 1000 1014
B1A9SA50EBG
900: Bratt Pan 50dm² Elec.Tilt (Gas)
230
a.c.
0,30
1,30
20,00
1,94 0 0 1,97 2,65 3,01 3,01 1017 1000 1014
B1A9SA50EBG 900: Bratt Pan 50dm² Elec.Tilt (Gas) 230 a.c. 0,30 1,30 25,00 1,94 0 0 1,97 2,65 3,01 3,01 1017 1000 1014
B1A9SA50MBG 900: Bratt Pan 50dm² Manual Tilt (Gas) 230 a.c. 0,10 0,40 20,00 1,94 0 0 1,97 2,65 3,01 3,01 1017 1000 1014
B1A9SA50MBG
900: Bratt Pan 50dm² Manual Tilt (Gas)
230
a.c.
0,10
0,40
25,00
1,94 0 0 1,97 2,65 3,01 3,01 1017 1000 1014
B1A9SA65EBE 900: Bratt Pan 65dm² Elec.Tilt (Elec) 400 3Na.c. 20,25 29,30 0,00 0 0 0 0 0 0 0 1017 1200 1014
B1A9SA65EBG 900: Bratt Pan 65dm² Elec.Tilt (Gas) 230 a.c. 0,30 1,30 24,50 2,25 0 0 2,29 3,07 3,49 3,49 1017 1200 1014
B1A9SA65EBG
900: Bratt Pan 65dm² Elec.Tilt (Gas)
230
a.c.
0,30
1,30
29,00
2,25 0 0 2,29 3,07 3,49 3,49 1017 1200 1014

Page 4 3BE390845NI – 01/12
BONNET GRANDE CUISINE
Registered office:
Rue des Frères Lumière - Z.I Mitry Compans
F-77292 MITRY MORY Cedex
1 DATA PLATES
1.1 GAS BRATT PAN
The data plates are stuck to the upper part of thecontrol panel (see diagram below).
In any correspondence about your equipment, please indicate:
- The model number (Model.)
- The serial number (Fab.Nr.)
- The date (Date).
Data plate
Gas setting plate
The box marked with a cross indicates the gas for which
the appliance has been adjusted
A second adjacent plate indicates:
- The gas that the unit is set up for
- The intended destination.
Country of destination
Advancia bratt pan
Advancia Plus bratt pan
Location of data plates Location of data plates

Page 5 3BE390845NI – 01/12
BONNET GRANDE CUISINE
Registered office:
Rue des Frères Lumière - Z.I Mitry Compans
F-77292 MITRY MORY Cedex
IN CASE OF A CHANGE OF GAS (See Section: Changing the appliance from one gas to
another). Modify this plate, and indicate the new gas to be used.
Fill in the "Pays" zone with the name of the country where the appliance is installed.
NOTE: Both the gas and pressure for which the appliance is set must be authorised in the
country in question. Check this point in the section: Changing the appliance from one gas to
another.
1.2 ELECTRIC BRATT PAN
The data plate is stuck to the upper part of the control panel (see diagram below).
In any correspondence about your equipment, please indicate:
- The model number (Model.)
- The serial number (Fab.Nr.)
- The date (Date).
Data plate
Advancia bratt pan
Advancia Plus bratt pan
Location of data plate Location of data plate

Page 6 3BE390845NI – 01/12
BONNET GRANDE CUISINE
Registered office:
Rue des Frères Lumière - Z.I Mitry Compans
F-77292 MITRY MORY Cedex
2 INSTALLATION: GENERAL
NATURE AND POSITION OF CONNECTIONS
See "Technical characteristics" at the beginning of these instructions.
2.1 GENERAL REQUIREMENTS
Only a qualified engineer should carry out the installation, modification or repair of the appliance in
a workmanlike manner.
These appliances must be installed with sufficient ventilation to prevent the formation of excessive
concentrations of noxious substances that are hazardous to health in the area in which they are
installed.
The appliance is of TYPE A (not connected to an exhaust duct for combustion products – gas
appliance).
The equipment is not designed to work in an explosive atmosphere. Accordingly it must not be
installed in an area subject to an ATEX directive
The required flow rate of new air for combustion is 2 m
3
/h per kW of heat release rate (gas
appliance).
The appliances must be installed according to EN 1717 and any local and national regulations in
force relating to water.
These units should only be placed against a wall or a partition. This must be of non-combustible
materials or, if not, must be covered with an appropriate, good insulating and non-combustible
material.
The manufacturer certifies that the packaging meets the provision 94/62/CE (relating to packaging
and packaging waste of 20.12.94) and requests that the final installer (or user) observes the rules
relating to the removal of the packaging (recycling or reuse).
2.2 HANDLING
The appliance should only be handled with suitable lifting equipment.
Should the appliance need to be transported, this must be on its original pallet and it must not be
stacked on other appliances under any circumstances.
If the appliance is to be moved without its pallet, it should be carried and not pulled.
2.3 UNPACKING
Before installation, remove the strapping from the appliance. The individual parts are not bolted down.
Remove the protective plastic film from all stainless steel parts before heating.
2.4 LEVELLING
The appliance is levelled by means of its adjustable legs (20mm spanner). The base of the well must be
perfectly level to ensure an even distribution of oil across it.

Page 7 3BE390845NI – 01/12
BONNET GRANDE CUISINE
Registered office:
Rue des Frères Lumière - Z.I Mitry Compans
F-77292 MITRY MORY Cedex
3 INSTALLATION: LOCATING
3.1 ASSEMBLING UNITS CANTILEVERED OFF A WALL
3.1.1 FREE STANDING UNITS
Drilling plan
892
16
212 131
400 800 1000 1200
41 4141 4141 4141 41
100 100
200 100 200 200 200 100100 200 200 200 200 100100 200 200 200 200 200 100
1118918718318
15 385 400 400 400 200 400 400 400 385 15
902
The fixing brackets must be able to support a force of 4000 N/m (2 brackets for units that are 400, 600,
800, 1000, 1200 or 1400 wide).
It is advisable, when cantilevering equipment off a concrete wall to comply with the following points:
* The reinforced concrete should be of at least 30 N/mm2 (C20/25) standard
* Use HSA-R M 8 x 75mm rawlbolts or equivalent (2 for cooking tops and 6 for ranges).
* For the rawlbolts mentioned above the hole for each should be 8mm diameter and at least 65mm
deep.
Procedure
- Fit the lower support beam to the wall.
Note: This beam must be level.
- Fix the sheet template supplied to the wall with two 5mm Ø screws. Ensure it is level.
902
212 131

Page 8 3BE390845NI – 01/12
BONNET GRANDE CUISINE
Registered office:
Rue des Frères Lumière - Z.I Mitry Compans
F-77292 MITRY MORY Cedex
- Drill through 5mm ∅holes for the fixing brackets. Use the top holes (2 fixing brackets per unit).
Note: Where it isn’t possible to drill through the top holes (Service runs, wall reinforcing...) use the
bottom holes.
- Remove the template.
- Enlarge the fixing bracket holes to 8mm ∅and to a depth of at least 65mm.
- Bolt the fixing brackets to the wall. Use HSA-R M 8 x 75mm rawlbolts or equivalent.
- Open the brackets to their maximum using the central screw
Bracket open
Opening screw
- Position the units on the brackets and tighten the brackets fully.
Note: The units should rest on the support beam
Support
beam
Bracket
Fixing bolt

Page 9 3BE390845NI – 01/12
BONNET GRANDE CUISINE
Registered office:
Rue des Frères Lumière - Z.I Mitry Compans
F-77292 MITRY MORY Cedex
- Fix adjacent units together, at the rear through the sides of the flue vents using 5 x 16mm setscrews and
5mm washers
3.1.2 CANTILEVERED
Procedure
- The wall brackets must be solidly fixed to the wall in the positions indicated below.
Wall support anchorage point table.
1200 wide 1400 wide 1600 wide
A 1200 1400 1600
C 1120 1320 1520
The fixing brackets must be able to support a force of 4000 N/m (2 brackets for units that are 1200 to
1600).

Page 10 3BE390845NI – 01/12
BONNET GRANDE CUISINE
Registered office:
Rue des Frères Lumière - Z.I Mitry Compans
F-77292 MITRY MORY Cedex
It is advisable, when cantilevering equipment off a concrete wall to comply with the following points:
- The reinforced concrete should be of at least 30 N/mm2 (C20/25) standard
- Use SPIT FIX 12/40 rawl bolts or equivalent (6 for ranges).
- The rawl bolts require a 12mm diameter hole at least 72mm deep (Note: the minimum distance
between the rawl bolt hole and a side wall or corner is 95mm).
- Hook the first unit onto its supports.
- Flatten it against the wall using the adjuster screw in the bracket
- Adjust the height (900mm), and level right to left using the top adjuster.
- Level front to back with the lower adjuster.
- Tighten the nuts and the lock nuts.
- Fit the other units in the same way.
- Fix adjacent units together, at the rear through the sides of theflue vents and at the front through the front
edge, in both cases using 5 x 16mm setscrews and 5mm washers.
Screw to adjust
the distance to
the
wall
Height adjuster
screw
Level adjuster
screw

Page 11 3BE390845NI – 01/12
BONNET GRANDE CUISINE
Registered office:
Rue des Frères Lumière - Z.I Mitry Compans
F-77292 MITRY MORY Cedex
3.2 ASSEMBLING UNITS ON INDIVIDUAL LEGS
- Fix adjacent units together, at the rear through the sides of theflue vents using 5 x 16mm setscrews and 5mm
washers

Page 12 3BE390845NI – 01/12
BONNET GRANDE CUISINE
Registered office:
Rue des Frères Lumière - Z.I Mitry Compans
F-77292 MITRY MORY Cedex
3.3 ASSEMBLING UNITS ON A CONCRETE PLINTH
Dimensions for a wall or central island concrete plinth
Am
Ls
Ac
Wall
Centrally
(side view)(side view)
(front view)
Full tiled base
Lf: Stove width
Stove depth Stove depth Stove depth
Full tiled base Full tiled base Full tiled base
1 cm/m maximum slope 1 cm/m maximum slope 1 cm/m maximum slope
Finished
height with
tiled front
Finished
height with
tiled front
Plinth dimensions
Range
Am
Depth of wall plinth Ac
Depth of central plinth Ls
Plinth length Finished height
tiled to front
Advancia 710 1420 Lf-50 110
A technical compartment is required if the stop cock, isolator or gas regulator is to be located in the
suite.
There are two possible solutions:
1) Neutral unit on a 200 or 400mm technical compartment.
2) 400mm services cupboard with any possible cooking top or neutral unit (but not induction)

Page 13 3BE390845NI – 01/12
BONNET GRANDE CUISINE
Registered office:
Rue des Frères Lumière - Z.I Mitry Compans
F-77292 MITRY MORY Cedex
Assembling units on a concrete plinth
Locate the units on the plinth.
Note: If the units are delivered separately from the legs first fit the ‘espace 2000’ legs to the units.
Connect up the electrics (see paragraph 4 Installation: Connections)
Level everything and connect the units to each other
- Fix together at the rear through the flue vents and at the front through the front edges in both cases
using
HM5
X
16 bolts 5mm
Ø
washer and nut.
Make all the necessary gas water and drainage connections.
Fit the plinth trims. One ‘espace 2000’ front trim per unit and a left and right hand trim according to the order.
- Assemble the trim(s) with 2 screws per junction in accordance with the number of legs.
- Fix the front trim(s)
and
onto the legs (at least two screws per trim).
- Fit the rear pièce
onto the end unit before finally fixing it to the leg with a hex headed nut.
- Fix the left and right hand trims
with 2 screws at the front and one to the rear.
1
24
3
Height
of plinth
at the
front
Appliance
Ventilation
Plinth trims
espace 2000
legs
Services could run
along the front

Page 14 3BE390845NI – 01/12
BONNET GRANDE CUISINE
Registered office:
Rue des Frères Lumière - Z.I Mitry Compans
F-77292 MITRY MORY Cedex
4 INSTALLATION: CONNECTIONS
4.1 ELECTRICAL CONNECTION
Note: these units are fitted with a polarised electronic flame control unit.
Before connecting them ensure neutral is wired to neutral and phase to phase.
4.1.1 GAS BRATT PANS
Advancia type bratt pan Advancia Plus type bratt pan
Location of the earth cross bonding terminal
The electrical connection is below the unit at the front irrespective of model.
- Undo the screw holding the terminal strip support plate.
- Tilt to the left.
- Thread the cable through the gland.
- Tighten the gland.
- Connect the wires.
- Refit the plate.
- Connect the earth cross bonding to the terminal provided.
•Only use H07 RN-F type supply cable 3 x 2.5mm
2
section
A local isolator must be provided for fixed supply wiring. All aspects of the installation should be in
compliance with current local regulations (In France: NFC 15.100).
The appliance must be connected to the earth. Different electric appliances must also be cross
bonded (all metallic structures at the same potential) by means of the terminal provided for this
purpose located next to the cable gland.
The manufacturer accepts no responsibility whatsoever if these instructions are not followed.

Page 15 3BE390845NI – 01/12
BONNET GRANDE CUISINE
Registered office:
Rue des Frères Lumière - Z.I Mitry Compans
F-77292 MITRY MORY Cedex
4.1.2 ELECTRIC BRATT PANS
Advancia type bratt pan Advancia Plus type bratt pan
Location of the earth cross bonding terminal
The electrical connection is below the unit at the front irrespective of model.
- Undo the screw holding the terminal strip support plate.
- Tilt to the left.
- Thread the cable through the gland.
- Tighten the gland.
- Connect the wires.
- Refit the plate.
- Connect the earth cross bonding to the terminal provided.
•Only use H07 RN-F type supply cable sized to suit the load of the unit as defined in the table below.
(see chapter 1 « technical characteristics » which give the electrical rating).
Intensity (A) Cable section (mm²)
0.1 to 16 2.5
16 to 25 4
25 to 40 6
40 to 63 10
63 to 96 16
A local isolator must be provided for fixed supply wiring. All aspects of the installation should be in
compliance with current local regulations (In France: NFC 15.100).
The appliance must be connected to the earth. Different electric appliances must also be cross
bonded (all metallic structures at the same potential) by means of the terminal provided for this
purpose located next to the cable gland.
The manufacturer accepts no responsibility whatsoever if these instructions are not followed.

Page 16 3BE390845NI – 01/12
BONNET GRANDE CUISINE
Registered office:
Rue des Frères Lumière - Z.I Mitry Compans
F-77292 MITRY MORY Cedex
4.2 GAS CONNECTION
Check that the unit is set to the type and pressure of gas provided on site. (See paragraph 1: Data
plate).
Connect the unit to the main gas float via a stop cock to allow the unit to be individually isolated.
The gas supply line should be sized to minimise pressure drop, its diameter is a function of its route, length
number of bends and the total load of the unit.
To check the gas pressure connect a water gauge to the test point on the gas control unit (point A on
the diagram below).
The measured dynamic pressure should be the same as that indicated on the gas data plate for the gas
in question (See paragraph 1)
Advancia bratt pan Advancia Plus bratt pan
TEST POINT A:
Slacken the screw (without
removing it)
Connect the water gauge pipe.
Take measurement with the
burners on.
Gas connections must meet current regulations (DTU 61.1) and be carried out only by qualified
registered installers.
Final connections are to a ½” male gas connection.
Advancia type bratt pan Advancia Plus type bratt pan
Gas connection
Gas connection

Page 17 3BE390845NI – 01/12
BONNET GRANDE CUISINE
Registered office:
Rue des Frères Lumière - Z.I Mitry Compans
F-77292 MITRY MORY Cedex
4.3 WATER CONNECTION
- Hot and Cold water supply.
- Minimum pressure 150 kPa / 1.5 bar, max 600 kPa / 6 bar.
- Maximum temperature for cold water 30°C.
- Maximum temperature for hot water 60°C.
- Fit local stop cocks.
- Connection 20/27 ∅(3/4") and 21 ∅(1/2") flexible.
Advancia type bratt pan Advancia Plus type bratt pan
Cold water
Hot water Cold water Hot water
Advancia Plus cantilevered bratt pan
Cold water Hot water
Water supply pipe purging
A purge has been added to the water delivery, this automatically purges the pipe work after the well is
filled. This purging produces a trickle of water from below the front of the unit which runs into the floor
gulley.
If this is undesirable for any reason it is possible to:
- connect the outlet directly to drain using 6mm internal diameter silicone hose
- block the outlet with an 8mm M4 setscrew (note: the purge will no longer work)

Page 18 3BE390845NI – 01/12
BONNET GRANDE CUISINE
Registered office:
Rue des Frères Lumière - Z.I Mitry Compans
F-77292 MITRY MORY Cedex
5 CHANGING FROM ONE TYPE OF GAS TO ANOTHER
General:
In the following chapters, the different gases are referenced by their international coding:
G20 NATURAL GAS Group H . (Methane, Lacq gas)
G25 NATURAL GAS Group L . (Groningue type gas)
G30 BUTANE
G31 PROPANE
5.1 LIST OF AUTHORISED GASES / PRESSURES PER CATEGORIES & COUNTRIES
Austria - Switzerland G 20 20
II
2H3B/P
G 30 and G 31 50
Sweden - Denmark
I
2H
G 20 20
Finland
I
3B/P
G 30 / G 31 30
Belgium G 20 / G 25 20/25
II
2E+3P
G 31 37
I
3+
G 30 / G 31 28-30/37
Germany G 20 / G 25 20
II
2ELL3B/P
G 30 / G 31 50
I
3P
G 31 50
Ireland - United Kingdom
G 20 20
Greece - Switzerland
II
2H3P
G 31 37
Portugal
I
3+
G 30 / G 31 28-30/37
Italy
I
2H
G 20 20
I
3+
G 30 / G 31 28-30/37
Spain G 20 20
II
2H3P
G 31 37 or 50
I
3B/P
G 30 / G 31 30
France G 20 / G 25 20/25
II
2E+3B/P
G 30 / G 31 50
G 20 / G 25 20/25
II
2E+3P
G 31 37/50
I
3+
G 30 / G 31 28-30/37
Luxemburg G 20 20
II
2E3B/P
G 30 / G 31 50
G 20 20
II
2E3P
G 31 50
I
3+
G 30 / G 31 28-30/37
Netherlands G 25 25
II
2L3B/P
G 30 / G 31 30
G 25 25
II
2L3P
G 31 50
Norway
I
3B/P
G 30 / G 31 30

Page 19 3BE390845NI – 01/12
BONNET GRANDE CUISINE
Registered office:
Rue des Frères Lumière - Z.I Mitry Compans
F-77292 MITRY MORY Cedex
5.2 CHANGING FROM ONE GAS TO ANOTHER
Depending on the country of installation and the category of the appliance (indicated on the data plate),
the change from one gas to another may require 2 operations:
CI Change jets (main burner, pilot) (See paragraph 5.4)
RA Adjustment of primary air (See paragraph 5.4)
PROCEDURE:
On the data plate, check:
- The category(ies) of the equipment
- The gas and pressure for which it is adjusted.
In the following table, select:
- the country in question
- the gas and the category of the equipment (see above)
- the gas and pressure for which the equipment is going to be set
- Follow and carry out the necessary operations
- Replace the gas data plate and fill in the box with the new gas used.

Page 20 3BE390845NI – 01/12
BONNET GRANDE CUISINE
Registered office:
Rue des Frères Lumière - Z.I Mitry Compans
F-77292 MITRY MORY Cedex
ORIGINAL GAS
(or new gas) NEW GAS
(or original gas)
COUNTRIES Gas P(mbar)
Gas P(mbar) CATEGORY NECESSARY &
AUTHORISED
OPERATIONS
Austria G 20 20 G 30 or G 31 50 CI - RA
Switzerland G 30 50 G 31 50 II
2H3B/P
None
Finland G 30 30 G 31 30 None
Sweden-Denmark I
3B/P
Belgium G 20 20 G 25 25 None
G 20 or G 25 20/25 G 31 37 II
2E+3P
CI - RA
G 30 28-30 G 31 37 I
3+
CI - RA
G 20 20 G 25 20 CI - RA
G 20 or G 25 20 G 30 or G 31 50 CI - RA
G 30 50 G 31 50 II
2ELL3B/P
None
G 20 20
G 25 20
Germany
G 30 50
G 31 50 I
3P
CI
Change of
category (see *)
Ireland - Portugal
G 20 20 G 31 37 II
2H3P
CI - RA
United kingdom G 30 28-30 G 31 37 CI - RA
Greece -
Switzerland I
3+
Italy G 30 28-30 G 31 37 I
3+
CI - RA
Spain G 20 20 G 31 37/50 CI - RA
G 31 37 G 31 50 II
2H3P
CI - RA
G 30 30 G 31 30 I
3B/P
None
France G 20 or G 25 20/25 G 30 or G 31 50 CI - RA
G 20 20 G 25 25 None
G 30 50 G 31 50 II
2E+3B/P
None
G 20 or G 25 20/25 G 31 37/50 CI - RA
G 31 37 G 31 50 II
2E+3P
CI - RA
G 30 28-30 G 31 37 I
3+
CI - RA
G 20 20 G 30 or G 31 50 CI - RA
G 30 50 G 31 50 II
2E3B/P
None
Luxemburg
G 20 20 G 31 50 II
2E3P
CI - RA
G 30 28-30 G 31 37 I
3+
CI - RA
Netherlands G 25 25 G 30 or G 31 30 CI - RA
G 30 30 G 31 30 I
2L3B/P
None
G 25 25 G 31 50 II
2L3P
CI - RA
Norway G 30 30 G 31 30 I
3B/P
None
* Change of category to be undertaken only under our responsibility or that of our local agent.
5.3 GAS FLOW RATES AND POWER
See Paragraph 1: TECHNICAL CHARACTERISTICS (Installation manual)
5.4 TABLE OF JETS and air adjustments
NOTE:
- The burners referred to as "main burner" are simple tubes (BP: Main Burner).
- The burners referred to as "secondary burner" are burners equipped with the inter-ignition ramp (BS:
Secondary Burner).
This manual suits for next models
15
Table of contents
Other Bonnet Cooker manuals
Popular Cooker manuals by other brands

Schlosser
Schlosser F604G1E manual

Hotpoint
Hotpoint EG600P Instructions for installation and use

Black Stone
Black Stone 1825 owner's manual

AGA
AGA Falcon Mercury 1200 Induction User's guide & installation instructions

Cuisinart
Cuisinart CPC-610XA instruction manual

Parkinson Cowan
Parkinson Cowan Mixed Fuel Cooker CSIM 509 Instruction booklet

Parkinson Cowan
Parkinson Cowan Renown 55 GX Operating and installation instructions

AEG
AEG CCB6761ACB user manual

Creda
Creda HB41201 Instruction and installation book

Menuett
Menuett 802-404 User instructions

Hansa
Hansa FCMW971291 operating instructions

Parkinson Cowan
Parkinson Cowan CSG 427 Operating and installation instructions