BOOCAX Penguin User manual

Penguin
Plasma Air Sterilization Robot
Better Robot, Better Life.
Customer Service Hotline
400–161–8661 Quick Guide
http://www.boocax.com

Unpack & Inspect items
Check items
1. Install battery
Assembly
01 02
( 01 ) Robot cabin
( 03 ) Charging pile, power cord
( 05 ) Quick Guide
( 07 ) Battery
( 02 ) Robot chassis
( 04 ) Warranty card
( 06 ) Positioning QR code
( 1 ) Take out the 6 screws
shown in the picture, and
take out the battery cover
at the same time;
( 2 ) With the battery
connector facing down,
gently put it into the
battery slot;
( 3 ) When the battery is
placed in the battery slot
and the four corners are on
the same level, the battery is
placed in the predetermined
position. At this time, use 6
screws to fix the battery in
the designated position;
( 4 ) After the battery is fixed,
put the battery cover and 6
screws just removed back to
their original positions. (Note
that the screws that fix the
battery cover cannot be used
to fix the battery, and the two
screws are nonstandard).
Screw hole
1 2
34
Tips:
1. This battery assembling only applies to the situation that
the robot and its battery are shipped separately
2. Without the manufacturer's permission, please do not
disassemble the battery privately

( 1 ) The direction of the cabin camera and the chassis camera
should be consistent;
( 2 ) Hold the cabin in hand and align it with the chassis front
and rear;
( 3 ) Put it down vertically and smoothly, and you can hear the
click sound of the buckle in place, indicating that the installation
is in place. Press lightly to confirm whether the upper and lower
joints are firmly attached .
Lower body buckle
Same direction
Place the charging pile against the
wall and connect the power cord
Charging pile
2. Docking the chassis and the cabin 3. Place the charging pile
03 04

3
Scan code
to download
Robot APP
Download & Install
Start-up, Registration
( 1 ) Place the charging pile
against the wall and connect the
power cord before starting;
( 2 ) Press and hold the power button
until you hear the buzzer and release it;
( 3 ) Turn on the WiFi of the Android
device and connect the WiFi name of
Penguin;
( 4 ) As shown in the figure , click on
Penguin Wifi name Penguin-PG1-XXXX,
and prompt “tap to share password”
robot 123, the connection is successful.
0605

Connet robot
08
Notes:
1. The principle of WiFi configuration is that the mobile
phone sends the WiFi account and password in the
environment to the robot through Bluetooth, and the
robot starts to connect after receiving the information;
2. The network distribution process is relatively slow,
and it may also occur that the configuration is unsuc-
cessful and requires multiple configurations;
3. After the configuration is successful, Penguin will
automatically turn off its own hotspot WiFi
(Penguin-PG1-XXXXXX). If you need to search for the
robot, you need to connect to the WiFi connected to
Penguin, and you can see it in “Local”page.
Connet robot
Next, open the Penguin APP,
display the Penguin serial
number (shown as below),
click to enter the APP interface
07
Penguin APP
Serial
Number
Home
Page
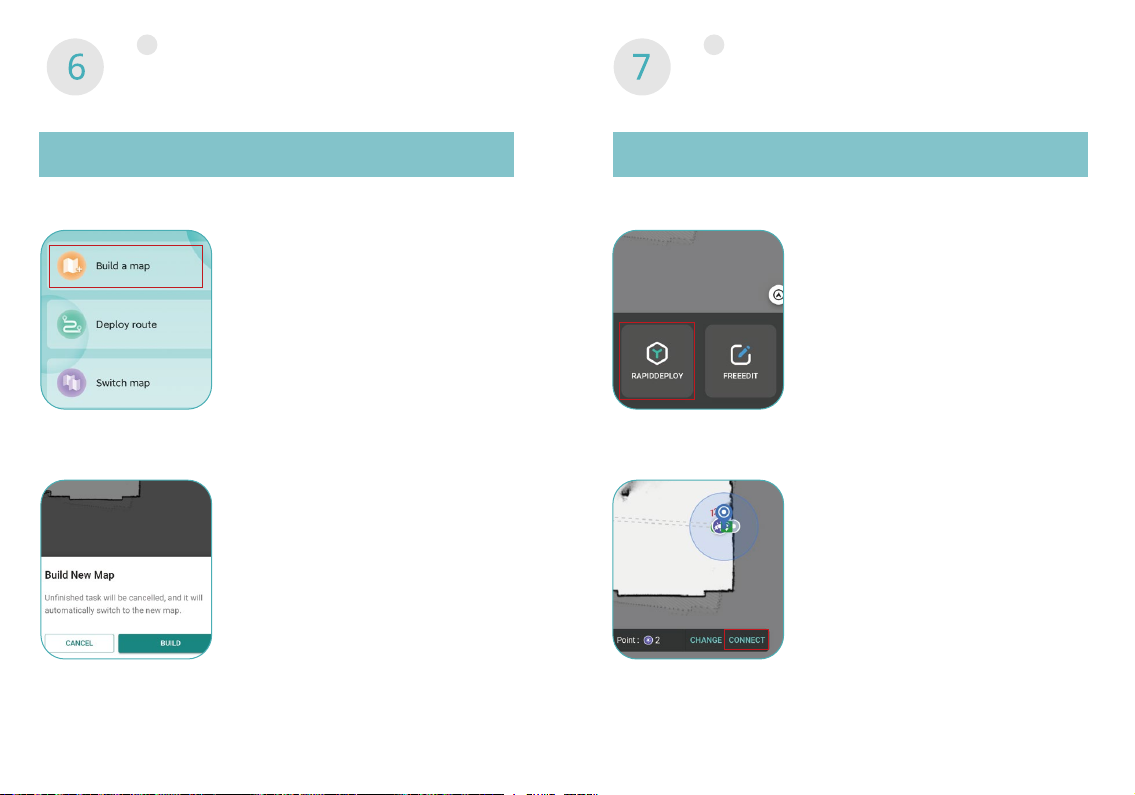
Build a scene map
Build a map
( 1 ) Click "Deploy" at the bottom
of the homepage-"Build a map";
( 2 ) Click " Build New Map" ,
start building the scene, at this
point you can name the newly
built map;
( 3 ) Push or remotely control the
robot to build a map of the area
to be delivered ( LIDAR scanning ).
It is recommended to push the robot
by hand when building the map to
improve efficiency.
Deploy walking route
Rapid Deployment
( 1 ) Deploy route - rapid deploy, follow
the prompts to set the “charging point”,
"path point" and"disinfection point“.
Disinfection point:
the point where disinfection must pass
Path point:
assist in setting the working path;
( 2 ) Set the walking path interface, you
can use the "CHANGE" and "CONNECT"
button to improve efficiency.
"CHANGE" means to switch different
position points, and "CONNECT" can
connect two position points;
( 3 ) Road planning supports editing
functions to facilitate the adjustment
of the robot's walking route at any
time.
09 10

Precautions:
Composition Precautions
11
Precautions for composition:
(1) Function button status light description:
Green always on - task's being executed
Blinking Green - task paused
Green off - task terminated
(2) Description of lighting status:
Blue always on - Disinfection unit switched on
Blue goes out - Disinfection unit off
Panel control
Panel control
12
09
Pause / Start
Child
safety Lock
Power status
Return to Charging
Manual
disinfection
Air volume
selection
Manual control
Air volume
display
( 1 ) When composing a picture, it is recommended to start
from 1m in front of the charging pile; after scanning the
work area, you need to return to the starting point of the
composition and use the APP to complete the composition;
( 2 ) When building a map, do not get too close to the wall
and keep a distance of at least 0.5m;
( 3 ) The operator must stand behind the robot to avoid
leaving image noise on the map;
( 4 ) When turning, walk slowly to allow the robot to collect
as much feature point data as possible.
(5) In abnormal environments (glass, mirror, pure black
objects, grids, etc.) lidar will not be able to identify accurate-
ly, it is recommended to use appropriate Auxiliary process-
ing, such as pasting frosted stickers, gray tape, reflectors,
etc.;
(6) If the scene is too large, you can use "INCREMENT" to
repair and expand the map;
(7) When passing through the QR code, stay in front of it for
more than 1s and there will be a corresponding voice prompt
when the entry is successful.

Legal Disclaimer
Legal Disclaimer
Please clear all kinds of obstacles blocking the robot's route before the
robot works (Sills higher than 10mm, narrow doors less than 600mm, and
slopes greater than 5 degrees), so as not to affect the normal operation of
the equipment;
Please use disinfectants that meet the local disinfection product
qualifications and are used for air disinfection. The types include: chlorine
dioxide, hypochlorous acid, hydrogen peroxide, etc. Before adding
disinfectant, be sure to follow the national disinfection technical specifica-
tions and refer to the manufacturer's instructions For implementation, if the
disinfectant liquid needs to be diluted for use, please use pure water;
The company will not be responsible for the loss caused by exceeding
the scope of use.
13
Table of contents
Popular Air Cleaner manuals by other brands


Rowenta
Rowenta PURE AIR GENIUS manual

ClimateRight
ClimateRight iAirQ600 owner's manual

Pure Enrichment
Pure Enrichment PUREZONE BREEZE user manual

UV CAN SANITIZE
UV CAN SANITIZE TULIP 2 product manual

Sanuvox
Sanuvox S300FX Installation, maintenance & operation guide

realme TechLife
realme TechLife RMH2102 instructions

AllerAir
AllerAir 6000 W Vocarb Technical specifications

Beurer
Beurer LR 210 Instructions for use

Blueair
Blueair HealthProtect 7400 Series user manual

Hessaire
Hessaire 11000 CFM Use & care guide

HoMedics
HoMedics TOTALCLEAN AP-DT10-CA Instruction manual and warranty information

Dimplex
Dimplex DXAPV3N instructions