Booker and Dax Searzall User manual
INSTRUCTION MANUAL
! D A N G E R !
The Searzall uses ammable gas. Failure to comply with these
warnings and instructions may result in an explosion or re that may
cause property damage, serious personal injury or death.
Read and comply with the instructions in this manual and familiarize
yourself with the Searzall before lighting and using. Review
instructions and warnings periodically to maintain awareness.
Do not try to operate before reading instructions.
Keep Searzall out of reach of children and anyone who has not read
the operating instructions.
DO NOT ever point Searzall towards face, other persons or ammable
objects.
NEVER attempt to use the Searzall as a cigarette lighter.
Disconnect Searzall from torch when not in use.
Treat the Searzall as you would any ne tool or instrument. DO NOT
drop, throw or abuse.
Always wear safety glasses when using the Searzall.
Work in well-ventilated areas.
Avoid contact with skin and eyes.
Be aware that the Searzall gets extremely hot during use. Take
precautions to protect yourself and others from accidental burns.
NEVER use the Searzall on or near combustible materials.
ALWAYS make sure the gas tank is placed on a stable, level surface
when setting it down. Be sure the Searzall is not pointed in a direction
which could cause nearby objects to ignite when the torch is set
down.
NEVER leave the Searzall unattended when lit.
ALWAYS have a re extinguisher and a bucket of water nearby when
using the Searzall.
NEVER used unapproved propane tank sizes due to tipping hazards.
NFPA (National Fire Protection Association) code 58 does not allow the
use of propane cylinders indoors for cooking
SAVE these instructions
Questions? www.searzall.com
I N T H E B O X
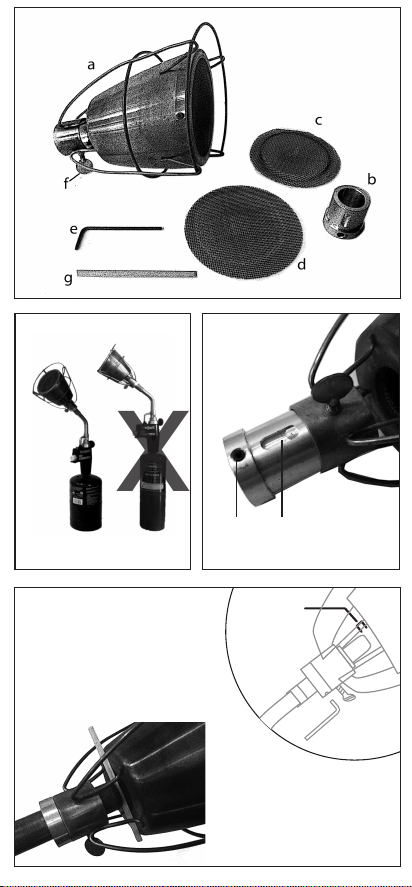
This package only contains one (1) Searzall (a), one (1) sleeve adaptor
(b, may be pre-attached), one (1) extra inner screen (c), one (1) extra
outer screen (d), one (1) 2-mm allen key (e), one (1) pre-attached
thumbscrew (f), and one (1) Searzall spacing adjustment tool (the
matchstick, g). Torch IS NOT included, but is necessary for use.
T O R C H E S A N D T A N K S
Before using your Searzall, make sure all parts are accounted for.
We require the use one of the following torches when using your
Searzall:
Bernzomatic TS8000 (14282 Btu/hour, ~1.5 hours of searing per tank)
Bernzomatic TS4000 (6732 Btu/hour, ~3.25 hours of searing per tank)
We do not recommend using an Iwatani or other model of torch.
Non-recommended torches may present safety hazards and work
poorly. See “Tanks” photo.
The Searzall requires a 16.4 oz “camping” propane gas cylinder tank
(fat squat tanks, typically green). These tanks are easily found at
hardware and camping supply stores. DO NOT USE 14.1 ounce
propane tanks (the tall skinny ones, typically blue), They may tip
over and start a re. Do not use MAPP tanks.
A S S E M B L Y
Always make sure gas is turned to the o position on your torch when
assembling the Searzall. After reading these instructions you can go to
www.searzall.com for an assembly demonstration video if you like.
Step 1: Make sure the Searzall is rmly attached to the sleeve adapter
(b). To place the Searzall on the adapter, loosen the thumbscrew (f),
align the screw with the slot in the adapter (see picture) and slide the
Searzall all the way on to the adapter. Tighten thumbscrew. The slot in
the adapter keeps the Searzall aligned and prevents the Searzall from
falling o of the torch during use even if the thumbscrew loosens
slightly.
Step 2: IMPORTANT ADJUSTMENT STEP ! Loosen the allen screw in
the adapter with the allen key (e). Slip the Searzall and sleeve adaptor
onto the torch head. Use the Searzall spacing adjustment tool
(matchstick) to set the spacing between the tip of the torch and the
opening in the back of the Searzall (see picture). The tip of the torch
should be 1/8 inch (3.25) from the hole in the back of the Searzall.
THIS SPACING IS CRUCIAL TO THE OPERATION OF THE SEARZALL. If
the spacing is larger than 1/8 inch, the inner screen could become
compromised -- you will experience rapid metal wasting. This
relationship is counter intuitive. If you lose the matchstick you may use
one US dime and nickel stacked together, or two 5 euro cent coins.
Make sure the Searzall is properly oriented on the torch with the
thumbscrew pointed down (see the picture labeled“Tanks”) and
tighten the sleeve adaptor into place with the 2-mm allen key (e). Do
not over-tighten. Remove matchstick.
b
f
Photo for Step 1
In the Box
slot
set screw
to secure
adapter
Tanks
x
NO!YES
Photo for Step 2 1/8 inch
(3.25 mm)
PROPER AIR-GAP
SPACING IS VITAL!
Use included matchstick.
Note thumbscrew is
pointed down
Incorrect spacing can damage
the inner Searzall screen! Once
the adapter is properly
adjusted, you may remove the
Searzall without worry if you
leave the adapter on the torch.

INSTRUCTION MANUAL
! D A N G E R !
The Searzall uses ammable gas. Failure to comply with these
warnings and instructions may result in an explosion or re that may
cause property damage, serious personal injury or death.
Read and comply with the instructions in this manual and familiarize
yourself with the Searzall before lighting and using. Review
instructions and warnings periodically to maintain awareness.
Do not try to operate before reading instructions.
Keep Searzall out of reach of children and anyone who has not read
the operating instructions.
DO NOT ever point Searzall towards face, other persons or ammable
objects.
NEVER attempt to use the Searzall as a cigarette lighter.
Disconnect Searzall from torch when not in use.
Treat the Searzall as you would any ne tool or instrument. DO NOT
drop, throw or abuse.
Always wear safety glasses when using the Searzall.
Work in well-ventilated areas.
Avoid contact with skin and eyes.
Be aware that the Searzall gets extremely hot during use. Take
precautions to protect yourself and others from accidental burns.
NEVER use the Searzall on or near combustible materials.
ALWAYS make sure the gas tank is placed on a stable, level surface
when setting it down. Be sure the Searzall is not pointed in a direction
which could cause nearby objects to ignite when the torch is set
down.
NEVER leave the Searzall unattended when lit.
ALWAYS have a re extinguisher and a bucket of water nearby when
using the Searzall.
NEVER used unapproved propane tank sizes due to tipping hazards.
NFPA (National Fire Protection Association) code 58 does not allow the
use of propane cylinders indoors for cooking
SAVE these instructions
Questions? www.searzall.com
I N T H E B O X
This package only contains one (1) Searzall (a), one (1) sleeve adaptor
(b, may be pre-attached), one (1) extra inner screen (c), one (1) extra
outer screen (d), one (1) 2-mm allen key (e), one (1) pre-attached
thumbscrew (f), and one (1) Searzall spacing adjustment tool (the
matchstick, g). Torch IS NOT included, but is necessary for use.
T O R C H E S A N D T A N K S
Before using your Searzall, make sure all parts are accounted for.
We require the use one of the following torches when using your
Searzall:
Bernzomatic TS8000 (14282 Btu/hour, ~1.5 hours of searing per tank)
Bernzomatic TS4000 (6732 Btu/hour, ~3.25 hours of searing per tank)
We do not recommend using an Iwatani or other model of torch.
Non-recommended torches may present safety hazards and work
poorly. See “Tanks” photo.
The Searzall requires a 16.4 oz “camping”propane gas cylinder tank
(fat squat tanks, typically green). These tanks are easily found at
hardware and camping supply stores. DO NOT USE 14.1 ounce
propane tanks (the tall skinny ones, typically blue), They may tip
over and start a re. Do not use MAPP tanks.
A S S E M B L Y
Always make sure gas is turned to the o position on your torch when
assembling the Searzall. After reading these instructions you can go to
www.searzall.com for an assembly demonstration video if you like.
Step 1: Make sure the Searzall is rmly attached to the sleeve adapter
(b). To place the Searzall on the adapter, loosen the thumbscrew (f),
align the screw with the slot in the adapter (see picture) and slide the
Searzall all the way on to the adapter. Tighten thumbscrew. The slot in
the adapter keeps the Searzall aligned and prevents the Searzall from
falling o of the torch during use even if the thumbscrew loosens
slightly.
Step 2: IMPORTANT ADJUSTMENT STEP ! Loosen the allen screw in
the adapter with the allen key (e). Slip the Searzall and sleeve adaptor
onto the torch head. Use the Searzall spacing adjustment tool
(matchstick) to set the spacing between the tip of the torch and the
opening in the back of the Searzall (see picture). The tip of the torch
should be 1/8 inch (3.25) from the hole in the back of the Searzall.
THIS SPACING IS CRUCIAL TO THE OPERATION OF THE SEARZALL. If
the spacing is larger than 1/8 inch, the inner screen could become
compromised -- you will experience rapid metal wasting. This
relationship is counter intuitive. If you lose the matchstick you may use
one US dime and nickel stacked together, or two 5 euro cent coins.
Make sure the Searzall is properly oriented on the torch with the
thumbscrew pointed down (see the picture labeled“Tanks”) and
tighten the sleeve adaptor into place with the 2-mm allen key (e). Do
not over-tighten. Remove matchstick.
b
f
Photo for Step 1
In the Box
slot
set screw
to secure
adapter
Tanks
x
NO!YES
Photo for Step 2 1/8 inch
(3.25 mm)
PROPER AIR-GAP
SPACING IS VITAL!
Use included matchstick.
Note thumbscrew is
pointed down
Incorrect spacing can damage
the inner Searzall screen! Once
the adapter is properly
adjusted, you may remove the
Searzall without worry if you
leave the adapter on the torch.

BREAD
CHEESE
STEAK
1"
2"
3"
4"
5"
The optimal distance range for
the Searzall is between <1" for
searing meat up to 4" when less
intense heat is required.
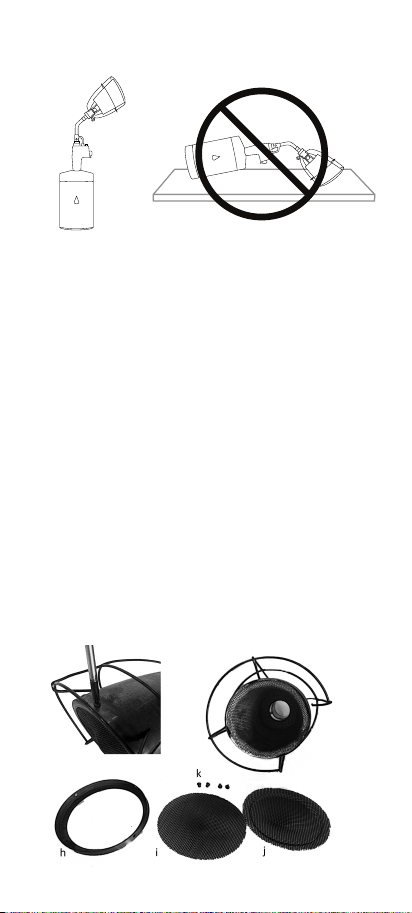
R E P L A C I N G T H E S C R E E N S
Your Searzall should provide you with many hours of happy
searing. During use the screens may become a bit warped. This
is OK. Eventually, the inner screen (j) may develop a few holes in
the center. This is OK. If the inner screen develops major holes it
should be replaced. The outer screen (i) should only need
replacing if you mechanically damage it. To replace screens
remove the four screws (k) retaining the bezel (h) to the Searzall
(careful, they are easy to lose -- see picture). Remove the bezel
and replace the screens. Note the orientation of the inner
screen -- the cupped portion sits in the Searzall cup maintaining
proper distance between the screens. Refasten bezel. Season
screens by running Searzall for 2 minutes with the front screen
parallel to the oor. Additional screens available at
www.searzall.com.
F I R S T U S E
The insulation in your Searzall is manufactured with a non-toxic
organic binder that must be burned o before using on food.
Additionally, an oxide layer must be built up on your screens,
“seasoning them.”Before using a new Searzall for the rst time,
ignite the torch, hold the front screen parallel to the oor and
let it run for two minutes. It is normal for an odor to occur as the
binder burns away. There will be no odor during normal
operation. It is also normal for there to be some ame
associated with burning away the binder.
H O W I T W O R K S
Naked torch ames are too intense for most foods and create an
o avor called“torch taste.”The Searzall has two very
lightweight high temperature metal screens that convert most
of the torch’s ame into radiant heat. The Searzall won’t create
torch taste. The Searzall is an immensely powerful broiler in the
palm of your hand. Because it is so lightweight it heats up
almost instantly -- ready to cook in under 6 seconds.
What is and isn’t the Searzall Good For?
While your Searzall can sear anything, its forte is anytime you
need high heat for a fast nish. It is great on meats and sh. It is
good at toasting bread. It is even powerful enough to sear pâté
without melting it. Use it camping and at picnics and tailgates.
Whenever you grill keep it around to melt cheese and sear the
top of food without ipping. The Searzall will be your buddy
when you are catering or food-styling. Some foods -- like crème
brûlée -- are still best with a naked torch. The searzall works best
in applications where you want to cook quickly with high heat.
Some foods -- like duck breast -- are best crisped up slowly
because they require fat rendering and moisture removal -- use
a pan. The other point to remember is the Searzall excels at
searing fairly small quantities of food. 1-4 steaks -- great. 30
steaks? Not so much. Go to www.searzall.com for ideas.
BOOKER
AND DAX
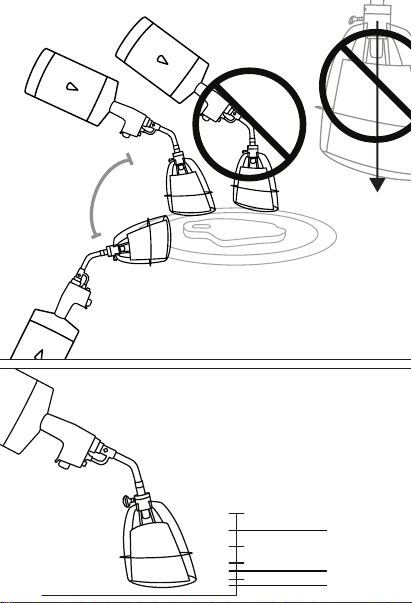
When you nish searing, do not remove the Searzall from the
torch before it has cooled completely. Place it in a standing
position in an area where it will not be touched until it has
cooled.
searing
anywhere in
this arc is OK.
torch ame
perpendicular
to ground
creates ame
instability
not good.
Searing Position
U S I N G Y O U R S E A R Z A L L
• The Searzall makes a popping sound on ignition. This is normal.
• Allow 5-10 seconds for Searzall to heat up before searing.
• Place item to be seared on a ame-proof and non-ammable
surface. Note that some ceramics are not ameproof and may
shatter.
The optimal distance for searing is closer than you think:
Steak sears best when the screen ia a bit less than 1”from the
meat. If you feel that you“aren’t searing fast enough”you are
probably too far away. Very dry items, like breads, go from
toasted to burnt quickly. A short start close to the item and then
pulling back to 3“ or 4” away is a good plan for these items. Any
further than that will render your Searzall ineective.
Searing:
Start by keeping the Searzall stationary over your food till it starts to
sizzle (moist foods) or brown (dry foods). Then move the Searzall
around over the area to be seared at a pace that keeps the whole
area searing properly. Try to keep it moving, lingering in areas that
need more attention. You will develop a feel for this. Often, when
searing larger areas, you will achieve better results by making several
light searing passes over the whole surface rather than searing
smaller sections all the way before moving on to the next section. As
a guideline, a rib steak takes between 1-2.5 minutes total to sear per
side. There is a protective wire cage around the Searzall to prevent
you from getting badly burned should you hit it by accident and to
prevent a re should the Searzall fall. The bottom front of the cage is
cut away so you can sear the edge of foods that are resting on a at
surface.
Go to www.searzall.com for videos and tips on best practices.
To remove the Searzall from the torch make sure it is cool then
loosen the thumbscrew and remove. LEAVE THE ADAPTER ON
THE TORCH. As long as the adapter remains in place the spacing
between the Searzall and torch tip will automatically be correct
when it is placed on the torch.
cool like this not like this
BREAD
CHEESE
STEAK
1"
2"
3"
4"
5"
The optimal distance range for
the Searzall is between <1" for
searing meat up to 4" when less
intense heat is required.
R E P L A C I N G T H E S C R E E N S
Your Searzall should provide you with many hours of happy
searing. During use the screens may become a bit warped. This
is OK. Eventually, the inner screen (j) may develop a few holes in
the center. This is OK. If the inner screen develops major holes it
should be replaced. The outer screen (i) should only need
replacing if you mechanically damage it. To replace screens
remove the four screws (k) retaining the bezel (h) to the Searzall
(careful, they are easy to lose -- see picture). Remove the bezel
and replace the screens. Note the orientation of the inner
screen -- the cupped portion sits in the Searzall cup maintaining
proper distance between the screens. Refasten bezel. Season
screens by running Searzall for 2 minutes with the front screen
parallel to the oor. Additional screens available at
www.searzall.com.
F I R S T U S E
The insulation in your Searzall is manufactured with a non-toxic
organic binder that must be burned o before using on food.
Additionally, an oxide layer must be built up on your screens,
“seasoning them.”Before using a new Searzall for the rst time,
ignite the torch, hold the front screen parallel to the oor and
let it run for two minutes. It is normal for an odor to occur as the
binder burns away. There will be no odor during normal
operation. It is also normal for there to be some ame
associated with burning away the binder.
H O W I T W O R K S
Naked torch ames are too intense for most foods and create an
o avor called“torch taste.”The Searzall has two very
lightweight high temperature metal screens that convert most
of the torch’s ame into radiant heat. The Searzall won’t create
torch taste. The Searzall is an immensely powerful broiler in the
palm of your hand. Because it is so lightweight it heats up
almost instantly -- ready to cook in under 6 seconds.
What is and isn’t the Searzall Good For?
While your Searzall can sear anything, its forte is anytime you
need high heat for a fast nish. It is great on meats and sh. It is
good at toasting bread. It is even powerful enough to sear pâté
without melting it. Use it camping and at picnics and tailgates.
Whenever you grill keep it around to melt cheese and sear the
top of food without ipping. The Searzall will be your buddy
when you are catering or food-styling. Some foods -- like crème
brûlée -- are still best with a naked torch. The searzall works best
in applications where you want to cook quickly with high heat.
Some foods -- like duck breast -- are best crisped up slowly
because they require fat rendering and moisture removal -- use
a pan. The other point to remember is the Searzall excels at
searing fairly small quantities of food. 1-4 steaks -- great. 30
steaks? Not so much. Go to www.searzall.com for ideas.
BOOKER
AND DAX
When you nish searing, do not remove the Searzall from the
torch before it has cooled completely. Place it in a standing
position in an area where it will not be touched until it has
cooled.
searing
anywhere in
this arc is OK.
torch ame
perpendicular
to ground
creates ame
instability
not good.
Searing Position
U S I N G Y O U R S E A R Z A L L
• The Searzall makes a popping sound on ignition. This is normal.
• Allow 5-10 seconds for Searzall to heat up before searing.
• Place item to be seared on a ame-proof and non-ammable
surface. Note that some ceramics are not ameproof and may
shatter.
The optimal distance for searing is closer than you think:
Steak sears best when the screen ia a bit less than 1”from the
meat. If you feel that you“aren’t searing fast enough”you are
probably too far away. Very dry items, like breads, go from
toasted to burnt quickly. A short start close to the item and then
pulling back to 3“ or 4” away is a good plan for these items. Any
further than that will render your Searzall ineective.
Searing:
Start by keeping the Searzall stationary over your food till it starts to
sizzle (moist foods) or brown (dry foods). Then move the Searzall
around over the area to be seared at a pace that keeps the whole
area searing properly. Try to keep it moving, lingering in areas that
need more attention. You will develop a feel for this. Often, when
searing larger areas, you will achieve better results by making several
light searing passes over the whole surface rather than searing
smaller sections all the way before moving on to the next section. As
a guideline, a rib steak takes between 1-2.5 minutes total to sear per
side. There is a protective wire cage around the Searzall to prevent
you from getting badly burned should you hit it by accident and to
prevent a re should the Searzall fall. The bottom front of the cage is
cut away so you can sear the edge of foods that are resting on a at
surface.
Go to www.searzall.com for videos and tips on best practices.
To remove the Searzall from the torch make sure it is cool then
loosen the thumbscrew and remove. LEAVE THE ADAPTER ON
THE TORCH. As long as the adapter remains in place the spacing
between the Searzall and torch tip will automatically be correct
when it is placed on the torch.
cool like this not like this
Other manuals for Searzall
1
Table of contents
Other Booker and Dax Kitchen Appliance manuals


