BOOM MAGNA User manual

Boom MAGNA
aprofessional camera for superior meetings
Quick Guide
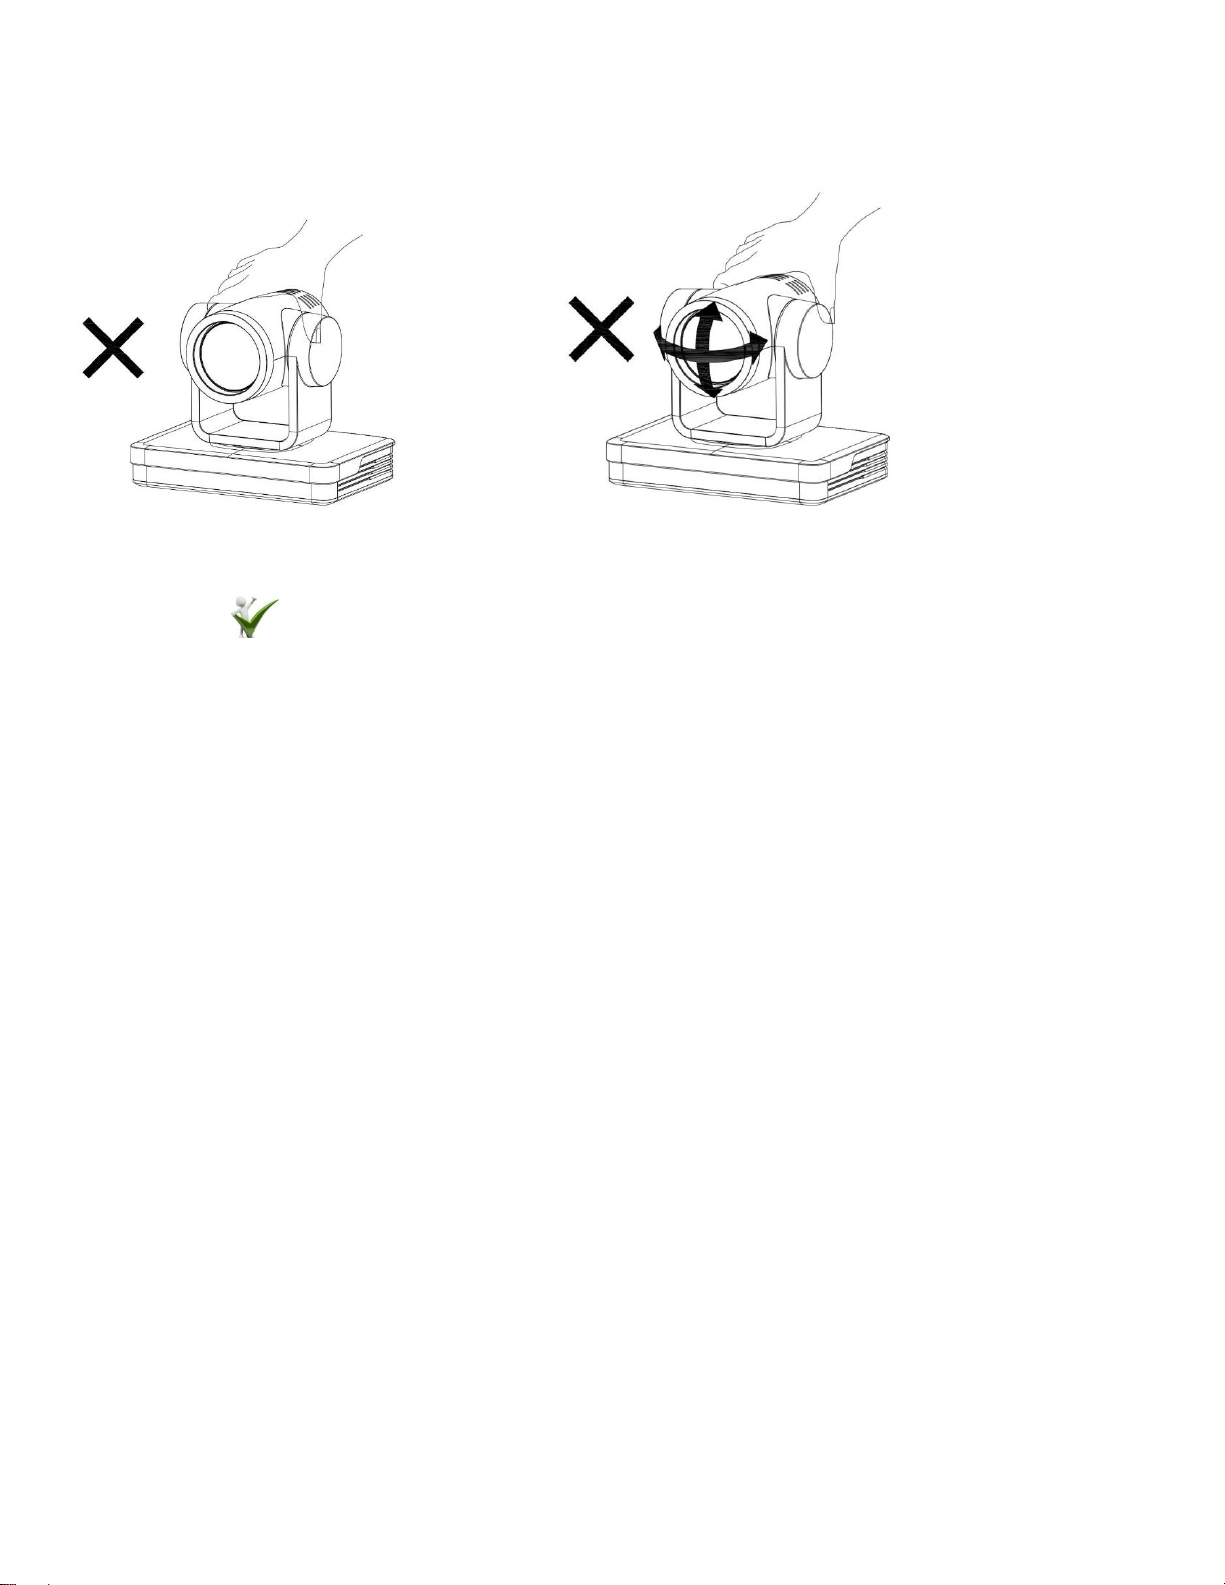
Handling your new Boom MAGNA
Improper handling may damage the camera and result in mechanical failure.
Move the camera by holding the base with one or both hands.
•Do not rotate the lens or holder manually.
•Do not get the unit wet or place objects on top of it.
•To prevent the risk of electric shock, do not open the case.
•Installation and maintenance should only be carried out by qualified technicians.
•Do not expose to extreme temperature, humidity, or power supplies not intended for this camera.
•To clean use a soft, dry cloth on the camera lens. Use only mild detergent if needed. Do not use strong
or corrosive detergents to avoid damaging the lens.
•Do not disassemble.
•Ensure there are no obstacles within rotation range of the holder.
•Electromagnetic fields at specific frequencies may affect the video image. This product is Class A. It
may cause radio interference in household application.
•Any damage caused by misuse or mishandling of the product will void the warranty.

Interfaces and connections
1.Camera Lens
5.Tripod thread
7.Power Switch
2.Camera Base
6.Tripod thread
8.DC12V Input Power Supply Socket
3.Indicator Light
9.LAN Port
4.Infrared Receiver
10.Rotary DIP Switch
11.RS232 Control Interface(input)
12.RS232 Control Interface(output)
13.RS422/RS485 Interface
14.Audio Input Interface (LINE-IN)
15.USB 3.0 Interface
16.HDMI Output Interface

Your new Boom MAGNA camera
Take your video conferencing to the next level with Ultra HD 4k at 60fps and 12x optical zoom. Enjoy superior
image quality with Sony CMOS sensor providing excellent low light optimization. Multiple video outputs, noise
reduction, remote control and multi-codec IP streaming make the Boom MAGNA your go to camera for huddle
and conference rooms. Anyone passionate about collaboration needs this camera. Better meetings. Simply.
What’s in the box?
Boom MAGNA camera
Remote Control
Power Adapter
RS 232 Cable
USB 3.0 cable
User Manual
Optional Accessories
Ceiling Mount
Wall Mount
Wireless remote
Let’s get started
1. Connect the power adapter to your camera and plug it in. Your camera lens will begin to move while it
warms up. Give it a second.
2. Connect the USB 3.0 cable from your camera to your computer or laptop.
3. Open the video software, select Boom MAGNA 4K and enjoy.
4. For RS232, Visca, and other connection details check out our support docs at
www.BOOMcollaboration.com
5. Need help? Drop us a line or give us a call:
•Phone: 800.534.BOOM
•Web support: BOOMcollaboration.com/support
•Email: [email protected]

Boom MAGNA highlights & features
4K UHD Resolution: 8.51M megapixel high quality SONY CMOS sensor. Resolution is up to 4K with frame rate
up to 60fps.
Optical Zoom Lens: 12X optical zoom with 82° wide angle field of view
Leading Auto Focus Technology: Fast, accurate and stable auto focusing technology.
Low Noise and High SNR: Super high SNR image is achieved with low noise CMOS. Advanced 2D/3D noise
reduction technology further reduces the noise while ensuring high image clarity.
Multiple video output interfaces: HDMI, USB3.0, LAN
Multiple Audio/Video Compression Standards: USB3.0 interface supports MJPEG, H.264, YUY2, NV12, H.265;
support AAC, MP3 and G.711A audio compression, 8000, 16000, 32000, 44100, 48000 sampling frequency.
Multiple Network Protocol: Supports ONVIF, GB/T28181, RTSP, RTMP protocols, RTMP push mode,
quick connection to streaming server (Wowza, FMS), RTP multicast mode and network full command VISCA
control protocol.
Control Interface: RS422 input (compatible with RS485), RS232 input/output, RS232 (cascade connection).
Multiple Control Protocol: Supports VISCA, PELCO-D, PELCO-P protocols and automatic identification
protocols.
Built-in gravity sensor: Supports PTZ automatic flip function for convenient installation.
Quiet Pan/Tilt: High accuracy step driving motor, extremely quiet and smooth.
Multiple presets: Up to 255 presets (10 presets via remote control). IR Remote control included.
Optional Wireless Remote Control: (sold separately) 2.4G wireless remote control allows for simple control
regardless of the angle, distance or infrared interference.
Multiple Application: Online-education, Lecture Capture, Webcasting, Video conferencing, Tele-medicine,
Unified Communication, Emergency command and control systems, etc.
Camera specs
Optical Zoom
12X
View Angle
Horizonal:6.55°(N)~69.4°(W)
Vertical:3.66°(N)~42.8°(W)
AV
F1.6 ~F2.8±5%
Sensor
1/2.8in SONY CMOS
Effective Pixels
8.51M megapixel 16:9
Video Format
HDMI video format
4KP60,4KP50,4KP30,4KP25,1080P60,1080P50,1080I60,1080I50,
1080P30,1080P25,720P60,720P50
USB3.0 interface video format
YUY2/NV12: 1920×1080P30,1280×720P30,960×540P30,640×360P30,
640×480P30,320×176P30
MJPEG/H.264/H.265: 3840×2160P30,1920×1080P30,1280×720P30,
1024×576P30,960×540P30,800×448P30,640×360P30,640×480P30,320×176P30
USB3.0 (compatible with USB2.0 video format)
YUY2/NV12: 640×360P30,640×480P30,320×176P30
MJPEG/H.264/H.265: 3840×2160P30,1920×1080P30,1280×720P30,
1024×576P30,960×540P30,800×448P30,640×360P30,640×480P30,320×176P30
Minimum Illumination
0.05Lux (F1.8, AGC ON)
DNR
DNR 2D﹠3D DNR
White balance
Auto/manual/ one push/ specify color temperature
Focus
Auto/manual/one push focus
Exposure mode
Auto/Manual/Shutter priority/Aperture priority/brightness priority
Aperture
F1.8 ~F11 CLOSE
Shutter speed
1/25~1/10000
BLC
ON/OFF
WDR
OFF/ Dynamic level adjustment
Video adjustment
Brightness, Color, Saturation, Contrast, Sharpness, B/W mode, Gamma curve
SNR
≥50dB

Input/Output specs
Video interfaces
HDMI, USB 3.0 (Type B compatible with USB2.0), LAN(POE), A-IN,
RS232-IN, RS232-OUT, RS422 (compatible with RS485), rotary DIP
switch, DC12V power supply, power switch
Video compression
LAN Interface: H.265, H.264
USB 3.0 Interface: YUY2, MJPEG, H.264, H.265, NV12
Audio input
Double track 3.5mm linear input
Audio Output
HDMI, LAN, USB 3.0
Audio compression
AAC, MP3, G.711A
Network interface
10M/100M/1000M Adaptive Ethernet port, POE power supply,
audio and video output
Network protocols
RTSP, RTMP, ONVIF, GB/T28181; Network VISCA control protocol:
remote upgrade, reboot and reset
Control interface
RS232-IN, RS232-OUT, RS422 compatible with RS485
Serial communication
VISCA/Pelco-D/Pelco-P
protocol
Baud Rate: 115200/38400/9600/4800/2400
USB communication
UVC (video),UAC (audio)
protocol
Power interface
HEC3800 outlet (DC12V)
Power supply
AC110V-AC220V to DC12V/2.5A
Input voltage
DC12V±10%
Input current
<1A
Power consumption
<12W
Pan rotation
-170°~+170°
Tilt rotation
-30°~+90°
Pan control speed
0.1°/s~100°/s
Tilt control speed
0.1°/s~45°/s
Preset speed
Pan: 100°/s, Tilt: 45°/s
Preset Number
255 presets (10 presets via remote control)

Additional specs
Temperature stored
-10℃~+60℃
Humidity stored
20%~95%
Working temperature
-10℃~+50℃
Working humidity
20%~80%
Dimensions
181mm(L) x 115mm(W) x 149mm(H)
Weight
1.15kg
Application
Indoor
Package contents
Camera, power supply, RS232 control cable, USB 3.0 cable, IR
remote, guide
Optional accessories
Ceiling mount, wall mount, wireless remote, extra cables (sold
separate)
Mounting options
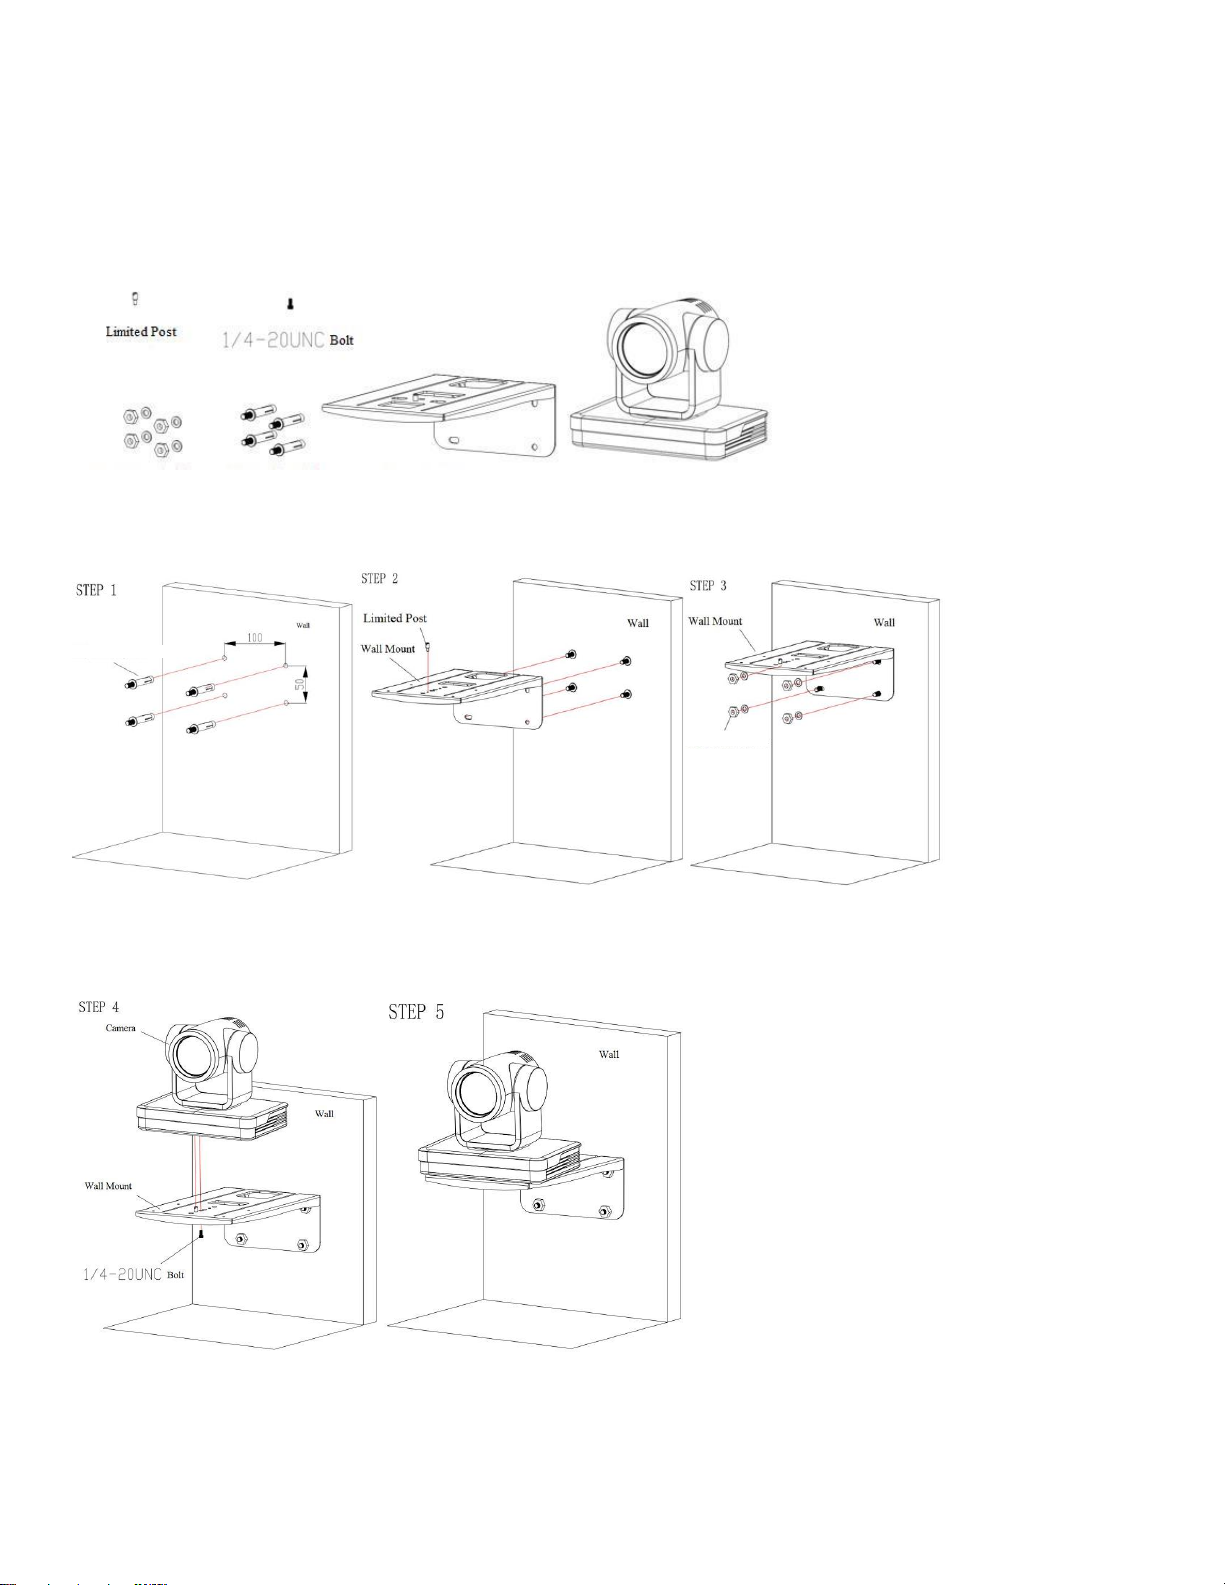
Wall Mount
Part #: BM04-0018
(sold as a separate accessory)
M6 nut and washer M6 expansion bolt Wall mount bracket Camera
M6 expansion bolt
M6 nut and washer
bolt
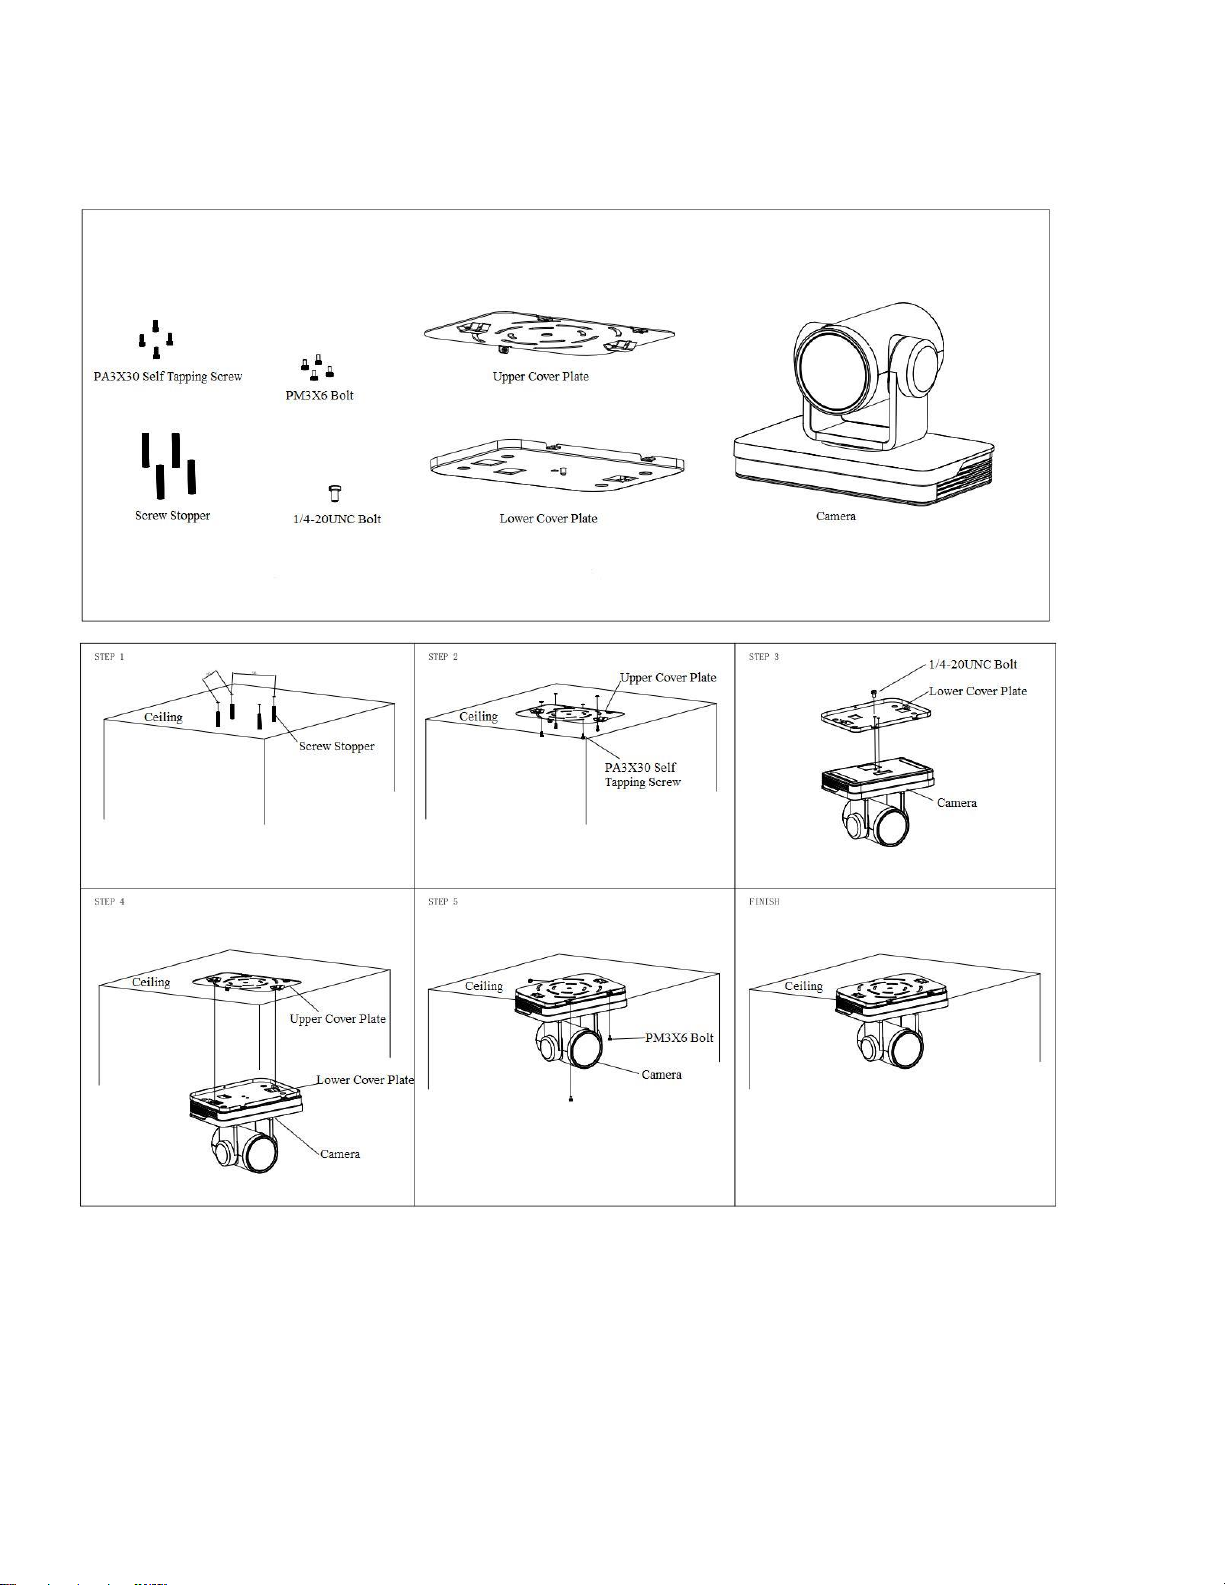
Ceiling Mount
Part #: BM04-0019
(sold as a separate accessory)
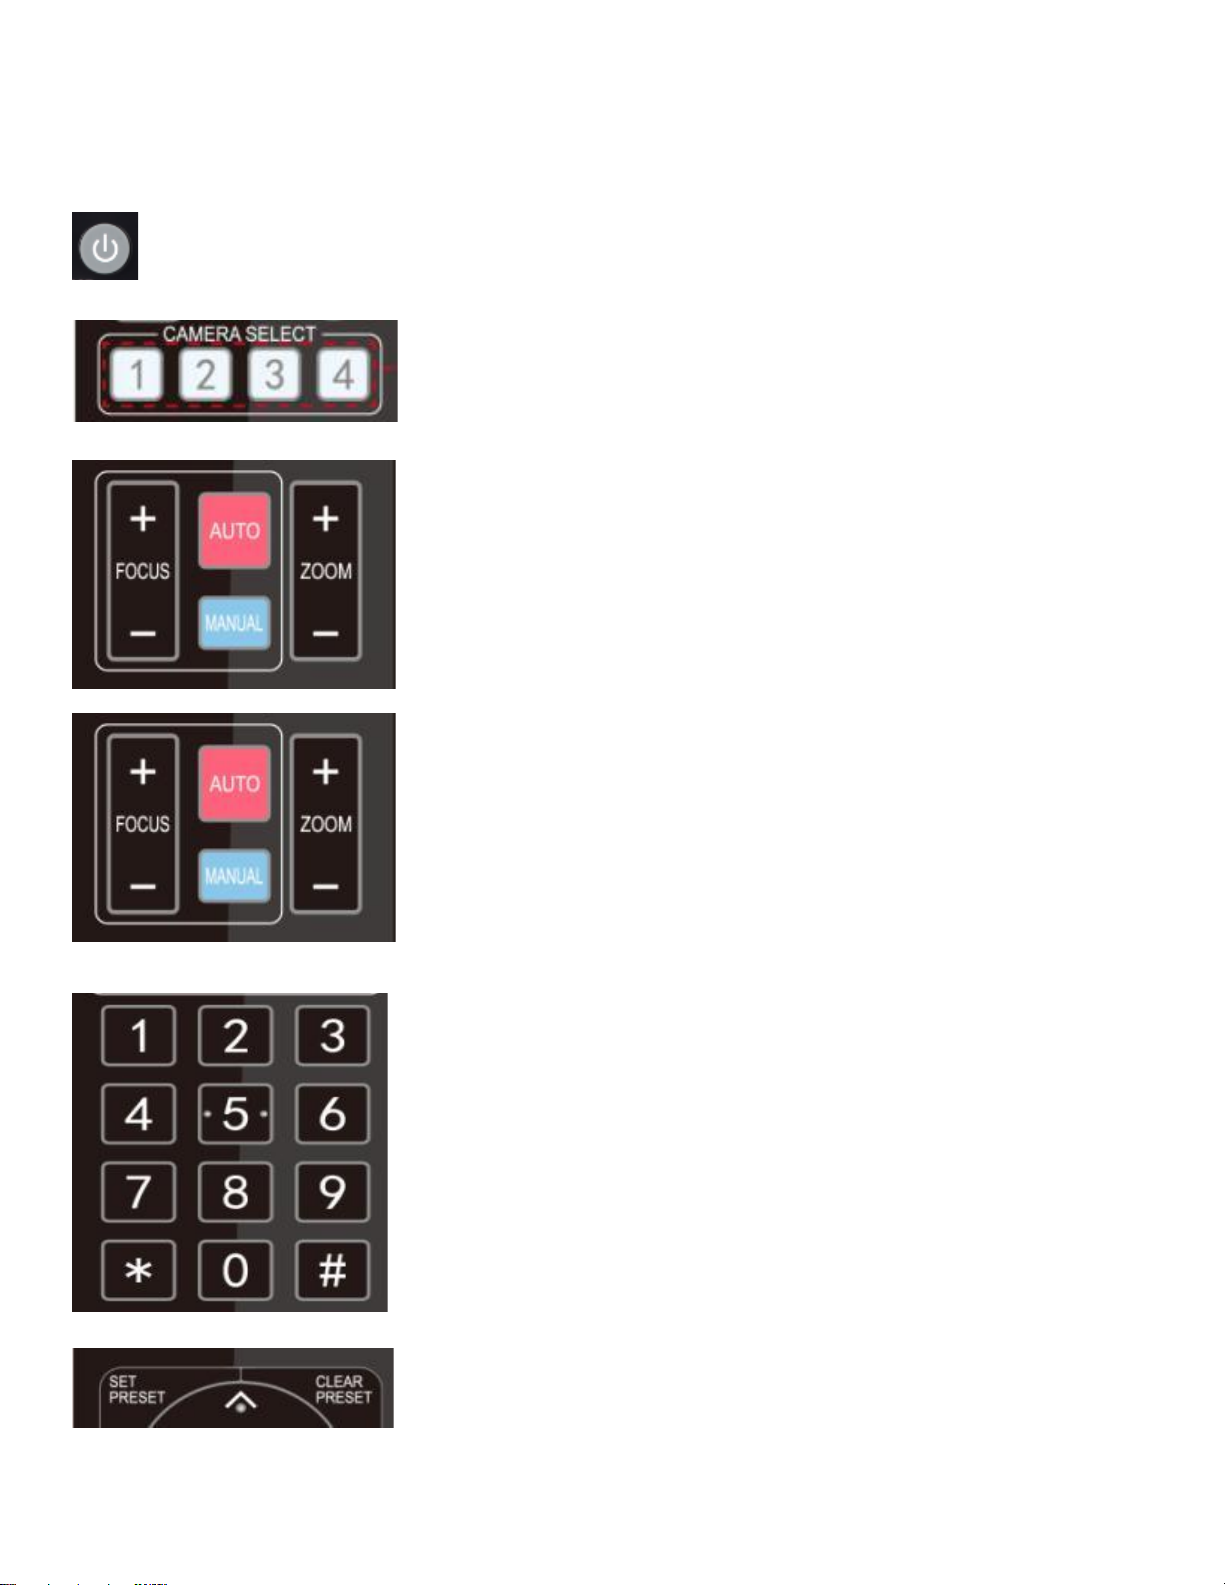
IR Remote Control
Using your new remote control:
Standby Key: press and hold for 3 seconds to enter standby mode. Self-check mode: Long press for 3 seconds a
2nd time. If camera preset 0 is set, the camera will return to preset 0. If not, it will return “home”
Camera Selection
Select the camera to control from 1-4
Focus control
For auto focus press the "AUTO" key
For manual focus press the "MANUAL" key
Adjust focus with the FOCUS + and FOCUS - keys*
*only available in manual focus mode
Zoom control
Adjust the zoom with the ZOOM + and ZOOM - keys*
*the focus will adjust once the zoom function has stopped
Setting presets
1. Adjust the angle of the camera to preferred location
2. Press "SET PRESET" button + number 0-9 to set the preset*
*there are 10 preset options via remote
Clearing presets
1. Press "CLEAR PRESET" button + the number 0-9
2. Press "#" 3 times to clear all presets

Pan/Tilt control
1. Adjust the pan/tilt of the camera with the up, down,
left and right arrows
2. Press "HOME" to return back to the main position
Menu
Press "MENU" to open/close the OSD menu
Home
Press "HOME" to send the camera lens back to its central
position.
Press "HOME" to confirm menu selections
Press "HOME" to enter the next menu
Press 【↑】【↓】buttons to select menu items
Press 【←】【→】buttons to modify values
BLC on/off
Turn back light compensation on or off
Camera remote control address setting
【*】+【#】+【F1】:Camera Address No.1
【*】+【#】+【F2】:Camera Address No. 2
【*】+【#】+【F3】:Camera Address No. 3
【*】+【#】+【F4】:Camera Address No. 4
Key combinations
Switch video format
Clear all presets: 【#】+【#】+【#】
4KP60:【#】+【#】+【0】
Restore factory defaults: 【*】+【#】+【6】
4KP50:【#】+【#】+【1】
Menu set to Chinese: 【*】+【#】+【3】
4KP30:【#】+【#】+【2】
Menu set to English: 【*】+【#】+【4】
4KP25: 【#】+【#】+【3】
Flip switch: 【*】+【#】+【9】
1080P60:【#】+【#】+【4】
Enter aging mode: 【*】+【#】+Auto
1080P50:【#】+【#】+【5】
Exit aging mode: 【#】+【*】+Auto
1080I60: 【#】+【#】+【6】
Restore default username, password, IP address:
1080I50: 【#】+【#】+【7】
【*】+【#】+Manual
1080P30:【#】+【#】+【8】
1080P25:【#】+【#】+【9】
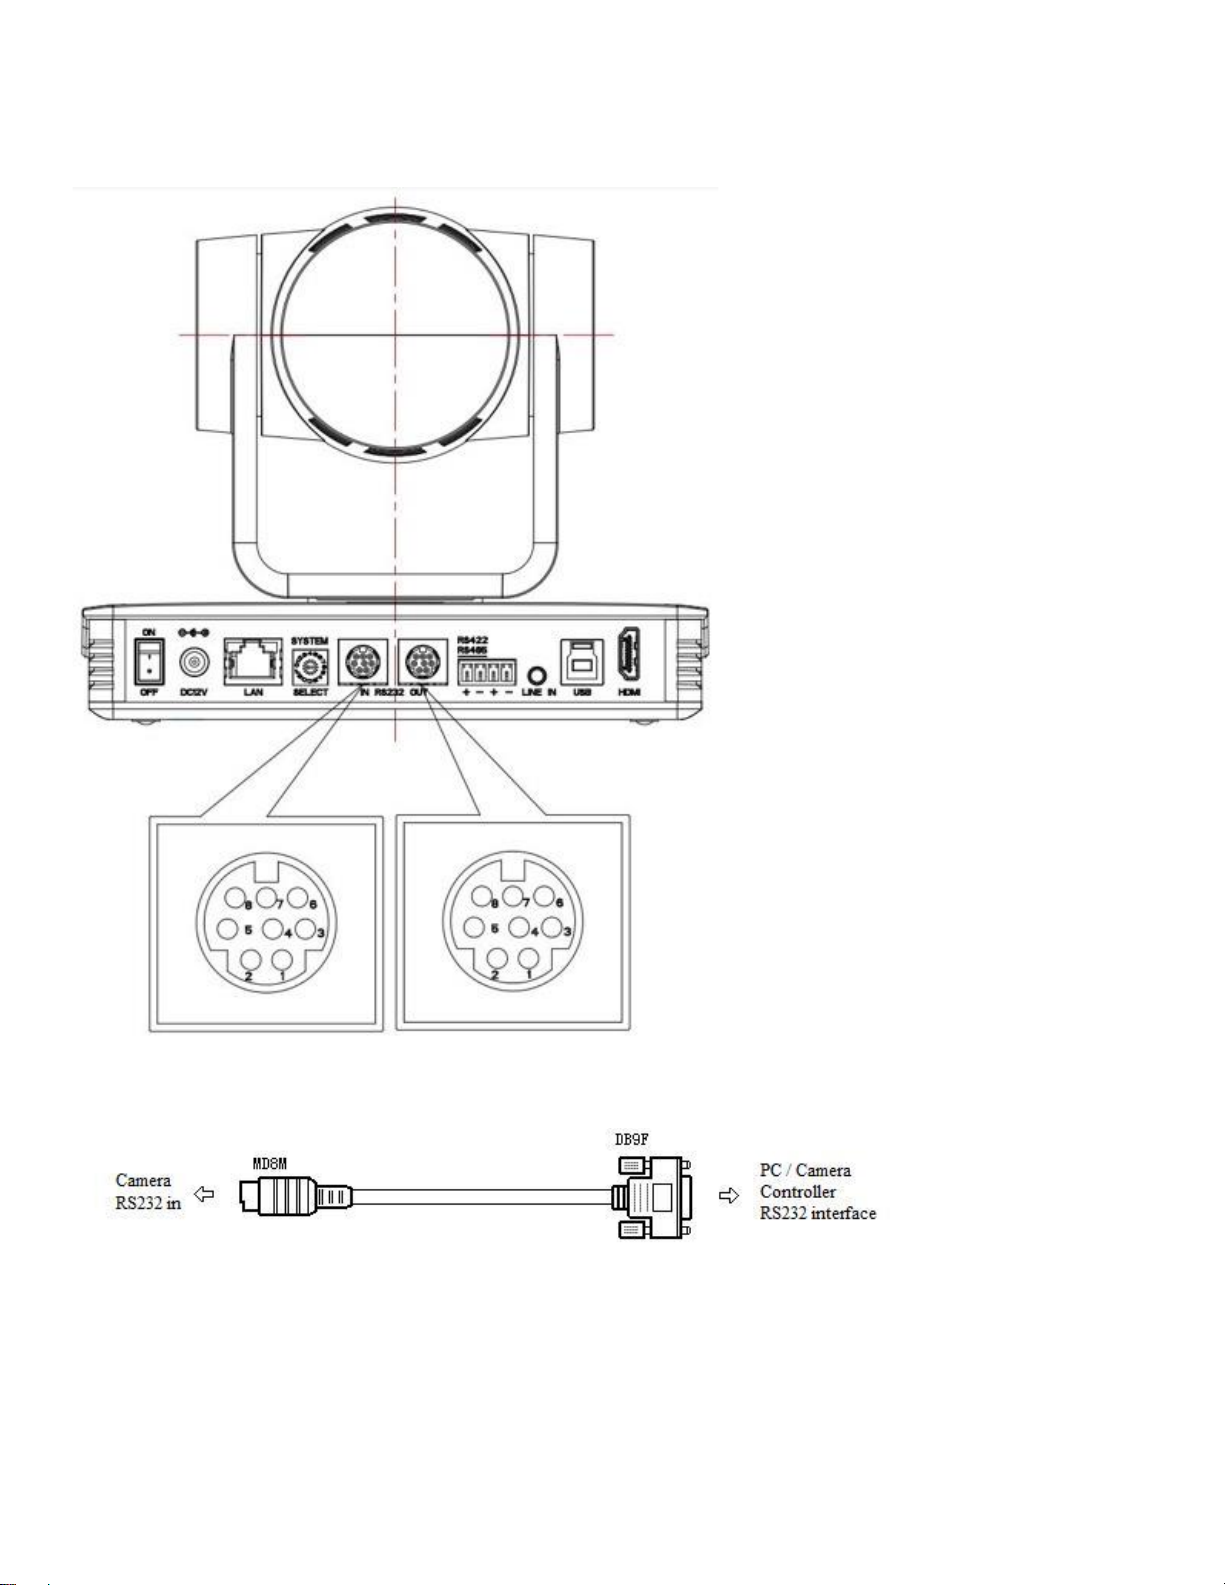
RS-232 Interface
Connection to PC or Camera Controller
Camera
1.DTR 2.DSR 3.TXD 4.GND 5.RXD
6.GND 7.IR OUT 8.NC
WindowsDB-9
1.DCD 2.RXD 3.TXD 4.DTR 5.GND
6.DSR 7.RTS 8.CTS 9.RI

Mini-DIN8-pin Port Definition
NO.
Port
Definition
1
DTR
Data Terminal Ready
2
DSR
Data Set Ready
3
TXD
Transmit Data
4
GND
Signal Ground
5
RXD
Receive Data
6
GND
Signal Ground
7
IR OUT
IR Commander Signal
8
NC
No Connection
RS232(DB9) Port Definition
NO.
Port
Definition
1
DCD
Data Carrier Detect
2
RXD
Receive Data
3
TXD
Transmit Data
4
DTR
Data Terminal Ready
5
GND
System Ground
6
DSR
Data Set Ready
7
RTS
Request to Send
8
CTS
Clear to Send
9
RI
Ring Indicator
VISCA networking as shown below
Camera cascade connection
Camera 1 1.DTR 2.DSR 3.TXD 4.GND 5.RXD 6.GND 7.IR OUT 8. NC
Camera 2 1.DTR 2.DSR 3.TXD 4.GND 5.RXD 6.GND 7.OPEN 8.OPEN
Note: Camera has RS232 input and output interfaces, which can be
cascaded according to the above methods.

Rotary DIP Switch
Dial-up
video format
Dial-up
video format
0
4KP60
8
1080P30
1
4KP50
9
1080P25
2
4KP30
A
720P60
3
4K25
B
720P50
4
1080P60
C
video format to be set on the
menu
5
1080P50
D
video format to be set on the
menu
6
1080I60
E
video format to be set on the
menu
7
1080I50
F
video format to be set on the
menu
Note: after the video format is modified by rotating dial code,
restart to implement the changes. Turn the dial to C, D, E, F,
power off and restart. The menu will display the video format.
Camera Maintenance
1) Please power off the camera and disconnect the power adapter and socket, if it’s not used for a long run.
2) Use soft cloth or tissue to clean the camera cover.
3) Wipe it with a soft, dry cloth when cleaning the camera lens. Wipe it gently with a mild detergent if needed.
Do not use strong or corrosive detergents to avoid scratching the lens and affecting the video quality.

Troubleshooting
No video output
•Ensure the camera power supply is connected, the voltage is normal, and the power indicator is lit.
•Restart the camera. It will enter self-check upon restart.
•Ensure the DIP switch is in normal operating mode (see Rotary DIP switch section).
•Check the video output cable and video display are connected properly.
No image
•Check the video output cable and video display are connected properly.
Video dithering on zoom-in/zoom-out
•Ensure the camera installation position is solid, not wobbly.
•Check surrounding area for shaking or vibrating electronics.
Remote control not functioning
•Remote control address is set to 1. (If the machine is set to factory defaults, the remote control
address will be 1 also).
•Check batteries or install new batteries.
•Ensure the camera is in normal operating mode (see Rotary DIP switch section).
•Camera control through remote is only available after exiting the menu. Close the menu if it is open. If
using video output from LAN, menu will not be displayed, menu will appear30s later, and then it can be
controlled by remote control.
Serial port not working
•Check that the camera serial device protocol, baud rate, and address is consistent.
•Check that the control cable is connected properly.
•Check that the camera working mode is in normal operating mode.
Web pages cannot log in
•Check if the camera outputs video normally by connecting directly to the screen.
•Check whether the network cable is connected properly. (Ethernet port flashes yellow to indicate
normal network cable connection).
•Check that your computer has added the segment and the segment is consistent with the IP address of
the camera.
•Click "Start" and select "Run" and then type “cmd” in the computer; Click "OK" then turn on a DOS
command window to enter ping 192.168.5.163. Press the Enter key to appear message as follows:
Description network connection is normal.
Table of contents


