Boots CR 255 User manual
LP
CR
255
CASSETTE
RECORDER
Operating
Instructions

BOOTS
CR255
CONTROLS
MOO!
CE
OIOIOlIe
\
\
\_\
VAN
A
%
1.
Record
Key.
10.
Tape
Counter
and
Re-Set
Button.
2.
Play
Key.
11.
Built-In
Condenser
Microphone.
3.
Rewind
Key.
12.
Earphone
Jack.
4.
Fast-Forward
Key.
13.
Auxiliary
Input
Jack.
5.
Stop/Eject
Key.
14.
Remote
Jack.
6.
Pause
Key
15.
Microphone
Input
Jack.
7.
Slideaway
Handle.
16.
Volume
Control.
8.
Battery
Level/Record
LED
Indicator
17.
Mains
Connector
Socket.
9.
Cassette
Door
18.
Battery
Compartment.
OPERATION
ON
AC
MAINS.
IMPORTANT
The
wires
in
the
mains
lead
are
coloured
in
accordance
with
the
following
code:
Blue
—
Neutral
Brown
—
Live
If
these
colours
do
not
correspond
with
the
markings
in
your
plug,
proceed
as
follows:
The
wire
which
is
coloured
Brown
must
be
connected
to
the
terminal
which
is
marked
with
the
letter
L
or
coloured
Red.
The
wire
which
is
coloured
Blue
must
be
connected
to
the
terminal
which
is
marked
with
the
letter
N
or
coloured
Black.
If
a
13-amp
(BS1363)
plug
is
used,
a
3-amp
fuse
must
be
fitted.
if
another
type
of
plug
is
used,
the
equipment
should
be
protected
by
a
3-amp
fuse
at
the
mains
distribution
board.
Consult
a
qualified
Electrician
in
case
of
difficulty.
—1—
WARNING:
Disconnect
the
recorder
from
the
mains
by
unplugging
the
lead
at
the
wall
socket
when
not
in
use.
OPERATION
ON
BATTERIES:
The
CR255
operates
from
4
x
1.5V
DC
batteries,
size
R14HP.
If
the
machine
is
to
be
used
mostly
from
battery
supply,
Manganese
Alkaline
batteries
(MN1400)
will
give
longer
battery
life
and
better
economy.
Under
no
circumstances
should
standard
R14SP
batteries
be
used.
Slide
off
the
lid
of
the
battery
compartment
and
insert
the
four
batteries
over
the
ribbon,
taking
care
to
observe
the
polarity
marking
inside
the
compartment.
INCORRECT
FITTING
MAY
DAMAGE
THE
CIRCUIT.
REMOVE
WEAK
OR
EXHAUSTED
BATTERIES
IMMEDIATELY.
if
the
recorder
is
not
to
be
used
for
long
periods
of
time,
or
mostly
on
the
mains,
remove
the
batteries
and
store
them
in
a
cool,
dry
place.
Insertion
of
the
mains
lead
into
the
input
socket
on
the
recorder
automatically
disconnects
the
batteries.
Always
disconnect
the
mains
lead
from
the
wall
socket
when
the
machine
is
not
in
use,
or
when
the
machine
is
unplugged
from
the
mains
lead.
PROPER
CARE
OF
YOUR
RECORDER
AND
CASSETTES.
*
Keep
the
recorder
in
a
clean
condition
as
described
under
Maintenance.
*
Do
not
expose
the
machine
to
damp
conditions
or
to
extreme
high
temperatures,
such
as
may
be
reached
inside
a
car
on
a
sunny
day.
*
Keep
the
machine
and
cassettes
away
from
strong
magnetic
fields,
such
as
close
to
large
transformers,
electric
motors,
television
receivers
and
loudspeakers.
*
Always
wind
your
cassettes
to
one
end
after
use.
*
Do
not
make
excessive
use
of
the
wind
and
rewind
keys
in
searching
for
a
particular
item
on
a
cassette.
This
may
cause
‘‘'stepping’’
or
ridges
in
the
layers
of
tape
and
so
cause
jamming
or
triggering
of
the
auto
stop.
*
Do
not
touch
the
heads
with
any
metallic
or
sharp-pointed
object.
NOTE
FOR
USERS
OF
HOME
COMPUTERS.
The
CR255
has
been
tested
and
found
to
operate
satisfactorily
with
most
Home
Computers.
You
may
need
to
experiment
in
the
setting
of
the
volume
control
in
order
to
obtain
satisfactory
loading
of
computer
programs
from
tape.
It
is
suggested
that
the
volume
control
is
set
around
mid-way.
If
this
does
not
give
satisfactory
results,
experiment
with
different
levels
of
the
volume
control.
The
Auxiliary
Input
should
be
tried
in
the
first
instance
to
record
programs
from
your
computer.
If
the
computer
has
a
very
low
output
level
(below
approx.
40mV)
it
may
be
necessary
to
use
the
Microphone
Input
in
order
to
obtain
sufficient
level
on
the
tape.
Most
computers
output
a
few
seconds
of
constant
tone
prior
to
sending
the
program
header
and
data
stream.
This
tone
will
allow
the
ALC
in
the
recorder
to
settle
and
record
the
program
without
corrupting
the
data.
If
your
computer
does
not
output
a
short
period
of
constant
tone,
the
program
header
may
suffer
corruption
unless
you
execute
a
sub-routine
or
change
the
Monitor
routines
to
force
the
production
of
audio
tone
prior
to
the
program
header.
CASSETTES.
Different
lengths
are
available
which
offer
a
choice
of
recording
time.
C60
cassettes
give
you
30
minutes
each
side.
C90
cassettes
give
you
45
minutes
each
side.
The
use
of
C120
cassettes
(2
x
60
minutes)
is
NOT
recommend
in
this
machine.
Use
only
good
quality
Standard
or
Super
Ferric
oxide
(IEC
Type
|)
cassettes.
Do
not
use
any
other
Type
of
cassette
in
the
CR255.
Although
this
is
a
monophonic
machine,
it
is
compatible
with
stereo
pre-recorded
cassettes
and
will
reproduce
these
in
mono.
Recordings
made
on
the
CR255
are
compatible
with
stereo
cassette
machine,
and
will
reproduce
on
them
in
mono.
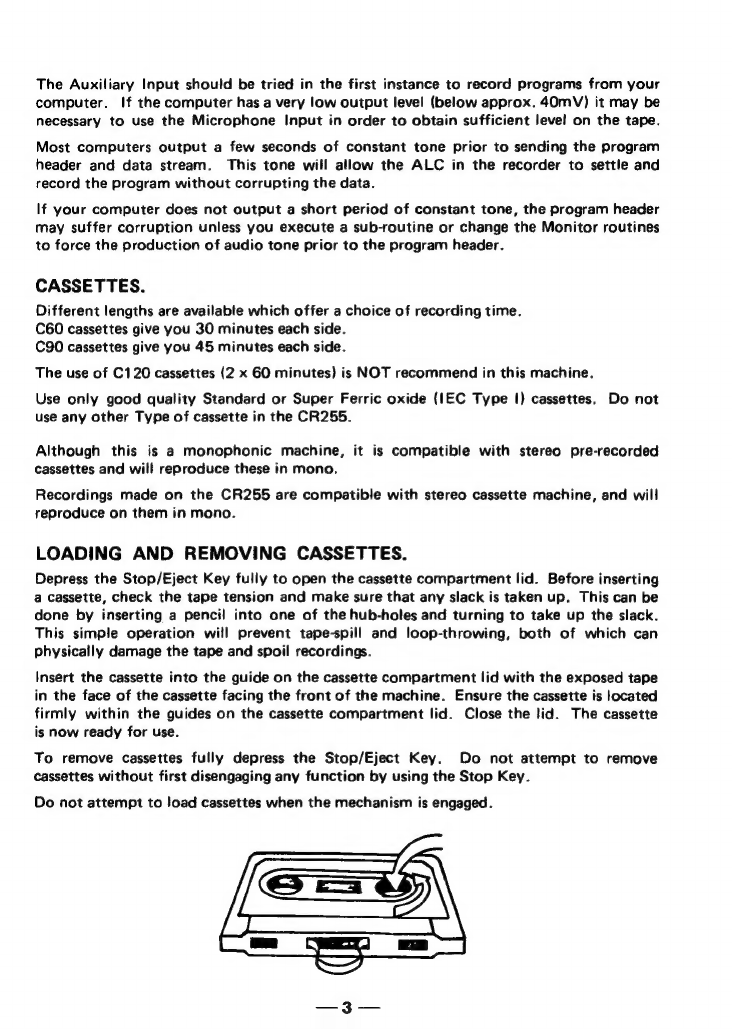
LOADING
AND
REMOVING
CASSETTES.
Depress
the
Stop/Eject
Key
fully
to
open
the
cassette
compartment
lid.
Before
inserting
a
cassette,
check
the
tape
tension
and
make
sure
that
any
slack
is
taken
up.
This
can
be
done
by
inserting
a
pencil
into
one
of
the
hub-holes
and
turning
to
take
up
the
slack.
This
simple
operation
will
prevent
tape-spill
and
loop-throwing,
both
of
which
can
physically
damage
the
tape
and
spoil
recordings.
Insert
the
cassette
into
the
guide
on
the
cassette
compartment
lid
with
the
exposed
tape
in
the
face
of
the
cassette
facing
the
front
of
the
machine.
Ensure
the
cassette
is
located
firmly
within
the
guides
on
the
cassette
compartment
lid.
Close
the
lid.
The
cassette
is
now
ready
for
use.
To
remove
cassettes
fully
depress
the
Stop/Eject
Key.
Do
not
attempt
to
remove
cassettes
without
first
disengaging
any
function
by
using
the
Stop
Key.
Do
not
attempt
to
load
cassettes
when
the
mechanism
is
engaged.
PLAYBACK
.
Cassettes
may
be
played
back
through
the
internal
speaker,
through
an
earphone
or
small
extension
speaker
(8
ohms
impedance)
using
the
earphone
socket.
The
same
socket
may
also
be
used
to
connect
the
recorder
to
other
audio
equipment
for
the
playback
of
cassettes.
RECORDING
USING
THE
BUILT-IN
MICROPHONE.
Insert
a
cassette
and
depress
the
Record
Key
and
the
Play
Key
simultaneously.
The
Recording
indicator
LED
will
show
that
the
machine
is
in
the
record
mode.
This
indicator
will
glow
brightly
when
the
machine
is
operated
from
the
mains,
or
when
the
batteries
are
in
a
good
condition.
When
batteries
are
weak,
this
indicator
will
glow
dimly
indicating
that
the
batteries
need
replacement.
Position
the
microphone
about
12ins/30cm
from
the
sound
source.
The
recorder
features
an
Automatic
Level
Control
(ALC)
to
maintain
all
recordings
at
an
optimum
level.
The
volume
control
operates
only
during
replay
and
therefore
does
not
need
adjustment.
Because
the
microphone
built
into
your
machine
is
in
close
proximity
to
mechanical
moving
parts,
it
may
pick
up
noise
from
these
if
the
recorder
is
operated
at
greater
distances
than
12ins/30cm
from
the
sound
source.
RECORDING
USING
AN
EXTERNAL
MICROPHONE.
Connect
a
tow-impedance
microphone
to
the
Microphone
Socket
(3.5mm
jack).
For
microphones
featuring
a
remote
stop-start
switch,
connect
this
facility
to
the
Remote
Socket
(2.5mm
jack).
Operate
the
recorder
as
above.
For
optimum
signal
to
noise
performance,
position
the
external
microphone
as
close
to
the
sound
source
as
possible.
insertion
of
a
jack
plug
into
the
microphone
socket
automatically
disconnects
the
built-in
microphone.
RECORDING
USING
THE
AUXILIARY
SOCKET.
The
Auxiliary
Socket
enables
your
recorder
to
be
directly
connected
to
other
equip-
ment
for
making
recordings.
Insertion
of
a
plug
into
this
socket
automatically
disconnects
the
built-in
microphone.
The
ALC
operates
also
when
recording
directly
using
the
Auxiliary
Socket
and
no
volume
adjustment
is
necessary.
The
nominal
sensitivity
of
the
Auxiliary
Socket
is
80mvV.
After
connecting
your
machine
to
the
other
equipment,
recordings
are
made
by
inserting
a
cassette
and
depressing
the
Record
Key
and
Play
Key
simultaneously.
The
Recording
Indicator
LED
will
show
that
the
machine
is
in
the
record
mode.
AUTO
STOP.
The
CR255
incorporates
a
mechanical
auto
stop
which
automatically
disengages
the
playback
or
record
functions
at
the
end
of
a
cassette.
This
does
not
operate
in
either
the
fast-forward
or
rewind
modes.
—
4q—

If
a
cassette
triggers
the
auto
stop
before
reaching
the
end
of
the
tape,
then
it
is
likely
that
the
tape
has
become
too
tightly
wound
or
has
wound
in
ridges,
causing
too
much
friction.
This
can
normally
be
corrected
by
rapping
the
cassette
face
down
on
a
flat
surface
and
then
winding
the
tape
through
from
end
to
end
in
your
machine.
FAST-FORWARD
AND
REWIND.
The
Fast-Forward
Key
and
the
Rewind
Key
allow
rapid
location
of
a
particular
section
of
tape.
Function
of
either
key
is
cancelled
by
using
the
Stop
Key.
Always
use
the
Stop
Key
to
halt
the
tape.
Attempting
to
go
from
winding
to
play
is
likely
to
damage
the
tape
and
may
cause
damage
to
the
mechanism.
Do
not
leave
the
machine
winding
tape
in
either
direction
since
the
Auto
Stop
will
not
operate
when
the
tape
reaches
the
end,
and
the
cassette
or
mechanism
may
be
damaged
if
left
in
this
way
for
any
length
of
time.
Always
use
the
Stop
Key
once
the
cassette
has
wound
through
to
one
end.
PROTECTING
RECORDINGS.
Normally,
anything
recorded
on
the
tape
is
automatically
erased
when
a
new
recording
is
made.
It
is
possible
to
protect
your
recordings
from
accidental
erasure
by
removing
the
erase-
lock
tabs
found
on
the
rear
of
the
cassette.
When
the
cassette
is
held
with
the
recorded
side
uppermost,
the
protective
tab
will
be
found
on
the
left
side
of
the
rear
edge
of
the
cassette.
All
pre-recorded
cassettes
are
protected
in
this
way
to
prevent
accidental
erasure
of
the
commercial
recording.
“Protected’’
cassettes
may
be
re-recorded
by
simply
fixing
a
piece
of
adhesive
tape
over
the
hole
where
the tab
has
been
removed.
This
takes
the
place
of
the
tab
and
your
machine
can
now
be
engaged
in
the
record-mode.
A
“Protected”
cassette
will
prevent
the
Record
Key
from
being
depressed.
If
at
any
time
you
attempt
to
record,
and
this
key
will
not
engage,
never
force
the
mechanism
or
damage
will
result.
Check
that
a
cassette
has
been
loaded
and
that
the
erase-lock
tab
has
not
been
removed.
Erase-lock
tab
for
side
1"
MAINTENANCE.
The
mechanics
of
your
CR255
require
no
routine
maintenance
and
under
no
circums-
tances
should
you
attempt
to
lubricate
any
part
of
the
machine.
However,
the
parts
of
the
machine
coming
into
direct
contact
with
the
tape
do
require
periodic
cleaning
to
ensure
continuing
good
performance.
The
tape
heads
(erase
and
record/play)
should
be
cleaned
using
a
cotton
bud
moistened
with
a
drop
of
isopropy!
alcohol
solution
or
proprietary
tape
head
cleaner.
—5—
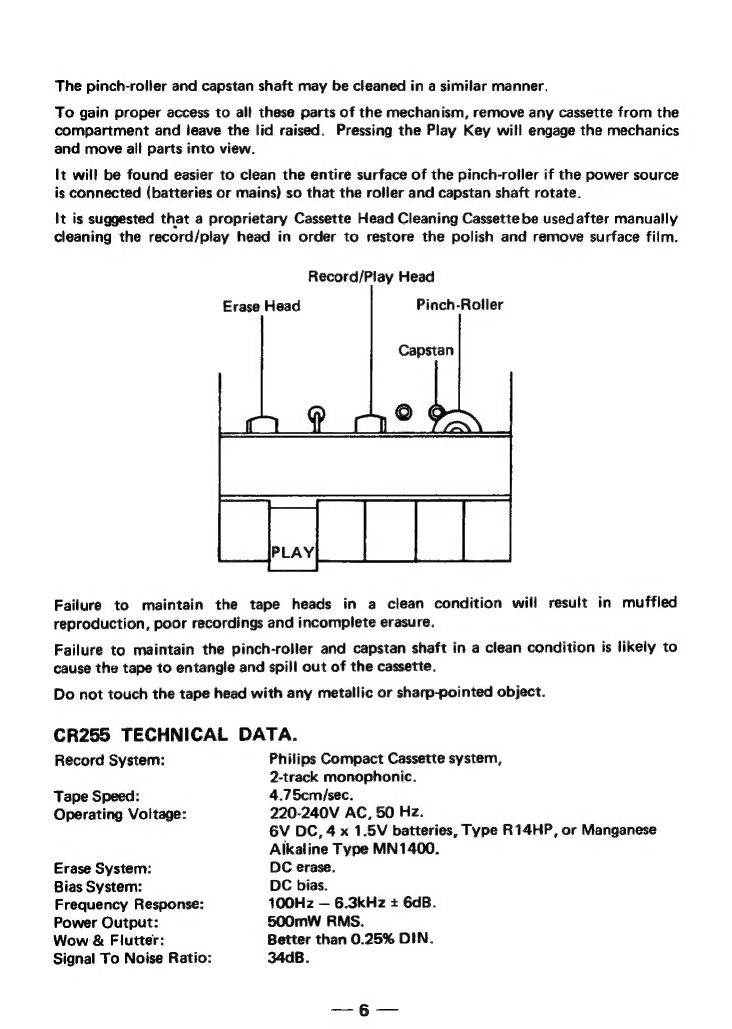
The
pinch-roijler
and
capstan
shaft
may
be
cleaned
in
a
similar
manner.
To
gain
proper
access
to
all
these
parts
of
the
mechanism,
remove
any
cassette
from
the
compartment
and
leave
the
lid
raised.
Pressing
the
Play
Key
will
engage
the
mechanics
and
move
all
parts
into
view.
It
will
be
found
easier
to
clean
the
entire
surface
of
the
pinch-roller
if
the
power
source
is
connected
(batteries
or
mains)
so
that
the
roller
and
capstan
shaft
rotate.
It
is
suggested
that
a
proprietary
Cassette
Head
Cleaning
Cassette
be
usedafter
manually
cleaning
the
record/play
head
in
order
to
restore
the
polish
and
remove
surface
film.
Record/Play
Head
Pinch-Roller
Erase
Head
Capstan
PLAY
eee
Failure
to
maintain
the
tape
heads
in
a
clean
condition
will
result
in
muffled
reproduction,
poor
recordings
and
incomplete
erasure.
Failure
to
maintain
the
pinch-roller
and
capstan
shaft
in
a
clean
condition
is
likely
to
cause
the
tape
to
entangle
and
spill
out
of
the
cassette.
Do
not
touch
the
tape
head
with
any
metallic
or
sharp-pointed
object.
CR255
TECHNICAL
DATA.
Record
System:
Philips
Compact
Cassette
system,
2-track
monophonic.
Tape
Speed:
4.75cm/sec.
Operating
Voltage:
220-240V
AC,
50
Hz.
6V
DC,
4
x
1.5V
batteries,
Type
R14HP,
or
Manganese
Alkaline
Type
MN1400.
Erase
System:
DC
erase.
Bias
System:
DC
bias.
Frequency
Response:
100Hz
—
6.3kHz
+
6dB.
Power
Output:
500mW
RMS.
Wow
&
Flutter:
Better
than
0.25%
DIN.
Signal
To
Noise
Ratio:
34dB.
BOOTS
AUDIO
GUARANTEE
FOR
CR
255
CASSETTE
RECORDER
Boots
The
Chemists
Ltd.
undertakes
that
if
any
defect
in
materials
or
workmanship
appears
in
the
product
within
TWELVE
MONTHS
after
the
date
of
consumer
purchase
it
will
repair,
or
at
its
option,
replace
free
of
charge.
This
applies
only
if
the
product
has
been
used
solely
for
domestic
purposes
and
has
not
been
damaged
through
misuse,
accident
or
neglect
and
has
not
been
modified
or
repaired
by
anyone
other
than
Boots
The
Chemists
Ltd.
or
its
agents.
This
undertaking
is
in
addition
to
4
consumer’s
statutory
rights
and
does
not
affect
those
rights-in
any
way.
If
a
defect
appears,
please
check
that
the
article
is
being
used
properly
in
accordance
with
the
instructions.
If
so,
return
it
with
this
certificate
or
some
other
proof
of
date
of
purchase
to
your
nearest
branch
of
Boots
The
Chemists
Ltd.,
which
stocks
this
article
or
similar
articles,
as
soon
as
possible.
Product
Serial
No.
Date
of
Purchase
Branch
Address
Name
and
Address
of
Purchaser
PLEASE
KEEP
SAFELY
Table of contents


