Born Free Liva User manual

liva
COMPACT FOLD STROLLER
POUSSETTE À PLIAGE COMPACT
COCHECITO DE PLIEGUE COMPACTO
™
OWNER’S MANUAL
MANUEL D’UTILISATION
MANUAL DEL PROPIETARIOL
™
IRRE S I S T I B L E B Y D E S IGN™


Cup Holder Cell Phone Holder
Components
Bumper Bar
Stroller Frame with Seat
Protective
Covers (2)
Front Wheels (2)
Rear Wheels (2) Carry Bag
1
Find Your Free.™
Congratulations on your new liva™ compact fold
stroller! We designed this stroller to include the
features experienced parents know are essential,
minus the heavy bulk of a full-size stroller.
liva
COMPACT FOLD
STROLLER
™

Please read the following instructions carefully.
Keep this instruction manual for future reference. No tools required.
For technical support,contact us at 1-401-671-6560 or www.shopbornfree.com/support
Keep small parts away from children.
WARNING
Read and follow all warnings and instructions.
Failure to do so could result in serious injury or death.
• Adult assembly required. Exercise care when unpacking and assembling the
product.
• Maximum weight and height of child: 50 lbs. (22.7 kg), 43 in. (109cm)
• NEVER leave child unattended.
• Avoid serious injury from falling or sliding out. ALWAYS use safety harness.
• When making adjustments to the product ALWAYS ENSURE that all parts of
a child’s body are clear of any moving parts of the product.
• Care must be taken when folding and unfolding the product to prevent
finger entrapment.
• DO NOT carry additional children, goods or accessories in or on this product
except as recommended in the manufacturer’s instructions.This could create
a hazardous, unstable condition.
• TO AVOID INJURY TO YOUR CHILD, DO NOT USE STORAGE BASKET
AS A CHILD CARRIER.
• DO NOT hang items on handle bar or place them on the canopy, as they can
tip stroller over and injure child.
• DO NOT OVERLOAD STORAGE BASKET. MAXIMUM 25 lbs. (11.3 kg).
• This product may become unstable if a parcel bag other than the one
recommended is used.
• DO NOT overload the storage pocket, cell phone holder or cup holder.
MAXIMUM weight for the cell phone and cup holder is 1lb. (0.45 kg).
MAXIMUM weight of storage pocket and child cup holder is 1/2 lb. (0.23 kg).
Excessive weight may cause stroller to become unstable or tip over.
• DO NOT place hot liquids in the cup holder. Spills can burn your child.
• Do not carry or roll stroller on stairs or escalators with child in it.
• Do not use the stroller if any part is lost or damaged.
• NEVER install Infant Car Seat without fastening it securely to the stroller
with provided car seat straps.
• NEVER lift the stroller by infant carrier handle.
• USE ONLY WITH Graco®SnugRide® Click Connect™, Chicco® Keyfit® 30,
Chicco® Fit2® Infant Car Seats. Other car seats or carriers are not designed
to fit this stroller frame and may result in serious injury or death. NEVER use
them as they have not been safety tested.
• Car seat must be in rear facing position only.
• ALWAYS remove the bumper bar before attaching the infant car seat to the
stroller with the car seat straps.
IMPORTANT! Before assembly, inspect this product for damaged hardware,
loose joints or missing parts. Never use if any parts are missing or broken.
2

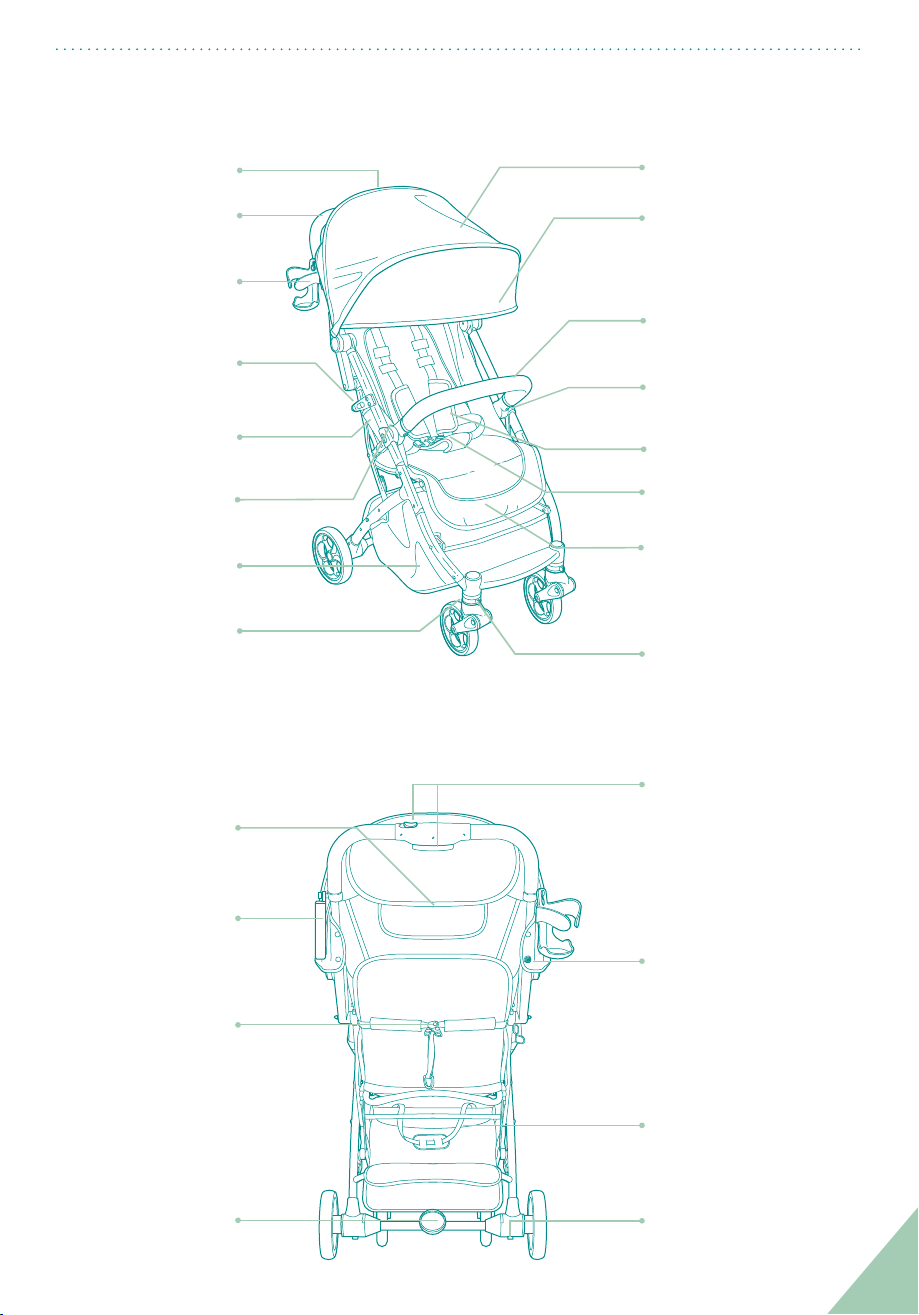
Features
5-point safety harness
tuck-away carry strap
adjustable leg rest
cup holder
car seat straps
child cup holder
harness pads
canopy extension
peek-a-boo window canopy
soft handle
dual-action fold release
rear wheel
release tabs
storage basket
fold lock
bumper bar
bumper bar
release buttons
front wheel
release tabs front wheel locks
cell phone holder
storage pocket
seat recline clip
rear wheel
brake pedal
secure-fold snap
3
Read and follow all warnings and instructions.
Failure to do so could result in serious injury or death.
• Adult assembly required. Exercise care when unpacking and assembling the
product.
• Maximum weight and height of child: 50 lbs. (22.7 kg), 43 in. (109cm)
• NEVER leave child unattended.
• Avoid serious injury from falling or sliding out. ALWAYS use safety harness.
• When making adjustments to the product ALWAYS ENSURE that all parts of
a child’s body are clear of any moving parts of the product.
• Care must be taken when folding and unfolding the product to prevent
finger entrapment.
• DO NOT carry additional children, goods or accessories in or on this product
except as recommended in the manufacturer’s instructions.This could create
a hazardous, unstable condition.
• TO AVOID INJURY TO YOUR CHILD, DO NOT USE STORAGE BASKET
AS A CHILD CARRIER.
• DO NOT hang items on handle bar or place them on the canopy, as they can
tip stroller over and injure child.
• DO NOT OVERLOAD STORAGE BASKET. MAXIMUM 25 lbs. (11.3 kg).
• This product may become unstable if a parcel bag other than the one
recommended is used.
• DO NOT overload the storage pocket, cell phone holder or cup holder.
MAXIMUM weight for the cell phone and cup holder is 1lb. (0.45 kg).
MAXIMUM weight of storage pocket and child cup holder is 1/2 lb. (0.23 kg).
Excessive weight may cause stroller to become unstable or tip over.
• DO NOT place hot liquids in the cup holder. Spills can burn your child.
• Do not carry or roll stroller on stairs or escalators with child in it.
• Do not use the stroller if any part is lost or damaged.
• NEVER install Infant Car Seat without fastening it securely to the stroller
with provided car seat straps.
• NEVER lift the stroller by infant carrier handle.
• USE ONLY WITH Graco®SnugRide® Click Connect™, Chicco® Keyfit® 30,
Chicco® Fit2® Infant Car Seats. Other car seats or carriers are not designed
to fit this stroller frame and may result in serious injury or death. NEVER use
them as they have not been safety tested.
• Car seat must be in rear facing position only.
• ALWAYS remove the bumper bar before attaching the infant car seat to the
stroller with the car seat straps.

3
Opening the stroller
click!
12
Check to make sure
wheels are attached
by pulling on them.
Check to make sure
bumper bar is
securely attached.
NOTE: When opening
the stroller, keep children
at a safe distance.
click!
click!
click!
4
click!
click!
click!
click!
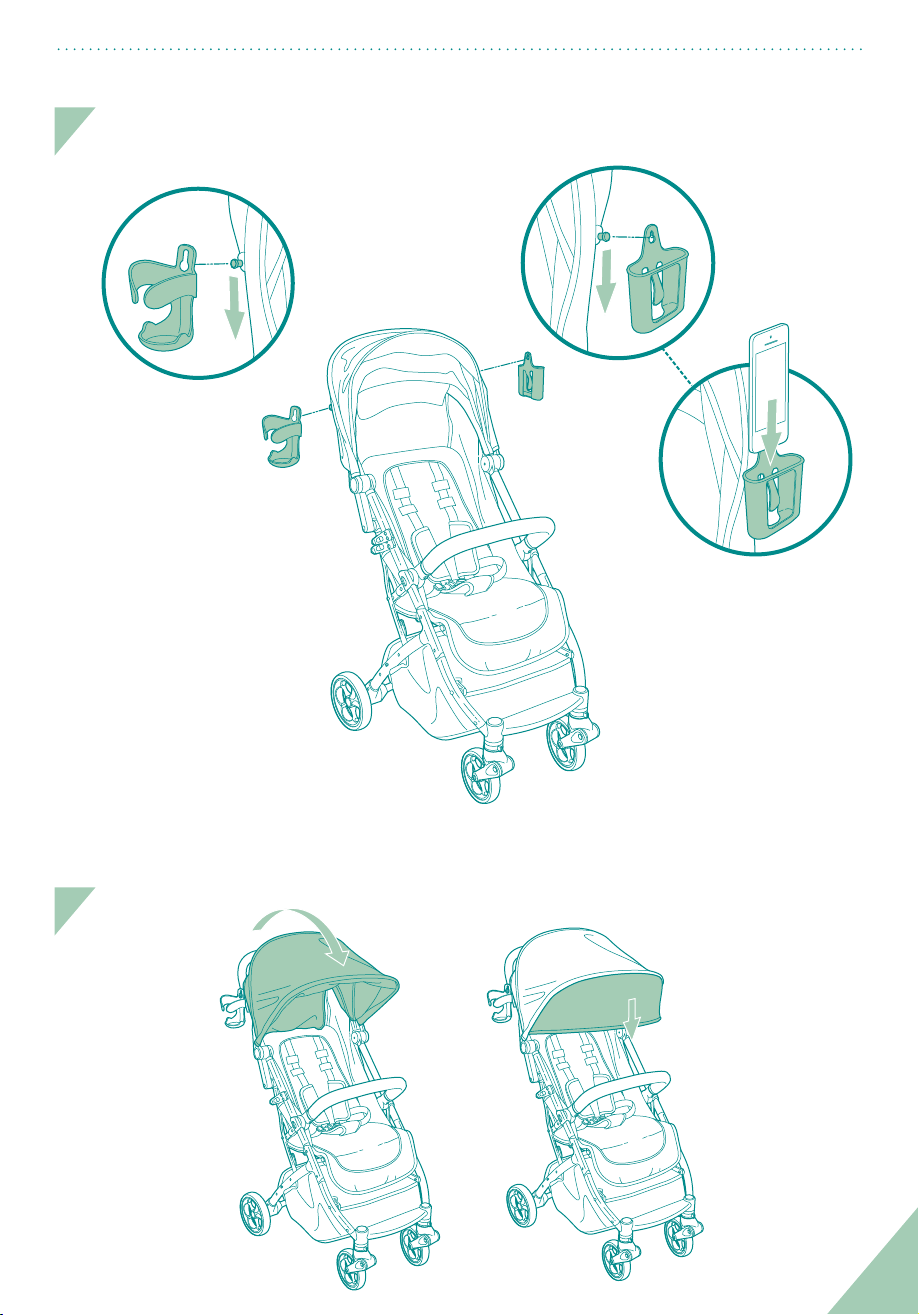
Attaching parts and accessories
12

Attaching parts and accessories (continued)
4
5
5
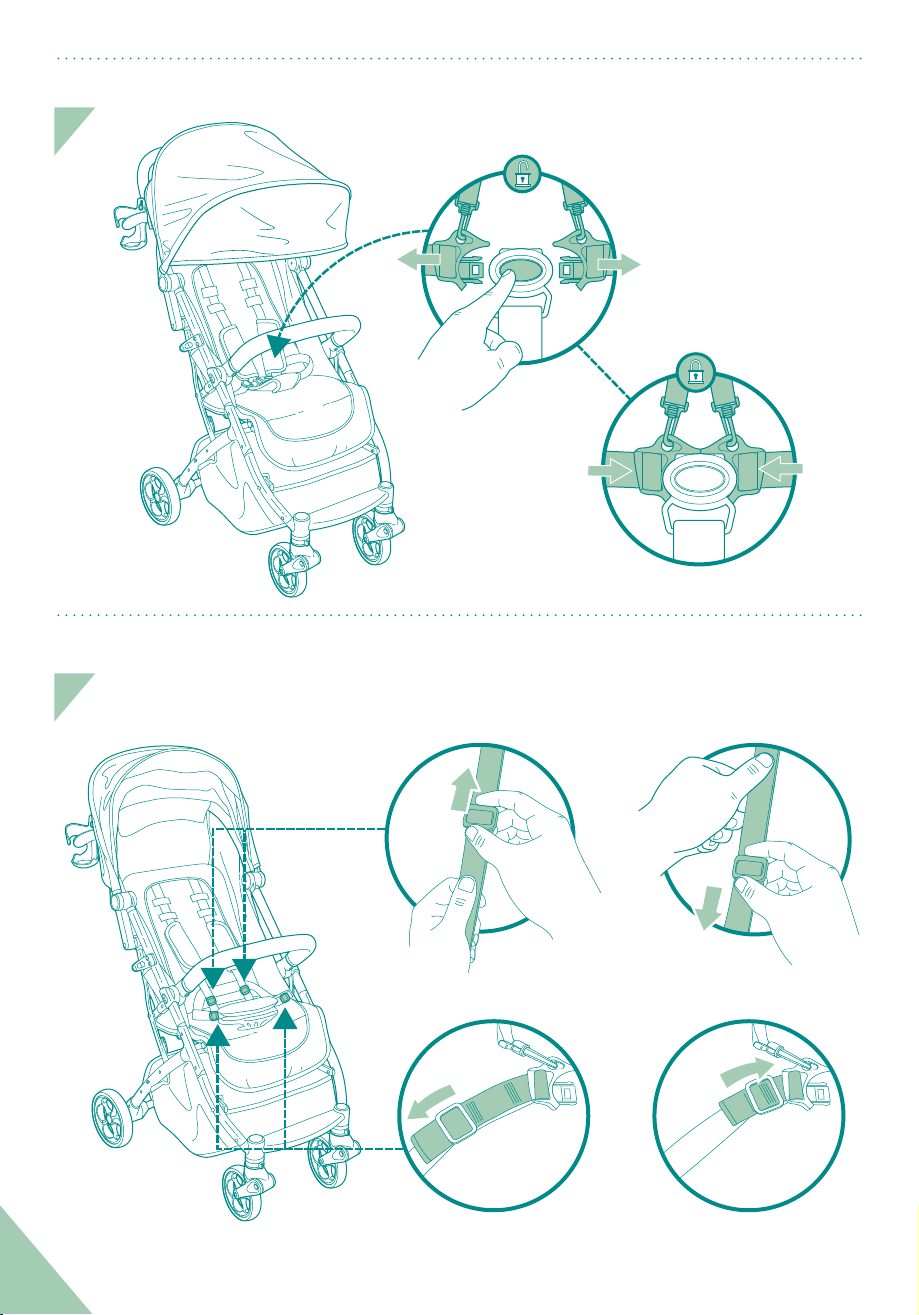
Securing child
1
click!
press!
6
Adjusting the harness
1
tighten loosen
tighten
loosen

Adjust harness position,
re-install harness pads,
and reclip harness clips.
7
1
Adjusting shoulder harness position
1
Locking and unlocking front wheel swivel
unclip
remove
harness
straps
remove
harness
pads
middle
position
upper
position
lower
position
1
2
3
NOTE: Shoulder harness
must be at or below
shoulder height.
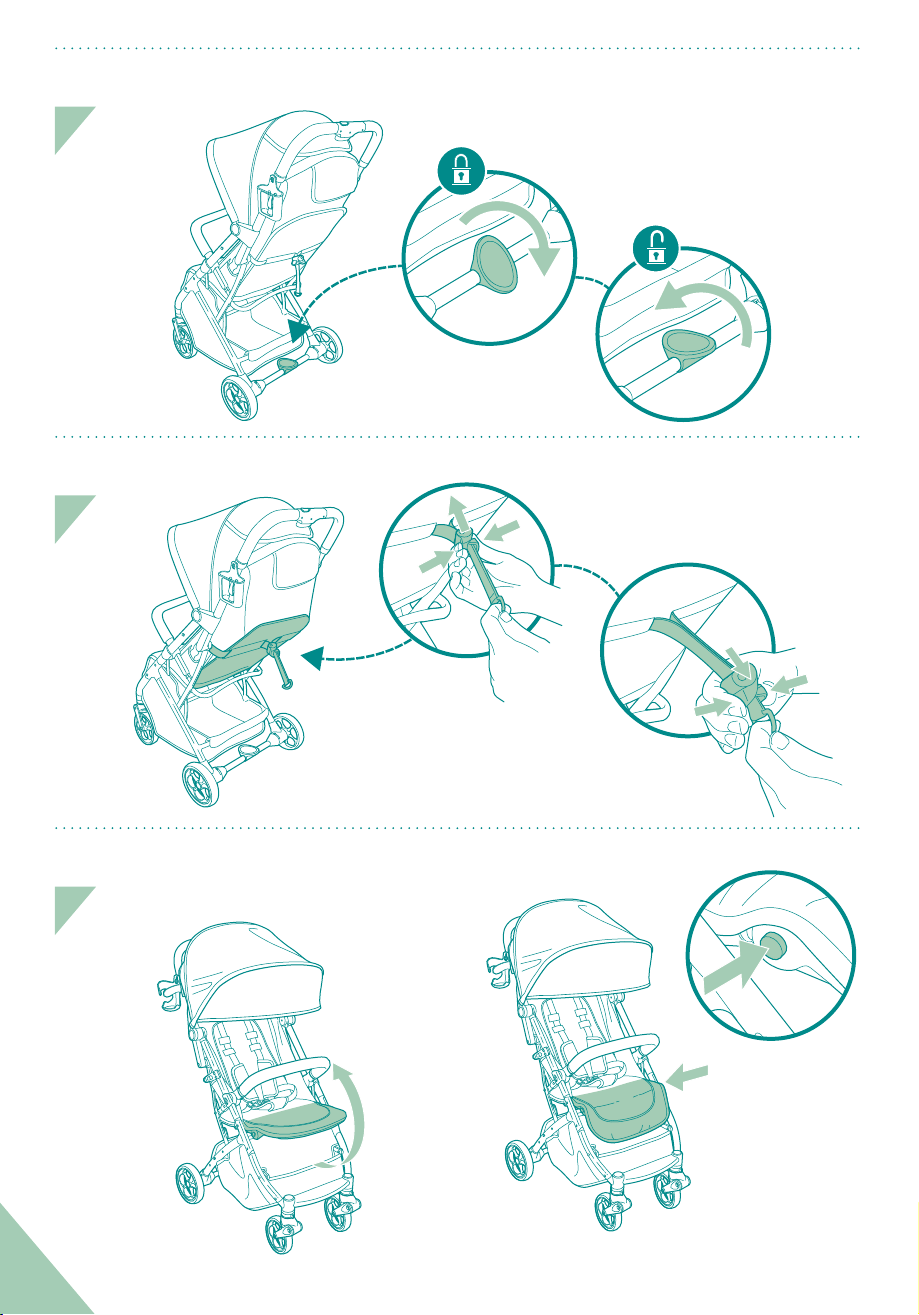
Locking & unlocking rear wheels
1
Adjusting the seat recline
1
click!
press!
press!
Adjusting the leg rest
1
Pinch and slide
the seat recline clip
up or down to adjust.
8

Child bottle/cup holder
1
Peek-a-boo window
1
Folding the stroller
1 2
3 4
snap! STANGULATION
HAZAD: Chidren hve
strned when strs hve
wred round their neck.
Kee this stroer crrier str
out of chidren’s rech.
When not in use, tuck str
into store ocket
beneth e rest.
press
forward!
slide!
squeeze!
1
2
(bottle not
included)
Slide the upper handle
button, then squeeze
the lower handle
release button.
Press the handle
forward to fold
the stroller.
Remove carry strap from
leg rest storage pocket.
Secure the folded
stroller with
the snap.
NOTE: Make sure fold
lock is firmly in place.
19
WARNING

Removing the bumper bar
1
press!
press!
Press the buttons beneath the bumper
bar knuckles to remove.
210
Removing the wheels
1
Pull tab to release wheel.
NOTE: Insert protective
covers after removing
bumper bar.
press!press!

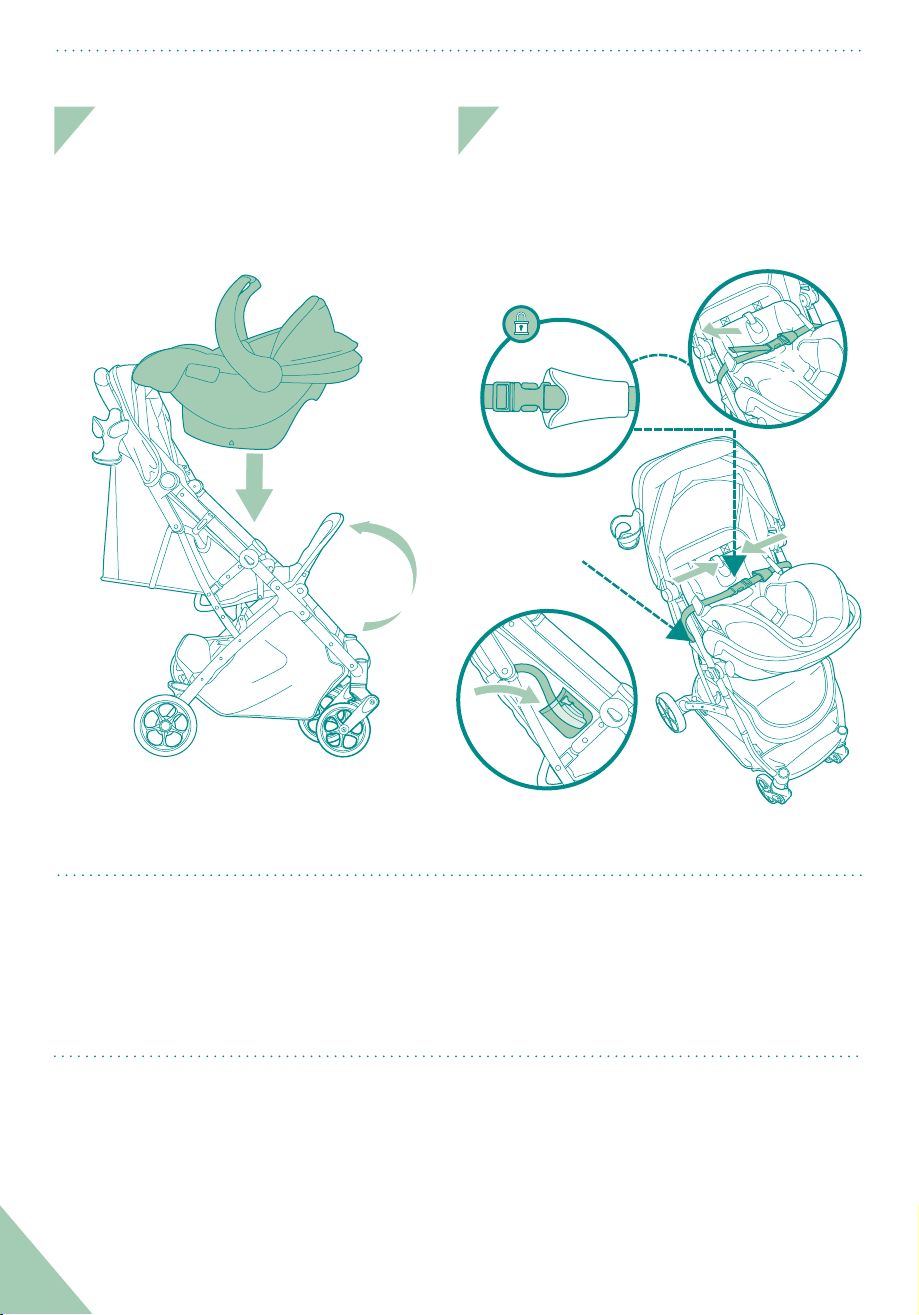
Attaching recommended rear-facing infant car seat
1
Graco® SnugRide® Click Connect™, Chicco® Keyfit® 30, Chicco® Fit2®
For the following models:
• NEVE inst Infnt Cr Set without fstenin it secure to the stroer with the rovided cr set
strs. Cr set must be in rer fcin osition on.
• NEVE ift the stroer b infnt crrier hnde.
• Use on with Grco Snuide Cick Connect™, Chicco Kefit 30, Chicco Fit2. Other cr sets or
crriers re not desined to fit this stroer frme nd m resut in serious inur or deth. NEVE use them
s the hve not been sfet tested.
Remove bumper bar.
2
Fold canopy.
3
Make sure seat
is fully reclined.
NOTE: Insert
protective
covers after
removing
bumper bar.
11
WARNING
pull
tight!
pull
tight!
front wheels
32824-24
rear wheels
32824-22
cup holder
32824-25
cell phone holder
32824-03
bumper bar
32824-05
bumper bar clips
32824-08
car seat strap set
32453-04
protective covers
32723-08
carry bag
32824-07
Replacement Parts
Attaching recommended rear-facing infant seat (continued)
4 5
Care & maintenance
click!
Car strap
storage
pockets.
Place the car seat into stroller in rear facing
position so that it is in full contact with both
the stroller seating surface and seat back.
Adjust the leg rest up until it firmly
contacts the back of the car seat.
There are two car seat straps attached
to the stroller rails.
Position the straps into the Vehicle
Belt Hooks and buckle across the car seat.
Pull tightly to secure.
Slide the padded buckle guard over
the buckle.
NOTE: Always check car
seat for secure fit in stroller.
NOTE: Car seat straps can be
stored in the pockets on side
of the stroller
click!
12
• Clean minor stains on fabric with cold water and mild soap.
• Clean plastic and metal surfaces with a soft damp cloth. Air dry.
• Do not use abrasive cleaners or solvents. Do not use bleach.
• Check seat pad harness and crotch straps weekly to ensure they are properly secured to frame.

Porte-gobelet Support pour cellulaire
Composants
Barre de sécurité
Cadre de poussette avec siège
Couvercles
de protection (2)
Roues avant (2)
Roues arrière (2) Sac de transport
13
Find Your Free.™
Félicitations pour votre nouvelle poussette à pliage
compact liva™! Nous avons conçu cette poussette
pour inclure les caractéristiques dont les parents
expérimentés savent qu’elles sont essentielles, moins
le lourd poids d'une poussette pleine grandeur.
liva
POUSSETTE À
PLIAGE COMPACT
™

Veuillez lire attentivement les instructions suivantes.
Veuillez conserver ce mode d’emploi pour toute référence ultérieure. Aucun outil requis.
Pour obtenir une assistance technique, veuillez communiquer avec nous au 1-401-671-6560 ou sur le site
www.shopbornfree.com/contact
Garder les petites pièces hors de portée des enfants.
IMPORTANT! Avant l’assemblage, vérifier que ce produit ne comporte pas de pièces endommagées ou
manquantes, ni de joints lâches. Ne jamais utiliser si des pièces sont manquantes ou cassées.
AVERTISSEMENT
Lire et suivre tous les avertissements et toutes les instructions.
Leur non-respect pourrait entraîner des blessures graves ou la mort.
• Montage par un adulte requis. Prendre les précautions nécessaires lors du
déballage et de l’assemblage du produit.
• Poids et grandeur maximaux de l’enfant : 22,7 kg (50 lb), 109 cm (43 po)
• NE JAMAIS laisser l'enfant sans surveillance.
• Éviter les chutes ou glissades pouvant entraîner des blessures graves.
TOUJOURS utiliser un harnais de sécurité.
• Au moment d’ajuster le produit, TOUJOURS S’ASSURER que toutes les parties du
corps de l’enfant sont dégagées de toutes les pièces mobiles du produit.
• Des précautions doivent être prises lors du pliage et du dépliage du produit
pour éviter de coincer les doigts.
• NE PAS transporter d’autres enfants, articles ou accessoires dans ou sur ce
produit, sauf en suivant les recommandations du fabricant. Cela pourrait
créer une situation dangereuse et instable.
• POUR ÉVITER DE BLESSER L’ENFANT, NE PAS UTILISER LE PANIER DE
RANGEMENT COMME PORTE-BÉBÉ.
• NE PAS accrocher d’articles sur la poignée ni les placer sur la capote sous
peine de faire basculer la poussette et de blesser l’enfant.
• NE PAS SURCHARGER LE PANIER DE RANGEMENT. MAXIMUM 11,3 Kg (25 lb).
• Ce produit peut devenir instable si un sac différent de celui recommandé est utilisé.
• NE PAS surcharger la poche de rangement, le support pour cellulaire ou le
porte-gobelet.
Poids MAXIMUM pour le support pour cellulaire et le porte-gobelet : 0,45 kg (1 lb).
Poids MAXIMUM pour la poche de rangement et le support pour tasse à bec :
0,23 kg (0,5 lb).
Un excès de poids peut rendre la poussette instable ou la renverser.
• NE PAS mettre de liquide chaud dans le porte-gobelet. Les éclaboussures
pourraient brûler l’enfant.
• Ne pas porter ou faire rouler la poussette dans les escaliers ou les escaliers
mécaniques avec l’enfant dedans.
• Ne pas utiliser la poussette si des pièces sont endommagées ou manquantes.
• NE JAMAIS installer un siège auto pour bébé sans le fixer solidement à la
poussette à l’aide des sangles du siège auto fournies.
• NE JAMAIS soulever la poussette par la poignée du porte-bébé.
• UTILISER UNIQUEMENT AVEC des sièges auto pour bébé Graco®SnugRide®
Click Connect™, Chicco®Keyfit®30, Chicco®Fit2®. Les autres sièges auto ou
porte-bébés ne sont pas conçus pour s’adapter au cadre de cette poussette
et peuvent entraîner des blessures graves ou mortelles. NE JAMAIS les
utiliser, car ils n’ont pas été soumis à un contrôle de sécurité.
• Le siège auto doit être en position face vers l’arrière uniquement.
• TOUJOURS retirer la barre de sécurité avant de fixer le siège auto pour bébé
sur la poussette à l’aide des sangles du siège auto.
14
Caractéristiques
harnais de sécurité
à 5 points
sangle de transport
escamotable
appui-jambes réglable
porte-gobelet
sangles pour
siège auto
support pour
tasse à bec
rembourrages de harnais
extension de capote
fenêtre capote
poignée souple
déverrouillage du rabat
à double action
languettes de
dégagement des
roues arrière
panier de
rangement
verrouillage
de pliage
barre de sécurité
boutons de
déverrouillage
de la barre de sécurité
languettes de
dégagement
des roues avant verrouillage des
roues avant
support pour
cellulaire
poche de rangement
clip d'inclinaison
du siège
pédale de frein
des roues arrière
accrochage de
rabat sécurisé
15

3
Ouverture de la poussette
clic!
12
Vérifiez que les roues
sont bien fixées
en tirant dessus.
Vérifiez pour vous assurer
que la barre de sécurité
est solidement fixée.
REMARQUE : Lorsque vous
ouvrez la poussette, gardez
les enfants à une distance
sécuritaire.
clic!
click!
clic!
16
clic!
clic!
clic!
clic!
Fixation des pièces et accessoires
12
Fixation des pièces et accessoires (suite)
4
5
17

Sécuriser l'enfant
1
clic!
appuyez!
18
Réglage du harnais
1
serrer desserrer
serrer
desserrer
Table of contents
Languages:


