Thank you, and congratulations on your choice of the BOSS BCB-60 Pedal Board.
Before using this unit, carefully read the sections entitled: “USING THE UNIT
SAFELY” and “IMPORTANT NOTES.”
These sections provide important information concerning the proper operation of
the unit. Additionally, in order to feel assured that you have gained a good grasp of
every feature provided by your new unit, this manual should be read in its entirety.
The manual should be saved and kept on hand as a convenient reference.
Copyright © 2003 BOSS CORPORATION
All rights reserved. No part of this publication may be reproduced in any form
without the written permission of BOSS CORPORATION.
■
Main Features
New Way to Secure Effects Pedals Works with All Types of Pedals,
Lets You Arrange Them However You Like
Now you can set up compact pedals as well as twin pedals simply and easily with
holding pads; the pedal shapes are described in dotted lines right on the pads. These
pads allow you to pull off and rearrange your pedals in seconds, without the need
for double-sided tape. In addition, the BCB-60 comes with an unshaped holding pad
blank, which you can cut to any desired shape, allowing you to use a wide variety of
pedals.
Power Supply Function
The BCB-60 comes with a high-capacity 1000-mA AC adaptor with five times the
capacity of PSA-series adaptors, providing ample power for all of the effects pedals
connected to the BCB-60.
Super-Tough Blow-Molded Body
.........................................................................................................................................................................................................................................................................................................................................................................................................................................................
■
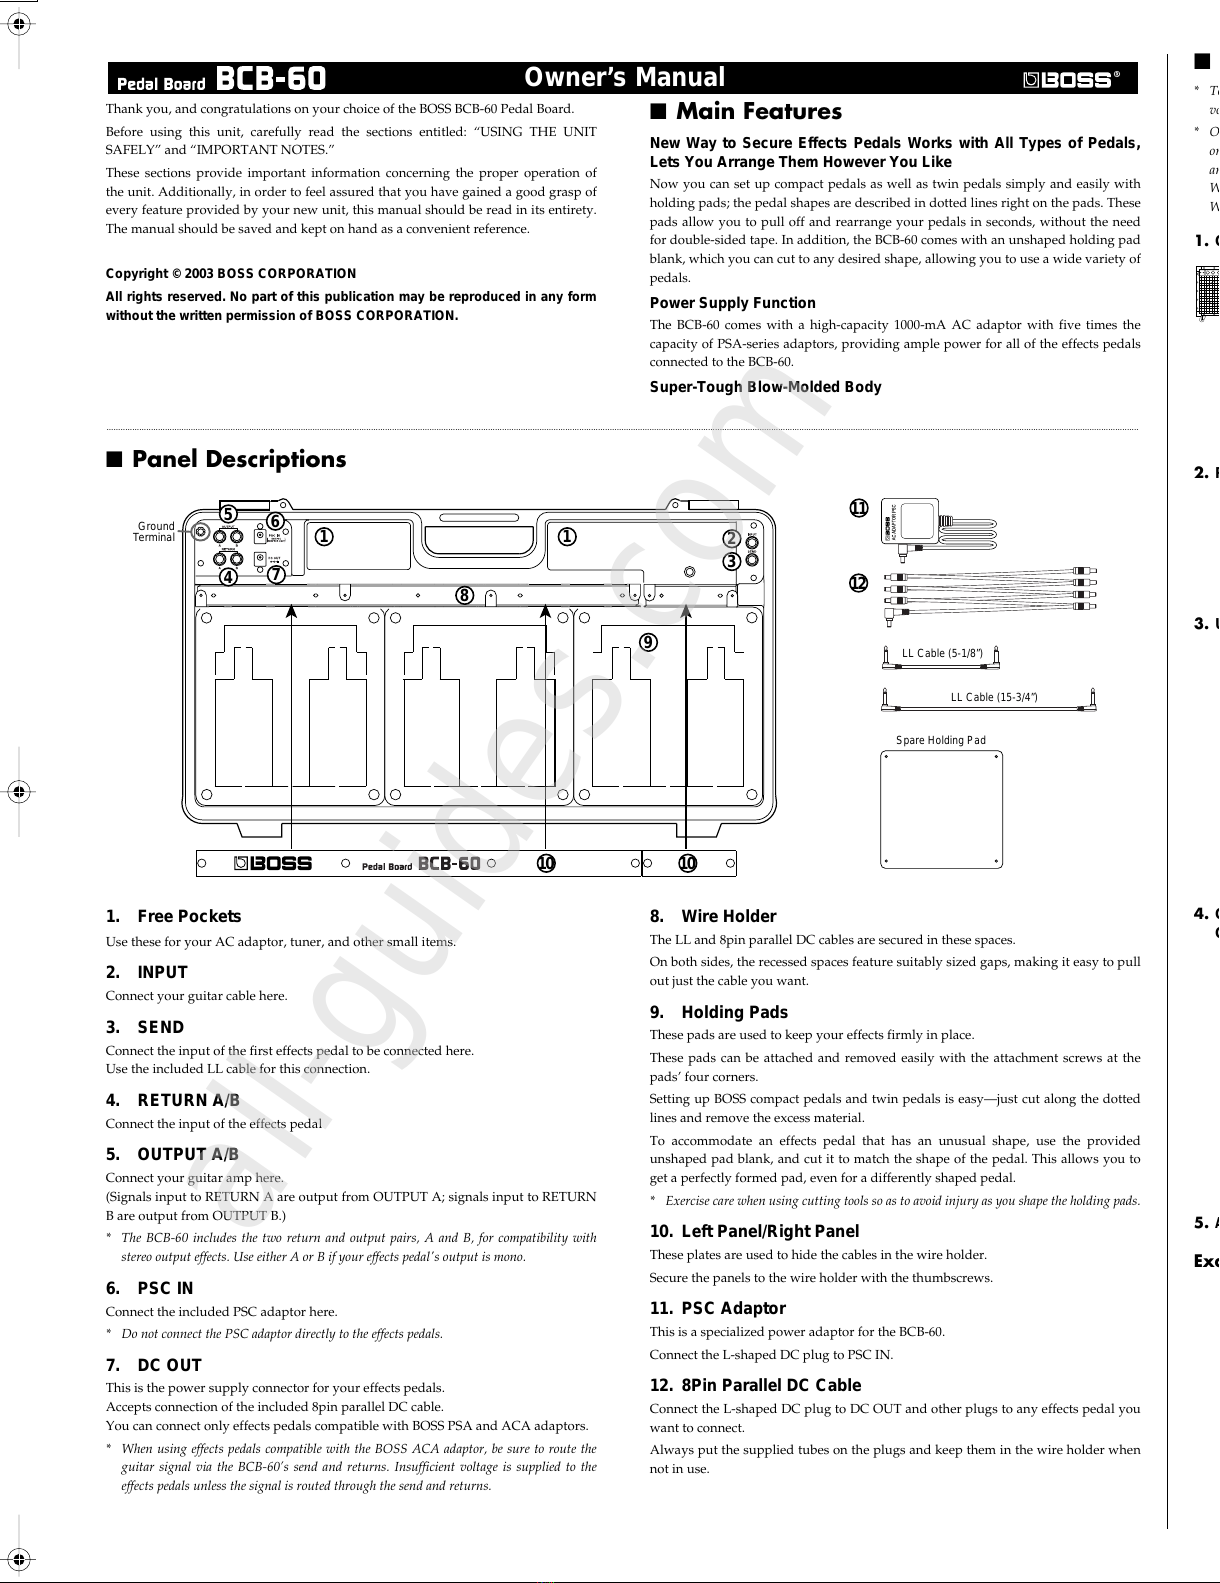
Panel Descriptions
1. Free Pockets
Use these for your AC adaptor, tuner, and other small items.
2. INPUT
Connect your guitar cable here.
3. SEND
Connect the input of the first effects pedal to be connected here.
Use the included LL cable for this connection.
4. RETURN A/B
Connect the input of the effects pedal
5. OUTPUT A/B
Connect your guitar amp here.
(Signals input to RETURN A are output from OUTPUT A; signals input to RETURN
B are output from OUTPUT B.)
*The BCB-60 includes the two return and output pairs, A and B, for compatibility with
stereo output effects. Use either A or B if your effects pedal's output is mono.
6. PSC IN
Connect the included PSC adaptor here.
* Do not connect the PSC adaptor directly to the effects pedals.
7. DC OUT
This is the power supply connector for your effects pedals.
Accepts connection of the included 8pin parallel DC cable.
You can connect only effects pedals compatible with BOSS PSA and ACA adaptors.
*When using effects pedals compatible with the BOSS ACA adaptor, be sure to route the
guitar signal via the BCB-60’s send and returns. Insufficient voltage is supplied to the
effects pedals unless the signal is routed through the send and returns.
8. Wire Holder
The LL and 8pin parallel DC cables are secured in these spaces.
On both sides, the recessed spaces feature suitably sized gaps, making it easy to pull
out just the cable you want.
9. Holding Pads
These pads are used to keep your effects firmly in place.
These pads can be attached and removed easily with the attachment screws at the
pads’ four corners.
Setting up BOSS compact pedals and twin pedals is easy—just cut along the dotted
lines and remove the excess material.
To accommodate an effects pedal that has an unusual shape, use the provided
unshaped pad blank, and cut it to match the shape of the pedal. This allows you to
get a perfectly formed pad, even for a differently shaped pedal.
*Exercise care when using cutting tools so as to avoid injury as you shape the holding pads.
10. Left Panel/Right Panel
These plates are used to hide the cables in the wire holder.
Secure the panels to the wire holder with the thumbscrews.
11. PSC Adaptor
This is a specialized power adaptor for the BCB-60.
Connect the L-shaped DC plug to PSC IN.
12. 8Pin Parallel DC Cable
Connect the L-shaped DC plug to DC OUT and other plugs to any effects pedal you
want to connect.
Always put the supplied tubes on the plugs and keep them in the wire holder when
not in use.
■
How to Connect
*To prevent malfunction and/or damage to speakers or other devices, always turn down the
volume, and turn off the power on all devices before making any connections.
*Once the connections have been completed, turn on power to your various devices in the
order specified. By turning on devices in the wrong order, you risk causing malfunction
and/or damage to speakers and other devices.
When powering up: Turn on the power to your guitar amp
last
.
When powering down: Turn off the power to your guitar amp
first
.
1.
Connect your amps and guitar as shown in the figure.
2.
Remove the thumbscrews, and remove the left and right panels.
3.
Use the LL cables to connect your effects pedals and tuner.
4.
Connect the effects pedals with the 8pin parallel DC cable.
Connect the L-shaped plug to DC OUT.
5.
Attach the left and right panels using the thumbscrews removed in step 2.
Examples of Compact Pedal and Twin Pedal Connections
Example of Connection Setup Incorporating a Wah Pedal
Remove the right panel, then use a Phillips head screwdriver to remove the two
screws securing the wire holder under the right panel.
Attach the wah pedal as shown in the figure. Set the wah pedal’s rubber feet in the
depressions.
Cut the holding pad to the shape of the pedal to be attached.
*Exercise care when using cutting tools so as to avoid injury as you shape the holding pads.
■
Main Specifications
Connectors: INPUT Jack (1/4” phone type)
SEND Jack (1/4” phone type)
RETURN A/B Jacks (1/4” phone type)
OUTPUT A/B Jacks (1/4” phone type)
PSC IN Jack, DC OUT Jack
Power Supply: DC 9 V: AC Adaptor (PSC series)
Dimensions: 670 (W) x 370 (D) x 100 (H) mm
26-7/16 (W) x 14-5/8 (D) x 3-15/16 inches
Weight: 3.8 kg / 8 lbs 7 oz
Accessories: AC Adaptor (PSC series) 9 V, 1000 mA x 1
8-pin Parallel DC Cable x 1
LL Cable (1/4” L-shaped
↔
1/4” L-shaped; 5-1/8”) x 5
LL Cable (1/4” L-shaped
↔
1/4” L-shaped; 15-3/4”) x 3
Spare Holding Pad x 1
Owner’s Manual (This sheet)
*In the interest of product improvement, the specifications and/or appearance of this unit
are subject to change without prior notice.
Thumbscrews